

Now for the additional gauges. In the kit we have 2 fuel gauges in the instrument panel. 1 rev counter on the forward engine cowl. 2 gauges (one @ left and right on the cockpit interior sides) These should be an (on the pilot's right) a signal strength meter linked to the trans radio. On the pilot's left a signal strength meter for the engine's twin magnetos.
There is no - oil pulseometer, airspeed indicator, water / radiator temp gauge or starting magneto. Another instrument might be a barograph and its gauge.
Also there is no storage bin for the parabellum drums. (But WNW shows one in their archived images.) Even though there is an antenna reel there is no outlet (usually found as a small housing near the floor and a cable / antenna exiting through it from the reel.
Early Aviation
Discuss World War I and the early years of aviation thru 1934.
Discuss World War I and the early years of aviation thru 1934.
Hosted by Jim Starkweather
WNW GB 2009 -10 Junkers J.I Stephen

JackFlash

Joined: January 25, 2004
KitMaker: 11,669 posts
AeroScale: 11,011 posts
Posted: Tuesday, October 19, 2010 - 11:43 AM UTC

thegirl

Joined: January 19, 2008
KitMaker: 6,743 posts
AeroScale: 6,151 posts
Posted: Tuesday, October 19, 2010 - 04:52 PM UTC
Very nice progress Stephen 

OEFFAG_153

Joined: February 19, 2010
KitMaker: 1,473 posts
AeroScale: 1,450 posts

Posted: Tuesday, October 19, 2010 - 09:11 PM UTC
Hi Stephen
You're cooking with Gas Nice update and great pointers on the gauges in the cockpit Thank You.
Mikael
You're cooking with Gas
Nice update and great pointers on the gauges in the cockpit Thank You.Mikael
JackFlash
Joined: January 25, 2004
KitMaker: 11,669 posts
AeroScale: 11,011 posts
Posted: Wednesday, October 20, 2010 - 09:00 AM UTC
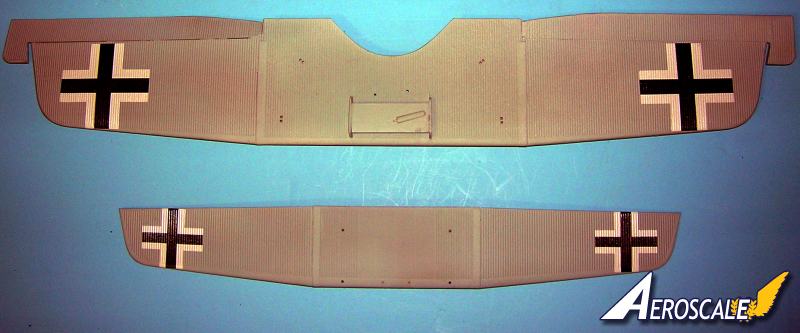
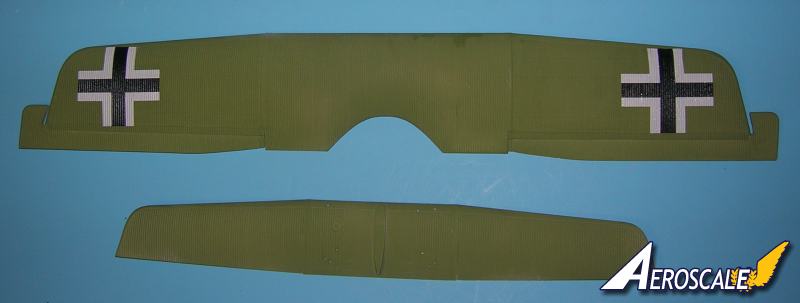
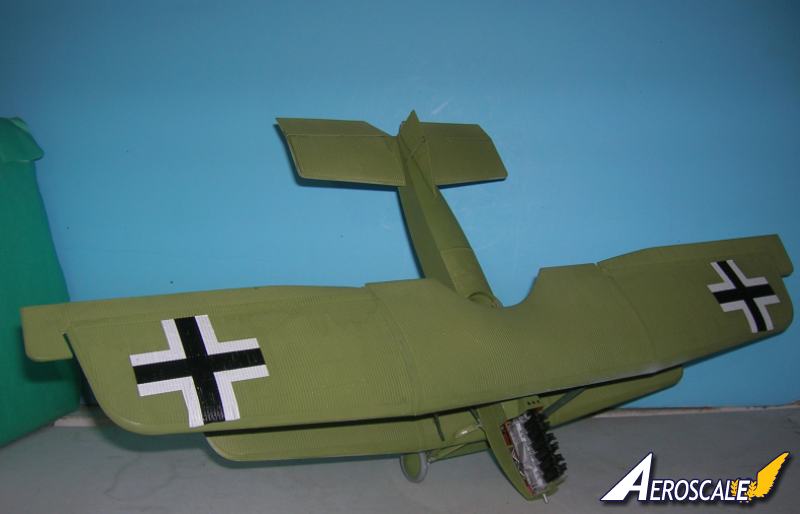
Here the crosses have been applied to the wings. The decals are reasonably easy to apply. The surface has minor challenges that cause the modeler to spend more time than average in seeing them secured properly.
JackFlash
Joined: January 25, 2004
KitMaker: 11,669 posts
AeroScale: 11,011 posts
Posted: Wednesday, October 20, 2010 - 10:20 PM UTC
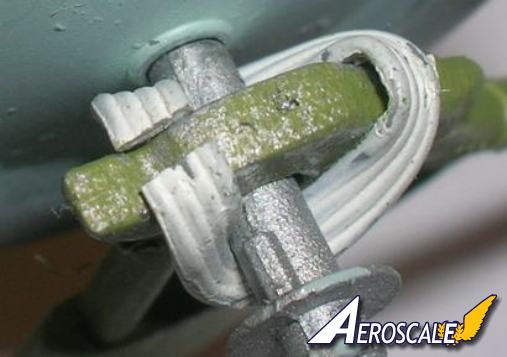
working on the landing gear the modeler will need to open up the axle retention hole to be more oblong. If left stock the simulated bumgee chords are under stress and will crack as shown..
JackFlash
Joined: January 25, 2004
KitMaker: 11,669 posts
AeroScale: 11,011 posts
Posted: Wednesday, October 20, 2010 - 10:28 PM UTC
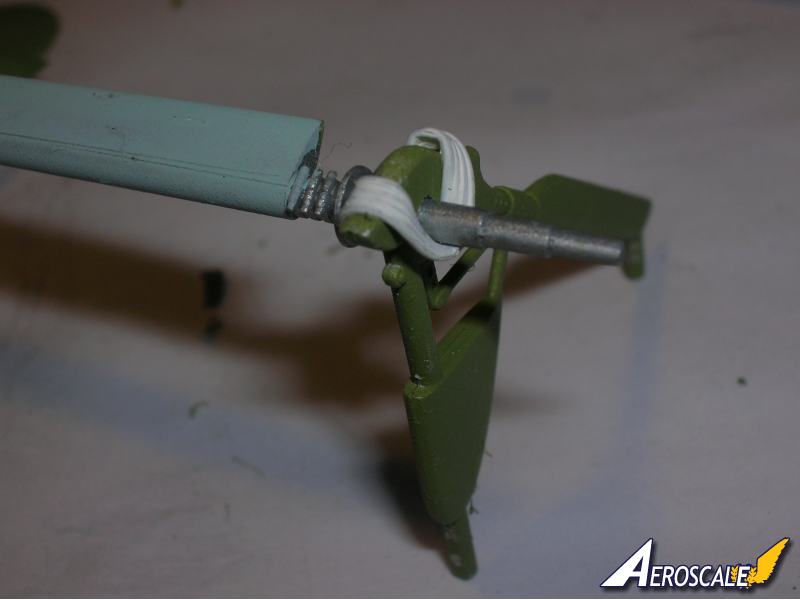
Here is the way it looks when itis modified. Now I have to pull it apart and finish painting the axle wing.
JackFlash
Joined: January 25, 2004
KitMaker: 11,669 posts
AeroScale: 11,011 posts
Posted: Wednesday, October 20, 2010 - 10:40 PM UTC
Here is the basics adding the landing gear works better when you open up the sockets in the lower wing. Lining up the gear is just as important in this scale.


JackFlash
Joined: January 25, 2004
KitMaker: 11,669 posts
AeroScale: 11,011 posts
Posted: Wednesday, October 20, 2010 - 10:51 PM UTC
When adding the interplane and the cabane struts you have to o it in steps. The interplane struts first. When thoroughly dry ahen begin to add the cabane struts. But these cross each other "X" inside the interplane strut stations. You will have to shave down the posts a bit going into the upper wing. As the cabanes tend to run very close to the interplane.


JackFlash
Joined: January 25, 2004
KitMaker: 11,669 posts
AeroScale: 11,011 posts
Posted: Friday, October 22, 2010 - 01:30 AM UTC
More bits and bobs done tonight. The prop is ready for is final coatings. Wiring and details being hung on the engine next. Not much to worry about there. I am keeping it simple. Not as grand as Des' or Hans or DanL's but still hope to have some surprises there.
I will augment the gun(s?) with some of Karaya's brass bits.
I will augment the gun(s?) with some of Karaya's brass bits.
OEFFAG_153
Joined: February 19, 2010
KitMaker: 1,473 posts
AeroScale: 1,450 posts
Posted: Friday, October 22, 2010 - 02:03 AM UTC
Greetings Stephen
Nice update you're really steaming ahead now, looks like you're going to make the dealine without any problem.
Mikael
Nice update you're really steaming ahead now, looks like you're going to make the dealine without any problem.
Mikael

Mgunns
Joined: December 12, 2008
KitMaker: 1,423 posts
AeroScale: 1,319 posts

Posted: Friday, October 22, 2010 - 04:10 AM UTC
Hi Stephen:It looks to be coming along nicely. I appreciate the tips and pointers regarding the fit in some of the areas. Looking forward to more pictures and progress.
Best
Mark
JackFlash
Joined: January 25, 2004
KitMaker: 11,669 posts
AeroScale: 11,011 posts
Posted: Friday, October 22, 2010 - 04:08 PM UTC
I just hope that WNW brings out the twin parabellum set up in their super kits. The gun mounts are in the rear cockpit near the floor with the barrels of the Parabellums sticking out through holes cut the rear cockpit flooring area. There is also a framework for stacking the ammo drums.
Essentially this is one of the first trench strafing gunships. Images here are from the WNW site and were taken by Giorgio Dorat. They show the rear cockpit of the Junkers J.I in Milan.
.jpg)
.jpg)
The divider wall between the front and rear cockpit has been removed to accomidate the twin parabellum installation.
". . .This application of the term for military aircraft is more specific, describing an aircraft that circles its target instead of performing strafing runs. Such aircraft have their armament on one side harmonized to fire at the apex of an imaginary cone formed by the aircraft and the ground when performing a banking turn. . . Such gunships with an operational profile that relies on flying in circles can only operate with the guarantee of air superiority. . . "
Essentially this is one of the first trench strafing gunships. Images here are from the WNW site and were taken by Giorgio Dorat. They show the rear cockpit of the Junkers J.I in Milan.
The divider wall between the front and rear cockpit has been removed to accomidate the twin parabellum installation.
". . .This application of the term for military aircraft is more specific, describing an aircraft that circles its target instead of performing strafing runs. Such aircraft have their armament on one side harmonized to fire at the apex of an imaginary cone formed by the aircraft and the ground when performing a banking turn. . . Such gunships with an operational profile that relies on flying in circles can only operate with the guarantee of air superiority. . . "
JackFlash
Joined: January 25, 2004
KitMaker: 11,669 posts
AeroScale: 11,011 posts
Posted: Saturday, October 23, 2010 - 04:51 AM UTC
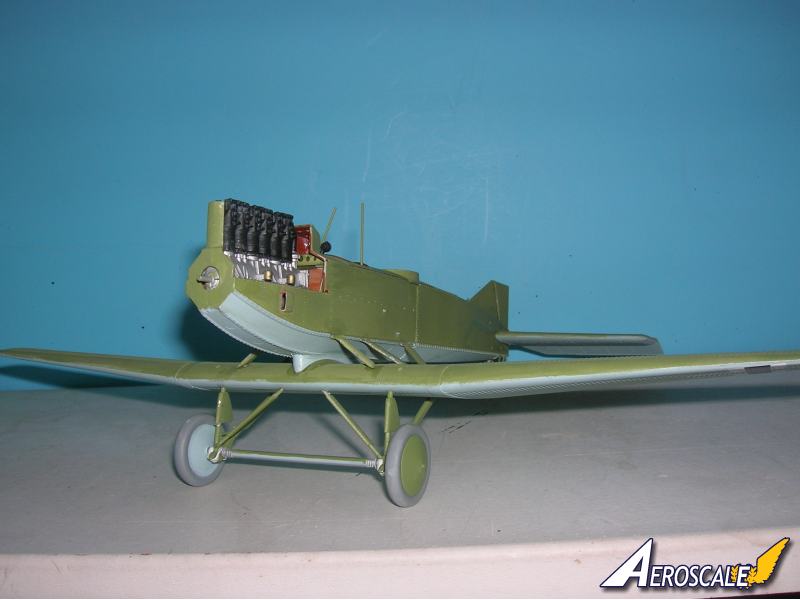
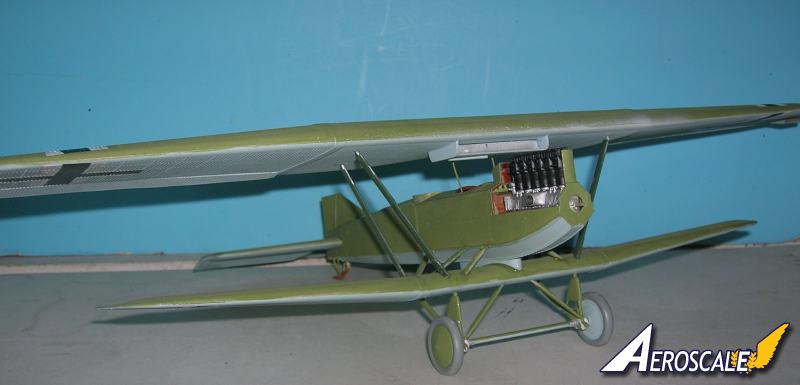
Here is a shot of the WNW 1:32 Junkers J.I propeller & spinner. Below it is the Roden 1:32 "Axial" Fok. Dr.I propeller.

Some engine details.
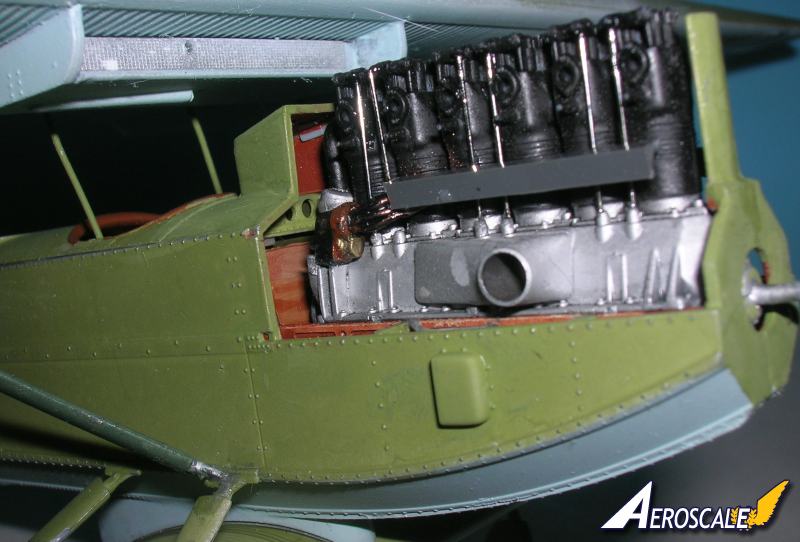
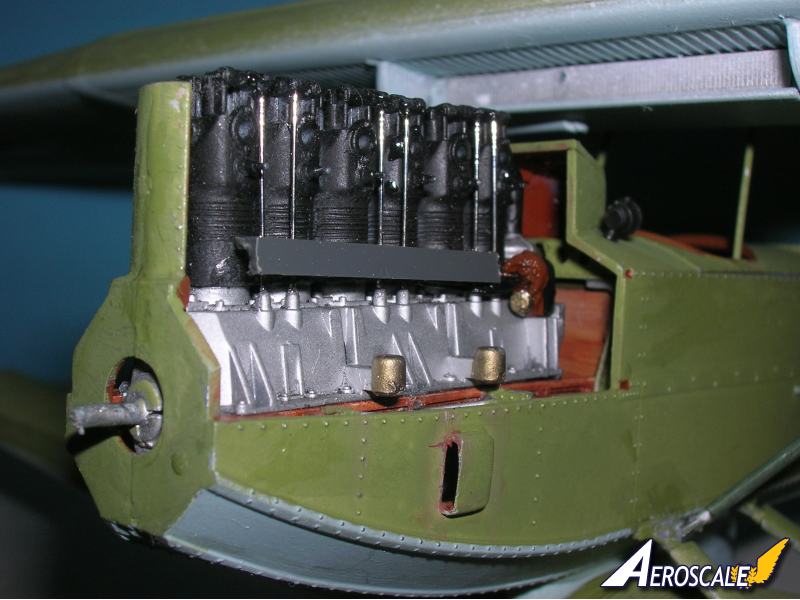
Later I had to go back and modify some of my modifications to get better cowling clearance. But I wanted one side slightly opened (pilot's left) to drive the IPMS judges crazy.
Some engine details.
Later I had to go back and modify some of my modifications to get better cowling clearance. But I wanted one side slightly opened (pilot's left) to drive the IPMS judges crazy.
JackFlash
Joined: January 25, 2004
KitMaker: 11,669 posts
AeroScale: 11,011 posts
Posted: Sunday, October 24, 2010 - 05:24 PM UTC
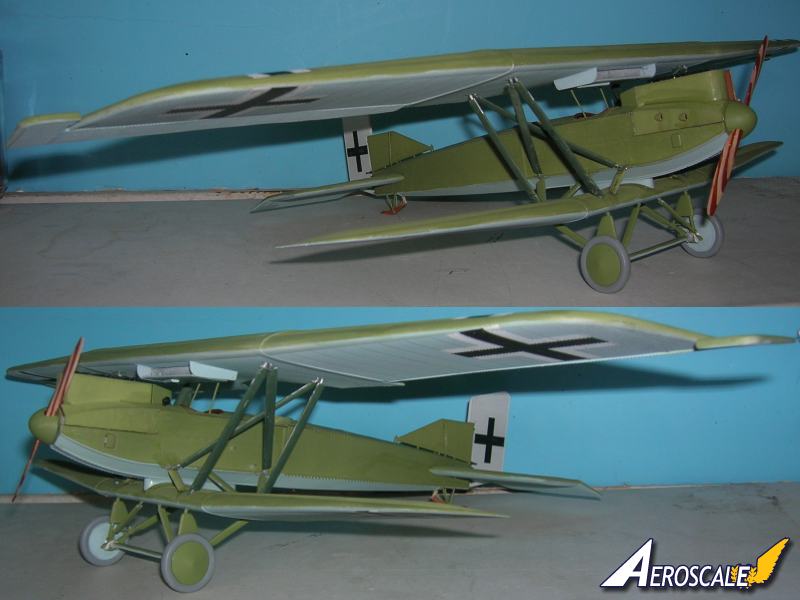
Well today the fuselage decals have been applied. They do go down fine on flat surfaces. The the Parabellum machine gun had a Karaya fretted jacket applied to one of the 14/17 breeches. The gun ring went on without a hitch. I did not even have to worry about tolerances there. The Oigee gun scope is MIA, so I built one.
Lastly tonight after work I will add control horns ands wire for their cables. Since I am going for a cleaner version, I have kept the wing struts relatively less scared up than the original.
I have really enjoyed this build. While its had a couple of challenges It deserved the 96 I gave it in the first look review. To get that rating from me is tough. WNW super kits are going to be all that and more.
If I ever get another one I will do a gunship version. I was looking at the WNW archived images and realized they would have to cut holes in the lower wing as well for that set up.
JackFlash
Joined: January 25, 2004
KitMaker: 11,669 posts
AeroScale: 11,011 posts
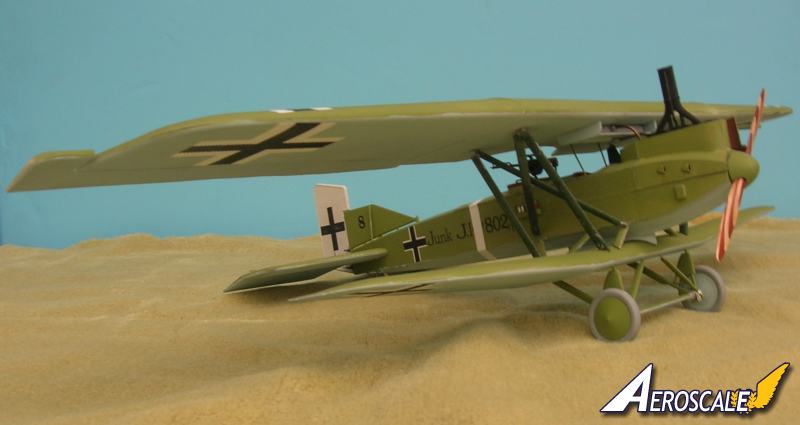
Posted: Monday, October 25, 2010 - 04:16 AM UTC
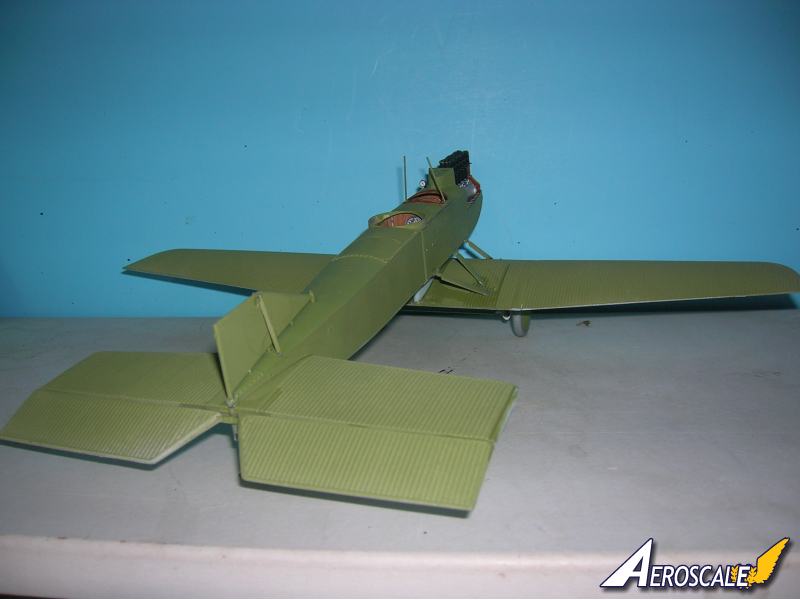
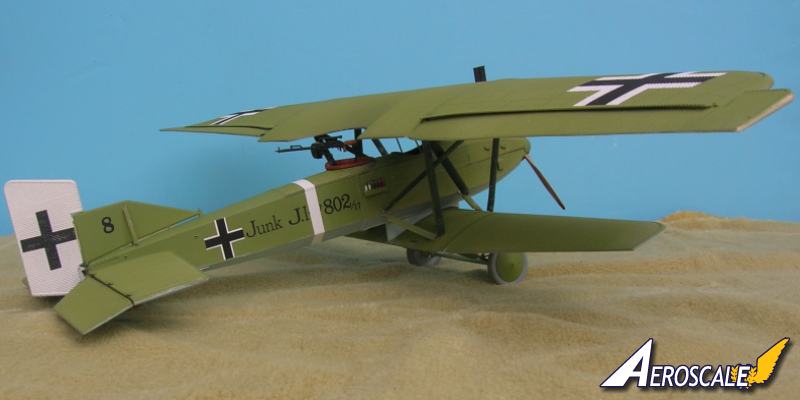
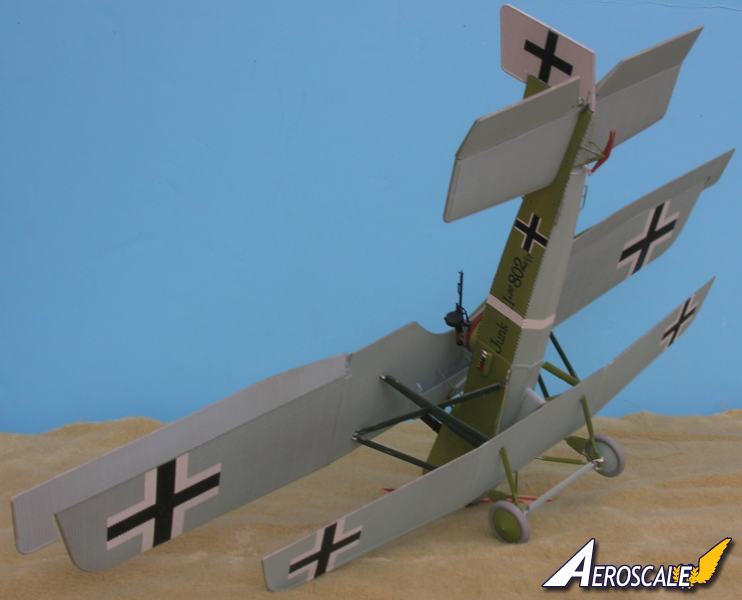
Stick a fork in it its done!


thegirl
Joined: January 19, 2008
KitMaker: 6,743 posts
AeroScale: 6,151 posts
Posted: Monday, October 25, 2010 - 05:39 AM UTC
Beautiful build Stephen ! You never disapoint us with your quiaity of builds .
OEFFAG_153
Joined: February 19, 2010
KitMaker: 1,473 posts
AeroScale: 1,450 posts
Posted: Monday, October 25, 2010 - 06:41 AM UTC
Great build in more than one sense Stephen Congratulations on finishing the groupbuild  And Thank You for many good pointers for us who still have to build this beast!
Best Regards
Mikael
Congratulations on finishing the groupbuild And Thank You for many good pointers for us who still have to build this beast!Best Regards
Mikael
Mgunns
Joined: December 12, 2008
KitMaker: 1,423 posts
AeroScale: 1,319 posts
Posted: Tuesday, October 26, 2010 - 09:16 AM UTC
Hi Stephen:Mighty fine build there Stephen. I will be referencing your build and others when I tackle mine. It certainly is a unique looking airplane.
Best
Mark

CaptainA
Joined: May 14, 2007
KitMaker: 3,117 posts
AeroScale: 2,270 posts
Posted: Wednesday, October 27, 2010 - 11:01 AM UTC
Great build. You have a beautiful Junker there. And as previously stated, you have made the path easier for those of us who have this thing sitting around, calling for us to build it.
What's for dinner?
What's for dinner?

JackFlash
Joined: January 25, 2004
KitMaker: 11,669 posts
AeroScale: 11,011 posts
Posted: Wednesday, October 27, 2010 - 11:12 AM UTC
Quoted Text
Great build. You have a beautiful Junker there. And as previously stated, you have made the path easier for those of us who have this thing sitting around, calling for us to build it.
What's for dinner?
Greetings Carl,
Homemade stew and fresh bread with ice cold cream soda and coffee with peach pie.
And Carl, Teri, Michael and Mark. My sincere thanks for your kind words.
 |

WEB HOSTING BY


Copyright ©2021 AeroScale and Kitmaker Network, a subsidiary of Silver Star Enterprises
All Rights Reserved. Please read our Conditions of Use and Privacy Policy.
All Rights Reserved. Please read our Conditions of Use and Privacy Policy.