_GOTOBOTTOM
Early Aviation
Discuss World War I and the early years of aviation thru 1934.
Camel vs Fok. Campaign Roden 1:32 Dr.I
Kornbeef
_VISITCOMMUNITY
England - South East, United Kingdom
Joined: November 06, 2005
KitMaker: 1,667 posts
AeroScale: 1,551 posts
Posted: Tuesday, November 17, 2009 - 05:49 AM UTC
Right...I'm gonna prove I have been doing something at least.

Roden 1/32 DR.I kit. Eduard & PofP etch sets, a resin cowl, some parts from failed earlier builds Roden & Andrea.
Refrences:- Windsock datafile special, the excellent Jagdstafflen, Schiffer's Fokker v5/Dr.1, Fokker Dr1 in action by Squadron/signal and Andrea's the Red Baron book.

So to the build...as usual by me I ended up with a lit in twice as many parts as it started out. Anyone who has seen any of my builds know I never do things the easy way.


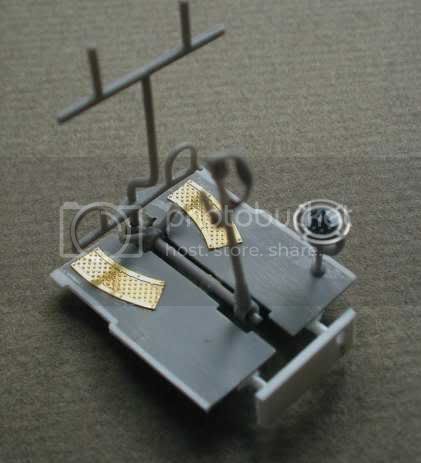
the engine...basically done so far. doesnt fit under the cowl co I butchered the tops of the cylinders off..


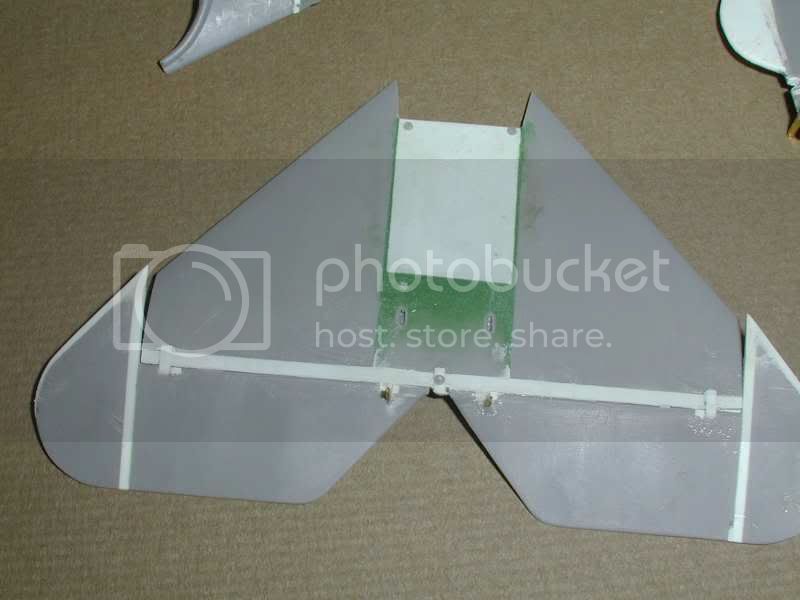
Wings and control surfaces.
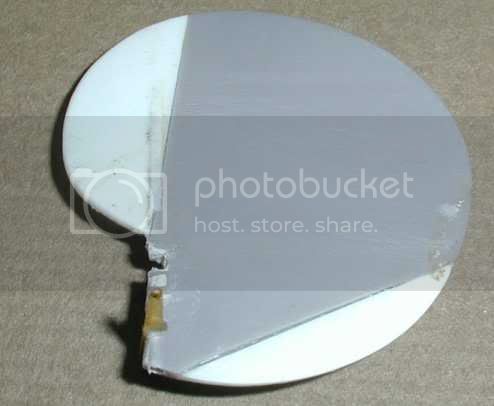
points out the major chopping and filleting to bet the tail to match the 1/32 plans in the Jagdstafflen book and the chopping and reshaping of the rudder.
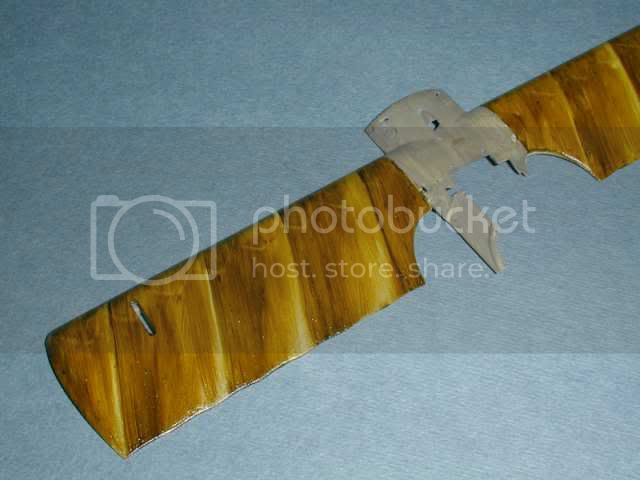
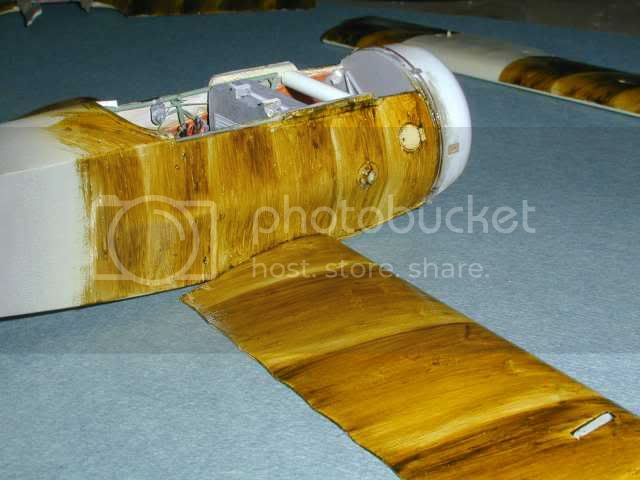
Much thinning of wings before cementing and more after was done, access doors replaced and the inspection window moved in the upper wing *I made a minor boo boo here modelling the spar etc then realised after assy that the window actually sits on the spar not behind it.


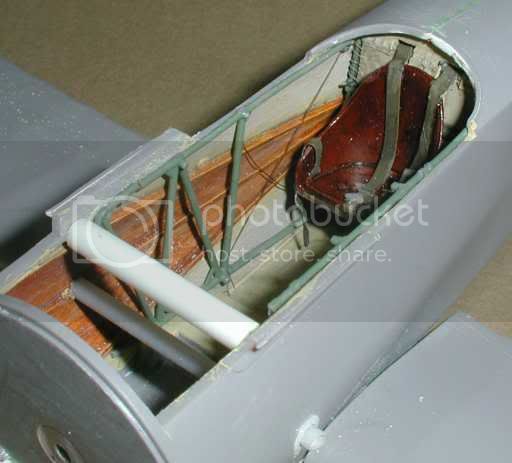
Fuselage mods and additions, some of which really should have been done my the manufacturer.
Rudder mountings and reprofiles the tail section to make the tail sit flatter and the shape match the plans closer.
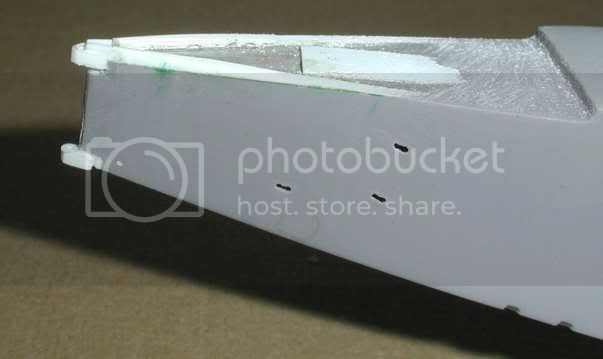
Gut the UC slots in the lower wing and filed the body recesses adding the door the hinge and the lip of the belly panel, all the studs are yet to be added.
Thinned out and reprofiled/detailed the cowl adding the second filler neck and opening out the fuel guage area though the actual shape across the front of the wing section looks different to the plans...I'm unsure which is right,


The U/C loads of thinning and reshaping to this blessed wing. added the edge details and redid the detail underneath. Yes the wheels are valveside out...I'm modelling Greim's 521-17 and one pic in the Jagdsaffeln book shows said valve openings to the outside.


okay, the fuselage itself. Not one to follow convention I joined the fuselage after adding the ply coaming from plasticard and strip,and once it was painted I glued and set the lot aside to set hard. the white rod is bracing the fuselage apart so it matches with the middle wing and the cowl fits right.
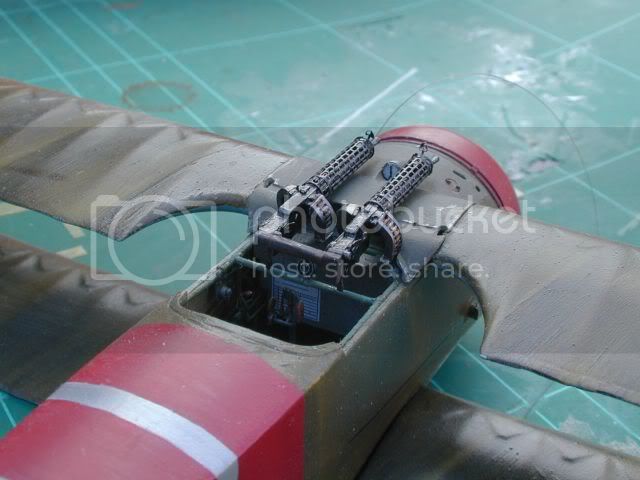
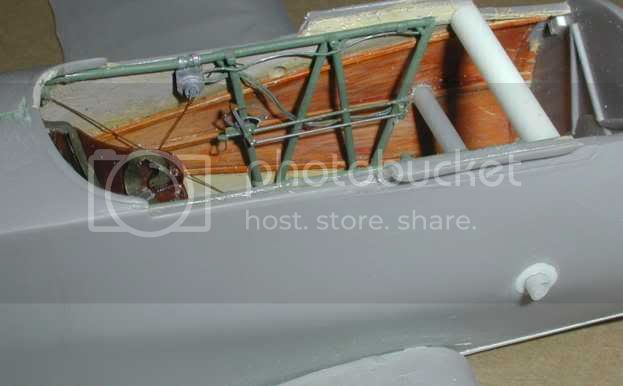
So I built the interior in sections adding them bit by bit, cutting down the unseen framework from the nose section I wont be adding anything out of sight.
Remade the carb intakes from tube and added the seals? around them to.

A lot done all in all even though I'm working slowly. But much to do still. but now the cockpit floor section is base painted, as is the prop and I'm hoping to have her closed up by next week...having just noticed the PofP ammmocans are far too short may have to resort to platicard ones I guess.

Any how all comments criticisms and pointers taken

Thanks for looking.

Keith


JackFlash
_VISITCOMMUNITY
Colorado, United States
Joined: January 25, 2004
KitMaker: 11,669 posts
AeroScale: 11,011 posts
Posted: Tuesday, November 17, 2009 - 08:16 AM UTC
Keith, Coming along nicely! Here is a bit of fun.

Fokker Streaked Camouflage 101
CaptainA
_VISITCOMMUNITY
Indiana, United States
Joined: May 14, 2007
KitMaker: 3,117 posts
AeroScale: 2,270 posts
Posted: Tuesday, November 17, 2009 - 09:33 AM UTC
I think you have gotten a lot done, Keith.
thegirl
_VISITCOMMUNITY
Alberta, Canada
Joined: January 19, 2008
KitMaker: 6,743 posts
AeroScale: 6,151 posts
Posted: Tuesday, November 17, 2009 - 01:15 PM UTC
Most excellent Keith !

Looking forward to seeing some colour on her now .
Kornbeef
_VISITCOMMUNITY
England - South East, United Kingdom
Joined: November 06, 2005
KitMaker: 1,667 posts
AeroScale: 1,551 posts
Posted: Thursday, November 19, 2009 - 04:05 AM UTC
Thanx for the comments guys and T
I've got the floor section painte up, needs a little weathering in and the cables run and slipped in .

Ammo bins are the next hurdle, seems the Pof P ones are a little small, maybe because of my mods on the body.(the bracing) .a choice of having the wings/cowls fit well or the internals

Kinda looking forwards to attempting the streaking cammo

K
Kornbeef
_VISITCOMMUNITY
England - South East, United Kingdom
Joined: November 06, 2005
KitMaker: 1,667 posts
AeroScale: 1,551 posts
Posted: Saturday, November 28, 2009 - 05:35 AM UTC
A detail of the front underside and a couple of shots of the interior, I scratched the ammo holders but have the dials still to add and a few minor details and the frame under the guns...etc but am quite pleased with the results so far. The plan is to slip the engine in and spear it with an overlong propshaft...we'll see LOL


Camo... attempt 2


It really is more olive and darker than this...Flash woes of nitetime pic taking, I think the fuselage banding is too close, I'll disguise that with the next coat maybe joinint every other band together.

Done in oils...so much better than anything else for this kinda thing...just waiting for it to dry is the bugbear.

Anyway Ta for lookin and any comments taken

Keith
RAGIII
_VISITCOMMUNITY
North Carolina, United States
Joined: June 19, 2007
KitMaker: 604 posts
AeroScale: 600 posts
Posted: Saturday, November 28, 2009 - 03:09 PM UTC
Although my work is certainly no bench mark for streaking , here are a couple of "Tips"
1. Use a hotter thinner such as Testors Model Master Airbrush thnner. This speeds up the drying time by about half.
2. Use a flat 1/4" wide brush, dampened with thinner and pull through the areas you want lighter. This leaves a realistic streaky film in the light areas bordered by a little darker line.

Reference your model, IMO your wings look very good! The fuselage might benefit from hint number 2. JMHO!. Again, Overall much better work than many, and that probably includes mine
On my 521/17 build I think I stripped and repainted the streaks 2 times
RAGIII
PS, Your work on improving this kit is phenominal!
thegirl
_VISITCOMMUNITY
Alberta, Canada
Joined: January 19, 2008
KitMaker: 6,743 posts
AeroScale: 6,151 posts
Posted: Sunday, November 29, 2009 - 12:26 AM UTC
Nicely done Keith . It is one of those methods which lot's of practicing is involved . You have done an out standing job . I do agree with Rick though on the fuselage sides . Go over with #2 to thin it out more in the lighter areas to add some balance to the over all effect .

looking forward to more progress
Kornbeef
_VISITCOMMUNITY
England - South East, United Kingdom
Joined: November 06, 2005
KitMaker: 1,667 posts
AeroScale: 1,551 posts
Posted: Sunday, November 29, 2009 - 04:12 AM UTC
Yep I agree fully, I did the fuselage first..it looked ok ay till I had the first wing done then I realised the stripes were too close

It can and will be corrected...plus this was a second hand ex Jasta 11 AC so prolly was a little tatty
Kornbeef
_VISITCOMMUNITY
England - South East, United Kingdom
Joined: November 06, 2005
KitMaker: 1,667 posts
AeroScale: 1,551 posts
Posted: Saturday, July 24, 2010 - 07:12 PM UTC
A forgotten one rises from the murky depths. Yes I never finished her in time for the build but I'm working on her now, correcting the sinks in the filler and paint that made me put her aside so long ago.

Keith
JackFlash
_VISITCOMMUNITY
Colorado, United States
Joined: January 25, 2004
KitMaker: 11,669 posts
AeroScale: 11,011 posts
Posted: Sunday, July 25, 2010 - 09:17 AM UTC
Right On! I am very happy to see this one make a come back! Model On!
thegirl
_VISITCOMMUNITY
Alberta, Canada
Joined: January 19, 2008
KitMaker: 6,743 posts
AeroScale: 6,151 posts
Posted: Tuesday, July 27, 2010 - 04:52 PM UTC
I've been waiting for this one for some time now , glad to see it back on the bench once more .
Kornbeef
_VISITCOMMUNITY
England - South East, United Kingdom
Joined: November 06, 2005
KitMaker: 1,667 posts
AeroScale: 1,551 posts
Posted: Thursday, July 29, 2010 - 07:46 AM UTC
I'm working on it alongside the DIII (OAW) so expect things on both posts if I ever find the OAW thread again :-P

Kornbeef
_VISITCOMMUNITY
England - South East, United Kingdom
Joined: November 06, 2005
KitMaker: 1,667 posts
AeroScale: 1,551 posts
Posted: Saturday, August 28, 2010 - 03:40 AM UTC
So...eventually I get around to posting progress... I think I have too many projects on the go at once. Too many other interests to, which would be good if any were actually productive.

Any how, I had her painted and the seam sank down the centre of the turtledeck....wasnt a happy bunny, but thefiller sank on the tail surfaces too.

Some repairwork done there, got the guns fitted and A few days dedicated work would have her done I guess...but oh those Albi's draw me away.


Heres a shot of assorted parts."A DRi garage sale"


I really should get my finger out...poor! Might do the do and get the tail sprayed tomorrow if the weathers nice. Then its top wing and undercarriage on and minimal rigging The prop is nice but isnt well laminated, I must have spares to try to improve it but it looks okay as is.

Cheers Keith
CaptainA
_VISITCOMMUNITY
Indiana, United States
Joined: May 14, 2007
KitMaker: 3,117 posts
AeroScale: 2,270 posts
Posted: Saturday, August 28, 2010 - 10:37 AM UTC
You have all these nice builds going on, and unlike me, you are making progress. Looks good
Kornbeef
_VISITCOMMUNITY
England - South East, United Kingdom
Joined: November 06, 2005
KitMaker: 1,667 posts
AeroScale: 1,551 posts
Posted: Saturday, August 28, 2010 - 08:57 PM UTC
Carl,

Thank, yes I should do this, but I have 3 Albatro2 on the go too, You know how alluring th albatros is>

I'm trying hard not to go any further with the second DVa than plan and do the basic set up..which is done till I get some of the others done including this.

RAGIII
_VISITCOMMUNITY
North Carolina, United States
Joined: June 19, 2007
KitMaker: 604 posts
AeroScale: 600 posts
Posted: Sunday, August 29, 2010 - 09:30 AM UTC
Keith,
Your upgrades to the basic kit are awesome! My only criticism is that you chose to do the same scheme as my old out of the box effort, thereby making mine look somewhat pitiful :-)
RAGIII
OEFFAG_153
_VISITCOMMUNITY
Västra Götaland, Sweden
Joined: February 19, 2010
KitMaker: 1,473 posts
AeroScale: 1,450 posts
Posted: Sunday, August 29, 2010 - 08:31 PM UTC
Nice DR1 Keith great attention to detail too. You're going to have a very full display case once all of these on the go are finished.

I am considering doing Greims DVII (when its realeased that is), I really like his broad red bands and silvery tail

Best Regards

Mikael
thegirl
_VISITCOMMUNITY
Alberta, Canada
Joined: January 19, 2008
KitMaker: 6,743 posts
AeroScale: 6,151 posts
Posted: Monday, August 30, 2010 - 01:55 AM UTC
You ever have one of those mornings where things just keep getting better and better , this is one of them , very nice surprise to see you back on with this project Keith Cool you have your mojo back once more .

Nice job on the Dr.1 so far . She is looking might fine my friend !
 _GOTOTOP