

I bought this kit last year, with the full intentions of going berzerko on it, then I saw Chuck W's builds and decided Im not that good/crazy/talented. So what follow is my attempts at making this kit not so horrible and a decent representation of this aircraft in this scale.
Notes so far:
Why did I buy this kit...The cockpit is horrendous!
ejector pins on the inside of the walls
total lack of a throttle quadrant
concrete slab style middle seat
no surface details in pilots area
rudder pedals attached to instrument panel-and they're aweful
What I've done so far (pics to come)
Shaved the "wiring" from the cockpit wall sides
filled the 3 ejector pin marks per wall per side
hacked chopped and filled for a representation of the throttle quadrant
removed the seat belts from the seats and opened up the harness slots
scratch built the "bin" in the pilots hole, like a mail bin on the port side of the tub. Probably for maps or such.
sorted through the spares box for some details to add, like panel lights, trim wheels, levers, etc, my wife says "it sounds like your diggin for treasure over there"..she is SO right
Im doing this build with no resin, no photo etch and no budget, lets see how creative I can get and if it goes on the shelf or in the bin.
So stay tuned for a REAL slow build and to see who wins, the plastic, the mental hospital or me.
World War II
Discuss WWII and the era directly before and after the war from 1935-1949.
Discuss WWII and the era directly before and after the war from 1935-1949.
Hosted by Rowan Baylis
What Have I started: 1/32 Revell Bf-110 C4/b

ShawnM

Joined: November 24, 2008
KitMaker: 564 posts
AeroScale: 510 posts

Posted: Sunday, December 13, 2009 - 06:14 AM UTC

FalkeEins

Joined: March 07, 2005
KitMaker: 868 posts
AeroScale: 690 posts
Posted: Sunday, December 13, 2009 - 06:23 AM UTC
..best of British mate...(good luck)
had this kit in the stash for years, even invested in two sheets of etch, all reasonable offers considered

ShawnM
Joined: November 24, 2008
KitMaker: 564 posts
AeroScale: 510 posts
Posted: Sunday, December 13, 2009 - 07:30 AM UTC
disclaimer!
it may not be 100% accurate since reference material is a bit hard to come by.
what etch sheets do you have?
it may not be 100% accurate since reference material is a bit hard to come by.
what etch sheets do you have?
ShawnM
Joined: November 24, 2008
KitMaker: 564 posts
AeroScale: 510 posts
Posted: Sunday, December 13, 2009 - 10:09 AM UTC
Pictars!


more to come, wish I'd have taken before pics...rest assured that wasn't there before....
more to come, wish I'd have taken before pics...rest assured that wasn't there before....

Merlin

#017


Joined: June 11, 2003
KitMaker: 17,582 posts
AeroScale: 12,795 posts

Posted: Sunday, December 13, 2009 - 09:18 PM UTC
Quoted Text
disclaimer!
it may not be 100% accurate since reference material is a bit hard to come by.
Hi Shawn
This is going to be a really interesting build!
 If you're looking for reference info, I can throughly recommend "Messerschmitt Bf 110 C,D and E" by John Vasco and Fernando Estanislau - Classic Publications, 2008. It's probably the definitive study of the aircraft, packed with info and pictures. I think you'll find it invaluable in detailing the kit.
All the best
Rowan


dioman13
Joined: August 19, 2007
KitMaker: 2,184 posts
AeroScale: 54 posts

Posted: Monday, December 14, 2009 - 05:05 AM UTC
Shawn, Is this the old night fighter 110-4-g destroyer?
ShawnM
Joined: November 24, 2008
KitMaker: 564 posts
AeroScale: 510 posts
Posted: Monday, December 14, 2009 - 12:11 PM UTC
thanks for the tip Rowan, cant recall if I have that on my wish list or not...
Bob, this is not the G night fighter variant, its a plain old C4/B
Im on to the floor boards now, cutting out the old slab for the center seat and removing the rear "butt pan" for the gunner. Then I need to scratch build the woven seat. I'll Use Solder and masking tape for this.
Stay tuned!
Bob, this is not the G night fighter variant, its a plain old C4/B
Im on to the floor boards now, cutting out the old slab for the center seat and removing the rear "butt pan" for the gunner. Then I need to scratch build the woven seat. I'll Use Solder and masking tape for this.
Stay tuned!
dioman13
Joined: August 19, 2007
KitMaker: 2,184 posts
AeroScale: 54 posts
Posted: Wednesday, December 16, 2009 - 05:12 AM UTC
Interesting build I'll keep my eye on. Those old Revell kits need a lot of work, but it's what we have to work with. I've the old destroyer kit that I want to build up as a belly landing. Think I'll wait and see how you do yours. Now lets figure where we'll meet, the loony bin or the bar.
ShawnM
Joined: November 24, 2008
KitMaker: 564 posts
AeroScale: 510 posts
Posted: Thursday, December 17, 2009 - 12:30 AM UTC
I say both, the bar and the boobie hatch.
I recarved the rear seat and added sides and a back to it, I filled in the floor for the middle seat and have detailed the spar pass through a bit further. I need to add the new flooring details and then work out the rear bulkhead. The only parts worth their salt is the radio bulkhead and the front seat. I added the adjustment lever to the front seat and will tweak the radio bulkhead a bit with wiring.
This is gonna be a looooong build.
ShawnM
Joined: November 24, 2008
KitMaker: 564 posts
AeroScale: 510 posts
Posted: Sunday, December 20, 2009 - 11:48 AM UTC
so after scouring the web for middle seat details, I found a few things:
some had NO mid seat just a cannon bay or ammo storage
some had the "woven seat"
and a few had a "saddle" shaped seat mounted to the spar
so, to be different thats what I've modeled.
I've also scratch built some spare magazines for the rear gunner to spice up the side walls
added the floor detail to where Revell had their block...err middle seat
pics on their way as Im off to shoot them now
ShawnM
Joined: November 24, 2008
KitMaker: 564 posts
AeroScale: 510 posts
Posted: Sunday, December 20, 2009 - 12:25 PM UTC

ShawnM
Joined: November 24, 2008
KitMaker: 564 posts
AeroScale: 510 posts
Posted: Sunday, December 20, 2009 - 12:31 PM UTC
so far I've used:
a bead
a photo etch sprue
a race car roll cages-scrap box
a champagne cork keeper (the metal twistie)
an earing
a gift card
the plastic blister pack from #11 blades-scrap box
a magneto from a zero-scrap box
a steering wheel from a mini-scrap box
57 chevy frame rail-scrap box
AIM-9 Sidewinder -scrap box
steering linkage from a 57 chevy -scrap box
handsfree set chord-stripped the sheathing got the fine wire
Im cheap
ShawnM
Joined: November 24, 2008
KitMaker: 564 posts
AeroScale: 510 posts
Posted: Thursday, December 31, 2009 - 01:21 AM UTC
comming up on some days off, "should" be able to finish up the cockpit walls and floor.
Still need to add some details and make something good out of the crap rear canon revell provided.
Still need to add some details and make something good out of the crap rear canon revell provided.
ShawnM
Joined: November 24, 2008
KitMaker: 564 posts
AeroScale: 510 posts
Posted: Sunday, January 03, 2010 - 09:28 AM UTC
New Year, new progress!
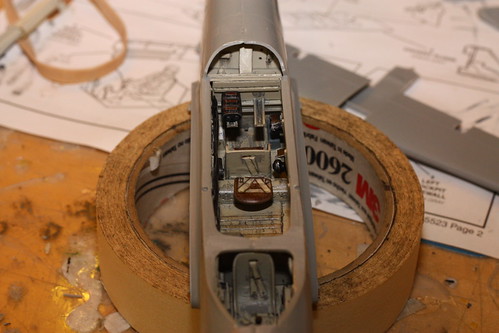
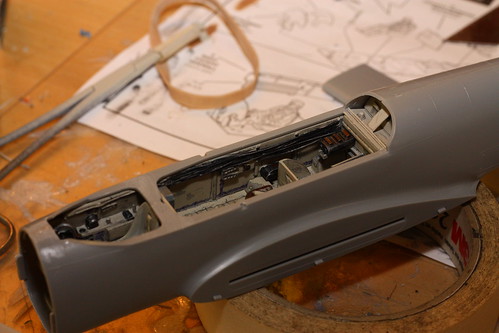
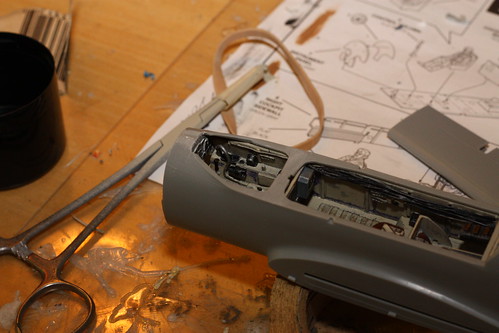
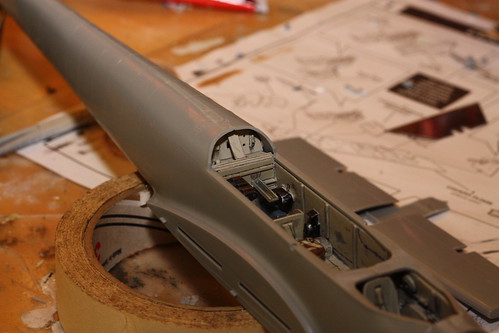
The cockpit is DONE and installed in the fuselage, which fit surprisingly well.
Final touched were a new rear bulkhead upper half, scratch built ammo racks and magazines, seat belts and instrument panel.Why is Revells mind was a decal instrument panel OK on a 1/32 bird?
I took the decal and laid it onto some .010 sheet. Then cut each instrument out and placed it on the kit part to give it some depth. The Only bit that remained un modified was the radio operators bulk head. It was fine, everything else was abysmal!
Pics:


Things to go:
still need to make the rudder pedals and attach those, need to wire,paint and weather the bulkhead top instruments, make handels and cockpit lip details
I've also decided to cut loose the elevators.
The cockpit is DONE and installed in the fuselage, which fit surprisingly well.
Final touched were a new rear bulkhead upper half, scratch built ammo racks and magazines, seat belts and instrument panel.Why is Revells mind was a decal instrument panel OK on a 1/32 bird?
I took the decal and laid it onto some .010 sheet. Then cut each instrument out and placed it on the kit part to give it some depth. The Only bit that remained un modified was the radio operators bulk head. It was fine, everything else was abysmal!
Pics:
Things to go:
still need to make the rudder pedals and attach those, need to wire,paint and weather the bulkhead top instruments, make handels and cockpit lip details
I've also decided to cut loose the elevators.
ShawnM
Joined: November 24, 2008
KitMaker: 564 posts
AeroScale: 510 posts
Posted: Thursday, January 07, 2010 - 01:29 AM UTC
i sanded the fuse seams down (hope this isn't like the Me-109 with the longitudinal seams) and added the belly etc rack. Need to fair in some parts and decide if I want to detail the nose gun bay or not.
ShawnM
Joined: November 24, 2008
KitMaker: 564 posts
AeroScale: 510 posts
Posted: Friday, January 08, 2010 - 01:23 AM UTC
I forgot to mention this is the first build that I can apply some of the techniques learned from the GREAT feature called "Reading the Seams", wow what a difference! I've been using my liquid cement wrong for all these years. This weekend I hop to:
finish up the etc rack installation and detailing, get the nose arrangement either sorted out or start detailing and I need to start masking the canopy and detailing the inner frame work. Plus I really just need to dive in on the eleveator/horz. stab and fill the gaps, shape the LE of the elevators and make a hinge setup.
Any tips or ideas on how to hinge the elevators?
ShawnM
Joined: November 24, 2008
KitMaker: 564 posts
AeroScale: 510 posts
Posted: Saturday, January 09, 2010 - 06:12 AM UTC
decided to keep the nose closed up as I really dont want to have to start from zero on yet another item here.
I started closing up the elevator and stab joints with sheet stock and finished the 1 spot of filler on the fuse and the small gap (which I used sheet stock to fill)at the shell exit slots on the bottom
I used cocktail straws for the gun tubes in the lower nose area after opening them up, still need to paint the whole nose interior black and decide what I want to do for gun barrels as the kit ones really suck...
ShawnM
Joined: November 24, 2008
KitMaker: 564 posts
AeroScale: 510 posts
Posted: Saturday, January 09, 2010 - 07:13 AM UTC
while checking my reference pictures I also noticed that my 'C' kit comes with late model 'G' rudders with the oversize trim tabs....more work ensues
said rudders also fit like dog poop to the stab and my choice for drooped elevators is going to haunt me, it better turn out well....
said rudders also fit like dog poop to the stab and my choice for drooped elevators is going to haunt me, it better turn out well....

armouredcharmer

Joined: June 09, 2009
KitMaker: 670 posts
AeroScale: 175 posts
Posted: Saturday, January 09, 2010 - 07:24 AM UTC
Hi Mate,i`m following this build with much interest as i`ve got both the C and G versions in my stash.My only deviation is i`ve gotten the Eduard etch set for the G,also as a guide to superdetailing i bought the Osprey Masterclass book on the ME 110.Even though the models are all in 1/48 scale the pictures are fantastic,so i`d recommend this to anyone as it`s a great guide.
ShawnM
Joined: November 24, 2008
KitMaker: 564 posts
AeroScale: 510 posts
Posted: Saturday, January 09, 2010 - 07:32 AM UTC
I too have the osprey book and am using it as well as all the ref. material I could scour on the web about 40mb worth. If you havent yet, go join the luftwaffe experten message board, there is a wealth if info in there.
http://www.luftwaffe-experten.org/forums/index.php?act=idx
Be ready when you go to build your 'C' as there is a lot to be done if you want a detailed kit. If you want a nice in flight bird go for it and hide that cockpit and gear wells.
http://www.luftwaffe-experten.org/forums/index.php?act=idx
Be ready when you go to build your 'C' as there is a lot to be done if you want a detailed kit. If you want a nice in flight bird go for it and hide that cockpit and gear wells.
ShawnM
Joined: November 24, 2008
KitMaker: 564 posts
AeroScale: 510 posts
Posted: Saturday, January 09, 2010 - 12:23 PM UTC
fussed with the rudder to stab fit and got that nice, also made some great progress on the elevators and stab details. Pics tomorrow for those that watch.
ShawnM
Joined: November 24, 2008
KitMaker: 564 posts
AeroScale: 510 posts
Posted: Sunday, January 10, 2010 - 01:58 PM UTC
got the nose all glued on and have sanded the lower section to fit. Still need to fill and sand the upper section..this model is getting bigger quickly.
Still finishing the elevator halves and deciding if I need to correct another glaring mistake. As built the rudders would not be able to turn without hitting the elevators. Revell took the elevators TO the rudders then forward, vs tapering them to the hinge line as they should be ( I was wrong here, there is a "flat" that goes forward)...plus one side is longer then the other! Im really glad I didnt separate the rudders like I planned on.
I attached the instrument pod (which I detailed with trimmed sprue and sheet stock to make it a bit thicker and give some gauge bodies on the back)to the cockpit decking and made an armored head rest for the pilot (out of a 1/48scale P-47D seat)...Im currently researching brass MG17 barrels for the nose...or I may "try" to detail the stock pieces as I am with the rear gun.
Sorry about no pictures today, got busy planning my gear to go shoot pics of the feeding eagles on the frozen river tomorrow.
ShawnM
Joined: November 24, 2008
KitMaker: 564 posts
AeroScale: 510 posts
Posted: Tuesday, January 12, 2010 - 05:03 AM UTC
now that I have all sorts of ETC rack details I need to go BACK and detail it...the tricky part is its already installed as I had NO idea how wrong and sparse it was....argh
have to work at the race shop tonight, no pics for a few days..FYI Aero Detail #21 is AWESOME for building these birds!
have to work at the race shop tonight, no pics for a few days..FYI Aero Detail #21 is AWESOME for building these birds!
ShawnM
Joined: November 24, 2008
KitMaker: 564 posts
AeroScale: 510 posts
Posted: Wednesday, January 13, 2010 - 07:18 AM UTC
CRAP!
Looking through some recently obtained documentation it looks like I need to go back and create some ammo drums for the belly canons and make a rack that goes just aft of the radio equipment...
Some images I have shoe nothing there (or it was removed for the photo) and now I see it was typical of all 'C' models...
DAMN YOU REVELL!
ShawnM
Joined: November 24, 2008
KitMaker: 564 posts
AeroScale: 510 posts
Posted: Sunday, January 17, 2010 - 05:11 AM UTC
Ok Revell, you win.
I had great plans of leaving a cowling open to expose a nicely detailed motor on one side. Then I built the kit motor and started referencing my materials...
what the hell is this inaccurate, out of shape, worthless lump of grey plastic! There are things molded into the "engine", and I use the term loosely, that have no basis in reality AT ALL!


so I surrender, the cowls will stay on, the nose bay will remain sealed...but I will have my little victories like the cockpit, exhaust and some other details I plan on forging ahead with.
If you're thinking about buying this kit, run away screaming and buy one of the FAR superior 1/48 scale kits out there.
I had great plans of leaving a cowling open to expose a nicely detailed motor on one side. Then I built the kit motor and started referencing my materials...
what the hell is this inaccurate, out of shape, worthless lump of grey plastic! There are things molded into the "engine", and I use the term loosely, that have no basis in reality AT ALL!
so I surrender, the cowls will stay on, the nose bay will remain sealed...but I will have my little victories like the cockpit, exhaust and some other details I plan on forging ahead with.
If you're thinking about buying this kit, run away screaming and buy one of the FAR superior 1/48 scale kits out there.
 |

WEB HOSTING BY


Copyright ©2021 AeroScale and Kitmaker Network, a subsidiary of Silver Star Enterprises
All Rights Reserved. Please read our Conditions of Use and Privacy Policy.
All Rights Reserved. Please read our Conditions of Use and Privacy Policy.