_GOTOBOTTOM
World War II: Germany
Aircraft of Germany in WWII.
Hosted by Rowan Baylis
Fw190D-9 Duo Review Build
TedMamere
_VISITCOMMUNITY
Moselle, France
Joined: May 15, 2005
KitMaker: 5,653 posts
AeroScale: 4,347 posts
Posted: Monday, February 15, 2010 - 06:43 AM UTC
Hi all,

With the Cessna Bobcat now out of the way, it is time to make a serious start on Eduard's new Fw 190 D-9. This will be something special as this build thread will be shared by Rowan and myself for a Duo Review Build.


A review of the kit can be found here.

Now enough talking, let's start...

Jean-Luc
TedMamere
_VISITCOMMUNITY
Moselle, France
Joined: May 15, 2005
KitMaker: 5,653 posts
AeroScale: 4,347 posts
Posted: Monday, February 15, 2010 - 06:55 AM UTC
Hi all,

It's me again...

I made a start on the kit. So far I have only glued some sub assemblies together such as the cockpit tub, the upper machine guns compartment, the visible part of the engine, the wheel bays etc...


I plan to get the various parts ready for the first painting session tomorrow. I think RLM02, RLM66 and silver will be in the program!

By the way, I will build my model all closed and strictly from the box (errors included) in the markings depicted in option C: Stab/JG 4, Frankfurt am Rhein-Main, April 1945.

All the best,

Jean-Luc
Merlin
Staff MemberSenior Editor
AEROSCALE
#017
_VISITCOMMUNITY
United Kingdom
Joined: June 11, 2003
KitMaker: 17,582 posts
AeroScale: 12,795 posts
Posted: Monday, February 15, 2010 - 07:26 AM UTC
Hi there

I'll be going for Dortenmann's aircraft in its final scheme and making a few tweaks here and there. I'll build the hatches open and will offer some simple solutions to address some problems with the kit that are apparent.

I made a start last week with some subassemblies:


I've used the styrene parts for the cockpit consoles and instrument panels. I thinned the seat somewhat for a better appearance and replaced the control runs and throttle damper because the moulded versions are just faintly depicted on the floor. The etched seat harness is nicely done, so I couldn't resist adding little fusewire loops to attach it. I've basically painted the "office" since these shots and will add the seat harness and smaller details this week.

With the gun bays in place, I found the wing halves a very tight fit, so an easy remedy is to sand the rear face of the spar and the front of the bays - with that done, the wings clip together very neatly:


I always think its easier to add protruding gun barrels after final assembly, so I trimmed them off before adding the parts visible in the wheel wells:


The basics are going together really nicely, and the overall fit is excellent:


I'll cover some of the mods I'm doing separately.

All the best

Rowan
alpha_tango
_VISITCOMMUNITY
Germany
Joined: September 07, 2005
KitMaker: 5,609 posts
AeroScale: 5,231 posts
Posted: Monday, February 15, 2010 - 07:30 AM UTC
Hi Jean-Luc

very nice start and also very nice that my kit is not here yet. I want to use it as a motivation build (i.e. "mostly oob" .. I will probably correct the area between the wheel wells) and you will show me any pitfalls in advance

curious when and if Rowan will follow ... I do not mean start but finish

cheers

Steffen
P.S. seems my provocation was a little late
Merlin
Staff MemberSenior Editor
AEROSCALE
#017
_VISITCOMMUNITY
United Kingdom
Joined: June 11, 2003
KitMaker: 17,582 posts
AeroScale: 12,795 posts
Posted: Monday, February 15, 2010 - 07:54 AM UTC
Hi again

The first problem that I noticed when checking the kit's parts was the propeller; it's nicely moulded, but doesn't have the distinctive notched appearance of the original. Test fitting the propeller and cowl revealed another issue - the rear of the blades actually hit the lip of the cowling. Comparisons with a couple of shots from Vol. 1 of Jerry Crandall's study of the Dora show what's amiss:


Fixing the rear of the blades is simple. There's actually a mould-line that makes a very useful guide to trim to:


I tackled the front of each blade by filing out a notch and insetting a chunk of styrene:


This was blended in with "superfiller" - a mix of CA adhesive and talcum powder:


It needs a bit more refining, but the appearance is already an improvement. I'm sure much better aftermarket replacements will soon be available, but in the meantime, this is a quick fix.

All the best

Rowan
Merlin
Staff MemberSenior Editor
AEROSCALE
#017
_VISITCOMMUNITY
United Kingdom
Joined: June 11, 2003
KitMaker: 17,582 posts
AeroScale: 12,795 posts
Posted: Monday, February 15, 2010 - 07:57 AM UTC

Quoted Text

... curious when and if Rowan will follow ... I do not mean start but finish

cheers

Steffen


Hi Steffen

Yes - I don't know how I bounced myself into building the kit with the hatches open and doing modifications, while Jean-Luc does the speedy clean build! If ever there was a case for doing things the other way round to give me even half a chance of keeping up...

All the best

Rowan
Merlin
Staff MemberSenior Editor
AEROSCALE
#017
_VISITCOMMUNITY
United Kingdom
Joined: June 11, 2003
KitMaker: 17,582 posts
AeroScale: 12,795 posts
Posted: Monday, February 15, 2010 - 08:14 AM UTC
Hi again

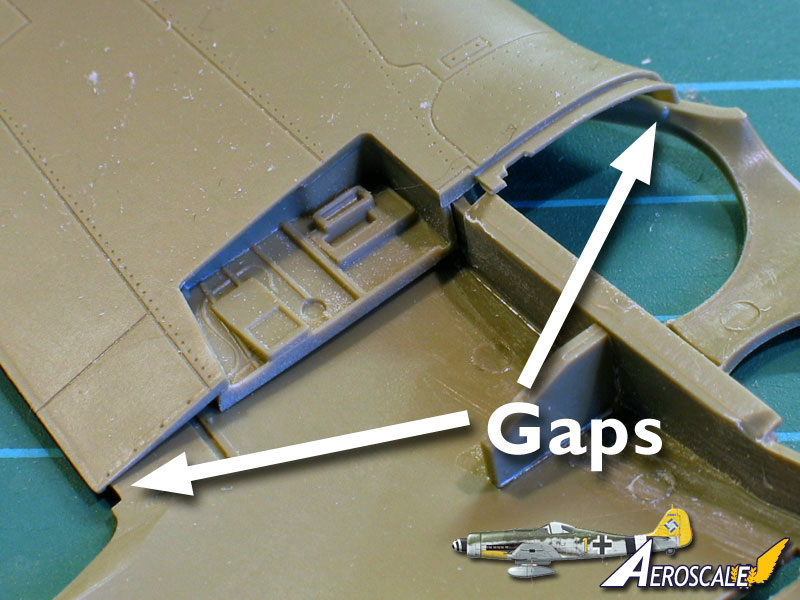
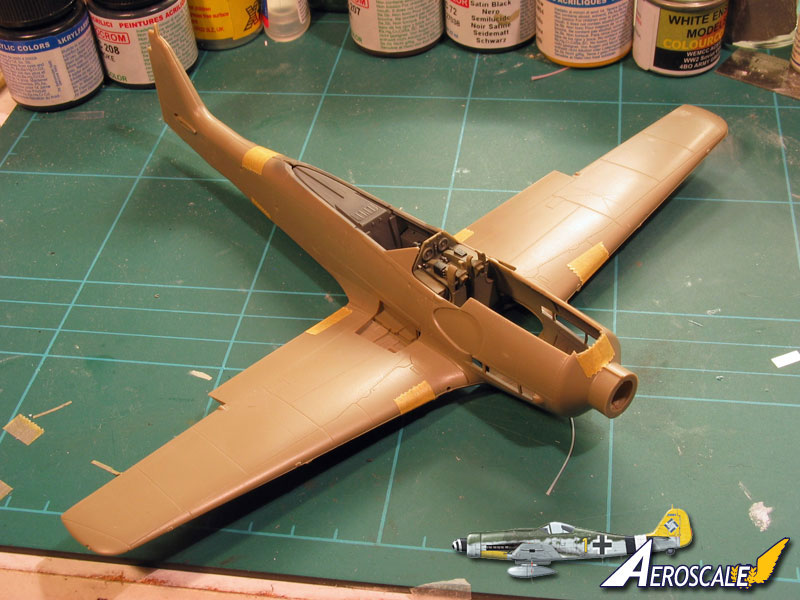
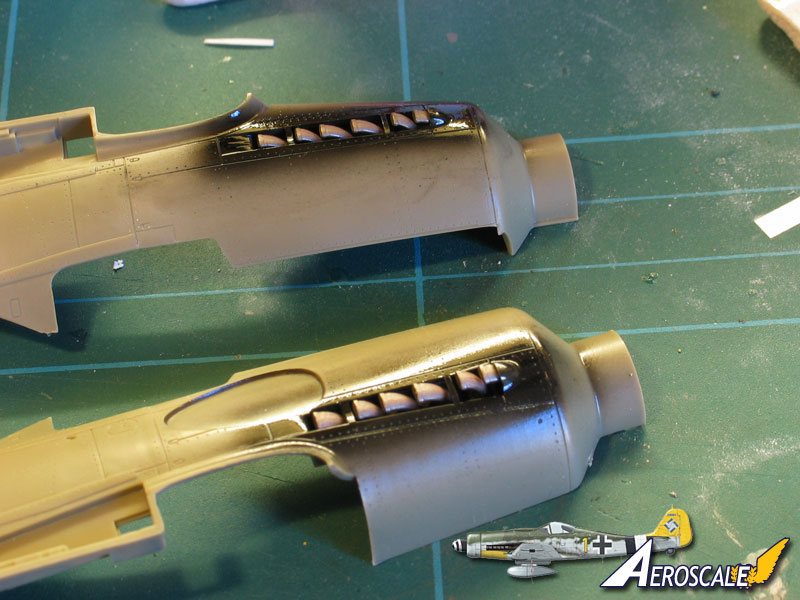
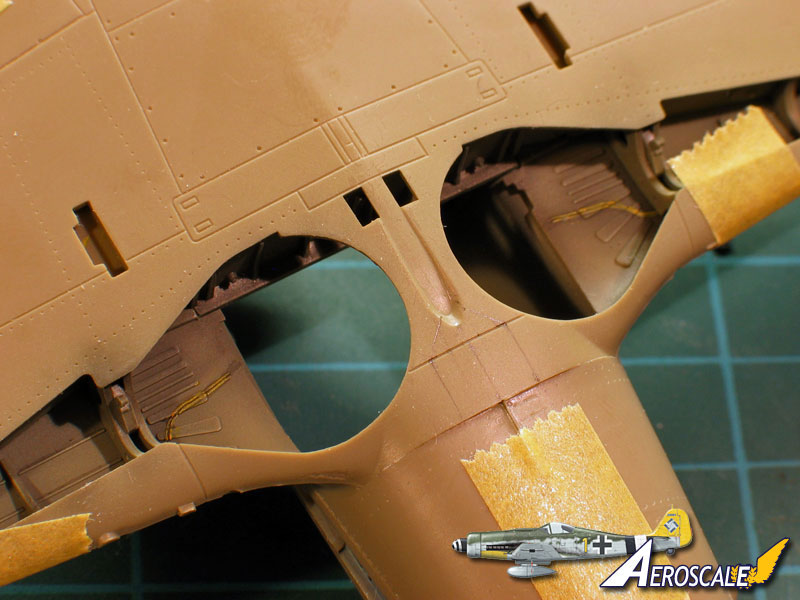
Another issue that's grabbed a lot of attention in modelling forums, as Steffen mentions, is the underside of the wing ahead of the wheel well. Eduard seem to have arrived at something of a hybrid appearance - the area is smooth (as on a 'D-13), but with with shell-case ports of the 'D-9.

I've seen it suggested that late 'D-9s may have had a smooth panel too, and I certainly can't discount this, but it's usually seen with an inset channel.

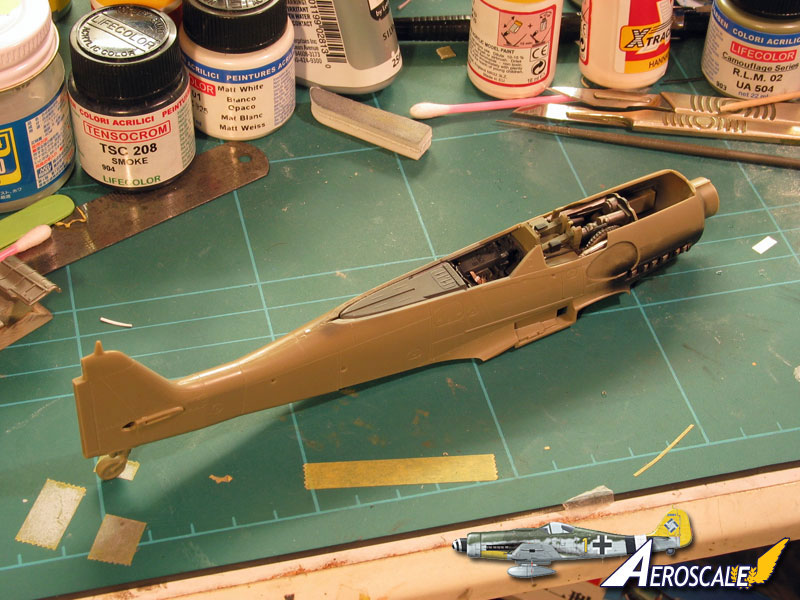
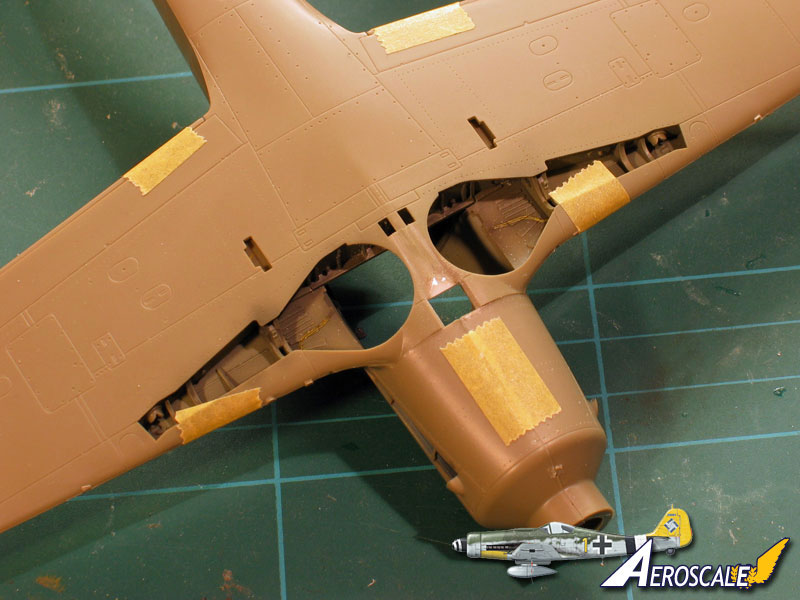
I wanted to compare the Eduard version with Trimaster's, but unfortunately the latter kit is so deeply buried in the pile of packing cases that I brought from London, I just couldn't get to it! So, I plucked up my courage, found a photo of the real thing, took measurements from the drawings in Jerry Crandall's book and sliced away the area:


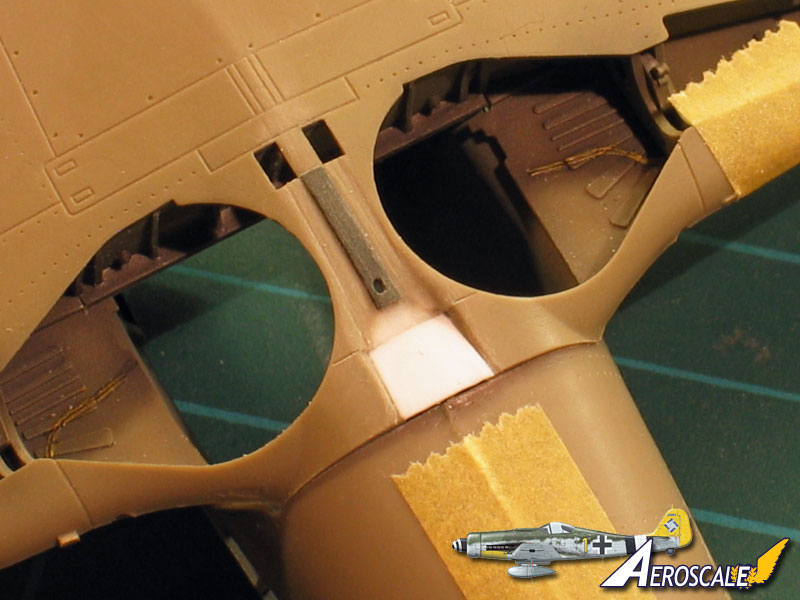
I filled the notch in the Eduard wing with "superfiller" again, and made the basic channel with plastic card, chiselling around each wheelwell to create a lip. I certainly won't claim any absolute accuracy for the result (it still needs scribing in the photo), but it gives a reasonable impression of something "going on" there - and it will be partially hidden by the drop tank anyway.


All the best

Rowan
thegirl
_VISITCOMMUNITY
Alberta, Canada
Joined: January 19, 2008
KitMaker: 6,743 posts
AeroScale: 6,151 posts
Posted: Monday, February 15, 2010 - 08:43 AM UTC
I'm truly going to enjoy watching this , will be rather neat seeing Rowan finish something

And with Jean-luc's talents tossed in ........................this is going to be sweet
Merlin
Staff MemberSenior Editor
AEROSCALE
#017
_VISITCOMMUNITY
United Kingdom
Joined: June 11, 2003
KitMaker: 17,582 posts
AeroScale: 12,795 posts
Posted: Monday, February 15, 2010 - 09:24 AM UTC

Quoted Text

I'm truly going to enjoy watching this , will be rather neat seeing Rowan finish something


Hi Terri

Yep - hopefully two finished builds from me before the year's even got properly started! Whatever next! As Andy said when he saw the Flitzer "Oh man, what is the world coming to, Rowan has built more kits then me this year LOL." So don't jinx me... it'll be fun to see this through too.

All the best

Rowan
Merlin
Staff MemberSenior Editor
AEROSCALE
#017
_VISITCOMMUNITY
United Kingdom
Joined: June 11, 2003
KitMaker: 17,582 posts
AeroScale: 12,795 posts
Posted: Monday, February 15, 2010 - 09:35 AM UTC
Hi again

Dohh! What I have totally forgotten to mention is that I'm also using this build as a chance to test LifeColor Luftwaffe acrylics, very kindly provided by The Airbrush Company Ltd.. An extra bit of fun for me, because I'm far more used to enamels. Obviously, there's not a lot to show yet as I've only been messing about with the interior, but they are going on beautifully with a lovely smooth finish.

All the best

Rowan
TedMamere
_VISITCOMMUNITY
Moselle, France
Joined: May 15, 2005
KitMaker: 5,653 posts
AeroScale: 4,347 posts
Posted: Monday, February 15, 2010 - 07:22 PM UTC
Hi Rowan,

Wow, what a progress!

The modifications also look great and easy to do... mmm... no, I will stick to my resolution and build mine from the box...

Jean-Luc
FalkeEins
_VISITCOMMUNITY
England - South East, United Kingdom
Joined: March 07, 2005
KitMaker: 868 posts
AeroScale: 690 posts
Posted: Tuesday, February 16, 2010 - 02:07 AM UTC

Quoted Text

I'm also using this build as a chance to test LifeColor Luftwaffe acrylics, very kindly provided by The Airbrush Company Ltd.. An extra bit of fun for me, because I'm far more used to enamels.


...Hi Rowan,

these are the six jar sets presumably..seem a little pricey at nearly £15 ?

otherwise great progress - that prop is disappointing from Eduard, but nice neat fix and looking good !
Removed by original poster on 02/16/10 - 14:52:05 (GMT).
ViperAtl
_VISITCOMMUNITY
Georgia, United States
Joined: August 22, 2005
KitMaker: 331 posts
AeroScale: 135 posts
Posted: Tuesday, February 16, 2010 - 05:42 AM UTC
Rowan,

I too have read about the channel between the wheel wells and went looking around for references and such in my boxed up pile too. From what I can see in photos and drawings is that both are correct and you would have to have a picture of the subject that you are modeling to get it right. My logic on this matter is that since the D had the same wing as an A it might have been the early production aircraft.

Then again, I could be wrong. Just ask any woman who knows me.
TedMamere
_VISITCOMMUNITY
Moselle, France
Joined: May 15, 2005
KitMaker: 5,653 posts
AeroScale: 4,347 posts
Posted: Tuesday, February 16, 2010 - 08:17 AM UTC
Hi all,

No spectacular progress but I have managed to apply the basic colors to most of the parts...


The RLM66 (dark grey) is mostly applied on cockpit parts (upper left), the RLM02 (brownish grey) mostly on the interior parts like the wheel bays, gear legs, engine bay, etc... (upper right), the aluminium and dark iron color is mostly applied on the engine parts (down left) and the rest is black/brown (exhaust) and yellow (coolant tank).

Tomorrow I will dry brush the parts and apply a wash. Maybe I will also find the time to do the cockpit interior.

Jean-Luc
AussieReg
Staff MemberAssociate Editor
AUTOMODELER
#007
_VISITCOMMUNITY
Victoria, Australia
Joined: June 09, 2009
KitMaker: 8,156 posts
AeroScale: 3,756 posts
Posted: Tuesday, February 16, 2010 - 08:47 AM UTC
This is a great thread already guys, very informative. I think it's a great idea to have parallel dual builds of new releases by different modellers to get different approaches and solutions.

@ joe


Quoted Text

Then again, I could be wrong. Just ask any woman who knows me.


This reminded me of something my Dad asked me once:

"If a man says something in a forest, and there's no women around to hear him, is he still wrong ??"

My dad was a very wise man !

Cheers, D
Merlin
Staff MemberSenior Editor
AEROSCALE
#017
_VISITCOMMUNITY
United Kingdom
Joined: June 11, 2003
KitMaker: 17,582 posts
AeroScale: 12,795 posts
Posted: Tuesday, February 16, 2010 - 09:03 AM UTC

Quoted Text

This is a great thread already guys, very informative. I think it's a great idea to have parallel dual builds of new releases by different modellers to get different approaches and solutions.


Cheers Damian

I think the dual-build format is something we may well try do more often. It worked really nicely with Terri and Mark doing Eduard's Pfalz - so I've just got to try to keep up with Jean-Luc once he gets the wind in his sails, and make sure I don't let the side down!

I've started work on the engine this evening:


The basic colours are on, with some pastels applied to dirty things up a bit. I'll seal them with varnish and then dry-brush and paint in the details. If I get a chance tomorrow, I'll try to finish the cockpit. My target is to get the interior pretty much sorted in the next couple of days.

All the best

Rowan
thegirl
_VISITCOMMUNITY
Alberta, Canada
Joined: January 19, 2008
KitMaker: 6,743 posts
AeroScale: 6,151 posts
Posted: Tuesday, February 16, 2010 - 03:42 PM UTC
Great progress from the both of you so far ......

Yes when the wind catches Jean-Luc's sail that man can fly with a build .

I do agree that we do need more of the dual builds to see different solutions to various model problems that arise . If not dual , then just more build reviews in general to give the follow modeller a better understand on how the kit goes together .

With the corrections which you are making along the way and Jean-luc doing out of the box this is a perfect exsample of this !


Cheers to the both of you
Merlin
Staff MemberSenior Editor
AEROSCALE
#017
_VISITCOMMUNITY
United Kingdom
Joined: June 11, 2003
KitMaker: 17,582 posts
AeroScale: 12,795 posts
Posted: Wednesday, February 17, 2010 - 09:13 AM UTC
Hi again

I was planning to use LifeColor acrylics throughout except for some Modelmaster metallics, but the colour scheme I'm doing has the classic black surround to the exhausts. It's much easier to paint this before fitting the exhausts and I tried acrylic black, but it soon got scuffed, so I've done a little cheat and gone for some good old enamel gloss black for maximum toughness:


Now, at this point, I don't know if I've missed something and really messed up or not... when I came to test-fit the engine section, I found that it just wouldn't fit over/around the exhaust "boxes" (Parts Y17 and 29). Even with the openings eased a bit, there was a whopping great gap under the nose:


Extra filing soon fixes the problem, but I recommend that you check the fit early, before doing a lot of work on the engine, and certainly before joining it to the firewall.

All the best

Rowan
Kornbeef
_VISITCOMMUNITY
England - South East, United Kingdom
Joined: November 06, 2005
KitMaker: 1,667 posts
AeroScale: 1,551 posts
Posted: Wednesday, February 17, 2010 - 01:12 PM UTC
quite a substantial gap.....nice recovery work though

I so want this kit...but have to resist.

Merlin
Staff MemberSenior Editor
AEROSCALE
#017
_VISITCOMMUNITY
United Kingdom
Joined: June 11, 2003
KitMaker: 17,582 posts
AeroScale: 12,795 posts
Posted: Wednesday, February 17, 2010 - 10:17 PM UTC

Quoted Text

quite a substantial gap.....nice recovery work though

I so want this kit...but have to resist.


Hi Keith

To be fair to Eduard, the pic does risk over-dramatising the problem (if there is one - I'm keen to see if Jean-Luc also finds the fit a bit tight). It's really just a question of a little trimming needed on each surface, but the combined effect without that is the gap.

The easiest thing to do is to check the fit early - before assembling the engine compartment - and, if I were building the kit again, I'd double-check that the exhaust boxes are a really snug fit inside the contours of the nose and attach them before painting the rest of the compartment.

I'll try to do some more work on the kit this afternoon - remember, my target was to get the interior fitted... Eeek!

All the best

Rowan
NickZour
_VISITCOMMUNITY
Attica, Greece / Ελλάδα
Joined: May 01, 2008
KitMaker: 1,437 posts
AeroScale: 1,241 posts
Posted: Thursday, February 18, 2010 - 04:57 AM UTC
Awesome dual build


Cheers Nick
Merlin
Staff MemberSenior Editor
AEROSCALE
#017
_VISITCOMMUNITY
United Kingdom
Joined: June 11, 2003
KitMaker: 17,582 posts
AeroScale: 12,795 posts
Posted: Thursday, February 18, 2010 - 08:58 AM UTC
Hi again

Well, I'm just about on target to get the interior fitted tonight. I'll add items like the shoulder straps, guns and the coolant tank after everything's safely installed:


Now to see if it all fits...

All the best

Rowan
Merlin
Staff MemberSenior Editor
AEROSCALE
#017
_VISITCOMMUNITY
United Kingdom
Joined: June 11, 2003
KitMaker: 17,582 posts
AeroScale: 12,795 posts
Posted: Thursday, February 18, 2010 - 09:34 AM UTC
Hi again

And the answer is.... yes!:


Now to get the wings on.

All the best

Rowan
TedMamere
_VISITCOMMUNITY
Moselle, France
Joined: May 15, 2005
KitMaker: 5,653 posts
AeroScale: 4,347 posts
Posted: Thursday, February 18, 2010 - 08:31 PM UTC
Hi Rowan,

You are too fast! Time to catch up a little...

Same Kit, same problems: I also had to work on part W1 so to get it to fit inside the fuselage. If you sand just a little (red areas on photo) the part will move inside smoothly...


The engine back and the gun mounting are finished. I didn't spent to much time painting the latter since I will glue the gun cowling in the closed position later...


I still have to add the seatbelts, but the cockpit is done as well. To the contrary of Rowan, I have used the pre-painted PE parts from the kit...


Though fitting the sub assemblies inside the fuselage seems fiddly, obviously it worked well for Rowan...

Jean-Luc
 _GOTOTOP