Texas, United States
Joined: February 01, 2007
KitMaker: 365 posts
AeroScale: 356 posts
Posted: Tuesday, March 16, 2010 - 09:47 AM UTC
Hello All,
The following are from one of my ongoing WW I Projects.I hope you enjoy. For this project I'll be converting Revell's old Fokker Dr.I into a Fokker E.V/D.VIII in 1/28 scale. Currently this nearly stalled due to my other project also posted in the Two Seater Campaign. So updates may be rather slow in coming ,but rest assured the build is continuing.
The Donor Kit..... A 1965 Edition Kit

The Fun Begins,It's Surgery Time

The first task was to cut down the fuselage to the configuration of the E.V. Followed by beginning the work on the interior.


More to follow in the next post.
Texas, United States
Joined: February 01, 2007
KitMaker: 365 posts
AeroScale: 356 posts
Posted: Tuesday, March 16, 2010 - 09:59 AM UTC
The saga continues with the semi completed interior.


By the time I had reached this point my poor eyes were just about shot,so leaving the small details behind for the major surgery of the wings. Thank you Fine Scale Modeler.
As per the FSM article the three wing were cut into pieces to build the one.


To Be Continued.........
Texas, United States
Joined: February 01, 2007
KitMaker: 365 posts
AeroScale: 356 posts
Posted: Tuesday, March 16, 2010 - 10:36 AM UTC
The Wing Saga Moves Forward..........
Both the upper and lower sections of the wing. You'll notice the heavily reinforced sections,this is a trick I learned from building vacuform kits to prevent drooping. But in this case it serves to keep Frankenwing together,

The basic Frankenwing all together now.


All sanded and primed and ready to go,but no it's time to try a new trick and take a chance on fowling up the whole thing.
Pause to insert a comment from my loving wife..... "What Are You Mental,You're Going To Mess It All Up". No my friends not going mental here but possibly crazy. After reading elsewhere about the wing structure covering sagging in I decided to attempt the same thing on Frankenwing.


Since these photos were taken the wing has been painted and woodgrained and more of the interior details done.Now that I have my camera back I'll post more as soon as I have something worth posting. Thanks for looking and as always any comment pro or con are most welcomed and appreciated.
Regards,
Gregory Jouette

Arizona, United States
Joined: December 12, 2008
KitMaker: 1,423 posts
AeroScale: 1,319 posts
Posted: Tuesday, March 16, 2010 - 11:52 AM UTC
Hi Gregory: Nice work so far, especially on the interior framing. Can you give the FSM issue#. I know I have it here somewhere. Let me see now...........

Looking forward to more. Thanks for posting these here.
L8R
Mark

We few, we happy few........
Västra Götaland, Sweden
Joined: February 19, 2010
KitMaker: 1,473 posts
AeroScale: 1,450 posts
Posted: Tuesday, March 16, 2010 - 06:30 PM UTC
Hi Gregory, really nice progress so far the interior looks great, love the framework. Really interesting to see your approach to the wing looking forward to seeing more of it with paint on

Thanks for showing these
Best Regards
Mikael
_________________________________________________________
Just finished the Wingnut Wings Taube. On to the Junkers D.1
Milano, Italy
Joined: November 30, 2007
KitMaker: 642 posts
AeroScale: 382 posts
Posted: Tuesday, March 16, 2010 - 08:26 PM UTC
Hi Gregory!
you keep surprising me! Stunning work!
ciao
Edo
Alberta, Canada
Joined: January 19, 2008
KitMaker: 6,743 posts
AeroScale: 6,151 posts
Posted: Wednesday, March 17, 2010 - 12:25 AM UTC
Well my friend , it's about time you finally shared this project with us

Excellent job done on the framing and the plywood panels . Love the cup effect on the wing !
Texas, United States
Joined: February 01, 2007
KitMaker: 365 posts
AeroScale: 356 posts
Posted: Wednesday, March 17, 2010 - 01:19 AM UTC
Thanks to everyone for their kind words.I very much appreciate it.
Mark the issue was November 1989 FineScale Modeler. Great article if you don't have this issue I can scan it and get it to you.Just let me know if you need it.
Mikael thanks for your comments.You will be seeing a much more complete framework coming soon along additional work to the wing.
Edo I am not sure I would call this project stunning just yet myself.But thanks for your more than kind words. I can only hope I live up to your comments.
Terri you're right I've rather slow getting this posted here, But the project thread is posted on several other sites. Thanks for your comments on the woodgraining,it took multiple attempts before it looked right to me. The wing itself wasn't that difficult to put together.The mapping out of the wings internal structure for the cupping was no doubt the worse of it.
Regards,
Gregory Jouette
Texas, United States
Joined: February 01, 2007
KitMaker: 365 posts
AeroScale: 356 posts
Posted: Thursday, March 18, 2010 - 06:28 AM UTC
Here's the latest update on this project.
Additional work on the interior framework,


With the floor board and assorted details.

The completed engine with only a light oil wash to date.


Texas, United States
Joined: February 01, 2007
KitMaker: 365 posts
AeroScale: 356 posts
Posted: Thursday, March 18, 2010 - 06:37 AM UTC
Texas, United States
Joined: February 01, 2007
KitMaker: 365 posts
AeroScale: 356 posts
Posted: Thursday, March 18, 2010 - 06:45 AM UTC
An overhead view of the upper/lower wing surface.


Misc. odds and ends.

That bring you all up to date on this project. Thanks for taking a look and i hope you're enjoying this project as much as I am. Until the next update.........
Regards,
Gregory Jouette
Västra Götaland, Sweden
Joined: February 19, 2010
KitMaker: 1,473 posts
AeroScale: 1,450 posts
Posted: Thursday, March 18, 2010 - 07:21 AM UTC
Looking really good Gregory, I do like the woodgrain effect on your wing and the interior and engine are coming along very well indeed. How are you going to tackle struts and landing gear?
Keep up the great work!
Best Regards
Mikael
_________________________________________________________
Just finished the Wingnut Wings Taube. On to the Junkers D.1
Arizona, United States
Joined: December 12, 2008
KitMaker: 1,423 posts
AeroScale: 1,319 posts
Posted: Thursday, March 18, 2010 - 08:17 AM UTC
Thanks for the info on the FSM issue. I think you are doing a truly outstanding job to date. The wing looks great, and your interior work is noteworthy to say (type) the least. I may just tackle this project at some point in time following your build blog here on Aeroscale.

Mark
We few, we happy few........
Texas, United States
Joined: February 01, 2007
KitMaker: 365 posts
AeroScale: 356 posts
Posted: Sunday, April 11, 2010 - 09:44 AM UTC
Hello All,
Time for another update on my E.V project. The fuselage is now closed and soon to be given a coat of primer.


Needs a little correction here.

Showing off the much rework kit prop.Still lacking the boss bolt heads and decals.

More to come............
Texas, United States
Joined: February 01, 2007
KitMaker: 365 posts
AeroScale: 356 posts
Posted: Sunday, April 11, 2010 - 09:49 AM UTC
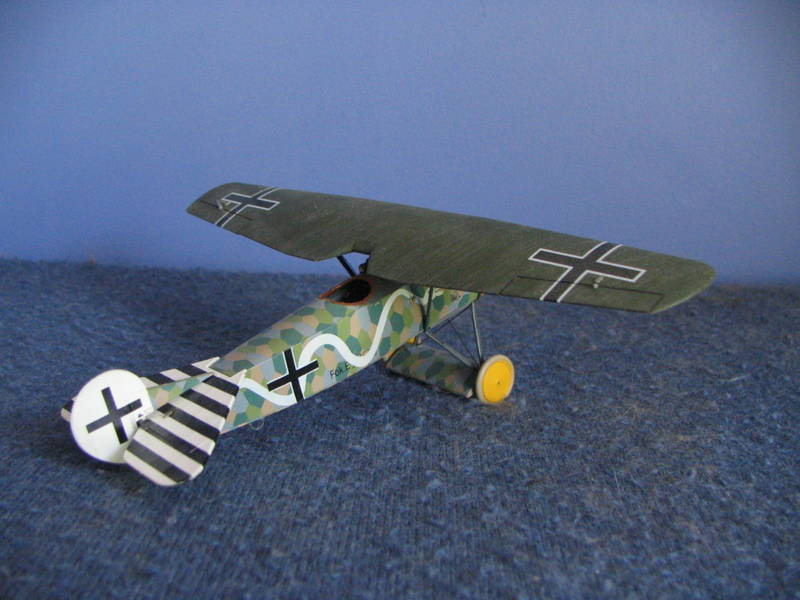
Here's a mock up with some of the completed bit and pieces.


That's all for now. As always any and all comments are welcomed and appreciated.
Regards,
Gregory Jouette
Texas, United States
Joined: February 01, 2007
KitMaker: 365 posts
AeroScale: 356 posts
Posted: Sunday, April 11, 2010 - 09:57 AM UTC
Hey Guys and Gals,
I have a couple of questions for all you Fokker Fans here on the forum. First was the gear wing camouflaged as the wing or should it be painted in solid Fokker green as the Dr.I was? Second, just what color would the underside stitching be? I've seen it in black but to my eyes it just doesn't look right. Thanks in advance for all your help and support.
Regards,
Gregory Jouette
Indiana, United States
Joined: May 14, 2007
KitMaker: 3,117 posts
AeroScale: 2,270 posts
Posted: Sunday, April 11, 2010 - 10:44 AM UTC
Super build. Can't help with your questions though.
"Treat 'em Rough", Current Builds--Wingnut Rumpler
I am frequently seen with blood shot eyes from staying up past my nap time to get the right colour scheme on my latest WWI model?
Colorado, United States
Joined: January 25, 2004
KitMaker: 11,669 posts
AeroScale: 11,011 posts
Posted: Monday, April 12, 2010 - 02:57 AM UTC
Quoted Text
Hey Guys and Gals,
I have a couple of questions for all you Fokker Fans here on the forum. First was the gear wing camouflaged as the wing or should it be painted in solid Fokker green as the Dr.I was? Second, just what color would the underside stitching be? I've seen it in black but to my eyes it just doesn't look right. Thanks in advance for all your help and support.
Regards,
Gregory Jouette
The axle wing was plywood skinned and painted dk grn on the upper surface with a bit of a wrap on the leading edge and lt. blue underside. The lacings would probably have been a natural cream / blonde colour and would be muted (with the rest of the undersurface colours) by the burned castor / synthetic oil exhaust.
". . .The most important thing is to know why you build and then get the most that you can out of building." via D.D.
Texas, United States
Joined: February 01, 2007
KitMaker: 365 posts
AeroScale: 356 posts
Posted: Tuesday, April 13, 2010 - 09:00 AM UTC
Carl and Stephen,
Thanks guys much appreciated.
Stephen,
I've planned to finish this project in Osterkampt's black and yellow strips,I understand that the paint scheme may be a work of fantasy and that it's wing may have been painted to resemble the lozenge printed fabric.This information was passed to me by Dan-San .What is your opinion on the black and yellow scheme? Any input you may be able to pass along concerning Osterkampt's E.V would be greatly appreciated.
Regards,
Gregory Jouette
Indiana, United States
Joined: May 14, 2007
KitMaker: 3,117 posts
AeroScale: 2,270 posts
Posted: Tuesday, April 13, 2010 - 10:20 AM UTC
I think it is a great looking scheme, and it is not like there is any photographic evidence to prove it doesn't exist.

I have seen a lot of conjecture that the scheme in fact never existed. The sources, like Dan San are very knowledgable, and there is no reason to doubt them. So, you should decide if you want to do it even if it is conjecture. On the other hand, tthere are some really colorful schemes you can choose from.
It took my about a dozen tries to get that photo posted from my gallery. Now I know why I use photobucket.
"Treat 'em Rough", Current Builds--Wingnut Rumpler
I am frequently seen with blood shot eyes from staying up past my nap time to get the right colour scheme on my latest WWI model?
Colorado, United States
Joined: January 25, 2004
KitMaker: 11,669 posts
AeroScale: 11,011 posts
Posted: Tuesday, April 13, 2010 - 04:29 PM UTC
Quoted Text
". . .Stephen,
I've planned to finish this project in Osterkampt's black and yellow strips,I understand that the paint scheme may be a work of fantasy and that it's wing may have been painted to resemble the lozenge printed fabric.This information was passed to me by Dan-San .What is your opinion on the black and yellow scheme? Any input you may be able to pass along concerning Osterkampt's E.V would be greatly appreciated. Regards, Gregory Jouette"
Here are a few comments that I gleaned when I did the review for the Eduard 1:48 Weekend kit.
here. ". . .The most important thing is to know why you build and then get the most that you can out of building." via D.D.
Västra Götaland, Sweden
Joined: February 19, 2010
KitMaker: 1,473 posts
AeroScale: 1,450 posts
Posted: Tuesday, April 13, 2010 - 09:54 PM UTC
Hi Gregory,
Looking real good I'm very impressed with you body reconstruction You're at the same stage as me, with your build at the moment. Hope to see more from you soon.
Best Regards
Mikael
_________________________________________________________
Just finished the Wingnut Wings Taube. On to the Junkers D.1
Alberta, Canada
Joined: January 19, 2008
KitMaker: 6,743 posts
AeroScale: 6,151 posts
Posted: Wednesday, April 14, 2010 - 02:12 AM UTC
I'm really happy that you are continuing on with this build . The fuselage looks great ! Love the prop too, very nicely done . Looking forward to the next up-date .
Texas, United States
Joined: February 01, 2007
KitMaker: 365 posts
AeroScale: 356 posts
Posted: Wednesday, April 14, 2010 - 12:48 PM UTC
Evening Guys and Gals,
Time for another small update today.Since Monday I've been doing some additional work on the fuselage . More putty and sanding to eliminate the wavy sides .It was nearly impossible to see in the last update but when you run a finger down the sides you sure feel them. Once I was satisfied the fuselage opening were masked the primed using Tamiya's Primer in a rattle can.
Here's the results.

Corrected the cockpit opening,well nearly but with the cockpit padding installed it should look right.


You'll notice that I've also cut the control surfaces away for the tail and rudder.The tail is a kit part which is slightly over scale but not enough to be replaced. I've also since Monday completed the prop boss nuts and the tail skid.One other item I'm working on is the struts,but very slowly due to fowl ups on my part. Sorry no more photos for this update,but once my camera's batteries are charged the rest will be in a follow up later on.
Thanks for looking .As alway any and all comments are welcomed and appreciated.
Regards,
Gregory Jouette
Västra Götaland, Sweden
Joined: February 19, 2010
KitMaker: 1,473 posts
AeroScale: 1,450 posts
Posted: Saturday, April 17, 2010 - 04:51 AM UTC
Gregory Looking real nice and smooth from this angle

Best Regards
Mikael
_________________________________________________________
Just finished the Wingnut Wings Taube. On to the Junkers D.1


