World War II
Discuss WWII and the era directly before and after the war from 1935-1949.
Hosted by Rowan Baylis
Cyber-Hobby (Dragon) 1:48 Bf 110D
Merlin
Staff MemberSenior Editor
AEROSCALE
#017
_VISITCOMMUNITY
United Kingdom
Joined: June 11, 2003
KitMaker: 17,582 posts
AeroScale: 12,795 posts
Posted: Wednesday, May 05, 2010 - 08:45 AM UTC
Hi Andreas

I can pass on suggestions, but you have to be aware that not all of them are accepted. It's usually a matter of pure economics - a number of features discussed for the 1:48 kit didn't quite make it (although I live in hope that some may appear yet in future versions). The big success was the last minute provision for what we've christened "Steffen Slats" - although Steffen was totally unaware that I was pitching for their inclusion at the time.

All the best

Rowan
GastonMarty
_VISITCOMMUNITY
Quebec, Canada
Joined: April 19, 2008
KitMaker: 595 posts
AeroScale: 507 posts
Posted: Friday, May 07, 2010 - 10:02 AM UTC

Quoted Text

A clear advantage of the Dragon kit in comparison to the ED is the width of the rear fuselage (behind the cockpit section). The Eduard kit is much too shallow (even worse than the Fujimi), wouldn´t work with a real plane. The "upper curve" from the fuselage sides to the top is a bit sharp, this must be sanded - an item that is more confidental with the Fujimi and the ED kit. The cross-section of this part of the plane as a close relation to that of the 109.
The nose looks better than the ED which appears to be too long (Fujimi`s is too short).
As on the ED kit the kink on the trailing edge of the main wing is missing (but it appears correctly on the Fujimi). BUT I have to consider that ED might have changed the moulds. I saw a G-4 in a show which had the kink (my two kits of early production runs don´t have them).
Can`t tell on the engines/nacelles now.
Cheers
Andreas


I am sorry but I do not understand at all what you are saying: You say the Dragon is better in width, then that the Eduard is too shallow, which implies a vertical issue: The two dimensions are at 90° to each other!

Also you seem to imply the Dragon 110 spine is too sharp, pointing out that the real-life similitude should be close in appearance to a Me-109... Yet the real-life Me-109 had an extremely sharp spine! I measured the Hasegawa 1/48th Me-109 spine, at frame 4, to be 82 mm wider(!!!!), at 100 mm profile depth from the spine's top, than the unrestored Ottawa National Air Museum's Me-109F: 254 mm actual width vs 336 mm Hasegawa...

That is well over a 3.2 inches error in a very small and narrow dimension... Only the upcoming Zvezda Me-109F kit has ever depicted this correctly among all the Me-109 kits...

So I doubt the Dragon spine could be too sharp if it should in fact match a real Me-109...

Interesting and very useful point about the 110 trailing edge kink...

The biggest problem by far with the Eduard kit, that I think Dragon seems to have fixed, is that the plan view of the real canopy "swells" wider in the middle very slightly, while the Eduard, it seems to me like all other 110 kits, has the canopy sides in plan view as two near-paralell straight lines! This "swelling" is especially noticeable on the top corner edge of the canopy...

However, this not just a canopy issue, but a fuselage top half cross-section "swelling" issue as well...

Quite an enormous problem I would think!

This is only an impression I got from small photos of the Dragon kit clear part, but the "swell" appears to be there in the real aircraft, making the canopy's mid-section look wider (especially at the top edge) compared, it seems to me, to all Me-110 kits previous to the Dragon (In 1/32 I think Dragon got the "swelling" correct also)...:


http://www.warbirdphotographs.com/LCBW7/Me110-19bf+.jpg

It would be nice if someone with the 1/48th Dragon kit would confirm my impression of this point (or of the wrongness or not of the Eduard kit's canopy plan-view "swelling" if I am mistaken), and clarify what I did not understand from the quoted post above...

Gaston


AndreasBeck
_VISITCOMMUNITY
Germany
Joined: October 28, 2007
KitMaker: 24 posts
AeroScale: 17 posts
Posted: Monday, May 10, 2010 - 05:47 AM UTC
Hi Gaston,
Well, it´s always a problem to describe a geometrical problem in words, so missunderstandings arise quickly. I try it again hoping to get it.
If we take the fuselage cross section between cockpit and tailplain it looks (very roughly) like an egg. Relatively broad in the lower section, then moving upwards the sidewalls to make a decent and smooth continous curve to the spine which appears to be rather "pointed". This is a common feature of the 109 and the 110. This curve has been captured quite well in the Eduard and Fujimi kits while the Dragon kit has "too vertical" side walls thus forcing them in a quite extreme curve to the spine. Leaving this aside the Dragon fuselage seems to have a confidental broadness while the Eduard kit is much too narrow specialy towards the tailplane.
OOF, did I get it ??
Cheers
Andreas
GastonMarty
_VISITCOMMUNITY
Quebec, Canada
Joined: April 19, 2008
KitMaker: 595 posts
AeroScale: 507 posts
Posted: Monday, May 10, 2010 - 06:57 PM UTC
Understood very well now Andreas!

These types of things are very hard to judge from photos, and good photos that make it easy to see are hard to find: I will look around and post my fidings on what you say about the tail, especially if I find the ever-rare plan-view photo!

If you have photos that illustrate your points, please post them here if you can...

Thanks for your explanation!

Gaston
Merlin
Staff MemberSenior Editor
AEROSCALE
#017
_VISITCOMMUNITY
United Kingdom
Joined: June 11, 2003
KitMaker: 17,582 posts
AeroScale: 12,795 posts
Posted: Monday, May 10, 2010 - 10:47 PM UTC
Hi again

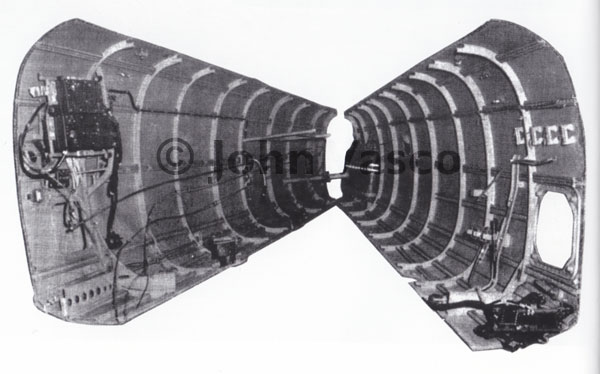
Here's a useful shot of the fuselage cross-section from John Vasco's excellent "Bf 110C, D and E - An Illustrated Study" Ian Allan (Classic) 2008. I recommend it unreservedly to anyone building an early version Bf 110:


All the best

Rowan
AndreasBeck
_VISITCOMMUNITY
Germany
Joined: October 28, 2007
KitMaker: 24 posts
AeroScale: 17 posts
Posted: Tuesday, May 11, 2010 - 06:44 PM UTC
Thanks for sharing, Rowan !!!
Dragon is very close to the real thing.
Ciao
be
alpha_tango
_VISITCOMMUNITY
Germany
Joined: September 07, 2005
KitMaker: 5,609 posts
AeroScale: 5,231 posts
Posted: Tuesday, May 11, 2010 - 08:06 PM UTC
Hi guys and esp. Rowan

Could you please provide some more constructive input to your build log? I know this may sound like a revolutionary idea, but I would like to see more of the work on the kit

cheers

Steffen
Merlin
Staff MemberSenior Editor
AEROSCALE
#017
_VISITCOMMUNITY
United Kingdom
Joined: June 11, 2003
KitMaker: 17,582 posts
AeroScale: 12,795 posts
Posted: Tuesday, May 11, 2010 - 08:09 PM UTC
Hi Steffen

Sorry, I'm tied up with other things - I've had no time for modelling. I'll try to do a bit later this week.

All the best

Rowan
GastonMarty
_VISITCOMMUNITY
Quebec, Canada
Joined: April 19, 2008
KitMaker: 595 posts
AeroScale: 507 posts
Posted: Wednesday, May 12, 2010 - 04:37 PM UTC

Extremely useful photo to judge the tail cross-section, Rowan!

My congratulations and much appreciated: I will compare immediately to the Eduard tail...

Gaston
GastonMarty
_VISITCOMMUNITY
Quebec, Canada
Joined: April 19, 2008
KitMaker: 595 posts
AeroScale: 507 posts
Posted: Wednesday, May 12, 2010 - 05:02 PM UTC

I've checked and I agree fully with the analysis of Andreas: The Eduard kit is mildly lacking in squareness of cross-section, but this gets increasingly severe towards the tailplanes where it really becomes obvious: The spine on the Eduard kit is simply too sharp and lacks a flat area on top as you near the tailplanes...:

http://www.warbirdphotographs.com/LCBW7/Me110-19bf+.jpg

http://www.warbirdphotographs.com/LCBW5/Me110-B-1s.jpg

I tend to consider tail cross-section issues as less severe than any nose issues, but still, I'd rather have it all since some kits can do it...

This is not catastrophic for Eduard, but some of the real "squareness" is missing there...

I can't wait for the Dragon 110G now... If they pork-up the nose, at least the Eduard nose still looks good to me...

Gaston
Merlin
Staff MemberSenior Editor
AEROSCALE
#017
_VISITCOMMUNITY
United Kingdom
Joined: June 11, 2003
KitMaker: 17,582 posts
AeroScale: 12,795 posts
Posted: Wednesday, May 19, 2010 - 12:25 AM UTC
Hi again

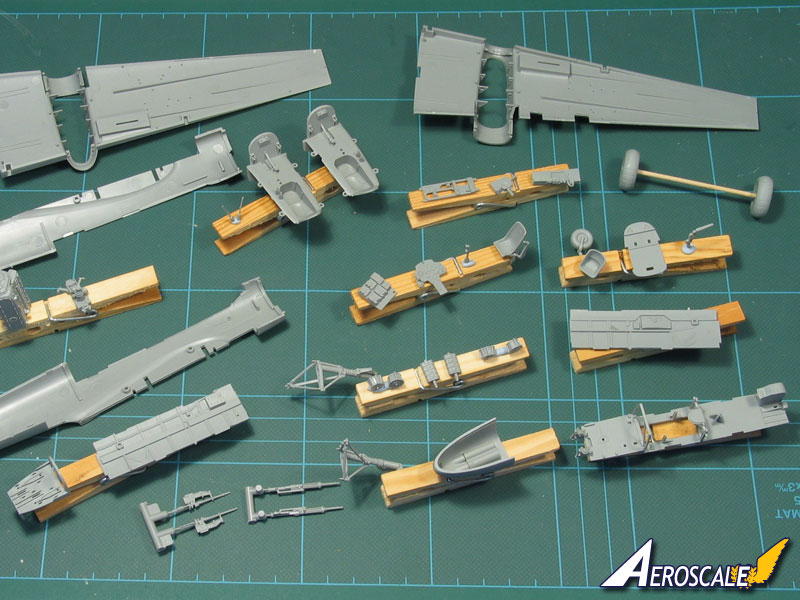
Sorry for the apparent lack of progress (what with the way life and Aeroscale admin have a habit of distracting, I probably shouldn't have started the thread until I was firmly underway ), but I haven't been entirely idle.

I've been preparing parts and sub-assemblies when I've had a free hour, and the plan is to start throwing paint at them today:


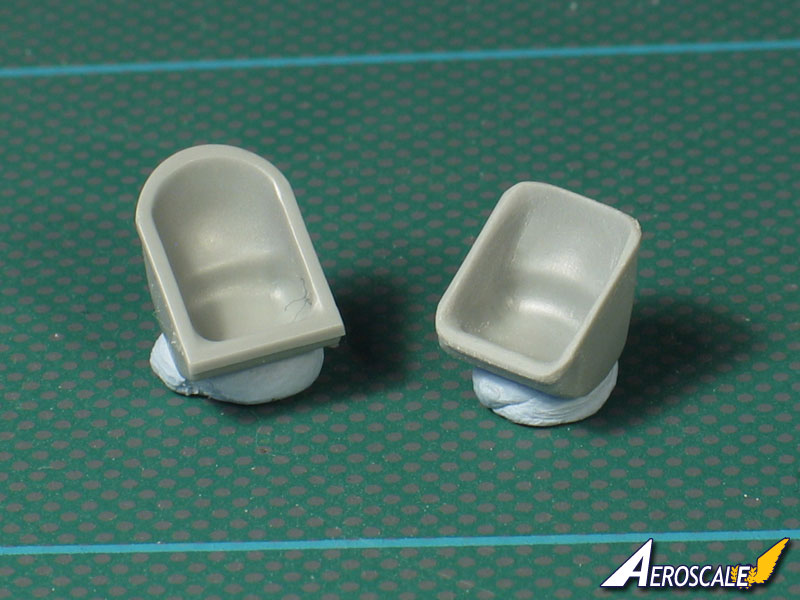
One change I've made is to thin down and re-shape the gunner's seat somewhat. There might actually have been more than one style, but compared with the original kit item (on the left) it now matches the reference photos I have a bit better:


More to follow soon, I hope.

All the best

Rowan
alpha_tango
_VISITCOMMUNITY
Germany
Joined: September 07, 2005
KitMaker: 5,609 posts
AeroScale: 5,231 posts
Posted: Wednesday, May 19, 2010 - 01:43 AM UTC
Hi Rowan

Finally!!! Looks good so far. the rear seat is kind f a mystery to me .. I never known in which version the bench seat was introduced and which seat variations existed .. also if and where seat belts were attached. You modified item looks much better that the original kit part! (compared to John Vascos pics of the 110C interior)

cheers

Steffen
ShawnM
_VISITCOMMUNITY
Missouri, United States
Joined: November 24, 2008
KitMaker: 564 posts
AeroScale: 510 posts
Posted: Wednesday, May 19, 2010 - 01:58 AM UTC
gunners seat looks good, that style seat was pretty typical and your thinning work looks the part.
These Dragon kits make me wish I'd never started the revell one.
Merlin
Staff MemberSenior Editor
AEROSCALE
#017
_VISITCOMMUNITY
United Kingdom
Joined: June 11, 2003
KitMaker: 17,582 posts
AeroScale: 12,795 posts
Posted: Wednesday, May 19, 2010 - 04:51 AM UTC
Cheers guys

I will try to keep some momentum going now I've started.


Quoted Text

...the rear seat is kind f a mystery to me .. I never known in which version the bench seat was introduced and which seat variations existed ...


Hi Steffen, I remember reading about just that somewhere. It might have been in one of Monogram's books. I'll try to find the passage.

All the best

Rowan
Merlin
Staff MemberSenior Editor
AEROSCALE
#017
_VISITCOMMUNITY
United Kingdom
Joined: June 11, 2003
KitMaker: 17,582 posts
AeroScale: 12,795 posts
Posted: Monday, May 24, 2010 - 07:53 AM UTC
Hi again

I've been unwell for the last few days, so not as much progress to show as I'd hoped. But the interior's coming on quite well and I should have some pics to show of the cockpit tomorrow or the day after.

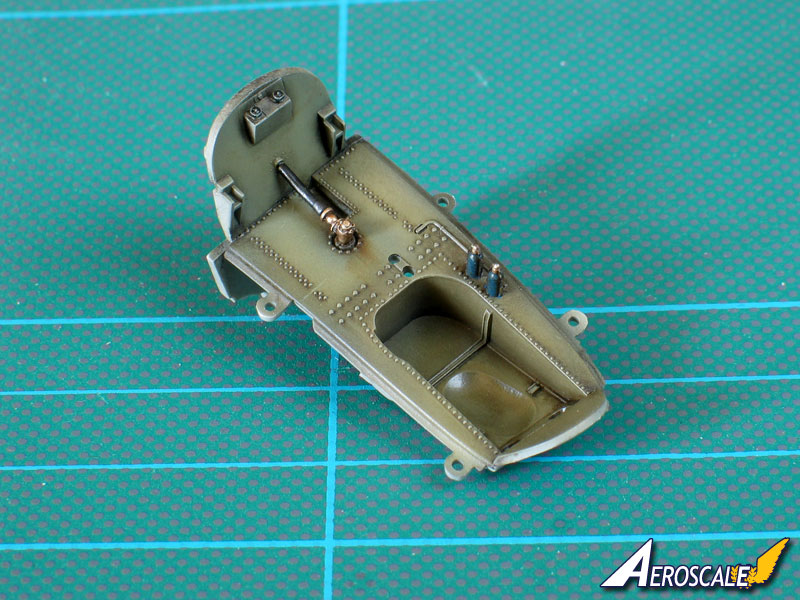
Meanwhile, the wheel-wells are done:


A test fit shows that it's perfectly possible to install the undercarriage after assembling the wings (the instructions show it fitted along with the wells), but it's very important to attach the lower nacelle fronts before installing the wells or you'll be in trouble:


All the best

Rowan
robot_
_VISITCOMMUNITY
United Kingdom
Joined: March 08, 2009
KitMaker: 719 posts
AeroScale: 691 posts
Posted: Monday, May 24, 2010 - 07:58 AM UTC
Rowan, that wheel well is amazing! How did you do the yellowy staining- washes or airbrushing? Or a combination of the two? Was any drybrushing involved?
Merlin
Staff MemberSenior Editor
AEROSCALE
#017
_VISITCOMMUNITY
United Kingdom
Joined: June 11, 2003
KitMaker: 17,582 posts
AeroScale: 12,795 posts
Posted: Monday, May 24, 2010 - 08:11 AM UTC
Hi Ben

Thank you very much for the kind words! Basically, I've pre-shaded all the interior with black enamel before painting with LifeColor RLM 02 acrylic, and sealing it with Klear (Future). Once that's dry, I've used a mix of Payne's Grey and Burnt Umber oils, applied neat - so it's not really a wash, more just scrubbed on. Once that's hardened a little (a couple of hours) I've removed the bulk of it with cotton buds and worked it with a brush. Finally, I've dry-brushed the highlights with lightened RLM 02.

Thanks again and all the best

Rowan
TedMamere
_VISITCOMMUNITY
Moselle, France
Joined: May 15, 2005
KitMaker: 5,653 posts
AeroScale: 4,347 posts
Posted: Monday, May 24, 2010 - 06:48 PM UTC
Hi Rowan,

Looks excellent so far...

Jean-Luc
alpha_tango
_VISITCOMMUNITY
Germany
Joined: September 07, 2005
KitMaker: 5,609 posts
AeroScale: 5,231 posts
Posted: Monday, May 24, 2010 - 08:23 PM UTC

Quoted Text

Hi Rowan,

Looks excellent so far...

Jean-Luc


Everything has been said but not yet by everyone, so:

Looks excellent so far...


and if I may add: keep at it!!!!!!!!!! (you know what I mean)

cheers

Steffen
AussieReg
Staff MemberAssociate Editor
AUTOMODELER
#007
_VISITCOMMUNITY
Victoria, Australia
Joined: June 09, 2009
KitMaker: 8,156 posts
AeroScale: 3,756 posts
Posted: Monday, May 24, 2010 - 10:22 PM UTC
Hi Rowan, guess what ?? I think it's looking excellent so far !! I'm just very disappointed that you didn't save this one up for ZERSTORER!! 2011 . Then again perhaps this is just a rough practice run and you will have a proper go next year.

And just so we're clear, I WILL be stealing lots of your ideas and techniques for my ZERSTORER, so pleeeeez post lots of progress pics here !!

Cheers, D
Merlin
Staff MemberSenior Editor
AEROSCALE
#017
_VISITCOMMUNITY
United Kingdom
Joined: June 11, 2003
KitMaker: 17,582 posts
AeroScale: 12,795 posts
Posted: Tuesday, May 25, 2010 - 03:17 AM UTC
Cheers guys

Thanks for the encouragement - I really appreciate it. I'm ploughing on, so I hope to have much more to show for my efforts soon.

Don't worry, Damian - I'll have something nice for your Campaign. Maybe Eduard's Bf 110G-4, or who knows what...

All the best

Rowan
chukw1
_VISITCOMMUNITY
California, United States
Joined: November 28, 2007
KitMaker: 817 posts
AeroScale: 729 posts
Posted: Tuesday, May 25, 2010 - 03:42 AM UTC
Brilliant work on that wheel well, my friend- very subtle and very convincing.
Cheers!
chuk
Merlin
Staff MemberSenior Editor
AEROSCALE
#017
_VISITCOMMUNITY
United Kingdom
Joined: June 11, 2003
KitMaker: 17,582 posts
AeroScale: 12,795 posts
Posted: Saturday, May 29, 2010 - 05:54 AM UTC
Hi again

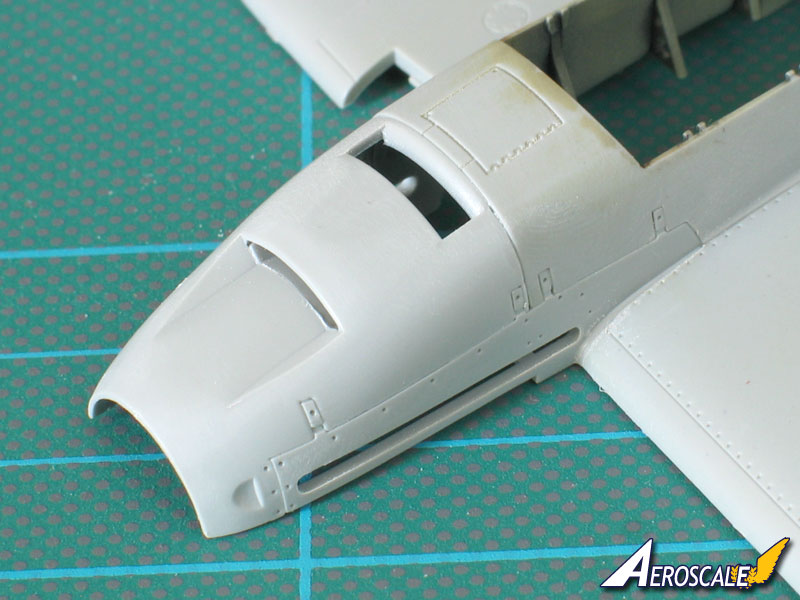
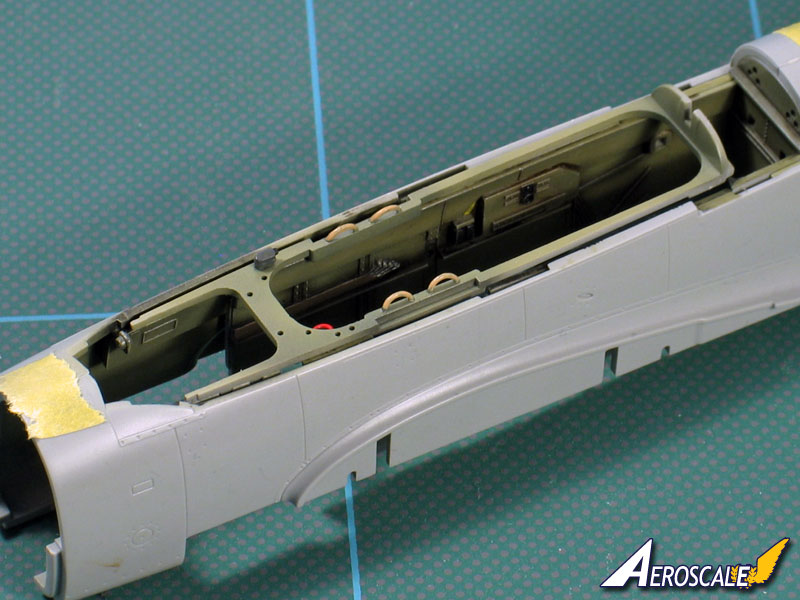
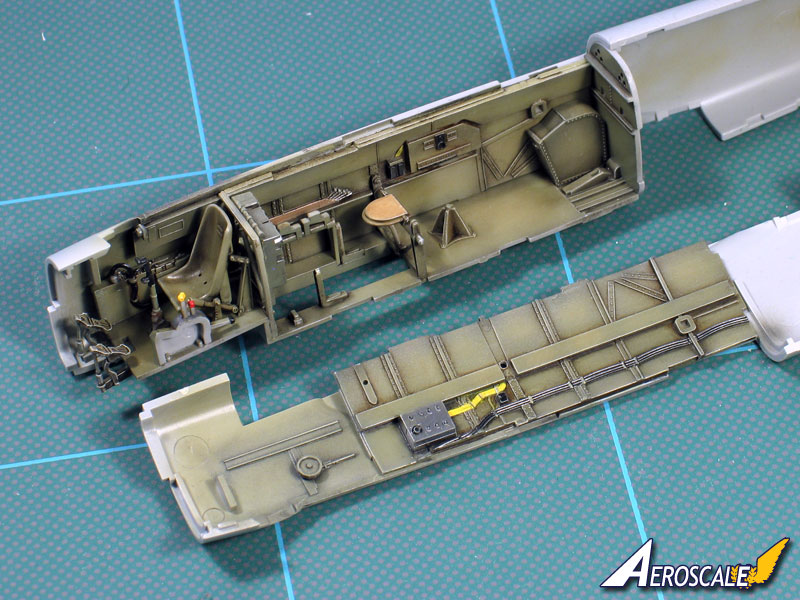
Well, the cockpit is coming on - still a bit to do, but I hope to install it tomorrow and close-up the fuselage:


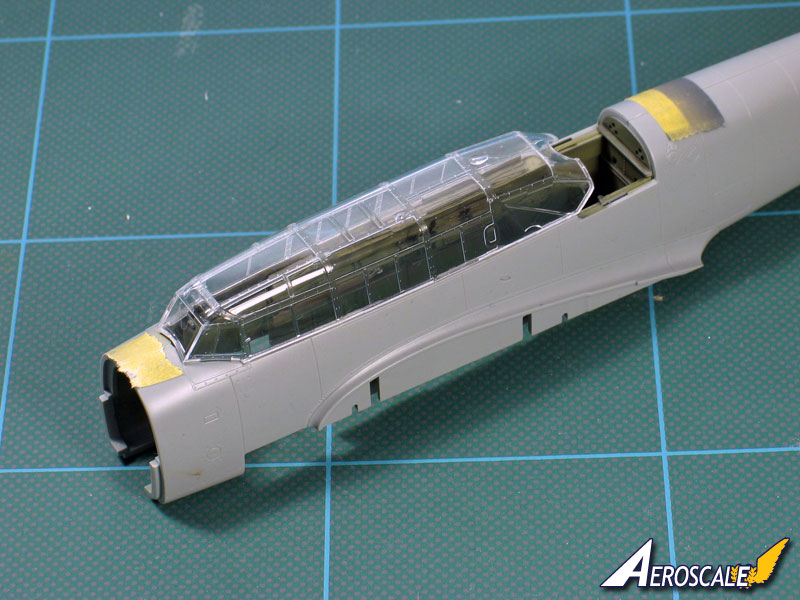
But, in preparing for that I've found a bit of a problem. With the fuselage halves taped together, the canopy is a pretty good fit:


But, underneath that, the cockpit "top decking" is both really loose and also sits too proud. If you clamp the fuselage sides tightly on it, the canopy no longer fits.:


It should be flush with the base of the canopy on the real thing, so I'm going to have to do a bit of crafty tinkering to sort something out.

All the best

Rowan
alpha_tango
_VISITCOMMUNITY
Germany
Joined: September 07, 2005
KitMaker: 5,609 posts
AeroScale: 5,231 posts
Posted: Saturday, May 29, 2010 - 05:58 AM UTC
Very nice, Rowan! You did not promise too much!

Someone wrote he likes the "new improved" Rowan (Andy?) ... though I wish you all the best, good luck and god's help with your hunt for a good salary I also like that you keep at the projects!!

So keep going!!

all the best

Steffen
Merlin
Staff MemberSenior Editor
AEROSCALE
#017
_VISITCOMMUNITY
United Kingdom
Joined: June 11, 2003
KitMaker: 17,582 posts
AeroScale: 12,795 posts
Posted: Saturday, May 29, 2010 - 07:20 AM UTC
Hi Steffen

My thanks for your kind words and wishes - I really appreciate them!

All the best

Rowan