_GOTOBOTTOM
Early Aviation
Discuss World War I and the early years of aviation thru 1934.
Eduard 1:48 Pfalz D.III wknd - Edo
edoardo
_VISITCOMMUNITY
Milano, Italy
Joined: November 30, 2007
KitMaker: 642 posts
AeroScale: 382 posts
Posted: Wednesday, May 12, 2010 - 10:01 PM UTC
Hi all!
I know, I know... I told you that for a little while I'd have stopped modelling to dedicate myself to other activities... but, what the heck!, why limit yourself when you can have both things?

So here I am with this new project.


It is a little one, indeed, just to fill a gap: I don't whant to start a major project since after the new fiscal year (which, to me, is after the summer hollidays). For that, I know you are curious , I have already bought a WNW Albatros DVa !!! . The downside of that was a custom duty of 15 € (almost 40% of the cost!), fortunately it was not entirely out of the blue, as others in the forum have already complained about it.

Ok, so here are some pics:

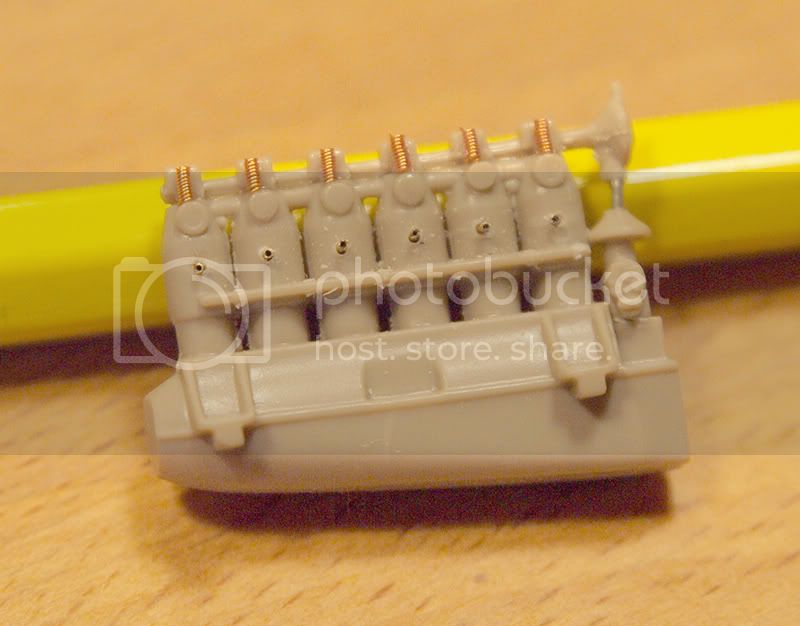
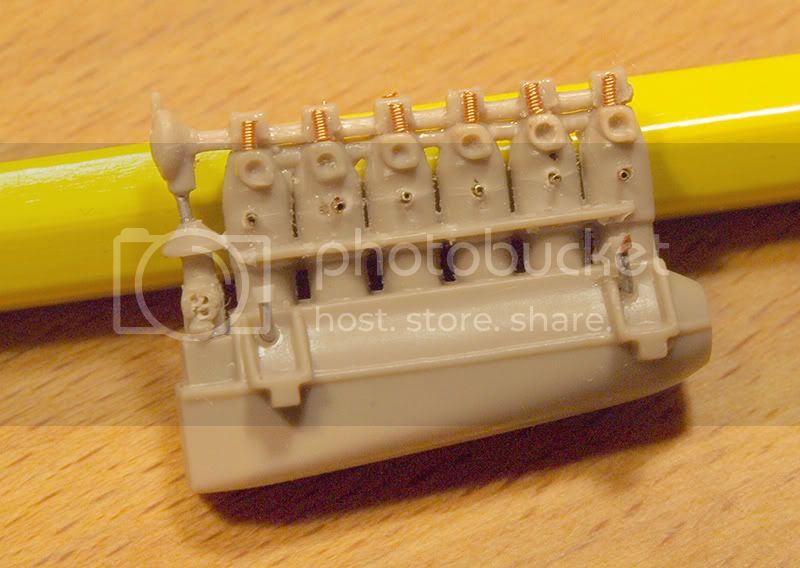
I started with the engine, which I tried to upgrade since the kit original proposal is very basic.
I drilled out the sparks that were replaced by 0,4 mm brass tube, added the springs on top of the chambers, last I drilled the chambers themselves to engrave them a bit.


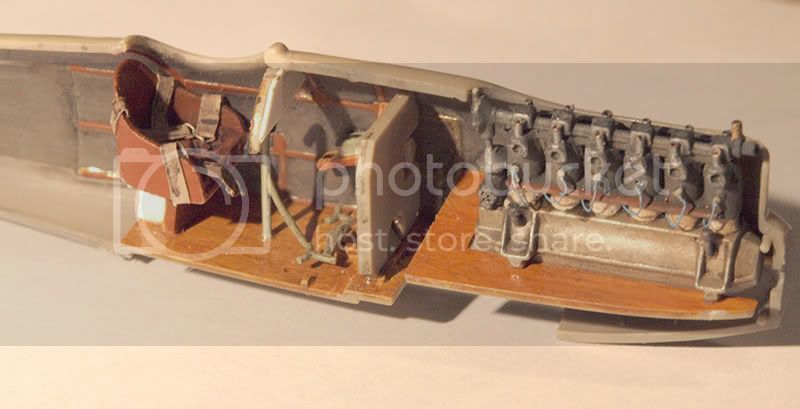
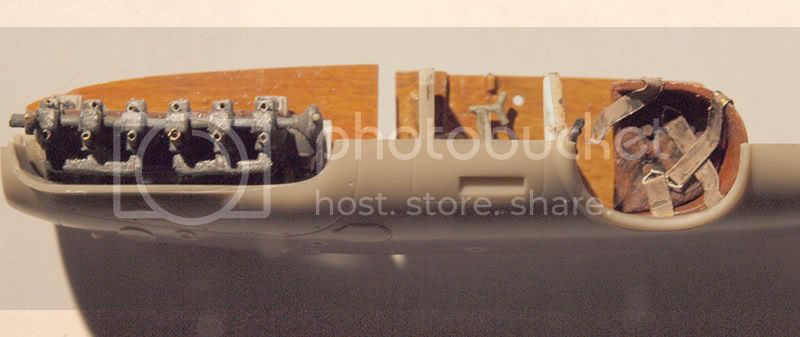
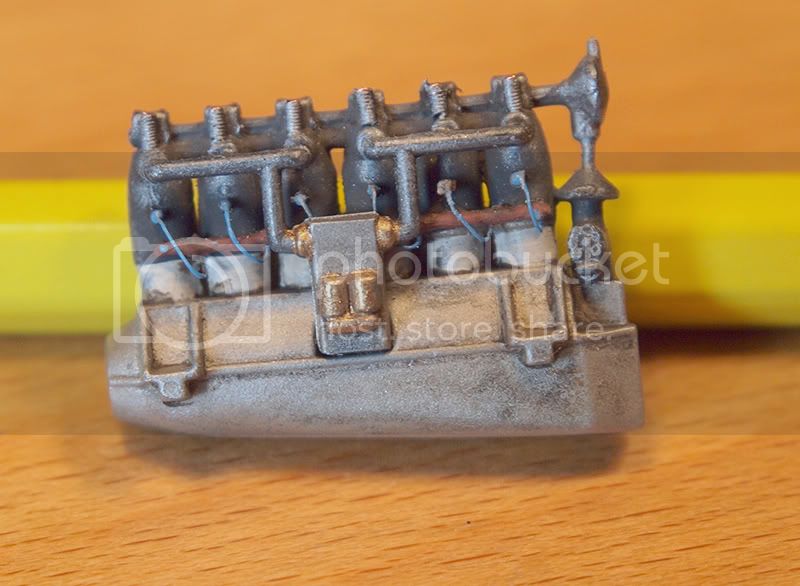
Here is an almost definitive result after adding the cableing and painting:


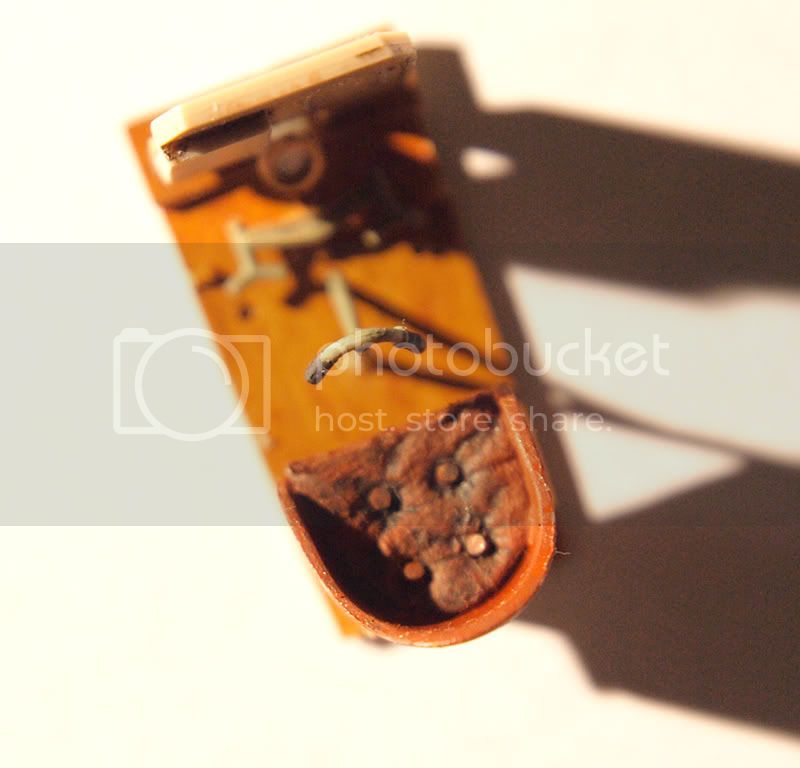
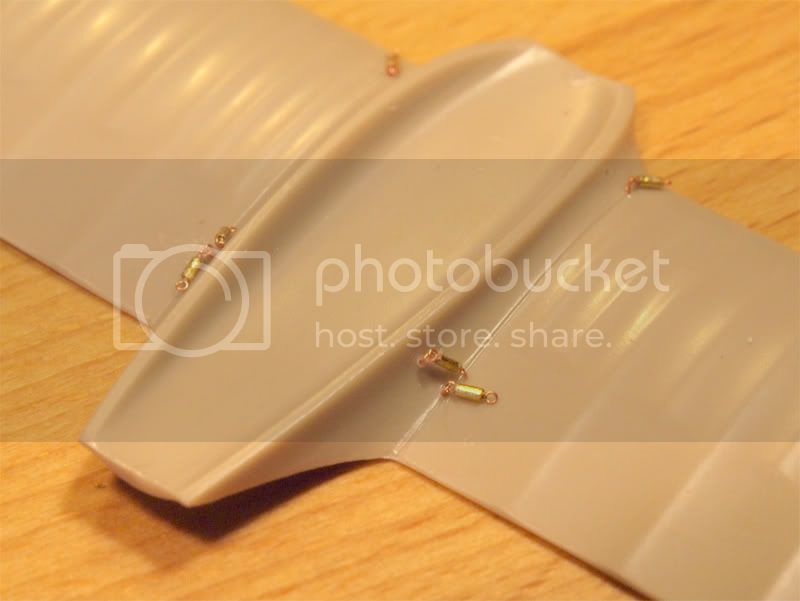
Then I started to plan for rigging. I started with the turnbuckles which I tried to make smaller then what I did for the F2B, but I fear I still have to work on that...


And that is all for now.
As usual, any comment is highly appreciated!

Ciao
Edo
thegirl
_VISITCOMMUNITY
Alberta, Canada
Joined: January 19, 2008
KitMaker: 6,743 posts
AeroScale: 6,151 posts
Posted: Wednesday, May 12, 2010 - 10:27 PM UTC
Hi Edo , great start on the worlds sexiest aircraft .

Nice job with the detail to the engine , but I do have a question . Are the turn buckles going to be in the way when you fill and sand the seem for the lower wing ? For some building tips there is the dual buld review which Mark and I did , just might be helpful for you on the rigging .

Looking forward to more progress , this will be cool when you get her done
edoardo
_VISITCOMMUNITY
Milano, Italy
Joined: November 30, 2007
KitMaker: 642 posts
AeroScale: 382 posts
Posted: Wednesday, May 12, 2010 - 11:04 PM UTC
Ouch Terri!
I have not thought about the seams!!!

Kornbeef
_VISITCOMMUNITY
England - South East, United Kingdom
Joined: November 06, 2005
KitMaker: 1,667 posts
AeroScale: 1,551 posts
Posted: Thursday, May 13, 2010 - 12:41 AM UTC
Edo, nice start and I'm glad I'm not the only one who does little ouchies like that. Good of Terri to point it out now rather than later though. I'm not sure either I'm upto tackling 1/48th turnbuckles either

Nice start.

K
gajouette
_VISITCOMMUNITY
Texas, United States
Joined: February 01, 2007
KitMaker: 365 posts
AeroScale: 356 posts
Posted: Thursday, May 13, 2010 - 01:54 AM UTC
Edo,
You're off to a great start my friend.The turnbuckles look good too,much more in scale.Looking forward to your next update and seeing this project progress.
Regards,
Gregory Jouette
CaptainA
_VISITCOMMUNITY
Indiana, United States
Joined: May 14, 2007
KitMaker: 3,117 posts
AeroScale: 2,270 posts
Posted: Thursday, May 13, 2010 - 05:25 AM UTC
Edo. Glad to see you building again. This is a nice kit I am sure you will enjoy.
Mgunns
_VISITCOMMUNITY
Arizona, United States
Joined: December 12, 2008
KitMaker: 1,423 posts
AeroScale: 1,319 posts
Posted: Thursday, May 13, 2010 - 09:03 AM UTC
Hi Edo:

Good work on the engine. I admire your work on the springs. Your turnbuckles look good as well, and think they will be fine for 1/48 scale.
L8R

Mark
edoardo
_VISITCOMMUNITY
Milano, Italy
Joined: November 30, 2007
KitMaker: 642 posts
AeroScale: 382 posts
Posted: Thursday, May 13, 2010 - 08:50 PM UTC
Thank you guys!
You make me feel at home!
Keith, glad to be in good company!, Terri's comment are most welcome: it's like mom's correction to the kid's mistep!
JackFlash
_VISITCOMMUNITY
Colorado, United States
Joined: January 25, 2004
KitMaker: 11,669 posts
AeroScale: 11,011 posts
Posted: Thursday, May 13, 2010 - 09:12 PM UTC

Quoted Text

". . .Terri's comment are most welcome: it's like mom's correction to the kid's mistep! "


Uh oh. . .some one just said something about someone being old. . .Everyone to the slit trenches!!! Incoming!!!
edoardo
_VISITCOMMUNITY
Milano, Italy
Joined: November 30, 2007
KitMaker: 642 posts
AeroScale: 382 posts
Posted: Thursday, May 13, 2010 - 10:23 PM UTC
WAIT!
I was meaning it in the sense of more experience...
(Hope my quick surrender will help me skip the firing squad...!)
thegirl
_VISITCOMMUNITY
Alberta, Canada
Joined: January 19, 2008
KitMaker: 6,743 posts
AeroScale: 6,151 posts
Posted: Friday, May 14, 2010 - 03:55 AM UTC

Quoted Text

WAIT!
I was meaning it in the sense of more experience...
(Hope my quick surrender will help me skip the firing squad...!)


No firing squad here , besides I'm not old - still young at heart ! We all make those opps every now them , I have lots! Through those opps we make is how we learn and gain experience in this wonderful hobby . The best part is we get to share these opps with other folks here

As Stephen would say , please model on
edoardo
_VISITCOMMUNITY
Milano, Italy
Joined: November 30, 2007
KitMaker: 642 posts
AeroScale: 382 posts
Posted: Sunday, May 16, 2010 - 10:53 PM UTC
Hi folks!
In the last fiew datys I worked on the cockpit which I tried to detail a bit.
First I added a cushion to the seat. It is made out of toilet paper soaked in white glue + water. Than I pinned it with 4 pins to simulate the bouncing of the buttons. These where made out of stretched sprue.
Please, have a look:


The instruments are very basic, so I tried to enhance also those. Here I added a ring on the lower gauge; it is made out of sprue as well, not very refined but I think that it makes the job sufficently well.


Also the wood grain is, in my opinion, better than my last attempt, it is not as good as what you can find here on the site, but I feel I am getting there...
Well, enough for now!
Have a nice day!
Ciao
Edo
thegirl
_VISITCOMMUNITY
Alberta, Canada
Joined: January 19, 2008
KitMaker: 6,743 posts
AeroScale: 6,151 posts
Posted: Monday, May 17, 2010 - 02:31 AM UTC
Looking good Edo , nice job on the cushion .
OEFFAG_153
_VISITCOMMUNITY
Västra Götaland, Sweden
Joined: February 19, 2010
KitMaker: 1,473 posts
AeroScale: 1,450 posts
Posted: Monday, May 17, 2010 - 08:31 AM UTC
Hi Edo

Your off to a great start, the Pfalz is a beautiful, and graceful plane. I saw your Bristol build, and was most impressed with your detailing.

Best Regards

Mikael
edoardo
_VISITCOMMUNITY
Milano, Italy
Joined: November 30, 2007
KitMaker: 642 posts
AeroScale: 382 posts
Posted: Friday, May 28, 2010 - 02:24 AM UTC
Thank you Terri and Mikael! Your comments are highly appreciated!

I proggressed slowely from my last update and now I am at the point of painting the fusolage.
I don't have any picture of it yet, but I can show you some more of the interior just before sealing it.
Here they come:
first a picture that shows the barrier (sorry for my lack of vocabulary...) I set on the back of the seat. It is out of plastic sheet. I know that the wood grain on it is very very poor, but it sits quite back in the rear fusolage, so very little of it will be seen...


now some pics of the cockpit:


I hope you'll enjoy them!

I started also to work on the propeller, which I'd like to paint trying to simulate the lamination. I tried the method proposed by Magunns and I have to say that it is very good indeed! Thank you friend for the tip!! Of course you have to practice a bit and I have to say that the results I have achived are not satisfactory yet, but it has a great potencial.
One of the difficulties I encountered is that I cannot figure out how the lamination in itself works... I remember to have seen here on the site a quite good lecure by Stephen on propeller lamination, so I'll start digging and studing.
Take care and have a nice week end!
ciao
Edo
gajouette
_VISITCOMMUNITY
Texas, United States
Joined: February 01, 2007
KitMaker: 365 posts
AeroScale: 356 posts
Posted: Friday, May 28, 2010 - 03:56 AM UTC
Edo,
Excellent progress my friend.I'm looking forward to your next update.
Regards,
Gregory Jouette
Mgunns
_VISITCOMMUNITY
Arizona, United States
Joined: December 12, 2008
KitMaker: 1,423 posts
AeroScale: 1,319 posts
Posted: Friday, May 28, 2010 - 04:01 AM UTC

Quoted Text

I started also to work on the propeller, which I'd like to paint trying to simulate the lamination. One of the difficulties I encountered is that I cannot figure out how the lamination in itself works... I remember to have seen here on the site a quite good lecure by Stephen on propeller lamination, so I'll start digging and studing.
Take care and have a nice week end!
ciao
Edo


Hi Edo:

What I did for the laminations was to get a good photo of the propeller, and try to copy on plastic the lamination pattern from the photo. Trying to do it from memory just doesn't work for me.
I like the wood grain and the work on the engine, very nice indeed. The barrier you refer to is a bulkhead. It is a naval term for 'wall', but 'wall' really dosn't fit so they came up with bulkhead. Works for me.
I am looking forward to more of your submissions on this a/c.

Best
Mark
a.k.a.
MGunns
guitarlute101
_VISITCOMMUNITY
West Virginia, United States
Joined: December 18, 2006
KitMaker: 1,121 posts
AeroScale: 1,063 posts
Posted: Friday, May 28, 2010 - 09:53 AM UTC


Great work Edo. The woodgrain and engine look really good.

Mark
wombat58
_VISITCOMMUNITY
New South Wales, Australia
Joined: March 26, 2009
KitMaker: 366 posts
AeroScale: 309 posts
Posted: Friday, May 28, 2010 - 10:00 AM UTC
Very nicely done so far Edo, I am looking forward to the next progress report, keep up the good work.

Des.

http://www.ww1aircraftmodels.com
AussieReg
Staff MemberAssociate Editor
AUTOMODELER
#007
_VISITCOMMUNITY
Victoria, Australia
Joined: June 09, 2009
KitMaker: 8,156 posts
AeroScale: 3,756 posts
Posted: Friday, May 28, 2010 - 11:58 AM UTC
Looking great Edo, very nice detail work !!

Cheers, D
thehannaman
_VISITCOMMUNITY
New York, United States
Joined: April 04, 2006
KitMaker: 279 posts
AeroScale: 194 posts
Posted: Friday, May 28, 2010 - 01:45 PM UTC
Looks great, Edo. I, too, love the engine.
thegirl
_VISITCOMMUNITY
Alberta, Canada
Joined: January 19, 2008
KitMaker: 6,743 posts
AeroScale: 6,151 posts
Posted: Saturday, May 29, 2010 - 03:01 AM UTC
Coming along very well Edo , you are doing a great job on this project so far .
edoardo
_VISITCOMMUNITY
Milano, Italy
Joined: November 30, 2007
KitMaker: 642 posts
AeroScale: 382 posts
Posted: Monday, May 31, 2010 - 07:38 PM UTC
Hi guys!
Thank you! You are very kind!

I am still working on the prop...I still can't get how the lamination works, the way it bends it is still a mistery to me... it is like an "8" or an "0" ? Unfortunately I don't have any pic of my attempts (so I can spare myself some boos.. )

In the last days I visited some "girl's" shop and found the "mithical" smoke invisible thread (hope it will improve my rigging). I usually paint my rigging silver, but bsides it usually is light blue, so I had to do it anyway, now do I have to paint the smoke invisible trhead as well?
Kornbeef
_VISITCOMMUNITY
England - South East, United Kingdom
Joined: November 06, 2005
KitMaker: 1,667 posts
AeroScale: 1,551 posts
Posted: Monday, May 31, 2010 - 08:01 PM UTC
Ah Edo...lovely work.

Laminations....something of a dark art to get to look right.
My tip....look at the prop from side on when working out how they should go...the line should be straight if viewed side on. And remember every type of prop has a different profile so the lamination lines will look different.

Sounds simple but it is hard to get a real look yes... some here have mastered the art far better than me.

BTW, sounds silly but I picked up a tip from your pics.
I never thought of using tube for spark plugs.. saves struggling with rod and Cyano when adding the ignition wires..Thank you

Keith
thegirl
_VISITCOMMUNITY
Alberta, Canada
Joined: January 19, 2008
KitMaker: 6,743 posts
AeroScale: 6,151 posts
Posted: Tuesday, June 01, 2010 - 05:51 AM UTC

Quoted Text

Hi guys!
Thank you! You are very kind!

I am still working on the prop...I still can't get how the lamination works, the way it bends it is still a mystery to me... it is like an "8" or an "0" ? Unfortunately I don't have any pic of my attempts (so I can spare myself some boos.. )

In the last days I visited some "girl's" shop and found the "mythical" smoke invisible thread (hope it will improve my rigging). I usually paint my rigging silver, but besides it usually is light blue, so I had to do it anyway, now do I have to paint the smoke invisible thread as well?


" Girl's shop ! " Sounds like some one is asking for a detention slip here , hehehehe

If you get find a metallic pen in silver you can colour the thread before hand by laying it done flat and running the marker over it . I leave the thread as is it has a more scale ( feel ) to it then having it done up in silver , but that is just my opinion .

Keith is right about the prop , they all turn out different and very hard to master . I have had to strip paint and start over on many occasions . 3 times on the BE2c
It all takes practice with this method and the more you do the better your skills will become on this method . Have a look on the net at props . With the spare props I get in the kit's these make great items to practice on using different shades and colours .

Oh-yeah ...we wouldn't boo you , only give you encouragment to excell !
 _GOTOTOP