OFFICIAL: Hangar Queen Campaign
Wisconsin, United States
Joined: September 11, 2009
KitMaker: 1,917 posts
AeroScale: 563 posts
Posted: Thursday, February 10, 2011 - 06:36 AM UTC
Matthew,
The C-46 is a fine choice, especially if that's where your interest takes you now. I'm constantly jumping around myself. This whole campaign is for those projects that lost interest and found it again later.
I don't recall seeing any other cargo planes on the forums lately. Looking forward to seeing this one.
thanks,
Sean.

Current: model railroad layout
Stalled a while ago:
. 1950's Chrome, WW II Twins
Last completed: Police Car
New Jersey, United States
Joined: October 18, 2007
KitMaker: 1,698 posts
AeroScale: 96 posts
Posted: Friday, February 11, 2011 - 01:52 AM UTC
Q - look forward to your cargo plane!
Sean - yes, the "Hangar Queen" is the BBD

The new build, I changed my mind and will make her a GREEN nose lol
Anyways, I did bore out the exhausts:

And painted the exhausts... then realized that the Revell P-51D exhaust parts have couple “wedges” (for lack of a better term) that helps keep them in place (see arrows).

Problem is, exhausts don’t have those “placers” and the fit is too high, exhausts should be midline of the opening with a slight downward tilt (I think….). Anyways, had to cut off the knobs and sculpt/ shave the backing a bit for the exhausts to fit properly. Now have to retouch the paint.
I added that piece of info in case anyone is as retentive about details as me

Vermont, United States
Joined: July 21, 2002
KitMaker: 3,569 posts
AeroScale: 419 posts
Posted: Saturday, February 12, 2011 - 03:50 AM UTC
If you can keep your head when all about you are losing theirs,
perhaps you've misunderstood the situation.
Vermont, United States
Joined: July 21, 2002
KitMaker: 3,569 posts
AeroScale: 419 posts
Posted: Saturday, February 12, 2011 - 05:17 AM UTC
Got the images, but lost the 'edit' function..
That's the Tamiya 1/72 Corsair with badly bubbled decals and the Platz Predator after the Gunze and Dullcote paint disaster and repaint.
I hove not looked to see who does their decals, but the longer ones are all too long and do not conform well at all.
The small badges all go on great, but those checkerboards do not snug down at all.
The Corsair will get finished this weekend, hopefully the Predator by weeks end.
If you can keep your head when all about you are losing theirs,
perhaps you've misunderstood the situation.
California, United States
Joined: April 01, 2002
KitMaker: 4,287 posts
AeroScale: 1,164 posts
Posted: Monday, February 14, 2011 - 04:03 AM UTC
"Don't fear the night, fear what hunts at night"
Wisconsin, United States
Joined: September 11, 2009
KitMaker: 1,917 posts
AeroScale: 563 posts
Posted: Monday, February 14, 2011 - 04:29 AM UTC
Guys, don't forget to take the beginning photo, before you resume the work, so we can all see what you started with. That said, it's nice to see so many builds coming back to life here! Good to know that they'll see the light of day again.

Mike, it's hard to see the decal trouble in those photos, but I've been there myself, and it'll be nice to see how you handle it.
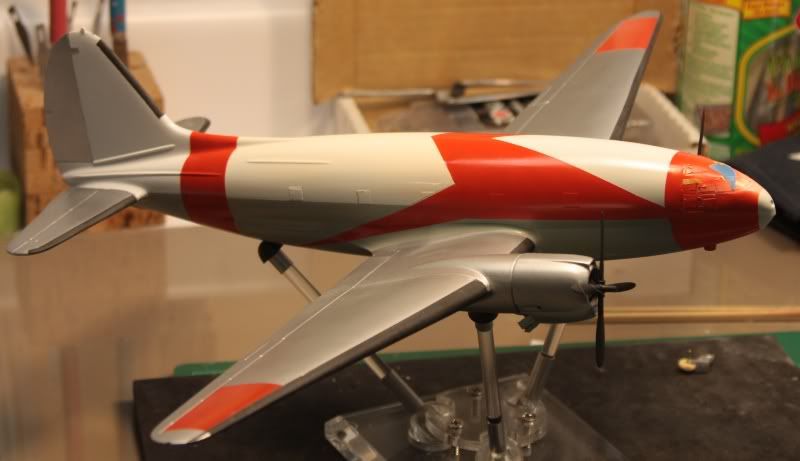
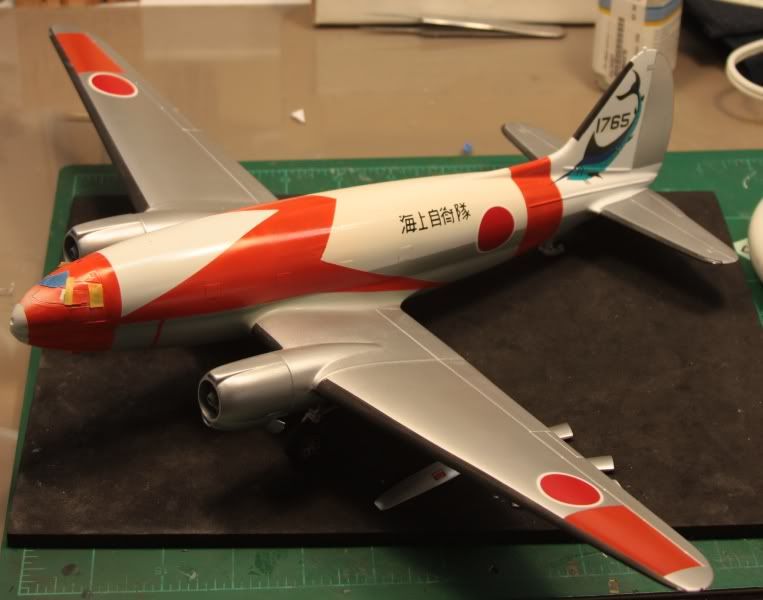
Matthew, the color scheme on that Japanese C-46 is spectacular! That'll be a real attention-grabber once it's done and on display.
Yes, I'll get back to my own build here one of these days...
thanks for posting!
-Sean.

Current: model railroad layout
Stalled a while ago:
. 1950's Chrome, WW II Twins
Last completed: Police Car
California, United States
Joined: April 01, 2002
KitMaker: 4,287 posts
AeroScale: 1,164 posts
Posted: Monday, February 14, 2011 - 05:26 AM UTC
"Don't fear the night, fear what hunts at night"
Wisconsin, United States
Joined: September 11, 2009
KitMaker: 1,917 posts
AeroScale: 563 posts
Posted: Monday, February 14, 2011 - 06:17 AM UTC
The campaign gallery is at
http://gallery.kitmaker.net/showgallery.php/cat/25957Matthew, by my calculations, you are the first one done-- let's fill that gallery with our finished builds!

thanks much!
-Sean.
Current: model railroad layout
Stalled a while ago:
. 1950's Chrome, WW II Twins
Last completed: Police Car
California, United States
Joined: April 01, 2002
KitMaker: 4,287 posts
AeroScale: 1,164 posts
Posted: Monday, February 14, 2011 - 09:20 AM UTC
And there are two pics posted in the gallery. C'mon and join me folks.

"Q"

"Don't fear the night, fear what hunts at night"
Texas, United States
Joined: February 22, 2008
KitMaker: 5,026 posts
AeroScale: 2,811 posts
Posted: Monday, February 14, 2011 - 07:43 PM UTC
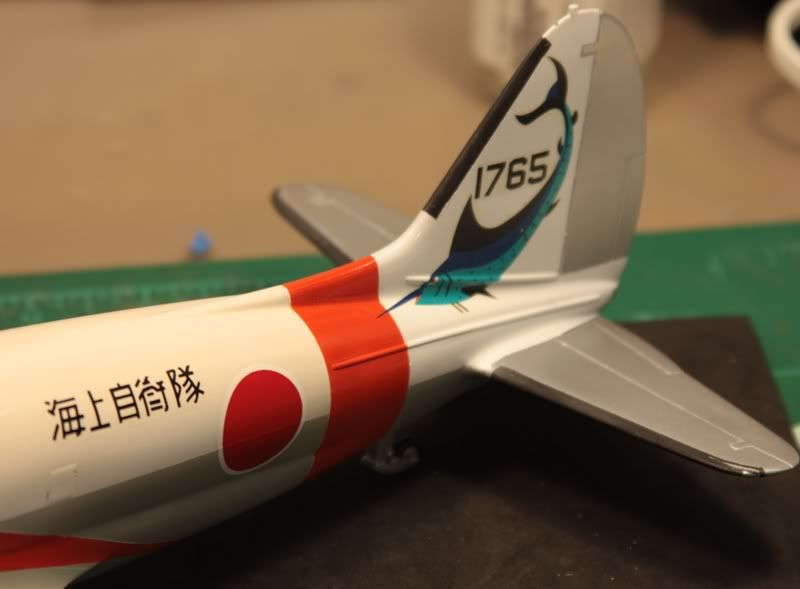
Matt, nice scheme on your C46. What era did this one reside in, the tail art throws me off.
Bob
If it aint broke dont fix it.
California, United States
Joined: April 01, 2002
KitMaker: 4,287 posts
AeroScale: 1,164 posts
Posted: Tuesday, February 15, 2011 - 01:07 AM UTC
Thanks Bob. Unsure as to the era as it is a combination of two schemes and fictitious markings. The actual plane is pretty well photographed. Google Japanese C-46 and you'll find the airplane that inspired the build. I just tweaked the scheme a bit. The tail markings are extras that came from a Hasegawa P-3 Orion kit. They fit so well I had to use them for that large tail surface. Glad you like it. Thanks again, "Q"

"Don't fear the night, fear what hunts at night"
Wisconsin, United States
Joined: September 11, 2009
KitMaker: 1,917 posts
AeroScale: 563 posts
Posted: Tuesday, February 22, 2011 - 01:55 AM UTC
Here's a bump to this thread.
Any progress to report, or thoughts/ideas?
The problem with these long campaigns is the lack of urgency with 7 months to go yet.

If no one else pipes up, I'll have to get going on my own build here.


I've got two campaign builds nearly done-- one more week maybe? Then I pull the queen from the back of the hangar and get her up to the flight line.

thanks,
Sean.

Current: model railroad layout
Stalled a while ago:
. 1950's Chrome, WW II Twins
Last completed: Police Car
California, United States
Joined: April 01, 2002
KitMaker: 4,287 posts
AeroScale: 1,164 posts
Posted: Tuesday, February 22, 2011 - 02:04 AM UTC
I will probably be pulling another one from the stash to re-furb here soon. Gotta see how my other builds come out first....lots to do yet.

"Q"
"Don't fear the night, fear what hunts at night"

#439
Washington, United States
Joined: November 05, 2005
KitMaker: 4,950 posts
AeroScale: 3,192 posts
Posted: Wednesday, February 23, 2011 - 08:25 AM UTC
Not completely stalled. But ready for the 5th trip to the paint shop.

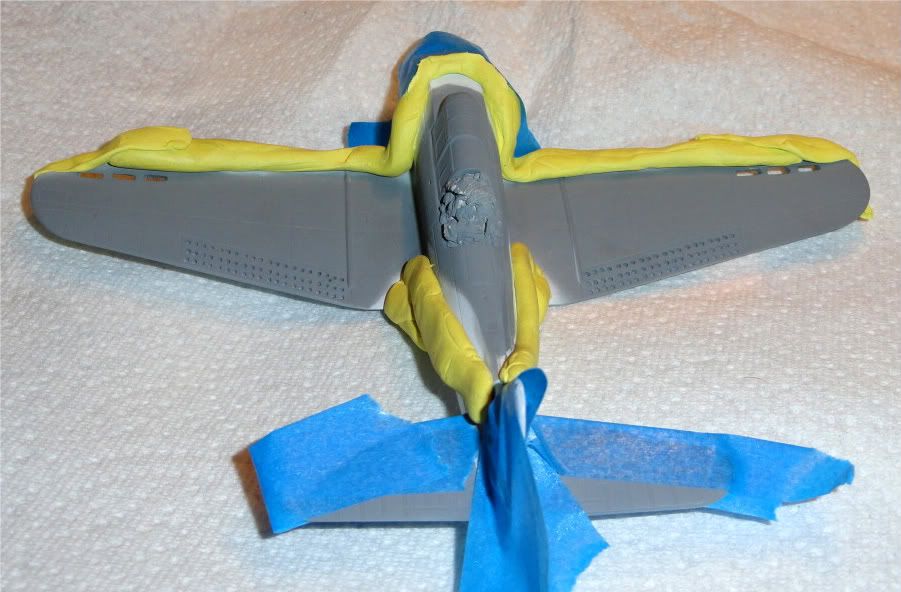
And on top of that, somewhere along the way, I lost the forward aerial............
Hanger Queens in Waiting:
Monogram 1/72 F8F-1
Corsair the Sky Pirate - 1/72 Ace A-7D
Century Series - Airfix 1/72 F-105G
Anti Shipping - Academy 1/72 PBJ-1D
Academy 1/72 F-84E
Wisconsin, United States
Joined: September 11, 2009
KitMaker: 1,917 posts
AeroScale: 563 posts
Posted: Wednesday, February 23, 2011 - 08:38 AM UTC
Don't let it beat you, Mark!

I did the same thing a week ago or so-- found my TBF's pitot tube stuck in the paint on the inside of my spray booth (okay, technically it's just a cardboard box in the garage).
While the rest here are quiet, all eyes are on you.

thanks for the update,
Sean.
Current: model railroad layout
Stalled a while ago:
. 1950's Chrome, WW II Twins
Last completed: Police Car

#439
Washington, United States
Joined: November 05, 2005
KitMaker: 4,950 posts
AeroScale: 3,192 posts
Posted: Wednesday, February 23, 2011 - 09:27 AM UTC
I've been toying with this thing since 2001
http://www.modelingmadness.com/reviews/allies/us/doremussbdpreview.htm I doubt that I'll be lucky enough to find it stuck to the back of my paint booth (also a very large cardboard box in the garage). But it migh have fallen into a box on the modeling desk.

Hanger Queens in Waiting:
Monogram 1/72 F8F-1
Corsair the Sky Pirate - 1/72 Ace A-7D
Century Series - Airfix 1/72 F-105G
Anti Shipping - Academy 1/72 PBJ-1D
Academy 1/72 F-84E
Wisconsin, United States
Joined: September 11, 2009
KitMaker: 1,917 posts
AeroScale: 563 posts
Posted: Friday, February 25, 2011 - 03:44 AM UTC
Just a random thought...
I know in Britain and her former colonies a ship is a "she", and in Germany it's a "he". Does that apply to their aircraft too? Would any German hangar queens actually be hangar kings?
Current: model railroad layout
Stalled a while ago:
. 1950's Chrome, WW II Twins
Last completed: Police Car

#439
Washington, United States
Joined: November 05, 2005
KitMaker: 4,950 posts
AeroScale: 3,192 posts
Posted: Saturday, March 05, 2011 - 07:07 PM UTC
Getting to be less of a queen:
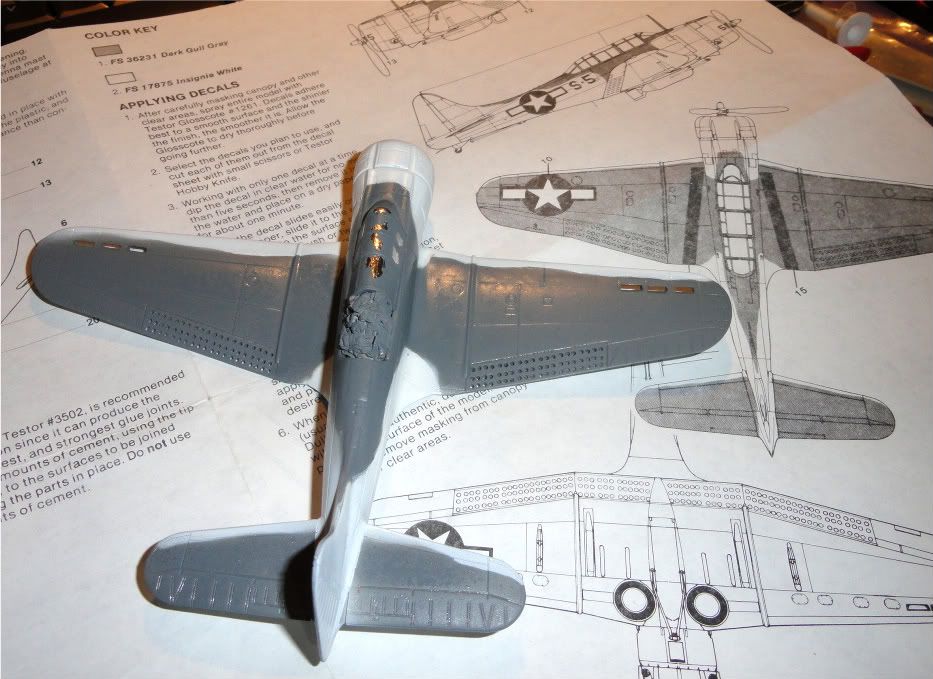
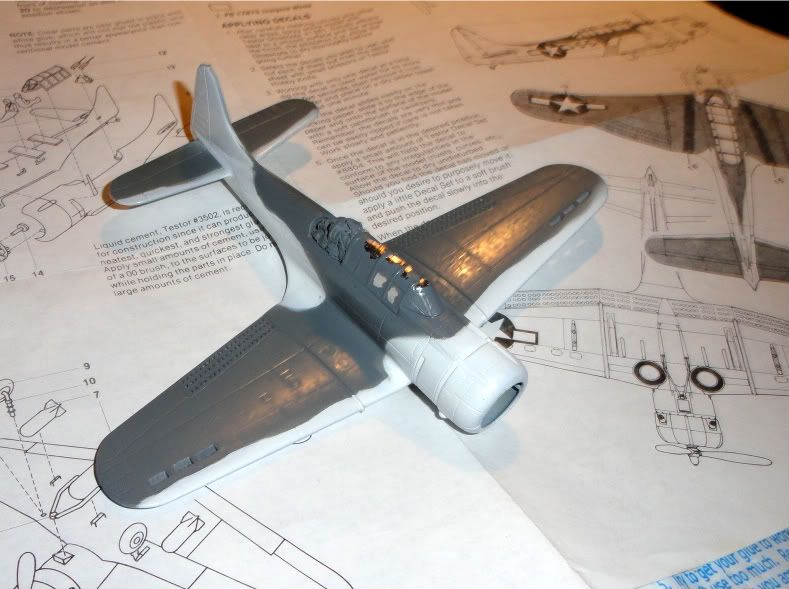
After 10 trips to the paint shop I almost ready to start decaling. Just shot some Future on the upper surfaces. Also need to get some black on the wheels.
Hanger Queens in Waiting:
Monogram 1/72 F8F-1
Corsair the Sky Pirate - 1/72 Ace A-7D
Century Series - Airfix 1/72 F-105G
Anti Shipping - Academy 1/72 PBJ-1D
Academy 1/72 F-84E
Texas, United States
Joined: February 22, 2008
KitMaker: 5,026 posts
AeroScale: 2,811 posts
Posted: Saturday, March 05, 2011 - 07:58 PM UTC
Mark, that Hawk cleans up pretty good.
Bob
If it aint broke dont fix it.
Wisconsin, United States
Joined: September 11, 2009
KitMaker: 1,917 posts
AeroScale: 563 posts
Posted: Sunday, March 06, 2011 - 02:07 AM UTC
Quoted Text
Mark, that Hawk cleans up pretty good.
Bob
I second that! Nicely done, Mark.
-Sean

Current: model railroad layout
Stalled a while ago:
. 1950's Chrome, WW II Twins
Last completed: Police Car

#439
Washington, United States
Joined: November 05, 2005
KitMaker: 4,950 posts
AeroScale: 3,192 posts
Posted: Sunday, March 06, 2011 - 06:14 AM UTC
It's been a real learning experience. I wanted to try my hand at scratch building a cockpit. Not that you can see it at the moment, but no two stringers are aligned and the ribs are a bit crooked too. Since it;s a one piece wing, I decided to open up the 'mail box' slots in the wings and drill out all the holes (~394),

Filling and sanding and filling and sanding and filling and sanding.
Learning experience: Eleven trips thru the paint shop. Bottle primer that never cured, Rattle can primer worked, overall gloss white, dark gull gray, touch up white where the gull gray went under the blue tack sausages, touch up the gray where the white went under the sausages, tape the gray to fix the white over-spray, tape the white to get gray on the places where the tape didn't cover enough of the white gray boundary. A quick shot of black on the tires (that I'll have to touch up by hand) and finally a shot of Future over the gray for decals.
Lost the main antenna, broke off 2 tries at a rear antenna post.
I'm gonna finish this thing if it kills me, so far I think it has the upper hand.........

Hanger Queens in Waiting:
Monogram 1/72 F8F-1
Corsair the Sky Pirate - 1/72 Ace A-7D
Century Series - Airfix 1/72 F-105G
Anti Shipping - Academy 1/72 PBJ-1D
Academy 1/72 F-84E

#439
Washington, United States
Joined: November 05, 2005
KitMaker: 4,950 posts
AeroScale: 3,192 posts
Posted: Sunday, March 06, 2011 - 06:35 PM UTC
Maybe I should check into funeral arrangements. I started on the decals tonight.

There's a tear in one of the star and bars, well maybe I can piece it together and put it on the lower wing. So I cut out the other star and bar and drop it into the water........ both bars tear, then the star tears !@#$%^&*(). Give one more decal a try, I go to push it off the backing and the numeral collapses into a dozen shards....

Hanger Queens in Waiting:
Monogram 1/72 F8F-1
Corsair the Sky Pirate - 1/72 Ace A-7D
Century Series - Airfix 1/72 F-105G
Anti Shipping - Academy 1/72 PBJ-1D
Academy 1/72 F-84E
Wisconsin, United States
Joined: September 11, 2009
KitMaker: 1,917 posts
AeroScale: 563 posts
Posted: Monday, March 07, 2011 - 01:22 AM UTC
Yikes, Mark, that's giving you one heck of a fight! Once you beat this one, I think you'll qualify for sainthood.
I must say again that the things within your control came out well! I hadn't realized you drilled every hole in the dive brakes and the wing slots-- well done again.
Thanks again for keeping us up-to-date! You've got our support. Keep up the fight!
-Sean.

Current: model railroad layout
Stalled a while ago:
. 1950's Chrome, WW II Twins
Last completed: Police Car
Wisconsin, United States
Joined: September 11, 2009
KitMaker: 1,917 posts
AeroScale: 563 posts
Posted: Thursday, March 17, 2011 - 12:40 AM UTC
a bump here.

I see many campaigns beginning in August and September, at least for myself, so just a reminder to keep this one in mind. Those old half-started plane kits need your attention.

Yes, yes, and I have to show something here soon too.

thanks,
Sean.
Current: model railroad layout
Stalled a while ago:
. 1950's Chrome, WW II Twins
Last completed: Police Car
Wisconsin, United States
Joined: September 11, 2009
KitMaker: 1,917 posts
AeroScale: 563 posts
Posted: Thursday, March 17, 2011 - 07:12 AM UTC
Quoted Text
The Corsair will get finished this weekend, hopefully the Predator by weeks end.
Is everyone waiting like me, on pins and needles, for MLD to post his work in the gallery?


Then there will be two ribbon-earners so far!
Just kidding. Keep on having fun out there (across the interwebs).
When there are 3 months to go, I'll send some PM's to those 17(!!) that signed up and haven't posted any word of what they'll be working on here.
thanks,
Sean.

Current: model railroad layout
Stalled a while ago:
. 1950's Chrome, WW II Twins
Last completed: Police Car


