_GOTOBOTTOM
Early Aviation
Discuss World War I and the early years of aviation thru 1934.
Lozenge Camouflage 201
JackFlash
_VISITCOMMUNITY
Colorado, United States
Joined: January 25, 2004
KitMaker: 11,669 posts
AeroScale: 11,011 posts
Posted: Thursday, September 30, 2010 - 05:43 PM UTC
To Everyone, If you want to build your kit as you will, there is nothing wrong with that choice. But this thread is probably not going to help you. We are attempting to get certain known aspects of this subject out to the modeler that wants help with the applications. To most of us getting it done like the original is half the fun.


Quoted Text

Now we have spent considerable time exploring the orientations, colour designations an covering methods of German 1917 -1918 multicolour printed aircraft fabric camouflage from the modeling point of view. Next "Lozenge Camouflage 201".

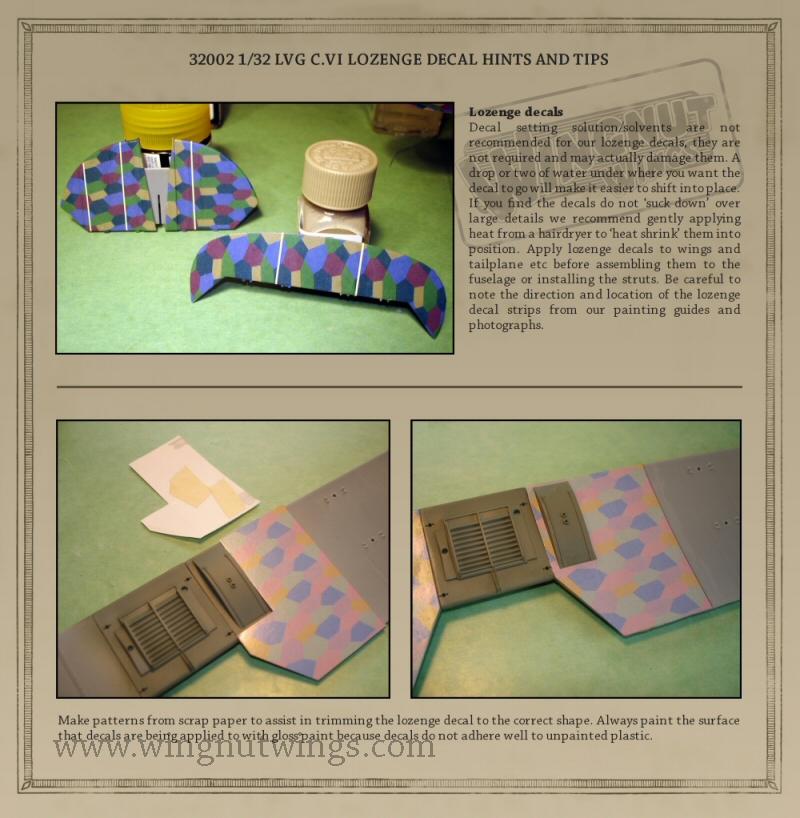
It is time we discuss the best method of laying down Lozenge decal strips and finishing them. This will be aimed as the first effort at the average modeler just learning to work with WWI aircraft models.


The focus of this thread will be to help modelers deal with various "Lozenge" decals available for scale model aircraft;
How to lay them down.
How to deal with surface obstacles.
How to ensure complete coverage.
How to repair in progress damage -patching.
How to finish the applied decals to simulate the look of the original in scale.

First a bit of a refresher. In the first thread we all learned that ;

"The official name for the printed fabric was Flugzeugstoff, originally developed under the name "Ballonstoff", because it was originally concieved to replace the highly visible yellow of the observation balloons.

The Vierfarbiger (four colour) Flugzeugstoff with the terrain camouflage, was the opposite to the more sophisticated Fünffarbiger (five colour) Flugzeugstoff of the NAK. The darker and cheaper dyes were used for the Fünffarbiger (5 colour) Flugzeugstoff.
. . ."

Then we began to discover how the fabric was applied and its orientations on original airframes. We talked about chordwise, spanwise and diagonal layouts. The bolt widths and the methods for the manufacture of printed fabrics of 19178 -18.

Now quick is the word and sharp is the action.

To start you will need tools.

A. Start with a purchase of 100 new sharp #11 Xacto blades. One or two handles for them is a gven. The reason for this is you should not concern yourself with the rationing sharp blades or having a dull one tear decals when in the middle of a project. If a blade can't cut a standard sheet of copy paper by dragging the blade down the edge of the paper its too dull.


B. Micro Set and Sol. I can't tell you how many 2 oz bottles of this stuff I have used over the 30 years, But it has to be in the hundred and fifty range. Set provides a mild Glacial acetic acid (smells similar to vinegar). This gives a goos uniform coverage to bond the decal to the required surface. Sol softens the decal to conform to the model's surface.

C. Spray cans of clear gloss and flat are major components to the process. I use Testors brands and have never had any concern about yellowing in 30 years.

D. Filtered warm water. You have all seen the scented oil candles on an electric warming base. The base can hold an 4 -8 oz glass ( clean jelly jar ). My advantage here is that I have a water filtering system on my house and don't have to purchase filtered water by the gallon at the grocery store. Filtered water has most or 99.9% of the minerals removed. Minerals in the water are harmful to decal adhesion.

E. Old spray can tops to rest projects on while the decals cure. I have some small stands that I have left over from wing support projects. Note the cut lozenge strip under the cradle for the top wing.

F. Tweezers both sharp and blunt types.

G. Optivisor, strongest power you can buy.

H. Steel 12 - 16 inch ruler.

I. Two - three sheets of each kind of "Lozenge" you will use. So you have to know what you need for a specific project.

J. Flex file. See here.


edoardo
_VISITCOMMUNITY
Milano, Italy
Joined: November 30, 2007
KitMaker: 642 posts
AeroScale: 382 posts
Posted: Thursday, September 30, 2010 - 08:20 PM UTC
Hi Stephen!
Seems another copy and save for future reference here!
Much needed indeed!
Thank you for sharing!
Ciao
Edo
JackFlash
_VISITCOMMUNITY
Colorado, United States
Joined: January 25, 2004
KitMaker: 11,669 posts
AeroScale: 11,011 posts
Posted: Friday, October 01, 2010 - 03:26 PM UTC
Thanks Edo. There are infact many articles on the subject of decal application here at Aeroscale. But this is the only one to deal with the German lozenge decal which tends to cover the most all of skeletal frame of the original machines from 1917 -1918 .

Every decal manufacturer worth their salt since the 1950's recommends the use of "warm water": when using water slide decals.

1. The warm water expands the decal
2. loosens the glue from the paper backing quicker
3. It also tends to weaken the bonding glue.

Returning to the amount of minerals in a given water supply that can further interfere with decal adhesion, having a sol and set at the ready only makes sense.

Now the difference here is that you are using a decal to cover a much larger area than most other kinds of markings decals. The first issue to deal with is trapped air under the decal.
JackFlash
_VISITCOMMUNITY
Colorado, United States
Joined: January 25, 2004
KitMaker: 11,669 posts
AeroScale: 11,011 posts
Posted: Sunday, October 03, 2010 - 07:58 PM UTC
The simplest way to deal with trapped air is prevention.

Start with treating the surface of the model. Gloss tends to add a layer that softens edges. The trick is to add a minimum layer. Clear Airbrushed Lacquers can be hotter and etch better than factory pigmented paint. Airbrush thinner is "hotter" than those in the spray cans.

A. Clean the plastic with antibacterial soap and water.
B. Dry thoroughly.
C. Rough the plastic up with 600 grit sanding film.
D. Then airbrush the surface with the 80% gloss clear / 20% airbrush thinner mix.
E. Let dry thoroughly ( 4-8 hrs).

OEFFAG_153
_VISITCOMMUNITY
Västra Götaland, Sweden
Joined: February 19, 2010
KitMaker: 1,473 posts
AeroScale: 1,450 posts
Posted: Sunday, October 03, 2010 - 09:40 PM UTC
Excellent thread Stephen!

Lots of hints that I did not know – I think this may well help to get the Lozenging a bit less of a painfull process for me.

Thank You for sharing.

Mikael
Maynard
_VISITCOMMUNITY
Florida, United States
Joined: September 29, 2007
KitMaker: 32 posts
AeroScale: 9 posts
Posted: Monday, October 04, 2010 - 12:00 PM UTC
Yup, this looks like another gem of a thread, i will be watching this one! I may even hold up on my D VII build to read more... so far i have the underside of the wings camo'd and it looks pretty good, just sprayed them with gloss before doing rib tapes... so i may just work on other parts for a bit

Thanks Stephen!
JackFlash
_VISITCOMMUNITY
Colorado, United States
Joined: January 25, 2004
KitMaker: 11,669 posts
AeroScale: 11,011 posts
Posted: Saturday, October 09, 2010 - 09:32 AM UTC
One of the finest modelers I have ever known has told me, Half of the time spent during the build of a kit is prepping.

But now we get down to the application.

1. Begin with the lower surfaces. Carefully measure the intended area (dividers are useful for transferring measurements), being sure to add a little extra at the ends—this will be trimmed later. Cut the piece of decal you need from the sheet. I usually use a paper template of the wing profile with the rib stations marked. See the template in the image below.


2. Dip it in the warm water for no more than five seconds. Submerging the decal for a longer period of time can dilute the adhesive and interfere with the adhesive qualities. Place it on a nonporous surface and wait for it to loosen from the paper backing.

3. Apply a good amount of Microset solution to the surface where the decal is to go. I have paint brushes dedicated to just this purpose. I tend to use the term "slather" Micoset inplace. When the decal section is loosened, gently slide the decal from the backing into place. .

4. Apply a thick film of Microset over the model surface. Exact position can be achieved by anchoring the decal section with a Q-tip. Then, gently lay down the decal to the surface, starting at one corner and carefully lay over the selected surface of the model. Its like turning the page of a book. It tends to push the air out of the way so its not trapped under the decal. Difficult areas (compound curves, extremely detailed areas) may require the use of MicroSol. More on that later.

5. When attached add the next 2 -3 sections to cover 1/2 the wing surface. This equuals 1/2 the op wing or one side of the entire lower wing. Repeat the process for the next panel, but make sure the leading edges are

a. even across from lower wing tip to wing root
b. even across from top wing tip wing tip.

When the lower surfaces are thoroughly dry, clean up the trailing edges and wing tips by burnishihing the excess with the face of your thumbnail, trimming excess material.

6. When dry after about 2-3 hours apply Micro Sol liberally and let set . Do Not Touch until thoroughly dry !! Microsol softens the decal so it can conform to the surface.

7. Repeat this process for the upper surfaces.

8. When all the decal panels have been added to both upper and lower surfaces, the rib tapes can be applied. These cover all full rib (not riblet) locations of the wings in one piece around the whole wing profile. So the same colour on the top surface was on the lower surface. Tapes were not applied to elevators or ailerons for production a/c. Camouflage tapes can be created by cutting strips (length wise) from the decal material. So the same colour on the top surface was on the lower surface. See the image below.

JackFlash
_VISITCOMMUNITY
Colorado, United States
Joined: January 25, 2004
KitMaker: 11,669 posts
AeroScale: 11,011 posts
Posted: Saturday, October 09, 2010 - 09:34 AM UTC
For your own information. Here is what it takes to cover a 1:48 Fokker D.VII. I tallied the lozenge "pieces used" for the simulated fabric covered areas. The 4 & 5 colour lozenge are slightly different widths like the originals. So keeping it to "how many pieces used" will give you the same total picecs used whether it is 4 or 5 colour.

You will need;

20 pcs for the upper wing & ailerons, upper & lower surfaces.
12 pcs for the lower wing, upper & lower surfaces.
05 pcs for the fuselage, upper & lower surfaces.
08 pcs for the horizontal tail unit (stabilizers & elevators, upper & lower surfaces.
02 pcs for the vertical fin left & right.
04 pcs for the wheel covers.
------------------
51 pieces of lozenge.

For the ribtapes;

28 pcs for the lower wing. (using on piece rib tapes upper & lower surfaces, leading edge, trailing edge and wing tips).

34 pcs for the top wing (using on piece rib tapes upper & lower surfaces, leading edge, trailing edge and wing tips).

-----------------------
64 cut strips of lozenge.

With the surfraces prepainted in a clear gloss, it took me about 4 evenings of 2.5 hours each. With me doing the lower surfaces one night, upper surfaces the next night and rib tapes & edging tapes the next two nights.
JackFlash
_VISITCOMMUNITY
Colorado, United States
Joined: January 25, 2004
KitMaker: 11,669 posts
AeroScale: 11,011 posts
Posted: Saturday, October 09, 2010 - 09:53 AM UTC
Now before we continue, are there any questions?
JackFlash
_VISITCOMMUNITY
Colorado, United States
Joined: January 25, 2004
KitMaker: 11,669 posts
AeroScale: 11,011 posts
Posted: Sunday, October 10, 2010 - 03:36 PM UTC

Quoted Text

Now before we continue, are there any questions?


Nothing? Ok then we continue.

Once all of the lower surfaces panels are done and dry, as I said earlier you can burnish the trailing edges and tips of the wings. Doing this with your this thumb tends to fold and break the areas that over hang evenly. Another trick I use is extremely fine grit sanding film in a "Flex file." Just gently keeping the fllm at the edge and only pushing it away from your wing surface pares down the over hanging decal edges. Don't worry about any exposed plastic edge. You will find that they are micro-exposures and are easily covered with the rib and edge tapes added later.

Below is an image of an undersurface repair that I demonstrated. The repair has not been textured in this image,


Now if you choose to texture these surfaces I would hold off until after the ribtapes are in place and thoroughly dry..
edoardo
_VISITCOMMUNITY
Milano, Italy
Joined: November 30, 2007
KitMaker: 642 posts
AeroScale: 382 posts
Posted: Sunday, October 10, 2010 - 08:57 PM UTC
Hi Stephen,
it seems to me that there is a sort of 'lip' of the upper surface lozenge that is urved around the wing and covers even a part of the lower wing (1-2 mm perhaps). Am I correct?
That would much easy the covering process not to have to join the two side of the lozenge in the middle section of the wing...
Thnak you
Ciao
Edo
JackFlash
_VISITCOMMUNITY
Colorado, United States
Joined: January 25, 2004
KitMaker: 11,669 posts
AeroScale: 11,011 posts
Posted: Sunday, October 10, 2010 - 09:43 PM UTC

Quoted Text

Hi Stephen,
it seems to me that there is a sort of 'lip' of the upper surface lozenge that is urved around the wing and covers even a part of the lower wing (1-2 mm perhaps). Am I correct?
That would much easy the covering process not to have to join the two side of the lozenge in the middle section of the wing...
Thnak you
Ciao
Edo


Actually Edo the leading edge, wing tip and trailing edge of the wing you mention has a separate tape around its profile. See the lower wing here note the trailing edge "tape".
thegirl
_VISITCOMMUNITY
Alberta, Canada
Joined: January 19, 2008
KitMaker: 6,743 posts
AeroScale: 6,151 posts
Posted: Monday, October 11, 2010 - 02:48 AM UTC
I remember this build Stephen and one question which has been on the back of my mind for so time now but never really asked before .

When texturing the wings would one do the lozenge first then add the rib tapes ?

I have notice that on some builds when using Microsculpt texturing decals lay this down on top of the lozenge and tapes having the pattern of cloth facing the same way . Wouldn't this cloth pattern be a different angle then on the lozenge ?
OEFFAG_153
_VISITCOMMUNITY
Västra Götaland, Sweden
Joined: February 19, 2010
KitMaker: 1,473 posts
AeroScale: 1,450 posts
Posted: Monday, October 11, 2010 - 03:06 AM UTC
Hi Stephen Great and informative read – Nice texturing of the Lozenge too – hope to read more soon.
BOC262
_VISITCOMMUNITY
New Jersey, United States
Joined: April 15, 2007
KitMaker: 51 posts
AeroScale: 50 posts
Posted: Monday, October 11, 2010 - 05:53 AM UTC
"...the rib tapes can be applied. These cover all full rib (not riblet) locations of the wings in one piece around the whole wing profile. So the same colour on the top surface was on the lower surface."

So the old chestnut about using blue tapes for upper surfaces and pink tapes for lower surfaces is wrong? Is there any evidence or rules of thumb suggesting when pink, blue, or lozenge tapes should be used?

I've only done a partial "lozenge job" before (Udet's red fuselage, candy striped D.VII), so I really appreciate the in depth information presented here.

A fascinated, and very helpful tutorial--thank you Stephen!
JackFlash
_VISITCOMMUNITY
Colorado, United States
Joined: January 25, 2004
KitMaker: 11,669 posts
AeroScale: 11,011 posts
Posted: Monday, October 11, 2010 - 06:06 AM UTC

Quoted Text

I remember this build Stephen and one question which has been on the back of my mind for so time now but never really asked before .

When texturing the wings would one do the lozenge first then add the rib tapes ?

I have notice that on some builds when using Microsculpt texturing decals lay this down on top of the lozenge and tapes having the pattern of cloth facing the same way . Wouldn't this cloth pattern be a different angle then on the lozenge ?


Greetings Terri,

1. that is the way I do it. Lozenge panels first then the tapes.

2. And in these scales it would be tough to call the difference in the texturing directions.
JackFlash
_VISITCOMMUNITY
Colorado, United States
Joined: January 25, 2004
KitMaker: 11,669 posts
AeroScale: 11,011 posts
Posted: Monday, October 11, 2010 - 06:17 AM UTC
Thanks MIkael, I am glad the info is useful.


Quoted Text

"...the rib tapes can be applied. These cover all full rib (not riblet) locations of the wings in one piece around the whole wing profile. So the same colour on the top surface was on the lower surface."

So the old chestnut about using blue tapes for upper surfaces and pink tapes for lower surfaces is wrong? Is there any evidence or rules of thumb suggesting when pink, blue, or lozenge tapes should be used?

I've only done a partial "lozenge job" before (Udet's red fuselage, candy striped D.VII), so I really appreciate the in depth information presented here.

A fascinated, and very helpful tutorial--thank you Stephen!


Greetings Karl

In general, from the factory Fokker used lozenge strips, OAW used light blue and lozenge and Albatros used salmon pink and lozenge. Some 2 seat maufacturers used clear doped linen. Check which profile you intend on doing. Note also that there are cases where whole wing components were mixed at the unit level as replacements. That is the lower wings were one component and the top wing was another.

It only seems reasonable that we would eventually come to a thread dedicated to model applications.
JackFlash
_VISITCOMMUNITY
Colorado, United States
Joined: January 25, 2004
KitMaker: 11,669 posts
AeroScale: 11,011 posts
Posted: Monday, October 11, 2010 - 05:06 PM UTC
Here is a bit of fun that led to this tutorial.

how do I apply it?

Flex file. See here.

JackFlash
_VISITCOMMUNITY
Colorado, United States
Joined: January 25, 2004
KitMaker: 11,669 posts
AeroScale: 11,011 posts
Posted: Sunday, October 24, 2010 - 02:23 AM UTC
Now some of the decal makers in New Zeland have a product that has been described as stretchy. WNW says that using Micro sol & set with their decals is a mistake.

thehannaman
_VISITCOMMUNITY
New York, United States
Joined: April 04, 2006
KitMaker: 279 posts
AeroScale: 194 posts
Posted: Sunday, October 24, 2010 - 05:56 AM UTC
Great stuff Stephen. Thanks so much for sharing your expertise!
JackFlash
_VISITCOMMUNITY
Colorado, United States
Joined: January 25, 2004
KitMaker: 11,669 posts
AeroScale: 11,011 posts
Posted: Saturday, November 27, 2010 - 04:21 PM UTC
Next we will go into some specific applications. How well certain loz decals react and to what.
JackFlash
_VISITCOMMUNITY
Colorado, United States
Joined: January 25, 2004
KitMaker: 11,669 posts
AeroScale: 11,011 posts
Posted: Friday, December 17, 2010 - 03:07 AM UTC
Ok folks to continue, Here we see lozenge application to a set of Mirage Halb. CL.II wheels.

Here the lozenge is laid over the part with the decal being rolled out over the surface. Note "Set" has been liberally applied..


The center of the decal has a "X" cut in the center. When almost dry apply the "Sol"


To allow them to dry evenly without sliding I put them in the depressions of this Testors paint tray. The depressions were originally designed to mix paint in.


JackFlash
_VISITCOMMUNITY
Colorado, United States
Joined: January 25, 2004
KitMaker: 11,669 posts
AeroScale: 11,011 posts
Posted: Tuesday, December 21, 2010 - 01:32 PM UTC
Next we begin discussing various German printed lozenge "Flugzeugfarbenstoff" decals by various manufacturers.

JackFlash
_VISITCOMMUNITY
Colorado, United States
Joined: January 25, 2004
KitMaker: 11,669 posts
AeroScale: 11,011 posts
Posted: Thursday, February 03, 2011 - 03:41 PM UTC
More to come. Stay tuned.
JackFlash
_VISITCOMMUNITY
Colorado, United States
Joined: January 25, 2004
KitMaker: 11,669 posts
AeroScale: 11,011 posts
Posted: Monday, February 21, 2011 - 03:27 PM UTC
Now for those of you who may be new, here is the review on the Microsculpt 1:48 German (4 & 5 colour) lozenge you have seen thus far.

Click here.
 _GOTOTOP