_GOTOBOTTOM
Early Aviation
Discuss World War I and the early years of aviation thru 1934.
The other D.Va WNW 1:32 Kornbeef
Kornbeef
_VISITCOMMUNITY
England - South East, United Kingdom
Joined: November 06, 2005
KitMaker: 1,667 posts
AeroScale: 1,551 posts
Posted: Saturday, October 02, 2010 - 09:30 PM UTC
I said in my OAW build I was thinking of filtching the flying surfaces from this kit for that. So I did, the plan being to build this a a fuselage either in A/ disrepair being either stripped or worked on, or B/ being in a state of shipping in it's knockdown state.

(Cry for help!)
I'm looking for detais of the area under the tank and the lower engine bay area without anything in the way, I had links to several sources but lost them when my old PC died. Any help in this would be appreciated greatly.

So I'm building this alongside the Roden/Encore DII, rsources are quite tight so dont expect either to leap forward..

Building but planning I'm not sure just how stripped out to go, anyway on with some progress shots. Any ideas or pointers would be great, I'm approaching this very open mindedly and if anyone has any ideas I'd love to hear.


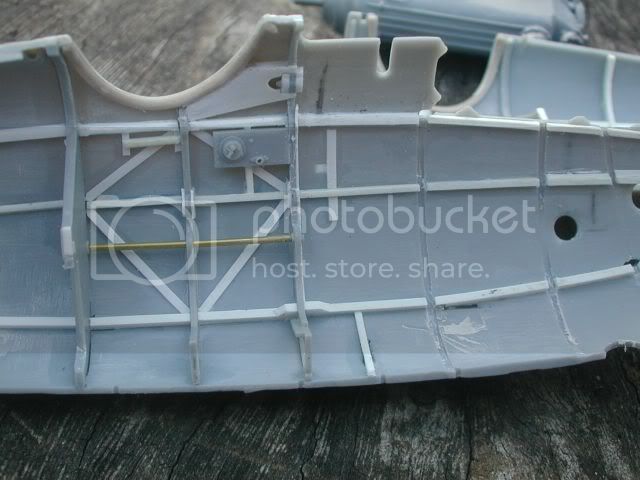
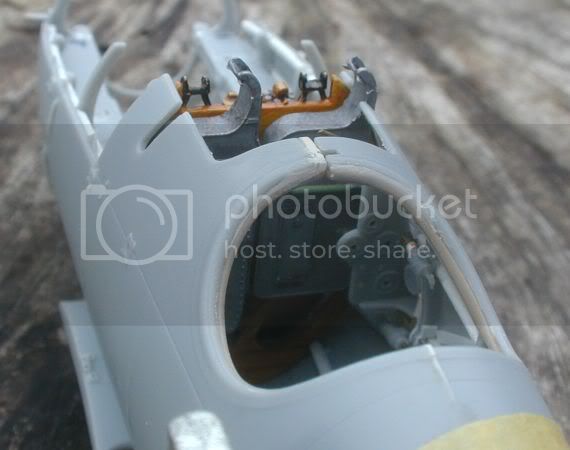
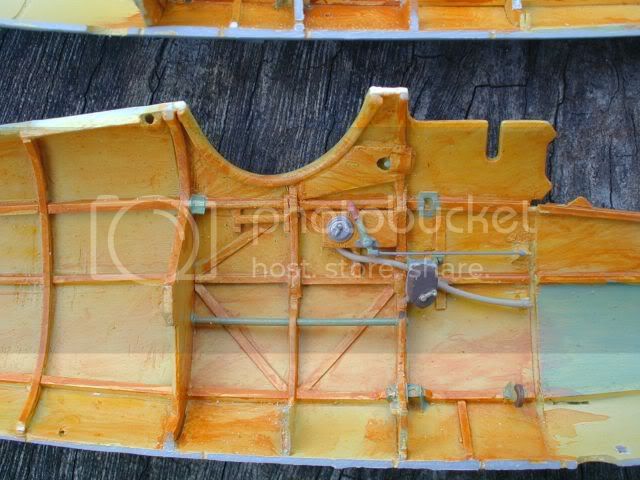
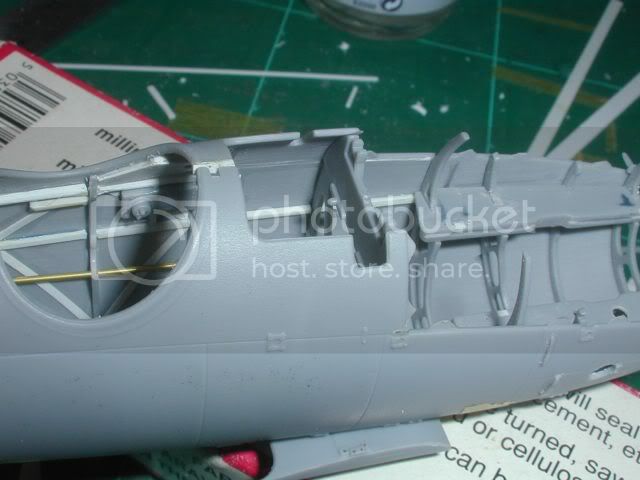
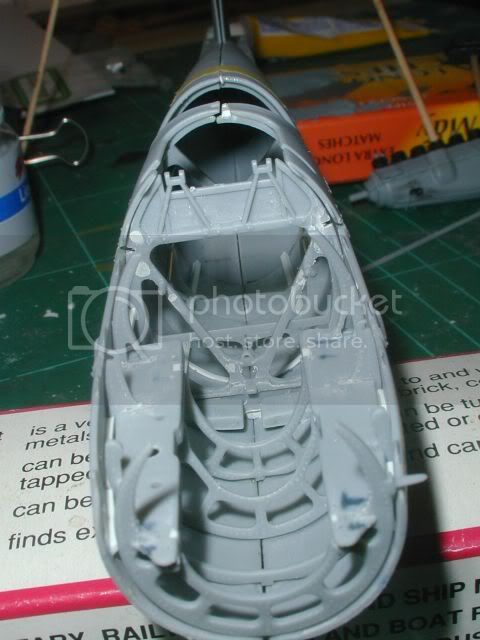
I sanded back the fuselage innards, not because theres anything wrong with WNWs representation of the structure, I just wanted a thinner more to scale look, this makes the bulkheads and formers more in scale being the reasoning. I left enough locating depressions though to be able to fit all the fuselage members correctly, this helped to keep a more to scale depth to the sides where the access doors will be open too. Originally I had intended to thin just the cockpit but the thought of building it with an stripped out engine bay made me thin that area our too. Of course this brings other issues up where kit parts are tewaked to suit the overscale thickness but nothing a little shimming and shaving cant cure.

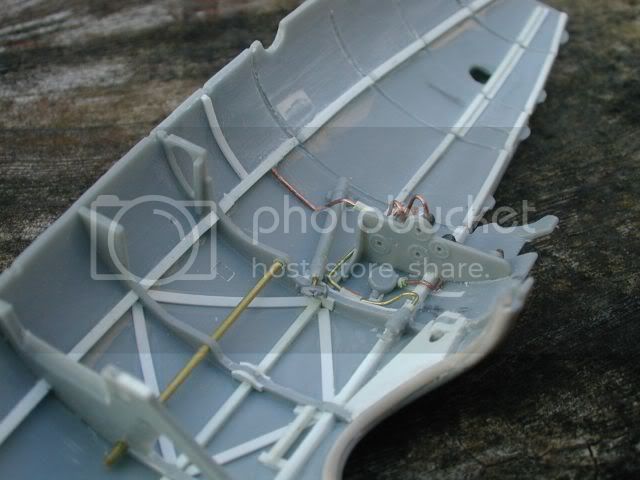
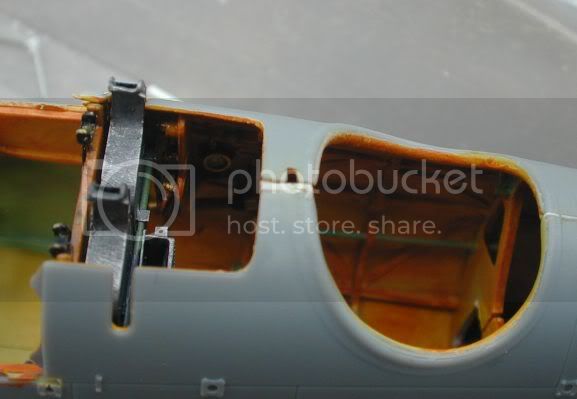
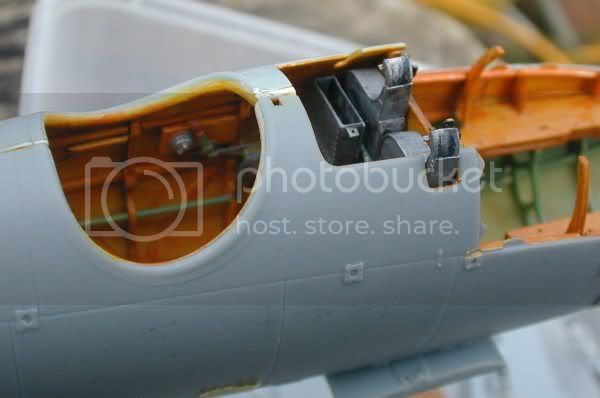
Briefly, I removed the nose cowl, sanded back to the first former (will be finished once the fuselage is mated), opened access doors, cooling slots to be done yet, looking to Eduard or PoP PE to see what they offer in way of replacement before deciding if to shave the louvers off or not. I cut all bar the main cross member in half thinking it will be easier to detail the kit this way. opened up the former behind the seat, I am intending showing it with the fabric cover hanging loose.

'm out of 0.40" square section, the wifes away and has the car mutters so I cant get to the LHS to resupply till next week


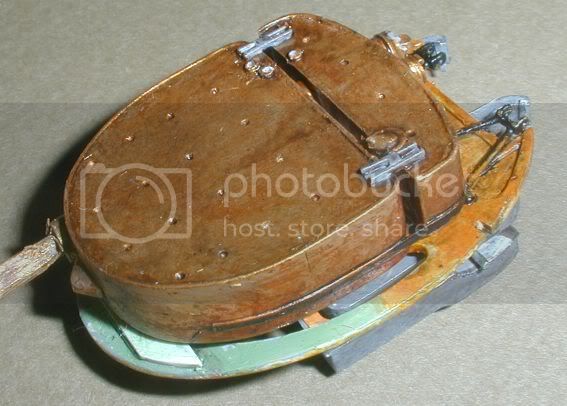
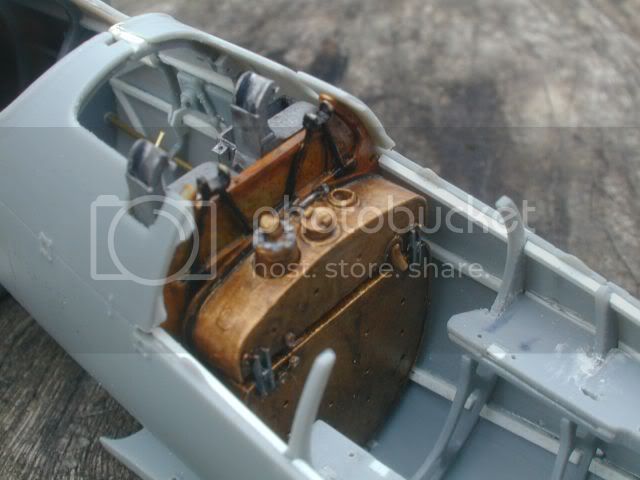
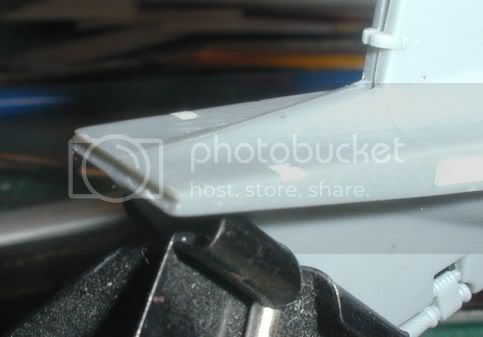
I split the tank, adding the rivet detail as per the Tval website, looking at the pics I have from the kit handbook it seems that tank was constructed a bit differently, I feel safe in assuming there were variances in design and or manufacturers though. I split the tanks, intending to have one or both removed (depending on finding details on the area hidden by them. fillers necks are plastic tube, I sanded the tanks down and added the lip to the main tank out of sheet. I still have some way to go though, these along with the engine are bits I can tinker with more once the wood paint is on and drying.


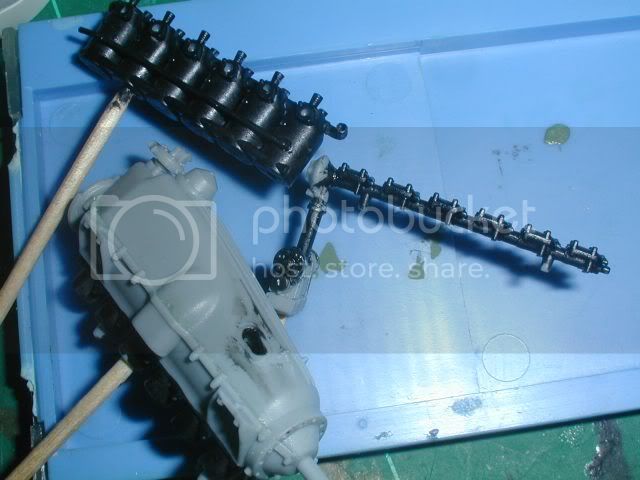
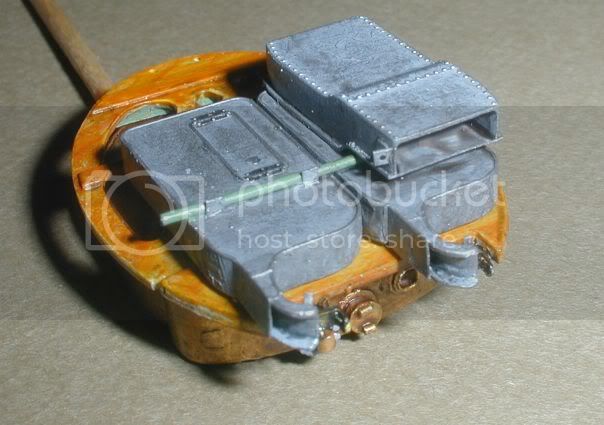
I opened up the holes on the lower front crank case, noting however that there is other holes in the lower care near the rear on shots of the Tval engine, are they common to all engines? Other mods so far are drilling the 12 holes on the front face of the engine, scratching a stub of cooling pipe for the cylinder block adding some details to the mags, drilling them for the wiring and totally disregarding the build instructions.


A few shots of the fuselage taped roughly together to give a feel for the finished idea, I would love to think I have the skill to pull this off without shortcuts, Time will tell of course. At the moment I'm thinking along the lines of her being either being stripped for spares or a derelict find or being stripped down for maintenance, leaning towards the former. My original plan of having her on a railcar (Dragon do some 1:35th flatcars which I think would be close enough in scale) would mean a more complete looking and weather protected (wrapped) look, am I wrong? I seem to recall Stephen posting at least one such pic ages ago in a build blog for one of Terri's stripey builds.

Anyway, enough prattling on by me! Any comments, ideas, info or slaps welcome.

Keith

thegirl
_VISITCOMMUNITY
Alberta, Canada
Joined: January 19, 2008
KitMaker: 6,743 posts
AeroScale: 6,151 posts
Posted: Sunday, October 03, 2010 - 03:05 AM UTC
I like the idea of the railcar . Either as being shipped to an airfield or being sent home for retor fitting . Yes I do recall that thread which Stephen posted that image . It was in my stripe D.V build thread and that was a while ago now , about two years ago . Didn't think any one would remeber that one .
CaptainA
_VISITCOMMUNITY
Indiana, United States
Joined: May 14, 2007
KitMaker: 3,117 posts
AeroScale: 2,270 posts
Posted: Sunday, October 03, 2010 - 06:07 AM UTC
I remember it. It was cool and It got me thinking also.

The Eduard set for the D.III us very usefull for this kit. Your build looks great. Be very, very careful with the struts.
JackFlash
_VISITCOMMUNITY
Colorado, United States
Joined: January 25, 2004
KitMaker: 11,669 posts
AeroScale: 11,011 posts
Posted: Sunday, October 03, 2010 - 02:22 PM UTC
Excellent white plastic added details. Let me see what I can find on the request. But your rear cockpit screen? Souldn't the opening be at the bottom to allow the elevator and rudder cables to pass thrrough?
Kornbeef
_VISITCOMMUNITY
England - South East, United Kingdom
Joined: November 06, 2005
KitMaker: 1,667 posts
AeroScale: 1,551 posts
Posted: Sunday, October 03, 2010 - 08:24 PM UTC
thanks for the comments guys and girl.

If I go for the railcar, theres two options, trumpeter or dragon do a lowsider about £8.00 difference, the dragon comes with a section of track and extras for certain but is more expensive...will have to think.

Stephen yes the cut out is lower, I havent yet removed it, one of those forgot to do things. What I had intended was to have the fabric pulled down at the top to expose some of the structure, (Maybe so they could check for structural damage) but just as a point of interest really. But thanks for reminding me about the opening, I likely wouldnt have realised till it came to cable running time.

Cheers K
OEFFAG_153
_VISITCOMMUNITY
Västra Götaland, Sweden
Joined: February 19, 2010
KitMaker: 1,473 posts
AeroScale: 1,450 posts
Posted: Sunday, October 03, 2010 - 09:30 PM UTC
Hi Keith

Really beautiful interior you've got going there – I do like what you're achieving with the plastic aditions  – this is going to look really nice.

Looking forward to seeing this one develop

Best Regards

Mikael
Kornbeef
_VISITCOMMUNITY
England - South East, United Kingdom
Joined: November 06, 2005
KitMaker: 1,667 posts
AeroScale: 1,551 posts
Posted: Monday, October 04, 2010 - 12:27 AM UTC
Thanks Mikael
edoardo
_VISITCOMMUNITY
Milano, Italy
Joined: November 30, 2007
KitMaker: 642 posts
AeroScale: 382 posts
Posted: Monday, October 04, 2010 - 01:22 AM UTC
Hi Keith!
This is a really interesting project!
I will follow you closely!
Ciao
Edo
Kornbeef
_VISITCOMMUNITY
England - South East, United Kingdom
Joined: November 06, 2005
KitMaker: 1,667 posts
AeroScale: 1,551 posts
Posted: Tuesday, October 12, 2010 - 06:27 AM UTC
lots of work...well by my standards, so a little update, it may seem theres little change but I've been working on other parts not detailed here too.


thinned more of the nose, one thing that came to light was the bottom front access door is in the wrong place on the kit it seems. it appears to be further forwards on shots I've studied.

lots of added strengtheners added and such, some of the internals, I lost the priming pump handle...scrounged one from a tamiya 30 cal carrying handle but I'm not sure about it..


Ammo cans and cartrige belt holder, I thinned out and opened up the ends of the amo holders, skinned the backs too, I'm showing the belt holder with the lid and feeds off if I show it in the A/C or not I'm not sure.

Now for a bit of fun as Stephen would say WNW Vs Revell circa last century.


Thats all folks!

Keith
OEFFAG_153
_VISITCOMMUNITY
Västra Götaland, Sweden
Joined: February 19, 2010
KitMaker: 1,473 posts
AeroScale: 1,450 posts
Posted: Wednesday, October 13, 2010 - 02:04 AM UTC
Wow Keith You have been busy indeed  – I do like the effort on the ammo can and cartridgeholders... The plumbing looks super too.

Mikael
thegirl
_VISITCOMMUNITY
Alberta, Canada
Joined: January 19, 2008
KitMaker: 6,743 posts
AeroScale: 6,151 posts
Posted: Wednesday, October 13, 2010 - 02:08 AM UTC

Quoted Text

Wow Keith You have been busy indeed  – I do like the effort on the ammo can and cartridgeholders... The plumbing looks super too.

Mikael


I second that , coming along very nicely Keith
Mgunns
_VISITCOMMUNITY
Arizona, United States
Joined: December 12, 2008
KitMaker: 1,423 posts
AeroScale: 1,319 posts
Posted: Wednesday, October 13, 2010 - 03:31 AM UTC
Hi Keith:

Looking good so far. Is the Revell Engine out of their 1:28 D.VII kit?
I am looking forward to more pictures as you progress.

Best
Mark
Kornbeef
_VISITCOMMUNITY
England - South East, United Kingdom
Joined: November 06, 2005
KitMaker: 1,667 posts
AeroScale: 1,551 posts
Posted: Thursday, October 28, 2010 - 08:02 AM UTC
Hi all, I have been plodding along on this, it's been difficult getting into the flow, lots of life issues clouding the skies right now.

Sorry mark...I missed your reply. Yes its the revell DVII engine..with some of my 1980s super detailing added..

Any way..so to see what I've done, I've done work all over but nothing much worth showing yes apart from the following

Tankside


the tank.....second build, I realised the WNW tank is the wrong shape, size and finally sits too high in the fuselage. I realised, you can see the edges of the tank from the cockpit interior, this came to me after poring over pics from the web, the WNW booklet and the old Windsock Albatros Special datafile, trying to work out how the fuel pipework etc got past the bulkhead frame. I realised the tank was too wide and too high (see the pic of the Albi on display with the skin removed and work it out against the framework). so a razorsaw came out and hefty reprofiling.

Originally I was going to build her with the tanks out but had a change of heart as I couldnt find good reference of the area beneath the tank, I still have the mountings to make. Paintwork is rough for the details and the tank is really more metallic in appreance (bad light and flash) I edged it in plasticard, remade the fillers and cap and added the detail to the sender unit. I rebuilt the gun mounts and Added the bracketry and the pipes that drop through the reserve to main tank, the drain off and bottom of the sender, and points for all the pipework connections which I am on with now.

Ammocan side


Ammo containers and belt bin. whilst working and trawling pics I realised the belt container was not as I had made it originally, it sits quite flush to the left ammocan and kinks out over the support tube near the top...I'm suprised at this never being picked up by WNW but maybe theres more than one style, I'm following the reference in WNWs excellent instruction book and the datafile. Adding this, replacing the kit support tube and adding the mounting tabs and some small details, the open feed chute ends will have the covers but I wont fit them till much later of course from PofP or Eduards DIII etch sets.

Fuel panel


bodge/scrtatched the fuel control valvework...the dark bits are Sherman towing hook parts but don't tell anyone. pipework to be added of course.

Other than the pics I'm still adding to the fuselage walls and dryfitting parts that will be sandwiched when she finally gats closed up. starting the rear flying surfaces attachment points and working out the lower wing bracketry.

If I get chance I will take some daylight pics soon

All comments welcome as usual

Ta Keith

OEFFAG_153
_VISITCOMMUNITY
Västra Götaland, Sweden
Joined: February 19, 2010
KitMaker: 1,473 posts
AeroScale: 1,450 posts
Posted: Thursday, October 28, 2010 - 08:33 PM UTC
Hi Keith,

A pleasure to see this build developing, you are certainly on the way to something very great here – love how you've detailed the tank, very convincing!

Oh  –and I also did a "superdetailing" job on the old Revell DVII engine some years ago, I still have it somewhere in a box, will have to have a look for a laugh

Best Regards

Mikael
Kornbeef
_VISITCOMMUNITY
England - South East, United Kingdom
Joined: November 06, 2005
KitMaker: 1,667 posts
AeroScale: 1,551 posts
Posted: Monday, November 01, 2010 - 04:39 AM UTC
Mikael, yes looking at the old DVII from Revell makes you appreciate just how fortunate we are in this day for what Roden, WNW, Eduard and others give us to play with.

Now a minor update.

Main former dryfitted.


dry fitted and tested, looking at the angle of the front shot made me realise theres no need to scratch the takn mounts as they are invisible. everything in place as per WNWs locations.

I was sitting in the study (WC) where I do my best thinking, poring over the picture of the DVa with the ply stripped off on display in London (Wingnuts Albatros Fighters special. p32) always dangerous to do, I'd already noticed the tank was too high... I realised the fuel control panel is located further forwards than WNW located it. luckily its dry fitted in these first pics.

The latest interior


Okay, these shots show the plumbing etc I've put in, I dont think I need to show every pipe behind the panel. With the fuel control panel in its new location and the fuel guage moved forwards to suit the pipework behind the panel is hardly visible. Even though I intend to build her without wings or machine guns I think little else will be required, once painted it will be quite gloomy behind there. I chopped the pipes short of the former, and will carry them on around the tank on the former, same with the spark control rod and the wiring loom on the left side, all spaced to give an impression of passing between the former and tank.

Everything shown is fixed in place, by the weekend I'm hoping to have the wood base coat down and start the painting of said woodwork. Saying that I have pulleys and brackets to make so It may be much later than that.

I am enjoying the challenges this is throwing at me while doing a small amount on my DRi which seems to be going backwards instead of forwards in construction

As always all comments welcome, TTFN

Keith
OEFFAG_153
_VISITCOMMUNITY
Västra Götaland, Sweden
Joined: February 19, 2010
KitMaker: 1,473 posts
AeroScale: 1,450 posts
Posted: Monday, November 01, 2010 - 07:11 AM UTC
Hello Kieth,

This AMS buidl of yours is really turning out really great

I think you're right about the fuel lines not showing much from above – even without the wing on. I did put them in, but the pit is pretty dark in that area once the fuselage is closed.

Ofcourse thogh – you'll not have the guns installed, so there will be a bit more to see from above then...

Just me thinking a bit aloud

Mikael
warreni
_VISITCOMMUNITY
South Australia, Australia
Joined: August 14, 2007
KitMaker: 5,926 posts
AeroScale: 2,201 posts
Posted: Monday, November 01, 2010 - 08:47 AM UTC
Great progress so far Keith. Will it be ready for the end of the WNW GB??
Kornbeef
_VISITCOMMUNITY
England - South East, United Kingdom
Joined: November 06, 2005
KitMaker: 1,667 posts
AeroScale: 1,551 posts
Posted: Monday, November 01, 2010 - 01:09 PM UTC

Quoted Text

Great progress so far Keith. Will it be ready for the end of the WNW GB??

Oh no... I never intended it to be...my SE5a could have been if I hadnt bottled on the rigging.
Kornbeef
_VISITCOMMUNITY
England - South East, United Kingdom
Joined: November 06, 2005
KitMaker: 1,667 posts
AeroScale: 1,551 posts
Posted: Thursday, November 04, 2010 - 05:29 AM UTC
Update....


Forward access door opening moved.

Now it sits under the engine sump where it should be accordintg to both photo's and plans. I made it a tad big, and theres no way to thin the panel to a scale thickness but a pic I have of this area shows a lip on the inside. I will likely line the lip with a plasticard strip amd sand it to suit. You may just be able to make out the old position between the two holes.

Framework and Engine mountings.

I'm cosidering this a something of a pop in assembly, once the fuselage is buttoned and the lower inside panel filled sanded and painted. It works on a dry run but we all know how those can differ once things are fixed.

Cockpit so far.


Brackets, pulleys etc added out of plasticard. Then airbrushed in Humbrol satin 71, let dry over night then brushed in Valleyo 981 Orangebrown. After which airbrushed with Tamiya clear yellow.
Details picked out in Humbrol, Lifecolor and Citadel paints. before the decals were added Instrument bezels added froman old Reheat etched set I found while rummaging. fixed witha copious dab of Klear and sealed with another once set. More detailing t add soon and washing/weathering everything in

Dry Assembled Cockpit.


In the first shot you can see how I moved the fuel control panel forwards. I don't think there is much need to show additional pipework behind it< do you agree?
Theres still a few details to add, the compass bracket for one, I cant imagine they would leave the compass in, far to valuable to leave in a derelict.
So while this dries...and I return to take a second view over it I'm working on the column and pedal assembly and the rear gun mounting. I have to work out cabling and wiring to guages, and the connections to machine guns, rear of the cam for the interuptor assemblies etc. Still lots to do..and dont think I havent thought of pinching Eduardo's downed Fokker idea for this...Half imagined it as being stripped on crash site for all the best bits.


TKS for looking, all comments appreciated.

Keith


gajouette
_VISITCOMMUNITY
Texas, United States
Joined: February 01, 2007
KitMaker: 365 posts
AeroScale: 356 posts
Posted: Thursday, November 04, 2010 - 05:50 AM UTC
keith,
Man that's some beautiful work.I'm impressed by your handling of the fuselage interior.This will be one awesome project my friend,keep up the excellent updates.

Regards,
Gregory Jouette
Kornbeef
_VISITCOMMUNITY
England - South East, United Kingdom
Joined: November 06, 2005
KitMaker: 1,667 posts
AeroScale: 1,551 posts
Posted: Thursday, November 04, 2010 - 01:02 PM UTC
Thank you Gregory.


Keith
JackFlash
_VISITCOMMUNITY
Colorado, United States
Joined: January 25, 2004
KitMaker: 11,669 posts
AeroScale: 11,011 posts
Posted: Friday, November 05, 2010 - 02:28 AM UTC
Nice work Keith. Let me encourage you to continue. Model On please!
OEFFAG_153
_VISITCOMMUNITY
Västra Götaland, Sweden
Joined: February 19, 2010
KitMaker: 1,473 posts
AeroScale: 1,450 posts
Posted: Friday, November 05, 2010 - 05:41 AM UTC
Really great progress Keith, with paint on, it is really starting to come alive – and yes, I agree – no need for any aditional piping behind the panel.

Keep it coming

Mikael

P.S. Yep – that crashsite idea of Edos is really tempting...
Kornbeef
_VISITCOMMUNITY
England - South East, United Kingdom
Joined: November 06, 2005
KitMaker: 1,667 posts
AeroScale: 1,551 posts
Posted: Sunday, November 07, 2010 - 02:21 PM UTC
thanks for the encouragement guys, I'm spending what time I can working on the rest of the cockpit parts, remaking the rudderbar assy, reworking the rear gun mount, detailing the column and hacking the seat to bits.


guitarlute101
_VISITCOMMUNITY
West Virginia, United States
Joined: December 18, 2006
KitMaker: 1,121 posts
AeroScale: 1,063 posts
Posted: Monday, November 08, 2010 - 12:52 AM UTC


Fantastic work Keith. Looking forward to more.

Mark
 _GOTOTOP