_GOTOBOTTOM
Early Aviation
Discuss World War I and the early years of aviation thru 1934.
WNW 1:32 Albatros D.Va
edoardo
_VISITCOMMUNITY
Milano, Italy
Joined: November 30, 2007
KitMaker: 642 posts
AeroScale: 382 posts
Posted: Monday, November 22, 2010 - 01:28 AM UTC
Hi all!
I know it is a tough arena, but nevertheless I'll enter yet another WNW Albatross Va!

After a fiew night spent on it I can say that it is a very beautiful kit, very well engineered and the bigger scale offers a high level of superdetailing.
This is the only shortcoming of such a kit: in the hands of a not so talented modeller as I am all that axtra room given by the bigger scale is of a little use since it will always end up as an OOB build and all those possibilities of detailing will be lost.

Anyway, it is a real joy to build and I think I am learning something throug it (even if my build is not at all error free).

Here are some pictures of the work in progress.
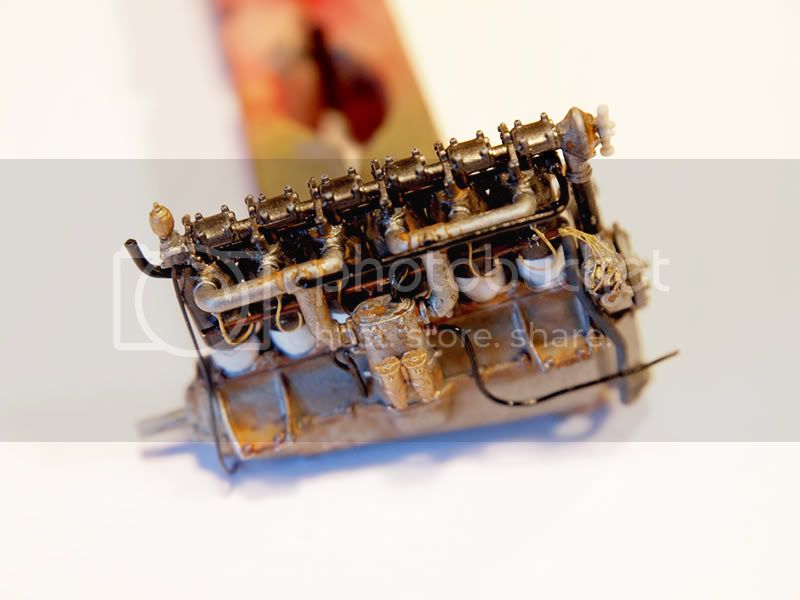
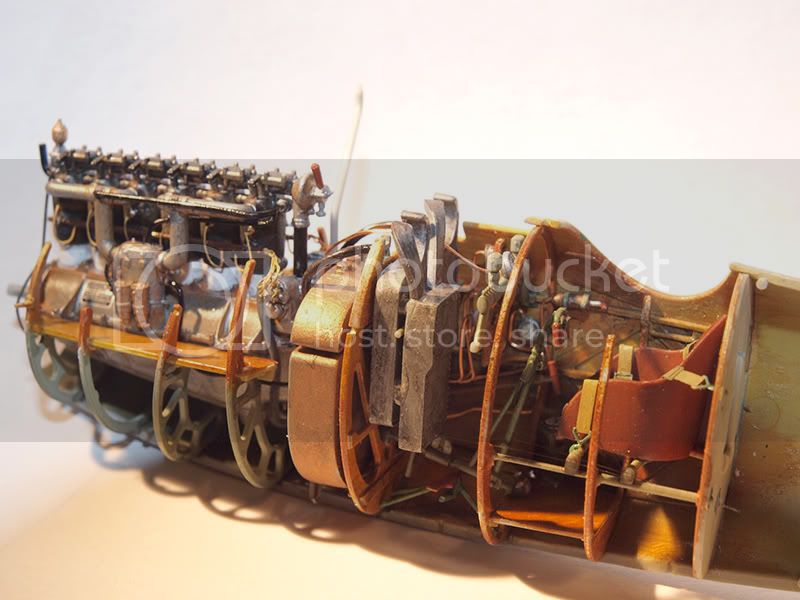
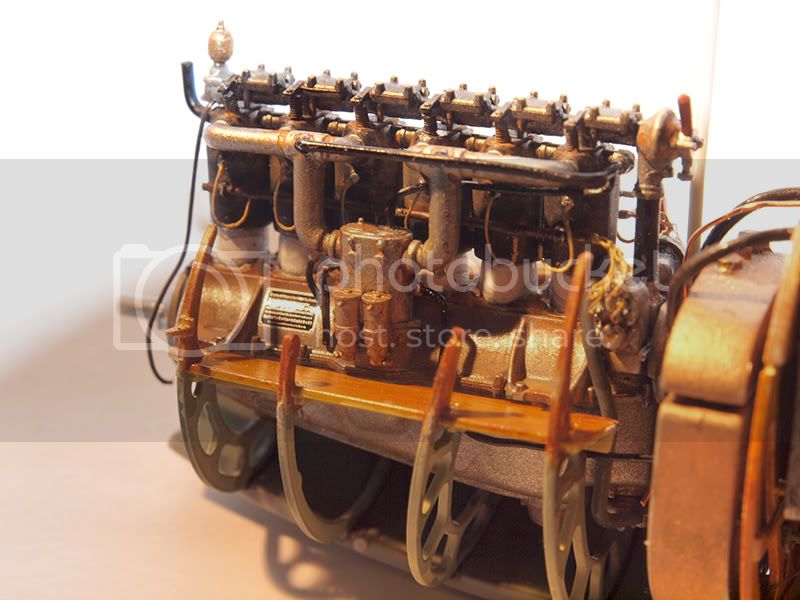
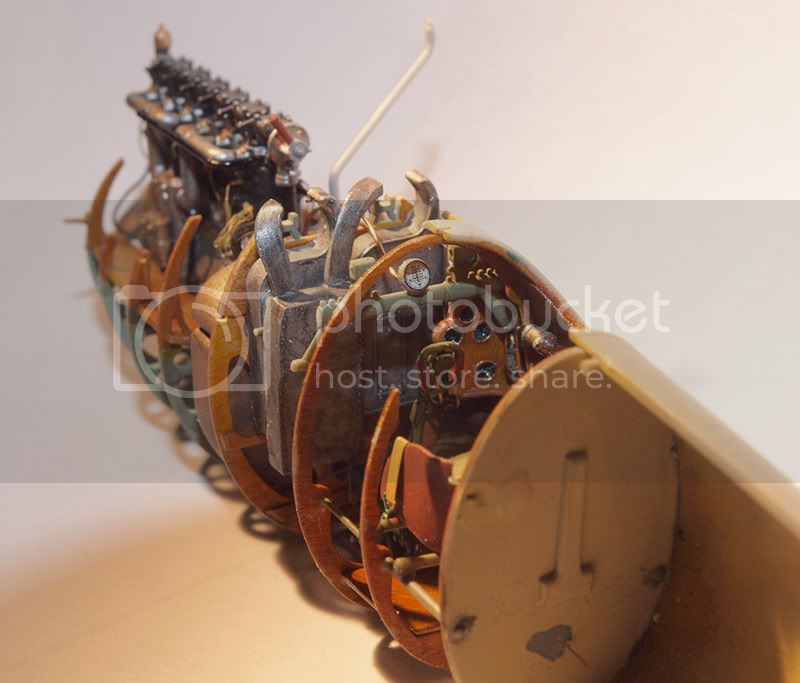
I started in detailing the engine: I used 0,6 mm brass pipe for the spark wire tubes, thus allowing me to insert the sparks' wire in it; than I used 0,4 mm brass pipe for the sparks themselves and finally I subsituted the springs with twisted copper wire.


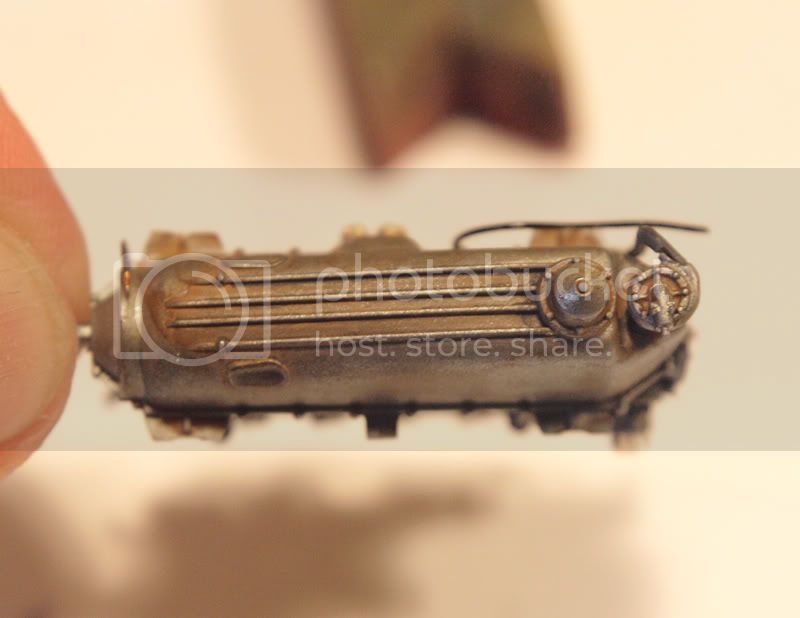
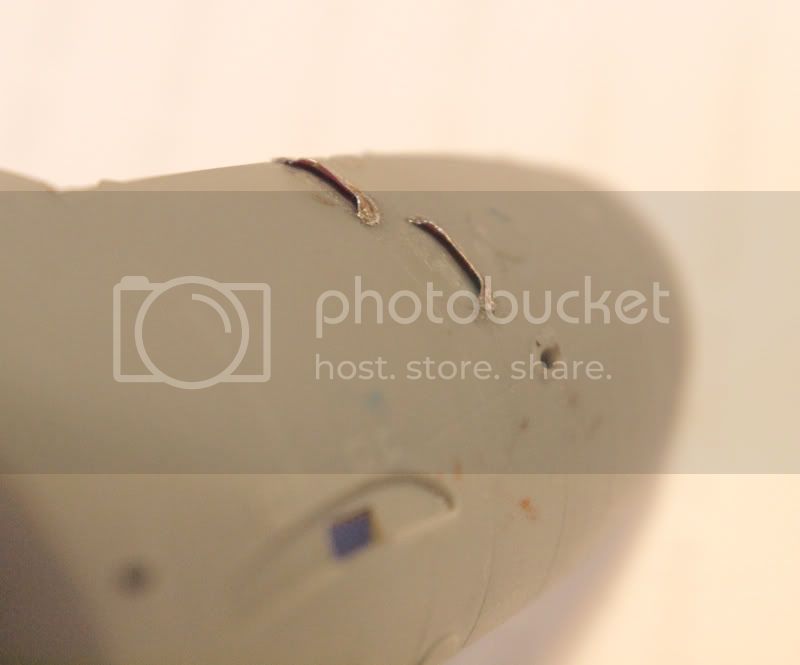
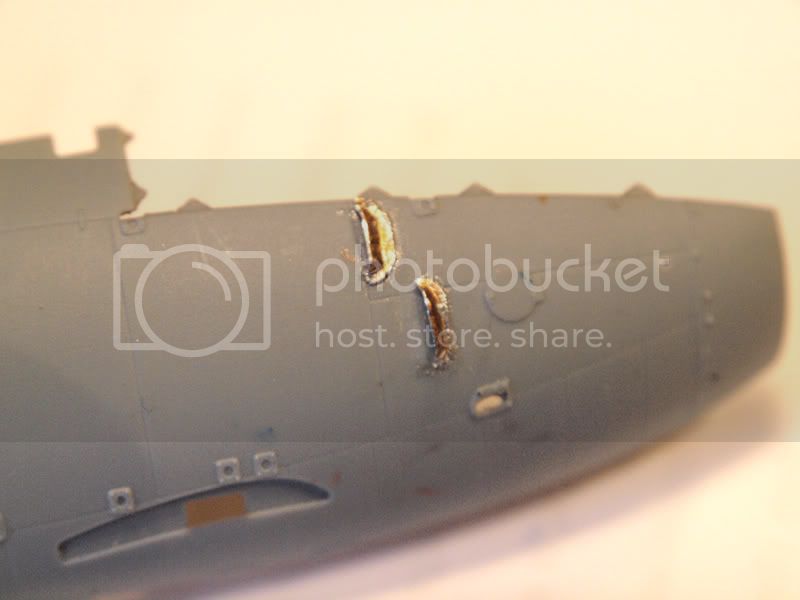
Next I sobstituted the air intake with some tinfoil:


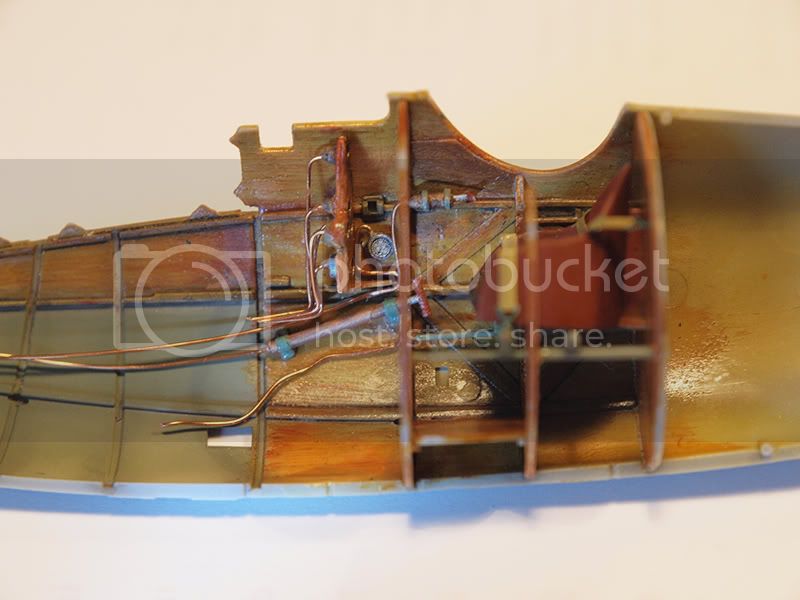
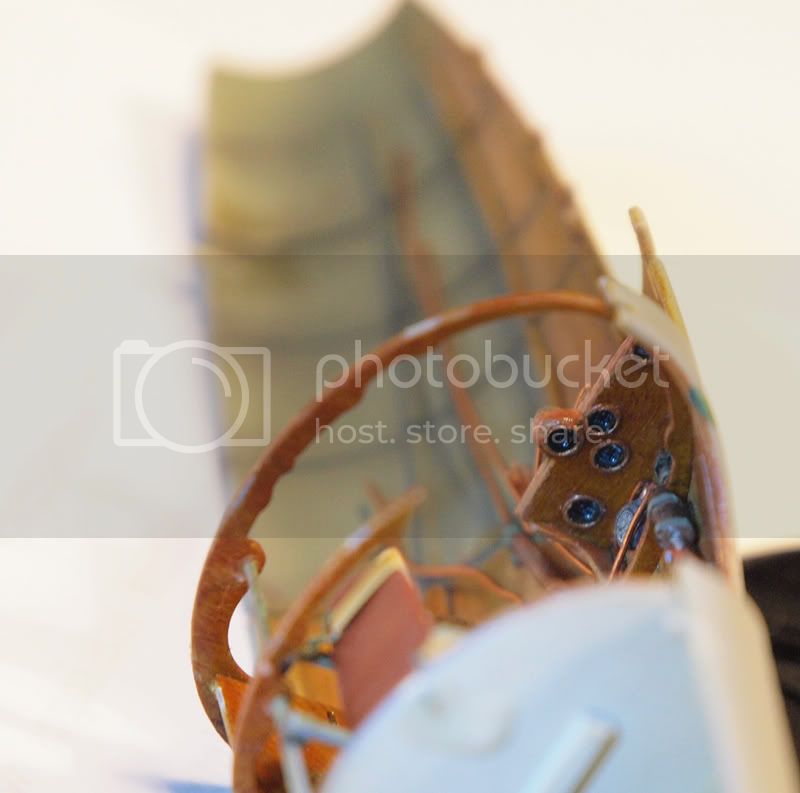
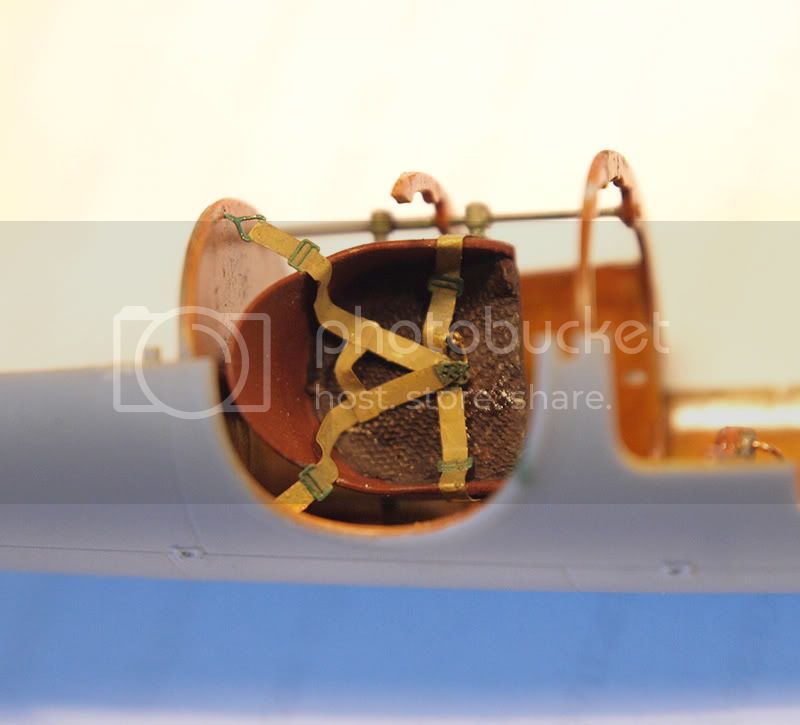
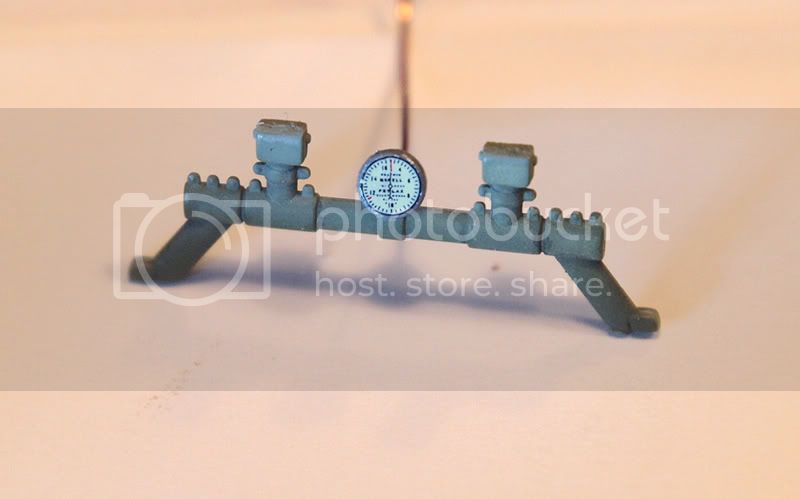
My last picture for today is a part of the instrument panel, by the way; the decals are really super! The best I have ever found!


This is all for now!
As always any comment is most welcome!
See you soon, my friends!

ciao
Edo
Mgunns
_VISITCOMMUNITY
Arizona, United States
Joined: December 12, 2008
KitMaker: 1,423 posts
AeroScale: 1,319 posts
Posted: Monday, November 22, 2010 - 03:08 AM UTC
Hi Edo:

Looking good my friend. The engine is really neat, and a tribute to your patience and craftsmanship; especially with the valve springs. I will have to try that when I get to mine. Keep those cards and letters coming!

Best
Mark
JackFlash
_VISITCOMMUNITY
Colorado, United States
Joined: January 25, 2004
KitMaker: 11,669 posts
AeroScale: 11,011 posts
Posted: Monday, November 22, 2010 - 04:02 AM UTC
Decent work so far Edo!
thegirl
_VISITCOMMUNITY
Alberta, Canada
Joined: January 19, 2008
KitMaker: 6,743 posts
AeroScale: 6,151 posts
Posted: Monday, November 22, 2010 - 05:06 AM UTC
Can't argue with others here , nicely done so far Edo !
Kornbeef
_VISITCOMMUNITY
England - South East, United Kingdom
Joined: November 06, 2005
KitMaker: 1,667 posts
AeroScale: 1,551 posts
Posted: Monday, November 22, 2010 - 07:23 AM UTC
Very nice start Edo,

Never enough Albatrossen in my mind, so lets see what you do with her.


Keith,
OEFFAG_153
_VISITCOMMUNITY
Västra Götaland, Sweden
Joined: February 19, 2010
KitMaker: 1,473 posts
AeroScale: 1,450 posts
Posted: Monday, November 22, 2010 - 08:31 PM UTC
Hi Edo

Very nice detailing and start of the DVa – I'm sure you´ll enjoy this one, they're very nice to build – almost finished my second one – and I've ordered a third from WNW. Like Keith says – you can never have enough Albatrossen

Best Regards

Mikael
edoardo
_VISITCOMMUNITY
Milano, Italy
Joined: November 30, 2007
KitMaker: 642 posts
AeroScale: 382 posts
Posted: Monday, November 22, 2010 - 08:42 PM UTC
Hi guys!
Thank you for the kind comments!
I know what you mean: one can easyly get addicted to Albatrosses, and watching your builds is highly inspiring too!!!
I'll post some new pics soon.


ciao
edo
RAGIII
_VISITCOMMUNITY
North Carolina, United States
Joined: June 19, 2007
KitMaker: 604 posts
AeroScale: 600 posts
Posted: Tuesday, November 23, 2010 - 11:48 AM UTC
Looks fantastic!
Keep up the great work,
RAGIII
edoardo
_VISITCOMMUNITY
Milano, Italy
Joined: November 30, 2007
KitMaker: 642 posts
AeroScale: 382 posts
Posted: Sunday, November 28, 2010 - 09:23 PM UTC
Hi all!

RAGIII: thank you for the nice worlds, it is very hard to keep up to the standard of the others builds!

But I have some update for you, that I can't wait to show off!
I worked ont the engine.. so here it goes:


As you can see I added some details (mainly the sparks' wiring), but it is not finished yet.

For the weathering I used (maybe too much of it...) what I call 'rusty vinegar'.
I don't master the technique, but it is a great weathering medium... here is the recipe:
In a small cup put some vinegar, then soak in it some steel wool. Let it rest till the wool completely dissolves itself (usually a couple of days), then filter the resulting fluid to get rid of eventual steel particles. Now you can use it to paint on your model with a pointed brush: it is very watery so be careful not to leave pools. Also be careful not to over use it: when liquid it seems almost transparent but when it dries the suspended rust will settle in a nice and smooth way. You can also dillute the effect in selected spots by adding a drop of water with the brush after you painted the rusty vinegar.
It is not as strong a rust effect as rust powder itself (as here you almost don't have any pattern) but it provides a good rust base upon which build further effects, either more rust or more polished via a light drybrushing.
Hope it helps!

ciao
Edo
Mgunns
_VISITCOMMUNITY
Arizona, United States
Joined: December 12, 2008
KitMaker: 1,423 posts
AeroScale: 1,319 posts
Posted: Monday, November 29, 2010 - 02:17 AM UTC
Hi Edo:

Thanks for the rust tips. Engine is coming along nicely, are you planning on displaying it?

Best

Mark
edoardo
_VISITCOMMUNITY
Milano, Italy
Joined: November 30, 2007
KitMaker: 642 posts
AeroScale: 382 posts
Posted: Monday, November 29, 2010 - 03:15 AM UTC
Hi Mark!
Thank you for the kind comments!
As far as the engine is concerned, to tell the truth I really don't know...
I'd like to let those detail seen, but an open cowl also make an 'incomplete' aircraft, the shape is 'broken'... don't know if I make myself understood...
So I really don't know... in the end I'll tink I'll wait for the very last to make up my mind!!

ciao
Edo
thegirl
_VISITCOMMUNITY
Alberta, Canada
Joined: January 19, 2008
KitMaker: 6,743 posts
AeroScale: 6,151 posts
Posted: Monday, November 29, 2010 - 03:44 AM UTC
She is coming very fine Edo ! Neet tip with the use of vingar ......
Mgunns
_VISITCOMMUNITY
Arizona, United States
Joined: December 12, 2008
KitMaker: 1,423 posts
AeroScale: 1,319 posts
Posted: Monday, November 29, 2010 - 08:31 AM UTC
Hi Edo:

I do understand about open cowlings. I think an open cowling is neat in a diorama where there is a mechanic working on the a/c, but just having the engine out there, even though the work is amazing, breaks the outline up and the model doesn't look complete. Your engine work is outstanding, but if most of it is hidden by the cowling, it becomes more of an effort in detailing for the personal enjoyment and practice rather than all that detail will be seen.

Best

Mark
Kornbeef
_VISITCOMMUNITY
England - South East, United Kingdom
Joined: November 06, 2005
KitMaker: 1,667 posts
AeroScale: 1,551 posts
Posted: Monday, November 29, 2010 - 08:42 PM UTC
Nice work Edo but you missed the Gersplungel shaft and the Flitzermerjiggy that leads to the whatjamacallit, next to the thingummyjig that makes the doodah spin.

Cowlings are an issue, best decide once you have her buttoned up, some people seem to have had fit issues, others not. I did, everything fitted fine when dryfitted. Several coats of paint and a little misaligning during construction later, I had to twist and shim under them to get them into place.

All said though it is a beauty to work upon and your work so far is super.

Seeing that you are replacing the vent louvres with foil..are you going to replace the access doors too? If so note the front one between the U/c legs is too far back, it needs moving to infront of the next most forward former so it sits under the sump of the engine. Not a big issue I know 99% of the kits including my own have been built unaware of this..just I spotted it when building the scrapper.


Keith

Removed by original poster on 11/30/10 - 11:43:19 (GMT).
OEFFAG_153
_VISITCOMMUNITY
Västra Götaland, Sweden
Joined: February 19, 2010
KitMaker: 1,473 posts
AeroScale: 1,450 posts
Posted: Monday, November 29, 2010 - 11:37 PM UTC
Hi Edo,

A supernice job on the detailing with the engine – it looks like you could start her right up

Very neat tip with the rusty vinegar – Thank You – I'm going to try that one in the future. This does prove the point that I learn something new everytime you guys start building a kit here at the forum

Best Regards

Mikael
edoardo
_VISITCOMMUNITY
Milano, Italy
Joined: November 30, 2007
KitMaker: 642 posts
AeroScale: 382 posts
Posted: Wednesday, December 01, 2010 - 01:41 AM UTC
Hi all!
Thank you for the nice world!

Keith! I was really trying to read what you wrote, trying to remember that little German I was thaught at school!! Ah! Ah! Ah! you make me laught, mate!

Thank you also for the tip on access hatch. To tell the truth I have some left over for a Roden kits of a D.III that I could use, but I fear to damage the panel lines while sanding though...

As far as the cowling are concerned, I think I'll follow Oeffag lead: one cowl on the other off...

One world on the 'rusty vinegar' tip.
I should have said it earlier...
The tip is not mine, I found it while rumbling on some site of modelling where it was also used to age wood.

ciao
Edo
JackFlash
_VISITCOMMUNITY
Colorado, United States
Joined: January 25, 2004
KitMaker: 11,669 posts
AeroScale: 11,011 posts
Posted: Wednesday, December 01, 2010 - 02:52 AM UTC
Edo just lay some masking tape down over the panel lines when sanding down the circular access hatch.
Kornbeef
_VISITCOMMUNITY
England - South East, United Kingdom
Joined: November 06, 2005
KitMaker: 1,667 posts
AeroScale: 1,551 posts
Posted: Wednesday, December 01, 2010 - 08:58 PM UTC
Edo, those 2 access panels are on the seam anyway and not so well detailed as the others so are worth sanding off and replacing if you are consididering moving it. simple and easy to remove without soing any real damage.

yes they were made up names...
edoardo
_VISITCOMMUNITY
Milano, Italy
Joined: November 30, 2007
KitMaker: 642 posts
AeroScale: 382 posts
Posted: Thursday, December 02, 2010 - 02:00 AM UTC
Stephen & Keith!
Thank you very much for the infos!
At this point I cannot but move the access doors...

In the maenwhile I started to work on the interior.
Here are some pics...

Here you can see the wireing I added and also the whaterpump I had to scratchbuild as the original was a toll the carpet monster claimed to my Albatross


Here you can see the control panel... youll notice that I have messed up the switches


Here a view from above: note the seat where I added a Milliput cushion, the pattern is made by pressing a T-shirt on it...

That's all for now!

Ciao
Edo
edoardo
_VISITCOMMUNITY
Milano, Italy
Joined: November 30, 2007
KitMaker: 642 posts
AeroScale: 382 posts
Posted: Wednesday, December 15, 2010 - 02:47 AM UTC
Hi all!
The cokpit is complete and I took the opportunity to take some pictures before sealing it...
Here are some, hope you'll enjoy!


Ciao
Edo
Mgunns
_VISITCOMMUNITY
Arizona, United States
Joined: December 12, 2008
KitMaker: 1,423 posts
AeroScale: 1,319 posts
Posted: Wednesday, December 15, 2010 - 04:28 AM UTC
Hi Edo:

This is really coming along nicely. You certainly put a lot of effort into the cockpit and it looks great. I am finally getting my basement back in order and getting the model room squared away. The WNW Albatros D.V is high on my to do list for this winter. I will be referring to yours for tips. Thanks for posting Edo.

Best
Mark
edoardo
_VISITCOMMUNITY
Milano, Italy
Joined: November 30, 2007
KitMaker: 642 posts
AeroScale: 382 posts
Posted: Wednesday, December 15, 2010 - 04:46 AM UTC
Hi Mark!
I am glad that your 'cave' will be soon ok, so that you can be back to the modelling banch soon!
WNW kits are great and I am sure you'll get the most out of it... I am curious to see the outcome!

Ciao
Edo

OEFFAG_153
_VISITCOMMUNITY
Västra Götaland, Sweden
Joined: February 19, 2010
KitMaker: 1,473 posts
AeroScale: 1,450 posts
Posted: Wednesday, December 15, 2010 - 07:07 AM UTC
Hi Edo,

Very nice progress on the DV, I think Your interior is really taking shape there. That T-shirt trick on milliput is pretty neat, I'll store that one for the future.

Looking forward to your next update.

Mikael
CaptainA
_VISITCOMMUNITY
Indiana, United States
Joined: May 14, 2007
KitMaker: 3,117 posts
AeroScale: 2,270 posts
Posted: Thursday, December 16, 2010 - 02:03 AM UTC
Looks great Edo. You are doing some really cool things on this one. The interior looks fantastic.
 _GOTOTOP