Connecticut, United States
Joined: February 05, 2009
KitMaker: 33 posts
AeroScale: 32 posts
Posted: Sunday, January 09, 2011 - 01:15 PM UTC
Here is my effort at constructing this kit right out of the box with the exception of Bob' Buckles, Albion Metal tubes and Misterkit paint for the first time.
This is a great kit that almost builds itself. What a gem. I plan on choosing the red and white scheme of Jasta 18 but who knows.


England - South East, United Kingdom
Joined: November 06, 2005
KitMaker: 1,667 posts
AeroScale: 1,551 posts
Posted: Sunday, January 09, 2011 - 01:20 PM UTC
Nice start, congrats on being the first to post this new gem of a kit too, I pondered long and hard whether to buy this or the Roland, settling for the quirkier looking Roland but this is still on the list.
I'll look forwards to your updates Thomas.
Keith
Still can't cure the AMS even with sausage finger implants & olde eyes.
Alberta, Canada
Joined: January 19, 2008
KitMaker: 6,743 posts
AeroScale: 6,151 posts
Posted: Sunday, January 09, 2011 - 02:15 PM UTC
I would really love to see the pic's , but I see is those lovely red X 's
Connecticut, United States
Joined: February 05, 2009
KitMaker: 33 posts
AeroScale: 32 posts
Posted: Sunday, January 09, 2011 - 02:21 PM UTC
I know. I am using a new netbook with windows 7 and I am having a terrible time downloading pix and I don't know why. Never had trouble before- been at it all day. I will postwhen I figure it out. Tom
Colorado, United States
Joined: January 25, 2004
KitMaker: 11,669 posts
AeroScale: 11,011 posts
Posted: Sunday, January 09, 2011 - 07:35 PM UTC
It is the Kitmaker gallery. Don't use the link box to take the link from. Open the image in the gallery and right click to get the properties. Copy between the image links in the post. I fixed the images for you.
". . .The most important thing is to know why you build and then get the most that you can out of building." via D.D.
Arizona, United States
Joined: December 12, 2008
KitMaker: 1,423 posts
AeroScale: 1,319 posts
Posted: Monday, January 10, 2011 - 01:36 AM UTC

Looking good. I got this for Christmas from my son. I really like the kit and am looking forward to building it. I will be following your build with "Keen Interest" as you progress for pointers and how to's. Thanks for sharing.
Best
Mark
We few, we happy few........
Indiana, United States
Joined: May 14, 2007
KitMaker: 3,117 posts
AeroScale: 2,270 posts
Posted: Monday, January 10, 2011 - 04:40 AM UTC
Looks great. I am really looking forward to getting one of these for myself. I will. Be watching this thread along with everybody else.
We also hope to see you loitering in the Early Aviation hangar more often.
"Treat 'em Rough", Current Builds--Wingnut Rumpler
I am frequently seen with blood shot eyes from staying up past my nap time to get the right colour scheme on my latest WWI model?
West Virginia, United States
Joined: December 18, 2006
KitMaker: 1,121 posts
AeroScale: 1,063 posts
Posted: Monday, January 10, 2011 - 05:04 AM UTC
Great to see you here Thomas. Nice work on the kit, it is a gem isn't it?
Mark
Connecticut, United States
Joined: February 05, 2009
KitMaker: 33 posts
AeroScale: 32 posts
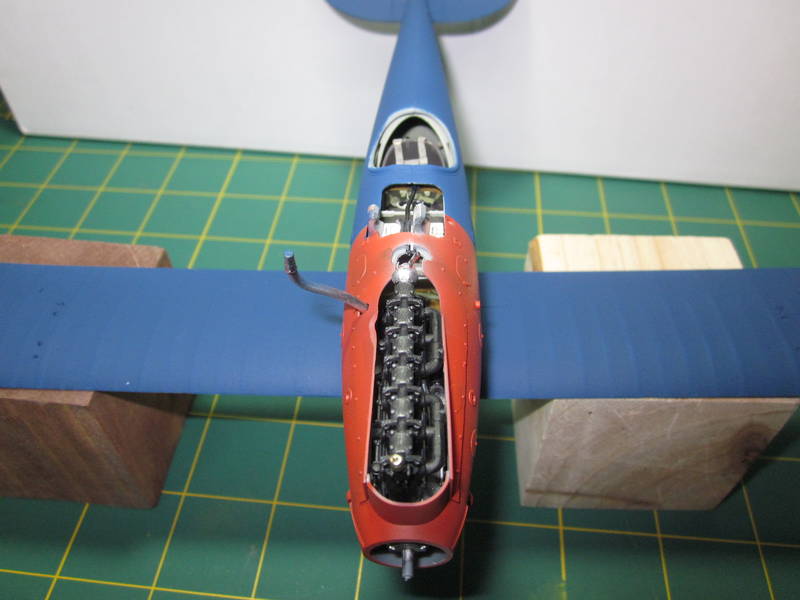
Posted: Monday, January 10, 2011 - 10:02 AM UTC
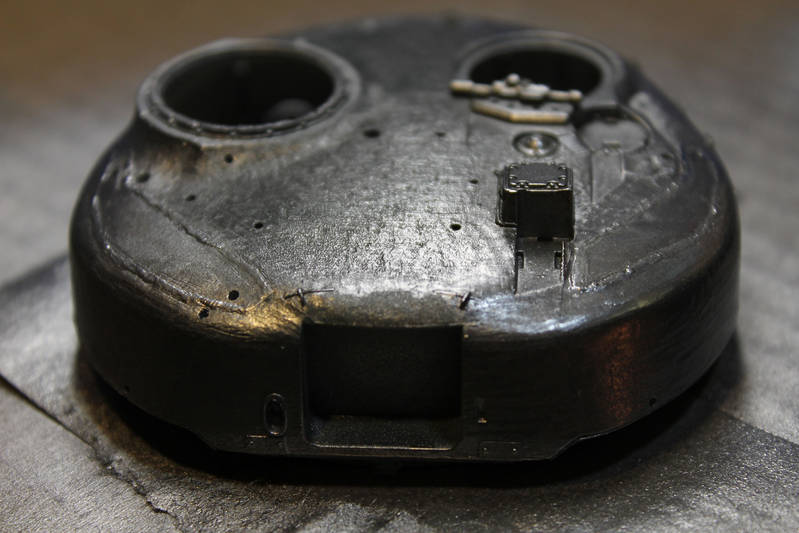
Here is a closeup of the engine- again out of the box.
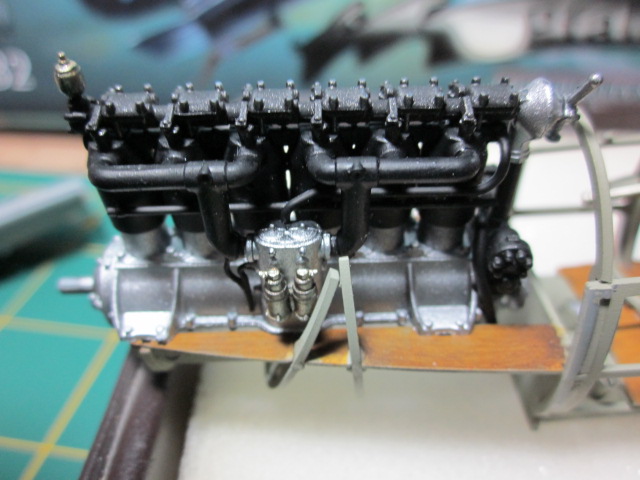
Does anyone know why the insides of the fusealage have all these vertical lines? Winnuts advises to paint light gray or gray-green. I'm not sure if I should emphasize these lines with shading . They won't be very visible once it's closed up.

Alberta, Canada
Joined: January 19, 2008
KitMaker: 6,743 posts
AeroScale: 6,151 posts
Posted: Monday, January 10, 2011 - 01:24 PM UTC
Very nice so far ! Nice clean paint job

As the others I will be following this build with more then a keen interest .
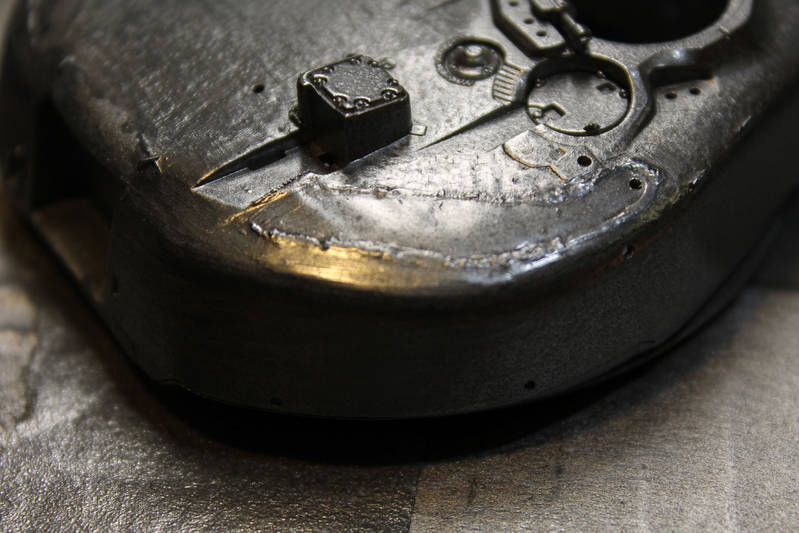
As to your question on the inside of the fuselage halves . On the real aircraft strips of wood are laminated together in layers with the strips being layed in criss-cross pattern , much like today with carbon fiber . and fromed/press molded . This process produce a very strong and ridged fuselage shell while saving weight . The fuselage of the Roland C.II/a was built the same way . Kind of hard for me to really explain it , but thats about the gest of it . Some esle will be able to explain it better then what I just did . ............
Stephen has posted a pic of this before for the Pfalz , but I can't find the thread it was in . It was a while back . If my scanner was working I would have posted a pic .
Colorado, United States
Joined: January 25, 2004
KitMaker: 11,669 posts
AeroScale: 11,011 posts
Posted: Monday, January 10, 2011 - 05:06 PM UTC
Quoted Text
As to your question on the inside of the fuselage halves . On the real aircraft strips of wood are laminated together in layers with the strips being layed in criss-cross pattern , much like today with carbon fiber . and fromed/press molded . This process produce a very strong and ridged fuselage shell while saving weight . The fuselage of the Roland C.II/a was built the same way . Kind of hard for me to really explain it , but thats about the gest of it . Some esle will be able to explain it better then what I just did . ............
Stephen has posted a pic of this before for the Pfalz , but I can't find the thread it was in . It was a while back . If my scanner was working I would have posted a pic .
Here you go Terri.
Roden Pfalz D.III build thread Here is the image your looking for.
". . .As a method of building up the fuselage, several mnufacturers began by steaming wood over male molds. Think of it as vacuforming plastic over a male mold. Albatros did whole panel sections in 3mm plywood. Pfalz used strips of wood 1 - 2mm thick. They would steam the wood. and lay it down over the mold diagonally, then they would run another course diagonally on the opposite direction and apply glue to laminate these layer together. The reultant half shells were nailed and screwed to wooden formers and usually very durable EXCEPT for one single problem.
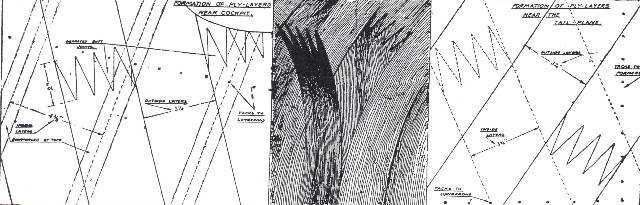
Germany was short on cured wood during the summer of 1917. (Manufacturers had to cure their own by the way.) Unfortunately for Pfalz Werke to keep up with their contractural demands "green wood" crept into their production of the D.III & D.IIIa aircraft. For a machine that shoud have an almost perfect flying profile it developed a nasty problem. After having served at the front for several weeks many of the Pfalz D. III and D.IIIa fighters began developing a twist or warp in the fuselage near the tail unit. Not noiceable on the ground but seen easy from above, the tail unit would be either left or right a few degrees from center. (I have a study on Jasta 64w that is due to be published in "Over the Front" next year (2008) that details some of these concerns. . ."
". . .The most important thing is to know why you build and then get the most that you can out of building." via D.D.
England - South East, United Kingdom
Joined: November 06, 2005
KitMaker: 1,667 posts
AeroScale: 1,551 posts
Posted: Tuesday, January 11, 2011 - 08:58 PM UTC
Very interesting Stephen.
For future reference for myself (not saying I'm buying a Pfalz but its high on the want list. The images are great but could you clear a point up for me? On the left image ((Joints near cockpit)). Are the extra lines each side of the joints tapes? Not as I need to know but the old AMS stirred as I looked. Showing us advanced sufferers such treasures is wicked of you, you do realise that I'm sure.

Kb ..... Already working out how to cut a *splice* stencil for when I do the Roland woodwork and I don't even have it yet even if I really fancy the humbug scheme of Emil Koch's J32b bird (profile D)
Keith
Still can't cure the AMS even with sausage finger implants & olde eyes.
Colorado, United States
Joined: January 25, 2004
KitMaker: 11,669 posts
AeroScale: 11,011 posts
Posted: Wednesday, January 12, 2011 - 01:50 AM UTC
Quoted Text
Very interesting Stephen.
For future reference for myself (not saying I'm buying a Pfalz but its high on the want list. The images are great but could you clear a point up for me? On the left image ((Joints near cockpit)). Are the extra lines each side of the joints tapes? Not as I need to know but the old AMS stirred as I looked. Showing us advanced sufferers such treasures is wicked of you, you do realise that I'm sure.
Kb ..... Already working out how to cut a *splice* stencil for when I do the Roland woodwork and I don't even have it yet even if I really fancy the humbug scheme of Emil Koch's J32b bird (profile D)
Keith
Yes, the extra lines you are seeing are cloth tapes.
". . .The most important thing is to know why you build and then get the most that you can out of building." via D.D.
Connecticut, United States
Joined: February 05, 2009
KitMaker: 33 posts
AeroScale: 32 posts
Posted: Thursday, January 13, 2011 - 12:31 PM UTC
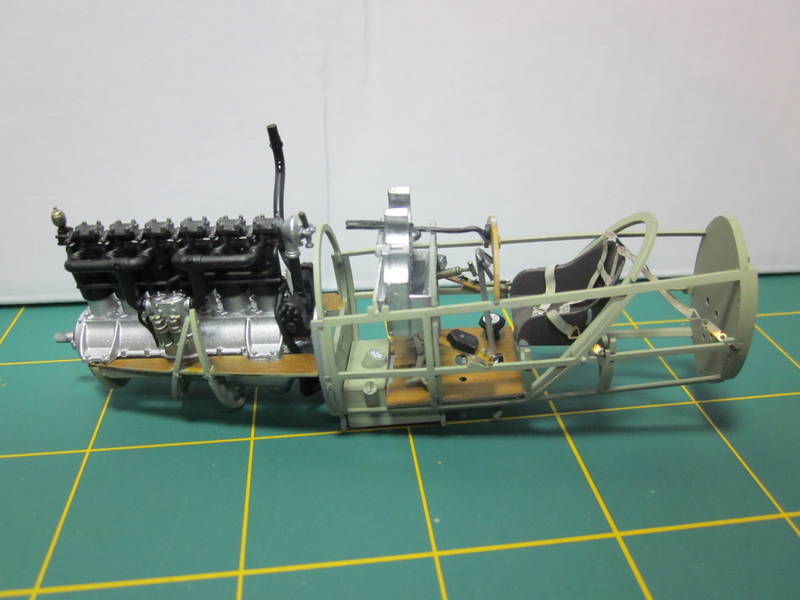
I am getting ready to close the fusealage. One word of caution with this kit- make sure to trim the parts off the sprue correctly-made a couple of mistakes already. Since I suffer from MMS ( Mortal ModelersSyndrome) the carpet monster got 3 pieces already. You eagle eyes can probably spot whats missing. That being said this kit might be the best I have made yet
and I am definitely going to get another one.

Colorado, United States
Joined: January 25, 2004
KitMaker: 11,669 posts
AeroScale: 11,011 posts
Posted: Sunday, January 16, 2011 - 11:58 AM UTC
Nice work so far Tom. Please continue.
". . .The most important thing is to know why you build and then get the most that you can out of building." via D.D.
Alberta, Canada
Joined: January 19, 2008
KitMaker: 6,743 posts
AeroScale: 6,151 posts
Posted: Monday, January 17, 2011 - 02:07 AM UTC
I second that , nice clean work so far !
Connecticut, United States
Joined: February 05, 2009
KitMaker: 33 posts
AeroScale: 32 posts
Posted: Monday, January 17, 2011 - 07:48 AM UTC
Connecticut, United States
Joined: February 05, 2009
KitMaker: 33 posts
AeroScale: 32 posts
Posted: Monday, January 17, 2011 - 07:58 AM UTC
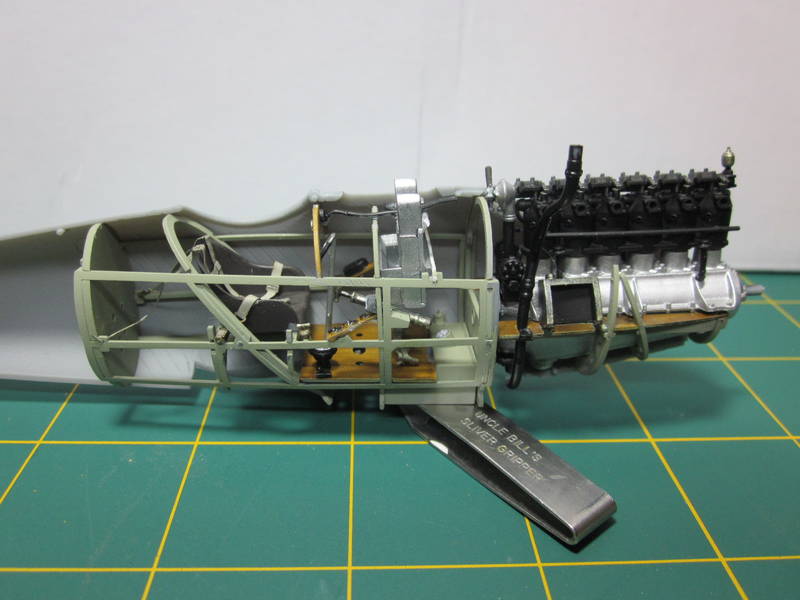
Work on the Pfalz is coming along. I closed up the fusealage and primed everything with Tamiya Sky Gray.
Next I taped the top wing for pre-shading. I used Jammy Dog tape for the first time and it really made taping a lot quicker and easier.

Here is the result.

Next up taping and shading the bottom wing.
Indiana, United States
Joined: May 14, 2007
KitMaker: 3,117 posts
AeroScale: 2,270 posts
Posted: Monday, January 17, 2011 - 08:17 AM UTC
How tight are the tolerances on this kit?
"Treat 'em Rough", Current Builds--Wingnut Rumpler
I am frequently seen with blood shot eyes from staying up past my nap time to get the right colour scheme on my latest WWI model?
Alberta, Canada
Joined: January 19, 2008
KitMaker: 6,743 posts
AeroScale: 6,151 posts
Posted: Monday, January 17, 2011 - 08:24 AM UTC
Pre-shading turned out very well , she is now starting to come together very nicely !
Connecticut, United States
Joined: February 05, 2009
KitMaker: 33 posts
AeroScale: 32 posts
Posted: Monday, January 17, 2011 - 09:35 AM UTC
This kit is much more forgiving than the Albatros but I did need to do a lot of sanding and test fitting to get the halves to fit right . If you don't get it perfect the bottom wing won't sit right. Better to get it right at this step.
Here are the pre-shading pixs of the bottom wing.


Still not sure on the final choice of livery- leaning towards the red and blue of Jasta 18.
Connecticut, United States
Joined: February 05, 2009
KitMaker: 33 posts
AeroScale: 32 posts
Posted: Saturday, January 22, 2011 - 05:33 AM UTC
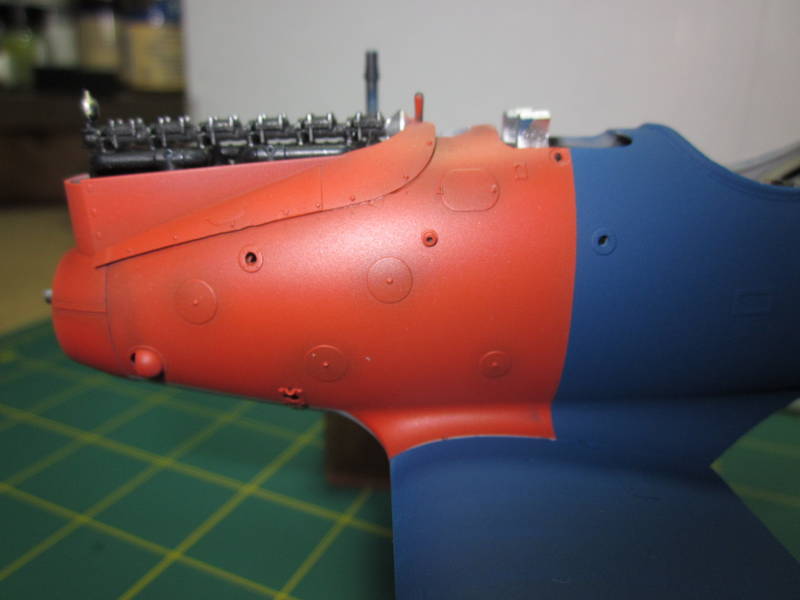
Finally getting to the fun part-painting. I tried Misterkit paints for the first time and they are great. Properly thinned they spray on smooth and leave a durable semi-gloss finish. I am a convert!
I decided on the red and blue of Jast 18.
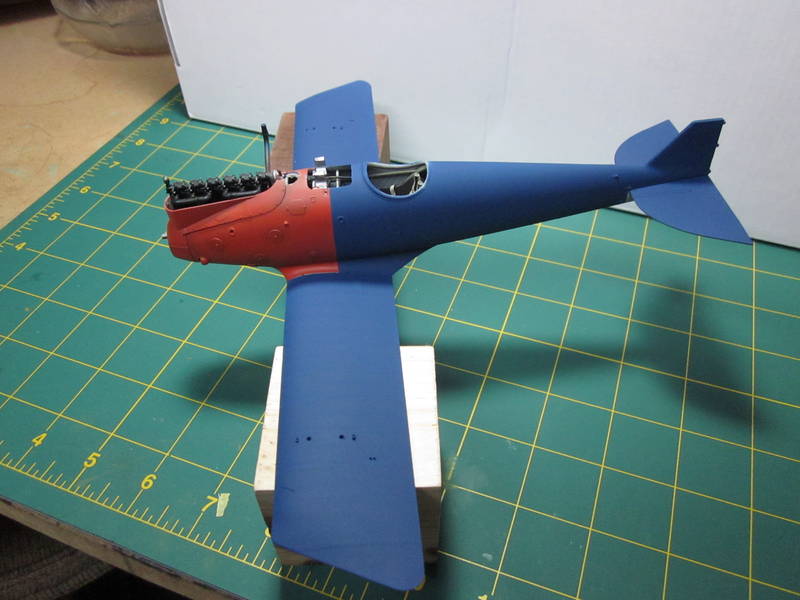

Next up are some touch ups, weathering and on to rigging.
Colorado, United States
Joined: January 25, 2004
KitMaker: 11,669 posts
AeroScale: 11,011 posts
Posted: Saturday, January 22, 2011 - 10:07 AM UTC
Fine work so far! Looking back is there anything you would have done differently up til now?
". . .The most important thing is to know why you build and then get the most that you can out of building." via D.D.
Connecticut, United States
Joined: February 05, 2009
KitMaker: 33 posts
AeroScale: 32 posts
Posted: Saturday, January 22, 2011 - 11:07 AM UTC
Thank you.
Yes. I would have been more careful assembling the insides to ensure everything lined up perfectly. Even though this kit seemed much easier to assemble than the Albatros everything lines up precisely. Also in my haste I trimmed a few parts too short and lost a few on the carpet. Wingnut's tooling definitely requires and rewards the patient modeler.
Onward and upward to the next step!


