Hi all,
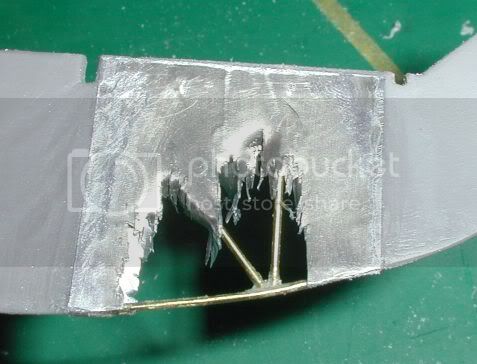
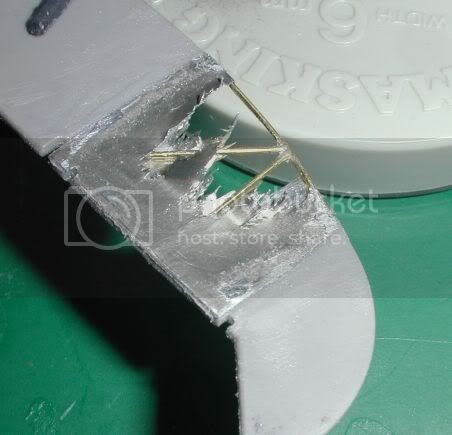
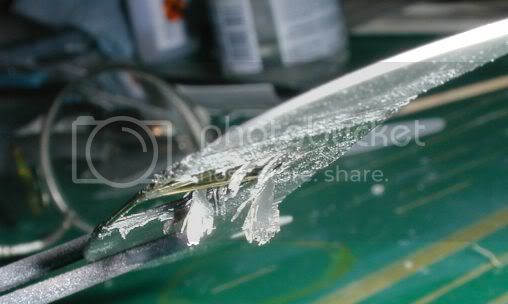
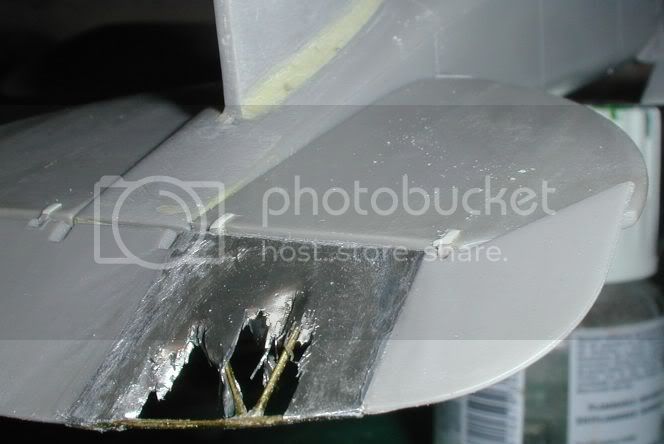
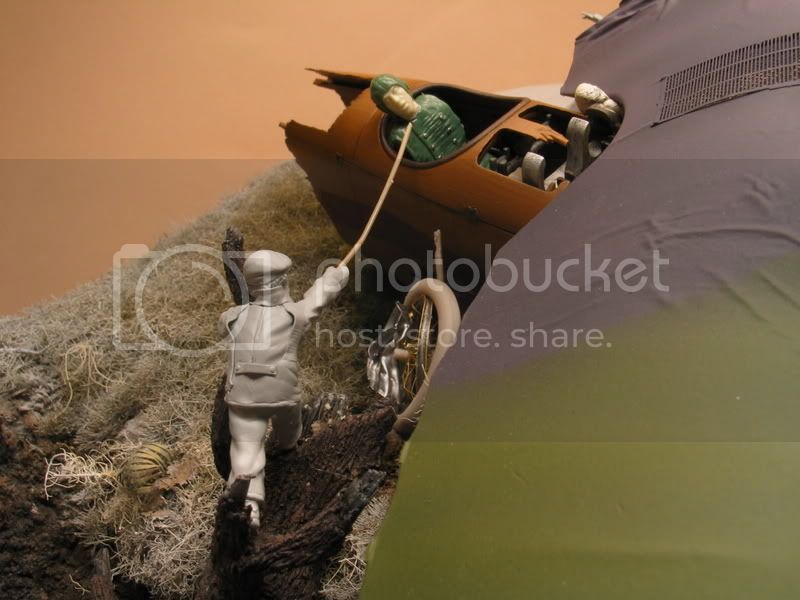
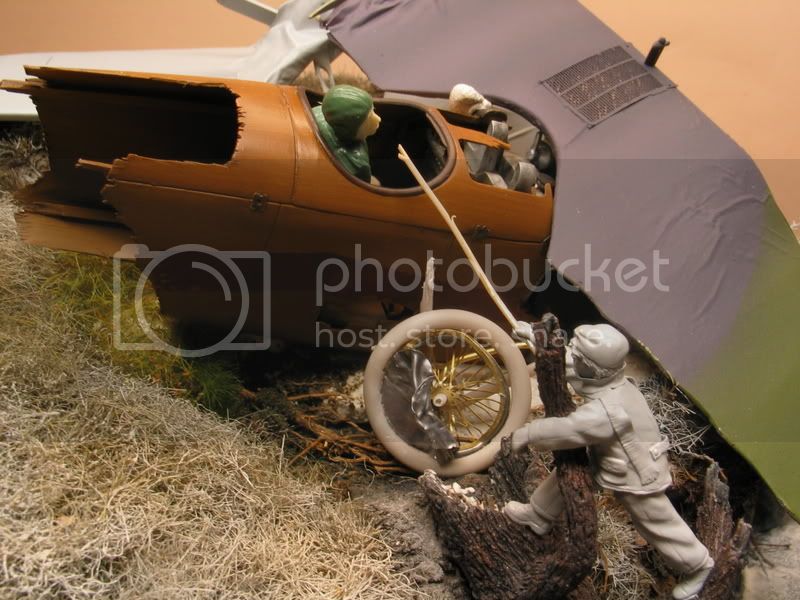
Doing my DII I got to thinking of trying something out. Remembering Edo's little diorama *( I told you I would steal and incorporate your idea Edo )* I set about a spare Albatros Elevator with my Minicraft grinder. a few lengths of brass wire and some wine bottle foil, an hour or so left me with this.
Rough at the moment and hard to see I know, I'll fill and prime it tomorrow if its dry and post better pics. I just wanted a few opinions on the idea. I know the steel frame was wrapped in strips of cloth and the fabric stitched to it, amazing what you pick up from the TVAL website.
Thanks Keith
Early Aviation
Discuss World War I and the early years of aviation thru 1934.
Hosted by Jim Starkweather
Fabric damage experiment.. opinions?
Kornbeef
England - South East, United Kingdom
Joined: November 06, 2005
KitMaker: 1,667 posts
AeroScale: 1,551 posts
Joined: November 06, 2005
KitMaker: 1,667 posts
AeroScale: 1,551 posts
Posted: Sunday, March 13, 2011 - 11:32 AM UTC
thegirl
Alberta, Canada
Joined: January 19, 2008
KitMaker: 6,743 posts
AeroScale: 6,151 posts
Joined: January 19, 2008
KitMaker: 6,743 posts
AeroScale: 6,151 posts
Posted: Sunday, March 13, 2011 - 01:19 PM UTC
I like it , turned out not to bad there Keith . Only question I have is ...won't the seem of the foil show up agaist the plastic once paint has been added ?
Could you skin the whole control surface with the wine bottle foil , or could you use alum foil ?
Didn't you try this on your Fokker D.VII build for stripes in the sky camapign .....
Could you skin the whole control surface with the wine bottle foil , or could you use alum foil ?
Didn't you try this on your Fokker D.VII build for stripes in the sky camapign .....
JackFlash
Colorado, United States
Joined: January 25, 2004
KitMaker: 11,669 posts
AeroScale: 11,011 posts
Joined: January 25, 2004
KitMaker: 11,669 posts
AeroScale: 11,011 posts
Posted: Sunday, March 13, 2011 - 01:46 PM UTC
Kornbeef
England - South East, United Kingdom
Joined: November 06, 2005
KitMaker: 1,667 posts
AeroScale: 1,551 posts
Joined: November 06, 2005
KitMaker: 1,667 posts
AeroScale: 1,551 posts
Posted: Sunday, March 13, 2011 - 08:32 PM UTC
Terri,
The seam well, hopefully is part of todays experiment. this really is basic playing about, if it works then I may incorporate and perhaps put a bullet hole or two in the DI. Of course I did something similar on Loerzer's D.VII (I must finish that some day) but not like this, that time I thinned the wing with a dremel and added the folded back/crumpled linen from PVA soaked tissue. wing structure was from strip. Well thats what I think I did.
Stephen yes I saw this thread before, quite inspirational.
K
Mgunns
Arizona, United States
Joined: December 12, 2008
KitMaker: 1,423 posts
AeroScale: 1,319 posts
Joined: December 12, 2008
KitMaker: 1,423 posts
AeroScale: 1,319 posts
Posted: Monday, March 14, 2011 - 01:26 PM UTC
Hi Keith:
To quote Bobby "The Brain" Friskne, the most brilliant mind in professional airline modeling...."It has the look". I think when it is primed and painted it will acheive the effect you want. Not bad for an hour's worth of puttzing.
Best
Mark
To quote Bobby "The Brain" Friskne, the most brilliant mind in professional airline modeling...."It has the look". I think when it is primed and painted it will acheive the effect you want. Not bad for an hour's worth of puttzing.
Best
Mark
OEFFAG_153
Västra Götaland, Sweden
Joined: February 19, 2010
KitMaker: 1,473 posts
AeroScale: 1,450 posts
Joined: February 19, 2010
KitMaker: 1,473 posts
AeroScale: 1,450 posts
Posted: Tuesday, March 15, 2011 - 06:16 AM UTC
Quoted Text
Hi Keith:
To quote Bobby "The Brain" Friskne, the most brilliant mind in professional airline modeling...."It has the look". I think when it is primed and painted it will acheive the effect you want. Not bad for an hour's worth of puttzing.
Best
Mark
I agree with Mark – this is looking very promising indeed – and something I'll test in a future project I have in mind
Mikael
CaptnTommy
Connecticut, United States
Joined: October 26, 2009
KitMaker: 424 posts
AeroScale: 389 posts
Joined: October 26, 2009
KitMaker: 424 posts
AeroScale: 389 posts
Posted: Tuesday, March 15, 2011 - 08:35 AM UTC
Two things come to mind.
1) The damage is awfully extensive such as Flak damage in which the structure would be damaged too.
2) Doped fabric is stiff and would hang differently.
I am going to try this technique it is the best I have seen. As to the seam plastic/foil once glued and use contact cement( Tester’s green tube is good) use a burnishing tool (a small metal spoon in this case) to smooth the seam and put the seam on a rib to blend.
dmopath
Kentucky, United States
Joined: July 02, 2010
KitMaker: 175 posts
AeroScale: 174 posts
Joined: July 02, 2010
KitMaker: 175 posts
AeroScale: 174 posts
Posted: Wednesday, March 16, 2011 - 12:37 AM UTC
I like it very much, although I have to agree that images of "bullet splashes" on the wings and tail show far less damage. It might better reflect flak with some defects in the brass.
edoardo
Milano, Italy
Joined: November 30, 2007
KitMaker: 642 posts
AeroScale: 382 posts
Joined: November 30, 2007
KitMaker: 642 posts
AeroScale: 382 posts
Posted: Monday, March 21, 2011 - 01:05 AM UTC
Hi Keith!
Thank you mate!
I like your results and the way you wear the farbric!
Cant wait to see the whole aircraft!
ciao
Edo
Thank you mate!
I like your results and the way you wear the farbric!
Cant wait to see the whole aircraft!
ciao
Edo
CaptnTommy
Connecticut, United States
Joined: October 26, 2009
KitMaker: 424 posts
AeroScale: 389 posts
Joined: October 26, 2009
KitMaker: 424 posts
AeroScale: 389 posts
Posted: Tuesday, March 22, 2011 - 11:09 AM UTC
Quoted Text
Two things come to mind.
1) The damage is awfully extensive such as Flak damage in which the structure would be damaged too.
2) Doped fabric is stiff and would hang differently.
I am going to try this technique it is the best I have seen. As to the seam plastic/foil once glued and use contact cement( Tester’s green tube is good) use a burnishing tool (a small metal spoon in this case) to smooth the seam and put the seam on a rib to blend.
So here I am back again. this time with some pictures (Hopefully)
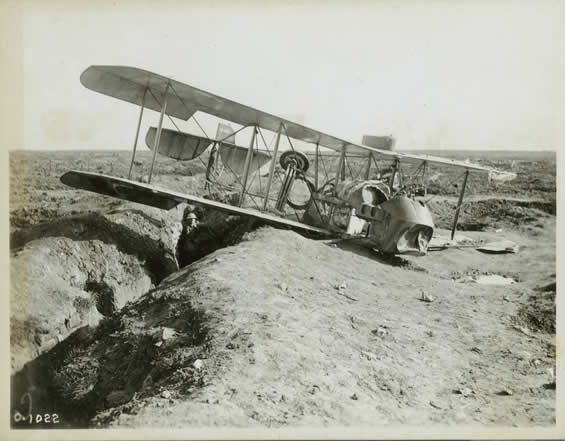
An interesting Image of a crashed DH-2. Notice the dented Plywood nose. and the structural integretty. Looks like the trench took out the Landing gear.
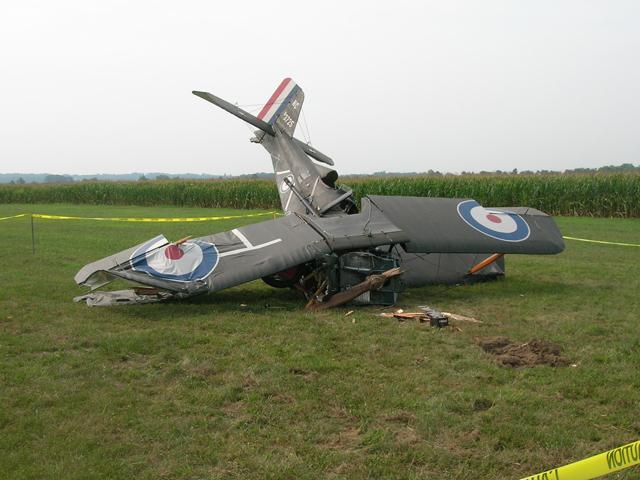
Here is a recent crash of a SE-5a, Notice the fabric and any tearing seems to be short fraying tears without long tails.
Here is a Stearman with a critically broken wing notice the spar and the crumpling but not tearing of the fabric.
Here is a seriously crashed and torn DH-4 but still no visible long threads in the tears.
Enjoy
Captn Tommy
edoardo
Milano, Italy
Joined: November 30, 2007
KitMaker: 642 posts
AeroScale: 382 posts
Joined: November 30, 2007
KitMaker: 642 posts
AeroScale: 382 posts
Posted: Tuesday, March 22, 2011 - 06:10 PM UTC
hi tom!
the dh2 seems very interesting, it is the perfect picture for what i had in mind for my diorama... it is possible to have a bigger one?
i understand your point, though: when a plane crashes the farbic tears but does not rip... my undersanding is that the ripping in the farbric is caused by bullets and/or schrapnel.
still, in my opinion it is more difficult to simulate such thorn fabric than a ripped one.... have you figured out how to do that?
ciao
edo
JackFlash
Colorado, United States
Joined: January 25, 2004
KitMaker: 11,669 posts
AeroScale: 11,011 posts
Joined: January 25, 2004
KitMaker: 11,669 posts
AeroScale: 11,011 posts
Posted: Thursday, March 24, 2011 - 08:20 AM UTC
Stress can be another factor.
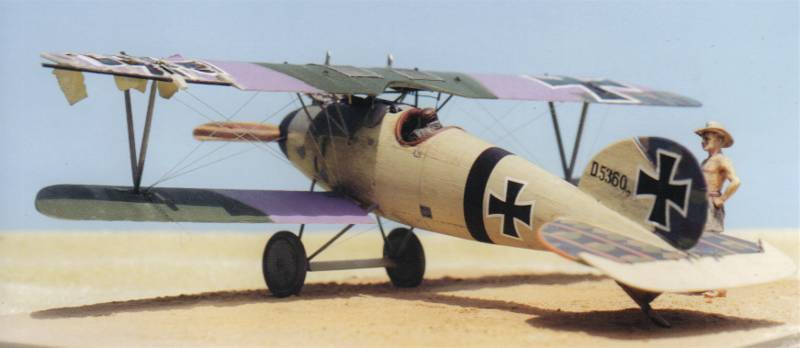
From my portfolio 1, Here is my version of Alb. D.Va 5360/17 in FA300 after an inflight collapse of the left wing tip. Titled "Nice landing herr Leutnant." This is the Eduard 1/48 kit #8109. At the beginning of 2002 we saw the introduction of Eduard's release their 'neu' mold of the Albatros D.V kits (Feb, #8109 and in March #8110 Profipack.) The new process allows finer more exacting details be included in the overall plastic mold. It easily competes with any of the ‘Tamigawa' companies processes. To simulate the Wood panel sections of the fuselage I used applications of acrylic and enamel paints. Rigging is monofilament, The cockpit is detailed to include structure and equipment using modified kit items and Eduard’s brass fret #48218. Lozenge decals are Eagle Strike 5 colour Camouflage sheets. National markings are kit items. Plumbing and landing gear struts are brass rod bent and cut to shape. Propellor is laminated wood carved to shape. The upper left wing tip was scratchbuilt and cover with layers of decal film.
The upper left wing tip was scratchbuilt from plastic stock and painted a light wood colour with only a wash of Testors 1166 for grain and covered with prepainted with layers of decal film. The second set of radiator facades are from the Eduard PE aftermarket set #48 218 for the Albatros D. V/ Va.
I repositioned the left arm and the head to represent the pilot slumped and attempting to hold his head in shock. Or he could be just pulling his gogles off.
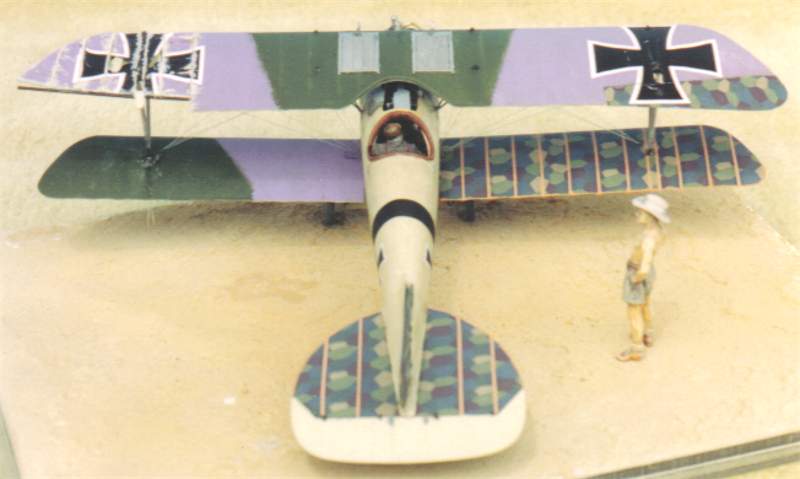
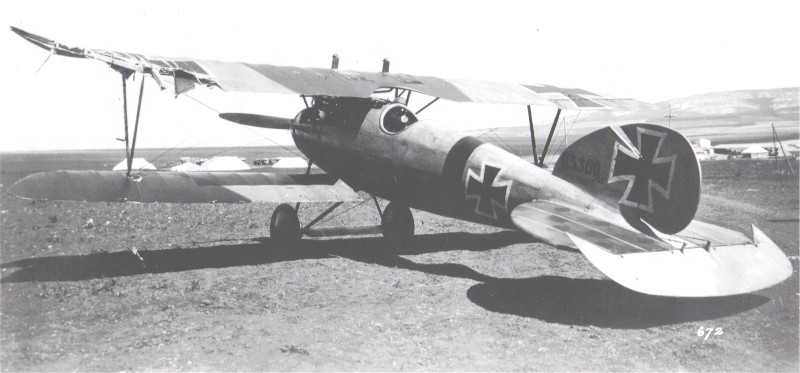
This kit represents a Johannistahl built Albatros D.Va 5360/17 flown by Ltn. Victor Häfner of FA300 & 304. Sometime in June - July 1918 after the ground crew had completed repairs To this machine, Ltn. Häfner took it up for a test flight one morning in his pajamas. At about 3000 ft the pilot heard a loud ‘crack’ the resultant emergency landing was due to a collapsed upper left wing tip. He managed to land at Afuleh airfield. This was one of several instances where the Top wing tip of a Tropical Albatros D.Va failed. An interesting note is that this machine doesn’t appear to have the outboard stay wire seen typically on Western front Albatros D.Va types. Since the wing probably failed due to over stressing and the original photo of the aircraft bears this out I wonder if the Ltn. was actually just in level flight at cruising speed when the damage occured as his report stated or at the top of a loop that he didn't want to discuss?
Kornbeef
England - South East, United Kingdom
Joined: November 06, 2005
KitMaker: 1,667 posts
AeroScale: 1,551 posts
Joined: November 06, 2005
KitMaker: 1,667 posts
AeroScale: 1,551 posts
Posted: Thursday, March 24, 2011 - 12:22 PM UTC
Some great responses, Like I said it was just an experiment, partly to find what peoples opinions were and glean some infoo. Both of which have been very succesful.
Tom I agree with you on what you say. the pics shown though are impact damages, what I was trying to capture was an area of damage that had been treated to the stresses of being abused by the slipstream between the point it happened and the plane landing, I know how dope stiffens the linen but as the linen was subjected to the s;ipstream it would delamimate the dope and fray possibly even tear away, reasonably small rips would soon grow to bigger problems as the wind got under the linen and tore it away. That at least was what I was trying to convey. but like most things it gets over done... chipping, rusting, and more, sometimes done correctly just doesnt appear right to the eye.
I think possibly I have been influenced too much by some of the pics of the catastrophic upper wing failures on the DR.1 and the way the linen hangs in them.
Anyway I've waffled enough... Methinks more research is in order...to the smallest room with my datafiles under my arm I go
Keith
CaptnTommy
Connecticut, United States
Joined: October 26, 2009
KitMaker: 424 posts
AeroScale: 389 posts
Joined: October 26, 2009
KitMaker: 424 posts
AeroScale: 389 posts
Posted: Friday, March 25, 2011 - 03:14 AM UTC
Quoted Text
what I was trying to capture was an area of damage that had been treated to the stresses of being abused by the slipstream between the point it happened and the plane landing, I know how dope stiffens the linen but as the linen was subjected to the s;ipstream it would delamimate the dope and fray possibly even tear away, reasonably small rips would soon grow to bigger problems as the wind got under the linen and tore it away. That at least was what I was trying to convey. but like most things it gets over done... chipping, rusting, and more, sometimes done correctly just doesnt appear right to the eye.
Keith
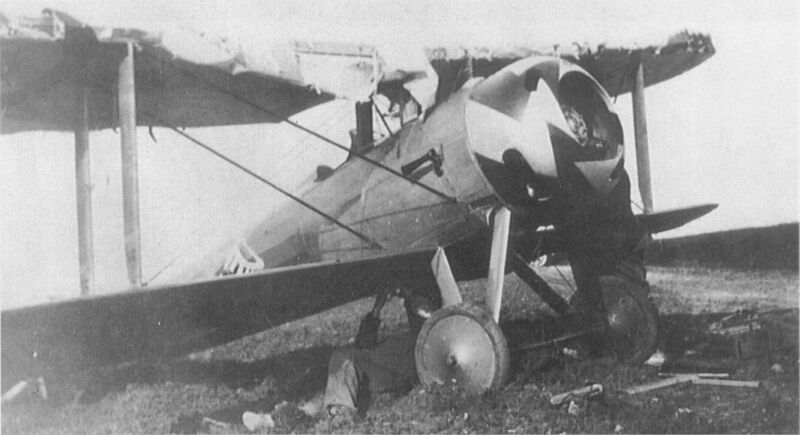
Rickenbacker shredded the top wing of his Nieuport in a dive, when he engaed an Alb. The damage was photograghed when he returnedto base (Lucky) as below. This looks more like your model especially photo 2. the pilot here is a Lt. Messier.
On the point of the thin tears trim the results of your technique to an even length. Oh yeah ... the tear destroys the dope layer so the shred would have a CDL color and the unshredded surface would have a cracked and damaged doped surface. Example: Take a sheet of Waxed Paper and lightly crunch it, then after you unfold it you will see white lines where the wax cracked the lines would show CDL on doped cloth. Now roll the wax paper in your hands and see the results. This is the best approximation for the destruction of doped fabric I can think of. Printed fabric ofcours keeps its color when shredded.
Enjoy
Captn Tommy
CaptnTommy
Connecticut, United States
Joined: October 26, 2009
KitMaker: 424 posts
AeroScale: 389 posts
Joined: October 26, 2009
KitMaker: 424 posts
AeroScale: 389 posts
Posted: Friday, March 25, 2011 - 03:24 AM UTC
Quoted Text
hi tom!
the dh2 seems very interesting, it is the perfect picture for what i had in mind for my diorama... it is possible to have a bigger one?
i understand your point, though: when a plane crashes the farbic tears but does not rip... my undersanding is that the ripping in the farbric is caused by bullets and/or schrapnel.
still, in my opinion it is more difficult to simulate such thorn fabric than a ripped one.... have you figured out how to do that?
ciao
edo
Edo
The photo is the size I have HOWEVER, down load it so you can edit it in Microsoft Paint the is is pretty clear up to 200% larger.
Captn Tommy
JackFlash
Colorado, United States
Joined: January 25, 2004
KitMaker: 11,669 posts
AeroScale: 11,011 posts
Joined: January 25, 2004
KitMaker: 11,669 posts
AeroScale: 11,011 posts
Posted: Friday, March 25, 2011 - 08:44 AM UTC
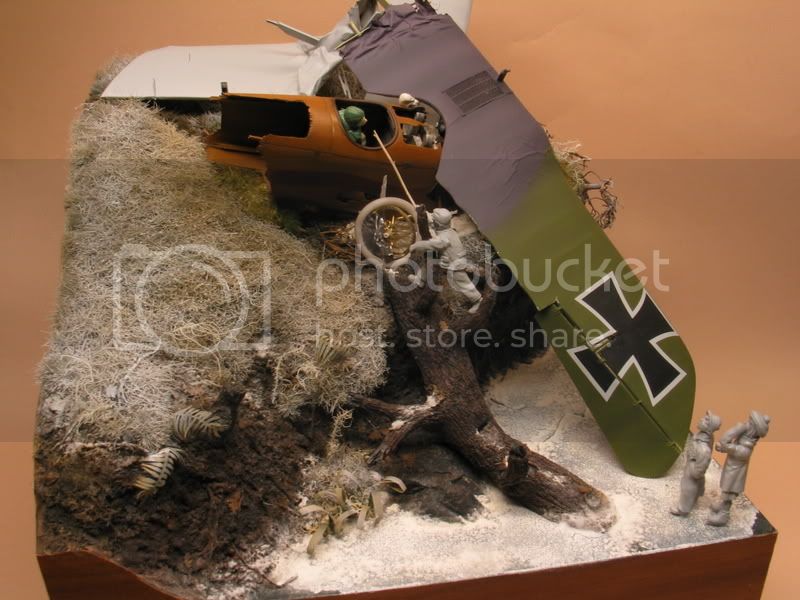
Here is another modeler's attempt in 1:32 using the Roden Alb. D.III
CaptnTommy
Connecticut, United States
Joined: October 26, 2009
KitMaker: 424 posts
AeroScale: 389 posts
Joined: October 26, 2009
KitMaker: 424 posts
AeroScale: 389 posts
Posted: Sunday, March 27, 2011 - 05:42 AM UTC
Hopefully Larger pictures of the Nieuport 28 shredded wing
Kornbeef
England - South East, United Kingdom
Joined: November 06, 2005
KitMaker: 1,667 posts
AeroScale: 1,551 posts
Joined: November 06, 2005
KitMaker: 1,667 posts
AeroScale: 1,551 posts
Posted: Sunday, March 27, 2011 - 08:17 AM UTC
Thanks Tommy, much easier to see, and to note how the fabric has ripped in strips from between the ribs. tattered but quite uniform at the same time. Very interesting pics to study.
Keith
Keith
edoardo
Milano, Italy
Joined: November 30, 2007
KitMaker: 642 posts
AeroScale: 382 posts
Joined: November 30, 2007
KitMaker: 642 posts
AeroScale: 382 posts
Posted: Monday, March 28, 2011 - 06:20 PM UTC
thank you tommy!
i'll do that!
very interesting pictures indeed...
ciao
edo
i'll do that!
very interesting pictures indeed...
ciao
edo
JackFlash
Colorado, United States
Joined: January 25, 2004
KitMaker: 11,669 posts
AeroScale: 11,011 posts
Joined: January 25, 2004
KitMaker: 11,669 posts
AeroScale: 11,011 posts
Posted: Monday, March 26, 2012 - 01:15 PM UTC
After repairing some broken image links I thought this might be good to bring back to the front page of the forum.
dolly15
Quebec, Canada
Joined: May 20, 2004
KitMaker: 8,227 posts
AeroScale: 3,915 posts
Joined: May 20, 2004
KitMaker: 8,227 posts
AeroScale: 3,915 posts
Posted: Tuesday, March 27, 2012 - 12:15 AM UTC
The way I see it you have battle damage,battle damage that has been subject to weathering,crash damage and weathered crash damage.What I find really interesting is fabric where the damage almost looks like crumbled aluminum skin as in the modern pic of the Stearman.I wonder if this is more a product of modern covering materials.The fraying on Rick's plane is probably caused by wind damage like you would see on the trailing edge of a worn flag.