

I have been asked to do a couple of 1/48 scale dioramas for a museum. While I have lots of photos for the allied version, I don't have as much for the German repair shop version. They are:
1. AEF Aircraft repair facility at the 3rd A.I.C. Issoudon.
2. German Frontline Armee Air Park repair facility.
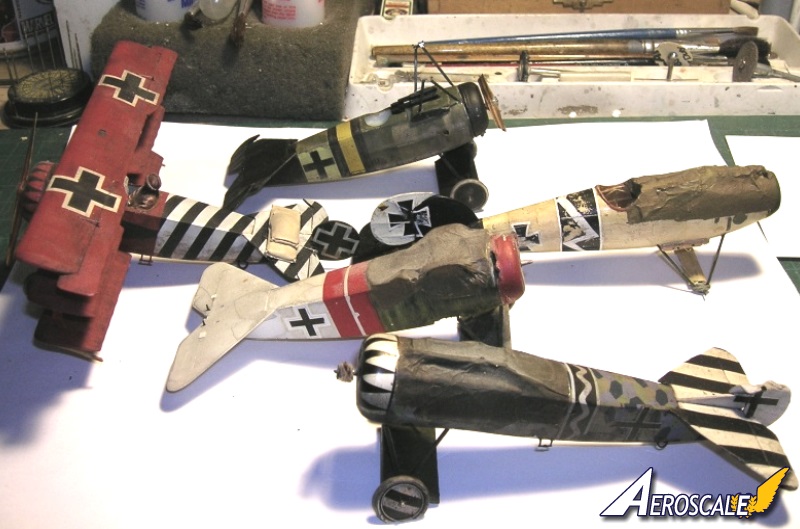
Still looking for 1/48 detail pieces for bent and battered Eduard or Roden parts to add. Jager ( before he went out of business) and Copper State did kick in a great deal of spare parts for bent and broken birds. If anyone has an Eduard Nieuport 17 or 21 they would like to trade parts and pieces for, please contact me offline. German pieces are far more varied Eduard, Roden, any a/c type. Can trade some Copper State wing panels and details for parts and pieces. I have some Eduard rotaries and inline engines. Any kit propellers you might need I probably have. Figures are being added though I'm looking for the CMK French set. Here are just a few pices that will serve as props for the German diorama. The Fok. D.VII has since had some bits n pieces added to the engine compartment to represent support structures.
Early Aviation
Discuss World War I and the early years of aviation thru 1934.
Discuss World War I and the early years of aviation thru 1934.
Hosted by Jim Starkweather
Detailing wrecked or derelict WWI aircraft

JackFlash

Joined: January 25, 2004
KitMaker: 11,669 posts
AeroScale: 11,011 posts
Posted: Saturday, September 10, 2005 - 02:37 AM UTC

Merlin

#017


Joined: June 11, 2003
KitMaker: 17,582 posts
AeroScale: 12,795 posts

Posted: Saturday, September 10, 2005 - 03:38 AM UTC
Hi Stephen
I'll have a look through the spares box and see if there's anything that might prove useful.
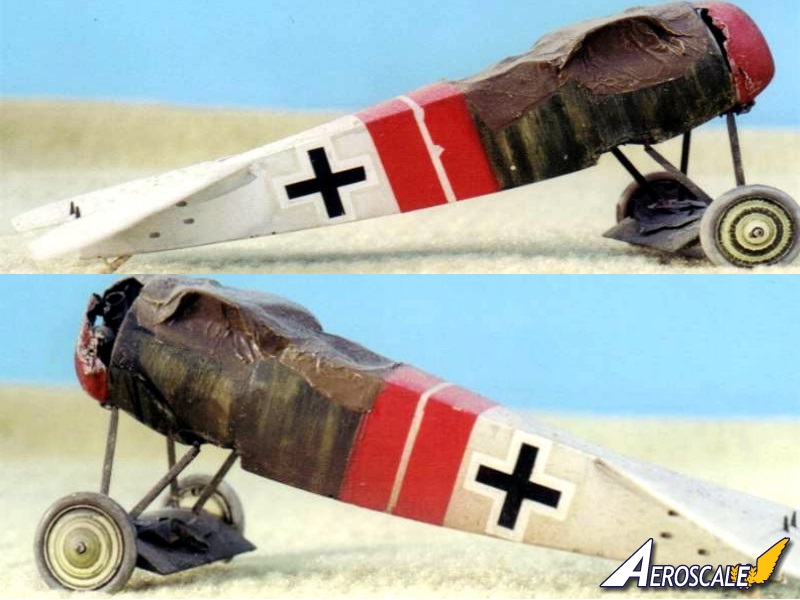
Those are beautiful models as usual! How did you represent the torn fabric on the Fokker?
All the best
Rowan
I'll have a look through the spares box and see if there's anything that might prove useful.
Those are beautiful models as usual! How did you represent the torn fabric on the Fokker?
All the best
Rowan

JackFlash
Joined: January 25, 2004
KitMaker: 11,669 posts
AeroScale: 11,011 posts
Posted: Saturday, September 10, 2005 - 04:13 PM UTC
JackFlash to Aromorama Air Wing base;
Greetings Merlin;
Thanks for the kind words. Ripped or torn fabric is replicated by grinding / or cutter tool chucked into a motortool at low speed. Grind or cut plastic from inner surfaces of fuselage halves but do not go through the plastic just get it as thin as you can. Plastic will ripple and sag then when heat of the grinder / cutter is removed let it harden back up. Then simply gouge out the area with a sharp #11 blade in your razor knife. Then represent the skeletal structure with painted pieces from the inside. Viola or Whallah as you would have it. Bob's your uncle, Fanny's your aunt and you got ripped or bullet torn fabric.
To do it more extensively over an open airframe. Begin with clear decal film sheets. Paint fabric colour first then after dry apply a clear barrier of dullcote (Testors laquer sray.) After thorough drying apply camouflage.
In the case of lozenge (like Eagle Strike) with a clear carrier film to begin with,) on an open airframe just spray the decal with a clear gloss while still on the sheet. Let dry for 20-40 minutes then apply in sections like the real airframe was done. If it tears where you don't want it to then just apply a section of clear decal film over the tear and let dry
JackFlash outbound at angels five.
JackFlash
Joined: January 25, 2004
KitMaker: 11,669 posts
AeroScale: 11,011 posts
Posted: Monday, October 03, 2005 - 08:24 AM UTC
Greetings all;
Of the multiple Nieuport 21 types that I will include in the allied diorama here is the development of one that I plan to have in the foreground.
Of the multiple Nieuport 21 types that I will include in the allied diorama here is the development of one that I plan to have in the foreground.
JackFlash
Joined: January 25, 2004
KitMaker: 11,669 posts
AeroScale: 11,011 posts
Posted: Monday, October 03, 2005 - 08:29 AM UTC
Here are a couple of discussions on the subject.
More subplots for the allied version.
More on Nieu. 21 types.
More subplots for the allied version.
More on Nieu. 21 types.
Merlin
#017
Joined: June 11, 2003
KitMaker: 17,582 posts
AeroScale: 12,795 posts
Posted: Monday, October 03, 2005 - 09:09 AM UTC
Hi Stephen
I just love looking at your models! It may sound corny, but there's an indefinable quality about them that puts the art back into our craft... put simply, they are inspirational!
All the best
Rowan
I just love looking at your models! It may sound corny, but there's an indefinable quality about them that puts the art back into our craft... put simply, they are inspirational!
All the best
Rowan

TedMamere

Joined: May 15, 2005
KitMaker: 5,653 posts
AeroScale: 4,347 posts

Posted: Monday, October 03, 2005 - 06:14 PM UTC
Hi Stephen!
I totally agree with Rowan's words! That's great work!
Do you plan to add some figures in the vignette? Hecker & Goros are making great ones of WW1 pilots... if you want some references, I have their catalogue...
Jean-Luc
I totally agree with Rowan's words! That's great work!
Do you plan to add some figures in the vignette? Hecker & Goros are making great ones of WW1 pilots... if you want some references, I have their catalogue...
Jean-Luc


chip250
Joined: September 01, 2002
KitMaker: 1,864 posts
AeroScale: 410 posts

Posted: Monday, October 03, 2005 - 08:40 PM UTC
I have something simple to say, Beautiful. Those are really grand! Great job.
~Chip
~Chip

almonkey

Joined: March 23, 2003
KitMaker: 2,124 posts
AeroScale: 788 posts

Posted: Tuesday, October 04, 2005 - 04:16 AM UTC
as a WW1aircraft fan i think thats some cracking work you've done there, stephen. i particularly like the broken prop on the D viii. having not long built a roden 1/72 version of this plane, that gave me a few headaches to simply build, thats taking it to a new level

JackFlash
Joined: January 25, 2004
KitMaker: 11,669 posts
AeroScale: 11,011 posts
Posted: Wednesday, October 05, 2005 - 11:21 AM UTC
Many thanks for the kind word gents.
JackFlash
Joined: January 25, 2004
KitMaker: 11,669 posts
AeroScale: 11,011 posts
Posted: Wednesday, October 12, 2005 - 12:28 PM UTC
Tom's Modelworks 1/48 Alb.D.Va done in Jasta 46 markings. I was going to use it in the allied diorama as a captured bird but I changed the "Stropp" to a lightning bolt.
JackFlash
Joined: January 25, 2004
KitMaker: 11,669 posts
AeroScale: 11,011 posts
Posted: Wednesday, October 12, 2005 - 12:31 PM UTC
Bad Case of Lozenge U...Ok sorry it is a bad pun. For the diorama I am using up extra wings and lozenge that I won't use on my regular builds as the colours are waaaaaay out of tune. I will go over the whole wing surfaces later with a translucent black or dk. blue.
JackFlash
Joined: January 25, 2004
KitMaker: 11,669 posts
AeroScale: 11,011 posts
Posted: Wednesday, October 12, 2005 - 12:35 PM UTC
Ritter von Greim's Dr.I 521/17 after loosing a cylinder inflight. DML 1/48 scale kit.
Merlin
#017
Joined: June 11, 2003
KitMaker: 17,582 posts
AeroScale: 12,795 posts
Posted: Wednesday, October 12, 2005 - 10:13 PM UTC
Hi Stephen
Great new pics! The lozenge one reminded me of a question I've been meaning to ask you; now I've got to the stage of applying rib-tapes on my D.VII, I've been looking at photos in the Windsock Datafile - some aircraft show coloured edge-tapes as well, while they don't seem to be there on others. I'm confused... was there a system behind this, or did things vary between factories?
All the best
Rowan
JackFlash
Joined: January 25, 2004
KitMaker: 11,669 posts
AeroScale: 11,011 posts
Posted: Thursday, October 13, 2005 - 04:57 AM UTC
JackFlash to Merlin;
Rib tapes were always on aircraft wings. On preprinted fabric like lozenge these were applied by sewing them in place with fabric battens nailed to the t rib caps then the applied fabric then the rib caps.
The three factories in Germany producing the Fokker D.VII employed what we believe is their standard methods.
Fokker Schwerin / Gorries used lozenge fabric ribtapes.
OAW used lt. blue and lozenge ribtapes.
Albatros used Salmon pink and lozenge rib tapes.
Instances where lozenge was used tended to render them invisible or indistinguishable from the lozenge fabric sheets used on the wing.
In some instances even clear doped linen was used but this must have been a measure of last resort compared to available supplies. It probably occured more at the war's end when textile stocks were low. The resultant varnish over all tended to turn the CDL a lt. brown / tan colour.
Merlin
#017
Joined: June 11, 2003
KitMaker: 17,582 posts
AeroScale: 12,795 posts
Posted: Thursday, October 13, 2005 - 07:40 AM UTC
Hi again Stephen
The list of what tapes were used by each manufacturer is fantastic! I'll keep that handy for all my future builds.
I'm not sure if I've used the right term with "edge-tape" so here are a couple of pics to show what I mean.
On the first one there's clearly a tape dividing the upper and lower lozenge fabrics which runs right 'round the wings:
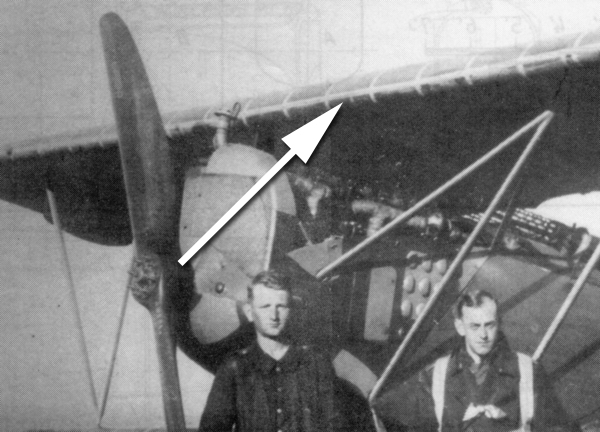
While here I can't see anything like it:
I've added this tape on my build - if it's wrong, there's always next time - but, I've remembered your comment about no rib-tapes on the ailerons.
A big thank you, as ever, for the help and encouragement
Rowan
The list of what tapes were used by each manufacturer is fantastic! I'll keep that handy for all my future builds.
I'm not sure if I've used the right term with "edge-tape" so here are a couple of pics to show what I mean.
On the first one there's clearly a tape dividing the upper and lower lozenge fabrics which runs right 'round the wings:
While here I can't see anything like it:
I've added this tape on my build - if it's wrong, there's always next time - but, I've remembered your comment about no rib-tapes on the ailerons.
A big thank you, as ever, for the help and encouragement
Rowan
JackFlash
Joined: January 25, 2004
KitMaker: 11,669 posts
AeroScale: 11,011 posts
Posted: Friday, October 14, 2005 - 09:10 AM UTC
Instances where lozenge was used tended to render them invisible or indistinguishable from the lozenge fabric sheets used on the wing. The perimeter tape in the lower case appears to be added ebfore the rib tapes. Since this perimeter tape was a cover for the edge seams (as there was considerable stress) these would be added first., then the rib tapes.
In the lower case a lozenge perimeter tape was employed with the solid rib tapes being applied after the wing covering was laid down. I have seen cases where the perimeter tape was doped on as a last step instead of before the rib tapes. Studying multiple photos is the best method of reserch.
In the lower case a lozenge perimeter tape was employed with the solid rib tapes being applied after the wing covering was laid down. I have seen cases where the perimeter tape was doped on as a last step instead of before the rib tapes. Studying multiple photos is the best method of reserch.
Merlin
#017
Joined: June 11, 2003
KitMaker: 17,582 posts
AeroScale: 12,795 posts
Posted: Friday, October 14, 2005 - 08:29 PM UTC
Thanks again Stephen
My heart sank when you described the usual order of applying the rib and perimeter tapes... the oposite of what I've done, of course! :-) - but you saved the day with mention of the cases where the perimeter tape was added last.
In any event, it's only a model and there's always the next one! Why are we here, if not to learn?
All the best
Rowan
JackFlash
Joined: January 25, 2004
KitMaker: 11,669 posts
AeroScale: 11,011 posts
Posted: Tuesday, October 03, 2006 - 05:34 AM UTC
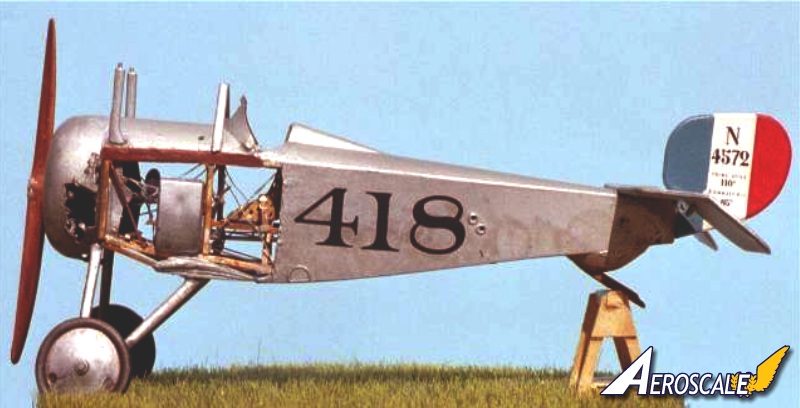
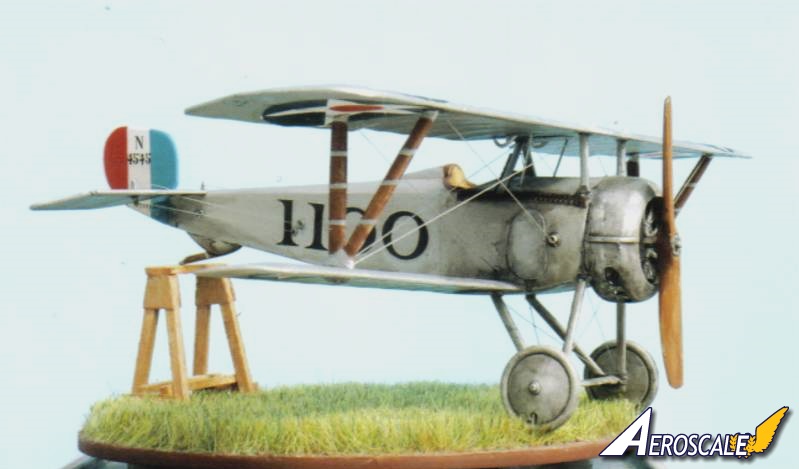
Greetings all; Here is a bit of fun I have been experimenting with. This is a Nieuport 21 (80hp) N.4545 School #1100) from Issoudon. This school number was assigned to Field # Five. The machine has the fuselage of N4545 but the wings from N4579. Often times when wings were reconditioned or repaired the American star and meatball was applied instead of the French cockade. Though more and more toward the end of 1918 this was done on instructor's machines (Nieuport 24, 24, bis and 27 types) exclusively. Also some Nieuport trainers had two sets of rigging cables on the landing gear instead of just one set.
My experiment was with duplicating the castor oil exhaust glaze that tended to build up on the trainers of the AEF. Crews often had several aircraft that had to be readied for the next days instruction. This exhaust buildup usually had to be sanded off and the area repainted. In the AEF training units it was considered a waste of time to do, as portions of the machine would probably be recovered or repaired several times within a three month period. Quarterly reviews were done on airframes to note the amount of work involved in maintaining their serviceability.
My experiment was with duplicating the castor oil exhaust glaze that tended to build up on the trainers of the AEF. Crews often had several aircraft that had to be readied for the next days instruction. This exhaust buildup usually had to be sanded off and the area repainted. In the AEF training units it was considered a waste of time to do, as portions of the machine would probably be recovered or repaired several times within a three month period. Quarterly reviews were done on airframes to note the amount of work involved in maintaining their serviceability.
JackFlash
Joined: January 25, 2004
KitMaker: 11,669 posts
AeroScale: 11,011 posts
Posted: Tuesday, October 03, 2006 - 05:43 AM UTC
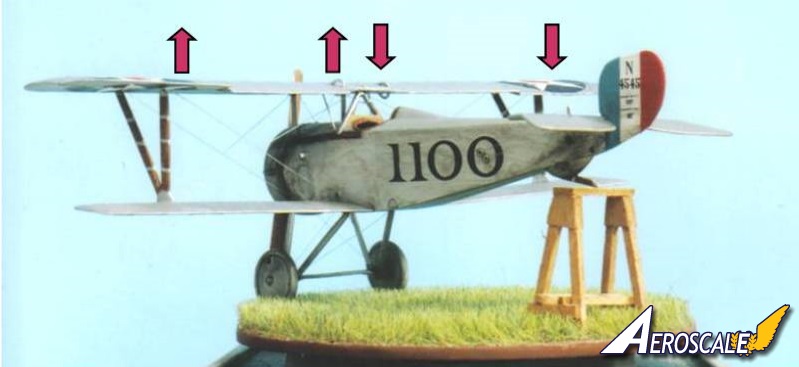
The red arrows show that when an aileron is actuated that the balances are also actuated and show be reflected in sympathy with the ailerons.
JackFlash
Joined: January 25, 2004
KitMaker: 11,669 posts
AeroScale: 11,011 posts
Posted: Tuesday, October 03, 2006 - 05:52 AM UTC
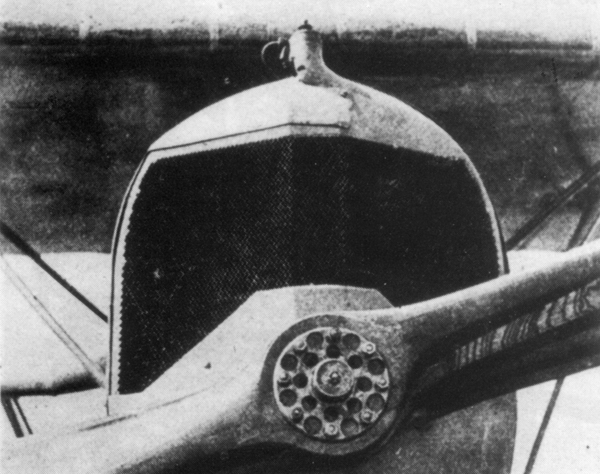
Most of the undersurfaces were covered in the exhaust spray from a rotary engine this is not an extreme case.

JackFlash
Joined: January 25, 2004
KitMaker: 11,669 posts
AeroScale: 11,011 posts
Posted: Sunday, December 24, 2006 - 07:25 AM UTC
I have been persuaded to continue this thread with some actual images of early aircraft under repair or derelict. Our own John Reid has seen this next image already but it will serve to show you the hodge podge of bits and pieces that make up a repair shop.
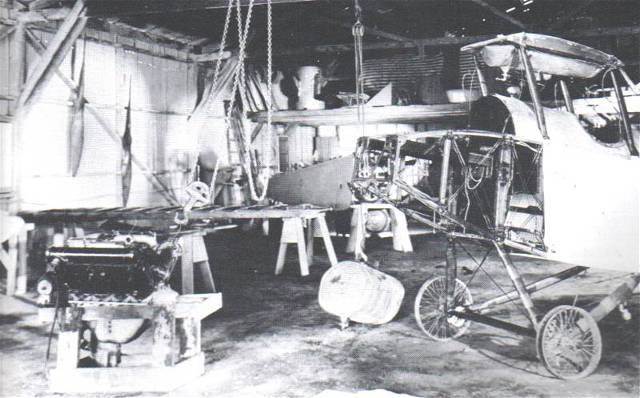
The fuselage of a Curtiss JN 4D(?) at right and a Hispano Suiza direct drive V-8 at left.
The fuselage of a Curtiss JN 4D(?) at right and a Hispano Suiza direct drive V-8 at left.
JackFlash
Joined: January 25, 2004
KitMaker: 11,669 posts
AeroScale: 11,011 posts
Posted: Sunday, December 24, 2006 - 07:32 AM UTC
Here an AEF rigger works inside the fuselage of an Spad XIII. The hatches he has removed were for the "camera compartment" that was more often used for stowage.


Lucky13

Joined: June 01, 2006
KitMaker: 1,707 posts
AeroScale: 1,119 posts

Posted: Sunday, December 24, 2006 - 07:39 AM UTC
That's NOT how you treat a girl Stephen....
AND,
Isn't that your garage and you in your younger days?
AND,
Isn't that your garage and you in your younger days?
Removed by original poster on 01/28/07 - 09:23:47 (GMT).
 |

WEB HOSTING BY


Copyright ©2021 AeroScale and Kitmaker Network, a subsidiary of Silver Star Enterprises
All Rights Reserved. Please read our Conditions of Use and Privacy Policy.
All Rights Reserved. Please read our Conditions of Use and Privacy Policy.