KotS GB 2011 Albatros D.Va wing_nut
New Jersey, United States
Joined: June 02, 2006
KitMaker: 1,212 posts
AeroScale: 468 posts
Posted: Wednesday, April 06, 2011 - 12:54 PM UTC
In recent weeks I have been lurking here in prep for the start of my D.Va. I say my 1st real WWI build since all i had done in the past was the Eduard Camel dual combo. Whipped 'em up OOB and did the rigging with the drill a bunch of holes and threading the line form hole to hole..
The day has finally come and I have started. A modest start but a start none the less. I post here less for praise than for critique. I'll likely be asking a lot of questions as I venture into the clouds.
Ejector marks filled, and interior gets the base colors


The seat was made a little wider on the sides since it looked a little more rounded at the top. The inside was covered with Tamiya tape for a bit of texture. The bottom has some tissue underneath for a padded look and then i made a slice with the back of a blade which pulled out some of the tissue to look like a tear in the leather. Tough to see in the pic but in the face to face it really looks good. Paint is Vallejo with artist oils


And the beginning of what will be a large pile of eyelets and turnbuckles ends

And my Aber Spandau upgrade set arrived today. SCHWING! I also finally figured out how to wrap the end of a .007" wire with some .003" wire without it breaking. It's been a good day

Alberta, Canada
Joined: January 19, 2008
KitMaker: 6,743 posts
AeroScale: 6,151 posts
Posted: Wednesday, April 06, 2011 - 01:44 PM UTC
Your off to a great start so far , seat looks cool and what a neet idea with the tiusse under the tape .
North Carolina, United States
Joined: June 19, 2007
KitMaker: 604 posts
AeroScale: 600 posts
Posted: Wednesday, April 06, 2011 - 02:41 PM UTC
As Terri said, Great Start ! You have already surpassed my comfort zone with your Turnbuckle ends

RAGIII
England - South East, United Kingdom
Joined: November 06, 2005
KitMaker: 1,667 posts
AeroScale: 1,551 posts
Posted: Wednesday, April 06, 2011 - 07:49 PM UTC
Yes as said a nice start. I look forward to seeing your progress.
Eyelets already, taking the pain in small doses instead of one big hit.

Keith
Still can't cure the AMS even with sausage finger implants & olde eyes.
New Jersey, United States
Joined: June 02, 2006
KitMaker: 1,212 posts
AeroScale: 468 posts
Posted: Thursday, April 07, 2011 - 03:14 AM UTC
Terri, Rick, Keith... thanks very much guys for the words of encouragement. I have been pretty excited about this build for a while. It's very much like when I was all airplanes all the time, hence wing_nut, and moved to all armor all the time. I wonder if this heralds all bipes all the time.
Alberta, Canada
Joined: July 26, 2010
KitMaker: 1,032 posts
AeroScale: 1,025 posts
Posted: Thursday, April 07, 2011 - 04:16 AM UTC
Quoted Text
Terri, Rick, Keith... thanks very much guys for the words of encouragement. I have been pretty excited about this build for a while. It's very much like when I was all airplanes all the time, hence wing_nut, and moved to all armor all the time. I wonder if this heralds all bipes all the time.
Marc,
I'll add my compliments as well; the seat pad is genius! Looks like I'll be the last to get my build thread started but I'm getting close. In the interim I'll be following your progress closely and by the looks of your start, "all bipes all the time" would be a great addition to this forum.
Cheers!
Officially Retired as of 20 August 2013 and looking forward to some un-interrupted bench time. Currently starting Roden's Nieuport 28 and hoping to follow that with another WNW Fokker DVII.
New Jersey, United States
Joined: June 02, 2006
KitMaker: 1,212 posts
AeroScale: 468 posts
Posted: Thursday, April 07, 2011 - 04:17 AM UTC
I have been looking at 2 wood grain technique to use on this build. The 1st is the one I use on all my armor tool handles which is just oils applied to acrylics and wiped off. The other actually paints on the darker bands of the plywood and looks truly awesome (David Parker's LGV C.VI in AIR Modeller issue 25) but will take a lot of practice. So I set to practicing in the wide open area behind the seat that will not be seen. It looked like it was going to take a lot more practice so I tried the dry, stiff, clean bush stroke blending technique that is fast becoming my favorite weathering tool. After a light coat that was wiped away with a piece of packing foam, I made some dashed with a flat brush loaded with oil paint and flattened to a shard chisel edge. A few blending stroke and the 2 technique combined into a look I that I am pretty happy with.

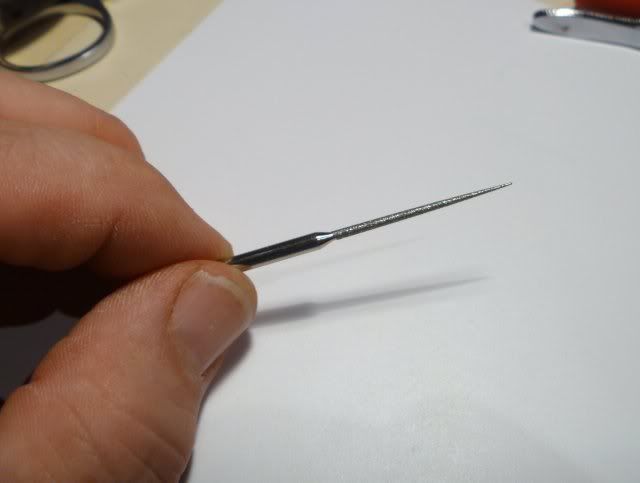
I got this tool at MosquitoCon over the weekend. It is a very fine pointed reamer that the tip will fit inside the Lion Roar tubing. Cleans the cutting burr and opens the end great. And it was just a dollar. I can find out who that vendor is if anyone has an interest.
England - South East, United Kingdom
Joined: November 06, 2005
KitMaker: 1,667 posts
AeroScale: 1,551 posts
Posted: Thursday, April 07, 2011 - 05:24 AM UTC
Quoted Text
Terri, Rick, Keith... thanks very much guys for the words of encouragement. I have been pretty excited about this build for a while. It's very much like when I was all airplanes all the time, hence wing_nut, and moved to all armor all the time. I wonder if this heralds all bipes all the time.
It can happen, I wandered in a while back nosing around about the Roden Dri....my Tasca Firefly and Dragon M2A1 H/t have been gathering dust since and I've gathered a wealth of knowledge and kits since.
Theres many schools of thought on wood..just remember the Albatros is sheathed in ply...the grain isnt always consistant and straight. My best attempt to replicate this was the DIII OAW and I dont class that as good. I do like the style and colour this turned out though..it has the glow.
K
Still can't cure the AMS even with sausage finger implants & olde eyes.
Arizona, United States
Joined: December 12, 2008
KitMaker: 1,423 posts
AeroScale: 1,319 posts
Posted: Thursday, April 07, 2011 - 06:30 AM UTC

Hi Marc:
The seat idea is really neat, I will try that on my next Albatros build, as I am beyond that step on the current build. Your wood looks good as well, as Keith mentioned there are many schools of thought, and, these kits can be very rewarding and 'addicting'. I am looking forward to more posts and pics as you progress through this build.
Welcome and have fun.
Best
Mark
We few, we happy few........
New Jersey, United States
Joined: June 02, 2006
KitMaker: 1,212 posts
AeroScale: 468 posts
Posted: Thursday, April 07, 2011 - 09:09 AM UTC
Thanks guys. I have a whole sheet of plastic ready to be painted with a base coat so I can practice, practice, practice, getting the plywood look locked down.
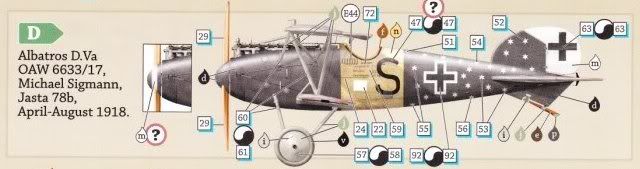
This is the aircraft I will be doing. It's from the WNW sheet "The Bavarians"
BTW...did I mention yet how much fun I am having

New Jersey, United States
Joined: June 02, 2006
KitMaker: 1,212 posts
AeroScale: 468 posts
Posted: Thursday, April 07, 2011 - 09:22 AM UTC
Colorado, United States
Joined: January 25, 2004
KitMaker: 11,669 posts
AeroScale: 11,011 posts
Posted: Thursday, April 07, 2011 - 04:01 PM UTC
Ash & Birch have that wild grain. If you can Marc get a look at some of the 1:48 Jasta 5 builds that Dwayne Williams has done here (Dwaynewilly)
here. ". . .The most important thing is to know why you build and then get the most that you can out of building." via D.D.
New Jersey, United States
Joined: June 02, 2006
KitMaker: 1,212 posts
AeroScale: 468 posts
Posted: Friday, April 08, 2011 - 12:35 AM UTC
Thanks for that link Stephen. Impressive work.
Colorado, United States
Joined: January 25, 2004
KitMaker: 11,669 posts
AeroScale: 11,011 posts
Posted: Friday, April 08, 2011 - 03:46 AM UTC
Here is one in 1:32 where the builder has his own website and describes his method for wood grain.
Click here. ". . .The most important thing is to know why you build and then get the most that you can out of building." via D.D.
New Jersey, United States
Joined: June 02, 2006
KitMaker: 1,212 posts
AeroScale: 468 posts
Posted: Friday, April 08, 2011 - 04:50 AM UTC
Again thanks Stephen. It is David's work I referred to in my 4/7 post. I iwll be attempting to replicate that type of pattern when i get the the exterior finishing. The nice thing about seeing work as exquisite as that, even though I iwll be trying to get the same results if it turns out 1/2 as good/// I 'll be pretty darn happy.

Michigan, United States
Joined: October 30, 2005
KitMaker: 8 posts
AeroScale: 4 posts
Posted: Sunday, April 10, 2011 - 06:54 PM UTC
New Jersey, United States
Joined: June 02, 2006
KitMaker: 1,212 posts
AeroScale: 468 posts
Posted: Monday, April 11, 2011 - 12:13 PM UTC
Thanks Jim.
Been a little busy with work... self employed so this is a good thing... but i did have time to get into the lab and come up a new molecule that will cure all future energy problems.

OK. so really... I started to make some turnbuckles last night and I decided my eyelets were too big. So I stated fresh. I stared with and 18" piece of wire and stared twisting. But instead of cutting each one I just kept twisting and made 50 in about 5 minutes.
New Jersey, United States
Joined: June 02, 2006
KitMaker: 1,212 posts
AeroScale: 468 posts
Posted: Tuesday, April 12, 2011 - 11:18 AM UTC
Great thread "Lozenge 201"... was there a "101"? This will help immensely when I get to the point of putting the lozenge on the wings of the DVa.
Some questions though... of course.
So the bolt is 52-54(ish)" wide and laid down chord wise. The mismatch of the fabric edge will likely fall in between the rubs and will not be covered by rib tape. I am assuming that's what the reference points on the WNW instruction sheet are pointing to. What are modelers doing to represent that seam? Just the mismatch in the decal or simulating that seam some how? I am thinking of a fine riveter and running along one side and picking out the detail with a wash.
Which brings me to rib tape. I've read all the threads about it and seen a bunch of photos but just not 100% sure about the trailing edge (TE). Does the tape wrap around the TE so its on both the top and bottom? or is it all on the top or all on the bottom.
England - South East, United Kingdom
Joined: November 06, 2005
KitMaker: 1,667 posts
AeroScale: 1,551 posts
Posted: Tuesday, April 12, 2011 - 07:39 PM UTC
Marc,
I believe the fabric was seamed together by stitching through, no external stitches would be showing, rather like the outside leg seamof a pair of Levi 501's. So would be all but invisible, a faint line scored chordwise would suffice if at all.
Also the tape along trailinig edges would wrap around as far as I can tell.
Keith
Still can't cure the AMS even with sausage finger implants & olde eyes.
New Jersey, United States
Joined: June 02, 2006
KitMaker: 1,212 posts
AeroScale: 468 posts
Posted: Wednesday, April 13, 2011 - 05:45 AM UTC
Thanks for the feedback Keith.
The engine will be stared soon so I made some valves springs. The link is to how I made them.
Valve Springs 
England - South East, United Kingdom
Joined: November 06, 2005
KitMaker: 1,667 posts
AeroScale: 1,551 posts
Posted: Wednesday, April 13, 2011 - 07:06 AM UTC
Well if you are going that far, why not cut all the rocker arms off and set them at different levels to show ports open and closed Firing sequence of the DIII engine anyone?
Seriously nice though...now you set my mind thinking... Over the last 2 days I've been fiddling witha Merc engine out my DVa....well its the Roland's I used the DVa in that. I've been adding extra details here and there. Now looking at your idea. hmmmm AMS kicks in and repeats
Firing sequence of the DIII engine anyone?
Firing sequence of the DIII engine anyone?
Great tip though TY
K
Still can't cure the AMS even with sausage finger implants & olde eyes.
New Jersey, United States
Joined: June 02, 2006
KitMaker: 1,212 posts
AeroScale: 468 posts
Posted: Wednesday, April 13, 2011 - 08:11 AM UTC
AMS? Oh yeah... know all about that.
I found some tiny spark plugs. They are for 1/24 cars and will likely need to be cut down a bit. The wire is .01 lead wire with the connector made from Lion Roar .5mm tubing.

And I like that firing order idea. Consider that one... er... borrowed
New Jersey, United States
Joined: June 02, 2006
KitMaker: 1,212 posts
AeroScale: 468 posts
Posted: Thursday, April 14, 2011 - 01:37 AM UTC
Some questions if i may...
The reproduction (?) aircraft on the WNW site shows an anemometer on the right interplane struts. This is not represented in the kit nor do I see it in period photograph... unless I've just missed it. There or not?
The next question is about the rib tapes again. Again on the WNW repro pjotos... it's the fact the aircraft is a repro that I always have some doubts/questions... they show the blue tape on top and the salmon on the bottom. From what I've read I though the color depending more on the manufacturer. Is this,or can this be, correct?
New Jersey, United States
Joined: June 02, 2006
KitMaker: 1,212 posts
AeroScale: 468 posts
Posted: Sunday, April 17, 2011 - 04:19 PM UTC
can someone help me with their opinion about these colors. I've been practicing some plywood. I've seen D.V's and D.Va's with the wood to the yellowish and with a bit of orange.
The 1st pic is the painted wood and the 2nd has a 50/50 yellow/orange mix on top and straight yellow on the bottom.


England - South East, United Kingdom
Joined: November 06, 2005
KitMaker: 1,667 posts
AeroScale: 1,551 posts
Posted: Sunday, April 17, 2011 - 07:58 PM UTC
Marc, nice work on your wood samples, I think you got it pretty right.
My opinion is go with the yellow perhaps add a splash of smoke to tone it down a little if you feel it too bright. After all if you spray and decide you arent overly happy its easier to ghost some orange over it. Though some go for a less intense colour which I think looks good personally and I would go for a less intense yellow. As I sadi above its far easier to add then to try to lighten.
Yes you are right about ribtaping they were manufacturer coloured abd fitted in one coninuous piece around the wing.
The guage wasnt a standard fit some aircraft have it some dont, some have the instrumant on the strut but the guage in the cockpit as per the Canberra A/c. the part is in the kit, it's parts 41E and 34E on the engine sprue. usually you'll find part 34E broke though.
Keith.
Still can't cure the AMS even with sausage finger implants & olde eyes.


