REVIEW Albatros D.III Oeffag 153
Colorado, United States
Joined: January 25, 2004
KitMaker: 11,669 posts
AeroScale: 11,011 posts
Posted: Sunday, April 10, 2011 - 08:43 AM UTC

Eduard''s scale wonder is a 1:48 version of the Albatros D.III licence built Autro-Hungarian concern at Wiener-Neustadt. The Austrian original was a finely improved version of the German type from Johannistahl Germany. Here we look at the Weekend kit issue of what promises to be a great series.
Link to ItemIf you have comments or questions please post them here.
Thanks!
". . .The most important thing is to know why you build and then get the most that you can out of building." via D.D.
Colorado, United States
Joined: January 25, 2004
KitMaker: 11,669 posts
AeroScale: 11,011 posts
Posted: Thursday, October 27, 2011 - 04:43 PM UTC
When I said that the original was a finely improved version of the German Albatros D.III I wondered if anyone would see that this kit fits the same description in compaerison to the Eduard 1:48 mold of the German version.
I have begun prepping this kit last week. I got the idea when Mirage first announced their Austrian Sworl Camouflage decals reviewed
here. Then as I decided to put this on the to do list HGW announced their wood grain decals for this specific kit
here. I chose the basic weekend kit as a foundation for this build. Also I will be following my review and posting images here. As personal markings I think I will delve into my stash of Americal / Gryphon Austro Hungarian sheets in 1:48 and see what can be had.
". . .The most important thing is to know why you build and then get the most that you can out of building." via D.D.
Colorado, United States
Joined: January 25, 2004
KitMaker: 11,669 posts
AeroScale: 11,011 posts
Posted: Thursday, October 27, 2011 - 04:48 PM UTC
Now as to the wing camouflage'
". . .Beginning in May 1918 it was applied to at least 4 of the late production 153 series (153.263, 153.264, 153.265 & 153.267) and in small batch groupings of all 253 series. Because of the method of production the real fabric was only available in small batches. I believe Dr. O'Connor's studies list the 253 series airframes that are confirmed by photo images. . ."
". . .The most important thing is to know why you build and then get the most that you can out of building." via D.D.
Colorado, United States
Joined: January 25, 2004
KitMaker: 11,669 posts
AeroScale: 11,011 posts
Posted: Friday, October 28, 2011 - 05:38 AM UTC
". . .The most important thing is to know why you build and then get the most that you can out of building." via D.D.
Colorado, United States
Joined: January 25, 2004
KitMaker: 11,669 posts
AeroScale: 11,011 posts
Posted: Friday, October 28, 2011 - 08:38 AM UTC
". . .The most important thing is to know why you build and then get the most that you can out of building." via D.D.
Colorado, United States
Joined: January 25, 2004
KitMaker: 11,669 posts
AeroScale: 11,011 posts
Posted: Friday, October 28, 2011 - 08:45 AM UTC
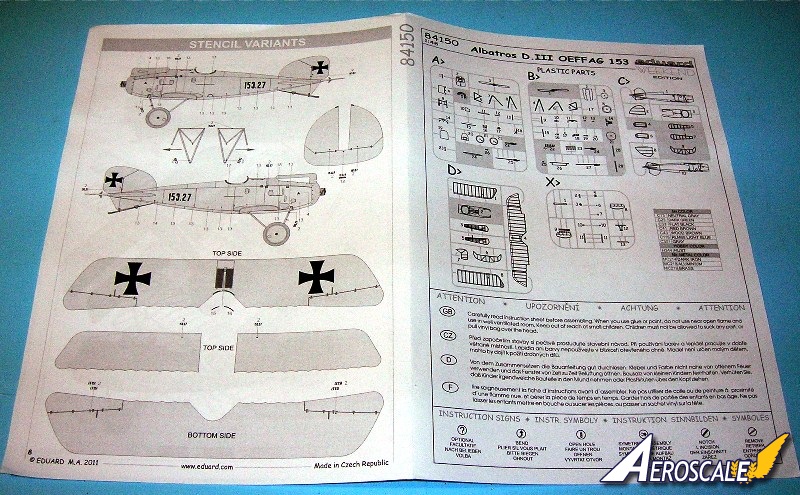
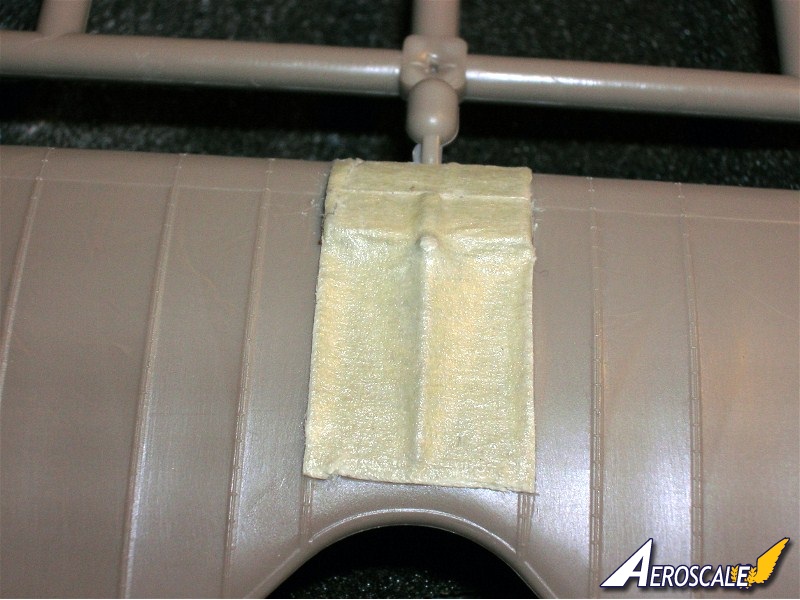
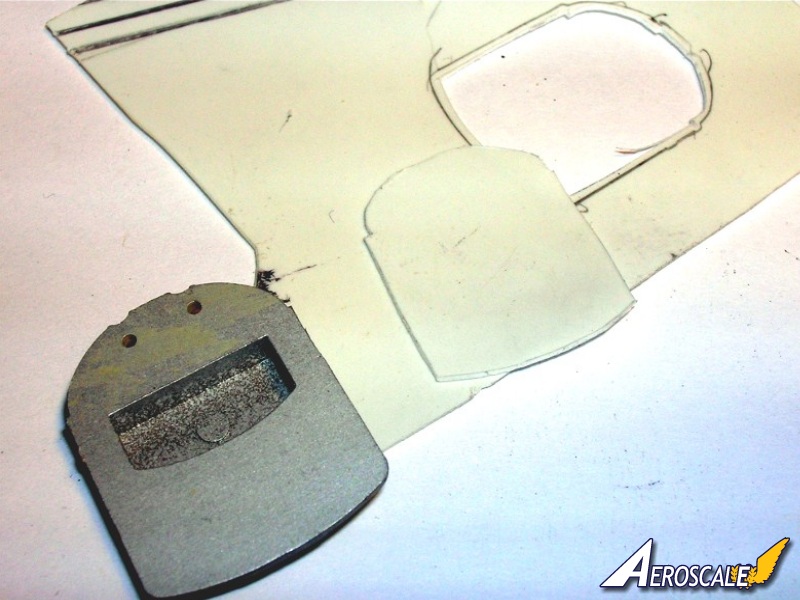
Here I block the radiator from being coloured with the base fabric coat. The Oeffag Albatros radiators were finished in black paint.

". . .The most important thing is to know why you build and then get the most that you can out of building." via D.D.
Colorado, United States
Joined: January 25, 2004
KitMaker: 11,669 posts
AeroScale: 11,011 posts
Posted: Friday, October 28, 2011 - 08:46 AM UTC
". . .The most important thing is to know why you build and then get the most that you can out of building." via D.D.
Colorado, United States
Joined: January 25, 2004
KitMaker: 11,669 posts
AeroScale: 11,011 posts
Posted: Friday, October 28, 2011 - 09:50 AM UTC
About a year ago Aeroscale member Steffan Arndt (Alpha Tango) did his build and posted it
here. ". . .The most important thing is to know why you build and then get the most that you can out of building." via D.D.
Colorado, United States
Joined: January 25, 2004
KitMaker: 11,669 posts
AeroScale: 11,011 posts
Posted: Saturday, October 29, 2011 - 01:22 PM UTC
I have several items enroute by postal service for this build yet I want to forge ahead with the Mirage "Sworl" camouflage. Even the fellows at Eduard agree with me that its is spelled "Sworl". To review;
"There were 3 types of finishes applied to the Oeffag built Albatros D. wings in 1918.
1. Plain bleached and unbleached linen.
2. "Brumowski Distribution" - upper surface only usually only 2 colours. The other was often called a "summation pattern" when it involved 3 or more colours.
3. Preprinted Sworl Camouflage - upper surface only. It is believed that this pattern was used originally on "oriental" large area rugs. . . "
There were two types of Sworl preprinted fabric in 1918. There was the spring leaf and autumn. Mirage has given us the spring leaf. FCM decals of Brazil gave us the autmn leaf. Though I like the Mirage pattern more as it is very distinct. (I will do a review on the FCM decals in November 2011.)
This is the Mirage set is one of the best rendered efforts of this topic.
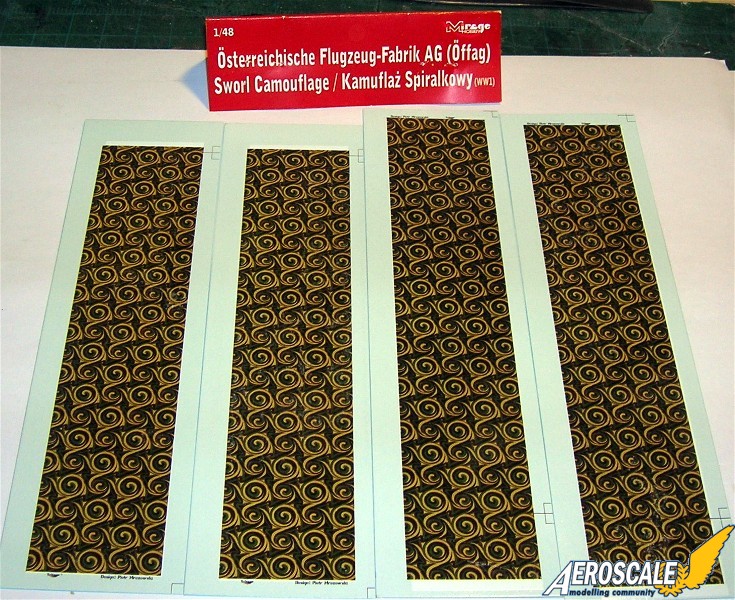
Of note if you have the Hit Kit 1:72 Alb. D.III Oeffag ser.253 kit you will note the Sworl pattern included are the same or almost the same colours as the current Mirage sets. Though the Hit Kit set does not have the same number of rows on a strip. Here again the Mirage set is far more accurate to the original in proportions.
". . .The most important thing is to know why you build and then get the most that you can out of building." via D.D.
Colorado, United States
Joined: January 25, 2004
KitMaker: 11,669 posts
AeroScale: 11,011 posts
Posted: Saturday, October 29, 2011 - 02:17 PM UTC
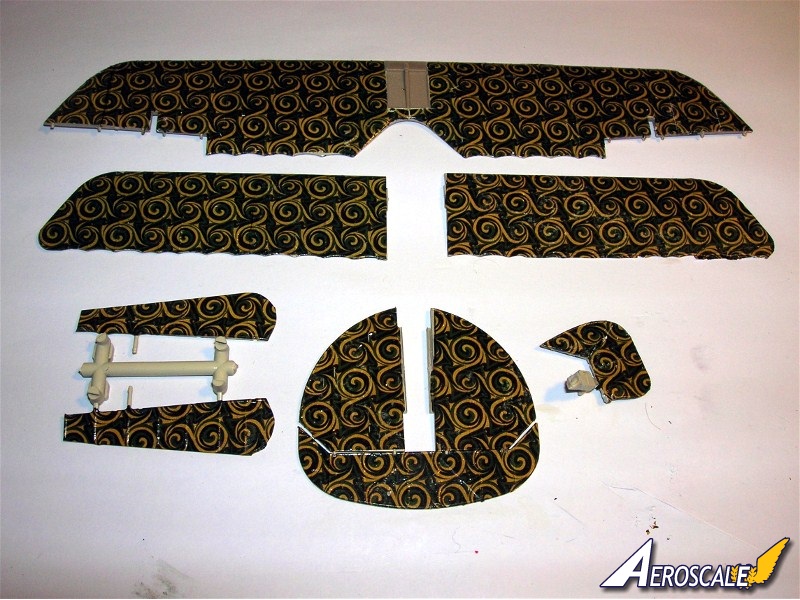
Now to begin with the application.
To the best of my knowledge the layout was not spanwise but was in fact a chordwise application. Like the German 4 & 5 colour lozenge -BUT the major differences were that;
1. the rib tapes were under the fabric covering, directly attached to the wooden wing ribs.
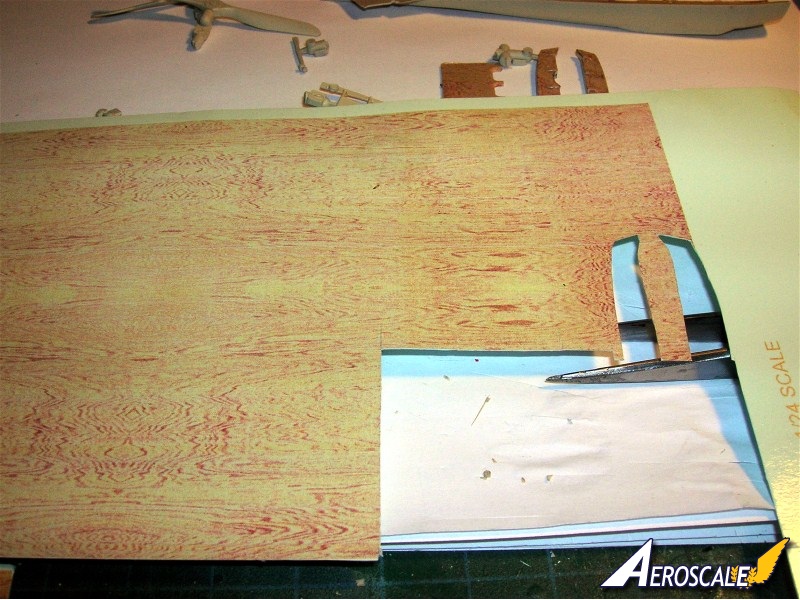
2. The original fabric (remember they did rugs) came in much wider rolls than the chord of the wing so at the factory the covering could be laid down in one piece and trimmed accordingly.
With the decals you have to cut the strips and align factory edge to factory edge as mentioned in the German Lozenge 101 thread. The Sworl pattern was designed as a rug pattern and therefore with its repeat pattern could fit as small or as large a room as needed without any visible seams. (Having a background in textiles this is very obvious to me.) Viewing the photo images available to me and noting the "key sworl pattern" we go back again and find the repeating forms and note their orientation on completed aircraft wings.
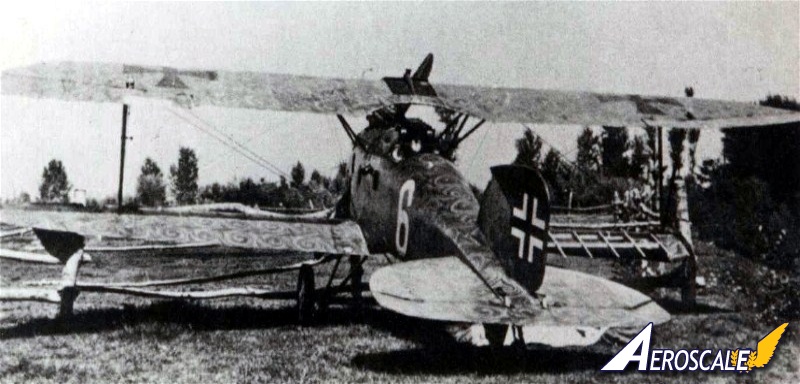
With all that in mind lets go to this image (as a start) and see if it bears out what I have mentioned. Compare to the Mirage decals above in the previous post that you must apply in strips to get the same result.
Note the direction at the center of each sworl. Note how the section that repeats is like two whirlpools turning in directions similar than the one its linked to. Like a stylized or reversed capital "S"
". . .The most important thing is to know why you build and then get the most that you can out of building." via D.D.
Colorado, United States
Joined: January 25, 2004
KitMaker: 11,669 posts
AeroScale: 11,011 posts
Posted: Saturday, October 29, 2011 - 04:26 PM UTC
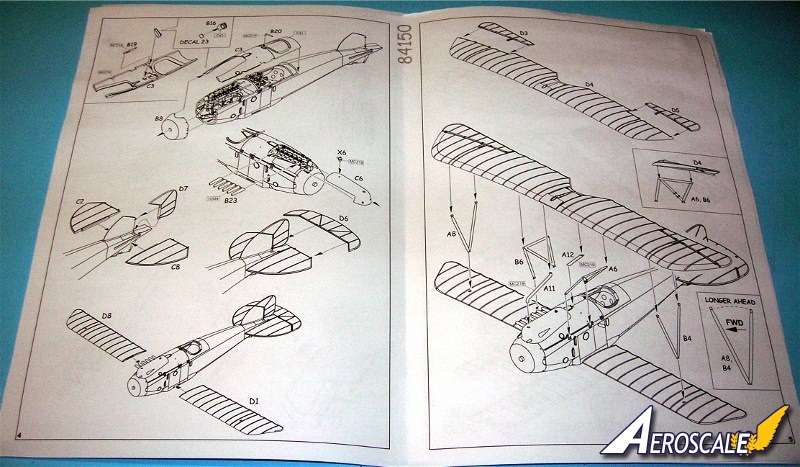
Just a reminder from a fellow historian; ". . .The hatch on the bottom side of the lower wing beneath the Vee-strut can only be found on German planes. The Austrians just covered this area with fabric. You would have to cut this open any time you inspect or grease the pulleys. that is why I used the German detail. . ."
". . .The most important thing is to know why you build and then get the most that you can out of building." via D.D.
Colorado, United States
Joined: January 25, 2004
KitMaker: 11,669 posts
AeroScale: 11,011 posts
Posted: Sunday, October 30, 2011 - 11:38 AM UTC
I had to go back and add some details to a previous post here. I have to keep reminding myself you can't read my mind or know where I am going to without specifics.
In short;
A. The original fabric came in much larger rolls and the chord of the fabric roll could easily cover the top wing in one run. By the way it took 3-4 days to get a run of 200m of "preprinted Sworl" fabric.
B. The Mirage strip decals have to be cut to match to get the one run or single covering look.
". . .The most important thing is to know why you build and then get the most that you can out of building." via D.D.
Colorado, United States
Joined: January 25, 2004
KitMaker: 11,669 posts
AeroScale: 11,011 posts
Posted: Monday, October 31, 2011 - 08:26 AM UTC
Here is the Mirage decal thread. Can you believe how thin this Eduard kit wing is?
". . .The most important thing is to know why you build and then get the most that you can out of building." via D.D.
Colorado, United States
Joined: January 25, 2004
KitMaker: 11,669 posts
AeroScale: 11,011 posts
Posted: Tuesday, November 01, 2011 - 06:06 PM UTC
". . .The most important thing is to know why you build and then get the most that you can out of building." via D.D.
Colorado, United States
Joined: January 25, 2004
KitMaker: 11,669 posts
AeroScale: 11,011 posts
Posted: Wednesday, November 02, 2011 - 08:30 PM UTC
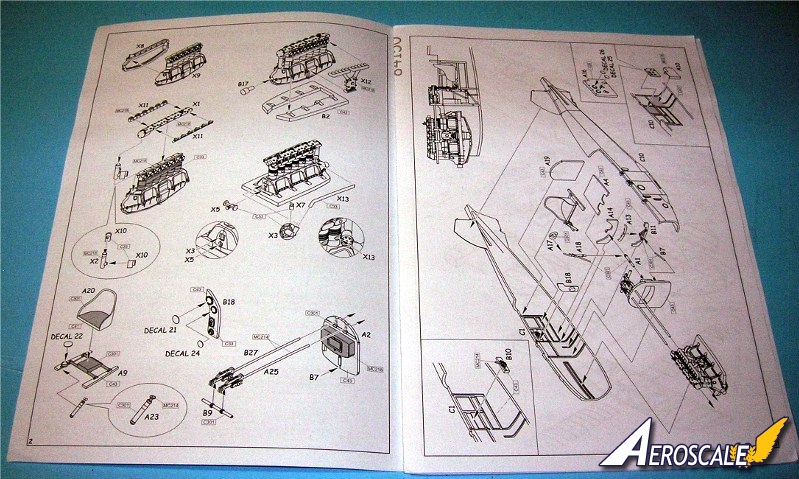
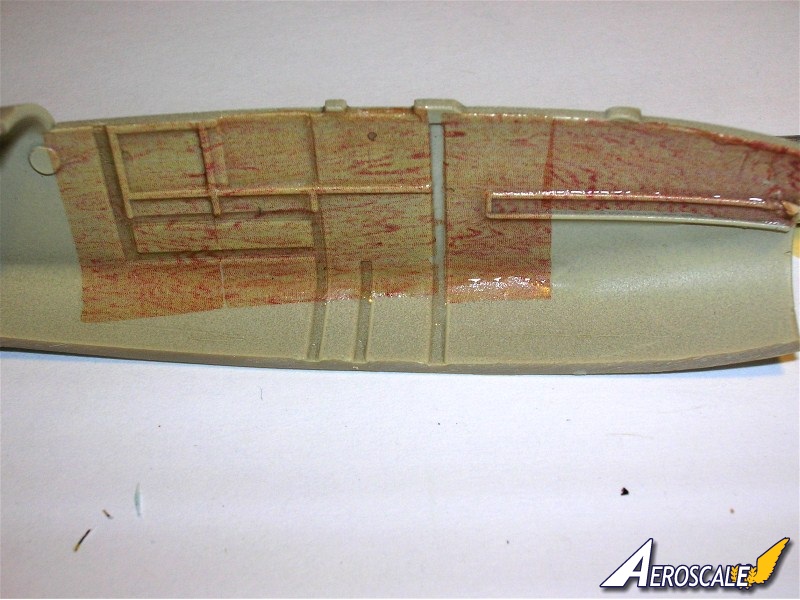
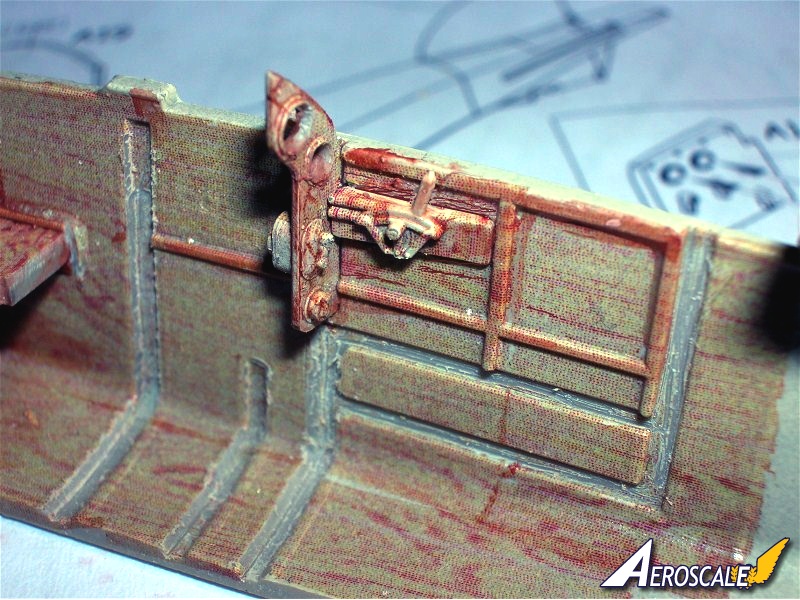
Now we go to the bulkhead for the ammo box, gun mounts and the fuel tank. First trace the bulk head. Cut inside the traced line.
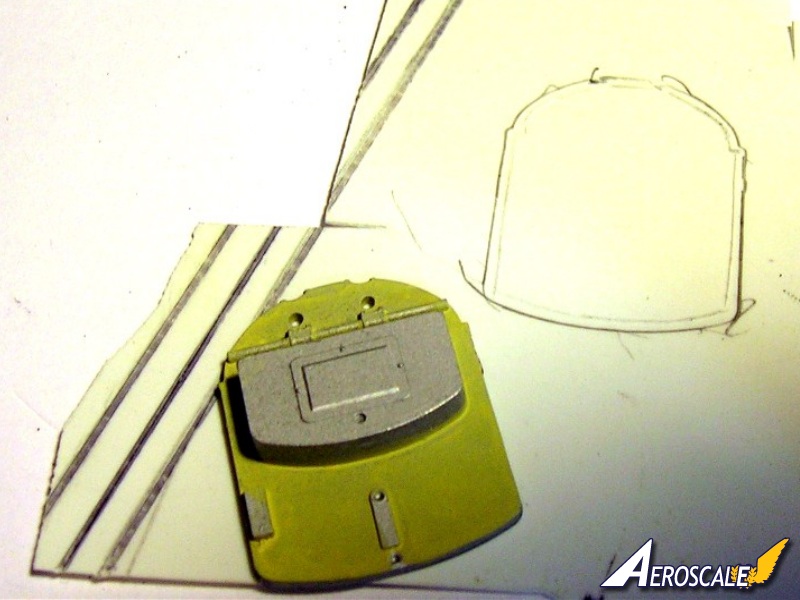
Then attach it to the side for the engine compartment.
Note I have left a clear edge for the kit part to fit in the fuselage inner surface grooves.
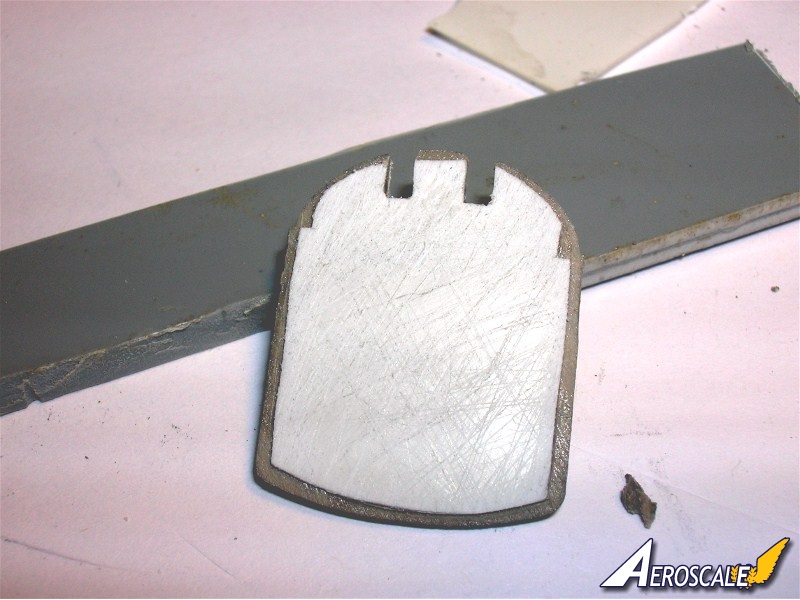
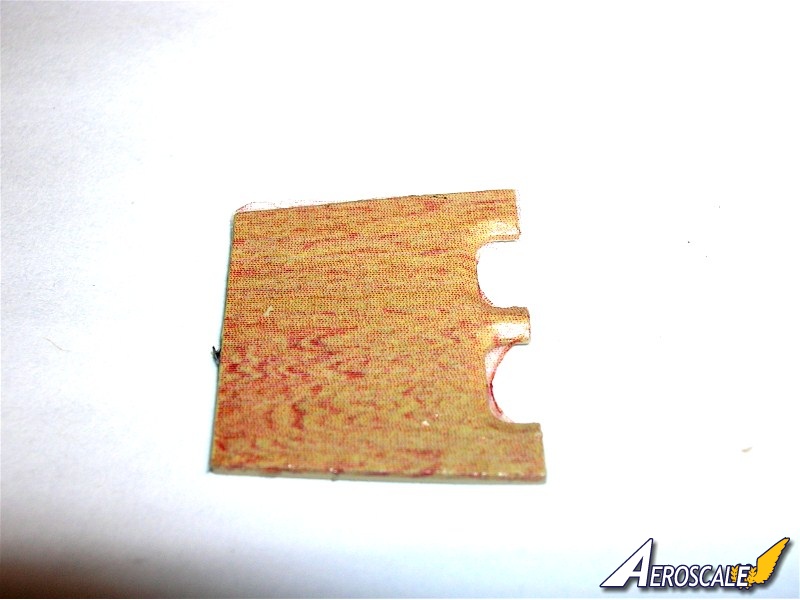
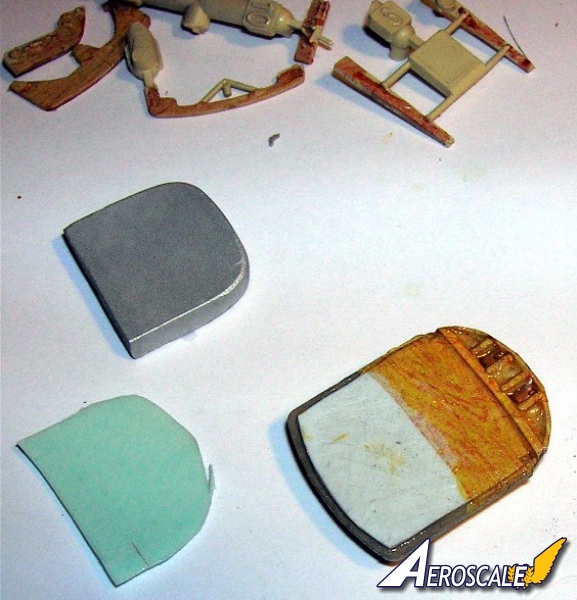
Next I want to cut the fuel tak from a sandwich of .060thou plastic. The remnant is above the scratchbuilt fuel tank in grey plastic.

Parts are ready to unite.
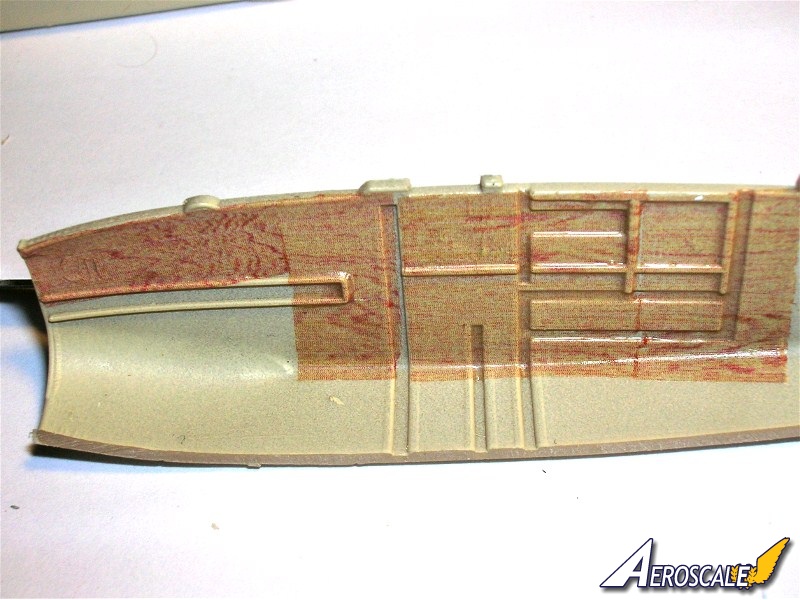
For a good fit I had to remove the rearmost (vertical) edge for the engine support. You can also see here tht I added some framing edges to the area where the gun barrels of Schwarzlose machine guns pass throught. This mimics the original airframe.

Now the fuel tank used in the 253. series was a whole different design and filled up the whole lower area behind and below the engine. So you might want to take that into account if you want to do one with an open cowling.
". . .The most important thing is to know why you build and then get the most that you can out of building." via D.D.
Colorado, United States
Joined: January 25, 2004
KitMaker: 11,669 posts
AeroScale: 11,011 posts
Posted: Friday, November 04, 2011 - 07:35 AM UTC
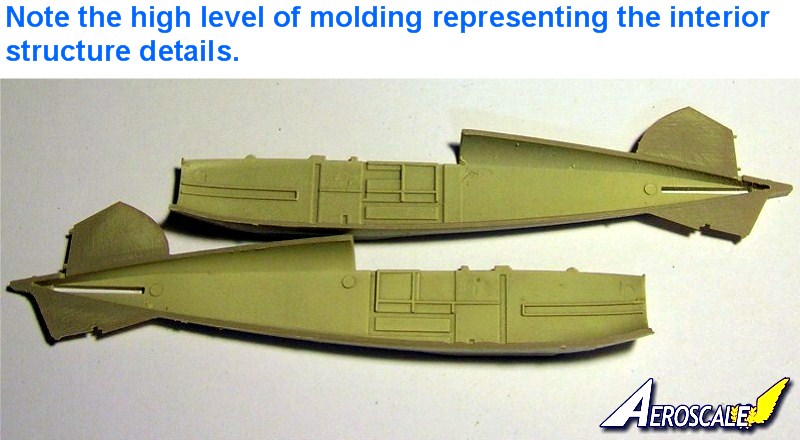
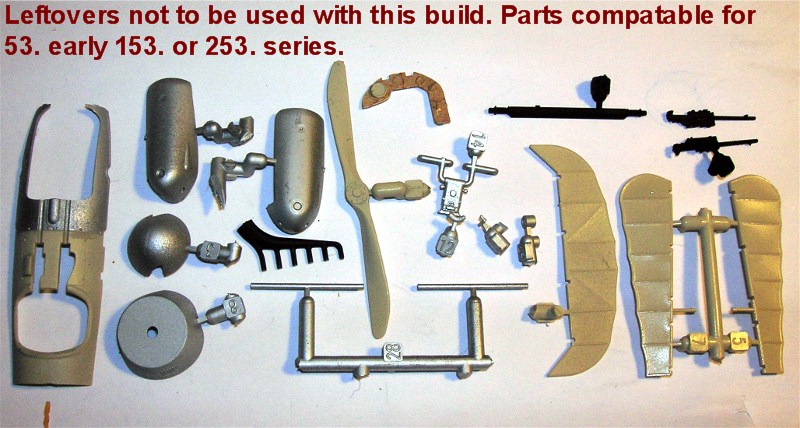
To Eduard's credit they have never been stingy with kit parts. This image simply re-affirms their policy to give the modeler a bit more than just plastic even in the "Weekend kits".
". . .The most important thing is to know why you build and then get the most that you can out of building." via D.D.
Colorado, United States
Joined: January 25, 2004
KitMaker: 11,669 posts
AeroScale: 11,011 posts
Posted: Friday, November 04, 2011 - 07:43 AM UTC
At this point the various applications of wood grain start to get a bit lost in each other. A bit of can't see the details for the multigrain. Fortunately adding the other cockpit colours will break this up.
". . .The most important thing is to know why you build and then get the most that you can out of building." via D.D.
Colorado, United States
Joined: January 25, 2004
KitMaker: 11,669 posts
AeroScale: 11,011 posts
Posted: Friday, November 04, 2011 - 07:45 AM UTC
Now how do you imagine that I should cover up that nasty center seam in the floor when I unite the fuselage halves?

. . .He says wryly. You in the back. . .Mike Satin, what think thee?
". . .The most important thing is to know why you build and then get the most that you can out of building." via D.D.
MichaelSatin
 Campaigns Administrator
Colorado, United States
Joined: January 19, 2008
KitMaker: 3,909 posts
AeroScale: 2,904 posts
Posted: Friday, November 04, 2011 - 12:14 PM UTC
Lay down a small strip of plastic overlapping the seam and pretend it's a former (stringer?). There, best I can come up with on short (no) notice.
Man, I had no idea there would be a quiz!

Mike

On the bench:
Sorta depends on your definition of "on the bench"...
Colorado, United States
Joined: January 25, 2004
KitMaker: 11,669 posts
AeroScale: 11,011 posts
Posted: Friday, November 04, 2011 - 12:28 PM UTC
Heh heh, That is what we do round here sir!

Must take advantage of the talent. The deal is not to make the stringer too obvious so it will blend in.
". . .The most important thing is to know why you build and then get the most that you can out of building." via D.D.
MichaelSatin
Campaigns Administrator Colorado, United States
Joined: January 19, 2008
KitMaker: 3,909 posts
AeroScale: 2,904 posts
Posted: Friday, November 04, 2011 - 12:38 PM UTC
Quoted Text
The deal is not to make the stringer too obvious so it will blend in.
Well yeah, of COURSE.

Mike
On the bench:
Sorta depends on your definition of "on the bench"...
MichaelSatin
Campaigns Administrator Colorado, United States
Joined: January 19, 2008
KitMaker: 3,909 posts
AeroScale: 2,904 posts
Posted: Friday, November 04, 2011 - 12:42 PM UTC
By the way, you have checked out my next
campaign, right? I'm planning on doing the WNW S.E.5a and Albatros D.V.
In case you're interested.

Mike
On the bench:
Sorta depends on your definition of "on the bench"...
Colorado, United States
Joined: January 25, 2004
KitMaker: 11,669 posts
AeroScale: 11,011 posts
Posted: Friday, November 04, 2011 - 01:50 PM UTC
Hhhhmmmmthat might just be the ticket. . .more later.
". . .The most important thing is to know why you build and then get the most that you can out of building." via D.D.
Colorado, United States
Joined: January 25, 2004
KitMaker: 11,669 posts
AeroScale: 11,011 posts
Posted: Tuesday, November 08, 2011 - 01:48 PM UTC
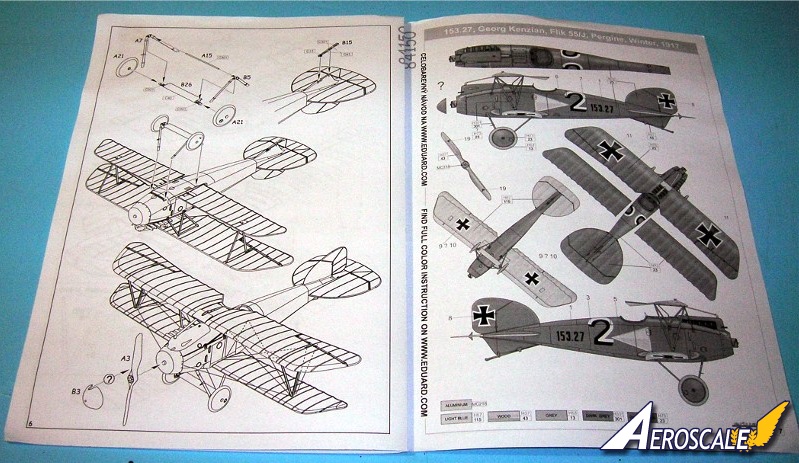
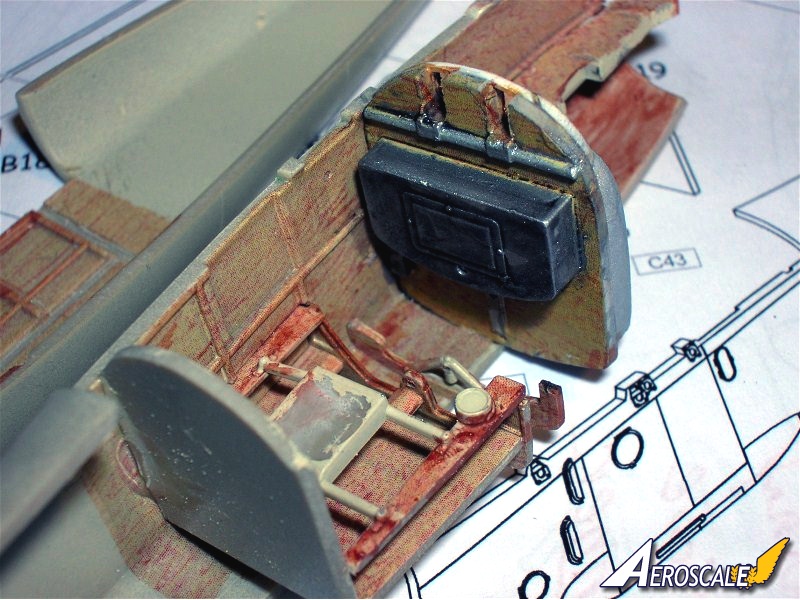
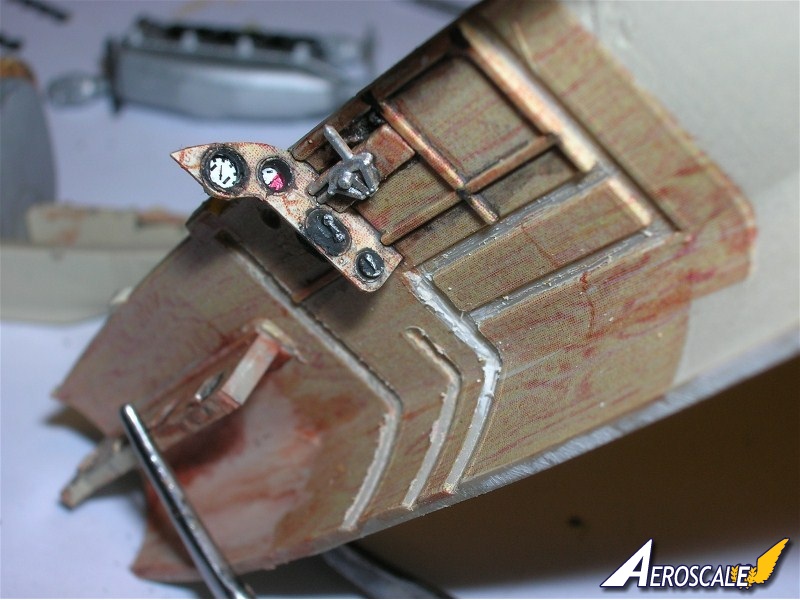
Something to add that is not in the instructions the fuel gauge should be mounted on the firewall between the guns.
". . .The most important thing is to know why you build and then get the most that you can out of building." via D.D.
Colorado, United States
Joined: January 25, 2004
KitMaker: 11,669 posts
AeroScale: 11,011 posts
Posted: Tuesday, November 08, 2011 - 08:30 PM UTC
Almost ready to close up.
The guns has to be dropped down 1/32 of an inch from what yo see here.
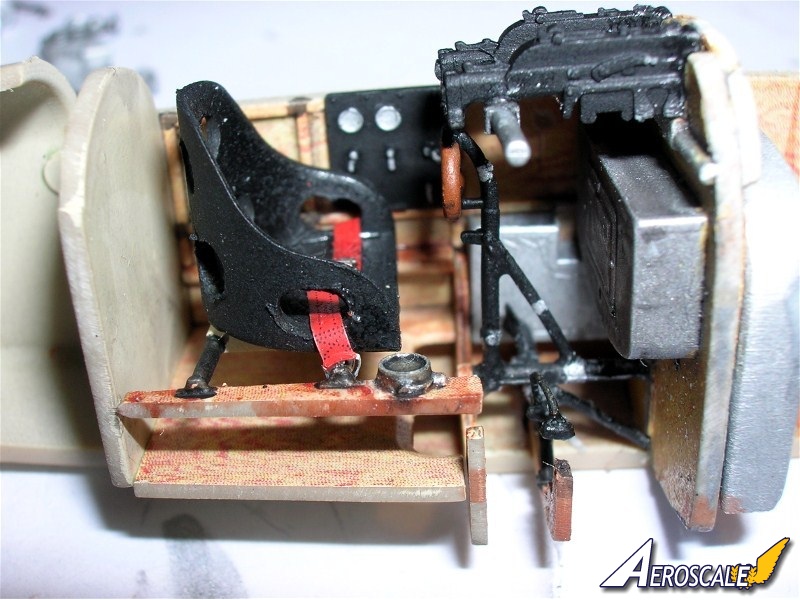
". . .The most important thing is to know why you build and then get the most that you can out of building." via D.D.