New South Wales, Australia
Joined: March 26, 2009
KitMaker: 366 posts
AeroScale: 309 posts
Posted: Monday, April 18, 2011 - 01:19 AM UTC
Check my site for 1:32 scale WW1 aircraft model build logs, build techniques, how to make turnbuckles and eyelets plus much more, plenty of photos of my finished models
New South Wales, Australia
Joined: March 26, 2009
KitMaker: 366 posts
AeroScale: 309 posts
Posted: Monday, April 18, 2011 - 01:22 AM UTC
Check my site for 1:32 scale WW1 aircraft model build logs, build techniques, how to make turnbuckles and eyelets plus much more, plenty of photos of my finished models
England - South East, United Kingdom
Joined: November 06, 2005
KitMaker: 1,667 posts
AeroScale: 1,551 posts
Posted: Monday, April 18, 2011 - 02:10 AM UTC
Beautiful work Des, as always of course. Inspiration for future work for many of us as always too.
I must say of the bigger WNW kits this one catches my eye, I love its ungainly ugliness. Seeing your work only makes me want to save that extra few quid and get it instead of a Pfalz even with all that skeery rigging.

Keith
Still can't cure the AMS even with sausage finger implants & olde eyes.
Arizona, United States
Joined: December 12, 2008
KitMaker: 1,423 posts
AeroScale: 1,319 posts
Posted: Monday, April 18, 2011 - 04:28 AM UTC

Hi Des:
Truly outstanding work. Like Keith wrote, and inspiration to all of us here, yours truly included. Rigging is outstanding.
Thanks for sharing your work and your tutorials.
Best
Mark
We few, we happy few........
Alberta, Canada
Joined: July 26, 2010
KitMaker: 1,032 posts
AeroScale: 1,025 posts
Posted: Monday, April 18, 2011 - 05:12 AM UTC
Quoted Text
Hi Des:
Truly outstanding work. Like Keith wrote, an inspiration to all of us here, yours truly included. Rigging is outstanding.
Thanks for sharing your work and your tutorials.
Best
Mark
Des,
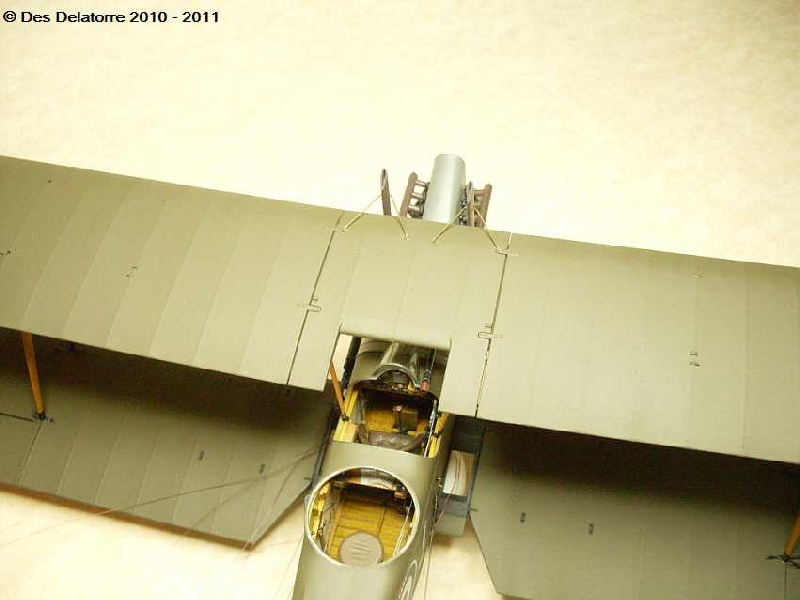
Just had to add my impressions............what absolutely beautiful work! The interior shots are, in a word, incredible. I hope I can someday just come close to your craftsmanship.
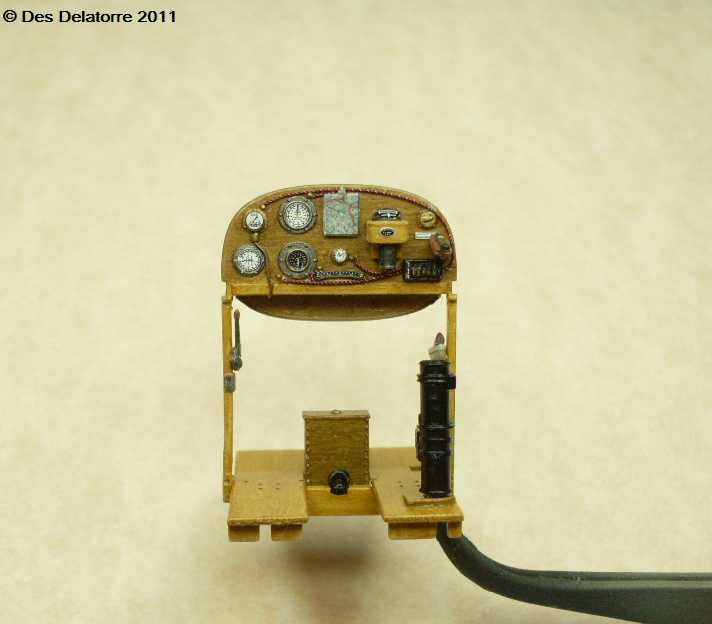
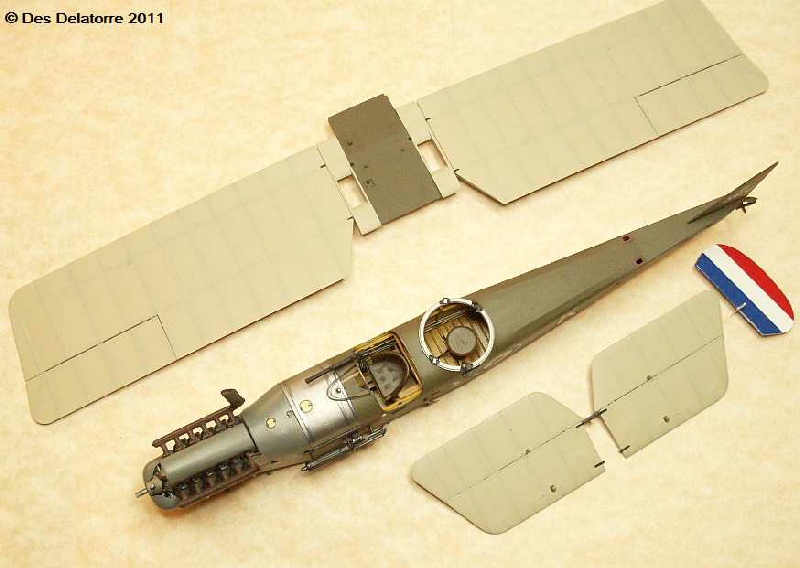
Can you share info on the maps.From where or how did you produce them?
A complete build thread would provide endless learning experience. You Sir are a true Artist and I'll be watching and learning from this article big time!
Cheers,
Lance
Officially Retired as of 20 August 2013 and looking forward to some un-interrupted bench time. Currently starting Roden's Nieuport 28 and hoping to follow that with another WNW Fokker DVII.
Colorado, United States
Joined: January 25, 2004
KitMaker: 11,669 posts
AeroScale: 11,011 posts
Posted: Monday, April 18, 2011 - 07:22 AM UTC
". . .The most important thing is to know why you build and then get the most that you can out of building." via D.D.
New South Wales, Australia
Joined: March 26, 2009
KitMaker: 366 posts
AeroScale: 309 posts
Posted: Monday, April 18, 2011 - 12:54 PM UTC
Thank you gentlemen for your kind comments, they are much appreciated.
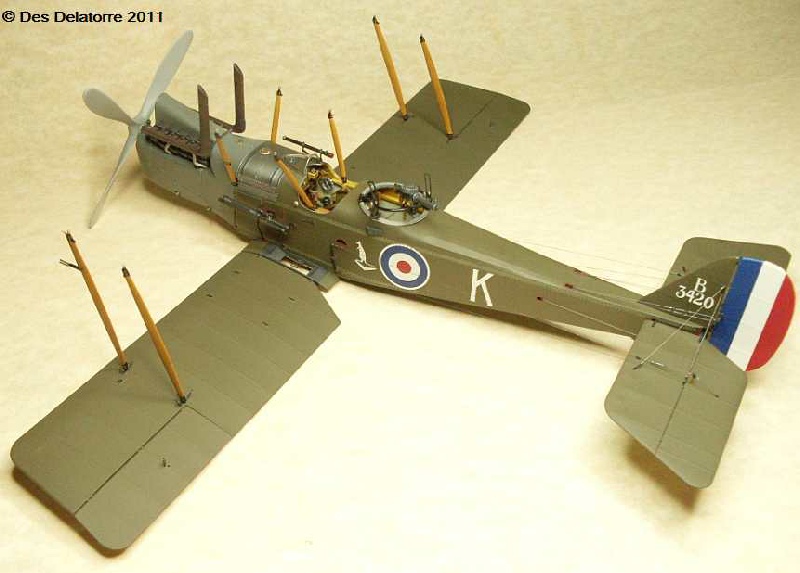
A full build log of this model can be found on my website.
http://www.ww1aircraftmodels.com You can download maps of any area around the world, resize them to what you want then print them out, iron in a few folds then flatten them out.
Des.
Check my site for 1:32 scale WW1 aircraft model build logs, build techniques, how to make turnbuckles and eyelets plus much more, plenty of photos of my finished models
Queensland, Australia
Joined: August 30, 2006
KitMaker: 285 posts
AeroScale: 281 posts
Posted: Tuesday, April 19, 2011 - 01:31 AM UTC
Hi Des - nice work as always. Ever thought of "dirtying" your builds up a bit? They are always very very clean

Weathering is always a personal preference I suppose, and I do tend to lean towards over-weathering...

BC
New South Wales, Australia
Joined: March 26, 2009
KitMaker: 366 posts
AeroScale: 309 posts
Posted: Tuesday, April 19, 2011 - 10:34 AM UTC
Thanks Brad for your kind words.
Weathering is not a thing I like doing, it can ruin what began as a really nice looking model. Some people are brilliant at applying weathering and can make a model look very used and very realistic, but I have seen a lot of models which look like they have been purposely brush painted with a bit of muck, not at all realistic.
I am still practicing weathering on older models and one day, if I get the technique right, will start adding it to my WW1 aircraft models, but for now, my models are aircraft which have just left the factory floor, spit and polish.
Des.
http://www.ww1aircraftmodels.comCheck my site for 1:32 scale WW1 aircraft model build logs, build techniques, how to make turnbuckles and eyelets plus much more, plenty of photos of my finished models
New South Wales, Australia
Joined: March 26, 2009
KitMaker: 366 posts
AeroScale: 309 posts
Posted: Wednesday, April 20, 2011 - 10:33 AM UTC
Just a quickie up-date.
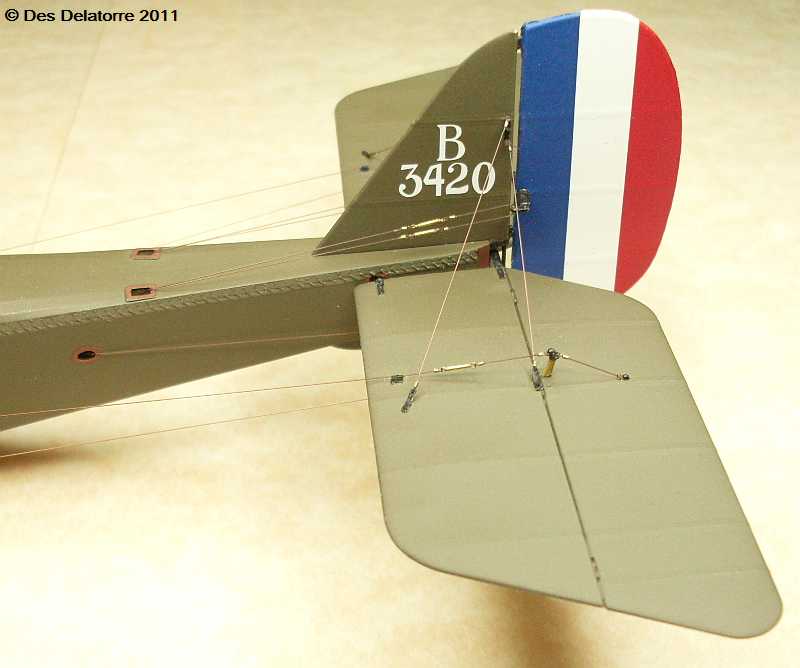
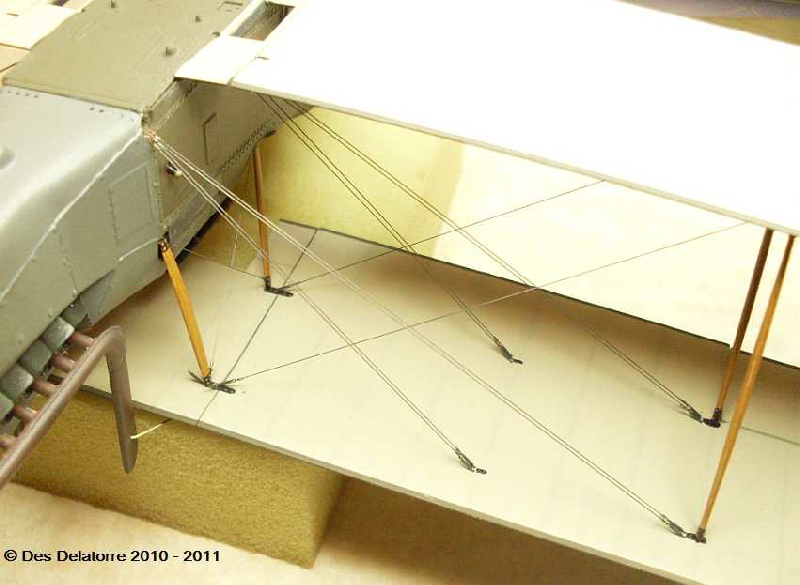
I painted the control cables and rigging wires with Mr Metal Color 213 Stainless and the turnbuckles with Mr Metal Color 212 Iron, once everything was dry (about 2 minutes) I buffed them slightly with a small soft brush.
Des.
http://www.ww1aircraftmodels.com 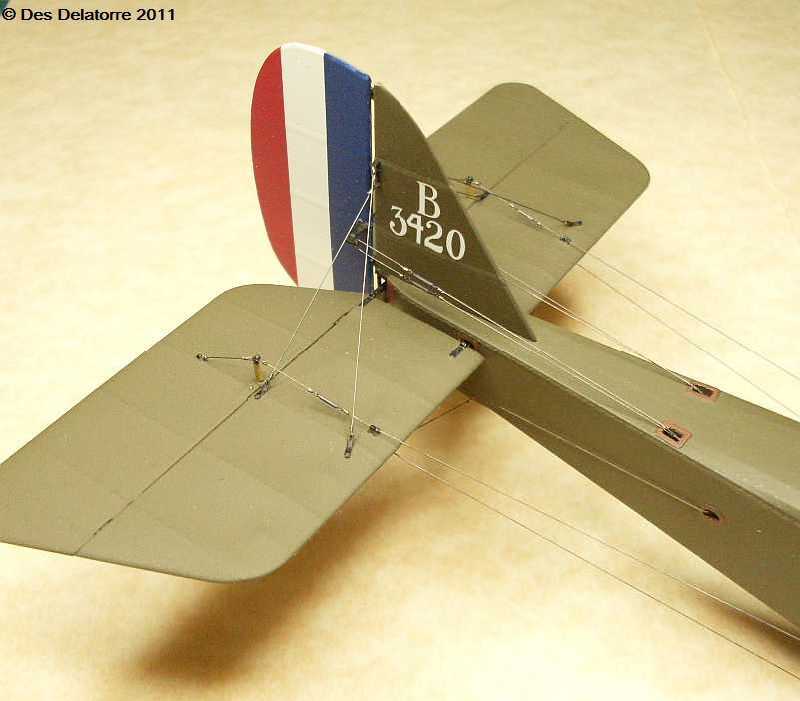
Check my site for 1:32 scale WW1 aircraft model build logs, build techniques, how to make turnbuckles and eyelets plus much more, plenty of photos of my finished models
England - East Midlands, United Kingdom
Joined: August 15, 2010
KitMaker: 43 posts
AeroScale: 35 posts
Posted: Wednesday, April 20, 2011 - 06:31 PM UTC
Lovely job on a superb kit!
What next?
Gordon
Gordon Upton.
NeOmega Resin
South Australia, Australia
Joined: August 14, 2007
KitMaker: 5,926 posts
AeroScale: 2,201 posts
Posted: Wednesday, April 20, 2011 - 10:32 PM UTC
I concur with Stephen Des... Excellent work. Those turn buckles can be a real test of ones patience.
You may be right, I may be crazy.
New South Wales, Australia
Joined: March 26, 2009
KitMaker: 366 posts
AeroScale: 309 posts
Posted: Sunday, April 24, 2011 - 10:11 AM UTC
Thanks for the nice words, much appreciated.
The turnbuckles can be frustrating at times, but once you have made the first half a dozen they are quite easy to make.
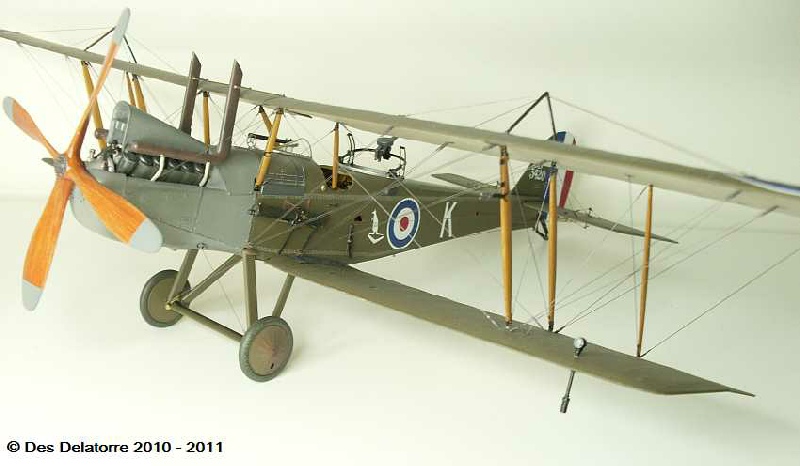
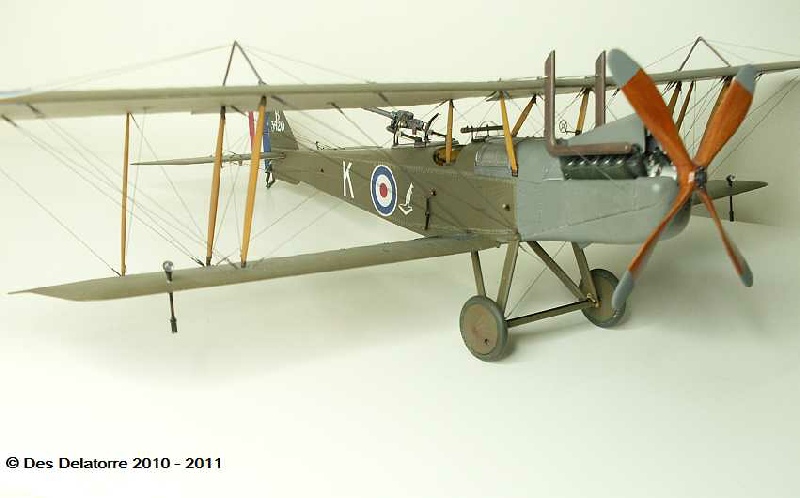
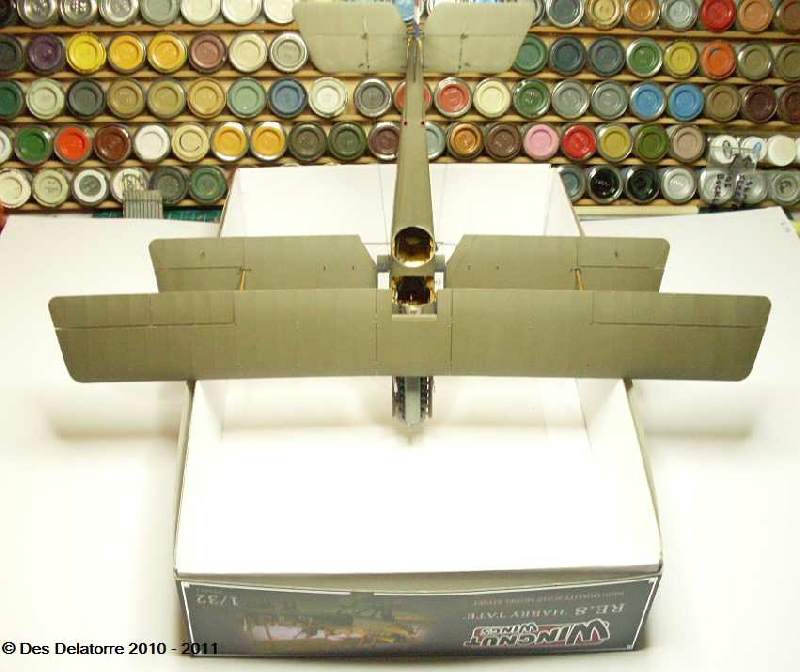
I have fitted the wing struts, I trial fitted the top wing to make sure the locating holes lined up with the struts. The struts fitted well but as per all Wingnut kits tolerances are tight so all traces of paint have to be removed otherwise fit will be a problem.
Des.
Check my site for 1:32 scale WW1 aircraft model build logs, build techniques, how to make turnbuckles and eyelets plus much more, plenty of photos of my finished models
New South Wales, Australia
Joined: March 26, 2009
KitMaker: 366 posts
AeroScale: 309 posts
Posted: Tuesday, April 26, 2011 - 12:15 PM UTC
Check my site for 1:32 scale WW1 aircraft model build logs, build techniques, how to make turnbuckles and eyelets plus much more, plenty of photos of my finished models
New South Wales, Australia
Joined: March 26, 2009
KitMaker: 366 posts
AeroScale: 309 posts
Posted: Wednesday, April 27, 2011 - 06:48 PM UTC
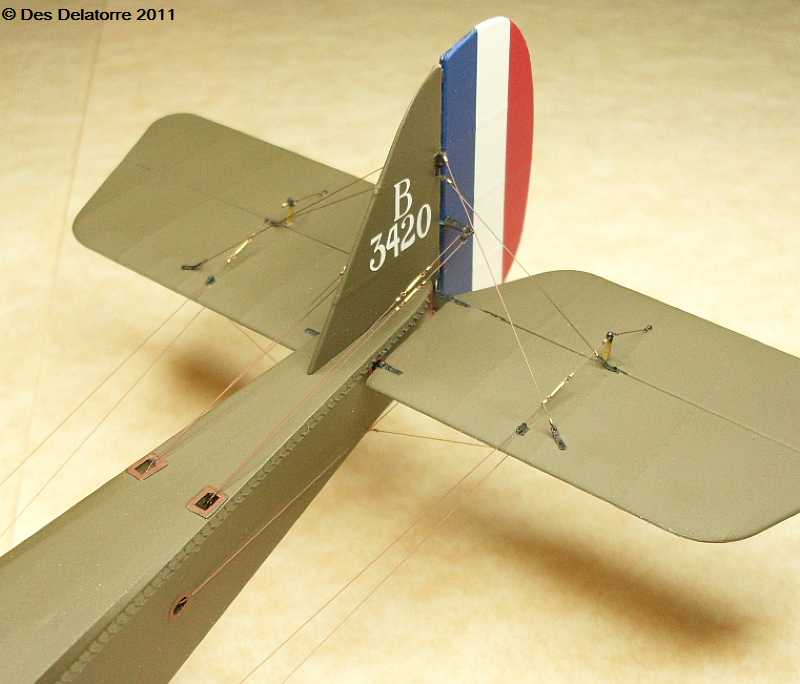
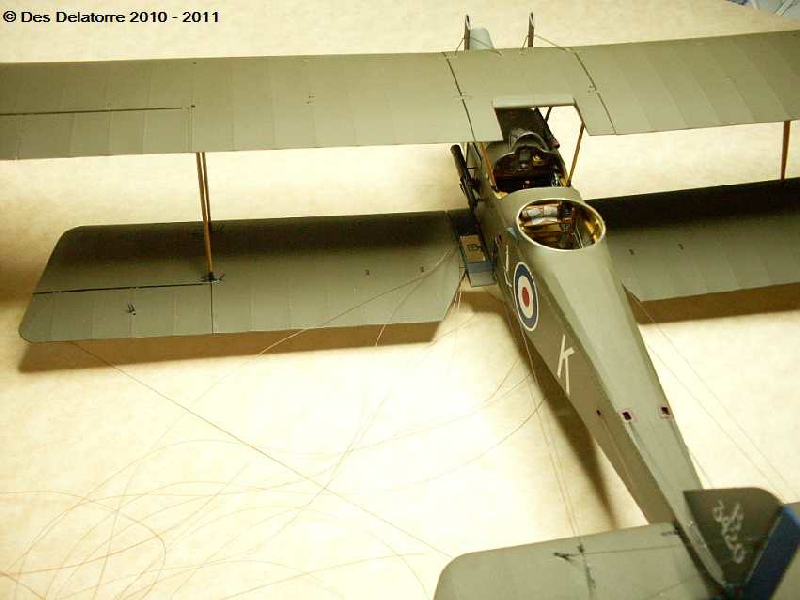
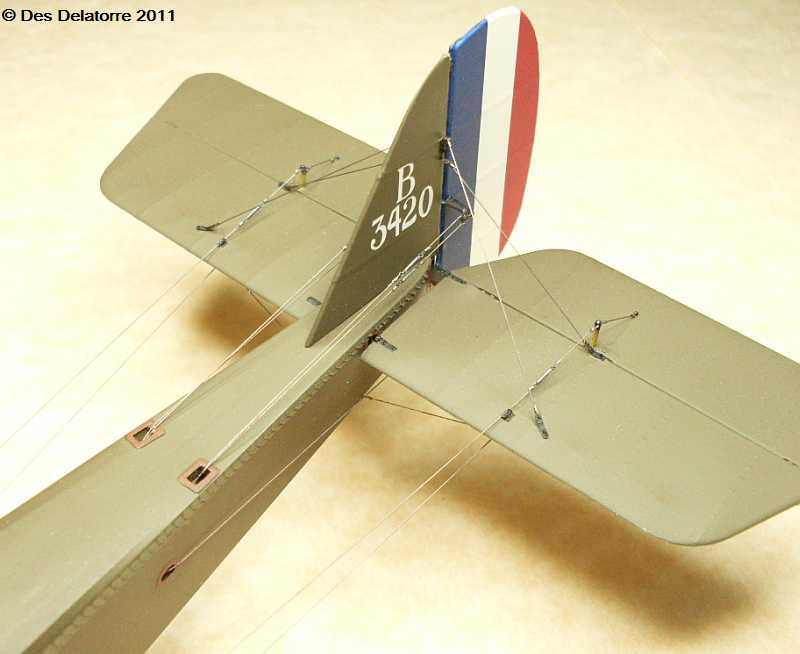
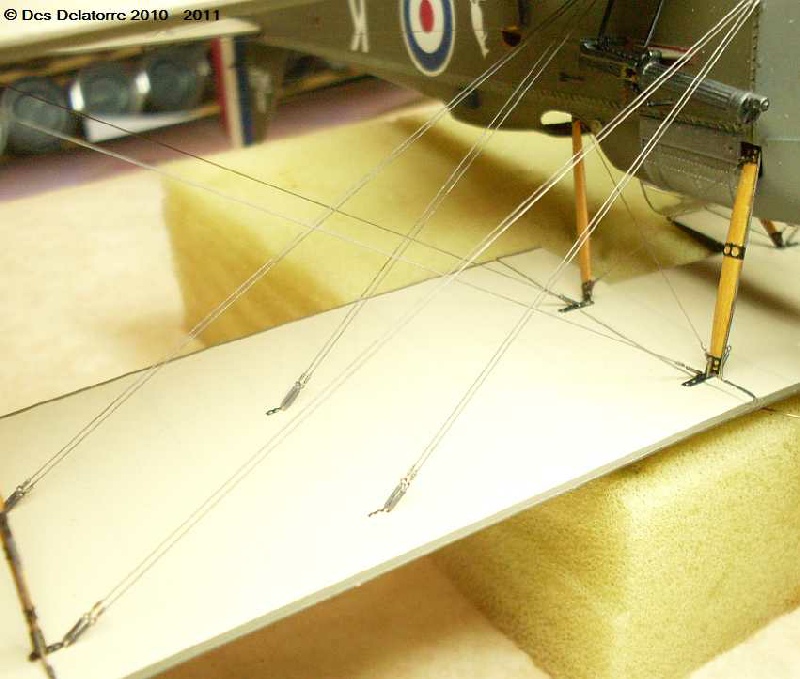
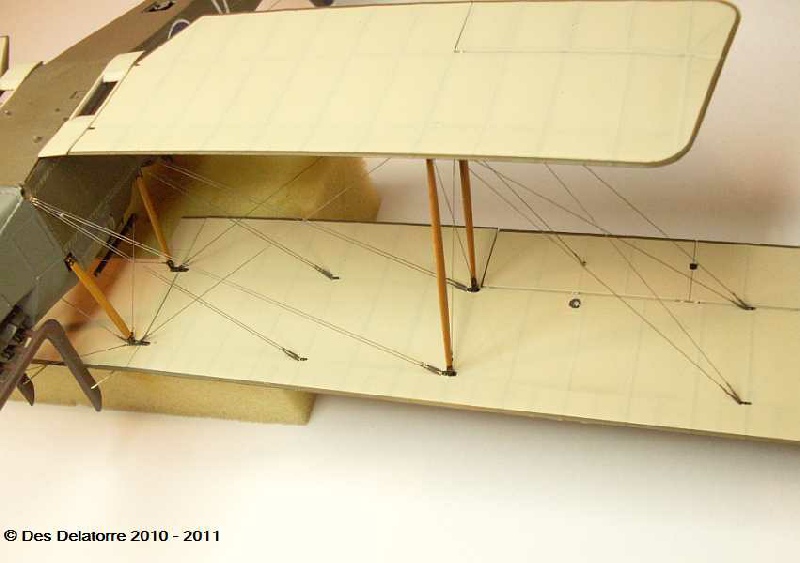
I have completed the rigging inboard of the interplane struts, I'm using 0.12mm mono and 0.4mm brass sleeves, once each line is fitted I paint them with Mr. Metal Color 213 Stainless, it is all held together with CA.
Des.
Check my site for 1:32 scale WW1 aircraft model build logs, build techniques, how to make turnbuckles and eyelets plus much more, plenty of photos of my finished models
England - South East, United Kingdom
Joined: November 06, 2005
KitMaker: 1,667 posts
AeroScale: 1,551 posts
Posted: Wednesday, April 27, 2011 - 07:50 PM UTC
Outstanding and inspirational, the extra effort with rigging points and such really sets this one apart.
Though seeing how much rigging there is, it sobered my urge to buy...that and the promised incoming arrivals on the WNW news page.

K
Still can't cure the AMS even with sausage finger implants & olde eyes.
Västra Götaland, Sweden
Joined: February 19, 2010
KitMaker: 1,473 posts
AeroScale: 1,450 posts
Posted: Wednesday, April 27, 2011 - 10:42 PM UTC
Absolutely beautiful Des, I can only agree with whats been said by everybody else here!
Mikael
_________________________________________________________
Just finished the Wingnut Wings Taube. On to the Junkers D.1
Colorado, United States
Joined: January 25, 2004
KitMaker: 11,669 posts
AeroScale: 11,011 posts
Posted: Thursday, April 28, 2011 - 06:10 AM UTC
". . .The most important thing is to know why you build and then get the most that you can out of building." via D.D.
United States
Joined: February 13, 2008
KitMaker: 36 posts
AeroScale: 35 posts
Posted: Friday, April 29, 2011 - 09:12 AM UTC
Des,
Nobody, absolutely nobody works as cleanly as you do!!!
Your work is absolutely beautiful. How do you paint these small details without any paint thickness showing up???
I want to sign up for a class. Really! Can you give us any tips?
Dave
New South Wales, Australia
Joined: March 26, 2009
KitMaker: 366 posts
AeroScale: 309 posts
Posted: Saturday, April 30, 2011 - 01:27 PM UTC
Thanks all for the kind words, they are much appreciated.
Dave - To paint the rigging wires and the turnbuckles I use Mr Metal Color paints, they are a lacquer based paint so are very thin and flow very well without any build up, it is very fast drying so quick brush work is required. Once dry, they can be buffed with a soft brush. I used Stainless for the cables and Iron for the turnbuckles.
The brackets on the struts and engine bearers plus any brackets on the fuselage frame and instrument bezels on the instrument panel are painted with black inkjet printer ink, this is a water based ink, it is very thin and flows easily, brushes well and does not add thickness to the item being painted.
Des.
Check my site for 1:32 scale WW1 aircraft model build logs, build techniques, how to make turnbuckles and eyelets plus much more, plenty of photos of my finished models
Colorado, United States
Joined: January 25, 2004
KitMaker: 11,669 posts
AeroScale: 11,011 posts
Posted: Saturday, April 30, 2011 - 03:02 PM UTC
Des I note you treat your paint the same way I do. I turn mine clockwise every week or two a 180 degrees to keep them from settling too much.

". . .The most important thing is to know why you build and then get the most that you can out of building." via D.D.
New South Wales, Australia
Joined: March 26, 2009
KitMaker: 366 posts
AeroScale: 309 posts
Posted: Saturday, April 30, 2011 - 10:32 PM UTC
Thanks for taking notice Stephen, every week I turn the tins.
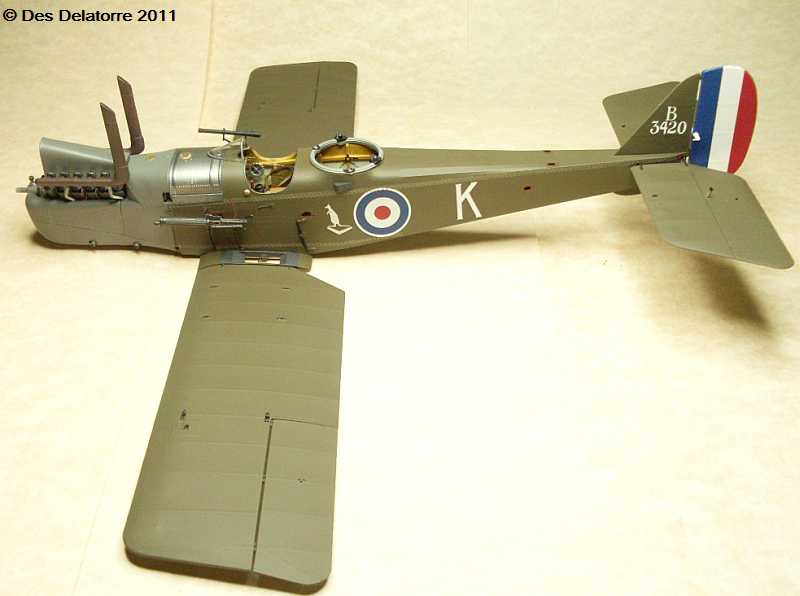
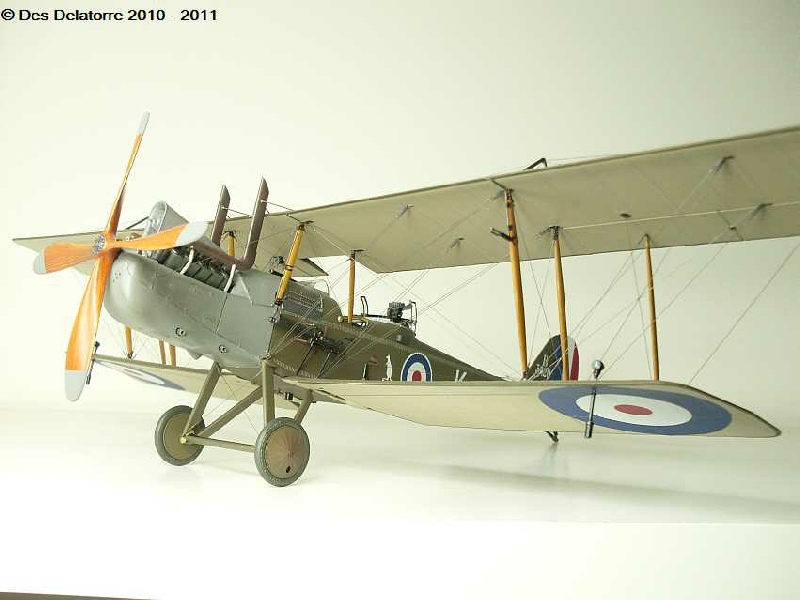
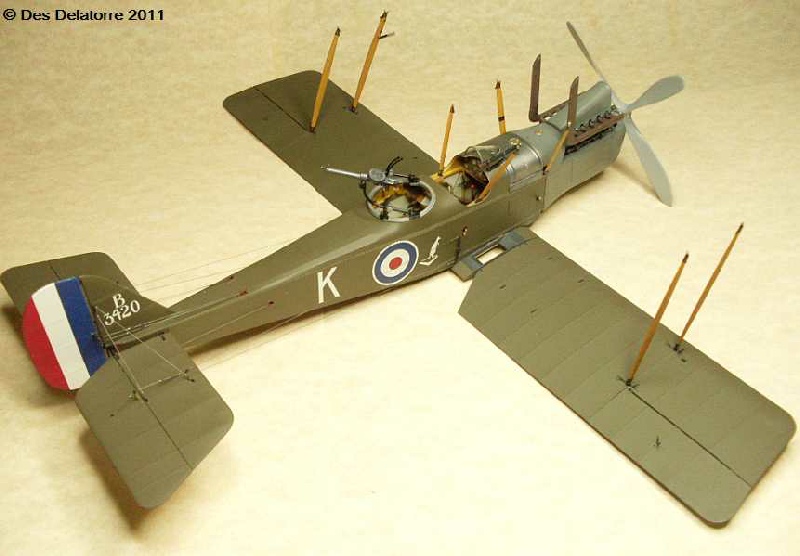
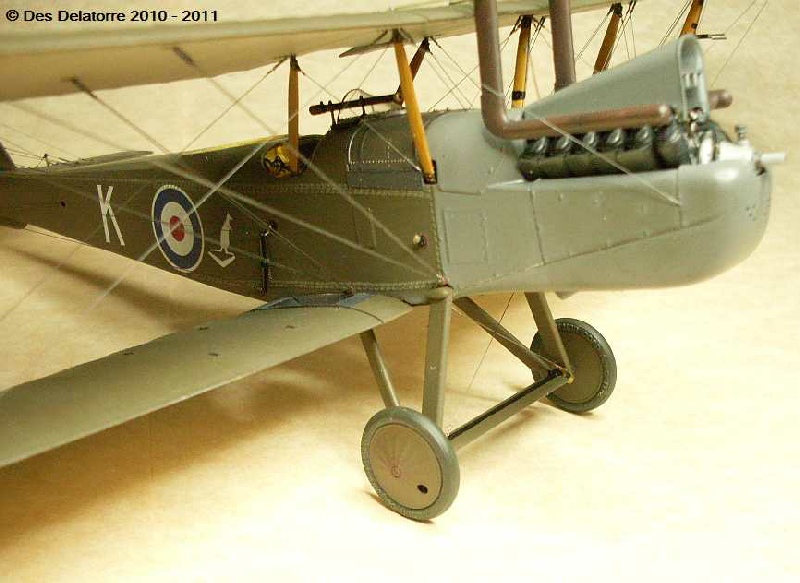
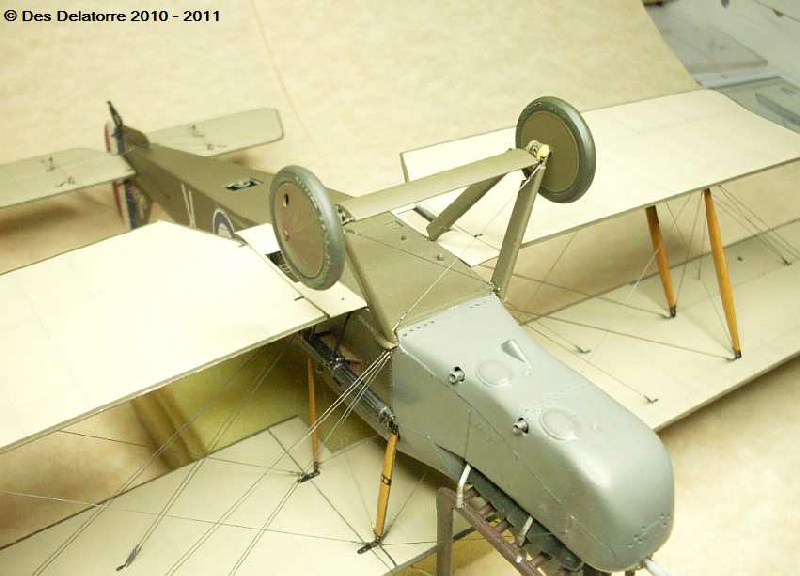
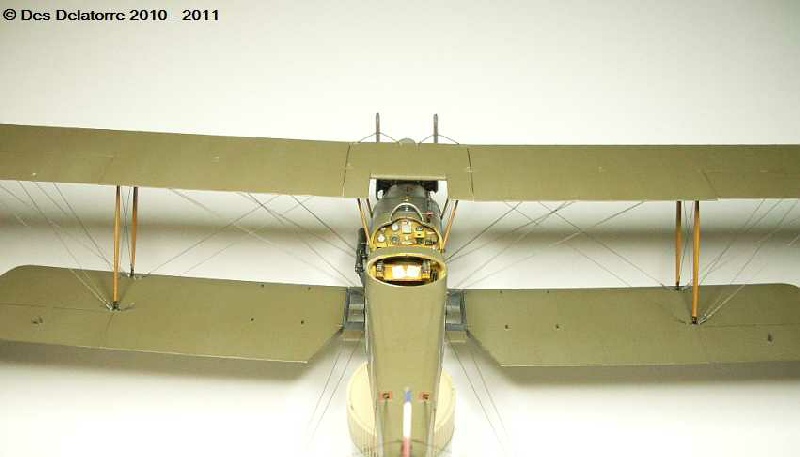
I have completed most of the wing rigging, the undercarriage is also fitted and rigged, the rigging has added a great deal of strength to the wings and undercarriage assemblies.
Des.
Check my site for 1:32 scale WW1 aircraft model build logs, build techniques, how to make turnbuckles and eyelets plus much more, plenty of photos of my finished models
North Carolina, United States
Joined: June 19, 2007
KitMaker: 604 posts
AeroScale: 600 posts
Posted: Sunday, May 01, 2011 - 02:29 AM UTC
New South Wales, Australia
Joined: March 26, 2009
KitMaker: 366 posts
AeroScale: 309 posts
Posted: Wednesday, May 04, 2011 - 07:10 PM UTC
Check my site for 1:32 scale WW1 aircraft model build logs, build techniques, how to make turnbuckles and eyelets plus much more, plenty of photos of my finished models
Västra Götaland, Sweden
Joined: February 19, 2010
KitMaker: 1,473 posts
AeroScale: 1,450 posts
Posted: Wednesday, May 04, 2011 - 08:08 PM UTC
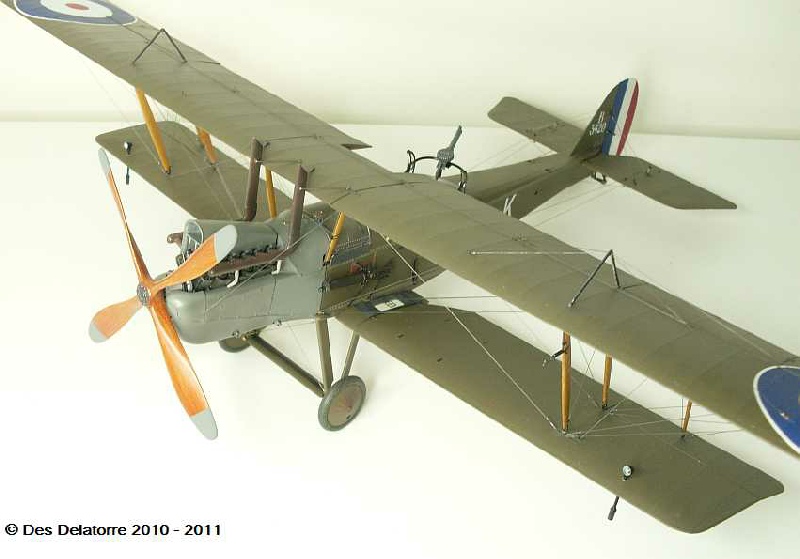
It is a real beauty Des one to be very proud of
Congratulations on finishing

Mikael
_________________________________________________________
Just finished the Wingnut Wings Taube. On to the Junkers D.1