

Being my first vacform build, I can use all the advice I can get!
Air Campaigns
Want to start or join a group build? This is where to start.
Want to start or join a group build? This is where to start.
Hosted by Frederick Boucher, Michael Satin
OFFICIAL: Vac Attack Campaign Thread

GaryKato


Joined: December 06, 2004
KitMaker: 3,694 posts
AeroScale: 163 posts

Posted: Sunday, May 22, 2011 - 07:15 PM UTC
ludwig113

Joined: February 05, 2008
KitMaker: 1,381 posts
AeroScale: 1,110 posts

Posted: Monday, May 23, 2011 - 04:33 AM UTC
a bit more from me...
the wings and body are all glued up(i added 1 bulkhead from scrap) and the main cockpit blue painted,starting on the photoetch interior now.
so far so good.

paul
the wings and body are all glued up(i added 1 bulkhead from scrap) and the main cockpit blue painted,starting on the photoetch interior now.
so far so good.
paul

magnusf

Joined: May 02, 2006
KitMaker: 1,953 posts
AeroScale: 1,902 posts
Posted: Monday, May 23, 2011 - 07:20 AM UTC
Seems like everyone is making good progress. And the thread is quickly turning into an excellent resource for anyone building a vacform!
I'm concentrating on the "conventional" Bücker kit right now but as soon as I have some more time and a pair of suitable wheels I'll continue with the vacform !

Magnus
I'm concentrating on the "conventional" Bücker kit right now but as soon as I have some more time and a pair of suitable wheels I'll continue with the vacform !
Magnus
magnusf
Joined: May 02, 2006
KitMaker: 1,953 posts
AeroScale: 1,902 posts
Posted: Thursday, May 26, 2011 - 09:12 AM UTC
Canopy doesn't fit. DISAPPOINTED! (For those of you who remember A fish called Wanda).

And Falcon failed miserably to deliver one of their absolutely stunning after-market canopies for the Airmodel, 1980 vintage, Bücker. I wonder why...
I'll have to figure something out. It might end in a high-risk operation involving heat, blistering fingers and a melted canopy (the only one in the kit by coincidence...).
Build blog is here where you can find one more photo of the ill-fitting canopy...
Magnus
ludwig113
Joined: February 05, 2008
KitMaker: 1,381 posts
AeroScale: 1,110 posts
Posted: Saturday, May 28, 2011 - 02:04 AM UTC
the cockpits done,you really cant see very much at all so i've just done the basic colours and a bit of weathering.

now time to close it all up.
paul
now time to close it all up.
paul

Tomcat31

#042

Joined: November 18, 2006
KitMaker: 2,828 posts
AeroScale: 1,720 posts

Posted: Saturday, May 28, 2011 - 04:20 AM UTC
Hi All
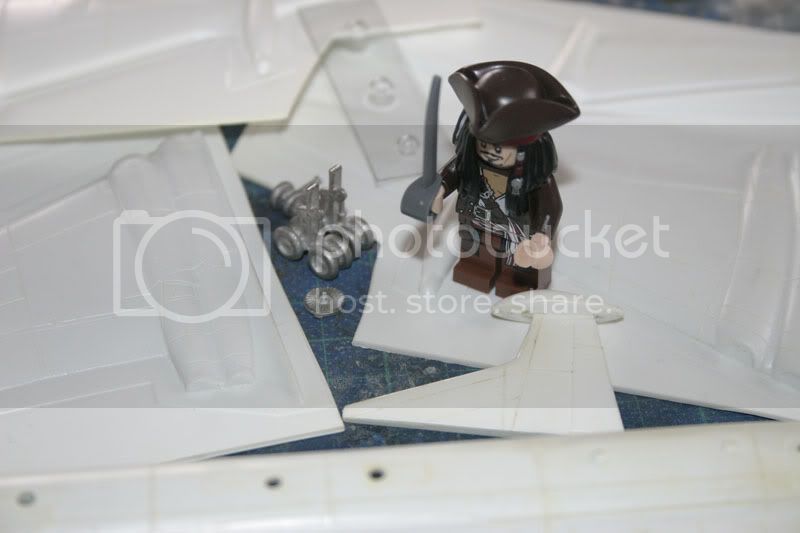
As promised here are the progress shots taken while I was on holiday the week before last. The wind stayed in the wrong direction most of the week so i made a bit of progress.
First the kit, this is the Welsh models Nimrod MR-2 in 1/144. this kit was given to me by a friend that has done masters for Welsh Models in the past as such the kit had been started (but only the fin)

The engine face doesn't come with the kit but my friend gave me one to cast some more as I plan on scratching the intakes and exhausts.
(I just hope Jack has a sharp sword for all this cutting )
)
The fuselage had already been separated from the sheet by me a while ago so I set about installing a cockpit that I had spare from when I was casting them for my B737 for the Civilian Campaign some slight modification were needed but I got it to fit in the end.
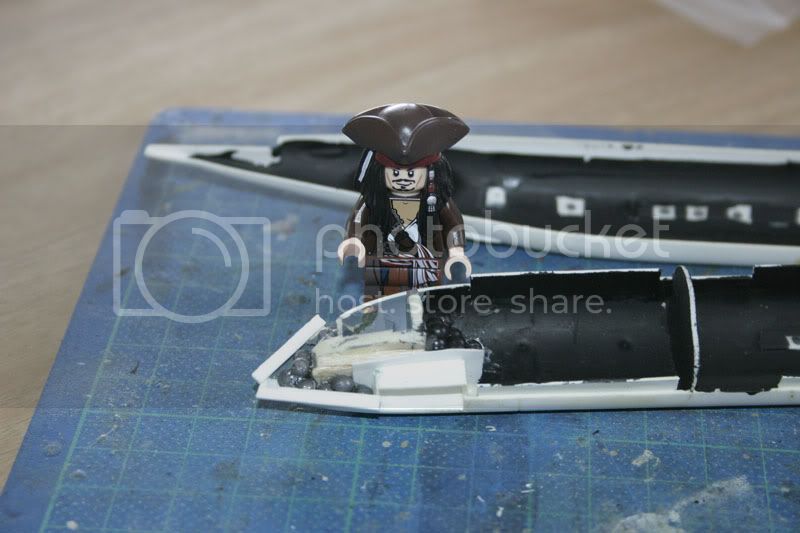
I'm not sure if it was my sanding of the fuselage or fitting the cockpit but the nose of the fuselage wouldn't mate properly on the test fits. so I glued some plastic strip to act as a shim.
Finally the fuselage half were joined together and left to set

I have also separated the wings and tailplane and started sanding them but haven't taken any pictures
This will be all my last update for the time being while I finish my Vindicator and Tomcat for some of the other campaigns.
As always comments, suggestions and critique is always welcome
As promised here are the progress shots taken while I was on holiday the week before last. The wind stayed in the wrong direction most of the week so i made a bit of progress.
First the kit, this is the Welsh models Nimrod MR-2 in 1/144. this kit was given to me by a friend that has done masters for Welsh Models in the past as such the kit had been started (but only the fin)
The engine face doesn't come with the kit but my friend gave me one to cast some more as I plan on scratching the intakes and exhausts.
(I just hope Jack has a sharp sword for all this cutting
)The fuselage had already been separated from the sheet by me a while ago so I set about installing a cockpit that I had spare from when I was casting them for my B737 for the Civilian Campaign some slight modification were needed but I got it to fit in the end.
I'm not sure if it was my sanding of the fuselage or fitting the cockpit but the nose of the fuselage wouldn't mate properly on the test fits. so I glued some plastic strip to act as a shim.
Finally the fuselage half were joined together and left to set
I have also separated the wings and tailplane and started sanding them but haven't taken any pictures
This will be all my last update for the time being while I finish my Vindicator and Tomcat for some of the other campaigns.
As always comments, suggestions and critique is always welcome

ludwig113
Joined: February 05, 2008
KitMaker: 1,381 posts
AeroScale: 1,110 posts
Posted: Tuesday, June 21, 2011 - 07:29 AM UTC
not been around for a while, but i've managed to get the body and wings etc together.

a bit more filler and sanding....then primer!
paul
a bit more filler and sanding....then primer!
paul

Bigrip74
Joined: February 22, 2008
KitMaker: 5,026 posts
AeroScale: 2,811 posts

Posted: Tuesday, June 21, 2011 - 01:54 PM UTC
@ Allen: I see that your pilot has you off and running. I have a little story re: the Nimrod back in 1973 while an aircrew member on P3 A/B's in Burmuda I had the privilege to see an early Hawker Siddley Nimrod from a distance on the same airfield. Our CO would not let us go to that end of the island to take a closer look for fear that one of our illustrious personel might break something. Well now we are to have our own jet powered ASW aircraft soon, lets see that makes it 38 years since I saw that bird. I still can see that Nimrod just sitting on the apron and making all of us jealous (US NAVY P3-ORION crews) (CANADIAN MILITARY in their CANADAIR CP-107 Argus crews) Now that was an old aircraft at the time, we were training some of the Canadian aircrews on the P3 for when they aquired theirs.
@ Paul: You beat me to the punch, I have not even cut any plastic yet. Too Many Campaigns Anyway nice start, do you have any advice for me on that kit?
@ Paul: You beat me to the punch, I have not even cut any plastic yet. Too Many Campaigns
Anyway nice start, do you have any advice for me on that kit?ludwig113
Joined: February 05, 2008
KitMaker: 1,381 posts
AeroScale: 1,110 posts
Posted: Wednesday, June 22, 2011 - 06:26 AM UTC
Quoted Text
@ Paul: You beat me to the punch, I have not even cut any plastic yet. Too Many Campaigns
hi bob,
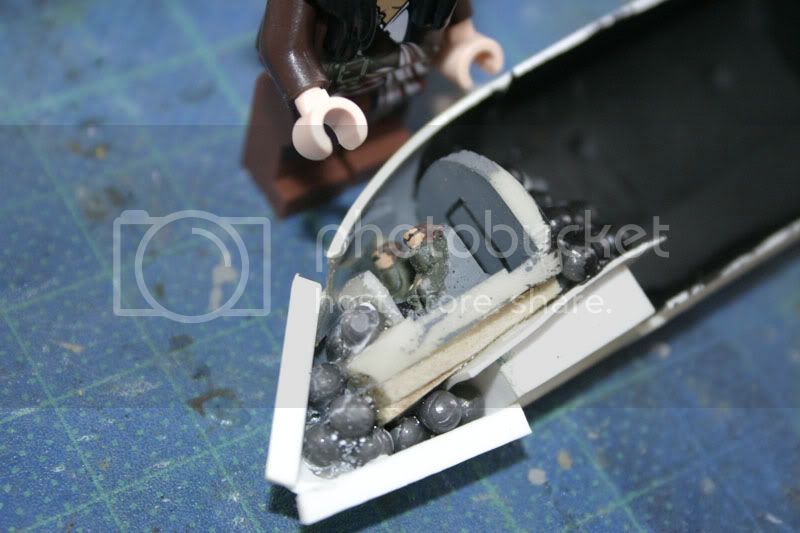
heres a pic of something that i think you'll find useful.

i cut out the bottom of the cockpit and the corresponding area in the top of the wing as i added a cockpit.
i also used about 4 tabs of plastic glued in one half of the fuselage, as locating "pins", make sure you put a tab of plastic at the bottom of the nose(marked in red).
when glueing the fuselage......to start with only glue the top, tail and under the tail - leave the bottom and front of the nose area unglued.
you can then adjust the nose area so that the cowling fits properly, as i found that if you put all the surfaces together the cowling was too big, you can see the gap left between the red arrows.
cheers paul
ludwig113
Joined: February 05, 2008
KitMaker: 1,381 posts
AeroScale: 1,110 posts
Posted: Sunday, July 17, 2011 - 12:24 AM UTC
hi all,
i've been a bit slack recently,but i'm back on the case now

a little more sanding then paint!
paul
i've been a bit slack recently,but i'm back on the case now
a little more sanding then paint!
paul

Dunners01

Joined: April 05, 2011
KitMaker: 15 posts
AeroScale: 14 posts
Posted: Saturday, July 23, 2011 - 07:02 PM UTC
Your Poli is looking good there Paul.
The lastest efforts on the Skyshark front :-
Fuselage is now mostly complete with the various inlets and exhausts opened up. The exhaust outlets have been fabricated from 8mm Evergreen tube to give some depth. A bit of effort was required to get the shape right and to fair into the fuselage sides. The tube had to be mangled a wee bit so that they wouldn't interfere with each other as the fuselage halves come together. Baffles installed to blank off the air intakes up front and the substantial tail wheel bay has a roof installed to blank off this area.
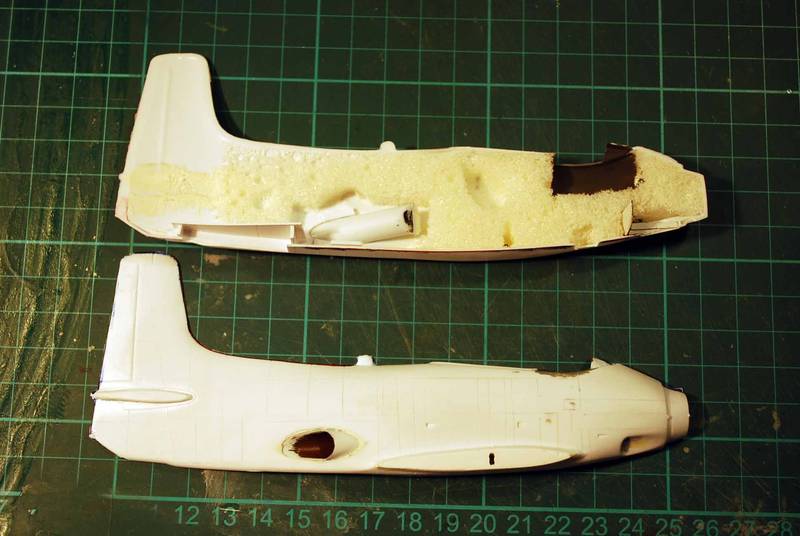
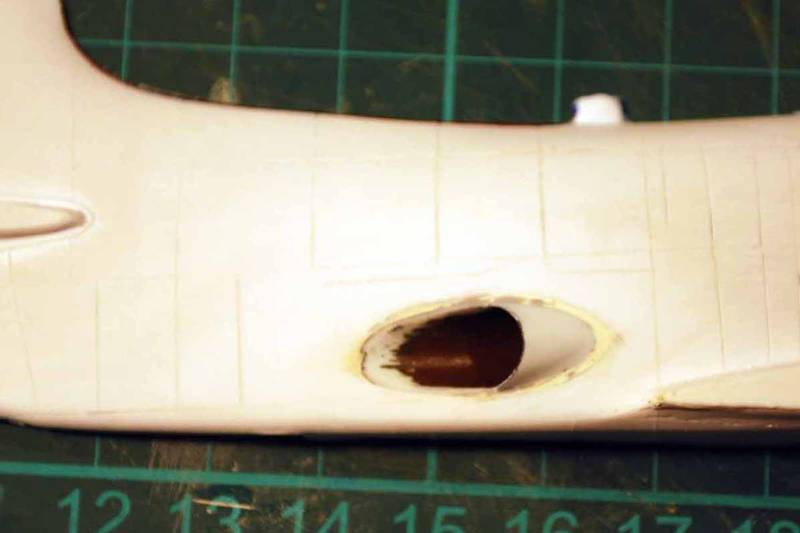
Close-up of the starboard exhaust. Not the best of efforts here as a fair amount of filler was required due too much material being removed from the fuselage walls when creating the openings.
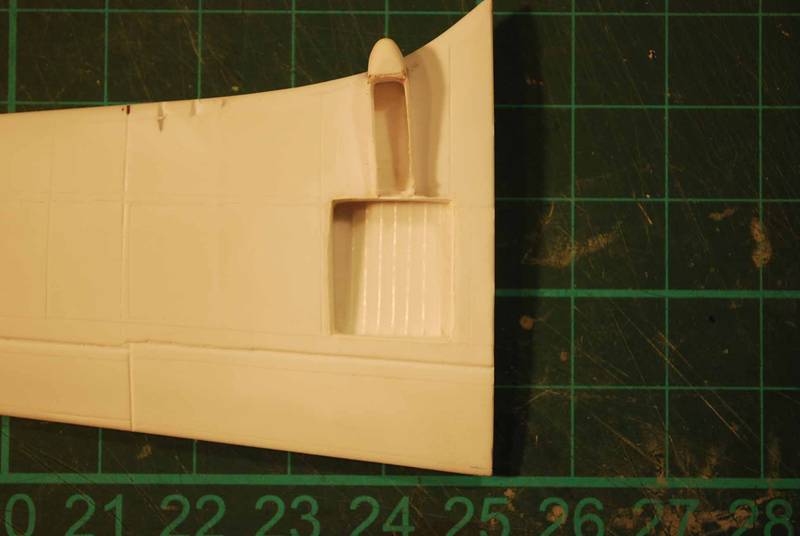
Wings almost complete with the whellwells boxed in. Next step is to cut in some nav. lights and provide mounting blocks for the undercarrige legs.
Tail planes and drop tanks done. Spinners in need of more work.
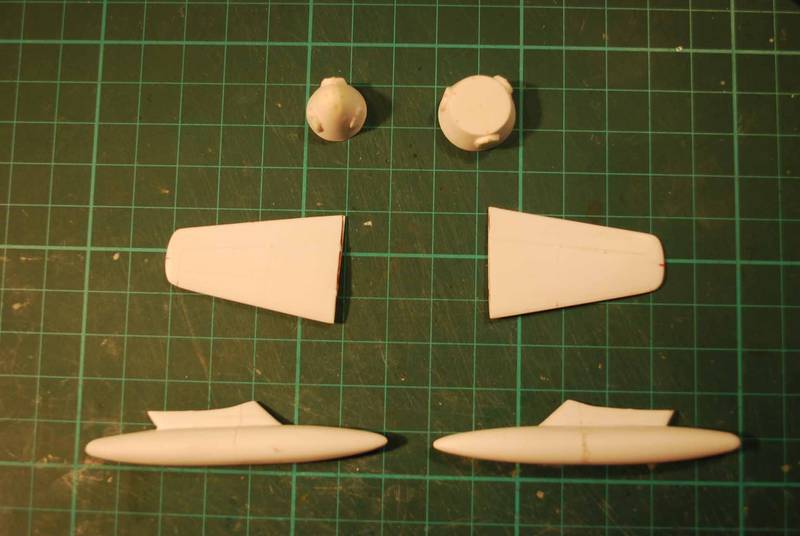
The problem with the spinners is that the propeller bosses are not representative of the real thing. A bit of trepidation here as I can see this lot turning to custard as we try to correct them. The process will involve drilling 8mm holes in each boss and I have that sense of impending doom.
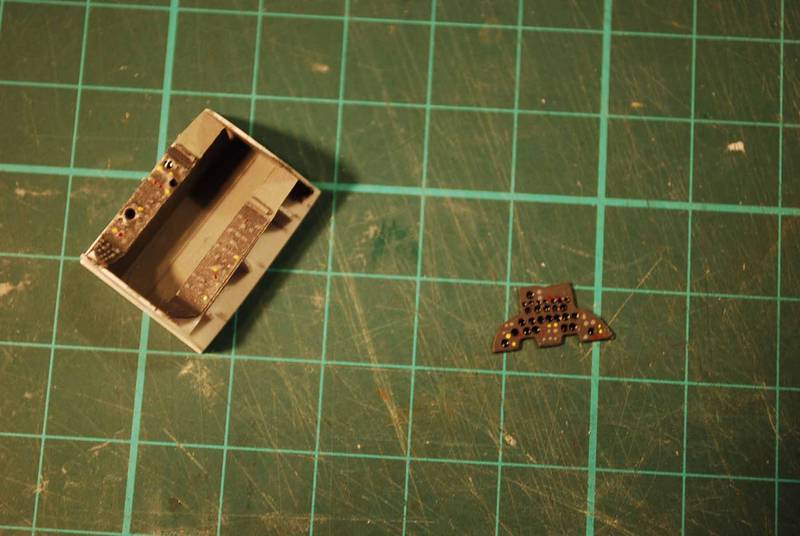
Cuckpit tub and instrument panel ready to go.
The lastest efforts on the Skyshark front :-
Fuselage is now mostly complete with the various inlets and exhausts opened up. The exhaust outlets have been fabricated from 8mm Evergreen tube to give some depth. A bit of effort was required to get the shape right and to fair into the fuselage sides. The tube had to be mangled a wee bit so that they wouldn't interfere with each other as the fuselage halves come together. Baffles installed to blank off the air intakes up front and the substantial tail wheel bay has a roof installed to blank off this area.
Close-up of the starboard exhaust. Not the best of efforts here as a fair amount of filler was required due too much material being removed from the fuselage walls when creating the openings.
Wings almost complete with the whellwells boxed in. Next step is to cut in some nav. lights and provide mounting blocks for the undercarrige legs.
Tail planes and drop tanks done. Spinners in need of more work.
The problem with the spinners is that the propeller bosses are not representative of the real thing. A bit of trepidation here as I can see this lot turning to custard as we try to correct them. The process will involve drilling 8mm holes in each boss and I have that sense of impending doom.
Cuckpit tub and instrument panel ready to go.
ludwig113
Joined: February 05, 2008
KitMaker: 1,381 posts
AeroScale: 1,110 posts
Posted: Monday, July 25, 2011 - 03:13 AM UTC
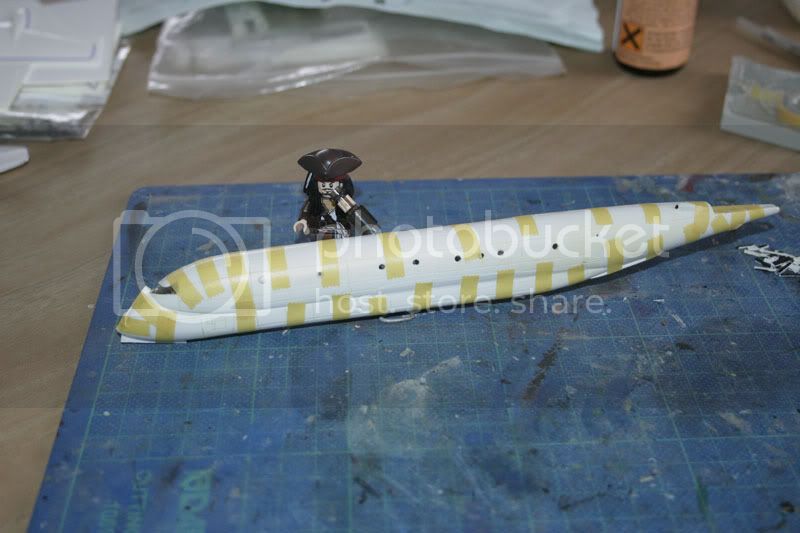
a quick update...
pre-shading done,got to sort the undercarridge then top coat.

paul
pre-shading done,got to sort the undercarridge then top coat.
paul
ludwig113
Joined: February 05, 2008
KitMaker: 1,381 posts
AeroScale: 1,110 posts
Posted: Sunday, August 14, 2011 - 02:26 AM UTC
underside colour done,top next...

i'm really enjoying this vac kit,will def. do more in the future.
paul
i'm really enjoying this vac kit,will def. do more in the future.
paul

Jessie_C

Joined: September 03, 2009
KitMaker: 6,965 posts
AeroScale: 6,247 posts

Posted: Monday, August 29, 2011 - 12:52 PM UTC
The Comet's vac parts are sanded down to the correct thickness and the outer wing panels glued. Now it's time for a test fit.


The resin centre section is a very tight fit. It tends to force the fuselage halves to spring open so I'll have to carefully sand it down fore and aft until it fits with a little less colourful language. The model almost overwhelms my faithful bue background paper. Whatever mould release agent Densil uses for his resin parts completely outclasses my masking tape. When I picked the model up after the photo session, it sprung apart. The resin will have to have a nice bath to get rid of the release agent.
The resin centre section is a very tight fit. It tends to force the fuselage halves to spring open so I'll have to carefully sand it down fore and aft until it fits with a little less colourful language. The model almost overwhelms my faithful bue background paper. Whatever mould release agent Densil uses for his resin parts completely outclasses my masking tape. When I picked the model up after the photo session, it sprung apart. The resin will have to have a nice bath to get rid of the release agent.
ludwig113
Joined: February 05, 2008
KitMaker: 1,381 posts
AeroScale: 1,110 posts
Posted: Monday, August 29, 2011 - 08:01 PM UTC
thats looks really nice jessie,keep up the good work
paul
paul
Jessie_C
Joined: September 03, 2009
KitMaker: 6,965 posts
AeroScale: 6,247 posts
Posted: Wednesday, August 31, 2011 - 02:32 PM UTC
The windows are now cut out and the inside sprayed black.


I'll install the windscreen posts after I close the model up. I still haven't decided how I'm going to glaze the windscreen. Perhaps I'll use sections of acetate or maybe I'll use Krystal Klear.
I'll install the windscreen posts after I close the model up. I still haven't decided how I'm going to glaze the windscreen. Perhaps I'll use sections of acetate or maybe I'll use Krystal Klear.
Jessie_C
Joined: September 03, 2009
KitMaker: 6,965 posts
AeroScale: 6,247 posts
Posted: Tuesday, September 13, 2011 - 12:13 PM UTC
Now that I have the DC-7 off my back I can give the Comet some love. First a little repair job. The rear bulkhead's sheves arrived broken, which is no surprise when you consider how thin the resin is.

It's a simple task to repair them with sheet styrene.

The cockpit is very simple. Floor/wheelwell, rear bulkhead and instrument panel in resin, plus seats and yokes in white metal. I won't be spending too much time in here given that very little will be visible through the cockpit windows.


The first coat of light aircraft grey is on and drying. I'll do a little detail painting and then I'll be able to seal everything up.

It's a simple task to repair them with sheet styrene.
The cockpit is very simple. Floor/wheelwell, rear bulkhead and instrument panel in resin, plus seats and yokes in white metal. I won't be spending too much time in here given that very little will be visible through the cockpit windows.
The first coat of light aircraft grey is on and drying. I'll do a little detail painting and then I'll be able to seal everything up.
ludwig113
Joined: February 05, 2008
KitMaker: 1,381 posts
AeroScale: 1,110 posts
Posted: Monday, September 19, 2011 - 03:49 AM UTC
my latest update...
today i sprayed the green!


i'm away this weekend but i'll start on the weathering next week.
come on everyone else lets see your progress
paul
today i sprayed the green!
i'm away this weekend but i'll start on the weathering next week.
come on everyone else lets see your progress
paul
Jessie_C
Joined: September 03, 2009
KitMaker: 6,965 posts
AeroScale: 6,247 posts
Posted: Monday, September 19, 2011 - 05:52 PM UTC
Nice green,Paul
The Comet's cockpit is as finished as I'm going to make it. Nothing much will be able to be seen besides the tops of the seats and possibly the yokes so there's no point in going nuts in there.


I'm trying a new-to-me technique. I've attached the decal windscreen to a piece of acetate and once it's dry I'll trim around the outlines and then tweak it until it fits into the cutout I made. Then a coat of Future to protect it from the superglue and I'll glue it into position. I'll scribe the window pillars just before I remove the decal so I'll be able to paint them later. The cheatline has the cockpit window outlines printed, so I'll use that to make everything neat once the decals go on.

The Comet's cockpit is as finished as I'm going to make it. Nothing much will be able to be seen besides the tops of the seats and possibly the yokes so there's no point in going nuts in there.
I'm trying a new-to-me technique. I've attached the decal windscreen to a piece of acetate and once it's dry I'll trim around the outlines and then tweak it until it fits into the cutout I made. Then a coat of Future to protect it from the superglue and I'll glue it into position. I'll scribe the window pillars just before I remove the decal so I'll be able to paint them later. The cheatline has the cockpit window outlines printed, so I'll use that to make everything neat once the decals go on.

eseperic

Joined: November 06, 2009
KitMaker: 624 posts
AeroScale: 609 posts

Posted: Monday, September 19, 2011 - 07:43 PM UTC
Hi there,
Some beautiful models out there!!! With my MPM 1/48 FW-58 Weihe on the shelves waiting for some of my superdetailing sessions, I think this is the right thread to follow. I didn't sign up for the campaign because I am already building too much... or I just didn't have guts to do it! I greet you all and will be following this thread closely... All the best!!
Some beautiful models out there!!! With my MPM 1/48 FW-58 Weihe on the shelves waiting for some of my superdetailing sessions, I think this is the right thread to follow. I didn't sign up for the campaign because I am already building too much... or I just didn't have guts to do it! I greet you all and will be following this thread closely... All the best!!
Jessie_C
Joined: September 03, 2009
KitMaker: 6,965 posts
AeroScale: 6,247 posts
Posted: Tuesday, September 20, 2011 - 06:38 AM UTC
The interior bulkheads, tabs and cockpit are installed

...and painted black

I have to find a few nice heavy weights to put in front of that froward bulkhead to make sure the nosewheel stays on the ground.
...and painted black
I have to find a few nice heavy weights to put in front of that froward bulkhead to make sure the nosewheel stays on the ground.
Jessie_C
Joined: September 03, 2009
KitMaker: 6,965 posts
AeroScale: 6,247 posts
Posted: Tuesday, September 20, 2011 - 03:38 PM UTC
The fuselage is closed and test fitting to the centre section which has been improved by a fair amount of sanding to ease the fit. I've attached the intakes and exhausts. They'll need quite a bit of cleaning up and fairing in. The wing outer panels are just sitting there to show how it'll look once everything gets put together. It's large enough to overwhelm my faithful blue background paper.

Jessie_C
Joined: September 03, 2009
KitMaker: 6,965 posts
AeroScale: 6,247 posts
Posted: Monday, September 26, 2011 - 04:21 PM UTC
It's beginning to look like an airplane now.

I installed new windscreen pillars using plastic strip cut to length and fit into place.

When I assembled the outer wing panels to the centre section I gave myself a couple of problems. The left wing panel has too much dihedral while the right doesn't have enough. I'm puzzling how to solve my self-inficted problem. It'll probably involve cutting kerfs in the wing surfaces, bending until they close and then gluing everything securely together. Either that, or I break them off and try again.

I installed new windscreen pillars using plastic strip cut to length and fit into place.
When I assembled the outer wing panels to the centre section I gave myself a couple of problems. The left wing panel has too much dihedral while the right doesn't have enough. I'm puzzling how to solve my self-inficted problem. It'll probably involve cutting kerfs in the wing surfaces, bending until they close and then gluing everything securely together. Either that, or I break them off and try again.
ludwig113
Joined: February 05, 2008
KitMaker: 1,381 posts
AeroScale: 1,110 posts
Posted: Tuesday, September 27, 2011 - 08:40 AM UTC
looking good jessie
paul
paul
Jessie_C
Joined: September 03, 2009
KitMaker: 6,965 posts
AeroScale: 6,247 posts
Posted: Tuesday, September 27, 2011 - 09:48 AM UTC
Photographic evidence shows me that there isn't a lot of dihedral to a Comet's wings in the first place, so perhaps I only need to correct that left wing. Time to go get cracking...
 |

WEB HOSTING BY


Copyright ©2021 AeroScale and Kitmaker Network, a subsidiary of Silver Star Enterprises
All Rights Reserved. Please read our Conditions of Use and Privacy Policy.
All Rights Reserved. Please read our Conditions of Use and Privacy Policy.