KotS GB 2011 Roland D.VIa wing_nut
New Jersey, United States
Joined: June 02, 2006
KitMaker: 1,212 posts
AeroScale: 468 posts
Posted: Thursday, July 21, 2011 - 02:10 AM UTC
Time to get the official thread going. Stephen... ready for you to do what it is you do.
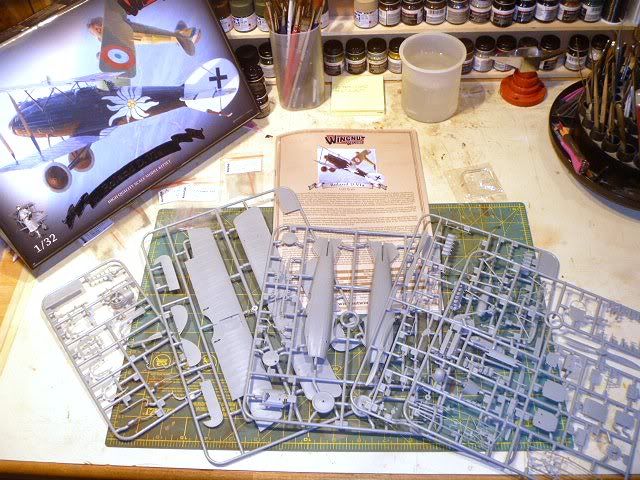
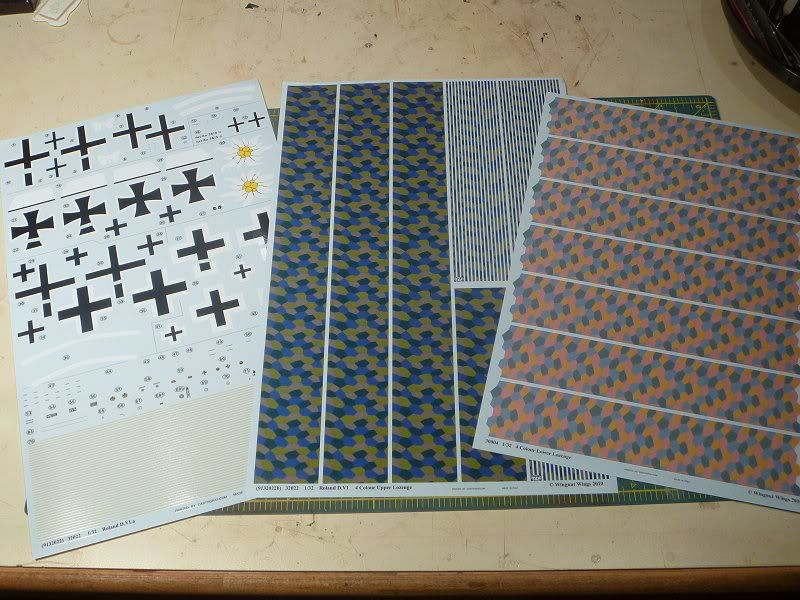
No real progress yet, just the contents of the box. Again I am impressed with the quality of the kit . The bag with the decals had the marking on top but was delighted to see the yellow rob tape. When I opened the bag I was thrilled to see the lozenge was included as well at rib tape cut from a lozenge bolt. Less money to spend on decals and more for some AM goodies.
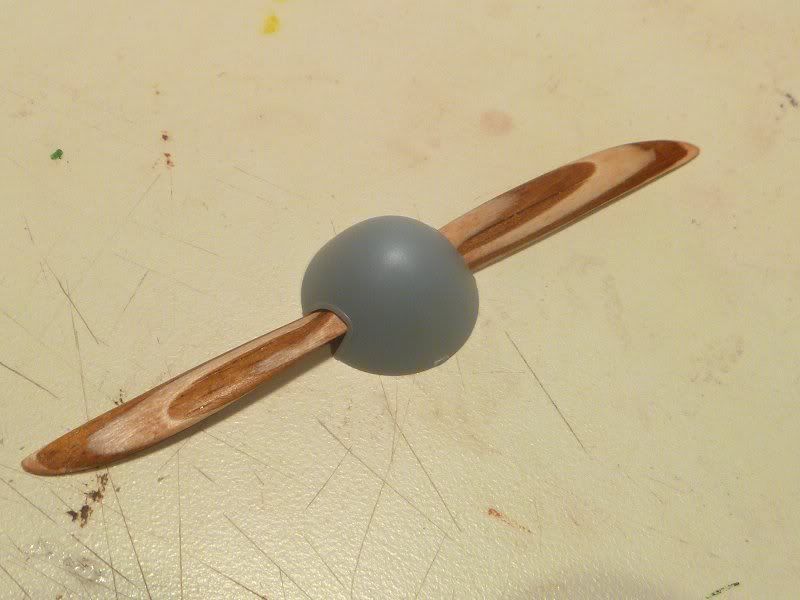
I do have 1 part ready to go. I finished the prop and I am very pleased with the results.
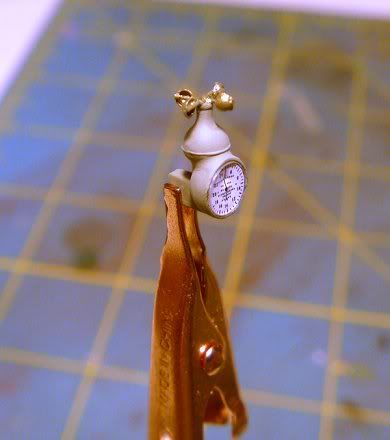
Even thought this will go on the D.Va I figured I'd through in the finished anemometer
Alberta, Canada
Joined: July 26, 2010
KitMaker: 1,032 posts
AeroScale: 1,025 posts
Posted: Thursday, July 21, 2011 - 06:05 AM UTC
Marc,
Beautiful prop! The 5 laminations are far superior to your prototype with 3.
Looking forward to following your progress through this one.
Cheers,
Lance
Officially Retired as of 20 August 2013 and looking forward to some un-interrupted bench time. Currently starting Roden's Nieuport 28 and hoping to follow that with another WNW Fokker DVII.
Colorado, United States
Joined: January 25, 2004
KitMaker: 11,669 posts
AeroScale: 11,011 posts
Posted: Friday, July 22, 2011 - 02:43 AM UTC
Nothing up my sleeeve! presto,abra cadab rah!
". . .The most important thing is to know why you build and then get the most that you can out of building." via D.D.
South Australia, Australia
Joined: August 14, 2007
KitMaker: 5,926 posts
AeroScale: 2,201 posts
Posted: Friday, July 22, 2011 - 08:30 AM UTC
Good to see a start Marc.
I don't think you will need to buy any parts for this one as WNW kits come with everything you need anyway.
Prop looks good, but I think it could be improved by making the laminations even thinner like the real aircraft. Just a suggestion.
Cheers
You may be right, I may be crazy.
New Jersey, United States
Joined: June 02, 2006
KitMaker: 1,212 posts
AeroScale: 468 posts
Posted: Friday, July 22, 2011 - 09:59 AM UTC
"Jumpin' Jack Flash it's a gas, gas, gas..." Thanks Stephen.
Warren, and it is a good suggestion. The thinnest i can find i 1/32. It was a real PITA to sand it to get to 5 plys. I had a razor plane form back in my RC building days. Gotta see if I can find that.
Alberta, Canada
Joined: January 19, 2008
KitMaker: 6,743 posts
AeroScale: 6,151 posts
Posted: Saturday, July 23, 2011 - 03:04 AM UTC
Love the prop Marc

New York, United States
Joined: July 13, 2010
KitMaker: 125 posts
AeroScale: 19 posts
Posted: Wednesday, July 27, 2011 - 03:44 PM UTC
have you, or can you please do a tutorial on how to do props like that?
Colorado, United States
Joined: January 25, 2004
KitMaker: 11,669 posts
AeroScale: 11,011 posts
Posted: Thursday, July 28, 2011 - 01:12 AM UTC
Here is a bit of fun on the subject.
One good turn deserves . . . ". . .The most important thing is to know why you build and then get the most that you can out of building." via D.D.
New Jersey, United States
Joined: June 02, 2006
KitMaker: 1,212 posts
AeroScale: 468 posts
Posted: Wednesday, August 10, 2011 - 02:00 AM UTC
I all. Been a couple of rough weeks lately. The 13 years old 230k truck finally had to be replaced and was working at it against the end of month dead line for the state required vehicle inspeciton... that there was no way in hell it was going to pass.
Then just to keep life interesting, the PC decide to go "blue screen of death" on me and have been working at getting my "life" put back into the newly wiped out and repartitioned drive. And trying to figure out Windows 7 all at the same time.
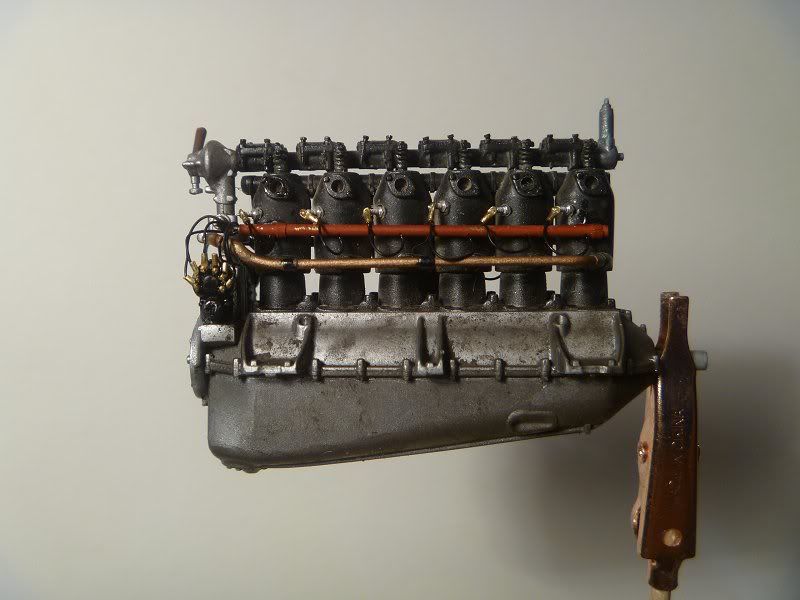
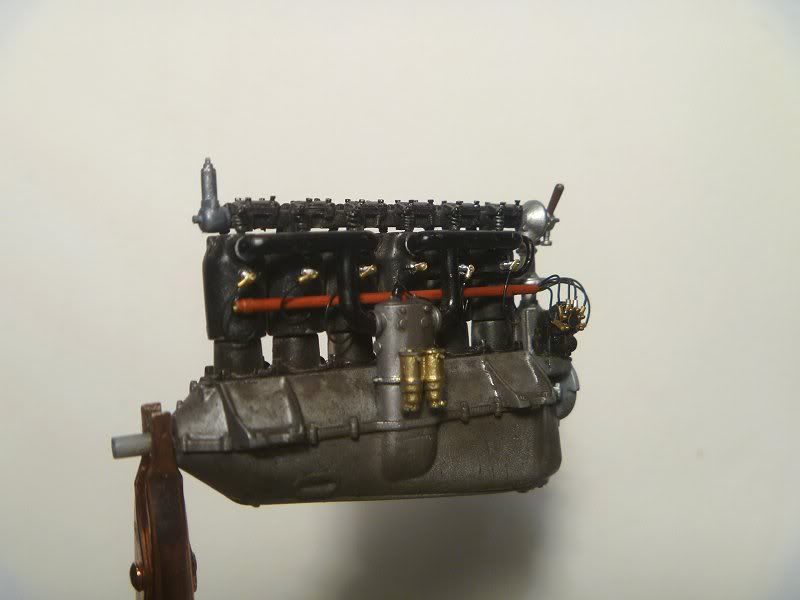
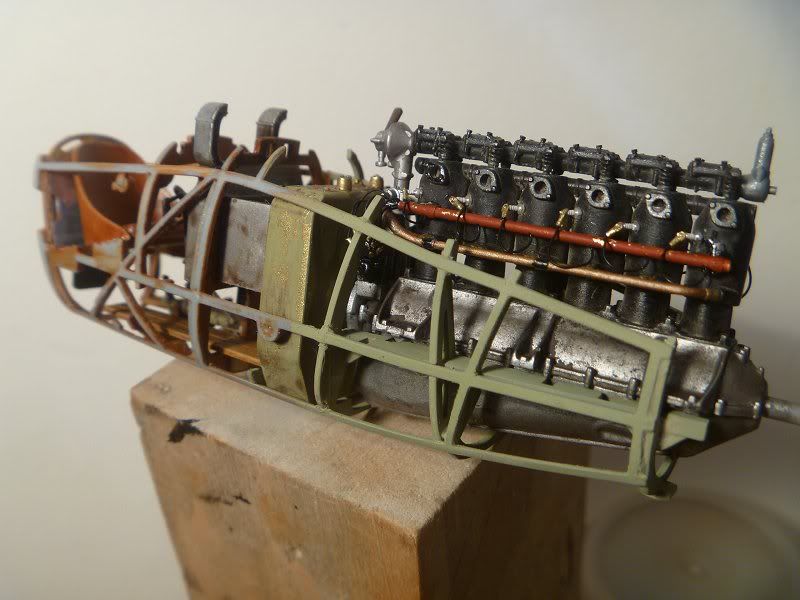
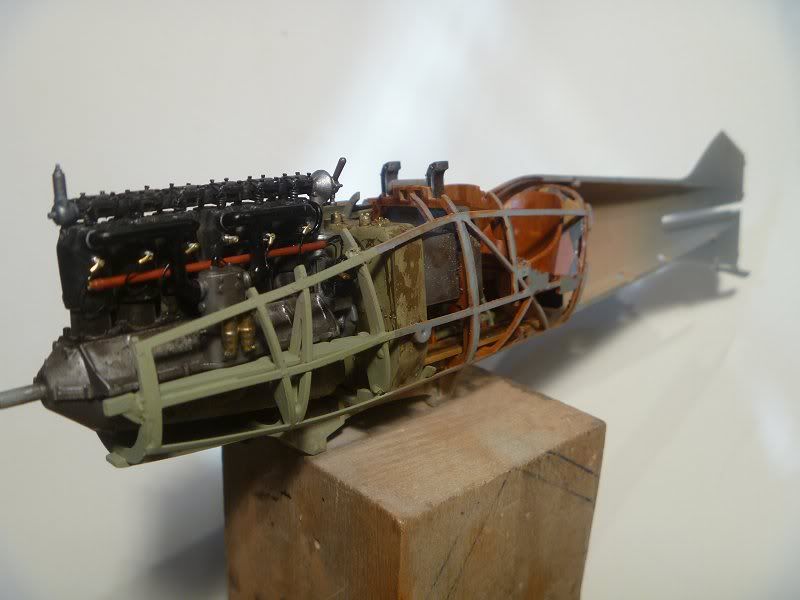
Some bench time was possible even though no time for an update. Interior just about done, engine all detailed and ready to close up the fuselage. Notre to self... drill holes for rigging BEFORE closing!
Not sure what did but since the fit is so precise it had to be something I did but for the life of me can't figure what I did. the engine is dead center along the center line laterally but the drive shaft is about 1/8" high

Time for some srugery... Scalpel... Suction.... Forceps, quick, we got a bleeder...
Alberta, Canada
Joined: March 08, 2009
KitMaker: 394 posts
AeroScale: 360 posts
Posted: Wednesday, August 10, 2011 - 02:50 AM UTC
A wonderful effort so far, Marc. That engine is pure eye candy with the added detail. And I very much admire your prop.
With all the hoopla on real wood props lately, I'm thinking about making one for my D.III, that is, when I get back to it. I'm going to try stain soaked balsa laminations.
Again, your doing a great job with an incredible educational value. Thanks
Current Projects: 1/144 R5D-3 (MiniCraft)
1/48 Ford Flivver (Williams Bro.)
1/72 UC-64A Norseman (MatchBox)
MAAC No.51187
IPMS CANADA No. 3369
Västra Götaland, Sweden
Joined: February 19, 2010
KitMaker: 1,473 posts
AeroScale: 1,450 posts
Posted: Wednesday, August 10, 2011 - 07:10 AM UTC
That is one very handsome build Marc!
A bit curious as to what you used for the sparkplug connections on the engine? They look very convincing to me!
Best Regards
Mikael
_________________________________________________________
Just finished the Wingnut Wings Taube. On to the Junkers D.1
New Jersey, United States
Joined: June 02, 2006
KitMaker: 1,212 posts
AeroScale: 468 posts
Posted: Thursday, August 11, 2011 - 01:13 AM UTC
Thanks Guy. Once the balsa is stain soaked can they still be glued together? Part of a Micro Mark birthday gift cert was spent of some 1/32" mahogany and cherry. I will plane it down to 1/64 to get more than 4 laminations. Too bad to waste 1/2 the wood but 1/32 is the thinnest they make.
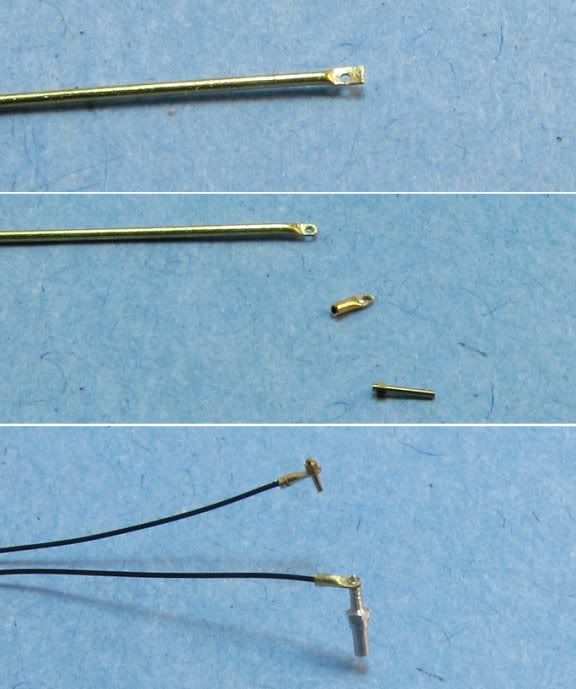
Mikael, the pic below shows how I made them from 0.5 mm brass tube.
Missouri, United States
Joined: November 10, 2009
KitMaker: 27 posts
AeroScale: 26 posts
Posted: Thursday, August 11, 2011 - 01:56 AM UTC
Look here:
http://www.rockler.com/c/wood-veneer.cfmTheir wood veneer (not glued) is roughly .4 mm.
New Jersey, United States
Joined: June 02, 2006
KitMaker: 1,212 posts
AeroScale: 468 posts
Posted: Thursday, August 11, 2011 - 09:49 AM UTC
Thanks for that link David.
Västra Götaland, Sweden
Joined: February 19, 2010
KitMaker: 1,473 posts
AeroScale: 1,450 posts
Posted: Thursday, August 11, 2011 - 09:21 PM UTC
Quoted Text
Mikael, the pic below shows how I made them from 0.5 mm brass tube.
Thank You kindly Marc for the tip I'll store it for for my next build of an inline engine

Mikael
_________________________________________________________
Just finished the Wingnut Wings Taube. On to the Junkers D.1
Alberta, Canada
Joined: January 19, 2008
KitMaker: 6,743 posts
AeroScale: 6,151 posts
Posted: Monday, August 15, 2011 - 03:07 PM UTC
That is a nice trick !
Excellent build so far Marc
New Jersey, United States
Joined: June 02, 2006
KitMaker: 1,212 posts
AeroScale: 468 posts
Posted: Tuesday, August 16, 2011 - 03:42 AM UTC
Thanks Terri
New Jersey, United States
Joined: June 02, 2006
KitMaker: 1,212 posts
AeroScale: 468 posts
Posted: Monday, August 22, 2011 - 05:35 PM UTC
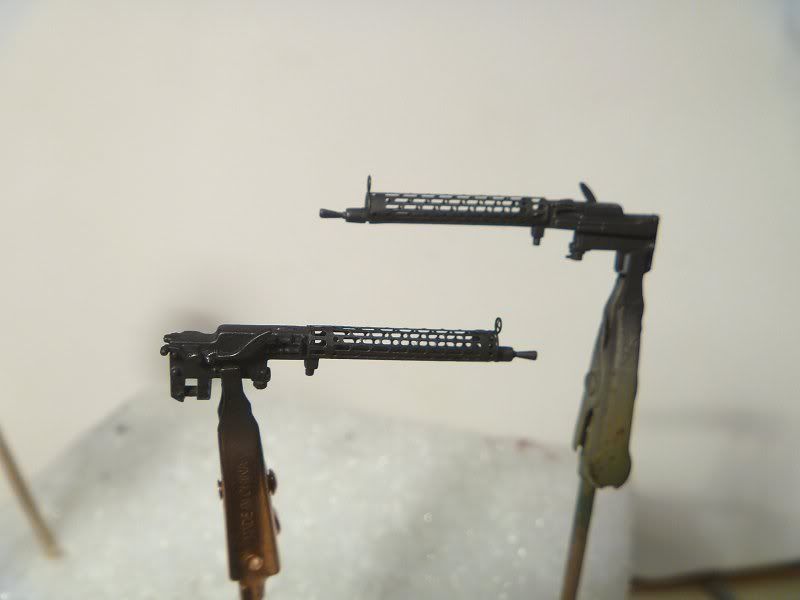
Slow and steady wins the race they say. Well I know it's not a race but I am certainly being slow and at least somewhat steady. I didn't go with the gun upgrade this time and the stock from the box guns don't look too bad I don't think.
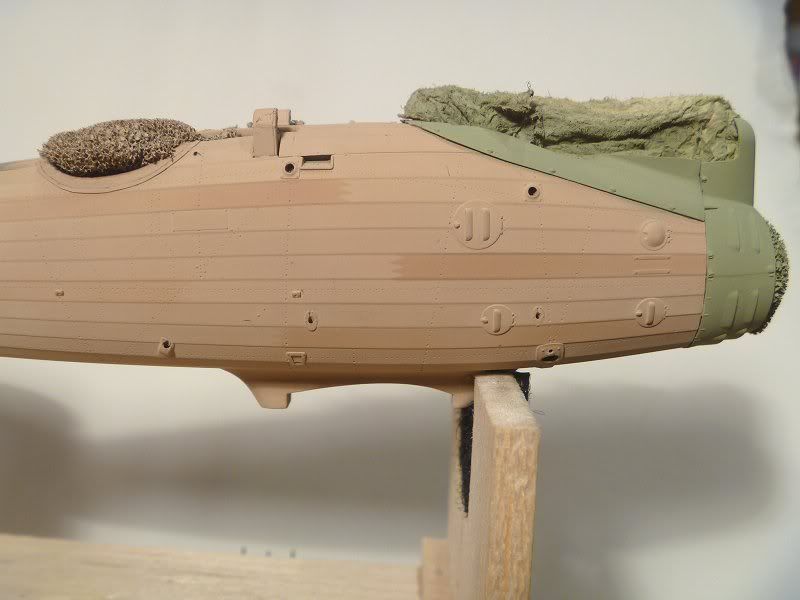
Started some painting on the fuselage. I am considering drawing in the grain on each board with an artist pencil then sealing with a clear top coat.
Västra Götaland, Sweden
Joined: February 19, 2010
KitMaker: 1,473 posts
AeroScale: 1,450 posts
Posted: Monday, August 22, 2011 - 07:21 PM UTC
Very nice progress Marc That foundation for the wood looks great will be inerested as to how the artist pencils work, always good to learn another trick up ones sleve
Miakel
_________________________________________________________
Just finished the Wingnut Wings Taube. On to the Junkers D.1
Alberta, Canada
Joined: July 26, 2010
KitMaker: 1,032 posts
AeroScale: 1,025 posts
Posted: Tuesday, August 23, 2011 - 03:19 AM UTC
Marc,
Looking very nice indeed..............looking forward to your pencil technique, I'd like to learn more from it as the previous examples I've seen are very subtle in their effect and something I'd like to try eventually. Keep the updates coming, this is a learning experience for sure.
Cheers,
Lance
Officially Retired as of 20 August 2013 and looking forward to some un-interrupted bench time. Currently starting Roden's Nieuport 28 and hoping to follow that with another WNW Fokker DVII.
New Jersey, United States
Joined: June 02, 2006
KitMaker: 1,212 posts
AeroScale: 468 posts
Posted: Tuesday, August 23, 2011 - 04:21 AM UTC
Mikael, Lance... thanks guys.
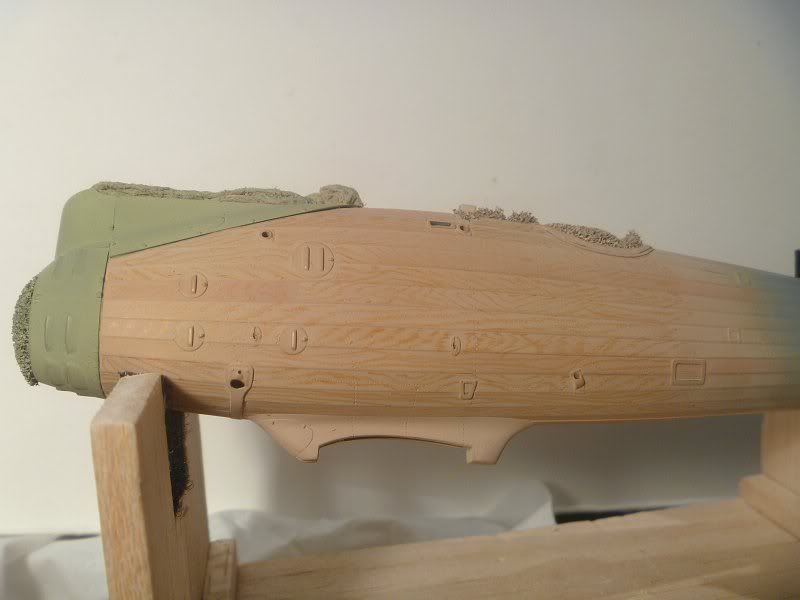
Here the results of the pencil. A bit stark but after I snapped this pic I took a cotton swap lightly dampened with mineral spirits and went over the surface. It toned it down nicely. I'll try to remember to get a pic before I put the clear yellow/orange over it.
Croatia Hrvatska
Joined: December 26, 2009
KitMaker: 144 posts
AeroScale: 109 posts
Posted: Tuesday, August 23, 2011 - 07:58 AM UTC
I want to do this plane, because I love her wooden hull. After these photos I do not will I have the guts. This is the perfect and after clearorange will be a dream

England - South East, United Kingdom
Joined: November 06, 2005
KitMaker: 1,667 posts
AeroScale: 1,551 posts
Posted: Tuesday, August 23, 2011 - 06:38 PM UTC
She is shaping up really nicely.
Keith
Still can't cure the AMS even with sausage finger implants & olde eyes.
Croatia Hrvatska
Joined: November 06, 2009
KitMaker: 624 posts
AeroScale: 609 posts
Posted: Tuesday, August 23, 2011 - 07:22 PM UTC
Marc... really, really nice! I like the plank wood simulation... It is really convincing! As Keith said, she's shaping up really nicely! Congrats!
"When everything else fails, read the instructions"
New Jersey, United States
Joined: June 02, 2006
KitMaker: 1,212 posts
AeroScale: 468 posts
Posted: Wednesday, August 24, 2011 - 01:29 AM UTC
Dani, Keith, Etoni... Thanks for the comments and encouragement.


