

Thanks guys!
@ Rowan, actually the decals are there so I could measure the hinomaru's to see if I had any pre-cut masks for them. I did find some for the fuselage, and will make some myself for the wings. I would have used decals, but since I've got to paint a bunch of red anyway...
@ Keith - hopefully it will look like it supposed to when I am done! I hope that some of the techniques/tips I have shown will help other modelers complete more kits!
Doug
Hosted by Rowan Baylis
Special Hobby 1/32 A5M4 Claude

DougN1

Joined: August 08, 2011
KitMaker: 410 posts
AeroScale: 409 posts

Posted: Tuesday, November 22, 2011 - 04:43 AM UTC
DougN1
Joined: August 08, 2011
KitMaker: 410 posts
AeroScale: 409 posts
Posted: Wednesday, November 23, 2011 - 07:38 AM UTC
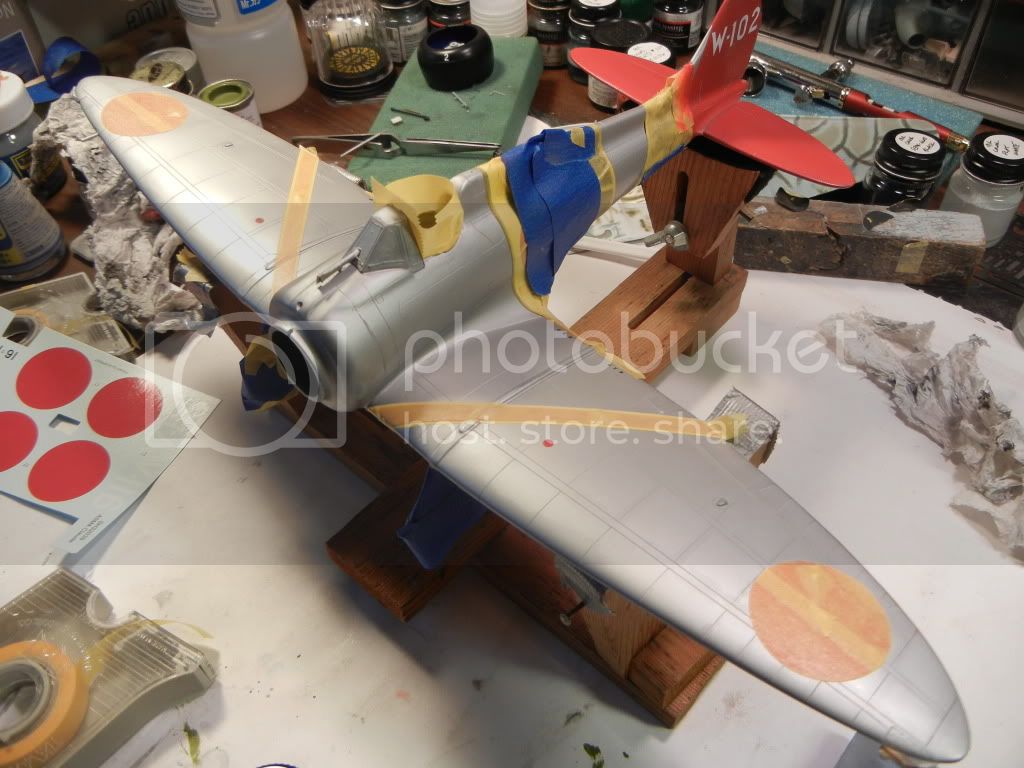
Did some masking and painted the red bits (cowl taped on for looks):
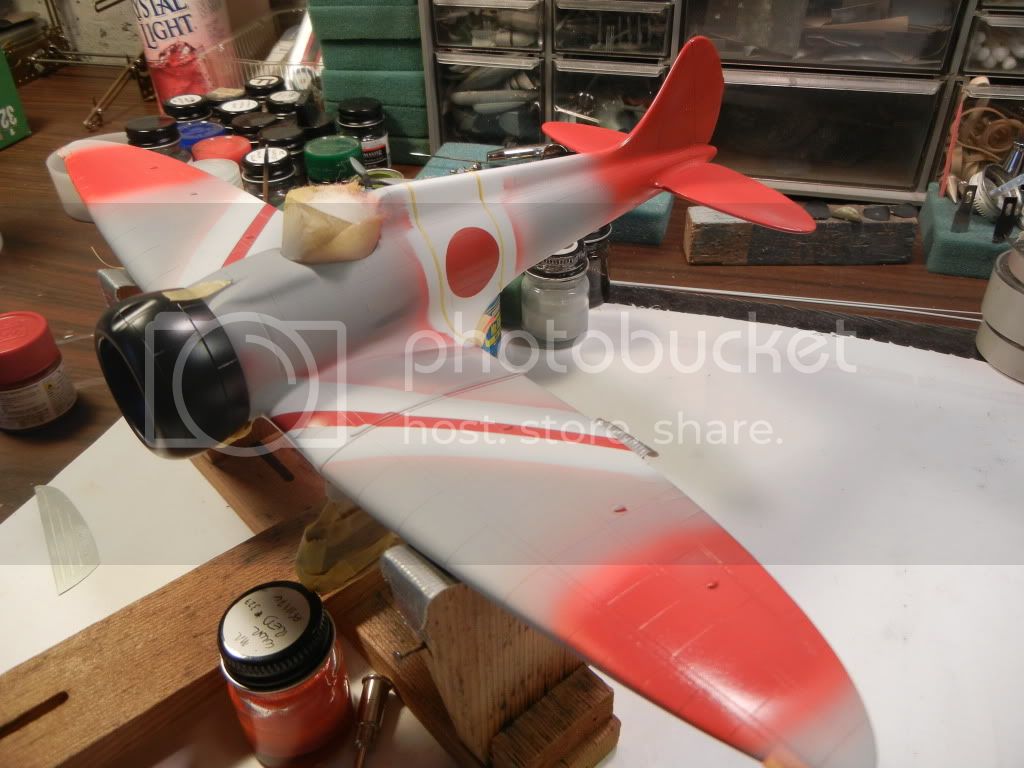
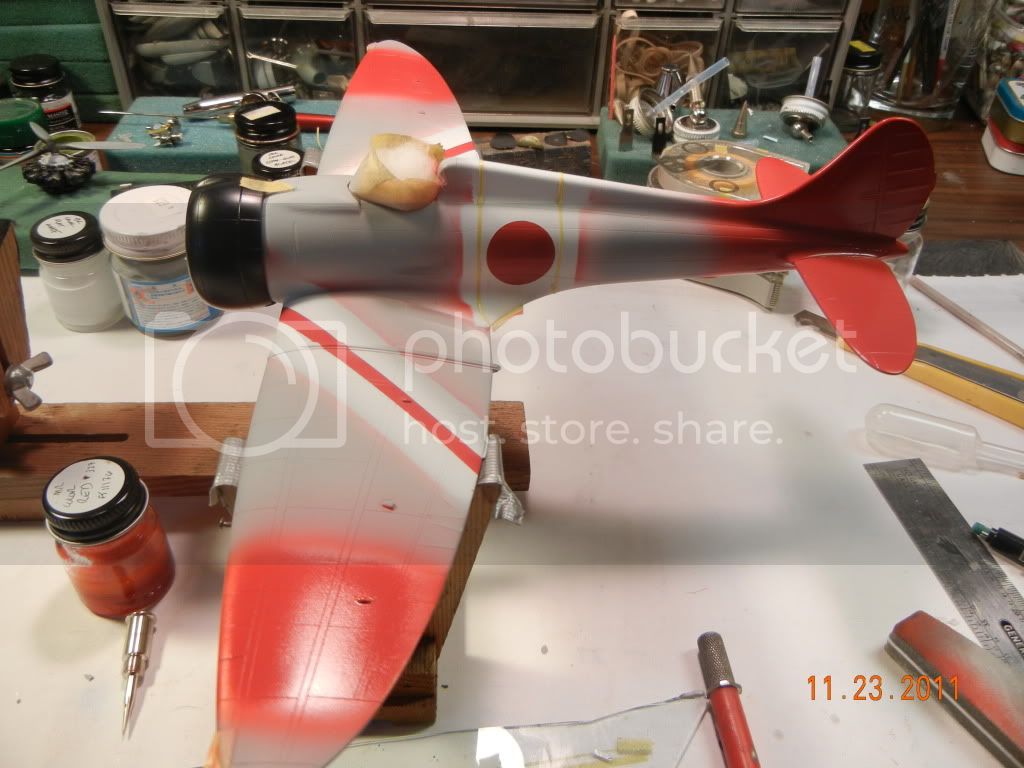
Then used up even more Tamiya tape masking for the next color (silver):
Silver showed a few flaws, so I'll rework those areas and get everything smoothed out
Thanks for looking!
Doug
Then used up even more Tamiya tape masking for the next color (silver):
Silver showed a few flaws, so I'll rework those areas and get everything smoothed out
Thanks for looking!
Doug
DougN1
Joined: August 08, 2011
KitMaker: 410 posts
AeroScale: 409 posts
Posted: Sunday, November 27, 2011 - 04:59 AM UTC
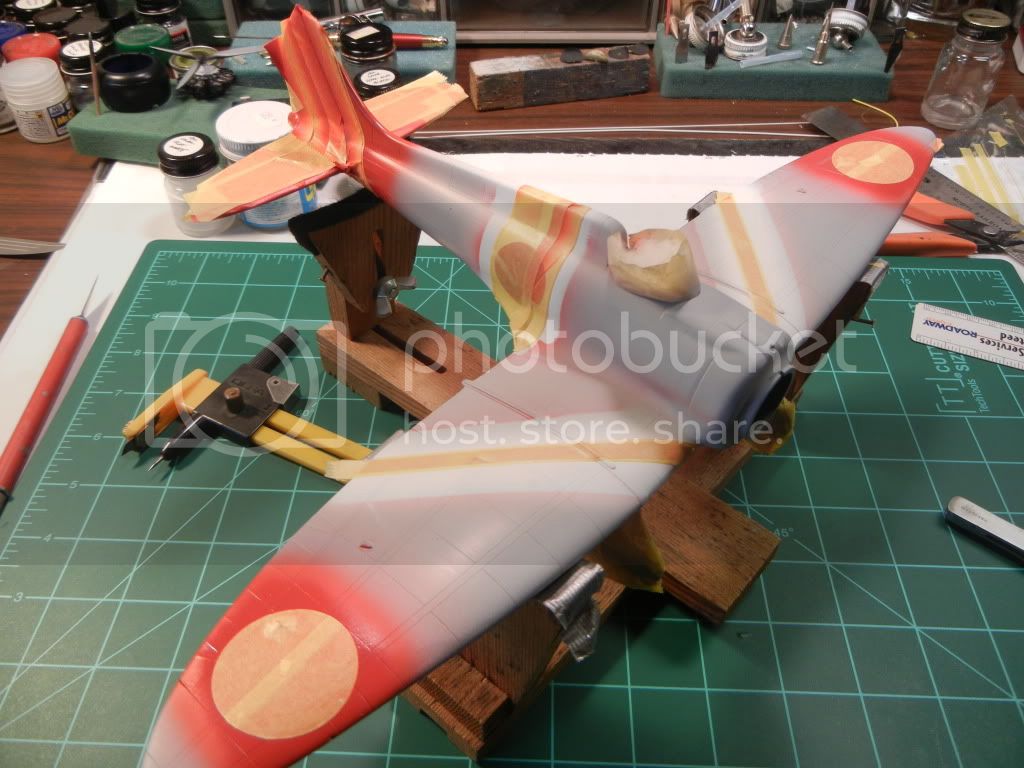
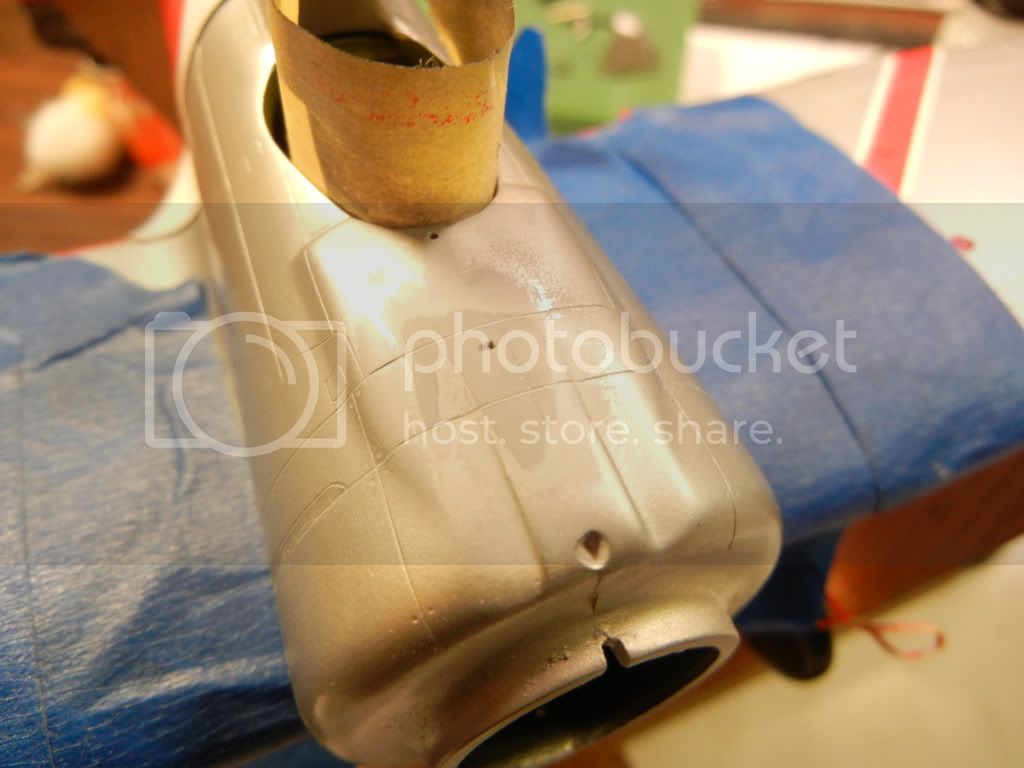
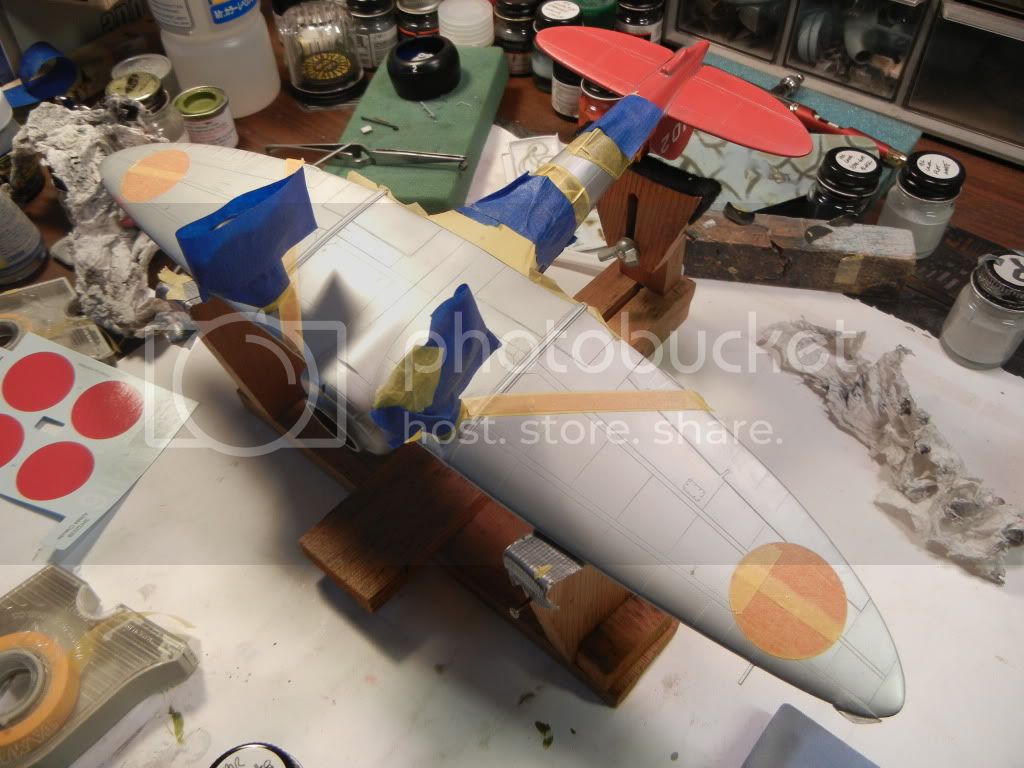
Right then - sprayed the Mr. Color Silver (#8) over the airframe, and I am pleased with the results:

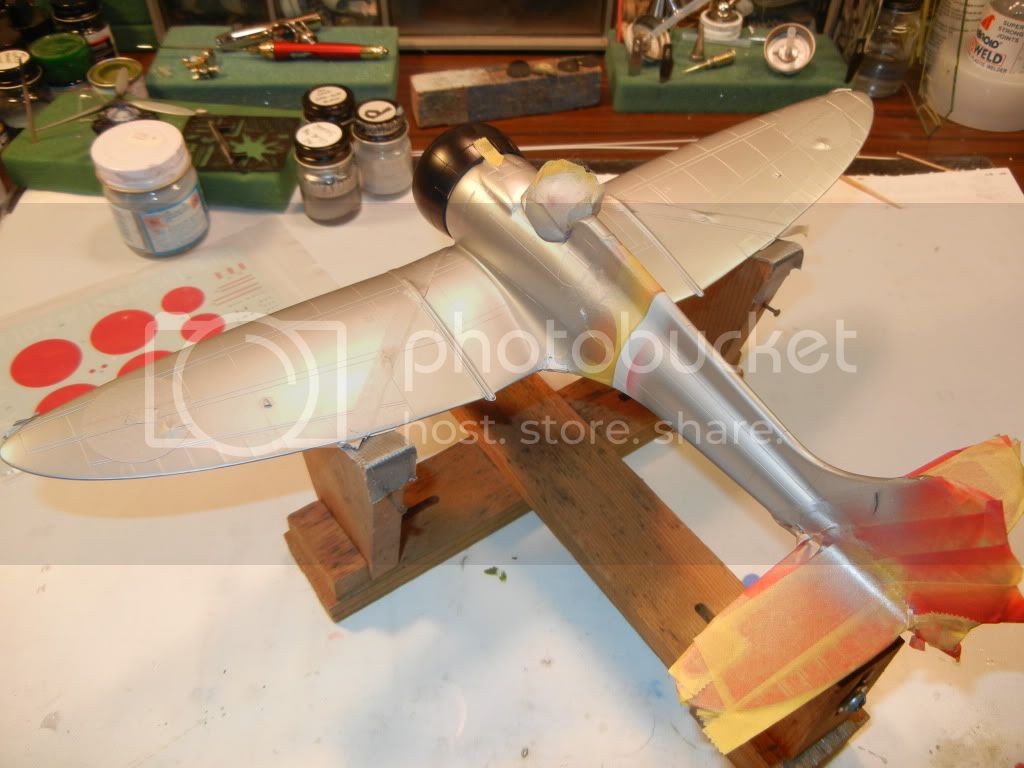
One more mask and spray and the main painting should be finished! Then it's on to the small bits...
Thanks for looking in!
Doug
One more mask and spray and the main painting should be finished! Then it's on to the small bits...
Thanks for looking in!
Doug
DougN1
Joined: August 08, 2011
KitMaker: 410 posts
AeroScale: 409 posts
Posted: Monday, November 28, 2011 - 07:45 AM UTC
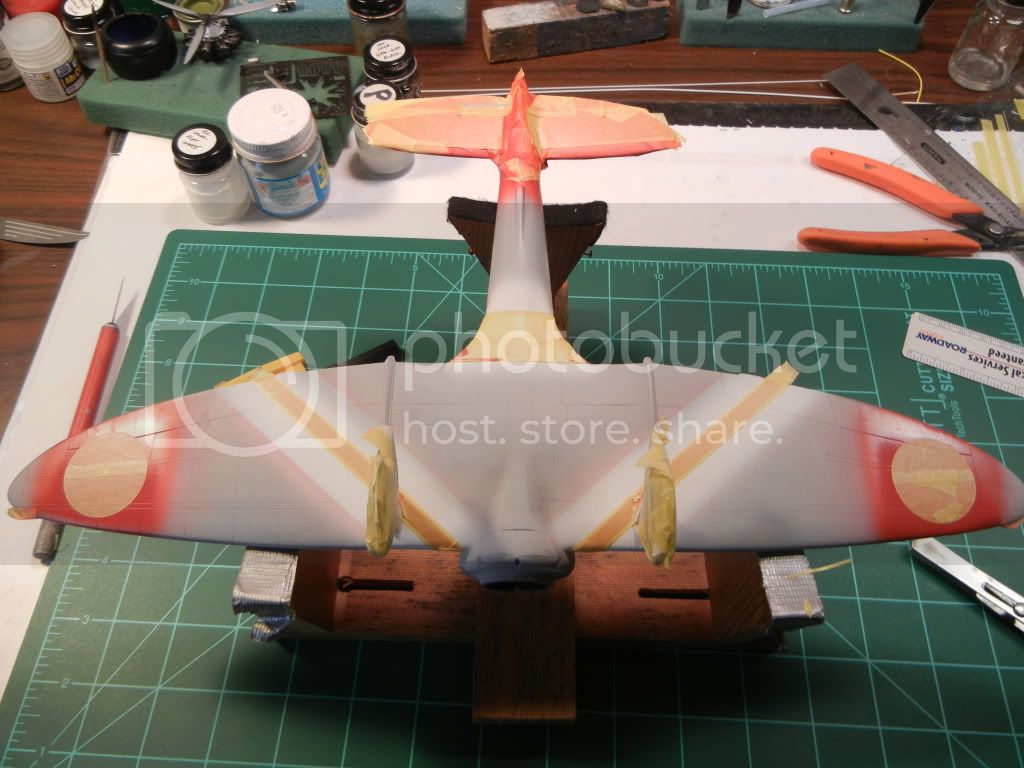
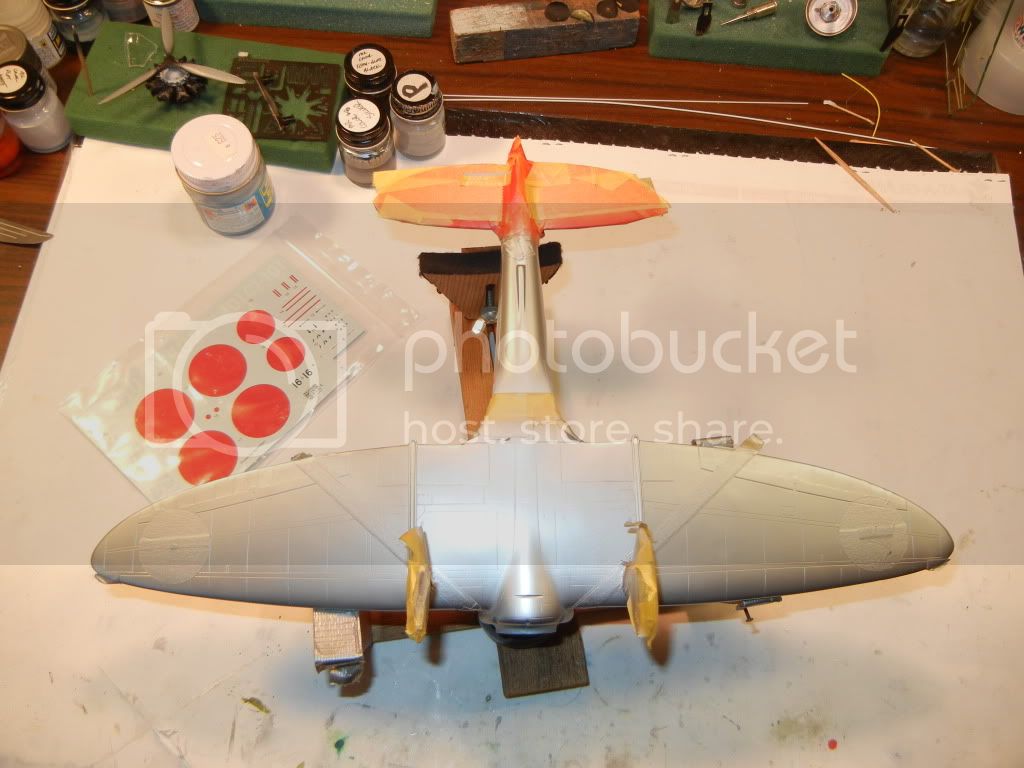
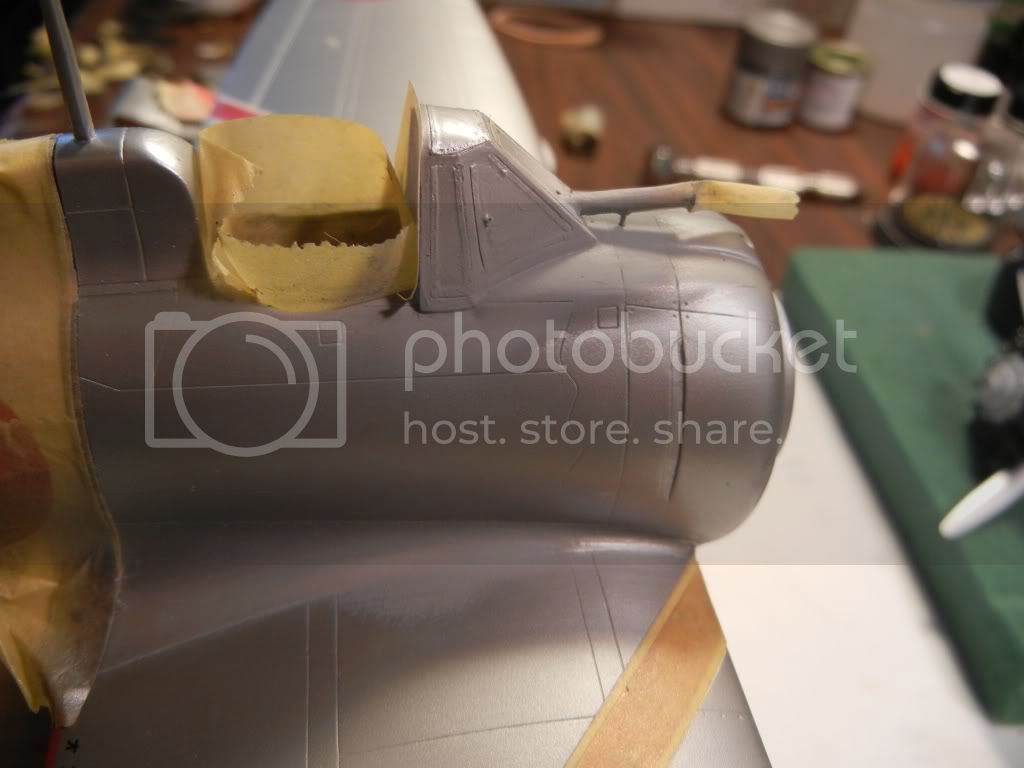
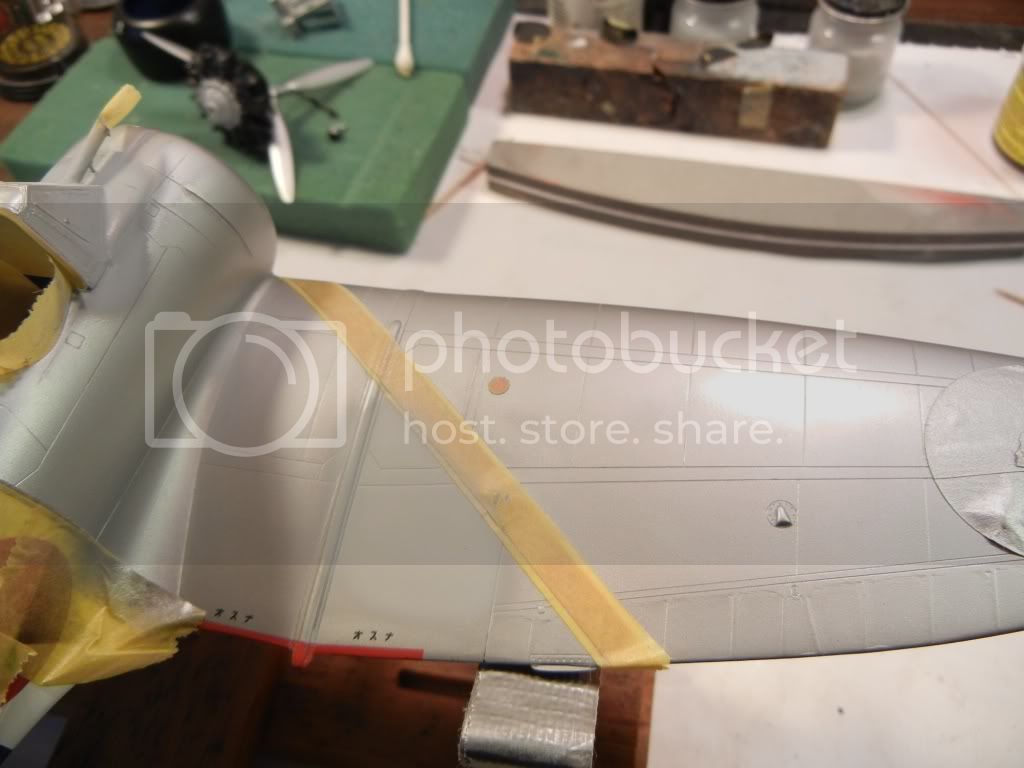
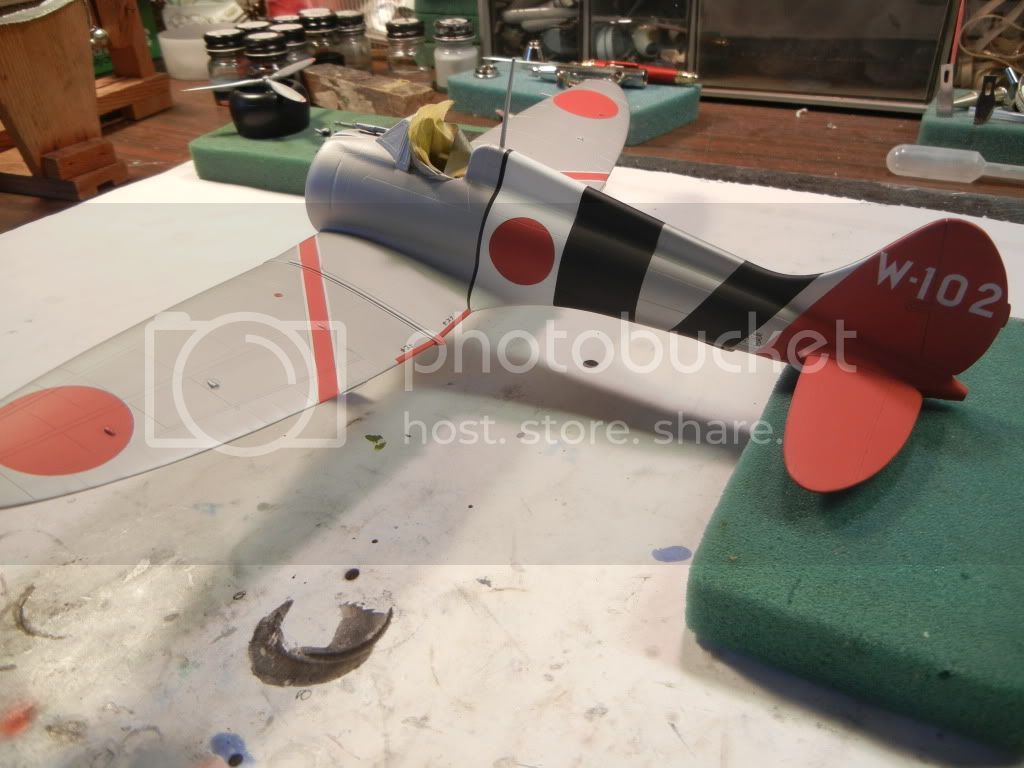
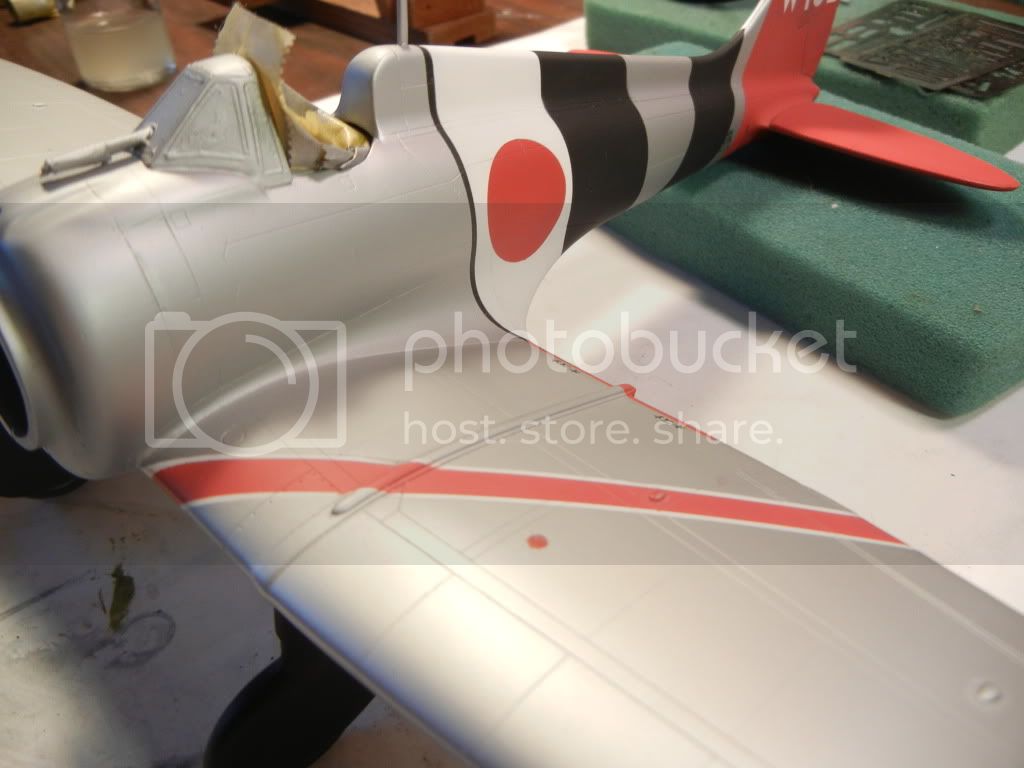
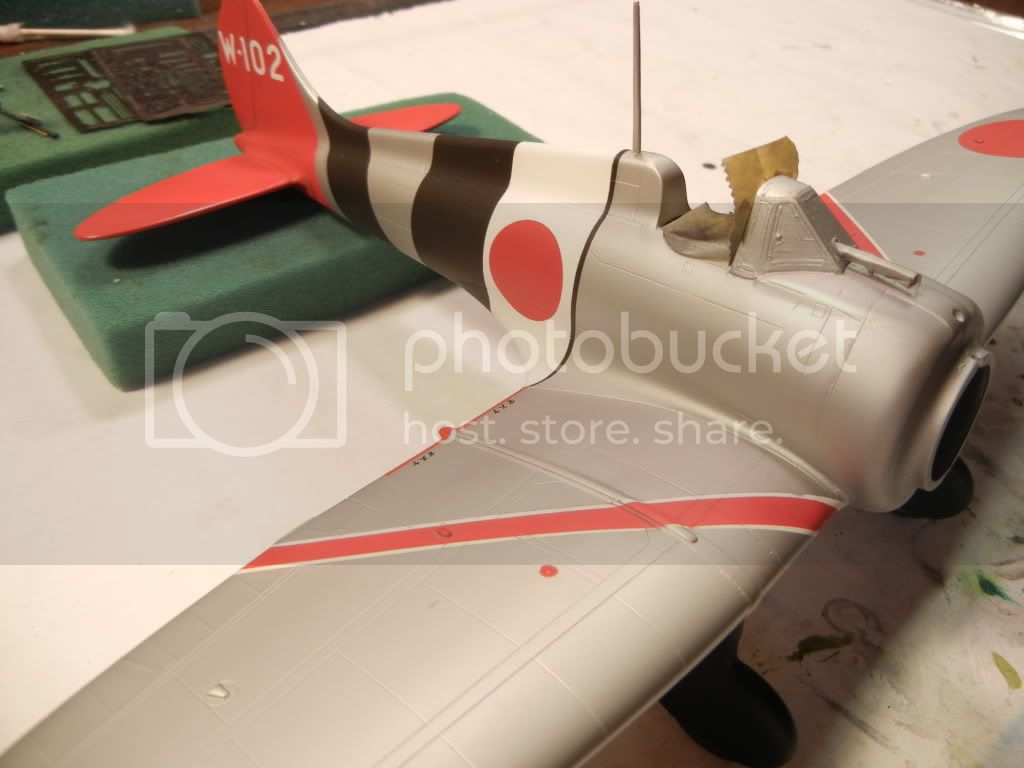
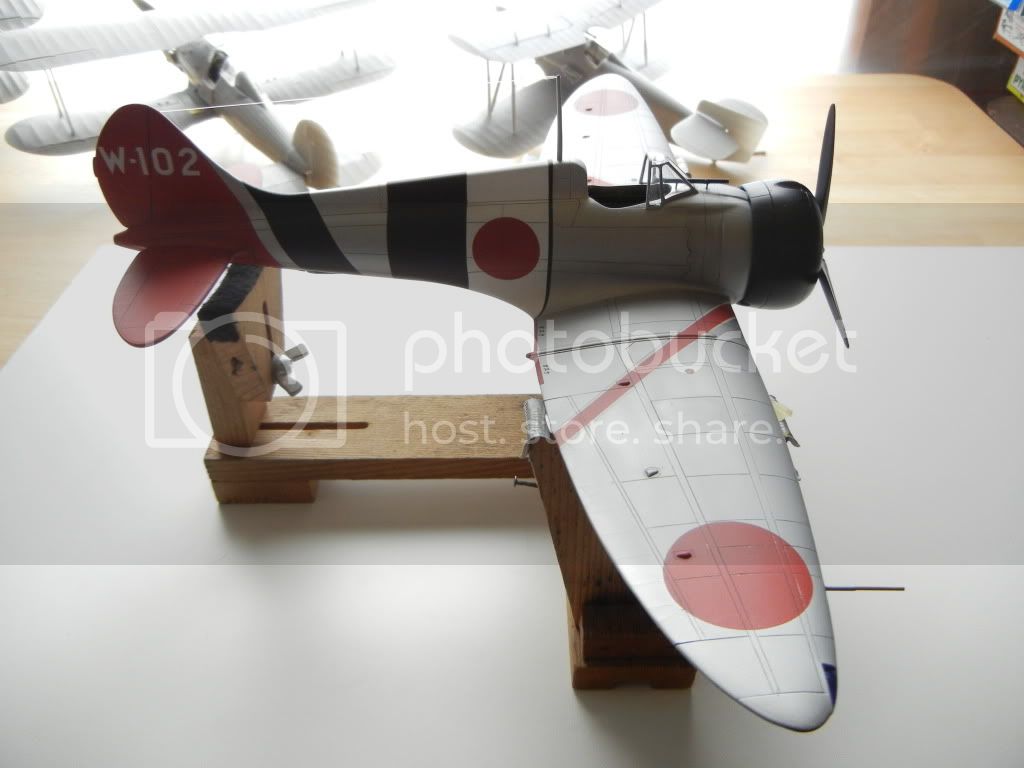
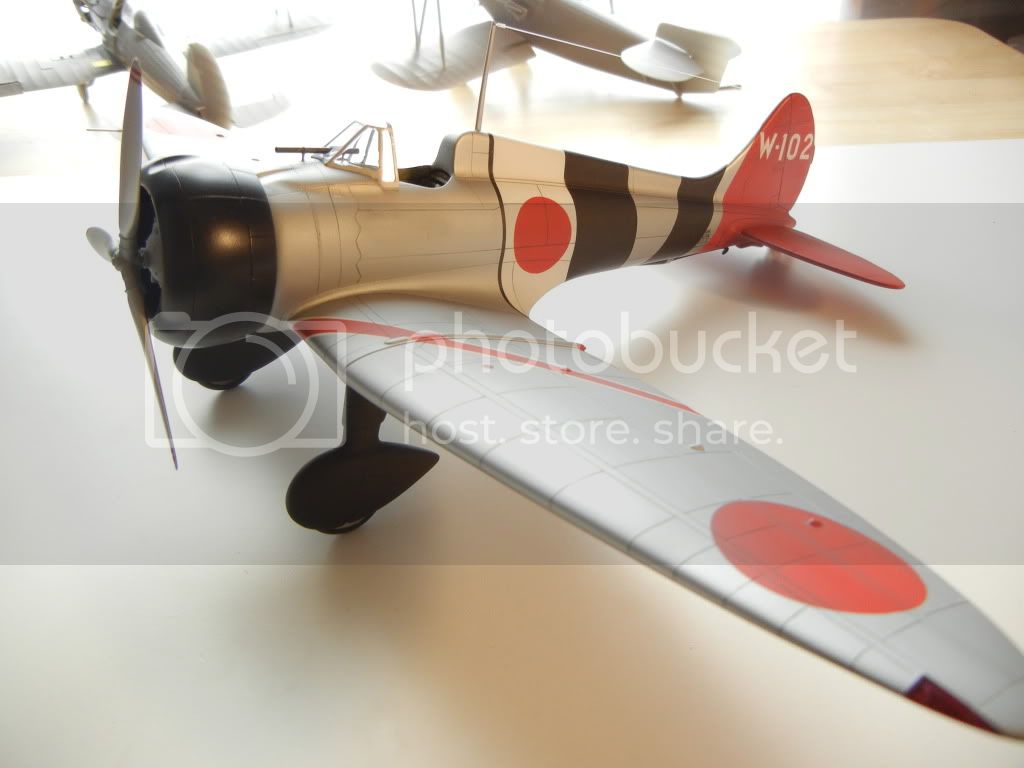
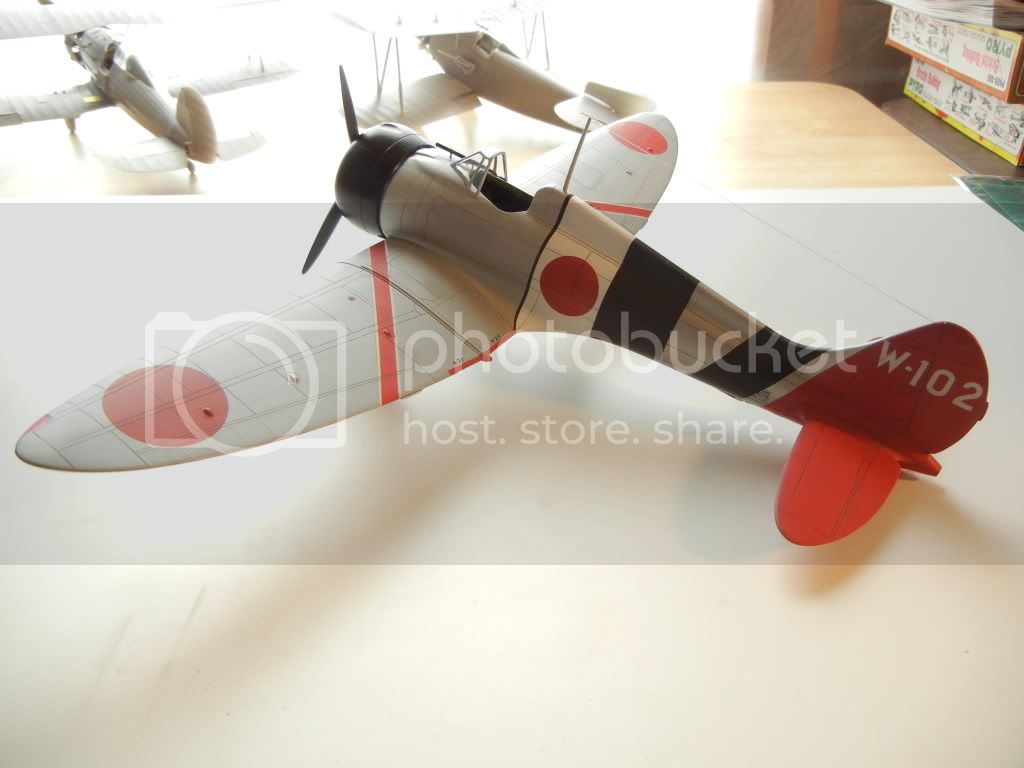
Last color masked and painted, masks off and now it's main painting completed! Have a small bit of white to touch up, and now the small bits to paint and attach. But, at least now you get the general idea I'm trying for here.

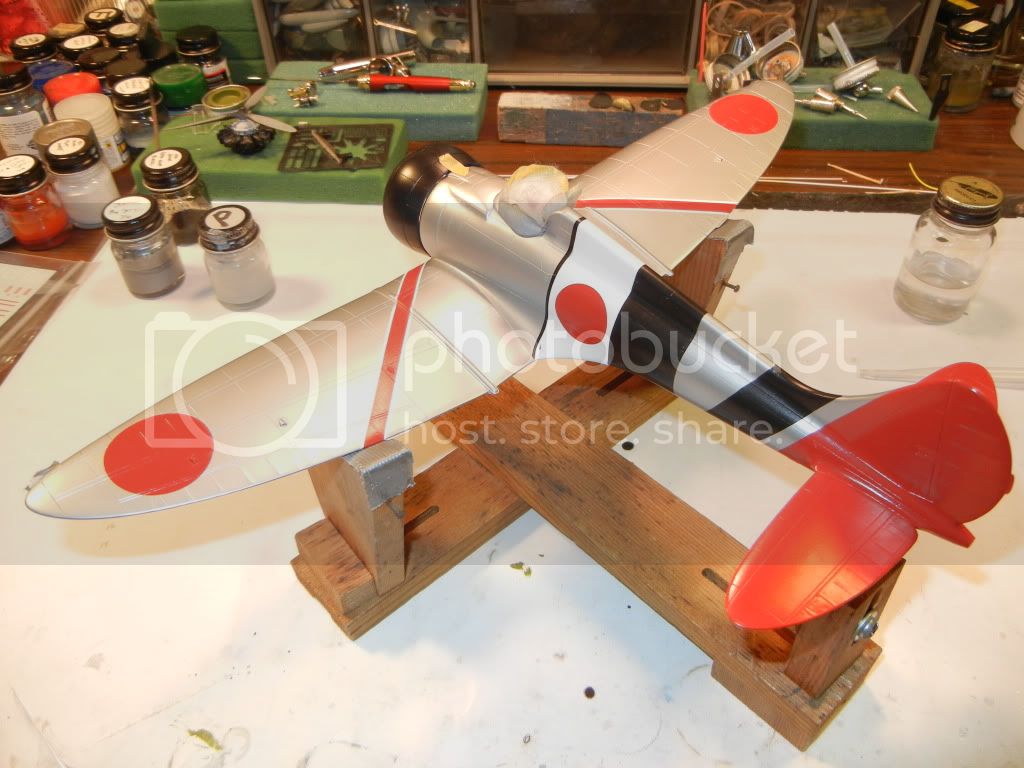


The next bits are not very exciting, but I like to have the painting complete on the main airframe to keep me motivated to make it to the finish line!
Thanks for looking in! All comments/questions welcome and appreciated!
Doug
The next bits are not very exciting, but I like to have the painting complete on the main airframe to keep me motivated to make it to the finish line!
Thanks for looking in! All comments/questions welcome and appreciated!
Doug

Naseby

Joined: October 15, 2010
KitMaker: 825 posts
AeroScale: 476 posts

Posted: Monday, November 28, 2011 - 08:08 AM UTC
Perfect paintjob of a interesting colourfull scheme. I realy like it.


Merlin

#017


Joined: June 11, 2003
KitMaker: 17,582 posts
AeroScale: 12,795 posts

Posted: Monday, November 28, 2011 - 10:16 AM UTC
Hi Doug
Wow! That is looking seriously tasty!
All the best
Rowan
Wow! That is looking seriously tasty!
All the best
Rowan


kaysersose

Joined: May 05, 2009
KitMaker: 86 posts
AeroScale: 2 posts

Posted: Monday, November 28, 2011 - 10:02 PM UTC
Just browsed the whole thread... nice job with the engine, especially.
Tip top!
Tip top!
DougN1
Joined: August 08, 2011
KitMaker: 410 posts
AeroScale: 409 posts
Posted: Tuesday, November 29, 2011 - 02:18 PM UTC
Thanks guys!
I've got the windscreen masked, and am working on the other small bits (e.g. aerial mast - which needs to be drilled out and a wire inserted to join it to the fuselage as it's a butt join otherwise). Will post a few more photos once I get them all prepped
Doug
I've got the windscreen masked, and am working on the other small bits (e.g. aerial mast - which needs to be drilled out and a wire inserted to join it to the fuselage as it's a butt join otherwise). Will post a few more photos once I get them all prepped
Doug
DougN1
Joined: August 08, 2011
KitMaker: 410 posts
AeroScale: 409 posts
Posted: Wednesday, November 30, 2011 - 07:56 AM UTC
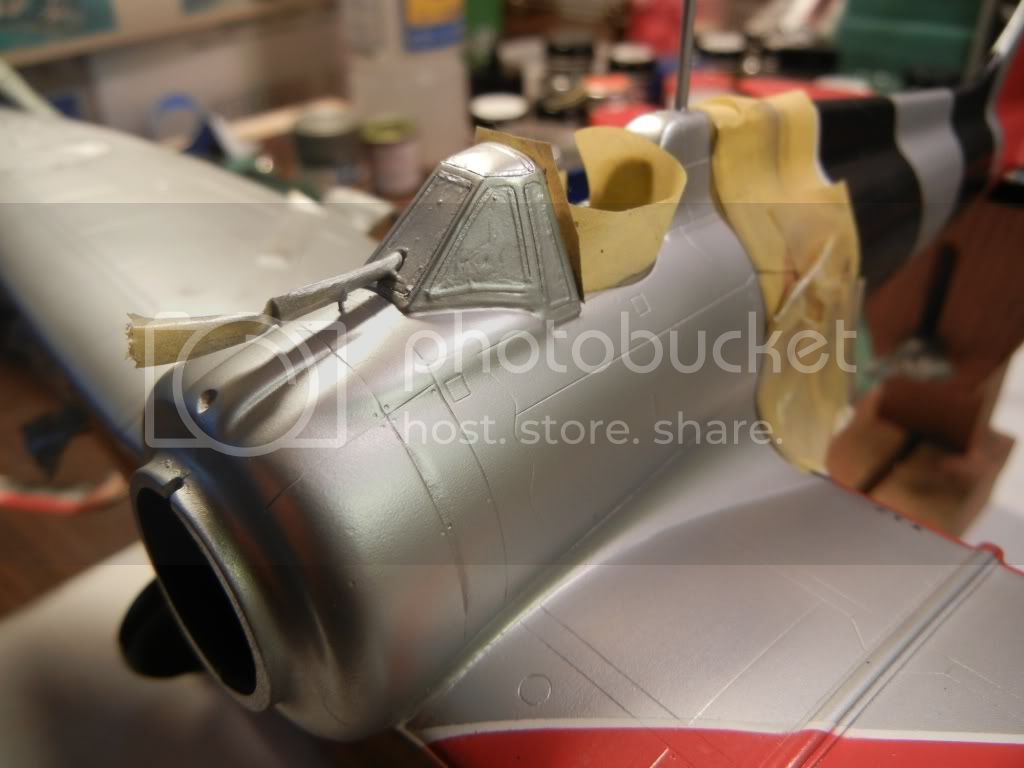
Just a quick update this time. Had to do some of that "modeling" stuff:
The kit pitot tube was rubbish, so I made a new one from some brass tubing:

The kit gunsight was also pretty bad, and has some sort of padding (I think) on one end which I could not find in any photos. Also, it has two mounting pins molded on, which makes it virtually impossible to fit it through the hole in the windscreen. So, I made up a new one using some styrene tubing and brass rod (still needs painting):
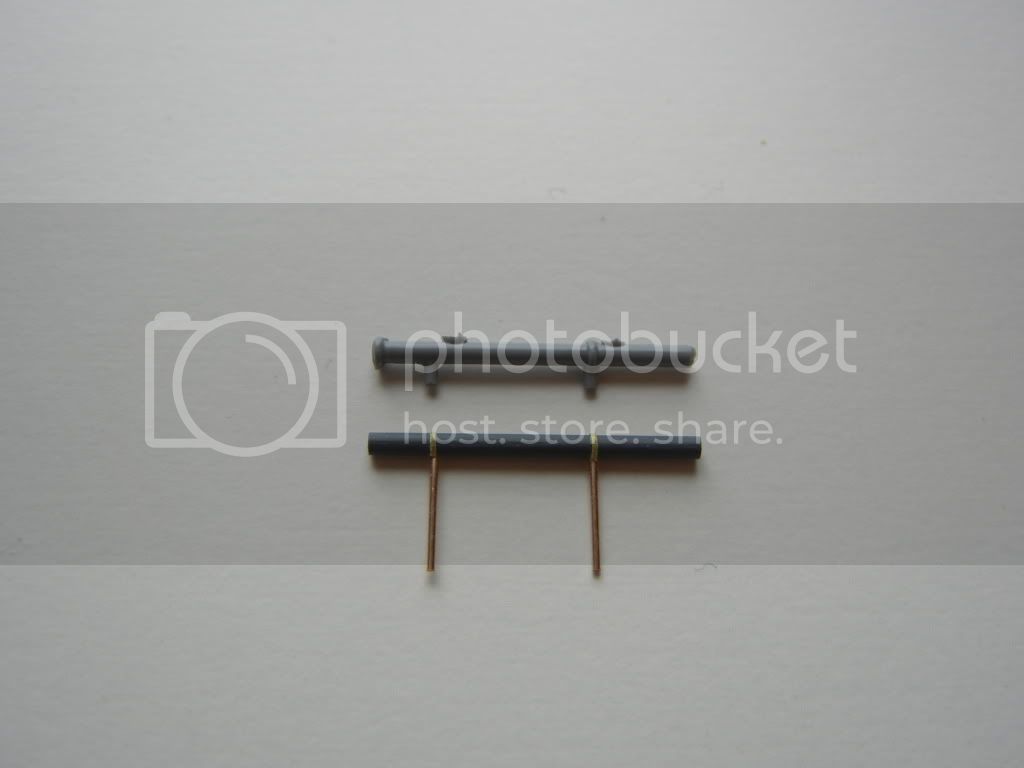
As mentioned, I also drilled a hole in the aerial mast and inserted a piece of brass rod there as well. Finally, I added a nut on the end of the prop hub, as the kit part was missing this feature:


That's it for now. As always, thanks for looking, comments/questions welcome!
Doug
The kit pitot tube was rubbish, so I made a new one from some brass tubing:
The kit gunsight was also pretty bad, and has some sort of padding (I think) on one end which I could not find in any photos. Also, it has two mounting pins molded on, which makes it virtually impossible to fit it through the hole in the windscreen. So, I made up a new one using some styrene tubing and brass rod (still needs painting):
As mentioned, I also drilled a hole in the aerial mast and inserted a piece of brass rod there as well. Finally, I added a nut on the end of the prop hub, as the kit part was missing this feature:
That's it for now. As always, thanks for looking, comments/questions welcome!
Doug

Jessie_C
Joined: September 03, 2009
KitMaker: 6,965 posts
AeroScale: 6,247 posts
Posted: Wednesday, November 30, 2011 - 11:42 AM UTC
You make it look so easy! Did this one have that nifty gold preservative coating?
DougN1
Joined: August 08, 2011
KitMaker: 410 posts
AeroScale: 409 posts
Posted: Tuesday, December 06, 2011 - 10:42 PM UTC
Quoted Text
You make it look so easy! Did this one have that nifty gold preservative coating?
Thanks, it actually was pretty easy (less than 30 mins for everything)
I'm always glad to answer questions about how I've done anything, so feel free to ask, although I've noted that most modelers on the board here are highly skilled and likely don't need the help!The gold preservative coating is still one of those open questions from the research I did. Looking at the airframe in the link in my first post (some of the only details photos of an A5M in existence), it looks to me that the airframe is covered with a silver dope paint, similar to other aircraft of that era. Based on that, my personal opinion on the matter and the fact I think the aluminium dope looks better than a gold color, I am going with it. I will be spaying the entire model with Testor's Dullcoat at the end, which does have a slight amber tint, which I think will nicely replicate the finish I am going for.
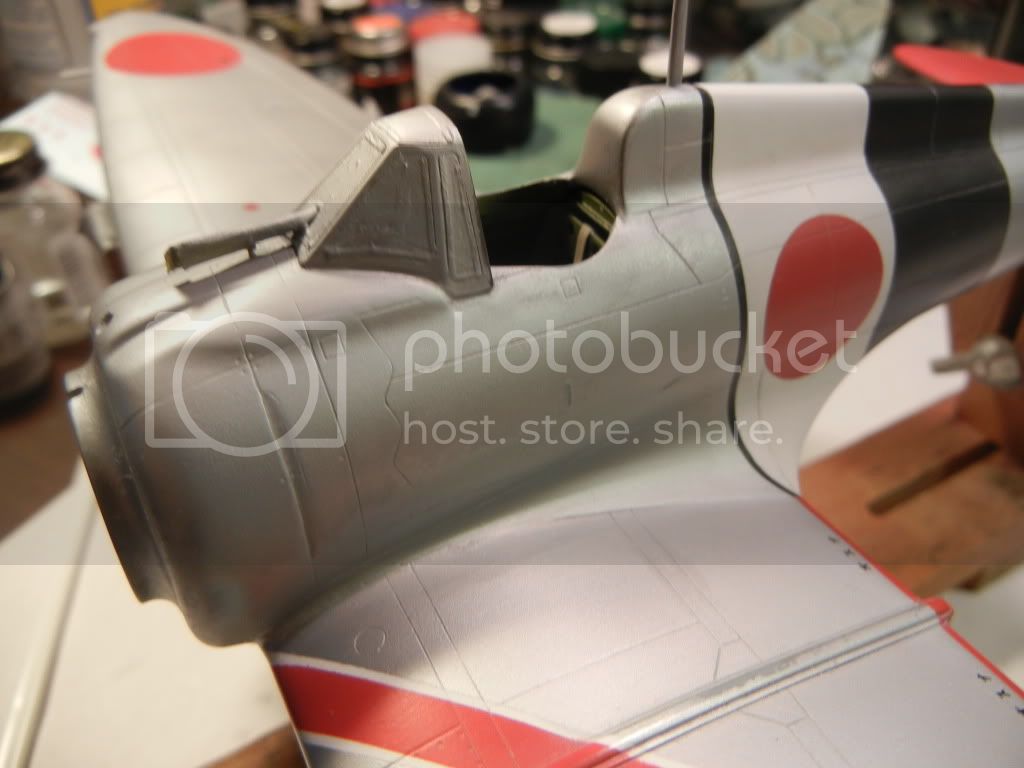
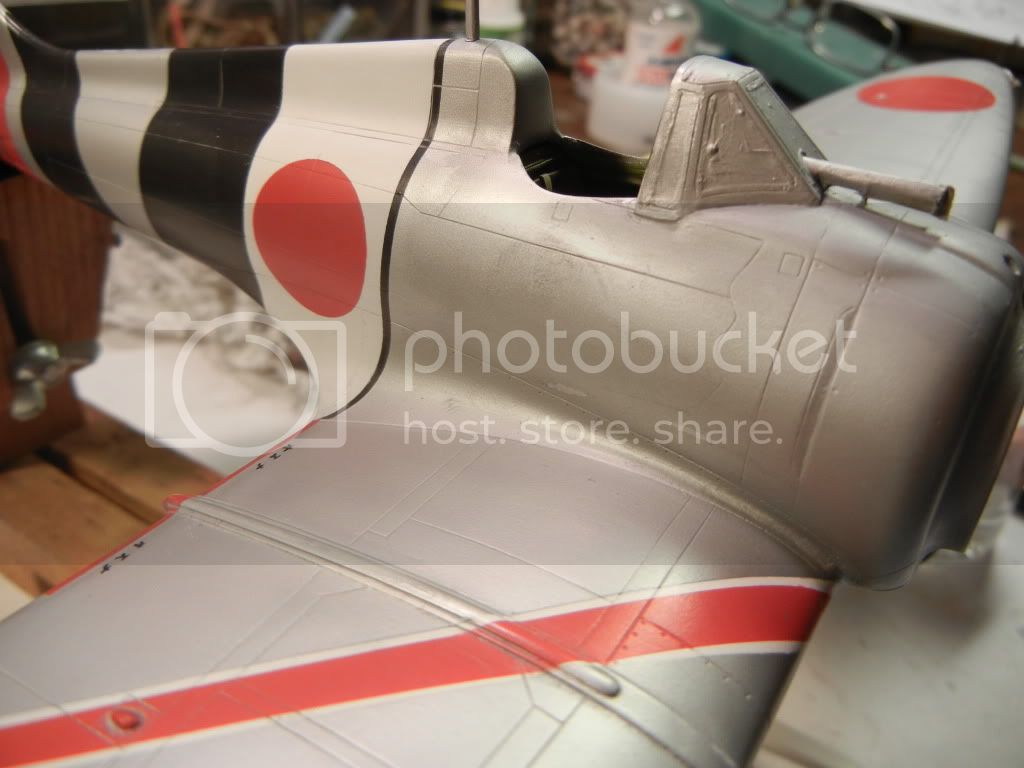
RIghto, just a small update this time. Been working on all the tedious and unexciting things like putting the small bits on the airframe, looking for the lost PE parts that never want to stay in place, etc. Also got the few decals on, but had a setback today when I drilled out the holes for the gunsight. The forward hole ended up slightly off-center, but I knew it would bug me, so I filled with superglue and re-drilled in the correct position:
Another issue popped up as well, the fit of the windscreen is not as good as it appeared during dry fitting (before paint):

Not sure how I will address this, as the gunsight will be in the way of any attempts to fair it in and repaint the area. I'll have to think about it a bit more
As always, comments, etc. are more than welcome! Thanks for looking!
Doug
Jessie_C
Joined: September 03, 2009
KitMaker: 6,965 posts
AeroScale: 6,247 posts
Posted: Tuesday, December 06, 2011 - 11:56 PM UTC
Quoted Text
Another issue popped up as well, the fit of the windscreen is not as good as it appeared during dry fitting
Not sure how I will address this, as the gunsight will be in the way of any attempts to fair it in and repaint the area. I'll have to think about it a bit more
Have you considered fairing it in with white glue? Alternatives that don't involve sanding are Miliput (sculpt it with water before it's dry) or wiping off the excess filler with nail polish remover before it dries. Lay strips of silver decal down over the frame/filler joint.
DougN1
Joined: August 08, 2011
KitMaker: 410 posts
AeroScale: 409 posts
Posted: Friday, December 09, 2011 - 06:36 AM UTC
Quoted Text
Quoted TextAnother issue popped up as well, the fit of the windscreen is not as good as it appeared during dry fitting
Not sure how I will address this, as the gunsight will be in the way of any attempts to fair it in and repaint the area. I'll have to think about it a bit more
Have you considered fairing it in with white glue? Alternatives that don't involve sanding are Miliput (sculpt it with water before it's dry) or wiping off the excess filler with nail polish remover before it dries. Lay strips of silver decal down over the frame/filler joint.
I've managed to improve the fit somewhat with a little reshaping and then beveling the edge of the mating surface by scraping with my Xacto blade. Now I'll get everything cleaned up and then see how it goes using white glue to fair it in. Good idea on the silver decal strips if the white glue doesn't turn out as desired - thanks!
Doug
DougN1
Joined: August 08, 2011
KitMaker: 410 posts
AeroScale: 409 posts
Posted: Thursday, December 15, 2011 - 11:03 AM UTC
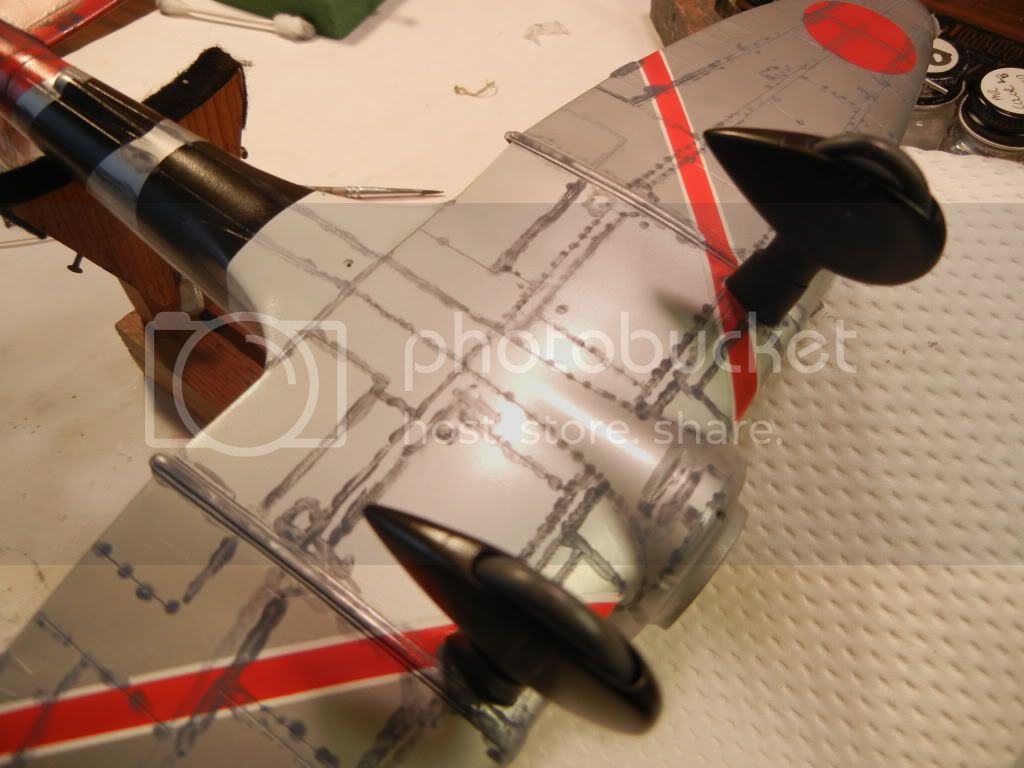
Ok, back on track again (I hope) having sorted out the windscreen issue and some self-imposed touch up work. After reworking the canopy, I think I got a slightly better fit as mentioned. I attached it with Gator's Grip glue, and since I could not find my actual white glue, used that to fair it in a bit. I wasn't 100% happy with that, since the GG glue cannot be shaped at all once dry, so I scraped that out and put in some Mr Surfacer. Since I had to sand out and repair a scrape in the wing, I had to get the primer out anyway, so off I went:

Lightly sanded a bit more, then it was time for some silver paint:

Of course, this took a few days with drying times, etc. to get accomplished Once I get the finishing coats on and a wash around the windscreen, it should look just fine (mind you these are macro pics that make it look worse than it is). Now we should be back on track to finishing this beastie off before I mess up something else on it:

As always, thanks for looking, comments/questions more than welcome!
Doug
Lightly sanded a bit more, then it was time for some silver paint:
Of course, this took a few days with drying times, etc. to get accomplished
Once I get the finishing coats on and a wash around the windscreen, it should look just fine (mind you these are macro pics that make it look worse than it is). Now we should be back on track to finishing this beastie off before I mess up something else on it:As always, thanks for looking, comments/questions more than welcome!
Doug
DougN1
Joined: August 08, 2011
KitMaker: 410 posts
AeroScale: 409 posts
Posted: Friday, December 23, 2011 - 04:39 AM UTC
Well, I think this model doesn't want to be finished this year, but I am going to continue to try to wrestle it into completion!
After getting everything all sorted out, I put on some Floquil Crystal Cote. I use that or future as a protective barrier, and since I was not putting on many decals (just a couple), I went with the Crystal Cote. I had thought this was a new bottle, but I guess I was wrong. I had noticed on some of the older sections that it did seem somewhat tacky, but I pressed ahead anyway and put a grey oil wash on the kit:

So far so good - but, when I used some turpenoid to remove the excess, it ended up taking lots of the Cyrstal Cote with it (Note that I have been using this method for 20 years now without issue). Of course, that meant 2 different shades on the silver parts, which was not acceptable:
So let everything get dry, gave it a light sanding and then back to the Tamiya tape:
Got the first coat of Mr Color silver on:

I'll lightly sand this coat and put another on, in an effort to get rid of all/most of the ridges in the paint. While Mr Color paints cover great, and leave all the details, the downside is they also show every flaw, especially when using silver!
Still hoping to get this kit done before the end of the year!
Doug
After getting everything all sorted out, I put on some Floquil Crystal Cote. I use that or future as a protective barrier, and since I was not putting on many decals (just a couple), I went with the Crystal Cote. I had thought this was a new bottle, but I guess I was wrong. I had noticed on some of the older sections that it did seem somewhat tacky, but I pressed ahead anyway and put a grey oil wash on the kit:
So far so good - but, when I used some turpenoid to remove the excess, it ended up taking lots of the Cyrstal Cote with it (Note that I have been using this method for 20 years now without issue). Of course, that meant 2 different shades on the silver parts, which was not acceptable:
So let everything get dry, gave it a light sanding and then back to the Tamiya tape:
Got the first coat of Mr Color silver on:
I'll lightly sand this coat and put another on, in an effort to get rid of all/most of the ridges in the paint. While Mr Color paints cover great, and leave all the details, the downside is they also show every flaw, especially when using silver!
Still hoping to get this kit done before the end of the year!
Doug
Merlin
#017
Joined: June 11, 2003
KitMaker: 17,582 posts
AeroScale: 12,795 posts
Posted: Friday, December 23, 2011 - 08:42 AM UTC
Hi Doug
Ouch! That sounds like a nightmare on any finish, let alone silver! Judging by the pics, you've done a great job smoothing everything out. So... Future next time?
All the best
Rowan
Ouch! That sounds like a nightmare on any finish, let alone silver!
Judging by the pics, you've done a great job smoothing everything out. So... Future next time?All the best
Rowan

amegan

#243

Joined: March 21, 2008
KitMaker: 996 posts
AeroScale: 915 posts

Posted: Tuesday, December 27, 2011 - 12:39 PM UTC
Started to read this as I am just starting a Special Hobby Polikarpov I-15 and planning to do it silver as well, although planning different techniques for different surfaces. I know how that finish disaster feels, I'll watch how the recovery comes out. Great build, but you have set a high standard for me on the engine!
DougN1
Joined: August 08, 2011
KitMaker: 410 posts
AeroScale: 409 posts
Posted: Wednesday, December 28, 2011 - 06:45 AM UTC
Thanks guys!
@ Rowan - actually, I'll just make sure the the Cyrstal Cote is not 10+ years old next time (or just use Future/Klear) If I had know I was going to have this much trouble with the silver, I would have used Floquil Old Silver instead, as it is much easier to correct mistakes with
@ Andrew - thanks, will look for your I-15 build! The engine was pretty easy, and I don't think it is anything special, just the kit parts with some simple detailing. Nothing too difficult.
Time for a quick update, I repainted the silver and black, touched up the white and red. Also repaired the aerial mast (forgot to mention it snapped in two when I was working on the re-finish). Sprayed with some Testor's Dullcoat, which will give me a nice base to do the penciled in panel lines when it gets good in hard in a day or two
Still hopeful to get this done before the end of the year!
Doug
@ Rowan - actually, I'll just make sure the the Cyrstal Cote is not 10+ years old next time (or just use Future/Klear)
If I had know I was going to have this much trouble with the silver, I would have used Floquil Old Silver instead, as it is much easier to correct mistakes with @ Andrew - thanks, will look for your I-15 build! The engine was pretty easy, and I don't think it is anything special, just the kit parts with some simple detailing. Nothing too difficult.
Time for a quick update, I repainted the silver and black, touched up the white and red. Also repaired the aerial mast (forgot to mention it snapped in two when I was working on the re-finish). Sprayed with some Testor's Dullcoat, which will give me a nice base to do the penciled in panel lines when it gets good in hard in a day or two
Still hopeful to get this done before the end of the year!
Doug
chukw1
Joined: November 28, 2007
KitMaker: 817 posts
AeroScale: 729 posts
Posted: Wednesday, December 28, 2011 - 08:42 AM UTC
Great work, Doug- that's the way to stick to it! I've really been enjoying your progress with this beauty- cheers!
chuk
chuk


Siderius
Joined: September 20, 2005
KitMaker: 1,747 posts
AeroScale: 1,673 posts
Posted: Wednesday, December 28, 2011 - 09:35 AM UTC
Doug, your work is magnificent to behold! Thanks for sharing it with us. Russell

DougN1
Joined: August 08, 2011
KitMaker: 410 posts
AeroScale: 409 posts
Posted: Sunday, January 01, 2012 - 06:56 AM UTC
Thanks for the support guys.
I told myself this one would be finished in 2011, and it was. I decided to just finish it and stick it in the back of the display case I'm not happy with the way this one turned out, and will do it again when I can get some "W-102" decals and use my A5M2 kit (with the parts from this one), or I find a cheap A5M4 kit. With the lessons learned from this build, I am certain it will meet my expectations next time around!
On to the final pics:


I may attempt some better "glamour" shots later on
Thanks to everyone for looking, I had hoped to show you a better finished model, but it was not to be! At least it is done and I can now focus on picking the next kit to build!
Doug
I told myself this one would be finished in 2011, and it was. I decided to just finish it and stick it in the back of the display case
I'm not happy with the way this one turned out, and will do it again when I can get some "W-102" decals and use my A5M2 kit (with the parts from this one), or I find a cheap A5M4 kit. With the lessons learned from this build, I am certain it will meet my expectations next time around! On to the final pics:
I may attempt some better "glamour" shots later on
Thanks to everyone for looking, I had hoped to show you a better finished model, but it was not to be! At least it is done and I can now focus on picking the next kit to build!
Doug
amegan
#243
Joined: March 21, 2008
KitMaker: 996 posts
AeroScale: 915 posts
Posted: Sunday, January 01, 2012 - 11:37 AM UTC
Like most of us youare your own worst critic, it looks great in the pics. If the I-15 comes out that well I'll be pleased. Thanks for showing this, warts and all, we all have disasters and sometimes knowing how to get out of them is important as it could save a good model from a short flight into a bin
Siderius
Joined: September 20, 2005
KitMaker: 1,747 posts
AeroScale: 1,673 posts
Posted: Sunday, January 01, 2012 - 12:11 PM UTC
Doug, you do great work. Your "Claude" is testament to that. I loved looking at it. Thanks again, Russell
DougN1
Joined: August 08, 2011
KitMaker: 410 posts
AeroScale: 409 posts
Posted: Tuesday, January 03, 2012 - 04:12 AM UTC
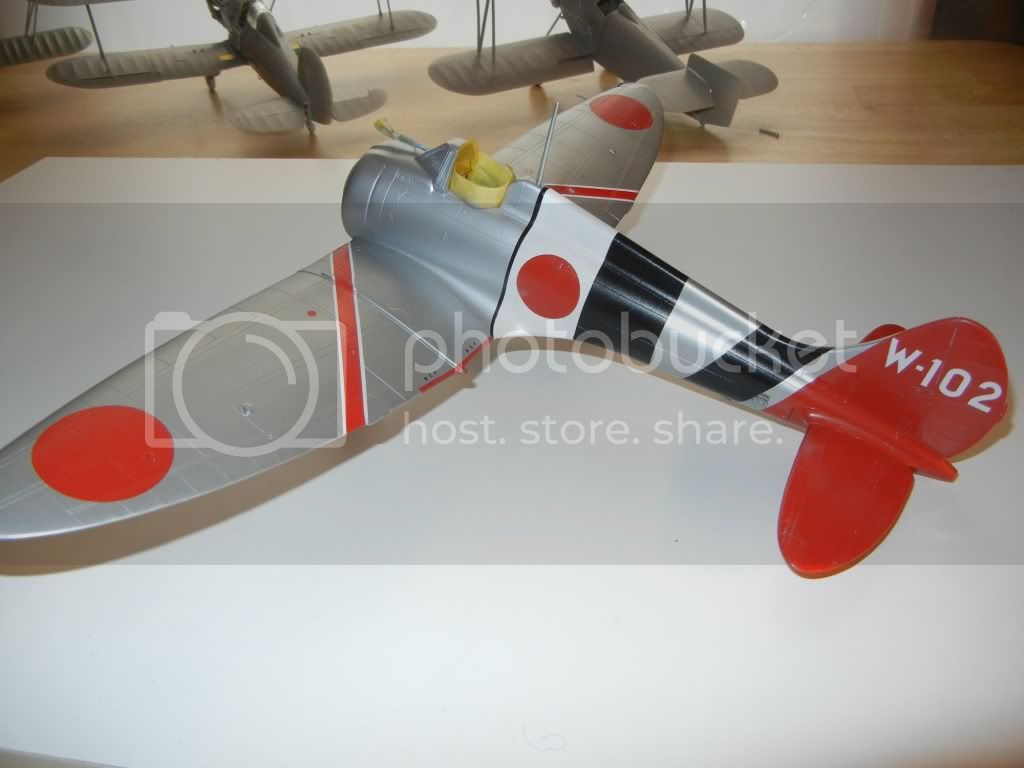
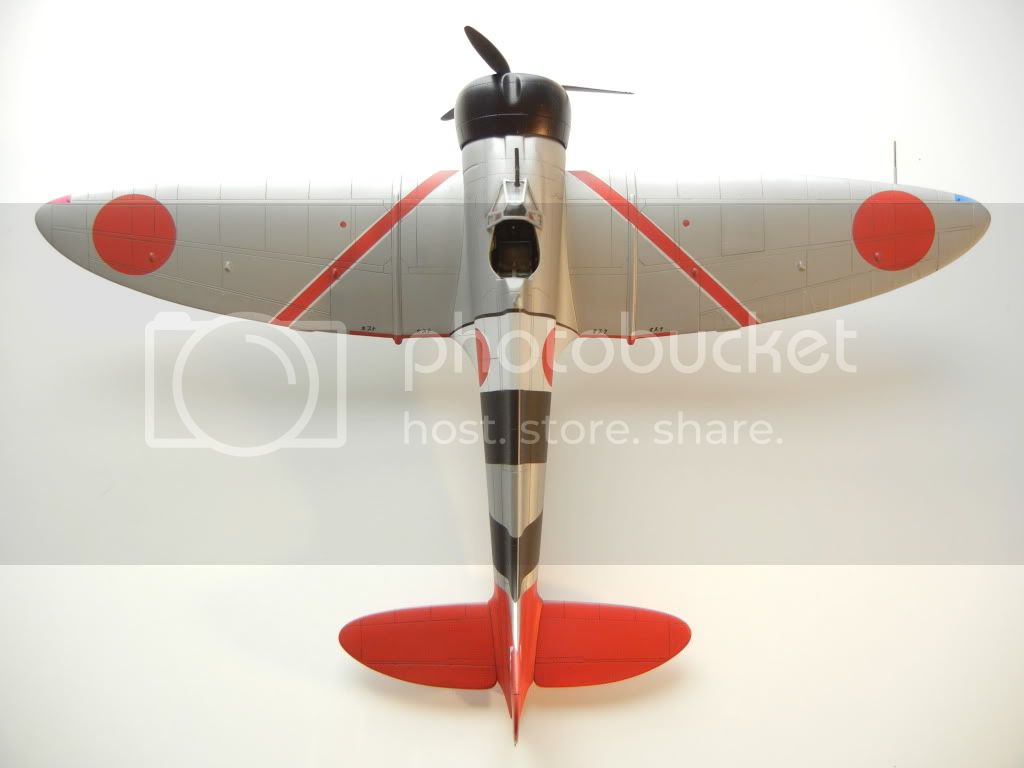
You guys are too kind. Ok, here are the final shots of the Claude in it's new home (my display case):
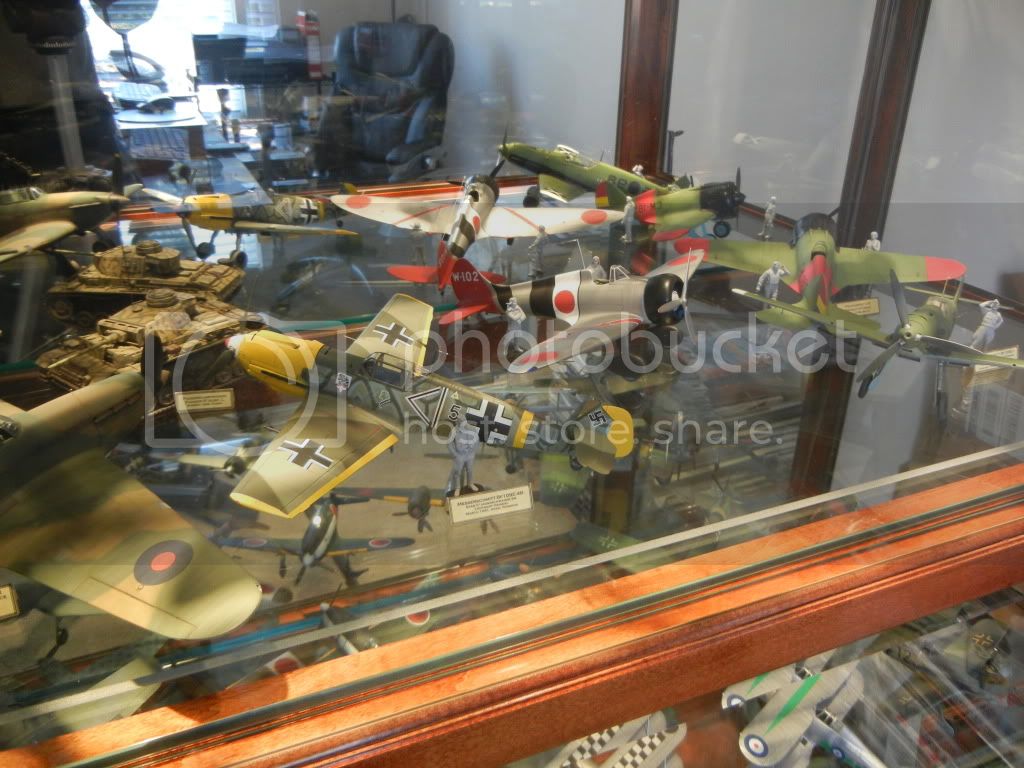
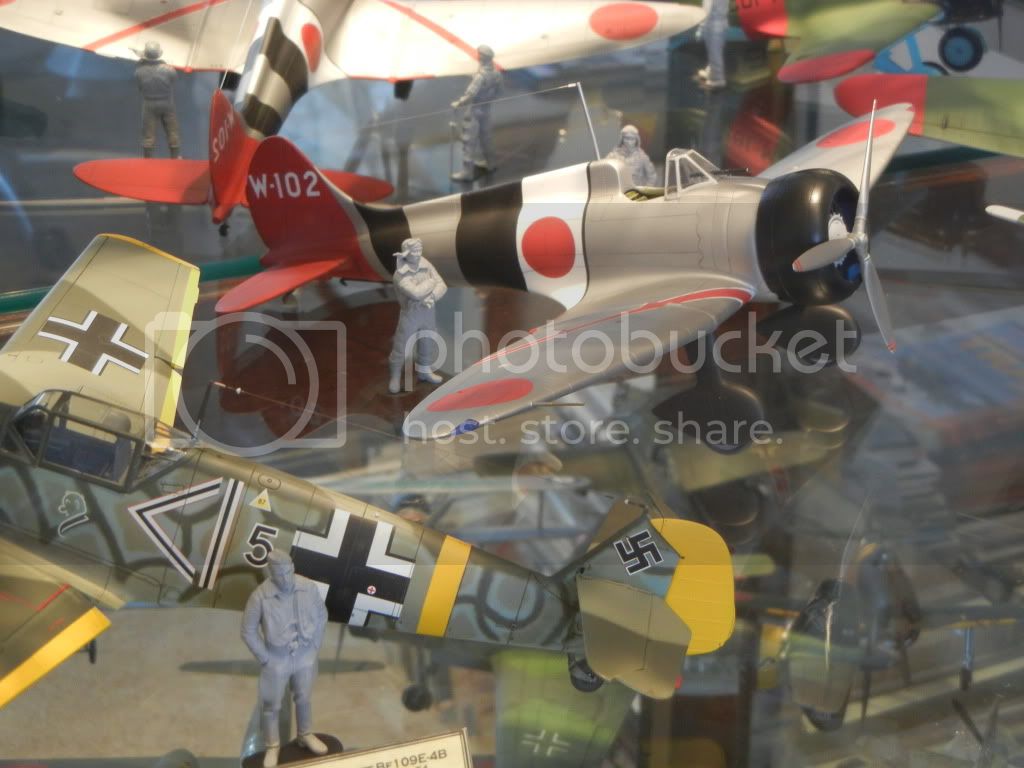
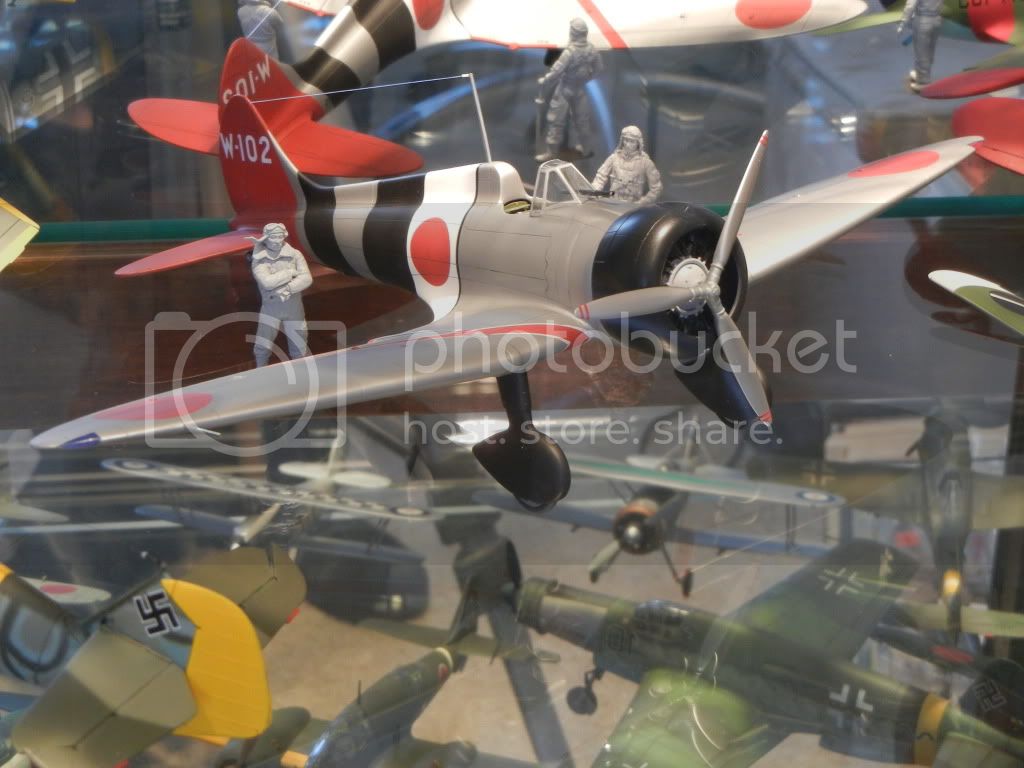
Again, thanks for all the comments and support, it certainly does help keep me motivated to actually finish the model!
Doug
Again, thanks for all the comments and support, it certainly does help keep me motivated to actually finish the model!
Doug
 |

WEB HOSTING BY


Copyright ©2021 AeroScale and Kitmaker Network, a subsidiary of Silver Star Enterprises
All Rights Reserved. Please read our Conditions of Use and Privacy Policy.
All Rights Reserved. Please read our Conditions of Use and Privacy Policy.