

Hi Edo !
Your basic storyline sounds pretty good to me,relaxed scenes with not too much animation seems to work the best.
But before starting I think that you must ask yourself a few questions first.
Will this be a piece that you are doing for yourself ? well then anything works as long as it pleases you or
will your goal be a piece that will hold the interest of an audience or viewer as long as possible ?.Well then that changes everything.It can be as simple as adding a little weathering or leaving a cowl off an engine.The viewer will then fill in the rest.Not much of a storyline there but still it is more than a "factory fresh" example sitting in showcase.I am not criticizing those that prefer to build this way but it holds little interest for me or the average viewer.
Next step up would be the simple vignette,un-cowled engine or bullet holes or weathering,or steps in the sand,ground or oil on the floor,some sign of human presence without having to do a figure.(sometimes it is even a more powerful story this way)
The next step can be a little intimidating for some modelers,modifying or painting figures but it really doesn't have to be this way.Personally I am only an average painter of figures in the traditional sense.In fact I find that most of the professionally painted stuff a little overdone.Just avoid the bug eyed look and let the light and shadows work for you.In my case the viewer never gets close enough to see if the eyes are painted or not.Here is a little experiment you may want to try for yourself.Don't paint the eyes in at all but just leave shadows where the eyes would have been and most viewers brains will fill them in for you.It seems that human being are so used to seeing eyes where they should be that it fills them in for you at a normal scale viewing distance.Where judges or nitpickers will actually pick up your work and look close up for flaws of course it wouldn't work.
The next step would be a vignette or diorama of a neutral or landscape type setting.Something like a travel documentary.Nice to look at but....
The best dioramas tell a story and need little explanation other than the title.The storyboard diorama is designed specifically to hold the viewers interest as long as possible. It can be hard to get right and nobody is successful all the time.What looks good on paper will probably have to be revised many times.
A storyboard diorama puts you in the directors shoes except you are the lighting guy,carpenter, ,producer,costume gal etc.. I am sure you get what I mean.And you must accomplish your storytelling goals with no music,dialogue or movement of any kind,a pretty tall order that may even intimate Spielberg a bit.
Early Aviation
Discuss World War I and the early years of aviation thru 1934.
Discuss World War I and the early years of aviation thru 1934.
Hosted by Jim Starkweather
Oh my dear! A Camel in my bedroom!

dolly15

Joined: May 20, 2004
KitMaker: 8,227 posts
AeroScale: 3,915 posts

Posted: Monday, January 23, 2012 - 05:38 AM UTC
dolly15
Joined: May 20, 2004
KitMaker: 8,227 posts
AeroScale: 3,915 posts
Posted: Tuesday, January 24, 2012 - 03:36 AM UTC
Here is something that I forgot to mention above."What to leave in and what to leave out" is also a very important consideration as well.Not only from the standpoint of the pure number of objects in a diorama but also in the sense of what things your viewer notices and what he doesn't.
Example: what I am working on right now the wings of the Bleriot.Your average viewer would never even notice that the lightening holes in the ribs are missing but they sure would notice if the wings were upside down.Things like the human face or human body language would be picked up right away as we are all experts on this but if he had a medal on his chest improperly placed or painted no one would care less except of course the "experts".In other words are you building your stuff for the competition model judges or for your average viewer or museum visitor.This is a very important consideration. It is also extremely important to know yourself .Would your temperament fit in with your diorama plans ?
If you are a perfectionist and can't stand for a spot of dust on a shiny surface then I would stick to "stand alone" models as dioramas are usually a lot messier than that and more concessions usually have to be made in order to ever finish ,especially on a very large project.It is really all about knowing yourself and your audience and where and how you plan to put your stuff out there.
dolly15
Joined: May 20, 2004
KitMaker: 8,227 posts
AeroScale: 3,915 posts
Posted: Tuesday, January 24, 2012 - 04:14 AM UTC
The next level of diorama building,in my opinion, is what I am attempting to do right now with my Bleriot/Falcon piece ,which is to mix not only the media aspects together but the modeling and the art genres together as well.
In other words taking whatever is available to you out there to help tell your story.Plastic,wood,kit or scratch,hobby or art ,it really doesn't matter when the storyline is your most important consideration.
In other words taking whatever is available to you out there to help tell your story.Plastic,wood,kit or scratch,hobby or art ,it really doesn't matter when the storyline is your most important consideration.

edoardo

Joined: November 30, 2007
KitMaker: 642 posts
AeroScale: 382 posts
Posted: Sunday, February 19, 2012 - 11:37 PM UTC
Hi all!
it has been a while since my last post... but I hope that the next pictur4es will repay you for the delay!
First of all I whant to show you how the cockpit turned out...
it has been a while since my last post... but I hope that the next pictur4es will repay you for the delay!
First of all I whant to show you how the cockpit turned out...
edoardo
Joined: November 30, 2007
KitMaker: 642 posts
AeroScale: 382 posts
Posted: Sunday, February 19, 2012 - 11:38 PM UTC
ok...
let me try this again...


let me try this again...
edoardo
Joined: November 30, 2007
KitMaker: 642 posts
AeroScale: 382 posts
Posted: Sunday, February 19, 2012 - 11:48 PM UTC
ok it worked...
now... let's continue with some pics...


Next I'm gonna show you a couple of figures I bought from Masterclub (btw: a very polite Company to deal with, I can recomend them to you).


I started to paint them, but I'm not sure of the colors... baybe I should use kaki also for the trousers...


Having seal dhe fusolage, I could not resist the temptation to see how the all diorama should look...


and this is all for now, I hope you enjoied it...
as usual, any comment is much appreciated!
ciao
edo
now... let's continue with some pics...
Next I'm gonna show you a couple of figures I bought from Masterclub (btw: a very polite Company to deal with, I can recomend them to you).
I started to paint them, but I'm not sure of the colors... baybe I should use kaki also for the trousers...
Having seal dhe fusolage, I could not resist the temptation to see how the all diorama should look...
and this is all for now, I hope you enjoied it...
as usual, any comment is much appreciated!
ciao
edo
dolly15
Joined: May 20, 2004
KitMaker: 8,227 posts
AeroScale: 3,915 posts
Posted: Monday, February 20, 2012 - 01:55 AM UTC
Nice,nice,nice Cheers! John.

JackFlash

Joined: January 25, 2004
KitMaker: 11,669 posts
AeroScale: 11,011 posts
Posted: Monday, February 20, 2012 - 04:15 AM UTC
edoardo
Joined: November 30, 2007
KitMaker: 642 posts
AeroScale: 382 posts
Posted: Wednesday, March 07, 2012 - 11:47 PM UTC
Hi all,
here is an update of my project.
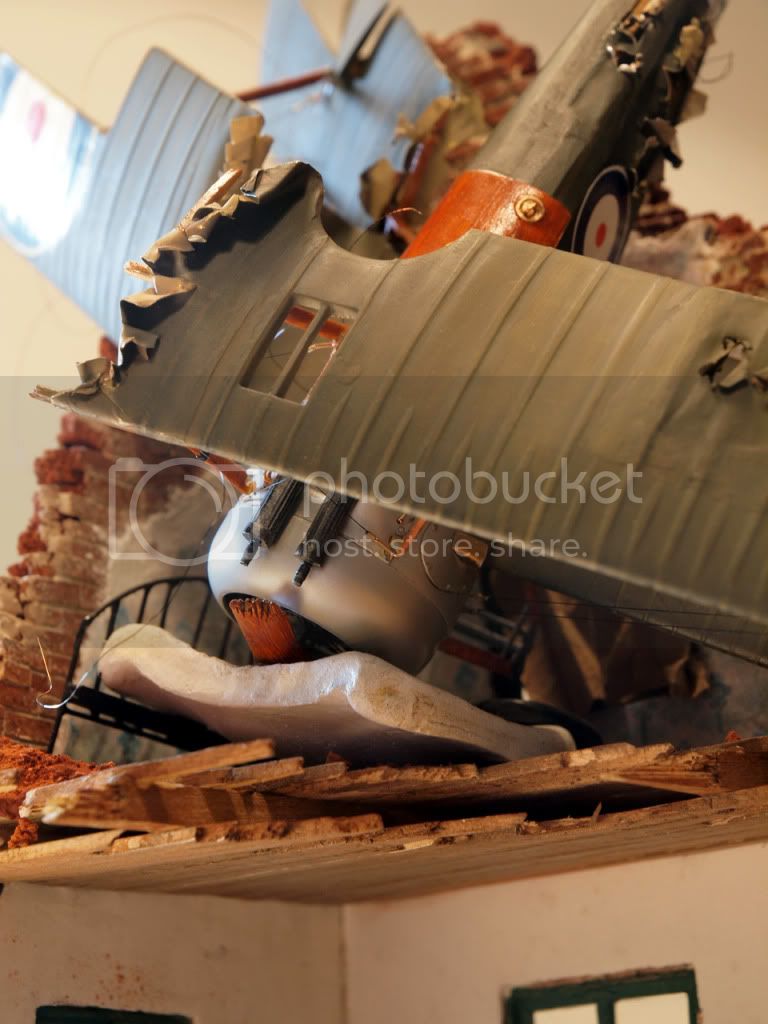
I'll start with a fiew pics of the plane:
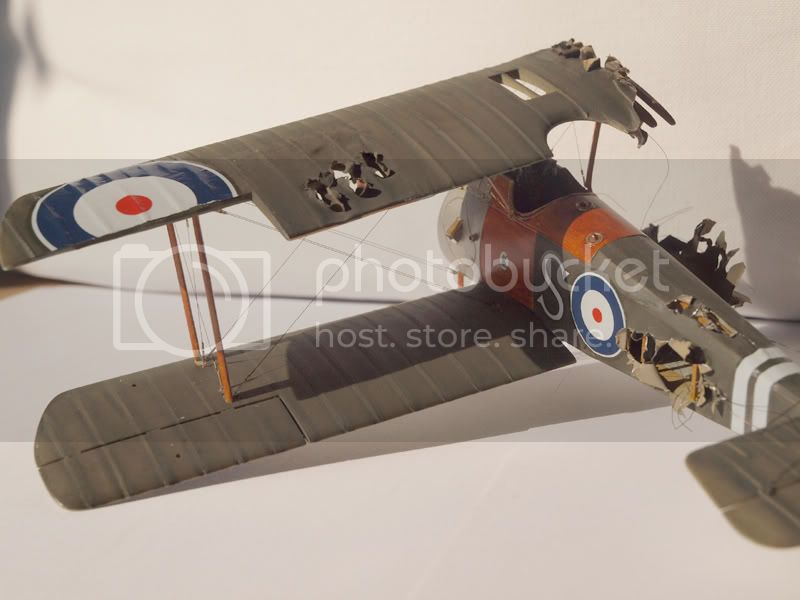
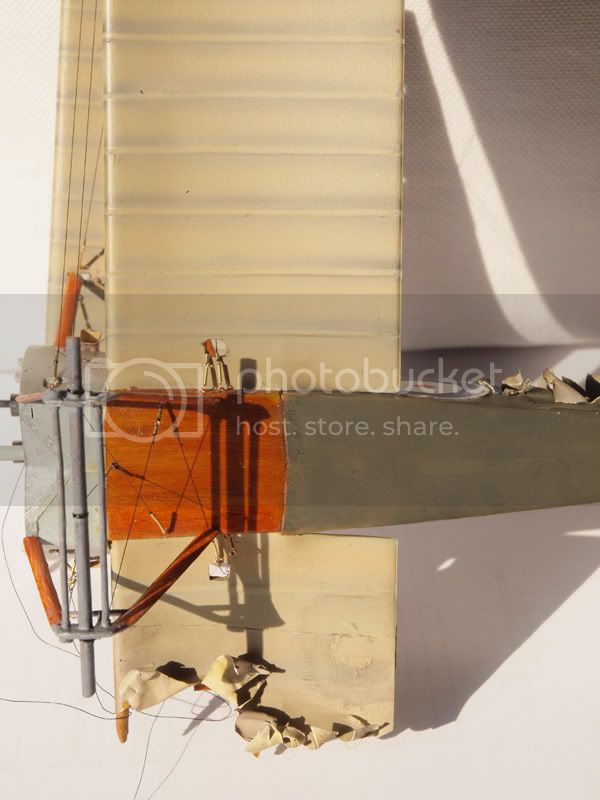
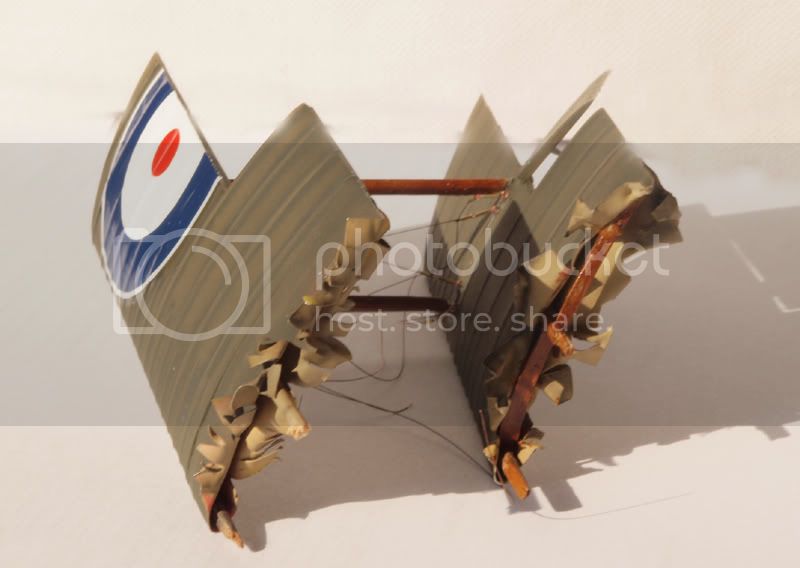


Rigging was done with mono on the left side and with thin copper wire on the right one. In this way I hope to give it a more twisted shape once in place.
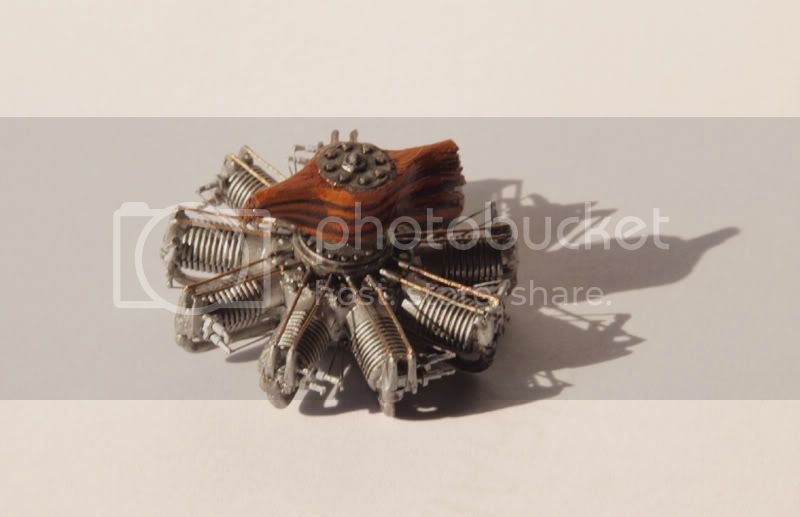

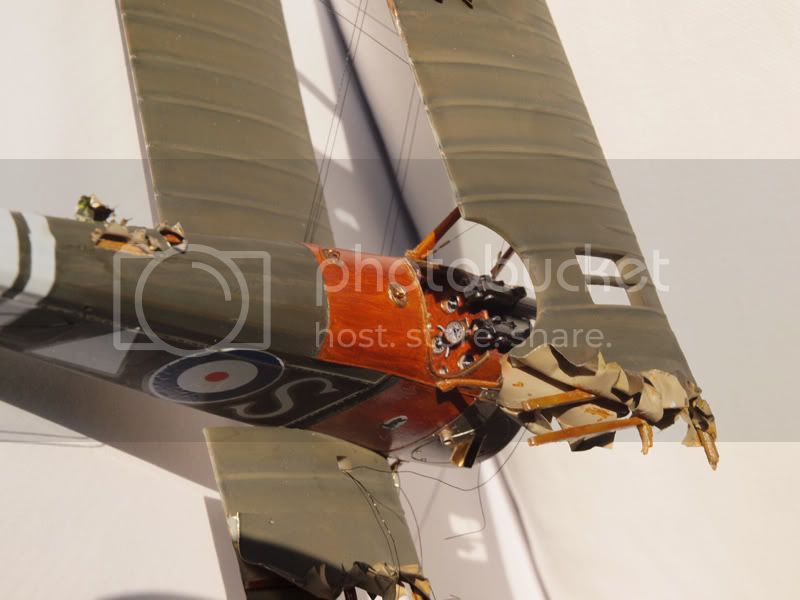
Above you can see the finished engine: btw should the prop be laminated?
Also I fear I have broken the prop a little too short.... as a replacement do you think that using a spare Albatross prop would be appropriate? (at least since it will broken... )
)
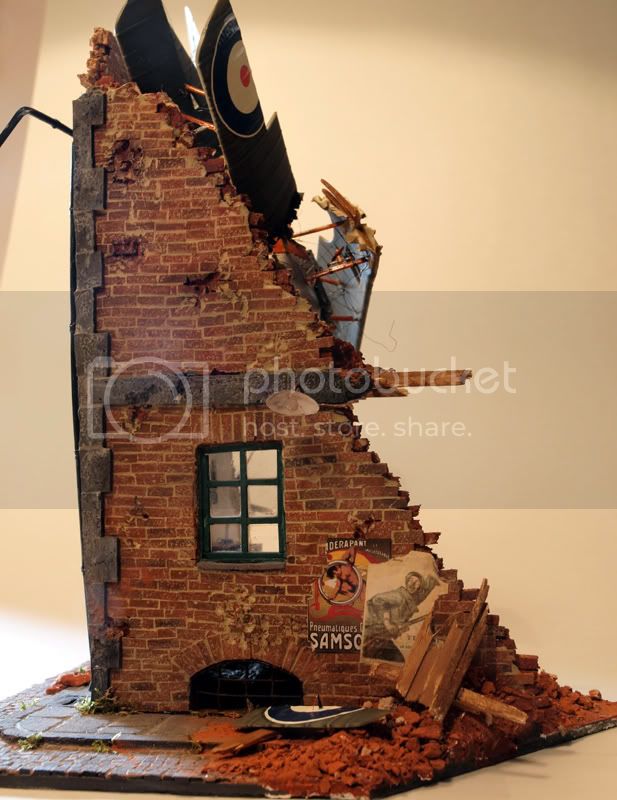
Next a fiew pics of the building
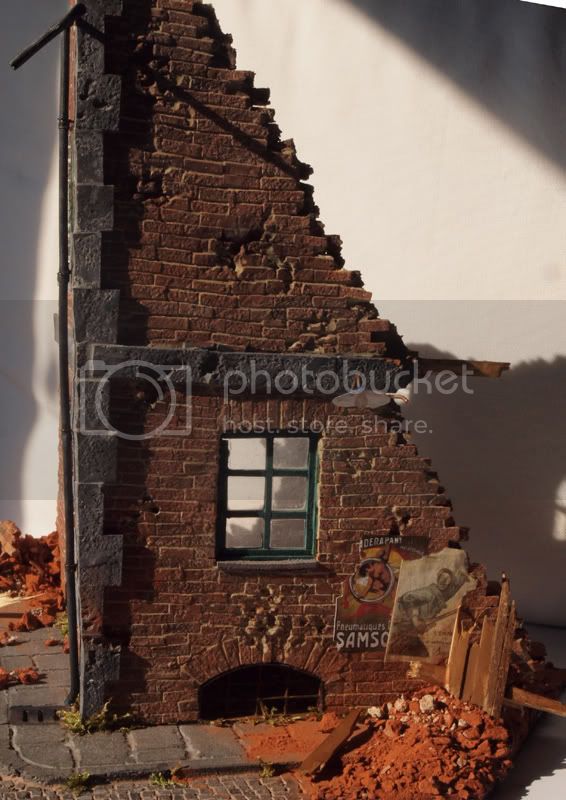


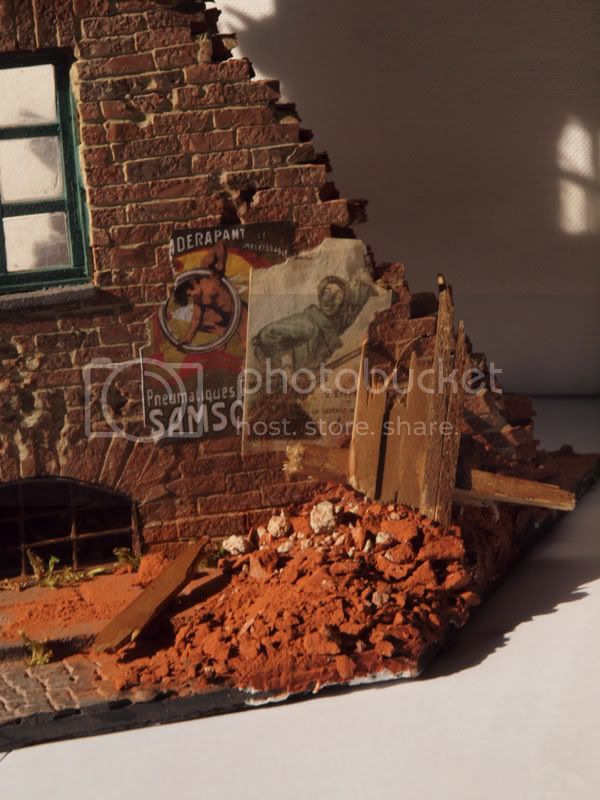
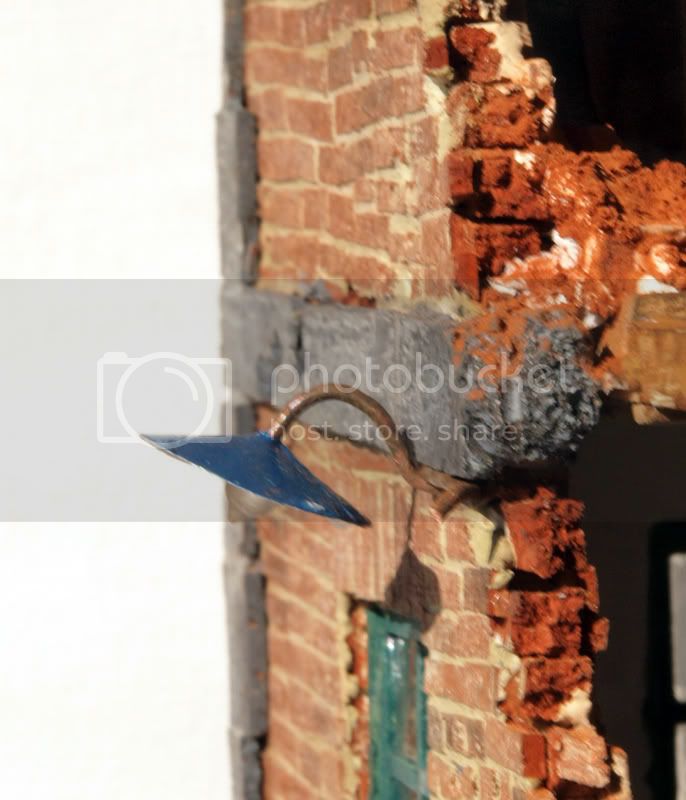
The ad were downloaded and resized, but I fear that the paper onto which I printed them is too thick... And what about the street lightning? do you think it is appropriate for the time period?
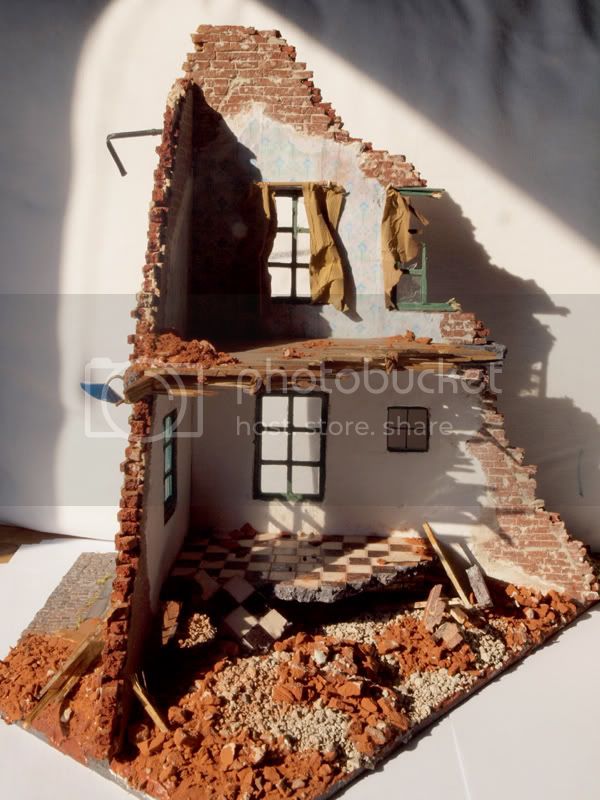

I am still trying to figure out how to make a convincing blanket to put on the bed... I tried with Milliput and looks ok, but the painting is orrible... any suggestion?
Lastly, I'll show you how the figure painting is going...
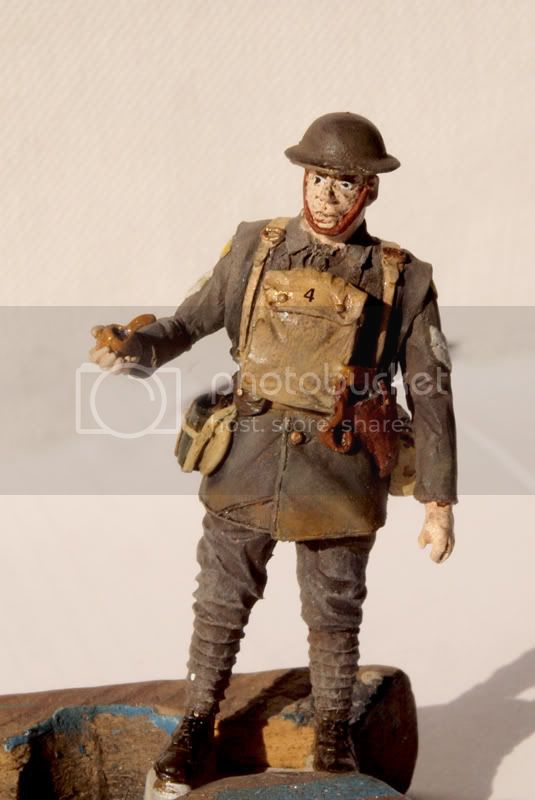


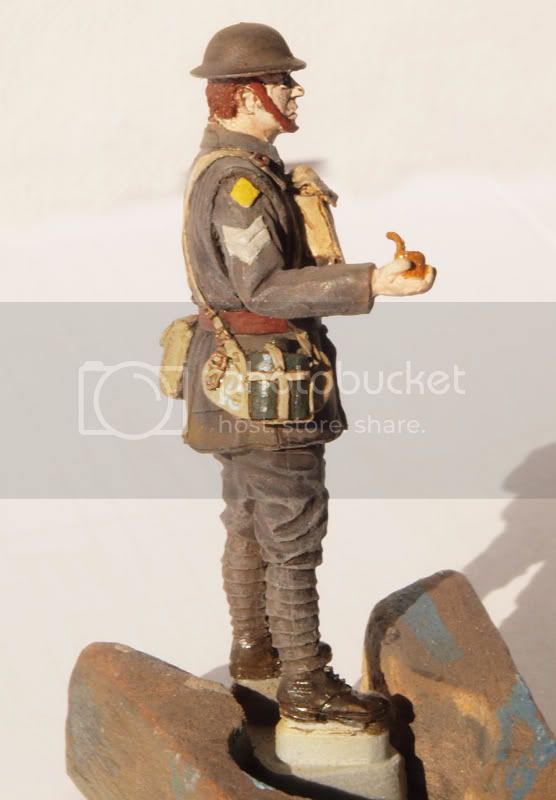
The ranks and insigna are out of Milliput. I still have to add a red "MG" on the yellow square, but not sure how to paint that small...
well,
this is all for now!
thank you for watching!
Ciao
Edo
here is an update of my project.
I'll start with a fiew pics of the plane:
Rigging was done with mono on the left side and with thin copper wire on the right one. In this way I hope to give it a more twisted shape once in place.
Above you can see the finished engine: btw should the prop be laminated?
Also I fear I have broken the prop a little too short.... as a replacement do you think that using a spare Albatross prop would be appropriate? (at least since it will broken...
)Next a fiew pics of the building
The ad were downloaded and resized, but I fear that the paper onto which I printed them is too thick... And what about the street lightning? do you think it is appropriate for the time period?
I am still trying to figure out how to make a convincing blanket to put on the bed... I tried with Milliput and looks ok, but the painting is orrible... any suggestion?
Lastly, I'll show you how the figure painting is going...
The ranks and insigna are out of Milliput. I still have to add a red "MG" on the yellow square, but not sure how to paint that small...
well,
this is all for now!
thank you for watching!
Ciao
Edo

OEFFAG_153

Joined: February 19, 2010
KitMaker: 1,473 posts
AeroScale: 1,450 posts

Posted: Friday, March 09, 2012 - 10:23 PM UTC
Edo this is lloking brilliant, I especially like the look and feel of the brickwork in the building. Just a small detail, your guns on the Camel seem to be mounted upside down?
Keep it coming, Im really looking forward to more of this
Best regaeds
Mikael
Keep it coming, Im really looking forward to more of this
Best regaeds
Mikael

thegirl
Joined: January 19, 2008
KitMaker: 6,743 posts
AeroScale: 6,151 posts
Posted: Saturday, March 10, 2012 - 01:27 AM UTC
Beautiful Edo !
Mikeal is right , guns are mounted up side down . Not that there is any thing wrong with that , could have been a field mod after the mechanics got all liquored up
Your prop looks fine to me Edo , are you going to have the other pieces laying around in the dio some where ?
Mikeal is right , guns are mounted up side down . Not that there is any thing wrong with that , could have been a field mod after the mechanics got all liquored up
Your prop looks fine to me Edo , are you going to have the other pieces laying around in the dio some where ?
edoardo
Joined: November 30, 2007
KitMaker: 642 posts
AeroScale: 382 posts
Posted: Saturday, March 10, 2012 - 06:22 AM UTC
Terri!
I am so pleased to here from you that I am not angry at all for the machine guns!!!
Now that is a very upsetting ...this is another fault of the kit, to tell the truth...To say nothing of my lack in chaeking any reference at all....
Problem is, with the rigging and all, I don't know if I'll be able to fix it....
Ciao
Edo
thegirl
Joined: January 19, 2008
KitMaker: 6,743 posts
AeroScale: 6,151 posts
Posted: Saturday, March 10, 2012 - 07:18 AM UTC
Hi Edo ,
I guess that would depend on what type of glue used and how much . You might be able to wiggle them free from the cockpit view where less wires are located . If the they come free with out effort repair the glue damaged ares on the guns , repaint and install .
If you find yourself having to pry the parts free , be careful and work slow .
You aren't the only one who has made this mistake , done it myself and I'm pretty confident that I will re-beat this in the future ! You see it's those damn gremlims messing with the instruction sheet middle of the night which up sets me .......
edoardo
Joined: November 30, 2007
KitMaker: 642 posts
AeroScale: 382 posts
Posted: Saturday, March 10, 2012 - 07:47 AM UTC
Ha! Ha! Ha! Terri!
It could surely be the Gremlins, but it is more likely me that got liquered up..
Ciao
Edo
It could surely be the Gremlins, but it is more likely me that got liquered up..
Ciao
Edo
JackFlash
Joined: January 25, 2004
KitMaker: 11,669 posts
AeroScale: 11,011 posts
Posted: Saturday, March 10, 2012 - 10:12 AM UTC
From the "Laws of Modeling 101",
here.
". . .20.) Alcohol & modeling never mix or at minimum you will glue something on upside down. . ."
here.
". . .20.) Alcohol & modeling never mix or at minimum you will glue something on upside down. . ."

AussieReg

#007

Joined: June 09, 2009
KitMaker: 8,156 posts
AeroScale: 3,756 posts
Posted: Saturday, March 10, 2012 - 10:35 AM UTC

Ok, now let me just fit this last part on before I go to bed . . . hold on, I don't recall the P-47 being a biplane !
Alcohol induced double-vision has affected us all at some stage Edo ! I've been following your work here from the start and it is coming together really well. Perhaps the guns were knocked off their mounts in the crash and just happened to land that way ?
Keep up the great work mate.
Cheers, D

edoardo
Joined: November 30, 2007
KitMaker: 642 posts
AeroScale: 382 posts
Posted: Saturday, March 10, 2012 - 08:38 PM UTC
Good morning gentle folks!
Last night i fixed the machine guns.
It was not that hard as i previously supposed... I was not able to de- glue it and resolved to cut off the muzzle, drill a little hole in it and insert a bit of copper wire, then reposition it un the lower part of the MG body...
Well, at least it is not so evident as before....
I'll post some pics....
Next night I'll invite you all over at the Modelling Cafe, for a round of drinks!
Cheers mate!
Edo
edoardo
Joined: November 30, 2007
KitMaker: 642 posts
AeroScale: 382 posts
Posted: Monday, March 26, 2012 - 07:08 PM UTC
Hi all!
it has been a while from my last update and now it is time for the final stages.
As it happens, when I get close to completion, I tend to oversee the small details as I am already thinking of my next project... so, even if I know that much could be added, here are the last picture for this diorama....
First of all a couple of pics of the finished plane:


Then the figures:


an everpresent fellow...

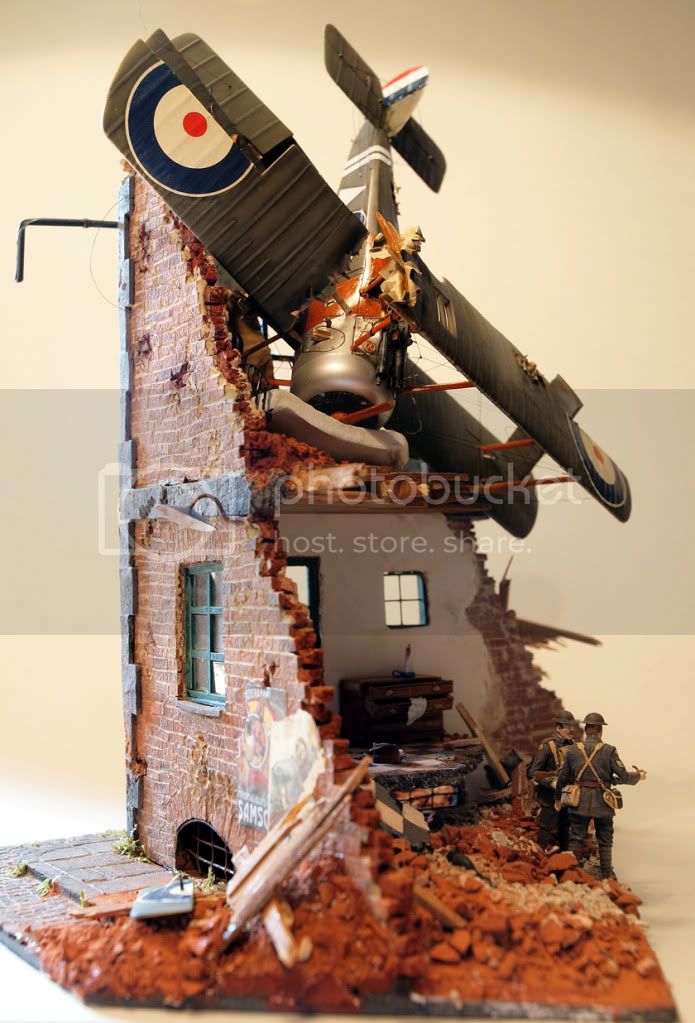
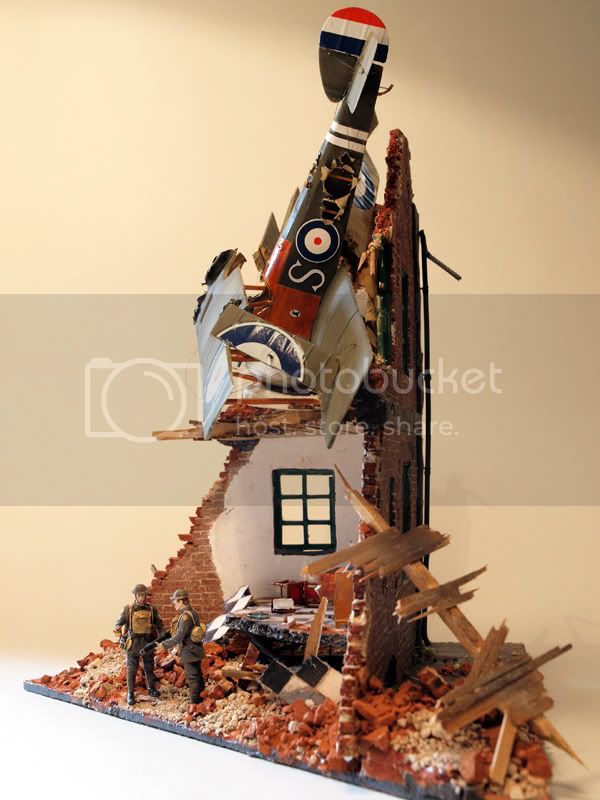
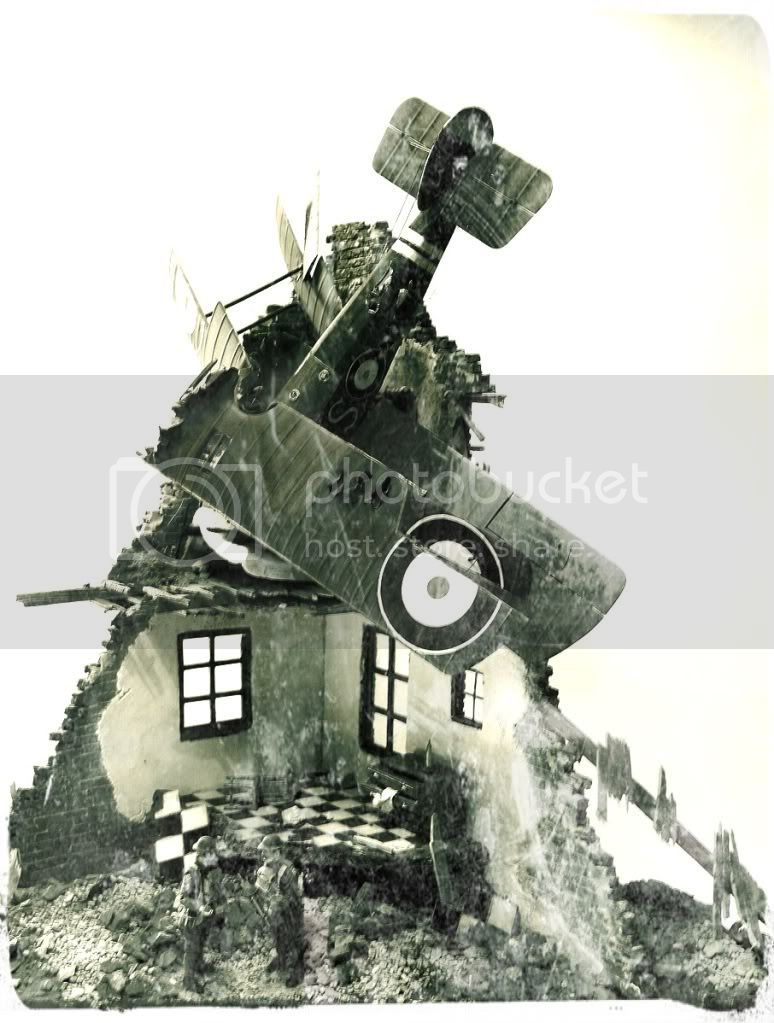
And now... (roll of drums, please)... here is the finshed diorama...


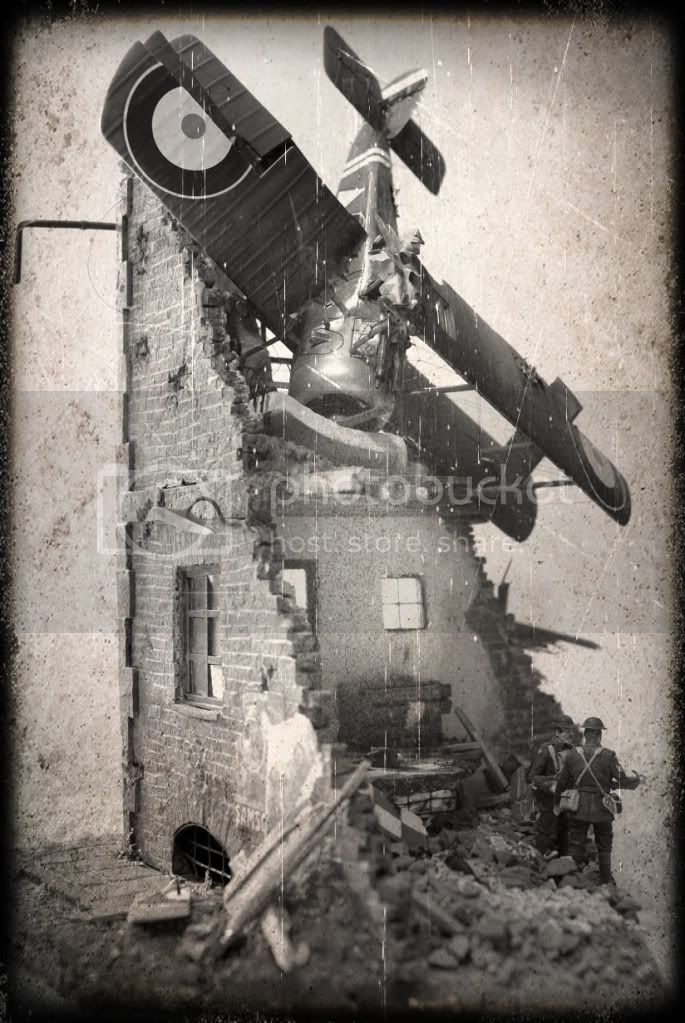
And lastly, a couple of historical images...
And that is all, dear fellow modellers.
Hope you enjoy it as much as I have...
So long, till next time!
ciao
Edo
it has been a while from my last update and now it is time for the final stages.
As it happens, when I get close to completion, I tend to oversee the small details as I am already thinking of my next project... so, even if I know that much could be added, here are the last picture for this diorama....
First of all a couple of pics of the finished plane:
Then the figures:
an everpresent fellow...
And now... (roll of drums, please)... here is the finshed diorama...
And lastly, a couple of historical images...
And that is all, dear fellow modellers.
Hope you enjoy it as much as I have...
So long, till next time!
ciao
Edo
OEFFAG_153
Joined: February 19, 2010
KitMaker: 1,473 posts
AeroScale: 1,450 posts
Posted: Monday, March 26, 2012 - 07:15 PM UTC
Brilliant stuff Edo this is one epic build and the result is quite stunning. I love the way the diorama builds up high, with the camel balanced on top!
Looking forward to what you will do next.
Best Regards
Mikael
Looking forward to what you will do next.
Best Regards
Mikael

GhostHawk

Joined: January 27, 2011
KitMaker: 268 posts
AeroScale: 264 posts
Posted: Monday, March 26, 2012 - 10:40 PM UTC
Yes Sir...!
It was VERY enjoyable...!!!
Thanks For Share...!
Bye
Diego
It was VERY enjoyable...!!!
Thanks For Share...!
Bye
Diego

gajouette
Joined: February 01, 2007
KitMaker: 365 posts
AeroScale: 356 posts

Posted: Tuesday, March 27, 2012 - 08:02 AM UTC
Edo,
Congratulations my friend your diorama is awesome my friend.I'm very much impressed with how you did the building and all that debris. You did a real justice to the Camel too.
Highest Regards,
Gregory Jouette
Congratulations my friend your diorama is awesome my friend.I'm very much impressed with how you did the building and all that debris. You did a real justice to the Camel too.
Highest Regards,
Gregory Jouette
dolly15
Joined: May 20, 2004
KitMaker: 8,227 posts
AeroScale: 3,915 posts
Posted: Tuesday, March 27, 2012 - 09:32 AM UTC
Nice one ! Love the story too! a nice smooth landing right on the mattress.

JPTRR
#051

Joined: December 21, 2002
KitMaker: 7,772 posts
AeroScale: 3,175 posts
Posted: Tuesday, March 27, 2012 - 02:49 PM UTC
Edo,
Great job!
Good job with the seat. I tried stretching nylon stockings over a solid seat once; couldn't see through it but it had nice texture.
The brick work looks super.
I enjoy the story line. You did a fine job!
Great job!
Good job with the seat. I tried stretching nylon stockings over a solid seat once; couldn't see through it but it had nice texture.
The brick work looks super.
I enjoy the story line. You did a fine job!

MrMox

Joined: July 18, 2003
KitMaker: 3,377 posts
AeroScale: 115 posts

Posted: Tuesday, March 27, 2012 - 06:30 PM UTC
A very fine piece of craftsman ship, may I suggest that you find a nice piece of wood and place your diorama on it - something dark and shiny and about 2 cm. high ?
Cheers/Jan
Cheers/Jan

edoardo
Joined: November 30, 2007
KitMaker: 642 posts
AeroScale: 382 posts
Posted: Tuesday, March 27, 2012 - 07:02 PM UTC
Thank you guys!
I really appreciate your support!!
Jan, I never thought of a proper base... I'll follow your tip!
thank you!
ciao
Edo
I really appreciate your support!!
Jan, I never thought of a proper base... I'll follow your tip!
thank you!
ciao
Edo
 |

WEB HOSTING BY


Copyright ©2021 AeroScale and Kitmaker Network, a subsidiary of Silver Star Enterprises
All Rights Reserved. Please read our Conditions of Use and Privacy Policy.
All Rights Reserved. Please read our Conditions of Use and Privacy Policy.