Colorado, United States
Joined: January 25, 2004
KitMaker: 11,669 posts
AeroScale: 11,011 posts
Posted: Friday, December 23, 2011 - 02:57 AM UTC

Most of you are familar with my desk set up. I thought we might discuss various methods of storage. With modern companies providing such wonderful options in their kits we always seem to have left over parts and decals. In many cases the problem is labeling. When aplicable I use the box end for aftermarket parts I include for the build.

I also have parts trays labelled with the contents. Typically I use two trays /drawers for one type of kit. Each tray can contain parts for 3-5 kits.
Alb. DIII fuselage (& parts).
Alb. DIII wings (& parts).
Fok.Dr.I fuselage. . .
Fok.Dr.I wings. . .
When various PE parts get to the point where I have many pieces, I separate them and put them edge to edge on the sticky side of masking tape. Then sore them in clear parts bags in the associated parts drawer / tray.

". . .The most important thing is to know why you build and then get the most that you can out of building." via D.D.
Colorado, United States
Joined: January 25, 2004
KitMaker: 11,669 posts
AeroScale: 11,011 posts
Posted: Friday, December 23, 2011 - 03:21 AM UTC
Sometimes I have to modify the tray / drawer to accept the pieces I want to store.
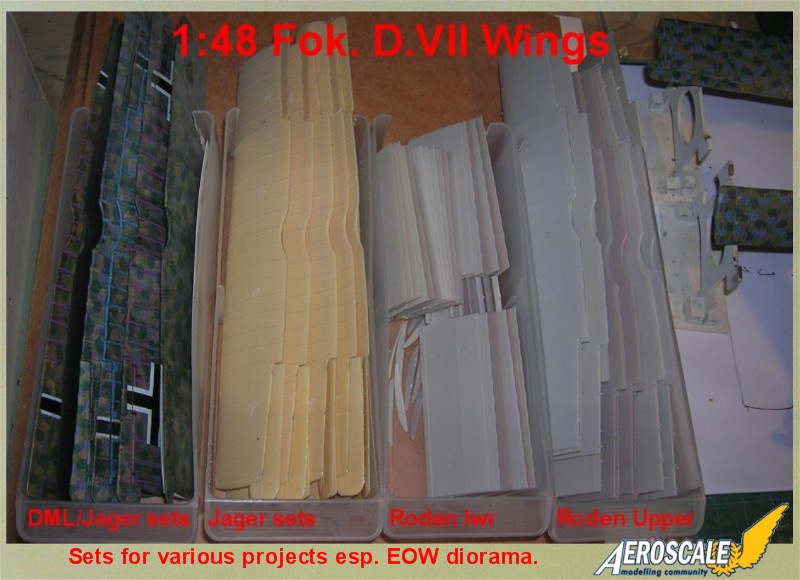
This a case where multiple manufacters require multiple trays/ drawers.
". . .The most important thing is to know why you build and then get the most that you can out of building." via D.D.
Colorado, United States
Joined: January 25, 2004
KitMaker: 11,669 posts
AeroScale: 11,011 posts
Posted: Saturday, December 24, 2011 - 09:43 AM UTC
The main concern with storage is finding what you need when you need it.


". . .The most important thing is to know why you build and then get the most that you can out of building." via D.D.
Colorado, United States
Joined: January 25, 2004
KitMaker: 11,669 posts
AeroScale: 11,011 posts
Posted: Saturday, December 24, 2011 - 10:02 AM UTC
". . .The most important thing is to know why you build and then get the most that you can out of building." via D.D.
Texas, United States
Joined: February 01, 2007
KitMaker: 365 posts
AeroScale: 356 posts
Posted: Saturday, December 24, 2011 - 10:22 PM UTC
Stephen,
Man that's the most orderly work space I've ever seen.Mine looks more akin to Downtown Bagdad. I'm curious though are a wings and bits you've shown from the spares or ongoing works in progress?
Highest Regards,
Gregory Jouette
MERRY CHRISTMAS TO YOU AND YOUR'S

Colorado, United States
Joined: January 25, 2004
KitMaker: 11,669 posts
AeroScale: 11,011 posts
Posted: Sunday, December 25, 2011 - 03:04 AM UTC
Quoted Text
Stephen,
Man that's the most orderly work space I've ever seen.Mine looks more akin to Downtown Bagdad. I'm curious though are a wings and bits you've shown from the spares or ongoing works in progress?
Highest Regards,
Gregory Jouette
MERRY CHRISTMAS TO YOU AND YOUR'S
Greetings Gregory,
It is a little of both. Whenever I want to I can do some work on any subject I fancy. If something requires radical changes from factory schemes or when it comes to uniting fuselage & wings I slip them into the bigger drawers and have notes on each subject. It tends to keep the stalled builds to a minimum.
". . .The most important thing is to know why you build and then get the most that you can out of building." via D.D.
Colorado, United States
Joined: January 25, 2004
KitMaker: 11,669 posts
AeroScale: 11,011 posts
Posted: Sunday, December 25, 2011 - 03:10 AM UTC
Remember these from the wood grain 101 application thread?

In a matter of days this was finished.

". . .The most important thing is to know why you build and then get the most that you can out of building." via D.D.
Västra Götaland, Sweden
Joined: February 19, 2010
KitMaker: 1,473 posts
AeroScale: 1,450 posts
Posted: Wednesday, December 28, 2011 - 02:56 AM UTC
Interesting thread Stephen, and good tips on how to store things.
The PE bits in a binder with instructions, is brilliant. I shall do a similar setup. As it is now I keep them all in piles in boxes, where they get tangled into eachoter. . . Not a good system. At all. . .
Best Regards and seasonal greetings
Mikael
P.S Very nice Albatros thats an interesting marking I've not seen before?
_________________________________________________________
Just finished the Wingnut Wings Taube. On to the Junkers D.1
Colorado, United States
Joined: January 25, 2004
KitMaker: 11,669 posts
AeroScale: 11,011 posts
Posted: Wednesday, December 28, 2011 - 05:53 AM UTC
Thanks Michael,
The insignia is the HGW bird from their decals. Strictly fantasy as a personal insignia. Though one fellow from Jasta 10 had a mono-toned eagle motif standing on a rock with its wings spread.
". . .The most important thing is to know why you build and then get the most that you can out of building." via D.D.
Alberta, Canada
Joined: July 26, 2010
KitMaker: 1,032 posts
AeroScale: 1,025 posts
Posted: Thursday, December 29, 2011 - 04:54 AM UTC
Stephen,
This is great and helpful stuff; keep it coming!
I use the binder approach with sleeves for decals and, like Mikael, will be setting up spare PE in another.
Great thread!
Cheers,
Lance
Officially Retired as of 20 August 2013 and looking forward to some un-interrupted bench time. Currently starting Roden's Nieuport 28 and hoping to follow that with another WNW Fokker DVII.
Arizona, United States
Joined: December 12, 2008
KitMaker: 1,423 posts
AeroScale: 1,319 posts
Posted: Sunday, January 01, 2012 - 04:07 PM UTC

Hello Stephen:
I like your idea of storing the PE in the binder in the baggies with instructions. Thanks for sharing your work space tips with us, I plan on incorporating some of them into my now limited work space.
Best
Mark
We few, we happy few........
Indiana, United States
Joined: May 14, 2007
KitMaker: 3,117 posts
AeroScale: 2,270 posts
Posted: Wednesday, January 04, 2012 - 11:36 AM UTC
Hello all, I am still hanging around here. I am ready to paint my new sanctuary. I think I will try to get everything masked up tomorrow. Then I will be builing the modeling desk. The idea of putting PE in Binders is fantastic, and will be intigrated into my new work area.
"Treat 'em Rough", Current Builds--Wingnut Rumpler
I am frequently seen with blood shot eyes from staying up past my nap time to get the right colour scheme on my latest WWI model?
Alberta, Canada
Joined: July 26, 2010
KitMaker: 1,032 posts
AeroScale: 1,025 posts
Posted: Wednesday, January 04, 2012 - 03:20 PM UTC
Carl,
I bought another binder today for PE; don't know why I hadn't thought of it sooner as I've done decals that way for years.
Could/would you publish a few Pics of your new workspace and desk as it comes together, I always get something great out of each new set up and may be forced into a move soon thus am gathering ideas for the next potential workspace.
Cheers ( and good luck with the re-build)
Lance
Officially Retired as of 20 August 2013 and looking forward to some un-interrupted bench time. Currently starting Roden's Nieuport 28 and hoping to follow that with another WNW Fokker DVII.
Colorado, United States
Joined: January 25, 2004
KitMaker: 11,669 posts
AeroScale: 11,011 posts
Posted: Thursday, January 05, 2012 - 03:47 PM UTC
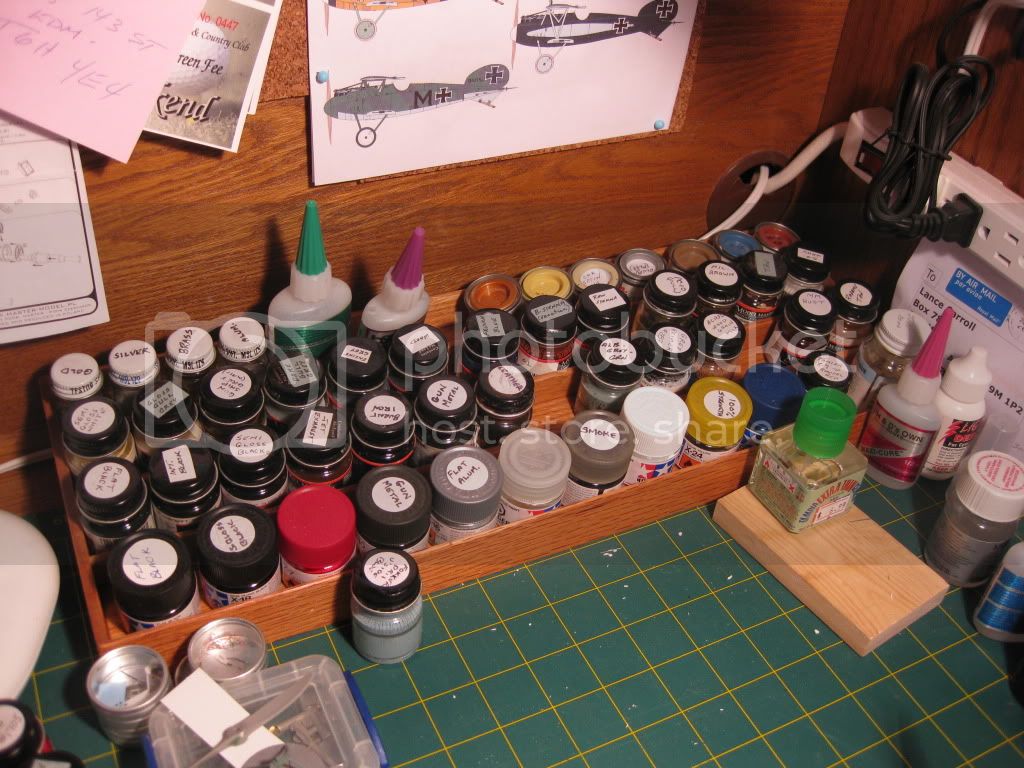
Work Space tips can include what we do with our tools as well. Note the method I use for the Micro Sol & Set, accelerator and one bottle of cyano (superglue) in the upper area of this image. Simply "X" cut into a new sponge and insert your closed bottle into the cut and it saves you from accidental spills. Especially if the sponge is trapped in a limited space. Mine is a Testors paint tray, my paint storage and an Xacto knife box.

". . .The most important thing is to know why you build and then get the most that you can out of building." via D.D.
Colorado, United States
Joined: January 25, 2004
KitMaker: 11,669 posts
AeroScale: 11,011 posts
Posted: Friday, January 06, 2012 - 06:59 AM UTC

Here is an older view.
". . .The most important thing is to know why you build and then get the most that you can out of building." via D.D.
Colorado, United States
Joined: January 25, 2004
KitMaker: 11,669 posts
AeroScale: 11,011 posts
Posted: Sunday, January 08, 2012 - 04:46 PM UTC
Now let me ask you, what are your nightmares or problem areas around your work space? Maybe we can help each other with solutions we use.
". . .The most important thing is to know why you build and then get the most that you can out of building." via D.D.
Västra Götaland, Sweden
Joined: February 19, 2010
KitMaker: 1,473 posts
AeroScale: 1,450 posts
Posted: Sunday, January 08, 2012 - 08:25 PM UTC
Hello Stephen
Well one area that I could improve on my own desk, is storing my paint jars in a better way, so that I get an overview of what I have, and can pick out the one I need. I see from your pics that you have some sort of a storage rack?
Problem is I don't have a wall nor a desk of drawers to stack this in, so I keep them in an old WNW kit box in two layers, which gets messy...
I frequently think I've run out of some paint only to get back from the hobbyshop and find one I did'nt see in the bottom...
Any suggestions most welcome
Mikael
_________________________________________________________
Just finished the Wingnut Wings Taube. On to the Junkers D.1
Alberta, Canada
Joined: July 26, 2010
KitMaker: 1,032 posts
AeroScale: 1,025 posts
Posted: Monday, January 09, 2012 - 01:44 AM UTC
Quoted Text
Work Space tips can include what we do with our tools as well. Note the method I use for the Micro Sol & Set, accelerator and one bottle of cyano (superglue) in the upper area of this image. Simply "X" cut into a new sponge and insert your closed bottle into the cut and it saves you from accidental spills. Especially if the sponge is trapped in a limited space. Mine is a Testors paint tray, my paint storage and an Xacto knife box.
Well, I must endorse Stephen's solution to the storing/supporting of Microset and Sol etc by way of a contemporary example. Last night I applied the decals to my DR.1 and managed to add an hour or more to the task by knocking over a bottle of Microset! Worse, I had several cut out and ready to go decals adjacent...managed to salvage all but one, more of which in my next Thread update. I liked the idea but of course elected to look for a chunk of foam later (why do something now when you can put it off til later.....that's why!)
As for Mikael's paint storage comment, I can relate. Anyone want to buy some various Model Master khaki's? I have over a dozen of assorted shades for the very same reason.
Great stuff Stephen; hope others can add more tricks of the trade.
Cheers,
Lance
Officially Retired as of 20 August 2013 and looking forward to some un-interrupted bench time. Currently starting Roden's Nieuport 28 and hoping to follow that with another WNW Fokker DVII.
Alberta, Canada
Joined: July 26, 2010
KitMaker: 1,032 posts
AeroScale: 1,025 posts
Posted: Monday, January 09, 2012 - 11:29 AM UTC
Quoted Text
Hello Stephen
Well one area that I could improve on my own desk, is storing my paint jars in a better way, so that I get an overview of what I have, and can pick out the one I need. I see from your pics that you have some sort of a storage rack?
Problem is I don't have a wall nor a desk of drawers to stack this in, so I keep them in an old WNW kit box in two layers, which gets messy...
I frequently think I've run out of some paint only to get back from the hobbyshop and find one I did'nt see in the bottom...
Any suggestions most welcome
Mikael
Mikael,
I can offer a partial solution to your paint storage challenge. I built a "stepped" tray (about 2 inches higher at the back) to keep the most frequently used or project related paints close by; the rest are stored in the desk drawers. It helps a lot given my very limited work space as you can see in the photos. I use a roll-top desk with lighting etc installed to give the ability to close it up when the Grand Children visit or when "Mrs" thinks it's getting to be an eyesore.
I'm considering adding a vertical rack in behind as I need more room for paints at times as you can see by the extras scattered about. The vertical also appeals if the jars are partially on their sides and can be turned occasionally to keep the pigments from completely settling. (point made by Stephen several months ago)
Overall shot, as you can see it's located well out of the immediate work surface.

and a closer view, it's sloped "downhill" from the back.
Hope this might help.
Cheers
Lance
Officially Retired as of 20 August 2013 and looking forward to some un-interrupted bench time. Currently starting Roden's Nieuport 28 and hoping to follow that with another WNW Fokker DVII.
Colorado, United States
Joined: January 25, 2004
KitMaker: 11,669 posts
AeroScale: 11,011 posts
Posted: Monday, January 09, 2012 - 04:37 PM UTC
Greeting Mikael & Lance,
My paint storage is an old Chemistry set metal box with a latch. I sore the paint on its side and turn them every few weeks. I also use the top of the bottle lid to display the paint in the bottle. In its dried condition I an able to make better choices on what shade to use.
I know one older modeler that stores his paint bottles upside down, standing on the bottle lid / top. His explaination is that the distillate thinners in the paint rise to the top of the fluid and can't dissapate or escape over time - drying out the paint.
Using a WNW kit box and having at least 2 levels of paint bottles tells me that you have a lot of paint. Try using smaller boxes and have just one type of colour in each box. stack them so that with lables on the side panels you can get to the ones you want quickly. One box reds, one box greens, one box metalizers, one box yellows, etc, etc.
If these are like the old Eduard kit boxes you can simply have the top upside down then put the bottom in the inverted top as a reinforcement then after labeling divide the colours up in a manner thats convienient for you.
Lance I feel your pain. Exactly why I went with the sponge years ago.
". . .The most important thing is to know why you build and then get the most that you can out of building." via D.D.
Västra Götaland, Sweden
Joined: February 19, 2010
KitMaker: 1,473 posts
AeroScale: 1,450 posts
Posted: Monday, January 09, 2012 - 09:23 PM UTC
Stephen and Lance Thank You for those suggestions on storing paint jars.
Lance you seem to have a pretty tidy workspace I dont think the Mrs could be too unhappy with your desktop

( Mine closes the door to the study when we have guets, telling them they can't under any surcumstances enter (as if there was some sort of bio hazard or bad accident in there

)
I think I'll do an inventory of my jars tucking away the ones I don't need on my desk. Sorting them by colour seems a good idea some I only use very seldom, others like CDL a lot more frequent. Small boxes for each category possibly stacked on a tray like Lance... Yup I think this is the way to go!
Thanks again guys!
Mikael
_________________________________________________________
Just finished the Wingnut Wings Taube. On to the Junkers D.1
Colorado, United States
Joined: January 25, 2004
KitMaker: 11,669 posts
AeroScale: 11,011 posts
Posted: Monday, January 16, 2012 - 02:36 PM UTC
While I have asked you to share your problems, let me ask you to share your work space tips. Things that help you file and then later find your project's details & parts.
Now we all use our kit boxes. But with my method I can have multiple kits under construction or semi finished in the parts drawers you see in my previously posted images. But I can use a kit box to store multiples of a kit the box represents. For instance I have one box from the Eduard Alb. D.III Profi pack that has bagged plastic trees for 3-4 Alb. D.III plastic kits. The detail parts go in the drawers and the decals go in the 3 ring binders. It saves space and yet allows you to pick and choose your projects as you choose.
Maybe there is a colour scheme you want to build. Going to your decal storage binders gives you a good indication of what you can do right away. Say you get a set of aftermarket decals and there is one or more choices you want to build. You may have a fuselage all closed up and ready for outer surface details. Viola! You have your project half finished. Some wings can be partially painted (undersurface lt. blue) or decal covers (4 or 5 lozenge) or leave them unpainted for solid surface paint later.
". . .The most important thing is to know why you build and then get the most that you can out of building." via D.D.
Colorado, United States
Joined: January 25, 2004
KitMaker: 11,669 posts
AeroScale: 11,011 posts
Posted: Monday, January 16, 2012 - 02:53 PM UTC
I also keep a running text document about what I have built, what year and some detail variations I included in the build.
Below is a sample of the document I have for future builds and what I want to do.
"1.Albatros C.III Wood veneer two toned wings. Diorama "The Good Comrade"- German- shot up-dead observer, being lifted out while the aircraft is loaded, re-fueled, rearmed, patched? X.
2.Albatros C.III Over all Lt. Blue on a Gimble table. Diorama An Advanced Gunnery Training. X.
Albatros D.V & D.Va
1. xxxx/17 Ltn. Dilthey J.40 CO April 1918 OTF 10/3/213 Loz. Grn/Wht. X
2. xxxx /17 Ltn. Udet J.37 CO. Nov.1917 Lozenge-All Black-LO. X.
3. xxxx /17 Ltn. Vallendor J.2 May-June1917 2 toned wings Zebra. X.
4. 4693/17 MvR JG.I CO Nov. 1917 Lozenge-Fuselage 2/3 red. X.
5. 2059/17 MvR JG.I CO Sept 1917 Lozenge wings -Fuselage All red. X.
6. 1177/17 MvR JG.I CO June 1917 All red-translucent. X.
7. 7343/17 Ltn.Naether J.62 CO April 1918 2 toned - black fuselage-flag. X.
8. xxxx/17 Vzfw Rumey J.5 2 toned w/B&W ribbon stripes X
9. 5787/17 Ltn.Kolb J.76b 1918 Lozenge "München Kindl". X.
10.xxxx/17 Ltn. Mendel J.15 6-20.8 1917 Lozenge skull n bones -fuse. black. X. . .
The "X" notes thatI have the kit in hand to work from.
". . .The most important thing is to know why you build and then get the most that you can out of building." via D.D.
Colorado, United States
Joined: January 25, 2004
KitMaker: 11,669 posts
AeroScale: 11,011 posts
Posted: Monday, January 16, 2012 - 03:08 PM UTC
For me (and maybe other kit reviewers that contribute regularly), I keep track of my reviews and even though there is a link to access these I posted here I try to keep track of items that I have that need to be reviewed. Here is a copy of my complete list for 2011.
My kit reviews for 2011.
Book Reviews:
FMP / Paladin Pfalz a/c in WWI. done
Karaya Junk. D.I done
T. Crean Voss & Jasta 10 done
Richthofens Circus Osprey done
RFC - RAF 60 Sqn Osprey done
Aber gun detail sets:
A32 017 2 @ Browning M2 50 cal machine gun barrels for aircraft. done
A32 040 2 @ Spandau Maxim for aircraft 1915-18. done
A32 050 6 @ 20mm barrels M61A modern US aircraft Electric minigun
rotating barrels. done
A32 106 2 gun barrels & pitot tube for Japanese A6M5 Zero aircraft. WWII. done
A32 110 Guns for ME / bf 110 C or D versions. done
A48 008 4@ barrels for German Oerlikon 20mmMG FF with sights. done
A48 012 2 barrels for 7.7 mm Japanese type 97 aircraft MGs. done
A48 105 E wing (late) armament for British Spitfire Mk.22/24. done
A48 113 Armament for German ME bf 109 G-4 thru K-8. done
Aerobase
#48001 Strip down Fokker Dr.I PE brass set done
Aeroclub 1:48 & etc.
Sopwith Pup done
STRUTZ done
Americal / Gryphon 1:48
Austro-Hungarian No. 136 Fliks 62 -71 done
DB lozenge decals 1:32
5 colour upper & lower done
FCM decals 1:48
Austro-Hungarian Sworl Autumn leaf done
Albatros D. set #48-16 done
Albatros D. set #48-17 done
WNW kits 1:32
Pfalz D.IIIa done
Roland D.VIa done
RE 8 done
HB W.29 done
DH 9a done
Pfalz D.XII done
WNW lozenge decals 1:32
5 Colour upper & lower done
Rib tapes done
WNW decals 1:32
#30013 Albatros D.V done
#30014 Albatros D.V done
#30015 Albatros D.V done
#30017 Albatros D.Va done
#30018 Albatros D.Va done
#30019 Pfalz D.IIIa part 1 done
#30020 Pfalz D.IIIa part 2 done
HGW 1:32
Alb. Seatbelts & etc done
SE 5a Seatbelts done
Sutton Farm harness A done
Sutton Farm harness Q done
Rib tapes & stitching done Roden kits
Instrument bezels done
Eduard 1:48
Albatros D.III Oeffag Weekend done
DH 2 Profipack done
HGW 1:48
Rib tapes & stitching done Roden kits
Wood Grain decal Albatros D.III Oeffag done
Wood Grain decal Albatros D.V / Va done
Mirage 1:48 munitions
Light duty munitions done
Heavy duty munitions done
Mirage 1:48 decals
Oeffag Sworl (spring pattern) done
Master 1:32 gun detail sets
Spandau Maxim done
Parabellum 14 done
Parabellum 14/17 done
Roden 1:72
Nieuport 24bis done
Nieuport 24 done
Roden 1:35
Rolls Royce A/C 1914 done
Roden 1:32
Nieuport 24bis #611 done
Roden 1:48
Beech 442 done
Pilatus 443 done
Pilatus 444 done
Beech 447 done
Roden 1:144
DC 7C 301 done
DC 7C 303 done
The Micro group
Laminated wood propellers. done
Uschi
Uschi Wood decals - coarse done
Builds:(?)
Eduard 1:48
Alb. D.I Prince Karl Freidrich of Prussia done
Alb. D.II Uschi Wood grain decals done
Alb. D.III Oeffag 153.265 Mirage Sworl, HGW wood grain decals done
WNW 1:32
Junkers J.I CAS 816/17 Master Parabellum 14/17 (1) and Spandau (2) done
". . .The most important thing is to know why you build and then get the most that you can out of building." via D.D.
Alberta, Canada
Joined: July 26, 2010
KitMaker: 1,032 posts
AeroScale: 1,025 posts
Posted: Tuesday, January 17, 2012 - 06:25 AM UTC
Take a look at my "Laser Cut Paint Rack" article. Great little concept I thought would have been better placed here. A far better set up then any I've seen for "horizontal" storage and access of paints on the work bench.
Cheers,
Lance
Officially Retired as of 20 August 2013 and looking forward to some un-interrupted bench time. Currently starting Roden's Nieuport 28 and hoping to follow that with another WNW Fokker DVII.


