


Early Aviation
Discuss World War I and the early years of aviation thru 1934.
Discuss World War I and the early years of aviation thru 1934.
Hosted by Jim Starkweather
KotS GB 2012: HP Heyford - warreni

mike_espo

Joined: September 26, 2011
KitMaker: 125 posts
AeroScale: 115 posts
Posted: Monday, February 27, 2012 - 07:33 AM UTC
Best of luck with this one.....can't wait to see your progress!

warreni

Joined: August 14, 2007
KitMaker: 5,926 posts
AeroScale: 2,201 posts

Posted: Thursday, March 15, 2012 - 01:22 PM UTC
Greetings one and all.
Making steady progress and have got many sub-assemblies together (photos later). I am not too sure how good the Chinese decals will be so I ordered a Revell version of the kit just in case as I have heard the decals in the Revell kit are very good..
Fit of most of the parts is good with some notable exceptions like the back cockpit wall being too wide for the narrow fuselage, and the locating pin for the rear of the cockpit area being out of position. Both problems were cured with a quick snip of the Xuron cutters.
Is going to need a far bit of filler for the sides of the fuselage, although the good ole scraper may do the job as well.
More news as it comes to hand.
warreni
Joined: August 14, 2007
KitMaker: 5,926 posts
AeroScale: 2,201 posts
Posted: Saturday, March 17, 2012 - 11:16 AM UTC
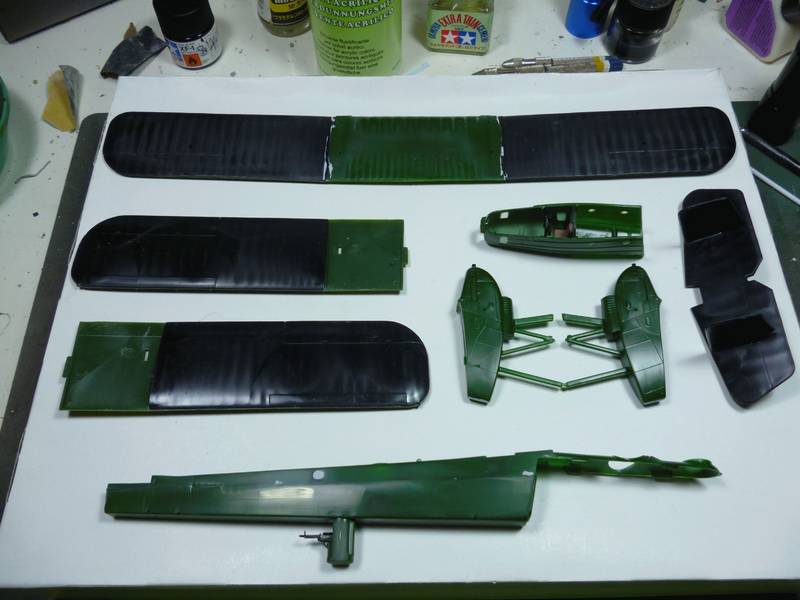
There are the sub-assemblies I was typing about. I have since finished the undercarriage and the fuselage is also all together. Now the fun begins putting the whole shebang together. Then I will paint it and wait for the other Heyford to get here, although I think I will try the chinese decals as they may be fine.
Cheers
Warren
warreni
Joined: August 14, 2007
KitMaker: 5,926 posts
AeroScale: 2,201 posts
Posted: Saturday, March 17, 2012 - 09:11 PM UTC
Hi everyone.
Got a bit more done on the Heyford between sessions on the Cerberus.
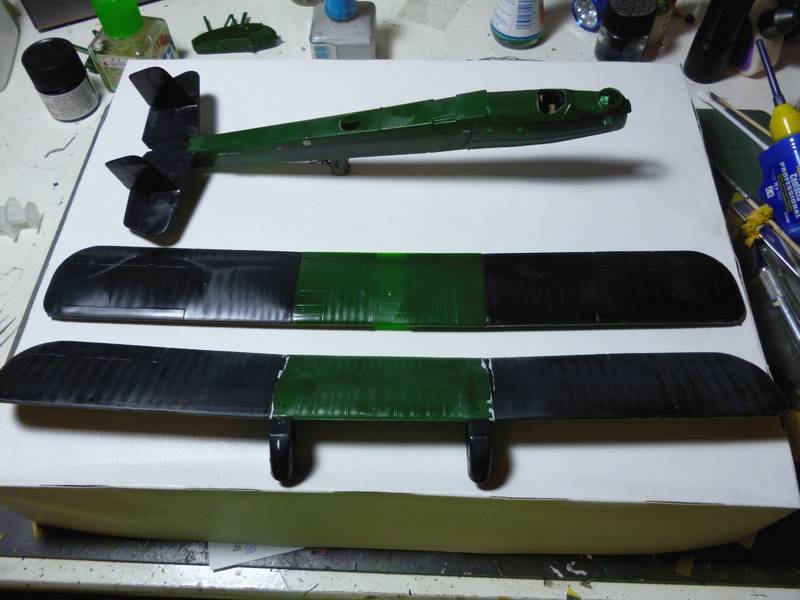
Fit of most of the large parts is pretty good. I have since fitted the upper wing to the fuselage and I don't think it will require any filler!
Hopefully I will get the rest of the assembly done during the week then it will be just the painting, which should be very simple as it is the same colour all over, and attaching the fiddly bits.
Cheers and thanks for looking
Warren
Got a bit more done on the Heyford between sessions on the Cerberus.
Fit of most of the large parts is pretty good. I have since fitted the upper wing to the fuselage and I don't think it will require any filler!
Hopefully I will get the rest of the assembly done during the week then it will be just the painting, which should be very simple as it is the same colour all over, and attaching the fiddly bits.
Cheers and thanks for looking
Warren

amegan

#243

Joined: March 21, 2008
KitMaker: 996 posts
AeroScale: 915 posts

Posted: Friday, March 23, 2012 - 10:21 AM UTC
I want one,I want one, looking good.

tinbanger

Joined: February 04, 2008
KitMaker: 2,507 posts
AeroScale: 1,814 posts

Posted: Friday, March 23, 2012 - 11:31 PM UTC
Nice green!
no paint need ,just stick on decals and hange it from the ceiling! like we would have done when were kids
no paint need ,just stick on decals and hange it from the ceiling! like we would have done when were kids


OEFFAG_153

Joined: February 19, 2010
KitMaker: 1,473 posts
AeroScale: 1,450 posts

Posted: Sunday, March 25, 2012 - 07:46 PM UTC
Oh this really brings back some fond memories
Mikael
Mikael
warreni
Joined: August 14, 2007
KitMaker: 5,926 posts
AeroScale: 2,201 posts
Posted: Monday, March 26, 2012 - 06:50 AM UTC
@ Andrew, they are not too hard to pick up on Ebay. Some shops even have them in stock.
@ Richard - yes, that was the way sometimes, but I think I painted stuff from the very start. They may not have been the most accurate colours, but.. I do remember many kits didn't get painted though as they were already moulded in the right colour, like the AIrfix DH,88 COmet that was red, F4U Corsair moulded in deep blue, and the list goes on and on.
@ Hope they are good memories Mikael.
@ Richard - yes, that was the way sometimes, but I think I painted stuff from the very start. They may not have been the most accurate colours, but..
I do remember many kits didn't get painted though as they were already moulded in the right colour, like the AIrfix DH,88 COmet that was red, F4U Corsair moulded in deep blue, and the list goes on and on.@ Hope they are good memories Mikael.
warreni
Joined: August 14, 2007
KitMaker: 5,926 posts
AeroScale: 2,201 posts
Posted: Friday, March 30, 2012 - 04:15 PM UTC
Greetings.
Time for a long overdue update.
First off, replacement of a few broken parts.. When I was removing one of these struts from the sprue it snapped in half and I have never been able to find it again. I found some spare PE from my GBay build and it was exactly the right width to replace the struts, so after a few cuts and a little bend I made two new ones to replace the too-thick original and the broken one.
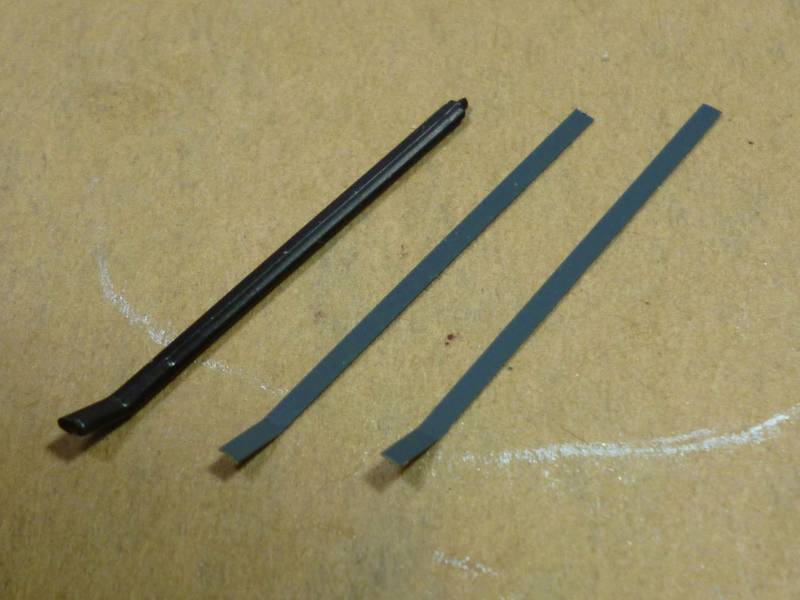
They are a little flat but you can't tell after they have been installed on the Heyford.
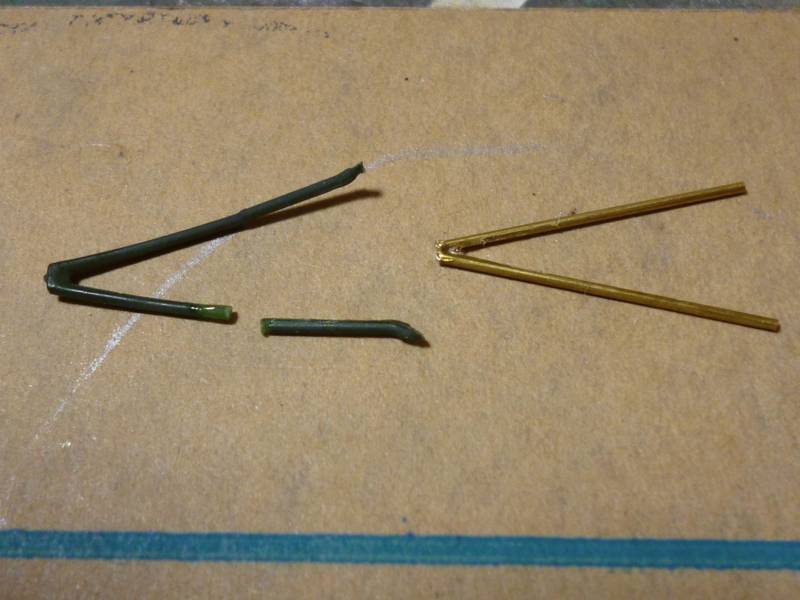
Next up, this wing support strut was broken in half when I opened the kit. One side mended fine with glue but the other wasn't even thinking of sticking. And as you can see the original plastic one was warped anyway. I found the strut was 0.8mm in width and I just happened to have received some 0.8 mm brass pipe during the week to make masts for my HMVS Cereberus. So without further ado I cut them to what I cnsidered the right length, arranged them in the same angle as the original struts and glued them at one end with CA glue, et voila a replacement in brass.
It went into place with a bit of a struggle and I have since painted the whole aircraft green again.
My extra Heyford also arrived during the week and if these Chinese Matchbox transfers turn out to be no good I can use the ones out of the new Revell kit. I also found the original transfers from the 1970s but much of them I used on the original and I wouldn't hold my breath too long to see if they were OK..
More pictures later.
Time for a long overdue update.
First off, replacement of a few broken parts.. When I was removing one of these struts from the sprue it snapped in half and I have never been able to find it again. I found some spare PE from my GBay build and it was exactly the right width to replace the struts, so after a few cuts and a little bend I made two new ones to replace the too-thick original and the broken one.
They are a little flat but you can't tell after they have been installed on the Heyford.
Next up, this wing support strut was broken in half when I opened the kit. One side mended fine with glue but the other wasn't even thinking of sticking. And as you can see the original plastic one was warped anyway. I found the strut was 0.8mm in width and I just happened to have received some 0.8 mm brass pipe during the week to make masts for my HMVS Cereberus. So without further ado I cut them to what I cnsidered the right length, arranged them in the same angle as the original struts and glued them at one end with CA glue, et voila a replacement in brass.
It went into place with a bit of a struggle and I have since painted the whole aircraft green again.
My extra Heyford also arrived during the week and if these Chinese Matchbox transfers turn out to be no good I can use the ones out of the new Revell kit. I also found the original transfers from the 1970s but much of them I used on the original and I wouldn't hold my breath too long to see if they were OK..
More pictures later.
warreni
Joined: August 14, 2007
KitMaker: 5,926 posts
AeroScale: 2,201 posts
Posted: Thursday, April 05, 2012 - 08:50 PM UTC
Hmmm.. best of luck indeed...
Ever had decals wash off an aircraft during a rinse a week after they were applied? I did and am not impressed. After giving it a wash last week (and no decals departing company) I found that the paint had a weird water stain on it. SO I went back to the sink and gave it another wash with a little detergent, et voila decals on the top wing both washed off.. Great .. knew the Chinese decals were dodgy. I inspected the other decals closely and the silvering on the codes under the wings has to be seen to be believed... SO I went to the thirty+ year old Matchbox decals and used roundels from that sheet to replace the two departed ones.
Now I just have to work out how to remove that weird stain.. I really don't want to have to paint it again.. This was supposed to be a quick build ya know..
warreni
Joined: August 14, 2007
KitMaker: 5,926 posts
AeroScale: 2,201 posts
Posted: Friday, April 06, 2012 - 08:50 AM UTC
Well, I am calling this one finished.. It is not perfect but the amount of effort I am putting into it is not giving the results I want. Having to make bits for what was a very cheap model, then having the decals stuff things up (probably because it was a cheap model ) means I have decided to start another build rather than take one step forward and two steps back with this one.
So without further ado here are the piccies!
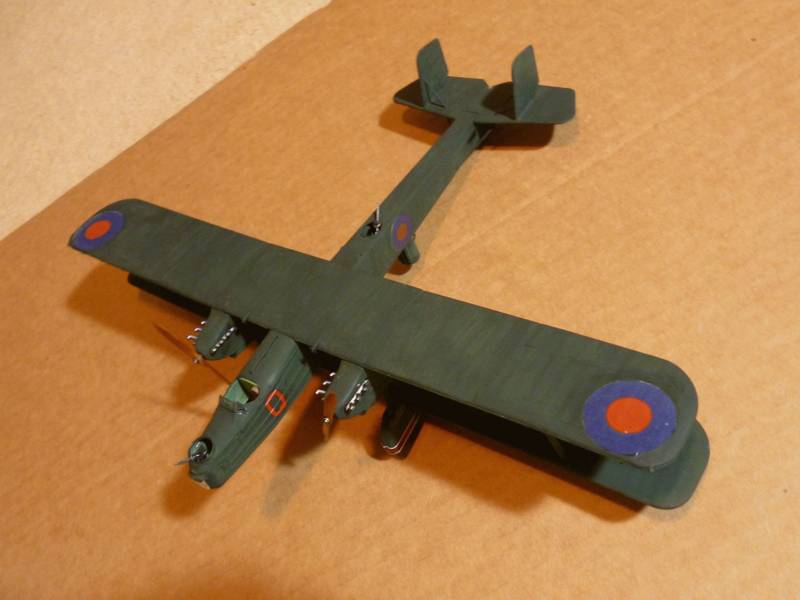

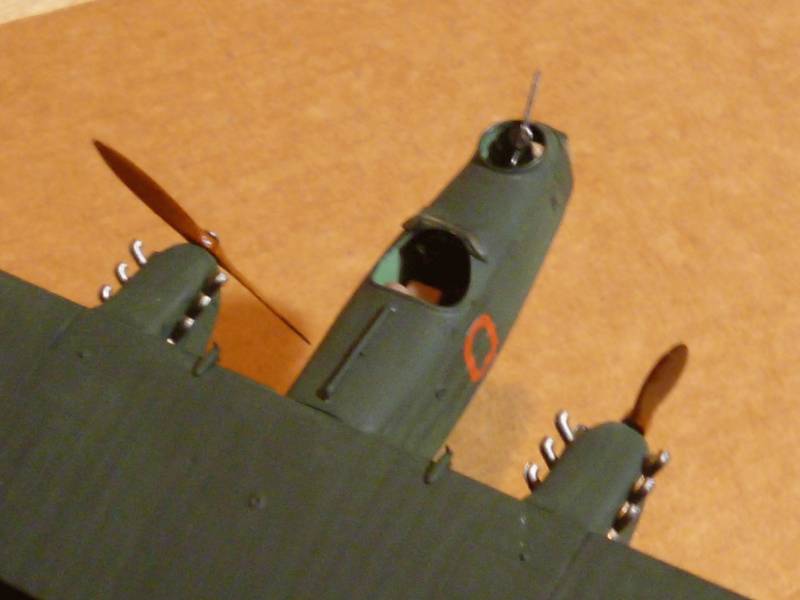
So there you have it. The photos appear to make the paint look blochy and weathered, which is what I was trying to do before the decals did their stunt.. so I suppose at least something worked as I wanted..
Must admit it bought back many memories of a much simpler time in my modelling life.. or is it just time mellowing me? It was over 30 years ago I first built this one.
Anybody want an unbuilt Revell Heyford missing two decals?
) means I have decided to start another build rather than take one step forward and two steps back with this one.So without further ado here are the piccies!
So there you have it. The photos appear to make the paint look blochy and weathered, which is what I was trying to do before the decals did their stunt.. so I suppose at least something worked as I wanted..
Must admit it bought back many memories of a much simpler time in my modelling life.. or is it just time mellowing me? It was over 30 years ago I first built this one.
Anybody want an unbuilt Revell Heyford missing two decals?

thegirl
Joined: January 19, 2008
KitMaker: 6,743 posts
AeroScale: 6,151 posts
Posted: Saturday, April 07, 2012 - 03:31 AM UTC
Warren , for the amount of set backs you had to under take . She turned out Great ! Like how the props turned out , very nice effect on my end of the screen .
warreni
Joined: August 14, 2007
KitMaker: 5,926 posts
AeroScale: 2,201 posts
Posted: Saturday, April 07, 2012 - 10:00 AM UTC
Quoted Text
Warren , for the amount of set backs you had to under take . She turned out Great ! Like how the props turned out , very nice effect on my end of the screen .
Ah! Great to see you back! Thanks for that..
amegan
#243
Joined: March 21, 2008
KitMaker: 996 posts
AeroScale: 915 posts
Posted: Sunday, April 08, 2012 - 09:03 AM UTC
I like it, I would need a little research but it is definitely an aircraft with character

JackFlash
Joined: January 25, 2004
KitMaker: 11,669 posts
AeroScale: 11,011 posts
Posted: Sunday, April 08, 2012 - 02:02 PM UTC
Definately a unique bird at that. And there was probably never one of these kits built so well.

AussieReg

#007
Joined: June 09, 2009
KitMaker: 8,156 posts
AeroScale: 3,756 posts
Posted: Sunday, April 08, 2012 - 07:37 PM UTC
Quoted Text
Anybody want an unbuilt Revell Heyford missing two decals?
Hey Warren, since you've had a practice run, how about you build the other one for my Matchbox Flying Nostalgia Campaign ??


Nice job, BTW, it looks fine to me.
Cheers, D

warreni
Joined: August 14, 2007
KitMaker: 5,926 posts
AeroScale: 2,201 posts
Posted: Sunday, April 08, 2012 - 08:00 PM UTC
Quoted Text
Quoted TextAnybody want an unbuilt Revell Heyford missing two decals?
Hey Warren, since you've had a practice run, how about you build the other one for my Matchbox Flying Nostalgia Campaign ??
Nice job, BTW, it looks fine to me.
Cheers, D
Thanks Andrew and Stephan.
Damien, I have quite a few other planes lined up that I can build for the Nostalgia campaign. Don't worry, I will be participating for sure!
This time though it will be a plane I didn't build back in the seventies, not that there were very many I didn't build.. mainly the large ones as I was only on pocket money back then.

Mgunns
Joined: December 12, 2008
KitMaker: 1,423 posts
AeroScale: 1,319 posts

Posted: Monday, April 09, 2012 - 04:28 AM UTC
 Hello Warren:
I think it looks fine. I know what you mean, you put in the time with minimal results, time to call it quits and move on to the next project with greater satisfaction and results.
Looking forward to your next build.
Best
Mark
guitarlute101
Joined: December 18, 2006
KitMaker: 1,121 posts
AeroScale: 1,063 posts
Posted: Monday, April 09, 2012 - 05:40 AM UTC
Fine show!
Mark

lcarroll
Joined: July 26, 2010
KitMaker: 1,032 posts
AeroScale: 1,025 posts
Posted: Monday, April 09, 2012 - 09:47 AM UTC
Warren,
I've watched this with interest; a trip down memory lane. You've motivated me (along with Damian's Matchbox Campaign comments)to dig around in some old packing boxes and I found a couple of "blasts from the past" for sure. I've dusted off a Matchbox Gladiator done in bright red and beige sprues, decals long gone but I'm sure I can cobble together something. Not yet committed but a weekend project to relax with, build OOB, and just goof around, sounds like fun!
Your Heyford BTW is quite nice; not like you had a great deal to work with for certain, we've come a long way!
Cheers,
Lance
warreni
Joined: August 14, 2007
KitMaker: 5,926 posts
AeroScale: 2,201 posts
Posted: Monday, April 09, 2012 - 02:17 PM UTC
Thanks for the compliments everyone. As you said Mark, better to cut and run than use more precious time on a kit that is kicking and screaming every step of the way.
tinbanger
Joined: February 04, 2008
KitMaker: 2,507 posts
AeroScale: 1,814 posts
Posted: Thursday, April 12, 2012 - 09:24 PM UTC
Well done!
Look's good
Look's good
OEFFAG_153
Joined: February 19, 2010
KitMaker: 1,473 posts
AeroScale: 1,450 posts
Posted: Friday, April 13, 2012 - 04:25 AM UTC
Hello Warren,
Congartulations on finishing - its looking mighty fine, and has the ring of nostalgia. Ah those Matchbox kits
Best regards
Mikael
Congartulations on finishing - its looking mighty fine, and has the ring of nostalgia. Ah those Matchbox kits
Best regards
Mikael
 |

WEB HOSTING BY


Copyright ©2021 AeroScale and Kitmaker Network, a subsidiary of Silver Star Enterprises
All Rights Reserved. Please read our Conditions of Use and Privacy Policy.
All Rights Reserved. Please read our Conditions of Use and Privacy Policy.