_GOTOBOTTOM
World War II: USA
Aircraft of the United States in WWII.
Hosted by Rowan Baylis
Eduard P-38J Over Europe
camogirl
_VISITCOMMUNITY
England - North East, United Kingdom
Joined: October 20, 2005
KitMaker: 1,045 posts
AeroScale: 622 posts
Posted: Sunday, August 12, 2012 - 09:21 AM UTC
Well after doing the in box review for this model see here I could not wait to get cracking on it and have decided to show the build progress through a build blog.

Here we are all set to go


The cockpit is as normal the starting point to any build (well unless your me and most times I have started with the wings)As all the cockpit is glorious Brassin resin I thought it best to get cracking on removing the excess resins from the part, I then had the idea to do this for all the resin parts

Before


and after


The resin was lovely and very easy to work with, it is good quality resin in the past with some mainstream resin manufacturers I have had allergic reactions to it when sawing and sanding but no such problems with this Brassin resin.

Admittedly I got as far as removing the excess from the resin pieces before having to call it a night. It did take me a good two hours to get as far as you see as I wanted to take my time to avoid any damage to the resin. There are some small fragile resin pieces such as rudder pedals etc where care will need to be taken as they could easily snap.Most of the delicate pieces can be removed using a sharp knife blade the larger pieces were removed using an RB Tools fine razor saw (which I temporarily borrowed from tomcat31) Thankfully all the delicate pieces survived in tact.

Hopefully might have an other update tomorrow evening barring how work and the horse goes
DougN1
_VISITCOMMUNITY
Georgia, United States
Joined: August 08, 2011
KitMaker: 410 posts
AeroScale: 409 posts
Posted: Friday, August 17, 2012 - 12:29 PM UTC
Nothing like the fun of parts cleanup eh? Looks like a great kit that is hopefully going to be fun to build!

Doug
bf443
_VISITCOMMUNITY
Idaho, United States
Joined: May 16, 2003
KitMaker: 895 posts
AeroScale: 457 posts
Posted: Saturday, August 18, 2012 - 03:53 PM UTC
I always have liked the Lightning, especially the early models with the streamlined air intakes. The kits I ordered were all sold by the second day of receiving them. I would consider building one in the future if more are made available (it's a limited release item).

While reviewing one of the boxes an item caught my attention and it's very visible one, the kit lacks aftermarket barrels for the cannon and machine guns. That said Eduard did a decent job with the detail parts and decals.

Enjoy the build Sam, I will be watching this with interest.

Brian
Siderius
_VISITCOMMUNITY
Tennessee, United States
Joined: September 20, 2005
KitMaker: 1,747 posts
AeroScale: 1,673 posts
Posted: Saturday, August 18, 2012 - 04:12 PM UTC
Hi Sam, looking forward to seeing your Lightning come out. Even though it's 48 scale! Seriously, it looks like a good kit, I hope you enjoy it. Russell

P.S. I've never worked with resin parts before, I'm told it isn't any big deal, just have to use a super glue like glue to adhere them to each other?
camogirl
_VISITCOMMUNITY
England - North East, United Kingdom
Joined: October 20, 2005
KitMaker: 1,045 posts
AeroScale: 622 posts
Posted: Saturday, August 18, 2012 - 07:02 PM UTC
Hi Russell hoping to get really cracking on it today and nest week as shock horror Ive actually go t a week off work so hopefully the build blog I started will have a fair few updates.

The Brassin resin is really good to work with Ive removed all the casting blocks the one on the cockpit floor took some time. Yep for all resin pieces and photoetch I just use some thick superglue that way you can quickly re align something if it goes squiffy when you put the parts together. Should be at the putting cockpit together stage this afternoon so blog update hopefully
mrockhill
_VISITCOMMUNITY
Pennsylvania, United States
Joined: June 17, 2009
KitMaker: 566 posts
AeroScale: 507 posts
Posted: Sunday, August 19, 2012 - 03:53 AM UTC

Quoted Text

I always have liked the Lightning, especially the early models with the streamlined air intakes. The kits I ordered were all sold by the second day of receiving them. I would consider building one in the future if more are made available (it's a limited release item).

While reviewing one of the boxes an item caught my attention and it's very visible one, the kit lacks aftermarket barrels for the cannon and machine guns. That said Eduard did a decent job with the detail parts and decals.

Enjoy the build Sam, I will be watching this with interest.

Brian


I agree some nice resin guns would have been great, especially such a noticeable feature. Ill be acquiring some for mine. Only thing I can knock it for, beautiful kit otherwise.
camogirl
_VISITCOMMUNITY
England - North East, United Kingdom
Joined: October 20, 2005
KitMaker: 1,045 posts
AeroScale: 622 posts
Posted: Thursday, August 23, 2012 - 09:45 PM UTC
Sorry for lack of updates but have been redoing a room in house where the computer is so it has been packed away. So limited to when I can get online.

Well the cockpit is done but not without a few problems and I think Ive learnt a few new curse words......


All weathered and ready to put together


Think the instrument panel is fab and well detailed


cockpit tub made up


radio bay

Right the main issues I found are the instructions tell you to cut away the cockpit coaming from the plastic part, which I could not understand as all the ref pics I had seen of P-38 J's had coaming. Well I got to the bottom of this as with the coaming the cockpit/ instrument panel will just not fit. All the cockpit parts were correctly aligned and in the correct placings, cockpit floor was as thin a paper and without hacking the instrument panel down to half its height and width it will not fit. As it stands now the canopy will only just fit over the instrument panel.

Coaming issue:


The next problem is for the front of the cockpit to be correctly located onto the academy plastic the radio bay sits too far back one of the radio boxes (the smaller one) ends up practically hidden away in the fuselage:


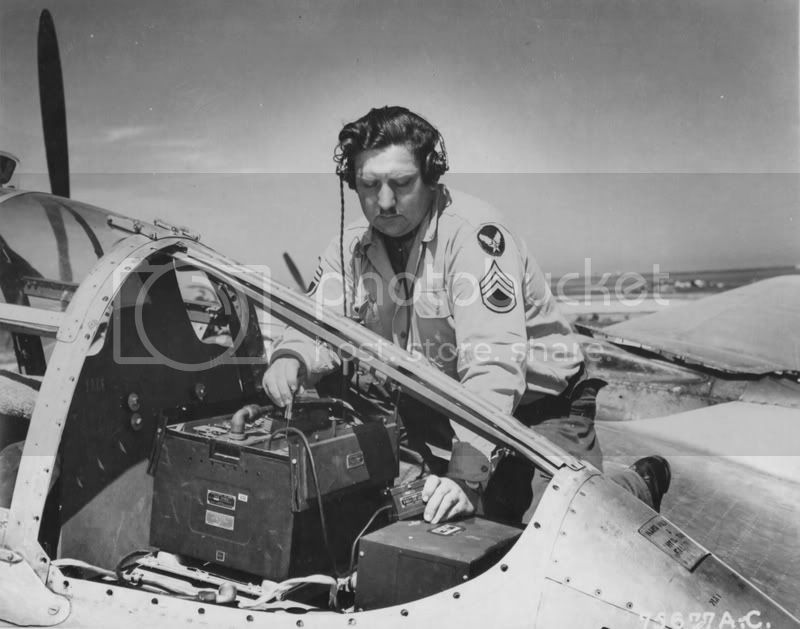
I did while googling for P-38 radio bay images come across some very useful info on a forum and the photo shows a guy working on the radio and both boxes are within the rear canopy for ease of working on and tuning. The pic I am on about is about the 9th post down on the first page:

http://warbirdinformationexchange.org/phpBB3/viewtopic.php?f=3&t=20566

This is the pic from the above forum (both boxes showing clearly in the canopy area)


After all the searching and messing around trying to get the cockpit and the radio bay in the correct places I had to concede defeat and settle with the radio box being hidden away.

At the moment I do feel really disappointed about this everything had been checked, double checked sanded to paper thin pieces all of it is located correctly but its not right. Even the instructions show the smaller box being tucked away into the rear of the fuselage I really can not understand why as like I have said after days and days looking at pics of actual P-38 J radio bays / cockpits and wondering if I had misaligned something all the info I have found shows both boxes clearly sat in the rear of the canopy easily accessible and cockpit coaming. If anyone knows of any other pics of actual aircraft showing what Eduards resin represents can someone please point me in the right direction as it has driven me round the bend. It got that bad Tomcat got drafted in to check the alignments/fit/ actual P-38 pics because I did wonder if I was having an off day.

I also dug out Tomcats Aires cockpit set and compared along side it does appear to be a better fit and size for the Academy kit all round. The Aires offering is one whole cockpit piece including the radio bay already attached and it slots pretty much straight into place, the Aires set also has the instrument panel already set into the cockpit coaming.

Don't get me wrong the Brassin offering has some nice details and does look very nice built up and together as the pics of the cockpit tub show but at the moment it seems to have some accuracy issues with the radio bay and coaming. (until I can find a pic confirming this anyway)

I have decided once I get this Eduard offering finished I will have to sort myself the Academy P-38 J kit out and the Aires set (well I can always "borrow" Tomcats) and Im going to do that as a build blog / comparison to this one I think that would be the fairer option all round.

Hopefully next update should see some photoetch progress into the wheel bays and then I might be ready to start getting it together

I honestly do mean if anyone has some pics of actual P-38 J's minus the coaming in WW2 or the radio bays showing the smaller box being hidden/ tucked away in the fuselage can they please share as it is driving me nuts as Im sure I ve looked at every pic going thats of a supposed P38 J
DougN1
_VISITCOMMUNITY
Georgia, United States
Joined: August 08, 2011
KitMaker: 410 posts
AeroScale: 409 posts
Posted: Friday, August 24, 2012 - 02:38 AM UTC
Hi Sam,

It's my understanding that the coaming over the instrument panel was often removed, and a quick google search on "P 38 cockpit photos" seems to show that, as some have it and some don't.

I also did another quick search on "P 38 interior" and looked at the images. In the first group was a photo of "Yippee" in flight, that seems to show the third radio almost hidden at the back:

http://www.planeaday.com/images/2011/Apr/Lockheed_P-38J_061019-F-1234P-011.jpg

Not sure if that is a "J" or not.

Hope that helps

Doug
camogirl
_VISITCOMMUNITY
England - North East, United Kingdom
Joined: October 20, 2005
KitMaker: 1,045 posts
AeroScale: 622 posts
Posted: Friday, August 24, 2012 - 02:53 AM UTC
Thanks Doug

Hmm thats what I searched and only found ones with the material coaming. I know Kozy Koza didn't have the coaming but as far as Buckeroo goes who knows?

I can see the two boxes in full view in the pic you show and the back of the radio bay the 3rd smaller rectangle which is at very the rear of the radio bay / fuselage join. Im more concerned that the Eduard Brassin has the 2nd box which is clearly visble in the pic you have posted Doug as being in the canopy area is the one that is being hidden away into the fuselage.

Yippee was only ever a demo plane when it was in that guise not one on active service it was the 5,000th lightning made so they gave it a bright red livery, white lettering and was signed by people in the factory who made it. It was used it in demos by the test pilots to show what the P 38 could do.

I do believe after the demos and such it was stripped and altered to go out to active service.

Ive made my decision Im leaving the kit as it is out of the box and as the only one I can be sure of not having the coaming is Kozy Kona Im going to do this one as that and I'll use Buckeroo decals on my next build.

Also found a photo of Buckeroo on hard standing and clearly shows silver spinners but the instructions show one black and one yellow?

Think Im going to stick to my guns and do Kozy for this build and then work my butt off researching for Buckeroo on the other one I build
Bronze4
_VISITCOMMUNITY
Florida, United States
Joined: December 20, 2009
KitMaker: 53 posts
AeroScale: 11 posts
Posted: Tuesday, August 28, 2012 - 07:31 PM UTC
I just wanted to show my support on your P-38. I have always been a big fan of the Lightning and I am currently engaged with an Academy Droop Snoot and wanted to share some of my observations on the base kit and what I am, or I am planning, to do about them. I hope some of it will help since you seem so determined to do a bang up job. Some of these are my own opinion and some are better known to the modeling community and you may be already well aware of.

This model is based off of a P-38L so to back date it to a P-38J-10 (my droop) I had to add the taxi light under the starboard wing, the measurements for which was taken off of my Hasegawa P-38J. I think you’ll be okay on the light being in the leading edge of the wing because I think the P-38J-25 is when the light was moved to that location, check your references to be sure. I don’t remember off of the top of my head if the P-38J-25 were fitted with the dive flaps or not and I am not too sure if all of the fuel boost bulges would be on the underside of the wings on the dash 25 either. On mine I removed all the fuel boost pump housings and the dive flaps. I don’t know if this Eduard release makes any mention of these differences, I know Academy didn’t. The other thing that needs to be removed is the bulges from the inboard sides of the engine nacelles. For some reason the designers of this kit interpreted the polished oval plates as bulges. Due to the loss of dzus fasteners while removing these bulges I pressed new ones on with a hypo needle, of course that meant that all the dzus fasteners needed to be redone to make them all the same.

I was about to drill out the air scoops that are on either side of both of the superchargers when I noticed that they are about the same size as the end of a round toothpick. That would make a perfect master to smash mold new scoops. I thought this would be much easier than trying to drill tiny half-moon holes.

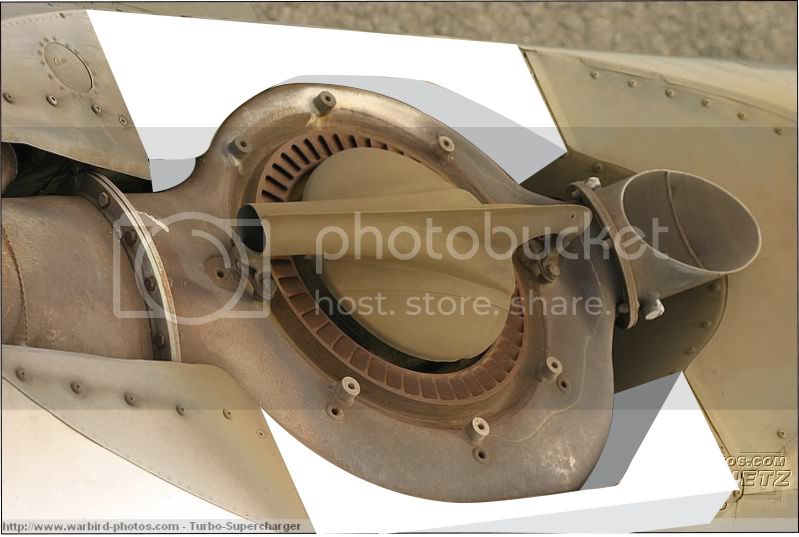
Something looked a bit off to me around the supercharger area. At first I thought it was the superchargers themselves (Academy’s aren’t the best detailed)but after looking at it and comparing this area to the Hasegawa P-38J and to real P-38s , I realized the turbine part on the kit just sat on top of the nacelle as opposed to sitting down into the nacelle as it should. It would seem that this is another shortcut Academy made to this kit. I used thick plastic stock to build up the areas on either side of each turbine. The other thing missing are the deflectors that would keep disintegrating pieces of turbine from flying off and hitting the pilot, again I used the Hasegawa kit for measurements to make these.

I didn’t much care for the simplistic way Academy molded the radiator doors. They looked way too ham fisted even for the likes of me. I smash molded new doors over the kits doors. Next I cut the kit doors out, taped the molds over the door area then sprayed paint from the inside of the boom half onto the molds to get the exact size of the door itself. Now all that is needed is to cut the doors to size and glue them on in the closed position. Extending the inner portion of the boom in the radiator housing with card stock was also necessary. I put them in the closed position for two reasons. First I wouldn’t need to add any internal detail, but more over because most period photos show these doors to be in the closed position while parked.

Now I’ll give my two cents about the instrument panel shroud …
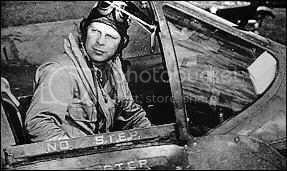
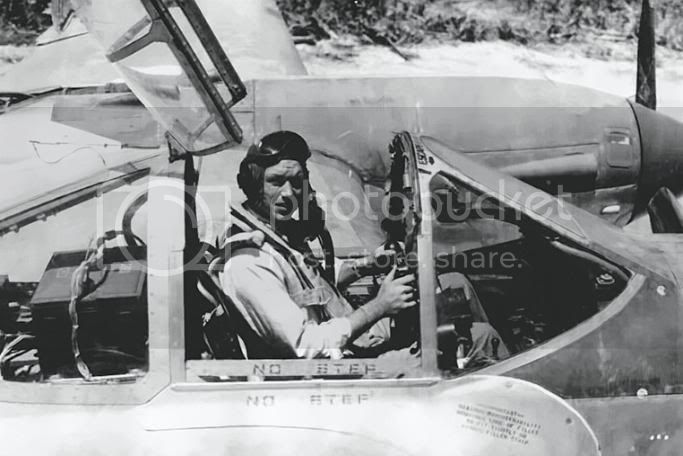
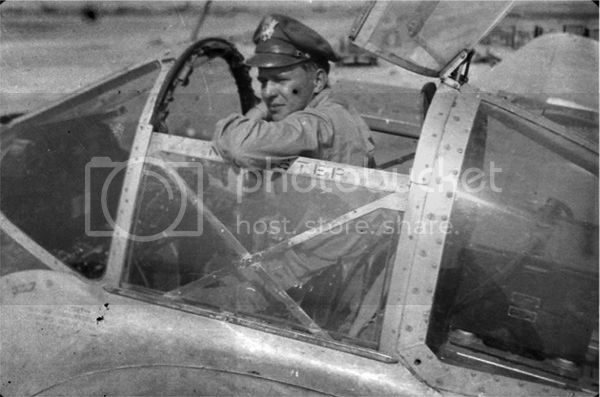
Most pictures show this was removed on combat aircraft. This is just a flimsy piece of canvas on a wire frame that I would think was easily removed and installed. I think you should go ahead and do the markings you wanted to. Remember that a photo is just an instant in time of that piece of machinery’s life. Having been in the military myself, I assure you that you would not be wrong with or without the shroud. I decided to remove it on my P-38F and I am really much happier for having done so. Now you can actually see the detail in the cockpit. The problem created there is that you will need to scratch the bracket for the gun sight. Fortunately you won’t need to worry about a bracket for the armored glass like you would on earlier model Lightnings.
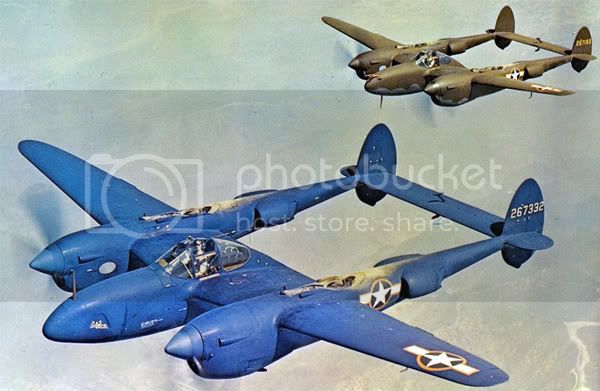
As you can see in these pictures of pilots in their operational aircraft the shroud is not present even though I am quite sure they came from the factory with them.


These were found on a quick search on the first page of looking.

Sorry to be so long winded, I get that way about things I like. Keep going as you are cause you are doing great so far. I know this P-38 fan will be following along with great interest!!!

Dave Shaw

camogirl
_VISITCOMMUNITY
England - North East, United Kingdom
Joined: October 20, 2005
KitMaker: 1,045 posts
AeroScale: 622 posts
Posted: Tuesday, August 28, 2012 - 08:23 PM UTC
Thank you for that that's been a fantastic help and very much appreciated
The gun sight bracket wont be a problem as Eduard includes this in a clear resin, I have not fully tested the superchargers but they do appear to sit down in the nacelles/ booms. That's great about the canvas actually really pleased no right or wrong will do it without and do Buckeroo. Will keep my eyes peeled as I progress for the areas you have highlight as in all honesty with work have not really any further than the last blog update hope to get cracking this weekend

Merlin
Staff MemberSenior Editor
AEROSCALE
#017
_VISITCOMMUNITY
United Kingdom
Joined: June 11, 2003
KitMaker: 17,582 posts
AeroScale: 12,795 posts
Posted: Wednesday, August 29, 2012 - 09:19 AM UTC
Hi Sam

Nice work on the kit so far. I did as promised and bought one for myself!

At the risk of opening a real can of worms... but looking at the tonal values on the radios in the various photos in this thread, were they actually painted black? - it's just a bit odd that the shadows and parts of their own data-plates look so much darker...

I'll duck for cover on that note, but it'd be good to know the answer for when I tackle my own kit.

All the best

Rowan
ViperAtl
_VISITCOMMUNITY
Georgia, United States
Joined: August 22, 2005
KitMaker: 331 posts
AeroScale: 135 posts
Posted: Wednesday, August 29, 2012 - 02:01 PM UTC
Good start with this kit.

I picked up one at the Nats earlier in the month. Upon returning home I took the cockpit parts and fit them to a Hasegawa kit. It will fit. The Hasegawa needs some scraping and thinning in some areas and removal of the instrument panel coaming, bulkhead behind radio and armor plate (used for the early birds). The instrument panel would need to be lowered about 1mm and the cockpit tub subassembly just about drops in.

The superchargers don't fit but I'll wait for Eduard to make some to fit this kit. The wheels are perfect.

I'll keep an eye on this build.
Bronze4
_VISITCOMMUNITY
Florida, United States
Joined: December 20, 2009
KitMaker: 53 posts
AeroScale: 11 posts
Posted: Wednesday, August 29, 2012 - 07:15 PM UTC
I am glad to be of service. Here is some of the info I found about the differences between the J-10, J-15, and J-25, and L models and what is needed to be done to the Academy kit for each.

“Do nothing and you have an L. If you don’t cut the leading edge landing light and add a light on the underside of the wing and fill the adjustable trim tabs you have a J-25. Get rid of the compressibility flaps, fuel pump bulges and you have a J-15. Leave the adjustable trim tab and you have a J-10. So that gives you the option of three different versions of the ‘standard’ J alone.”

So it would seem that for your P-38J-25 you will have to reposition the landing light to under the wing (I was wrong yesterday) and fill in the trim tabs and that’s it. I do suggest cross verifying this with your own references.


Shame I don’t have a camera at the moment to show you exactly what I meant about the area around the turbines. Instead I will try to show you by drawing on a photo of the real thing. The white and grey in the first photo is supposed to represent the area I built up with thick plastic stock. The second picture is of course how it should look. I grant you that doing this type of mod isn’t for everyone and I wouldn’t blame you if you don’t bother but as long as I am on my soapbox I might as well throw it out there.


In these next photos I drew some common mistakes I have seen builders make in regards to the panel lines where the spinner assembly is glued to the front of the booms. The red lines must be filled and sanded and the green line stays or needs to be added. Again I realize that you may already know this but just in case you didn’t, or other readers didn’t, I thought I’d point it out.


Finally, in this last picture I will illustrate what I meant about the radiator doors. This is a photo of the closed doors on my P-38F. It is the Hasegawa kit so the mod was quite simple, since the doors are separate pieces, but this is the end result of how I want my Academy kit to look. I would say that is an improvement from what Academy offers.


By the way the only reason I carry on so, is the fact of how you were not satisfied with the radios and not sure about what to do with the instrument shroud quandary, so much so that you were willing to ditch the markings you wanted. That shows me that you really want it to be as right as you can make it and it is that important to you. So I hope I don’t seem like a pest or some type of “Know it all” because I am not. I thought it would be better to know these things now (if you didn’t) so it would not bite you down the road, say after you applied the decals.

I too am in the beginning stages of my Droop Snoot, bombardier’s compartment slowing me up at the moment (and life in general), so if you find anything that I should look for please be sure to pass it along to me.
Mustanger
_VISITCOMMUNITY
Virginia, United States
Joined: July 06, 2012
KitMaker: 94 posts
AeroScale: 33 posts
Posted: Thursday, August 30, 2012 - 08:21 AM UTC

Quoted Text

By the way the only reason I carry on so, is the fact of how you were not satisfied with the radios and not sure about what to do with the instrument shroud quandary, so much so that you were willing to ditch the markings you wanted. That shows me that you really want it to be as right as you can make it and it is that important to you. So I hope I don’t seem like a pest or some type of “Know it all” because I am not. I thought it would be better to know these things now (if you didn’t) so it would not bite you down the road, say after you applied the decals.

I too am in the beginning stages of my Droop Snoot, bombardier’s compartment slowing me up at the moment (and life in general), so if you find anything that I should look for please be sure to pass it along to me.


Good information, Dave. I'll use it when it comes time to build my 1/48 P-38
camogirl
_VISITCOMMUNITY
England - North East, United Kingdom
Joined: October 20, 2005
KitMaker: 1,045 posts
AeroScale: 622 posts
Posted: Thursday, August 30, 2012 - 11:00 PM UTC
Honestly Dave the info is fab and will be acted upon.

I admit normally I am just build it out of the box really don't care as long as it looks like a plane at the end but with this kit and the really obvious bits brought up with the resin location etc and confusion I have had Im determined to get this somewhere near right well apart from the radios location but like I said Ive accepted that its in and done.

GastonMarty
_VISITCOMMUNITY
Quebec, Canada
Joined: April 19, 2008
KitMaker: 595 posts
AeroScale: 507 posts
Posted: Monday, September 03, 2012 - 04:24 PM UTC

Very nice information about those P-38 engine panel lines: I would likely have made those errors...

To supplement this, unfortunately, there is a lot more in outline accuracy issues with all of the 1/48th P-38 kits:

-The Academy kit's canopy is too broad and flat on the rear portion's cross-section, the sides of which are also too vertical; the real thing was in fact more like a "rounded corners triangle", with slightly bulged sides, on all variants. Hasegawa's is not great there either, but better...

-The Monogram's clear parts have a 1 mm gap in length for all the center clear parts, and if you fill that gap with other longer center clear parts (like Academy's), leaving the front and rear parts where they want to go on the Monogram kit, then the canopy looks too low or too long: The Academy kit shares slightly this "chop-top" hot rod look... Only the Hasegawa canopy looks correctly tall enough, and makes the best overall canopy if laboriously adapted to the Monogram kit, as the Hasegawa kit's short-looking nose really sticks out otherwise... (See outlines)

But by far the biggest issue with both of the two "newer" 1:48th P-38s is that their later-style engines radiators obviously do not both "bulge" and "pinch" enough at the front and rear of the cowls. This is so extreme on the kits, it suggests to me that not only are they not "bulged" enough, but also that their spinner diameter is too large: This seems to be confirmed by two different things: All drawings show a 1 mm smaller spinner diameter, and the Monogram agrees with the drawings, and as a result it is the only kit whose engines look "bulged" and not "straight", even if it is still not enough...

The lines below show the extent of the issue from this angle, and the angles are well-matched for once...

Another serious problem is that I have never seen either the Academy or the Hasegawa built with the tailplane level with the inner forward corners of the booms, and I think (after much experience with either kits), that they simply cannot be built correctly on this alignment issue... The Monogram kit is comparatively perfect on this issue.

Here is the engine "bulge" issue on the Hasegawa kit, the Academy being identically "flat" compared to Hasegawa, and the Monogram way, way better, with its 1964 raised surface detail actually being far more intricate than on either of the engraved kits, but nearly impossible to preserve because the fit is so bad: Modelling between a rock and a hard place...:
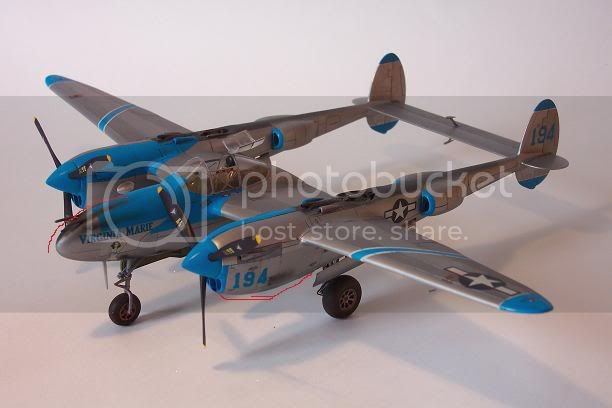


The missing volume is worth about a tube of putty or more... PER engine... I doubt grafting the Monogram engines would work, as the taper of the cross-section also "pinches" differently towards the main landing gear bays, and that difference is where much of the trouble is... I think grafting the entire Monogram booms could be worth looking into...

The Monogram wingspan is 3 mm short (not that big a deal on such a large measurement), and without upturned tips (both issues are fixable at the wingtips alone), and the Hasegawa wingtips are way to skinny in plan view, but could be fixable as well...

For all the good I said about he Monogram kit, its airfoil surface is curved throughout, and that means that preserving the exquisite raised surface detail is not possible if the trailing edges are to be a meeting of sharp flat surfaces, as they should... The resulting "scalloping" transition near the edges, to try to get it both ways (sharp without surface detail damage), could be unnoticeable under a camo finish, but I didn't want a camo P-38, and that issue was severe enough with a bare metal finish to ruin my build... Beware...

Gaston

P.S. BTW, Tamiya rattle can clear gloss makes for a GREAT primer for those metal finishes with a lot of putty underneath, and it does not attack the naked plastic despite its lacquer content (it does frost clear parts occasionally however)...

G.
SunburntPenguin
_VISITCOMMUNITY
Australian Capital Territory, Australia
Joined: March 15, 2011
KitMaker: 121 posts
AeroScale: 112 posts
Posted: Tuesday, September 04, 2012 - 11:13 AM UTC
I still see a P-38 in these pictures, can't mistake it for anything else despite what the naysayer has to offer.

Millimetres out in some dimensions, wow. Call the company and get them to retool the kit right now

Sam, great work, looking forward to see how you progress with this.
MrMtnMauler
_VISITCOMMUNITY
Washington, United States
Joined: January 15, 2011
KitMaker: 224 posts
AeroScale: 223 posts
Posted: Tuesday, September 04, 2012 - 02:48 PM UTC

Quoted Text

I still see a P-38 in these pictures, can't mistake it for anything else despite what the naysayer has to offer.

Millimetres out in some dimensions, wow. Call the company and get them to retool the kit right now

Sam, great work, looking forward to see how you progress with this.


The horror, the horror!
72ndbrigade
_VISITCOMMUNITY
New York, United States
Joined: September 27, 2012
KitMaker: 29 posts
AeroScale: 8 posts
Posted: Wednesday, October 10, 2012 - 01:28 AM UTC
The ongoing saga of the angled photo versus the real thing goes on and on, and on, and on--------------

Everyone now knows NOT TO SNIFF too much rattle-can paint!
Siderius
_VISITCOMMUNITY
Tennessee, United States
Joined: September 20, 2005
KitMaker: 1,747 posts
AeroScale: 1,673 posts
Posted: Wednesday, October 10, 2012 - 09:30 AM UTC
Keep on going Sam, looks good to me. Can't wait to see it finished. Russell
moonpuppy
Joined: September 28, 2007
KitMaker: 5 posts
AeroScale: 3 posts
Posted: Saturday, October 13, 2012 - 02:47 PM UTC
Hey Sam, just wanted to let you know i'm having the exact same problems with the cockpit fit so it's not you.
72ndbrigade
_VISITCOMMUNITY
New York, United States
Joined: September 27, 2012
KitMaker: 29 posts
AeroScale: 8 posts
Posted: Sunday, October 14, 2012 - 05:51 AM UTC
BTW Sam, great build log, can't wait to see the finished product!
camogirl
_VISITCOMMUNITY
England - North East, United Kingdom
Joined: October 20, 2005
KitMaker: 1,045 posts
AeroScale: 622 posts
Posted: Sunday, October 14, 2012 - 07:43 AM UTC
Thanks guys glad its not just me I am still working on it but trying to get the wings on but due to the cockpit having some issues so Im sneaking up on it and spending 5 mins here and there on it (have not done much modelling as things have been hetic with my paid day job and Ive been getting rather stressed and trying to model when stressed doesn't work well with me )

Hopefully if I can get the wings on more pics and further update will be up as soon as I get the wings sorted no pics at the moment as it still looks pretty much the same as the last pics. Im not giving up and I will not be beaten by some plastic and resin
spiralcity
_VISITCOMMUNITY
Illinois, United States
Joined: October 14, 2012
KitMaker: 150 posts
AeroScale: 107 posts
Posted: Sunday, October 14, 2012 - 07:45 PM UTC
I love your P-38, she looks great! Nice work.
 _GOTOTOP