New York, United States
Joined: December 15, 2006
KitMaker: 365 posts
AeroScale: 344 posts
Posted: Friday, October 26, 2012 - 11:01 AM UTC
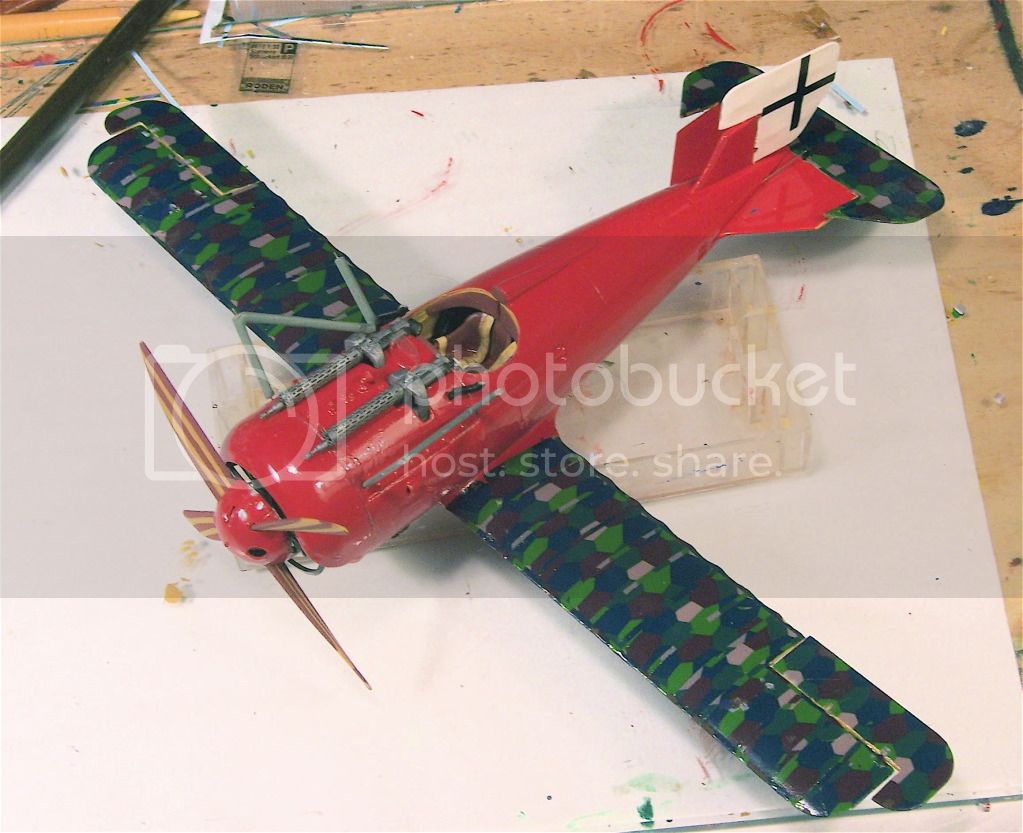
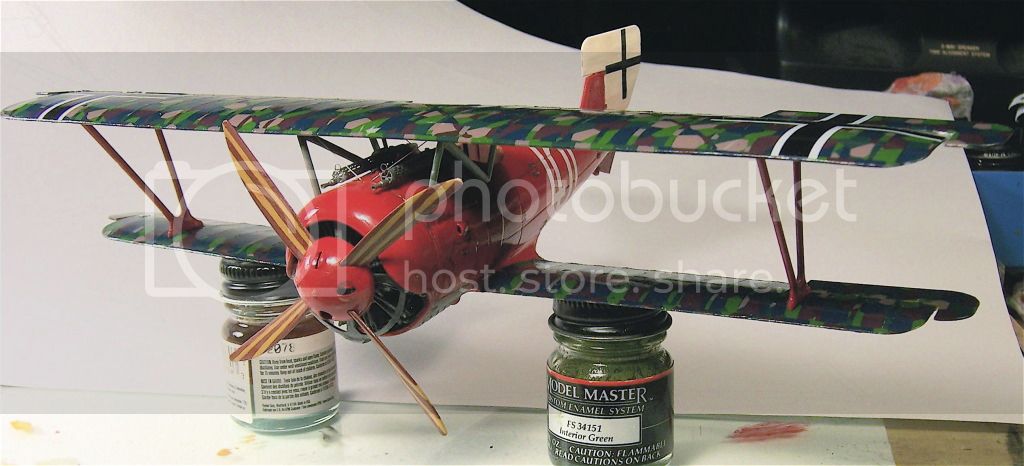
The ailerons and rudder have been pinned and attached. The lozenge and tapes are finished. I've added the rudder and upper wing national insignia.
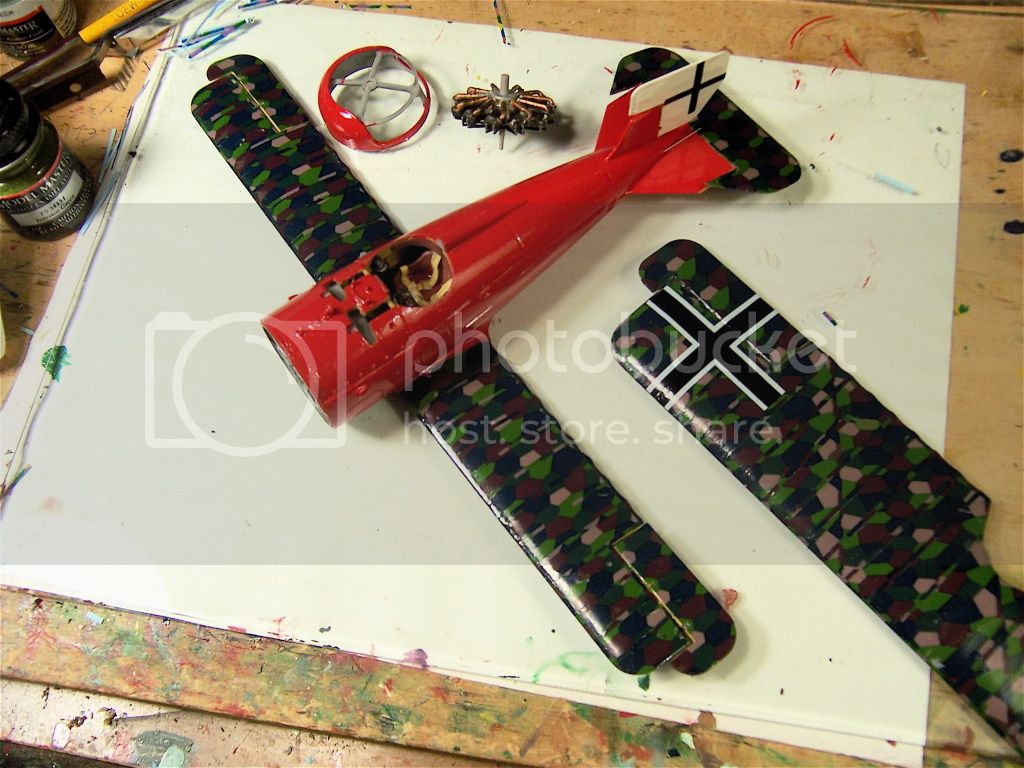
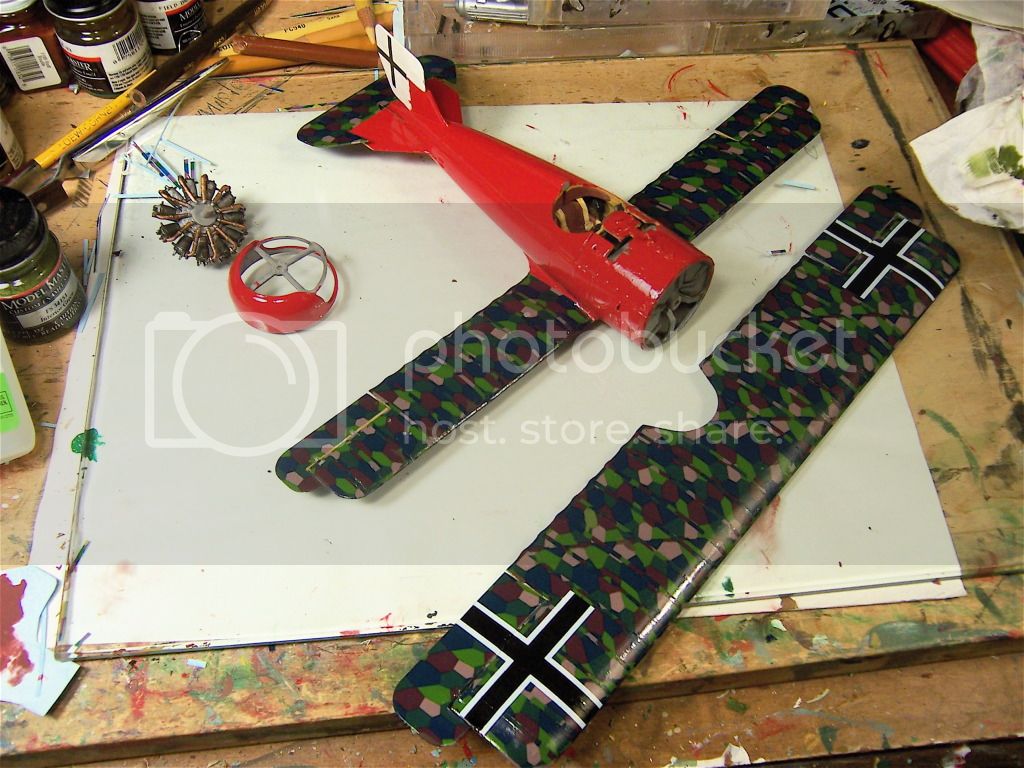
Now it's onto attaching the cowling and the machine guns, weathering the fuselage and coordinating the wing attachment and rigging.
Dwayne
Alberta, Canada
Joined: January 19, 2008
KitMaker: 6,743 posts
AeroScale: 6,151 posts
Posted: Saturday, October 27, 2012 - 11:18 AM UTC
Making excellent progress so far , shaping up very nicely !
Terri
New York, United States
Joined: December 15, 2006
KitMaker: 365 posts
AeroScale: 344 posts
Posted: Sunday, October 28, 2012 - 02:46 AM UTC
Thanks Teri, it's amazing what you can get done with a few days off and many chores taken care of. I'm really focused on this project right now and have devoted a lot of my free time to it.
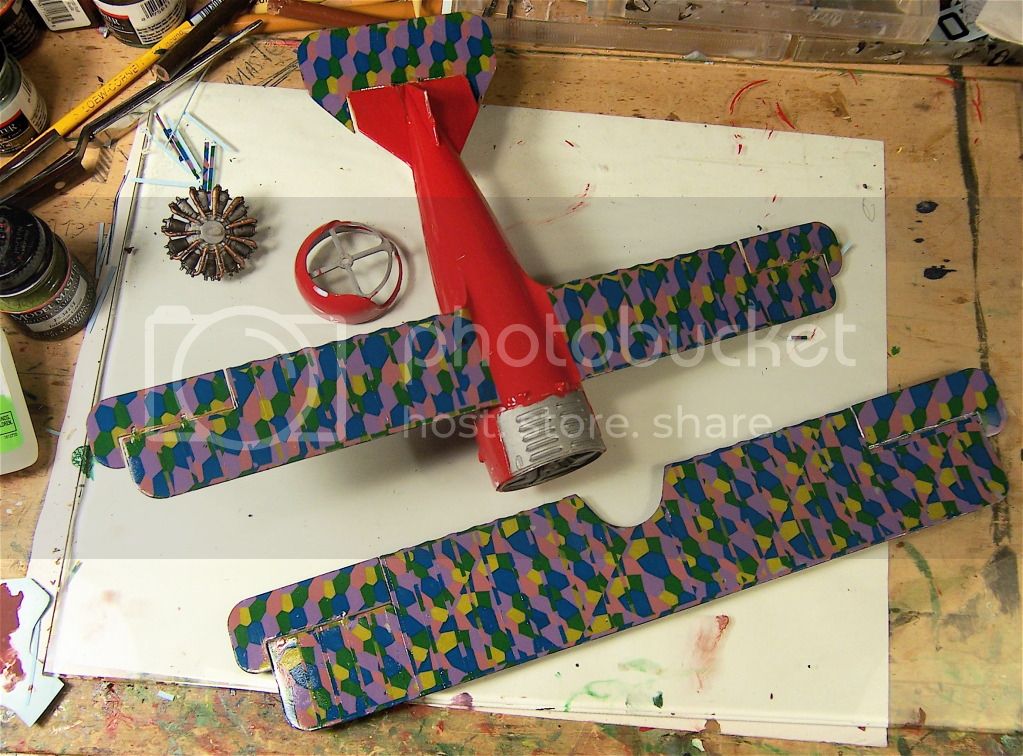
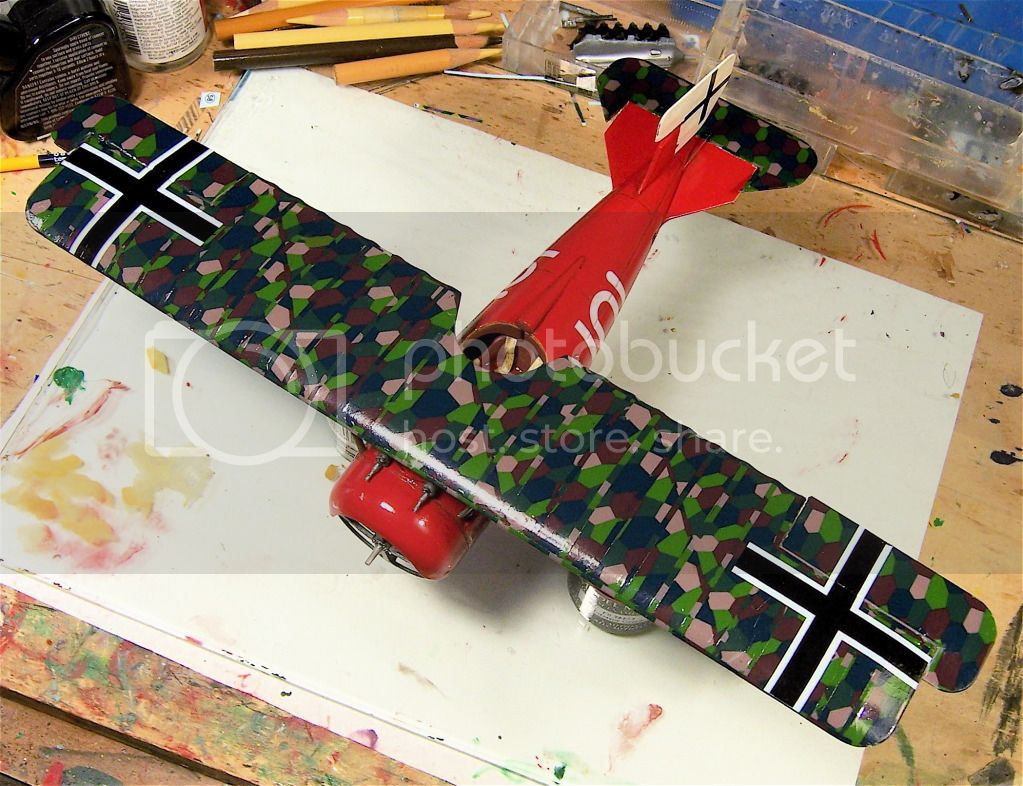
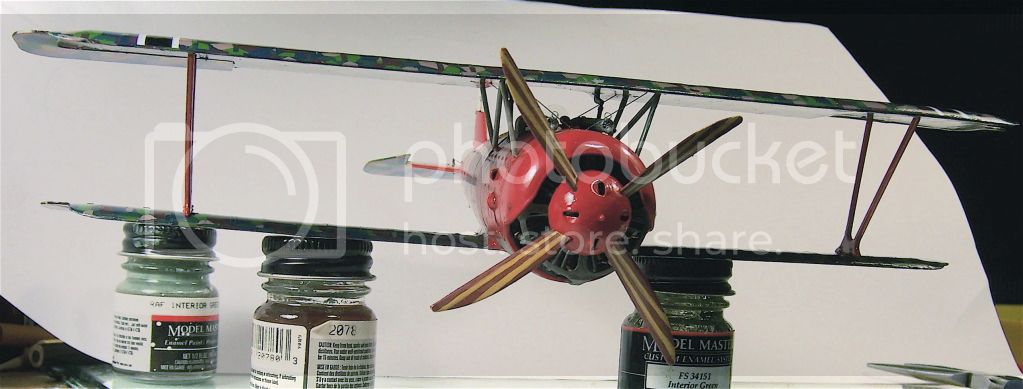
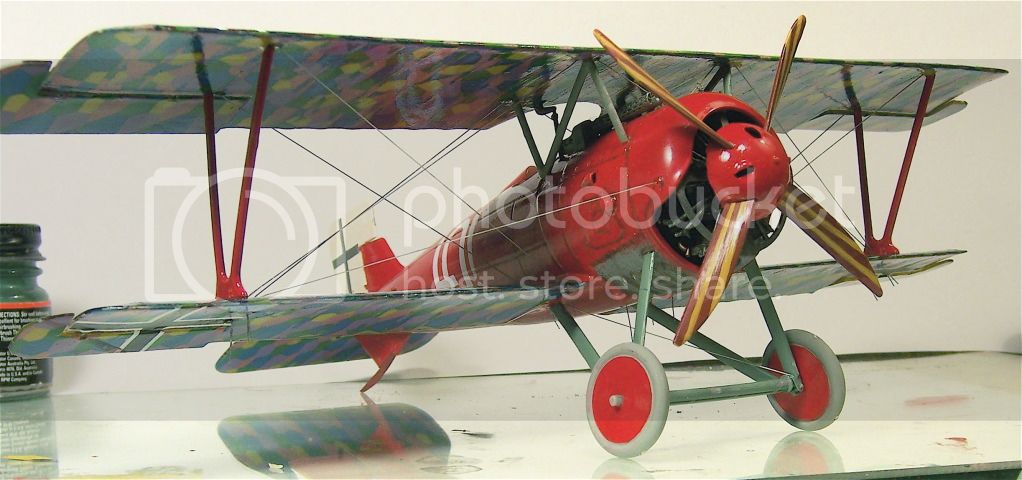
I had to grind down some of the framing inside the cowling to get the engine to rotate as the cylinder heads were hitting them. Not too much material was removed so the structure was not compromised. Then it was just a matter of mounting the engine and gluing the cowling in place. Some putty was required to this joint but not what I would call a major undertaking.
Roden supplies a cap to place on the engine mounting stud as it fits into the fire wall. This is unnecessary as the cowling frame holds the engine in place. I started the propellor a while back and have put it together temporarily for the pics.

I attached the MG's, rigged the elevator and pinned the cabane struts.
Weathering and wing attachment next.
Dwayne
Alberta, Canada
Joined: January 19, 2008
KitMaker: 6,743 posts
AeroScale: 6,151 posts
Posted: Monday, October 29, 2012 - 02:35 PM UTC
She is looking really nice D ! I'm kinda of being taken by the red . Looking forward to your next up-date

Terri
Västra Götaland, Sweden
Joined: February 19, 2010
KitMaker: 1,473 posts
AeroScale: 1,450 posts
Posted: Monday, October 29, 2012 - 10:08 PM UTC
Coming on very nicely Dwayne like Terri says, the red is very fetching on this machine!
Mikael
_________________________________________________________
Just finished the Wingnut Wings Taube. On to the Junkers D.1
Arizona, United States
Joined: December 12, 2008
KitMaker: 1,423 posts
AeroScale: 1,319 posts
Posted: Tuesday, October 30, 2012 - 02:58 AM UTC
Looking good Dwayne:
As Terri mentioned, the red is very fetching. The lozenge looks good, I know how difficult that material is to work out.
Looking for more.
Best
Mark
We few, we happy few........
New York, United States
Joined: December 15, 2006
KitMaker: 365 posts
AeroScale: 344 posts
Posted: Thursday, November 01, 2012 - 09:10 AM UTC
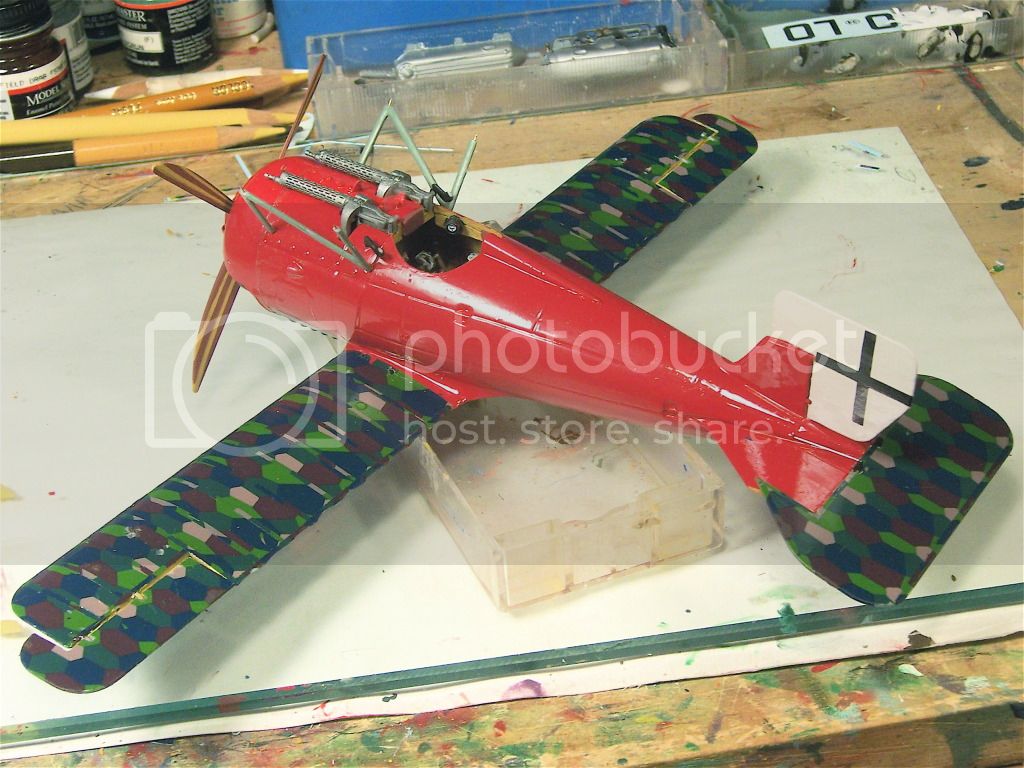
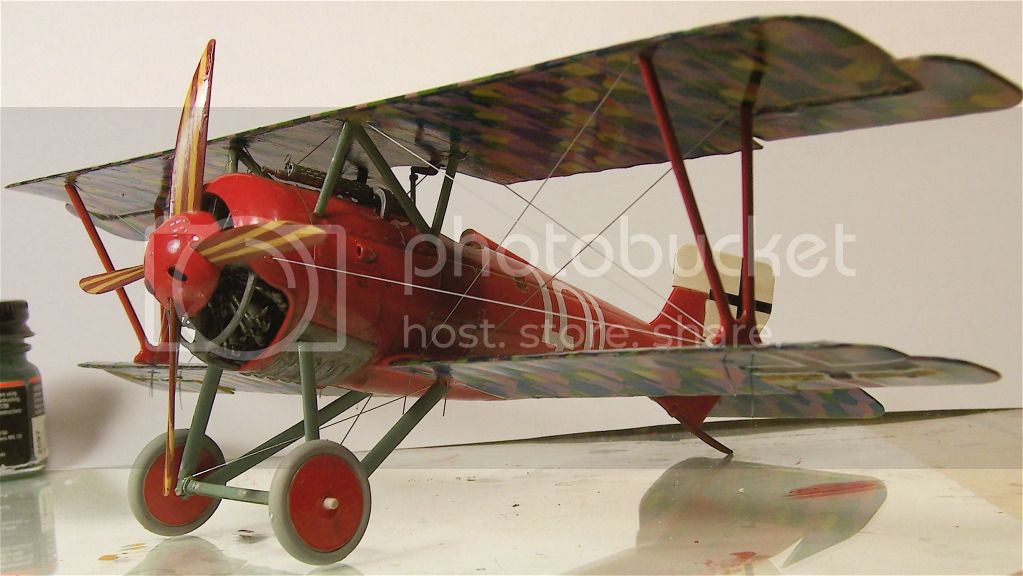
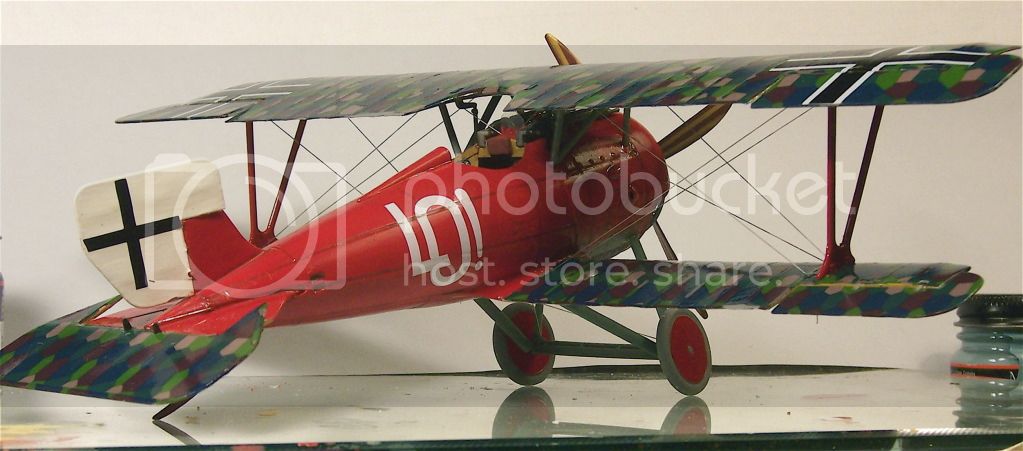
Okay, we're coming down the stretch. The fuselage has it's preliminary weathering done. Then it was on to the top wing.
The top wing went on very easily, especially when compared to the construction of the rest of the kit. All rigging holes were drilled before attachment.
It's very important to test fit the inter plane struts before committing any cement to the process. You will need to file down the tabs on the struts or widen their receiving holes in the wings to get the struts to fit properly.
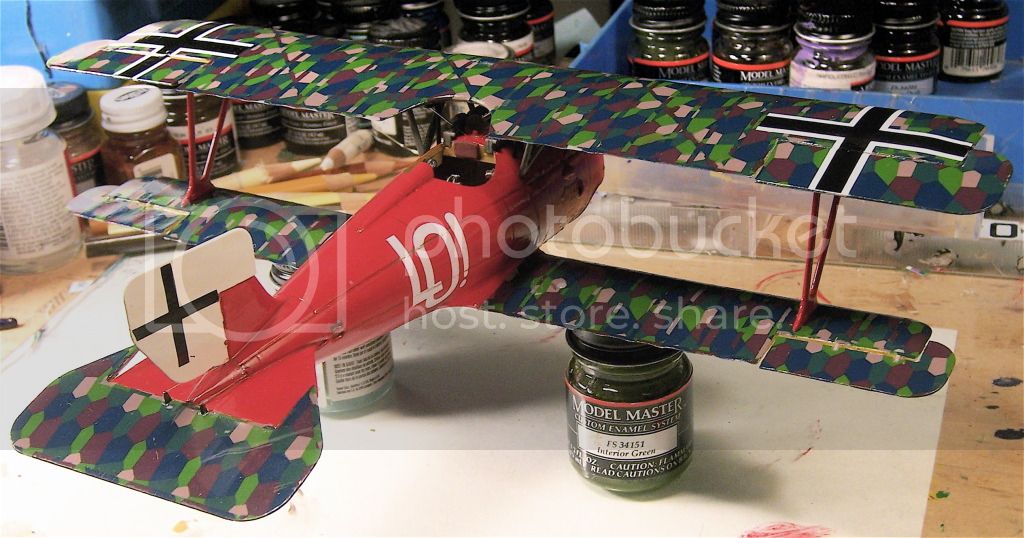
Once that was done I had to make sure the cabane struts with their pins lined up well. Once I dry fitted and proved the alignment of the pins and their receptive holes it was time to attach the wing.
I used regular plastic cement to attach the inter plane struts to the top wing first and let that dry for about an hour. I used cyanoacrylate "Zap A Gap" to cement the cabane struts to the fuselage. Once that has set I cemented the bottom of the inter plane struts into the lower wing. I am happy to say that the alignment here was pretty much on the money and that Roden got that most crucial piece to fit right.
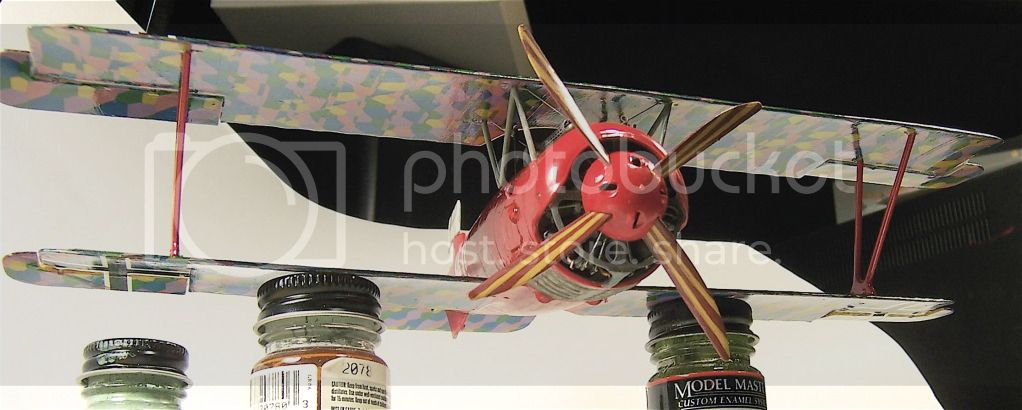
The really cool thing about this aircraft is when you attach that four bladed propeller with the spinner it takes on a most sinister and menacing look.
Onto the rigging, undercarriage and then final touch up.
Dwayne
Alberta, Canada
Joined: January 19, 2008
KitMaker: 6,743 posts
AeroScale: 6,151 posts
Posted: Friday, November 02, 2012 - 03:41 PM UTC
With the prop and spinner in place she sure does have a sinster look to her . Coming along really well D .
Looking forward to seeing this one wrap up !
Terri
Arizona, United States
Joined: December 12, 2008
KitMaker: 1,423 posts
AeroScale: 1,319 posts
Posted: Saturday, November 03, 2012 - 01:19 PM UTC

Hi Dwayne:
Yes, the prop and the attitude you have it on the paint bottles definately makes this airplane look lethal. You are doing great work in a short time, and it is looking good and motivating me to pull this one out of the stash and tackle it.
Best
Mark
We few, we happy few........
Colorado, United States
Joined: January 25, 2004
KitMaker: 11,669 posts
AeroScale: 11,011 posts
Posted: Saturday, November 03, 2012 - 03:16 PM UTC
Very nice Dwayne! Yes, please get it down to the finish line. Model On please!
". . .The most important thing is to know why you build and then get the most that you can out of building." via D.D.
New York, United States
Joined: December 15, 2006
KitMaker: 365 posts
AeroScale: 344 posts
Posted: Saturday, November 10, 2012 - 08:44 AM UTC
Here on Long Island we've been wrestling with hurricane Sandy for the last two weeks so it's been hard to get to the work bench. The weather gods threw in a Noreaster just in case the hurricane didn't finish you off!!!
I got my power back pretty quickly, 3 days and relatively minor damage. Some folks still don't have their power yet. The toughest part now is trying to get gasoline. Fuel lines really bite!
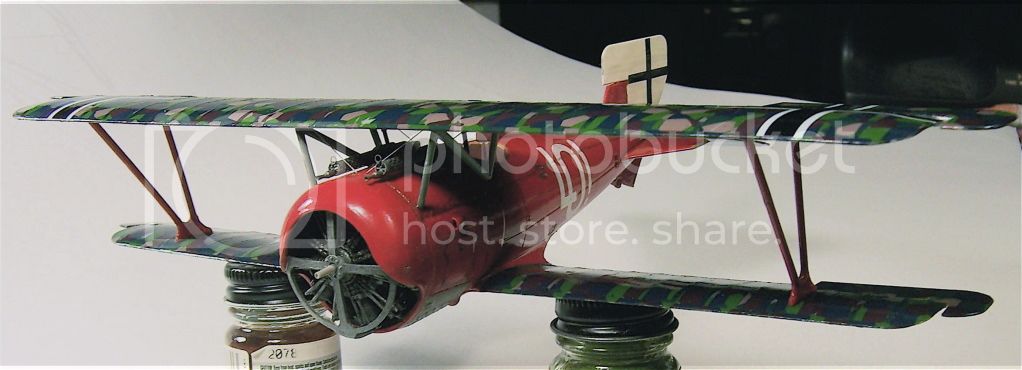
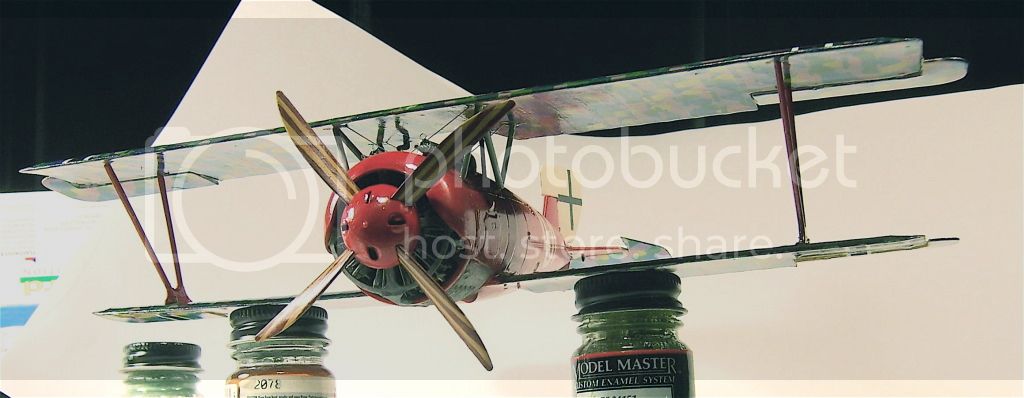
Well, enough whining already. Here are some pics showing the model about 95% complete.

The rigging is .009 monofilament colored with a silver magic marking pen.
The wheels have been temporarily attached for the pictures so they appear to be a little wobbly.
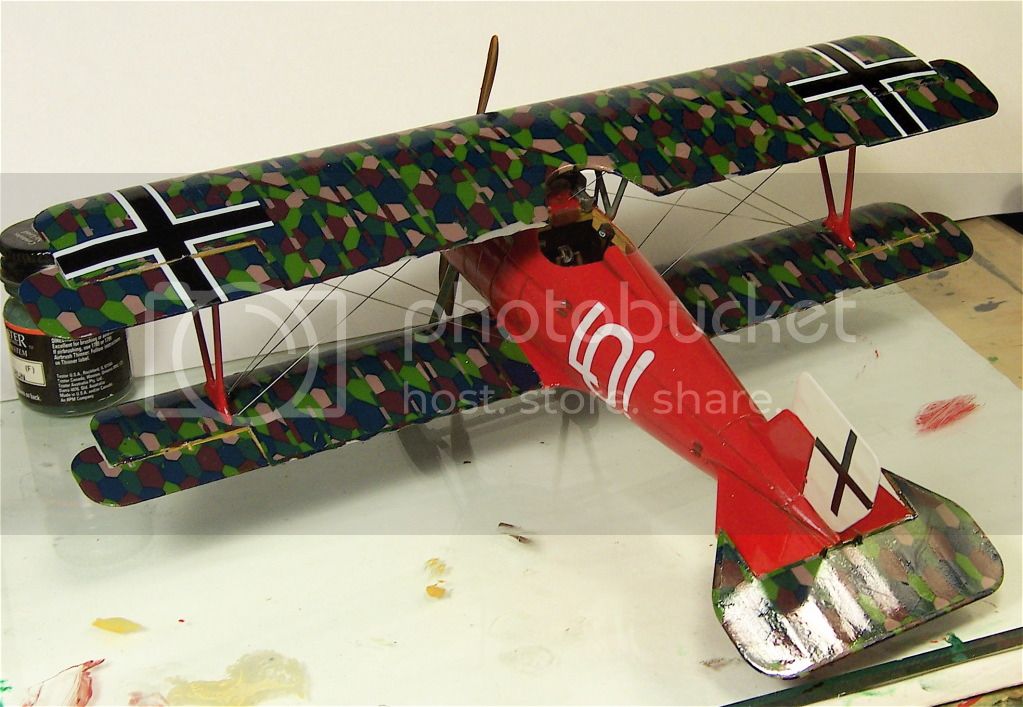
The Roden lozenge flaked near the trailing edges in a few spots while handling ... imagine that!
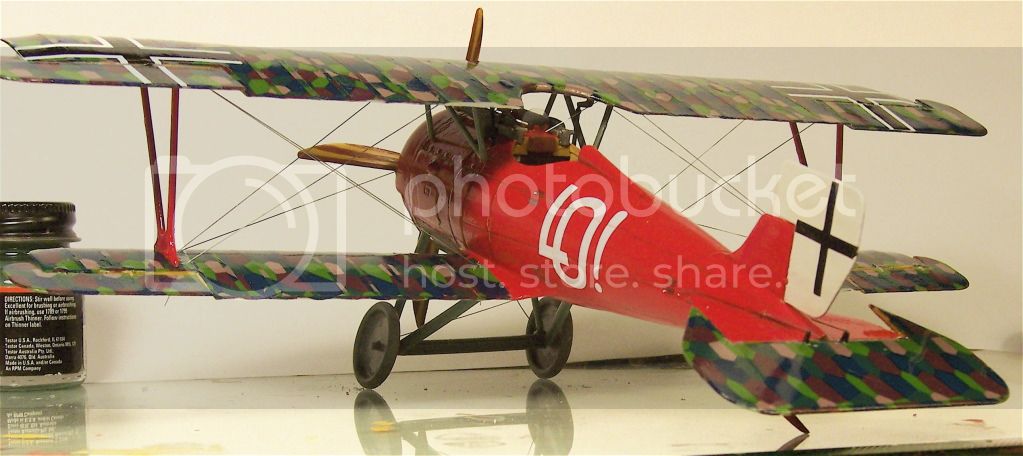
Some touch up left and a few more parts, a flat coat and then a base and we're done.
Dwayne
Cordoba, Argentina
Joined: January 27, 2011
KitMaker: 268 posts
AeroScale: 264 posts
Posted: Saturday, November 10, 2012 - 09:19 AM UTC
Hello Dwayne,
Yes, like everybody are saying... You are building a very fine piece of artwork...!!!!
Congrats...!!!

P/D: I hope we acan reach a new 1/48 kit of this beaty...!!! Some Day....

Bye
Arizona, United States
Joined: December 12, 2008
KitMaker: 1,423 posts
AeroScale: 1,319 posts
Posted: Saturday, November 10, 2012 - 11:17 AM UTC
Hello Dwayne:
It is really nice. I like it. I like Udets A/C and you have done a great job on this kit.
Best
Mark
We few, we happy few........
Colorado, United States
Joined: January 25, 2004
KitMaker: 11,669 posts
AeroScale: 11,011 posts
Posted: Saturday, November 10, 2012 - 02:55 PM UTC
Nicely done Dwayne. Thanks for showing it here. And please Model On!

". . .The most important thing is to know why you build and then get the most that you can out of building." via D.D.
Alberta, Canada
Joined: January 19, 2008
KitMaker: 6,743 posts
AeroScale: 6,151 posts
Posted: Sunday, November 11, 2012 - 03:16 AM UTC
For a kit which has a few issues , you have done a spectular job right out of the box !
Looking forward to the final pic's of this one all finished up
Terri
Alberta, Canada
Joined: July 26, 2010
KitMaker: 1,032 posts
AeroScale: 1,025 posts
Posted: Sunday, November 11, 2012 - 02:40 PM UTC
Dwayne,
Very nice work on a Kit that (I hear) is difficult to work with. I'll be book-marking this thread as I really would like to tackle this one in the near future.
Cheers,
Lance
Officially Retired as of 20 August 2013 and looking forward to some un-interrupted bench time. Currently starting Roden's Nieuport 28 and hoping to follow that with another WNW Fokker DVII.
Västra Götaland, Sweden
Joined: February 19, 2010
KitMaker: 1,473 posts
AeroScale: 1,450 posts
Posted: Sunday, November 11, 2012 - 09:56 PM UTC
She's looking great Dwayne, That red fuselage looks very handsome!
Mikael
_________________________________________________________
Just finished the Wingnut Wings Taube. On to the Junkers D.1
New York, United States
Joined: December 15, 2006
KitMaker: 365 posts
AeroScale: 344 posts
Posted: Tuesday, December 04, 2012 - 01:12 PM UTC
Colorado, United States
Joined: January 25, 2004
KitMaker: 11,669 posts
AeroScale: 11,011 posts
Posted: Tuesday, December 04, 2012 - 02:15 PM UTC
". . .The most important thing is to know why you build and then get the most that you can out of building." via D.D.
Alberta, Canada
Joined: July 26, 2010
KitMaker: 1,032 posts
AeroScale: 1,025 posts
Posted: Tuesday, December 04, 2012 - 02:21 PM UTC
Very nice finish Dwayne. A mean machine for sure and you've done a great job, the colour scheme is one of the most spectacular for this bird.
Have to ask, what is the source of the "grass" on the display base? Really sets it off well.
Cheers,
Lance

Officially Retired as of 20 August 2013 and looking forward to some un-interrupted bench time. Currently starting Roden's Nieuport 28 and hoping to follow that with another WNW Fokker DVII.
England - South East, United Kingdom
Joined: November 06, 2005
KitMaker: 1,667 posts
AeroScale: 1,551 posts
Posted: Tuesday, December 04, 2012 - 05:41 PM UTC
beautifully finished Dwayne. She looks really outstanding. The base sets her off just perfectly.
Next project???
If WNW hadnt released a deluge of kits I was on the brink of buying this kit from following your blog.
Keith
Still can't cure the AMS even with sausage finger implants & olde eyes.
New York, United States
Joined: December 15, 2006
KitMaker: 365 posts
AeroScale: 344 posts
Posted: Wednesday, December 05, 2012 - 11:13 AM UTC
Thank you kindly folks for the incouraging words. My kick doing this is the history and the colorful schemes that these machines were finished in. I could never touch the skill level many of you bring to the hobby and your kits. Thats why I concentrate on the really colorful schemes and try to finish them the best I can.
Lance, it's called static grass. Look to the war gaming sites and companies like Games Workshop. It comes in a variety of colors and a couple of bags will provide all you'll ever need at this level.
Dwayne
British Columbia, Canada
Joined: September 03, 2009
KitMaker: 6,965 posts
AeroScale: 6,247 posts
Posted: Wednesday, December 05, 2012 - 01:27 PM UTC
That deserves a day on the front page. Are you willing to send me the pics and a little description of the build?
When once you have tasted flight you will walk the Earth with your eyes turned skyward.
For there you have been, and there you will always long to return.
-Leonardo Da Vinci
Arizona, United States
Joined: December 12, 2008
KitMaker: 1,423 posts
AeroScale: 1,319 posts
Posted: Thursday, December 06, 2012 - 12:46 AM UTC
Hello Dwayne:
This is one neat model Dwayne. Who says Roden makes bad kits? I like your use of oils to highlight the panels and the base really adds a nice touch. Let Jessie C put it on the front page.
Outstanding comes to mind.
Best
Mark
We few, we happy few........
New York, United States
Joined: December 15, 2006
KitMaker: 365 posts
AeroScale: 344 posts
Posted: Thursday, December 06, 2012 - 07:05 PM UTC
Mark,
Many thanks. I couldn't agree more about Roden. We get spoiled by how well some of the kit manufacturers models fall into place. You have to bring your skills to bare when building a Roden kit but they reward you with a smart looking model when you're done.
Regards,
Dwayne


