_GOTOBOTTOM
Early Aviation
Discuss World War I and the early years of aviation thru 1934.
Udet's SSW D.III
Dwaynewilly
_VISITCOMMUNITY
New York, United States
Joined: December 15, 2006
KitMaker: 365 posts
AeroScale: 344 posts
Posted: Monday, October 15, 2012 - 06:35 AM UTC
Kind Folk,

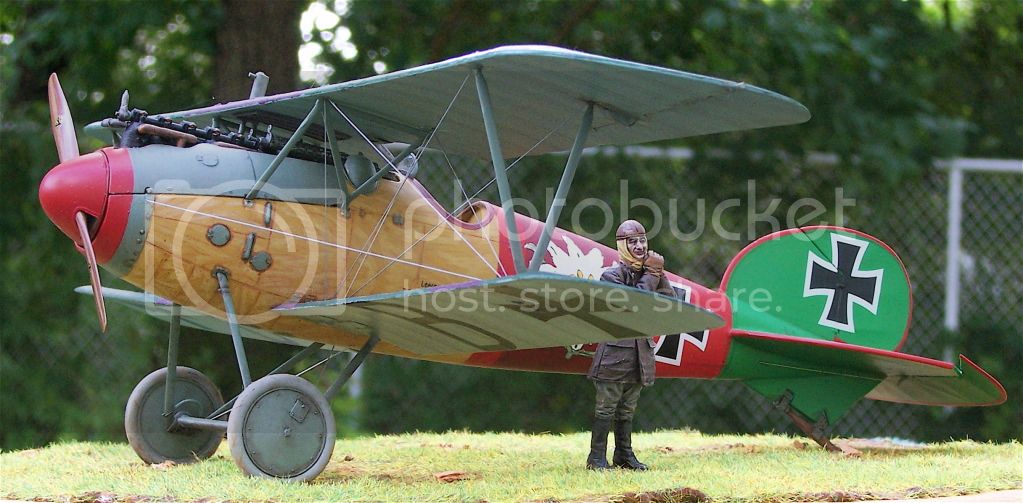
It's been a while and thought I'd share my latest endeavor into 1/32 scale, Rodens SSW D.III.


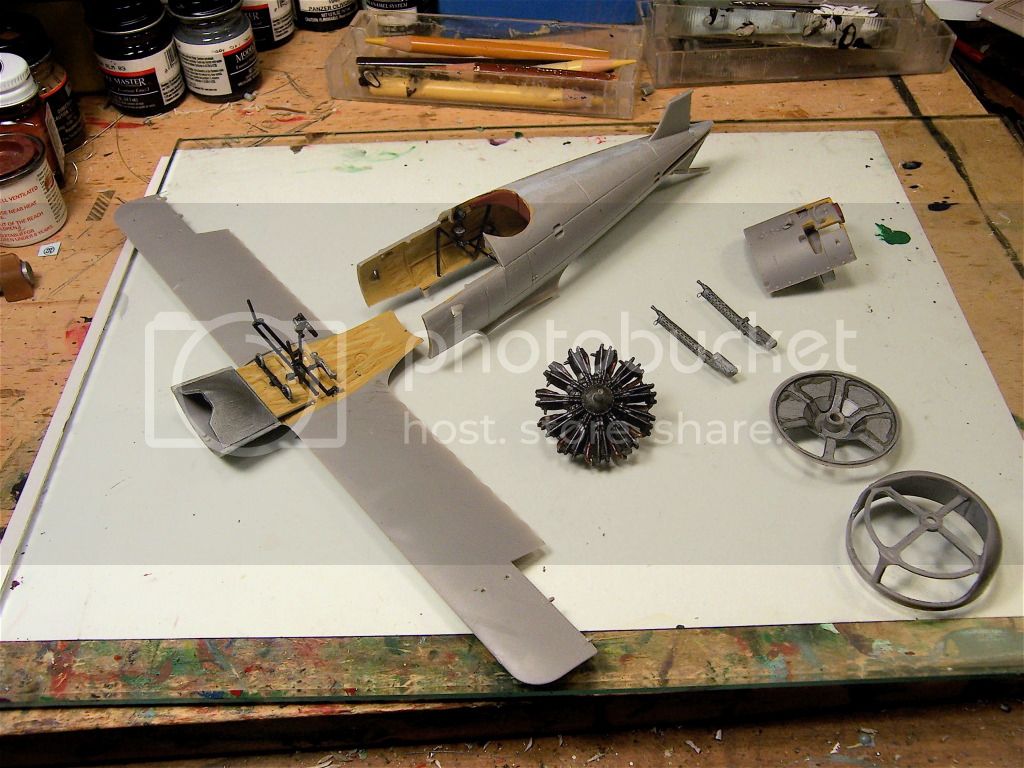
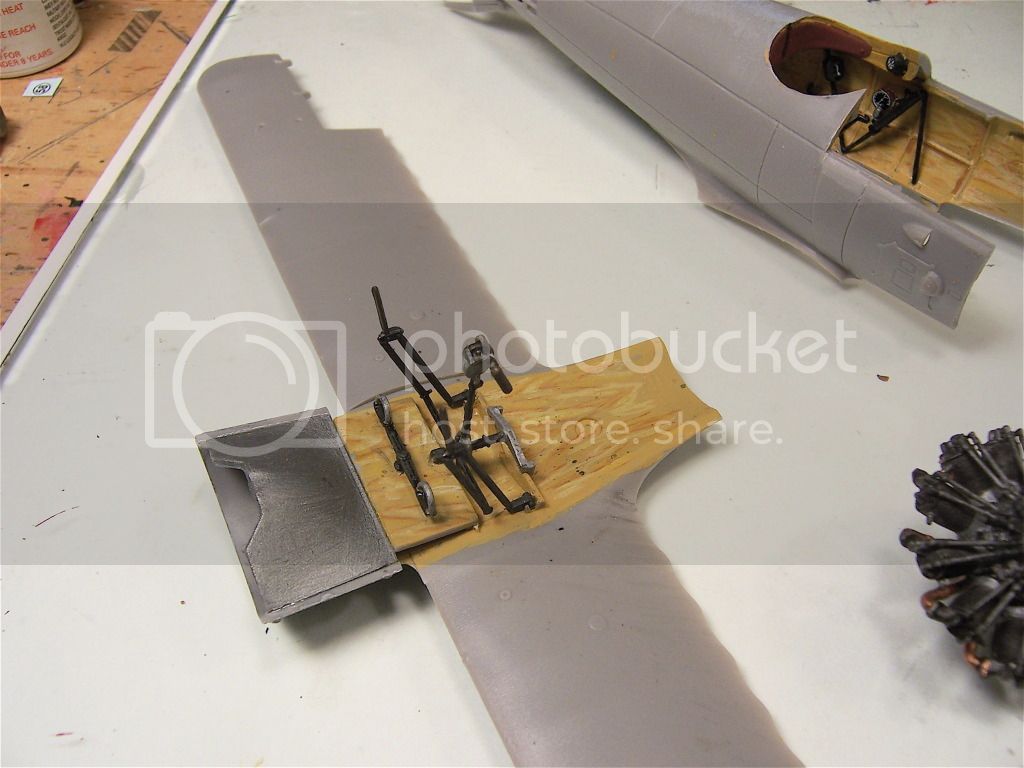
Bottom wing with steering

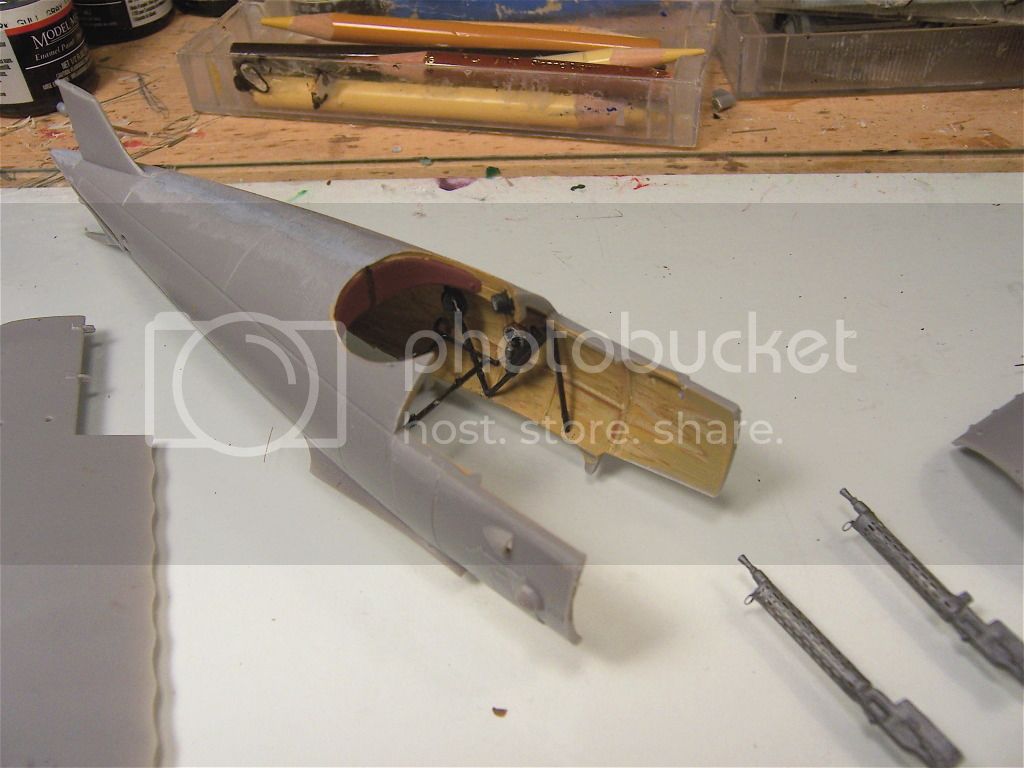
Fuselage with MGs

My impressions of the kit are this is no shake and bake affair. Roden kits require your full attention and draw heavily on your modeling skills. That being said, for some of the subject matter out there they are the only thing available and there is nothing wrong with a little work!

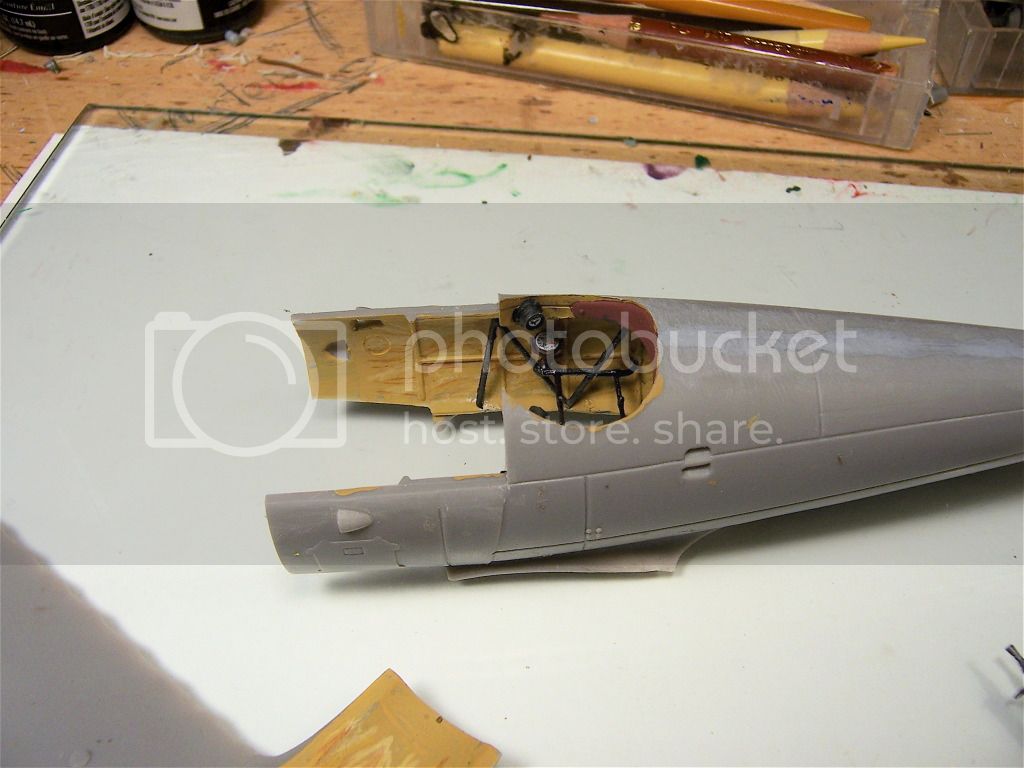
Fuselage with enterior

Aubassemblies


Since there is not a whole lot of documentation on the entire airplane I will be using some personal preferences as far as markings are concerned ... I mean, why not?!!!

Regards,
Dwayne

wolfpack6
_VISITCOMMUNITY
Alabama, United States
Joined: August 07, 2004
KitMaker: 179 posts
AeroScale: 80 posts
Posted: Monday, October 15, 2012 - 08:09 AM UTC
Please tell me how you did the wood grain on your master piece:)
Mgunns
_VISITCOMMUNITY
Arizona, United States
Joined: December 12, 2008
KitMaker: 1,423 posts
AeroScale: 1,319 posts
Posted: Monday, October 15, 2012 - 10:27 AM UTC
Hello Dwayne:

Looking good so far. I have seen a few build blogs featuring this kit, and it makes into an impressive model. The hot rod of its day. It will be fun to see how you do this as you progress.

Best

Mark
lcarroll
_VISITCOMMUNITY
Alberta, Canada
Joined: July 26, 2010
KitMaker: 1,032 posts
AeroScale: 1,025 posts
Posted: Monday, October 15, 2012 - 02:19 PM UTC
Dwayne;
I'll be following your progress closely, always been intrigued by this machine however still havn't taken the time to get some detailed perspective on her. I'd like to pick up the Kit and the Resin that Pheon markets for it; definitely one of the "meanest" (in appearance at least)subjects of her era.
Cheers,
Lance
OEFFAG_153
_VISITCOMMUNITY
Västra Götaland, Sweden
Joined: February 19, 2010
KitMaker: 1,473 posts
AeroScale: 1,450 posts
Posted: Monday, October 15, 2012 - 08:24 PM UTC
Hi Dwayne

Nice to see a build of yours, and looking very good! Excellent choice of subject too! I have this one in the pipeline so I'm really looking forward to your take on this puppy!

Mikael

Dwaynewilly
_VISITCOMMUNITY
New York, United States
Joined: December 15, 2006
KitMaker: 365 posts
AeroScale: 344 posts
Posted: Tuesday, October 16, 2012 - 01:45 AM UTC
Thanks for the words of encouragement.

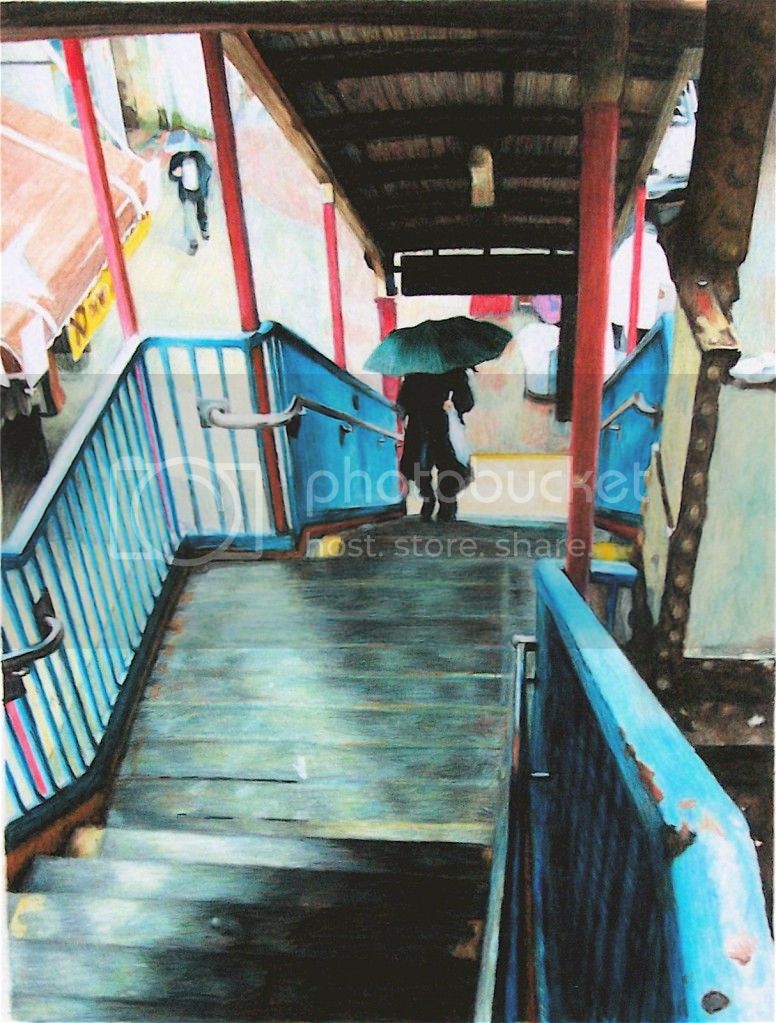
Todd, if you look at the top of several of the pictures you will see some colored pencils. They are made by Sanford and they go by the name of Prismacolor. They are made of pigment in a wax based binding and are mainly used for drawing. This is what I usually use them for:


Photobucket


I painted the base coat of the cockpit interior using Humbrol #63. I let that thoroughly dry. Then I drew the pattern of the wood grain using one of several photos of plywood that I have accumulated as a guide. I start with the light colors and then use a dark outline. Finally I use a medium color to blend the outline.

The colors are White, PC 938; Cream, PC914; Sand, PC940; Yellow Ochre, PC942 and Sienna Brown, PC945. The PC numbers are the Sanford catalog numbers in case you want to order them on line or at an art supply store like Pearl Paint. The first three are the light colors which I use to draw the pattern and give it some depth. I don't color over the entire base coat with these colors. Sienna is used for outlining the pattern and then Yellow Ochre is used for blending the outline with the base. Just draw over the Sienna outline with the Yellow Ochre. The wax binder requires you to press into the color underneath in order to "blend" them. Try it out on some scrap and you'll see how it works.

I used Airscale decals for the instrument dials and Karaya photoetch for the M.G. cooling jackets.

Dwayne
JackFlash
_VISITCOMMUNITY
Colorado, United States
Joined: January 25, 2004
KitMaker: 11,669 posts
AeroScale: 11,011 posts
Posted: Tuesday, October 16, 2012 - 04:20 AM UTC
Greetings Dwayne,

Here is a bit of fun on the subject. It is from my own review of this kit.

". . .References:
Eisernes Kreuz und Balkan Kreuz by H.Nowarra, Hoffman Pub. p.120, 1968.
German Army Air Service in WWI, Osprey, Vintage Warbirds #2, Photos 102-105, 1985.
German Fighter Units - June 1917-1918 by A.Imrie, Osprey Pub. 1978.
Lafayette Foundation Archive, Denver CO. USA.
Over the Front Vol. 2, #4, p.376, 1986.
Over the Front Vol.14, #3, p.280 1999.
Over the Front Vol.14, #4, p.368-370, 1999.
Over the Front Vol.15, #4, p.370, 2000.
Pictorial History of the German Army Air Service by A.Imrie, Ian Allan Pub. p.173, 1971.
Siemens Schuckert D.I/ III/ IV by Harry Woodman, Scale Models, Pp.348-352, July 1981.
Siemens Schuckert D.III & IV by P.L.Gray, Profile Pub. #86, 1966.
Spandau Machine Gun by David Watts, 1998 WWI Aero.
SSW D.III by Dick Bennett, WWI Aero #123, Feb. 1989.Pp.8-25.
SSW D.III Cockpits & Instruments by Roy Meyers, WWI Aero #123, Feb. 1989, Pp.72-75.
SSW D.III - D.IV by P.M.Grosz, Albatros Pub. Ltd. Windsock Datafile #29, 1991 & 98.

Comments;
An authority on the S.S.W. Mr. Richard (Dick) Bennett has graciously allowed me to use his data throughout this article and further his recent comments; ‘...The power developed by this engine is all over the map, depending on the source. Siemens ran dynamometer tests on one of the prototypes in 1917, and it put out 160 - 170 hp. One Siemens document credits it with a sustained power rating of 170 hp and a peak output of 240. Problem was that at low altitudes, where that peak power could have been developed, pilots' instructions forbid opening the throttle all the way. They were concerned that the high (for those days) compression would cause engine failure. Pilots were instructed to keep it below 850 rpm until they were above 3000 m. After that they could push it to the full 900 (or 1800, depending on how you look at it). Of course, at that altitude, the air density had dropped off, so a genuine 240 hp was unattainable...The British ran one on a test brake after the war and got 205 hp out of it...Both the Sh.3 and Sh.3a had the same displacement; I believe their power outputs were identical. The Rhemag engines were all Sh.3a's, because they didn't start production until after the engine had been redesigned. This is probably why they developed the reputation as being more reliable than the first Siemens-built engines. From what I've been able to find, the Siemens-built Sh.3a's were just as reliable & powerful as Rhemag's. Udet's engine is a fascinating one, because there doesn't seem to be any surviving information about what Rhemag did to hop it up. It may have been simply "balanced and blueprinted", as the professional high performance engine builders say...

Concerning the SSW D.III marked with the ‘V” Here's where the problem arises: Of the first 18 D. III types modified this way, one was sent to Idflieg for testing, one (D. 8350/17) went to Rhemag to become Udet's red hopped-up engine airframe, and the others were assigned to various Kests. Unless Jasta 15 markings were left on it through all this, the V was probably applied during its Kest service. That and the fact that Veltjens used a winged arrow on his other aircraft lead me to doubt it was his. In fact, this applies to all the post-rebuild D. III types issued. . ."
Dwaynewilly
_VISITCOMMUNITY
New York, United States
Joined: December 15, 2006
KitMaker: 365 posts
AeroScale: 344 posts
Posted: Tuesday, October 16, 2012 - 06:29 AM UTC
Thanks for the research input Stephen.

One other thing I should mention about the colored pencils. When you finish doing a section of the kit you're working on seal them with an acrylic based sealer. They will smudge under constant handling and and oil based sealer will dissolve the wax binder and basically melt your work.

Dwayne
OEFFAG_153
_VISITCOMMUNITY
Västra Götaland, Sweden
Joined: February 19, 2010
KitMaker: 1,473 posts
AeroScale: 1,450 posts
Posted: Tuesday, October 16, 2012 - 06:54 PM UTC
Very nice painting/drawing Dwayne, you are a very talented artist!

Mikael
lcarroll
_VISITCOMMUNITY
Alberta, Canada
Joined: July 26, 2010
KitMaker: 1,032 posts
AeroScale: 1,025 posts
Posted: Wednesday, October 17, 2012 - 12:22 AM UTC
Dwayne,
I'll be trying your woodgrain method on some old stock; I already had 2 of the Prismacolours you listed, will be getting the others today. I had bought them to experiment with "shading" but found Chalk Pastels better.
Can you tell me what colour Humbrol #63 is? I don't have a product List/Key for Humbrol nor a local source.
I like the effect you've achieved, nicely done!
Cheers,
Lance
Dwaynewilly
_VISITCOMMUNITY
New York, United States
Joined: December 15, 2006
KitMaker: 365 posts
AeroScale: 344 posts
Posted: Wednesday, October 17, 2012 - 12:53 PM UTC
Mikael,

Thanks for those kind words, glad you liked it. It is a drawing done totally with the colored pencils.


Lance,

Humbrol call it "Sand". You should be able to get your local retailer to order it by using #63.

This was my first attempt at using the pencils:

Photobucket

I don't know if I could keep a sharp enough point on the Prismacolor pencils to use them for 1/48 scale. I received a set of Sanford colored pencils that had a harder binder but I don't think they were the prismacolor ones and I'm not sure if they would "blend" as well. Unfortunately I no longer have them.

Good luck with the pencils and have fun.

Dwayne
Mgunns
_VISITCOMMUNITY
Arizona, United States
Joined: December 12, 2008
KitMaker: 1,423 posts
AeroScale: 1,319 posts
Posted: Thursday, October 18, 2012 - 01:09 PM UTC
Hello Dwayne:

Thanks for the tips on the pencils.

Best

Mark
guitarlute101
_VISITCOMMUNITY
West Virginia, United States
Joined: December 18, 2006
KitMaker: 1,121 posts
AeroScale: 1,063 posts
Posted: Thursday, October 18, 2012 - 01:32 PM UTC


Looking great Dwayne, Love your builds!!!

Mark
Dwaynewilly
_VISITCOMMUNITY
New York, United States
Joined: December 15, 2006
KitMaker: 365 posts
AeroScale: 344 posts
Posted: Friday, October 19, 2012 - 01:50 AM UTC
You're welcome and thank you to the "Marks" bros!

Dwayne
Dwaynewilly
_VISITCOMMUNITY
New York, United States
Joined: December 15, 2006
KitMaker: 365 posts
AeroScale: 344 posts
Posted: Sunday, October 21, 2012 - 12:33 PM UTC
Well here are some progress pics. The fuselage is finished and the lower wing is attached. This required quite a bit of test fitting with the wing/fuselage joint needing some putty and sanding. I applied a couple of coats of Humbrol#19 Gloss Red.


Top with Lozenge
Bottom with lozenge

The Lozenge decals have been applied to both wings and the elevator. I'm in the process of applying the rib tapes. The Roden decals are a bit fragile and will break, especially the large ones. They don't respond very well to Solvaset so they are a bit of a challenge to use. The rib tapes need to be cut from a panel supplied for that purpose. I coated the panel with Future acrylic so they wouldn't chip and break undergoing the knife. It worked for the most part but they still chipped and the edges aren't as straight as I wanted. I can imagine what would have happened if I didn't apply the Future. They turned out usable and thats good enough for me. Aside from the Airscale decals and the Karaya M.G. cooling jackets this is an out of the box build.

Rotary engine
Top wing with some tapes


Just have to finish up the rib and border tapes and then it's onto assembling the rest with a bit of weathering.

Dwayne
JackFlash
_VISITCOMMUNITY
Colorado, United States
Joined: January 25, 2004
KitMaker: 11,669 posts
AeroScale: 11,011 posts
Posted: Sunday, October 21, 2012 - 05:51 PM UTC
Did you know that on the original the wings, elevator, wheel covers, interplane and cabane struts were red too. The chin pan and landing gear legs were bare metal. Rudder is white.

Dwaynewilly
_VISITCOMMUNITY
New York, United States
Joined: December 15, 2006
KitMaker: 365 posts
AeroScale: 344 posts
Posted: Sunday, October 21, 2012 - 06:35 PM UTC
Stephen,

This is what I was referring to in my first post concerning the documentation on this Particular SSW D.III. I did some research on line and found this article on The Aerodrome:

http://www.theaerodrome.com/forum/models/46615-udets-sswdiii-red-wings.html

Dan-San and Greg Van were discussing the wings and the LO! in particular. I went with Greg on the wings and I went with my gut on the elevator and the port side LO!.
OEFFAG_153
_VISITCOMMUNITY
Västra Götaland, Sweden
Joined: February 19, 2010
KitMaker: 1,473 posts
AeroScale: 1,450 posts
Posted: Sunday, October 21, 2012 - 07:49 PM UTC
Nice and quick progress Dwayne. Very interesting discussion link on Udets SSW!

Mikael
JackFlash
_VISITCOMMUNITY
Colorado, United States
Joined: January 25, 2004
KitMaker: 11,669 posts
AeroScale: 11,011 posts
Posted: Monday, October 22, 2012 - 12:36 AM UTC

Quoted Text

Did you know that "ultimately" on the original D.8350/17 the wings, elevator, wheel covers, interplane and cabane struts were red too. The chin pan and landing gear legs were bare metal. Rudder is white.


Greetings Dwayne,
I should have added "ultimately" to my statement. Like any large area colour scheme it probably took some time to apply. Here are some of those images from Greg.


Mike G. Taylor of Misterkit USA also commented;
". . .I think what is safe to say is due to the progession of accumlitive markings . . . you'd be safe choosing either :

1. No "lo !" 's

2. one "lo ! " on the Right side only

3. Both "lo !" 's

4. Red with Day-Dark Loz wings with loz rib tapes

5. All over Red with Red Washed over Lozed Wings.

What ever your perfereance it appears there was a day the aircraft appeared that way. . ."
Mgunns
_VISITCOMMUNITY
Arizona, United States
Joined: December 12, 2008
KitMaker: 1,423 posts
AeroScale: 1,319 posts
Posted: Monday, October 22, 2012 - 04:38 AM UTC
Hello Dwayne:

It is coming along and cudos for tackling the Roden Lozenge! It has kept me from doing some of their other kits, this and the Fokker D.VI in particular. It is a neat model otherwise, and I look forward to more of your work and commentary.
It looks as if you could do any marking you want and it would be correct. That is nice to have that much leeway.

Best
Mark
gajouette
_VISITCOMMUNITY
Texas, United States
Joined: February 01, 2007
KitMaker: 365 posts
AeroScale: 356 posts
Posted: Monday, October 22, 2012 - 05:23 AM UTC
Dwayne,
Beautiful work my old friend. Love that outstanding woodwork.
Highest Regards,
Gregory Jouette
Dwaynewilly
_VISITCOMMUNITY
New York, United States
Joined: December 15, 2006
KitMaker: 365 posts
AeroScale: 344 posts
Posted: Monday, October 22, 2012 - 07:09 AM UTC
Thanks Gregory, good to hear from you.

Mark,

I know this is a late war machine and that it isn't known how much combat flying Udet actually did with it. I wanted to be as sure as is possible and there were questions in my mind on whether Rodens take on the markings were correct.

Reading that blog from the Aerodrome was both informative and nostalgic at the same time. I have a tremendous amount of respect for both Dan-San and Greg Van, knowing how much both of those men put into their research and understanding, it was like playing in the footsteps of Giants! The best part was bringing Dan-San back into view. I think he is very much missed by us all and it was fun to read his thoughts and take a lesson, relearned if you will, from the master again.

Blue Skies,
Dwayne
CaptainA
_VISITCOMMUNITY
Indiana, United States
Joined: May 14, 2007
KitMaker: 3,117 posts
AeroScale: 2,270 posts
Posted: Tuesday, October 23, 2012 - 01:00 AM UTC
Your build is looking good. I think when I try this one I will use aftermarket decals.
thegirl
_VISITCOMMUNITY
Alberta, Canada
Joined: January 19, 2008
KitMaker: 6,743 posts
AeroScale: 6,151 posts
Posted: Tuesday, October 23, 2012 - 07:26 AM UTC
Coming along beautifully Dwanye . Nice to see this aircraft scheme , one can go either way with it and still look good !


Terri
Dwaynewilly
_VISITCOMMUNITY
New York, United States
Joined: December 15, 2006
KitMaker: 365 posts
AeroScale: 344 posts
Posted: Tuesday, October 23, 2012 - 12:05 PM UTC
I hear you loud and clear Captain. I'll probably do the same if this kit ever crosses my bench again!

Thanks Teri. Sometimes the historical record isn't complete and an educated guess is the best we can do. I'm certainly not above using my own preferences if given the latitude.

Dwayne
 _GOTOTOP