1:32 Tamiya Mustang Build
New York, United States
Joined: June 08, 2013
KitMaker: 197 posts
AeroScale: 193 posts
Posted: Monday, June 10, 2013 - 10:13 AM UTC
Nige
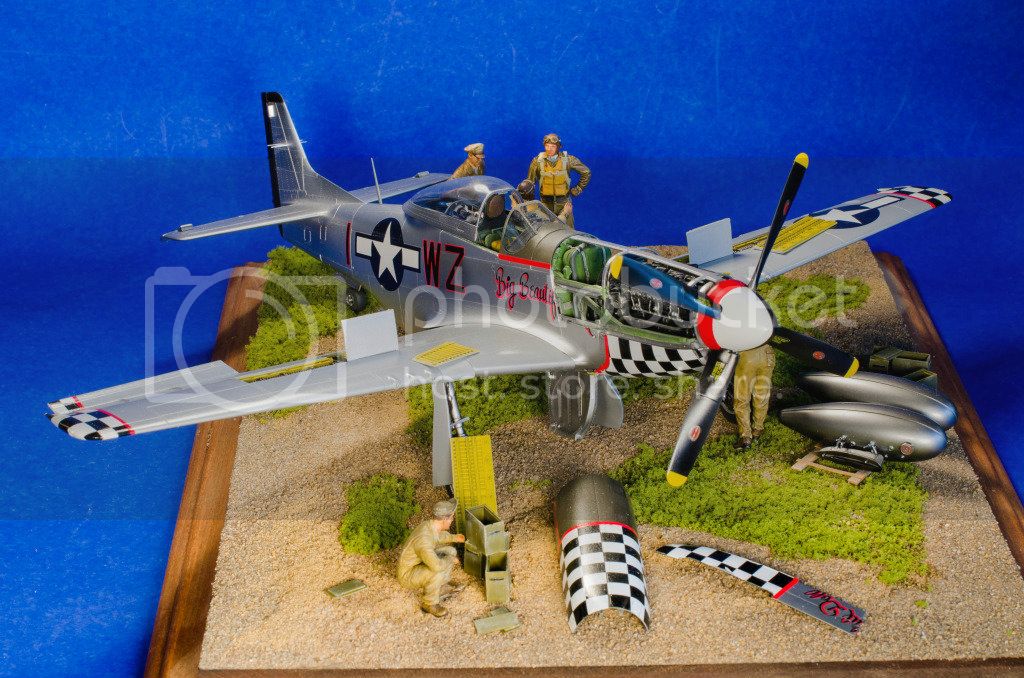
Thank you the permission to post few photographs of my completed Tamiya Mustang. Lots of Barracuda Resin Upgrades were used in the cockpit and for the wheels and tires as well.Just gorgeous upgrades.
Looking forward to your progress and next update
Thanks Peter

Peter
On the Bench
1/32 Tamiya Mosquito Mk VI
Joel_W
 Associate Editor
New York, United States
Joined: December 04, 2010
KitMaker: 11,666 posts
AeroScale: 7,410 posts
Posted: Monday, June 10, 2013 - 11:19 AM UTC
Pete, As I've said from the start, it's an outstanding build. Love the NNF, and the Vignette, which is 1st rate.
Ok everyone. I've seen this build from day one to completion and then some. You see, Pete and I are bothers,& long time model builders for more years then we can to admit to. Lets just say that we were building models for the 1st time back in the mid 60s.
Joel
On my Workbench:
Monogram 1/24 scale 427 Shelby Cobra
Just Completed:
Beemax 1/24 scale BMW M3 E30 1992 Evolution II
Holdfast
 President
#056
England - South West, United Kingdom
Joined: September 30, 2002
KitMaker: 8,581 posts
AeroScale: 4,913 posts
Posted: Monday, June 10, 2013 - 06:12 PM UTC
Pete, I will be doing my P-51 as BBD as well

I just love these markings. I have a major problem though; as I am painting on the the markings I am struggling to get the checkers for the nose drawn accurately (everything else is waiting to go, including the BBD script). not one of the "squares" is square so trying to get the exact shape of each one is, I think, not feasible because if one is slightly wrong then its nieghbour is out as well! So, assuming that you used decals, whose decals were they? and if you painted them on how did you do it?
A great looking P-51, thanks for sharing

MAL the MASK
BULLDOG # 6 (President)
BEWARE OF THE FEW
Sappers: First in, last out. (UBIQUE)
It's not the same, better, but not the same.

#029
England - East Midlands, United Kingdom
Joined: December 23, 2005
KitMaker: 6,249 posts
AeroScale: 3,270 posts
Posted: Tuesday, June 11, 2013 - 05:38 AM UTC
She's a beauty Pete,
Hope you submit loads of photos for a feature


Nige
It's not the same, better, but not the same...
New York, United States
Joined: June 08, 2013
KitMaker: 197 posts
AeroScale: 193 posts
Posted: Tuesday, June 11, 2013 - 10:09 AM UTC
Thanks JA
But I think our model building days go back even further then that. Good thing you're older by 30 minutes!
Peter
Peter
On the Bench
1/32 Tamiya Mosquito Mk VI
New York, United States
Joined: June 08, 2013
KitMaker: 197 posts
AeroScale: 193 posts
Posted: Tuesday, June 11, 2013 - 10:15 AM UTC
Thank Mal
Appreciate the kind words. All the markings, checker board and decals are from EagleCal. Incredible decals and of the highest quality. I just can't image how much work it will take to mask and paint the checkerboards. The decals fit perfectly after a bit a adjustment and sit down with no problems at all.
Looking forward to seeing your BBD Mustang.
Peter
On the Bench
1/32 Tamiya Mosquito Mk VI
New York, United States
Joined: June 08, 2013
KitMaker: 197 posts
AeroScale: 193 posts
Posted: Tuesday, June 11, 2013 - 10:19 AM UTC
Hi Nige
Thanks so much for the kind words and letting me post a few photos of BBD on your thread. I'll open up a thread in the On Display area, so as not to interfere with your build.
Peter
On the Bench
1/32 Tamiya Mosquito Mk VI
British Columbia, Canada
Joined: September 03, 2009
KitMaker: 6,965 posts
AeroScale: 6,247 posts
Posted: Tuesday, June 11, 2013 - 10:36 AM UTC
Quoted Text
Hi Nige
Thanks so much for the kind words and letting me post a few photos of BBD on your thread. I'll open up a thread in the On Display area, so as not to interfere with your build.
You could also send it to the staff so we can put it on the front page...
When once you have tasted flight you will walk the Earth with your eyes turned skyward.
For there you have been, and there you will always long to return.
-Leonardo Da Vinci

#029
England - East Midlands, United Kingdom
Joined: December 23, 2005
KitMaker: 6,249 posts
AeroScale: 3,270 posts
Posted: Tuesday, June 11, 2013 - 10:37 AM UTC
Your welcome Peter

Btw, masking checkerboards isn't as hard as you think. Just a bit tedious

Nige

It's not the same, better, but not the same...
Holdfast
 President
#056
England - South West, United Kingdom
Joined: September 30, 2002
KitMaker: 8,581 posts
AeroScale: 4,913 posts
Posted: Tuesday, June 11, 2013 - 07:38 PM UTC
Quoted Text
Btw, masking checkerboards isn't as hard as you think. Just a bit tedious
Yep I know that Nige but I am trying to create the individual squares so that the masking can be done in a single process, and that is an absolute nightmare; none of the segments are actually a square and if any one of the segments aren't perfect then it doesn't sit right on the compound curvature of the nose. I have the upper cowling done but that is comparatively easy to the rest of it. I was thinking of supplying simple thin lengths of masking material but that just seems like a cop out! I have the same problem with the P-47 Cowling! This is the reason that these aircraft aren't getting built!!!!
MAL the MASK
BULLDOG # 6 (President)
BEWARE OF THE FEW
Sappers: First in, last out. (UBIQUE)
It's not the same, better, but not the same.
Joel_W
 Associate Editor
New York, United States
Joined: December 04, 2010
KitMaker: 11,666 posts
AeroScale: 7,410 posts
Posted: Wednesday, June 12, 2013 - 01:47 AM UTC
Mal, individually masking the checker pattern sounds like a true nightmare that requires a great deal of work just to align them correctly. Pete used EagleCal decals, and they came out perfect. Why not give them a try, and save yourself all the aggravation you seem to be going through.
If you still want to do it with individual masks, your idea of small strips for the outline seems the logical way to handle compound curves.
Joel
On my Workbench:
Monogram 1/24 scale 427 Shelby Cobra
Just Completed:
Beemax 1/24 scale BMW M3 E30 1992 Evolution II
Holdfast
 President
#056
England - South West, United Kingdom
Joined: September 30, 2002
KitMaker: 8,581 posts
AeroScale: 4,913 posts
Posted: Wednesday, June 12, 2013 - 03:05 AM UTC
Hi Joel,
I cannot use decals as I produce paint masks and that would be sacrilege

Actually laying out the individual squares is easy, if they are the right shape to take in the curvature. They only have to microscopically out and it all starts going wrong! I have got part way but there is just to much going on lower down after the exhaust opening. I think that using thin strips is the way to go, so I'm going to give that method a go

MAL the MASK
BULLDOG # 6 (President)
BEWARE OF THE FEW
Sappers: First in, last out. (UBIQUE)
It's not the same, better, but not the same.
Joel_W
 Associate Editor
New York, United States
Joined: December 04, 2010
KitMaker: 11,666 posts
AeroScale: 7,410 posts
Posted: Wednesday, June 12, 2013 - 03:44 AM UTC
Mal, I see.
I'm new to Aeroscale as I've been strictly building armor for the last few years. Pete, (whose my brother) got me back into aircraft modeling, so here I am.
I'm assuming that you sell your masks, do you have a web site so I can see what masks are available?
Joel
On my Workbench:
Monogram 1/24 scale 427 Shelby Cobra
Just Completed:
Beemax 1/24 scale BMW M3 E30 1992 Evolution II

#029
England - East Midlands, United Kingdom
Joined: December 23, 2005
KitMaker: 6,249 posts
AeroScale: 3,270 posts
Posted: Sunday, October 06, 2013 - 10:54 AM UTC
One thing nobody can accuse me of doing is rushing a build thats for sure

Finally got a bit of benchtime today and did some detail painting on the Mustang.
I've made a start on the cockpit walls and various bits and pieces that will be attached to them in due course.
For now though, it's been a bit of detail painting and dry brushing on the cockpit.
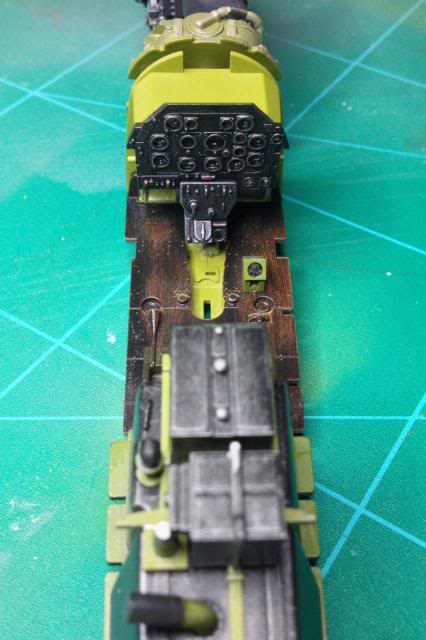
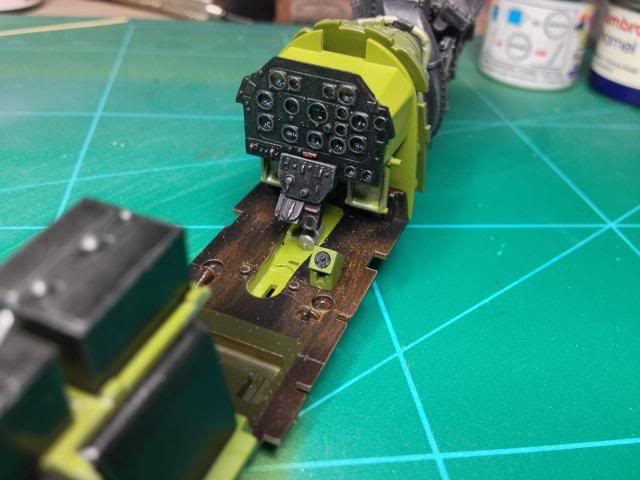
Not a massive amount of progress but it IS progress

Watch this space,,but don't wait up

Nige

It's not the same, better, but not the same...
Holdfast
 President
#056
England - South West, United Kingdom
Joined: September 30, 2002
KitMaker: 8,581 posts
AeroScale: 4,913 posts
Posted: Sunday, October 06, 2013 - 08:00 PM UTC
Its just nice to see you posting mate, pits looking good too

MAL the MASK
BULLDOG # 6 (President)
BEWARE OF THE FEW
Sappers: First in, last out. (UBIQUE)
It's not the same, better, but not the same.
Joel_W
 Associate Editor
New York, United States
Joined: December 04, 2010
KitMaker: 11,666 posts
AeroScale: 7,410 posts
Posted: Monday, October 07, 2013 - 01:22 AM UTC
Nigel, everyone works at their own pace, since we all have different responsibilities in life that get in the way of our bench time. Just build and post when you can.
Guess I'm luckier then most. I have two off days from work, that I do spend a great deal of modeling. Need to get my butt into gear around the house, so my modeling time will be decreasing some. Good news is that the end of Nov. I semi-retire. for me that's 4 days/32 hours. Hopefully that translates into a little more modeling time each week.
Joel
On my Workbench:
Monogram 1/24 scale 427 Shelby Cobra
Just Completed:
Beemax 1/24 scale BMW M3 E30 1992 Evolution II
Maryland, United States
Joined: March 01, 2013
KitMaker: 152 posts
AeroScale: 98 posts
Posted: Monday, October 07, 2013 - 05:52 AM UTC
Beautiful work, Peter!

Dan
Current Build: Italeri P-40E/K 1:48

#029
England - East Midlands, United Kingdom
Joined: December 23, 2005
KitMaker: 6,249 posts
AeroScale: 3,270 posts
Posted: Sunday, February 09, 2014 - 03:22 AM UTC
Well I finally found time to spend a couple of hours at the bench and make a miniscule amount of progress on this.
The cockpit sidewalls are together and blocked out, ready for some Barracuda decals and then drybrushing/weathering.
I made a start on the seabealts too. Im using a set of HGW fabric belts. The detail is amazing but they are soooo fiddly. I got one of the lap belts together and that was enough for one sitting!
The rudder is going to be red/white checkers and I figure the easiest way to paint this will be to do it as a separate part before the tail is assembled, so after a preshade of black I dusted on the white base coat.After a couple of coats of Klear have been applied I'll mask off ready for the red bits


Nige
It's not the same, better, but not the same...
Joel_W
 Associate Editor
New York, United States
Joined: December 04, 2010
KitMaker: 11,666 posts
AeroScale: 7,410 posts
Posted: Sunday, February 09, 2014 - 05:28 AM UTC
Nigel, really nice to see another update. Looking good. I like your idea on how to paint the tail checkerboard. Without having to contend with the rest of the aircraft, it should be a lot easier.
Joel
On my Workbench:
Monogram 1/24 scale 427 Shelby Cobra
Just Completed:
Beemax 1/24 scale BMW M3 E30 1992 Evolution II
Uppsala, Sweden
Joined: January 09, 2008
KitMaker: 92 posts
AeroScale: 90 posts
Posted: Sunday, February 09, 2014 - 09:14 AM UTC
Great work so far! I've been building the Tamiya Spit for a while, a truly great kit - and I understand that the Mustang might be even better.
Wouldn't it be fairly easy for Mal to make a mask for the tail? Everything is pretty straight and even. But it would be interesting to see how you manage the masking. I'm planning to build a Fw190 with a checkered cowling and could sure use some pointers on how to mask it.
/Fred

#029
England - East Midlands, United Kingdom
Joined: December 23, 2005
KitMaker: 6,249 posts
AeroScale: 3,270 posts
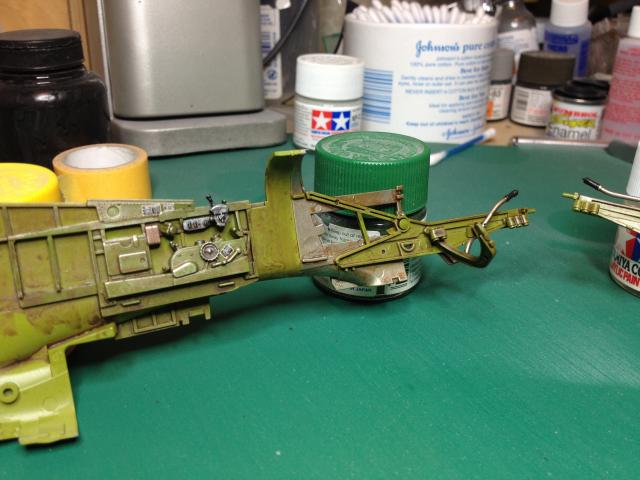
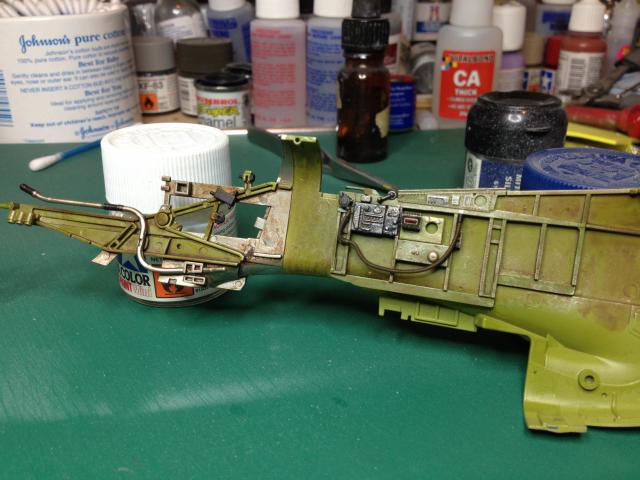
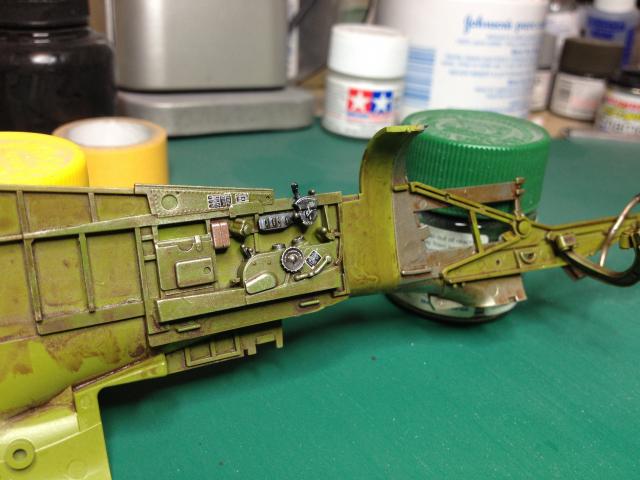
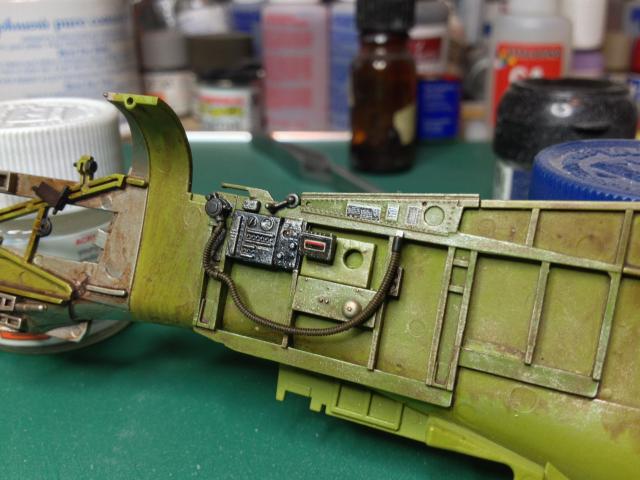
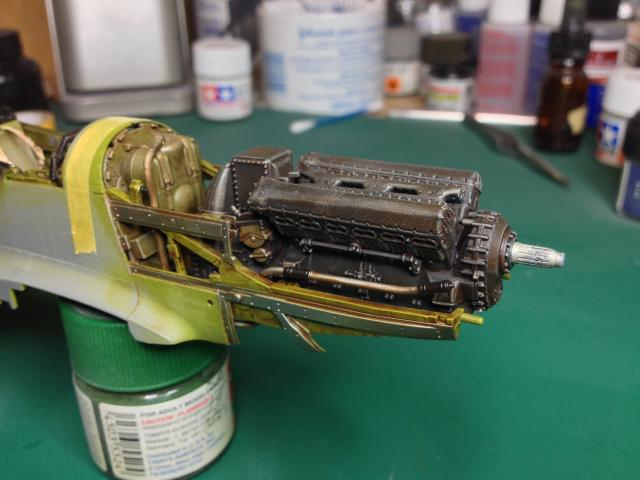
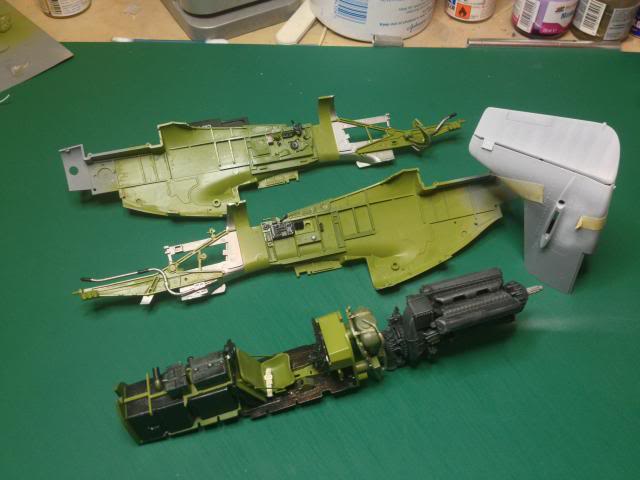
Posted: Monday, May 05, 2014 - 10:35 AM UTC
It's not the same, better, but not the same...
Merlin
 Senior Editor
#017
United Kingdom
Joined: June 11, 2003
KitMaker: 17,582 posts
AeroScale: 12,795 posts
Posted: Monday, May 05, 2014 - 07:49 PM UTC
Hi Nige
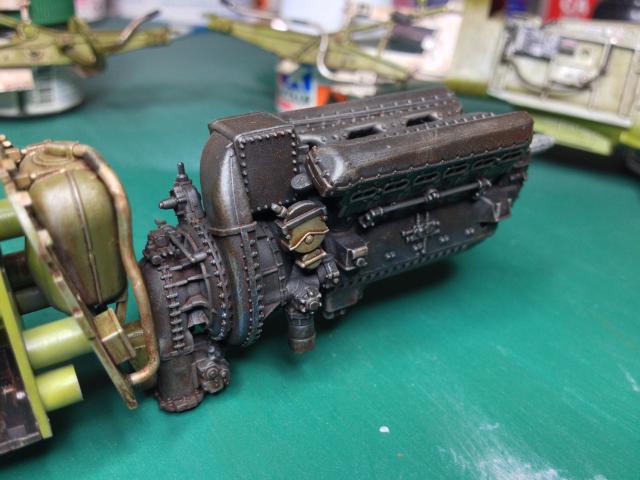
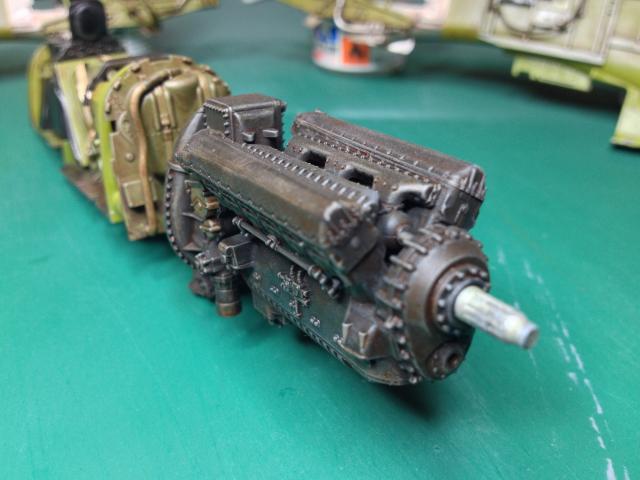
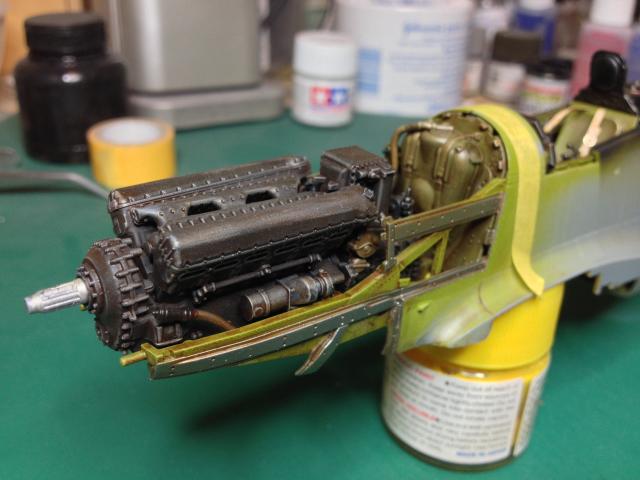
Nice to see another update. I really like some of the oily tones you've got happening on the engine and accessories.

All the best
Rowan

BEWARE OF THE FEW...
As I grow older, I regret to say that a detestable habit of thinking seems to be getting a hold of me. - H. Rider Haggard
Joel_W
 Associate Editor
New York, United States
Joined: December 04, 2010
KitMaker: 11,666 posts
AeroScale: 7,410 posts
Posted: Tuesday, May 06, 2014 - 03:10 AM UTC
Nigel,
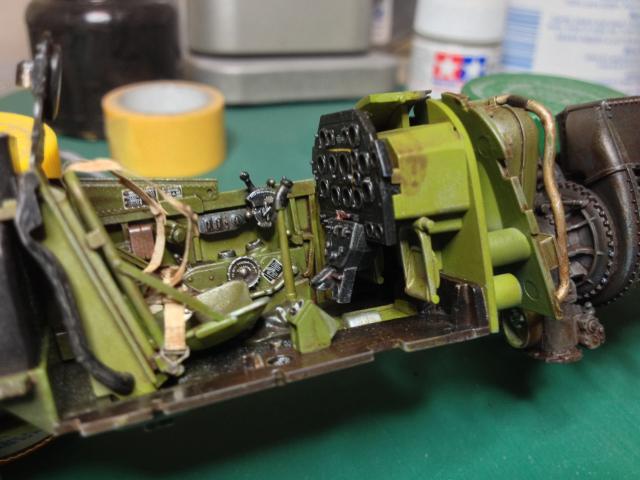
Your fuselage halves really look good. The weathering washes are just what it needed. Hope to see another update soon. Well, sooner then later.
Joel
On my Workbench:
Monogram 1/24 scale 427 Shelby Cobra
Just Completed:
Beemax 1/24 scale BMW M3 E30 1992 Evolution II
Alberta, Canada
Joined: January 19, 2008
KitMaker: 6,743 posts
AeroScale: 6,151 posts
Posted: Thursday, May 08, 2014 - 12:18 PM UTC
Always worth the wait Nigel . Out standing job on the wreathing . What really stands out for me is the cockpit floor , best I have seen , well done on creating a realistic effect

Terri
Holdfast
 President
#056
England - South West, United Kingdom
Joined: September 30, 2002
KitMaker: 8,581 posts
AeroScale: 4,913 posts
Posted: Thursday, May 08, 2014 - 06:02 PM UTC
Nicely done mate

I still haven't started mine

but I do have several models on the go and I am about to start the 1/24 Typhoon

so it won't get started for a while.
MAL the MASK
BULLDOG # 6 (President)
BEWARE OF THE FEW
Sappers: First in, last out. (UBIQUE)
It's not the same, better, but not the same.


