Early Aviation
Discuss World War I and the early years of aviation thru 1934.
KotS III GB Fok. D.VII (ALB.)
OEFFAG_153
_VISITCOMMUNITY
Västra Götaland, Sweden
Joined: February 19, 2010
KitMaker: 1,473 posts
AeroScale: 1,450 posts
Posted: Sunday, April 14, 2013 - 01:55 AM UTC

Quoted Text

Looking just as great as I'd expected it to Mikael. Excellent work for certain, not that I doubted for one moment it wouldnt be.

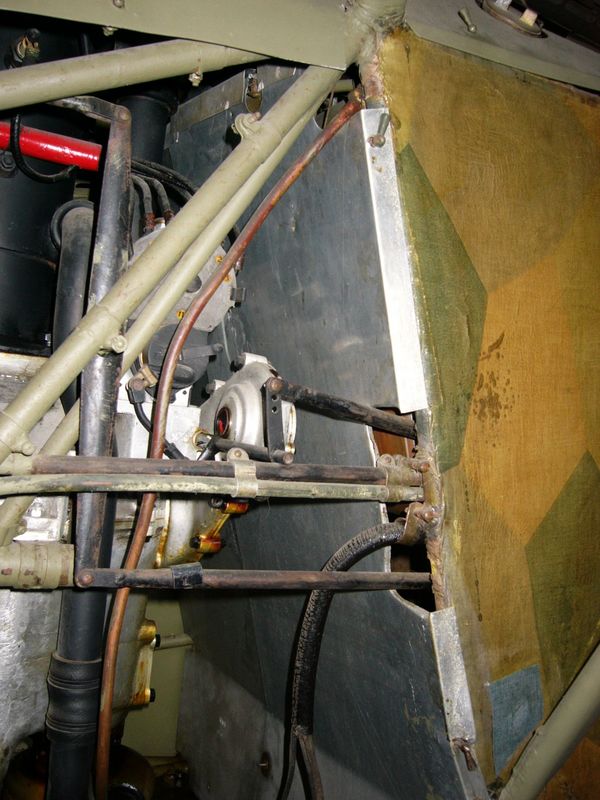
One point to check though. The airpump pipework... does it clear the back of the radiator assembly, mines quite tight to the cylinder front.

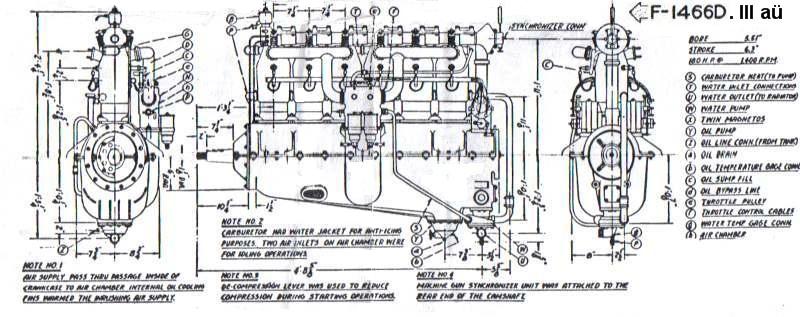
Also any idea where the pipe runs from the balance bottle rearwards, I'm scratching my head over that as all my ref shows it disconnected. Though some pics of the opposite rear upper engine show a pipe appearing under the cam shaft behind the rear cylinder and eventually vanishing through the firewall. My assumption from this is it runs behind the carb body then rises to below the camshaft to cross. Any idea's Mikael... or anyone to that matter.

Keith


Thank You so very much Keith, always great to read your comments

Its also very good to have you ahead of me, scouting the way so to speak. Yes, I think you're very right about the pipes and the radiator, I'll need to adjust them as I mount them together. Fortunately they are pretty flexible.

I've been pondering the same questions myself – I have added the pipe connection from the firewall, that will run into the "back" of the first cylinder – I figured it might have something to do with the grease pump? Though probably not I'm unfortunately not too familiar with the functions of some of the ancillaries on the DIII engines.

When you say the balance bottle – are you referring to the two cylinders on the carburetor? I have been pouring over pictures of this and I can only follow the thin pipes down under the sump, where they seem to stop... The main fuel lines I have been able to pin point though... Maybe you're refering to the same pipes? Anyway, as you can read here I'm probably more bewildered than you

So if there is anyone that have some info – please do tell!

Cheers for now

Mikael
OEFFAG_153
_VISITCOMMUNITY
Västra Götaland, Sweden
Joined: February 19, 2010
KitMaker: 1,473 posts
AeroScale: 1,450 posts
Posted: Sunday, April 14, 2013 - 01:57 AM UTC
Diego – Thank You so very much!

Mikael
JackFlash
_VISITCOMMUNITY
Colorado, United States
Joined: January 25, 2004
KitMaker: 11,669 posts
AeroScale: 11,011 posts
Posted: Sunday, April 14, 2013 - 03:11 AM UTC
Balance bottle?
OEFFAG_153
_VISITCOMMUNITY
Västra Götaland, Sweden
Joined: February 19, 2010
KitMaker: 1,473 posts
AeroScale: 1,450 posts
Posted: Sunday, April 14, 2013 - 03:42 AM UTC

Quoted Text

Balance bottle?


Hi Stephen – just the man we need I think!

Well, I'm unsure as to which part Keith is refereing to, but I'm sure he knows and has a good reason for naming it so

I guess, what we both are looking for is some schematic or reference for the various small fuel lines, and plumbing on the D.VII with the D.IIIaü engines.

For instance, the pipe running through the firewall on the upper right corner (seen from the pilot), connecting over the cam/first cylinder. What is its job, and where does it go after this? There is a good pic of it in the Fokker D.VII Antology 1 p.15 picture 11.

Also the small fuel lines (4?) connecting to various points on the brass cylinders on the carburettor, then going down under the sump... In the pic in the same Fokker antohlogy 1 pic 7 on page 14 they seen disconnected... How were they connected and where did they eventually end up?

Well hope any of this makes some sense

Best Regards

Mikael
Kornbeef
_VISITCOMMUNITY
England - South East, United Kingdom
Joined: November 06, 2005
KitMaker: 1,667 posts
AeroScale: 1,551 posts
Posted: Sunday, April 14, 2013 - 04:16 AM UTC
by balance bottle I meant from the air pump, the canister it connects to between the two front cylinders in front of the carb.
On engines with the single air pump the pipe runs in various ways but one seems to run along above the exhaust to the point similar to the pipe that vanihes through the firewall. This led me to believe that is the fuel pressure pipe to the fuel control valves (which vary between manufacturers obviously.. grrr lol.

On the Alb the greaser pipe runs from the opening where the throttle liknkage, spark advance linkage etc comes through on the left hand side, down the frame to the greaser on the water pump. you can see it quite simply in pics of the Brome County D.VII OAW folloed Fokkers method location and routing I believe.

the 4 thin ipes were drain offs I think, simply exiting between the rear of the chin cowl and lower panel
OEFFAG_153
_VISITCOMMUNITY
Västra Götaland, Sweden
Joined: February 19, 2010
KitMaker: 1,473 posts
AeroScale: 1,450 posts
Posted: Sunday, April 14, 2013 - 06:33 AM UTC
Cheers Keith for the good intel. – drainage makes sense going by how it looks – and now I know where the grease pump runs too...

Yes I see what you mean about the canister connected to the air pump, I guess I never realised that it connected in turn towards the cockpit... I does seem logical that it could be the pipe through the fire wall over the back of the engine. Though like you say, it probably varied with the different producers... Hmmm Im going to have a closer look at my sources.

Mikael
JackFlash
_VISITCOMMUNITY
Colorado, United States
Joined: January 25, 2004
KitMaker: 11,669 posts
AeroScale: 11,011 posts
Posted: Sunday, April 14, 2013 - 10:47 AM UTC


JackFlash
_VISITCOMMUNITY
Colorado, United States
Joined: January 25, 2004
KitMaker: 11,669 posts
AeroScale: 11,011 posts
Posted: Sunday, April 14, 2013 - 10:54 AM UTC
JackFlash
_VISITCOMMUNITY
Colorado, United States
Joined: January 25, 2004
KitMaker: 11,669 posts
AeroScale: 11,011 posts
Posted: Sunday, April 14, 2013 - 11:02 AM UTC
JackFlash
_VISITCOMMUNITY
Colorado, United States
Joined: January 25, 2004
KitMaker: 11,669 posts
AeroScale: 11,011 posts
Posted: Sunday, April 14, 2013 - 11:26 AM UTC
OEFFAG_153
_VISITCOMMUNITY
Västra Götaland, Sweden
Joined: February 19, 2010
KitMaker: 1,473 posts
AeroScale: 1,450 posts
Posted: Sunday, April 14, 2013 - 06:49 PM UTC
Thank You Stephen!  – Those are most helpful!

Mikael
JackFlash
_VISITCOMMUNITY
Colorado, United States
Joined: January 25, 2004
KitMaker: 11,669 posts
AeroScale: 11,011 posts
Posted: Wednesday, April 17, 2013 - 08:14 AM UTC
Good work on the Pfalz diorama. (Because next year's KotS is going to have a diorama theme.)
OEFFAG_153
_VISITCOMMUNITY
Västra Götaland, Sweden
Joined: February 19, 2010
KitMaker: 1,473 posts
AeroScale: 1,450 posts
Posted: Wednesday, April 17, 2013 - 09:40 PM UTC
Thank You Stephen – feels good to be ahead of the game

Mikael
OEFFAG_153
_VISITCOMMUNITY
Västra Götaland, Sweden
Joined: February 19, 2010
KitMaker: 1,473 posts
AeroScale: 1,450 posts
Posted: Thursday, April 18, 2013 - 03:20 AM UTC
Hi all,

Time for another update. The build is flowing fairly well, gluing the body halves together was pretty uneventful, with only a small gap just behind the cockpit to tend to. The bottom seam is a brilliant move on WNWs behalf, and it really reduces any filling and sanding.

Everything fits really well, but it is tight, so as mentioned before – dry fitting is the key...

I've chosen not to ad the engine at this stage – I plan to finish most of the painting, before I do this. It is out of sequence with the instructions, but I feel its ease to handle the model this way.

Here are the results so far:


Only some small gaps to fix.


I'm going to leave both the hatch and the small circular access open I think...


Oh, yes – two sink marks on the bottom... Easy to fix though. The bottom seam is really handy.


Waiting for the engine...

There we are – last night I masked in waiting for base coat – I hope to be able to get to that this weekend.

Thank You for looking. All and any comments are as usual most welcome.

Mikael
Kornbeef
_VISITCOMMUNITY
England - South East, United Kingdom
Joined: November 06, 2005
KitMaker: 1,667 posts
AeroScale: 1,551 posts
Posted: Thursday, April 18, 2013 - 04:29 AM UTC
Coming together well Mikael.

Your catching me fast, I better get my finger out over the weekend.

I think leaving the engine out till you have to fit it to connect all the linkages is the way to go, I did but still fitted it earlier than would have been best...

Are you going to fit the coaming and cowls over the tank (1 piece)before painting? I'd recommend it, it leaves an ugly seam thats impossible to hide otherwise. (I'd thought WNW could have handled that area better and modded mine to include the lip)

Keith
Keith
Mgunns
_VISITCOMMUNITY
Arizona, United States
Joined: December 12, 2008
KitMaker: 1,423 posts
AeroScale: 1,319 posts
Posted: Thursday, April 18, 2013 - 06:03 AM UTC
Hello Mikael:

I am just now catching up with the build. You are making good progress to date and it is looking good. I like what you did with the inside lozenge and as has been said, the engine speaks for itself.

Best

Mark
OEFFAG_153
_VISITCOMMUNITY
Västra Götaland, Sweden
Joined: February 19, 2010
KitMaker: 1,473 posts
AeroScale: 1,450 posts
Posted: Friday, April 19, 2013 - 09:01 PM UTC

Quoted Text

Coming together well Mikael.

Your catching me fast, I better get my finger out over the weekend.

I think leaving the engine out till you have to fit it to connect all the linkages is the way to go, I did but still fitted it earlier than would have been best...

Are you going to fit the coaming and cowls over the tank (1 piece)before painting? I'd recommend it, it leaves an ugly seam thats impossible to hide otherwise. (I'd thought WNW could have handled that area better and modded mine to include the lip)

Keith
Keith


Thank You very much Kieth – like I said before, Its very nice to have you ahead of the game We'll see if I catch you up or not – this weekend will not see me do much building at all I'm afraid – too much work on my hands.

Yes, I will leave the cockpit coaming/cowling off on this one – I feel there is much interesting going on there, that I like to show. We'll see how this works. On my other build I will include the coaming, so thanks for the heads up on this issue! I will probably solve it the same as you – adding a slight lip!

@ Mark – Always nice to have you stopping by! Thank You very much for your very kind comments.

All the best to everyone

Mikael

CaptainA
_VISITCOMMUNITY
Indiana, United States
Joined: May 14, 2007
KitMaker: 3,117 posts
AeroScale: 2,270 posts
Posted: Sunday, April 21, 2013 - 12:25 AM UTC
I always like to see your builds before I start my build of the same aircraft. Very nice.
OEFFAG_153
_VISITCOMMUNITY
Västra Götaland, Sweden
Joined: February 19, 2010
KitMaker: 1,473 posts
AeroScale: 1,450 posts
Posted: Sunday, April 21, 2013 - 04:48 AM UTC
Thank You Carl for your kind comments. I think you'll enjoy building the DVII!

Mikael
FAUST
#130
_VISITCOMMUNITY
Noord-Holland, Netherlands
Joined: June 07, 2002
KitMaker: 8,797 posts
AeroScale: 190 posts
Posted: Sunday, April 21, 2013 - 06:38 AM UTC
Your work is very inspiring. I have to say I'm incredibly impressed by the details of that Wingnut Wings kit. I have heard several people that they are the stuff. That engine is amazing and the cockpit detail as well. I hope one day my skills can justify purchasing one of these birds.
OEFFAG_153
_VISITCOMMUNITY
Västra Götaland, Sweden
Joined: February 19, 2010
KitMaker: 1,473 posts
AeroScale: 1,450 posts
Posted: Sunday, April 21, 2013 - 09:40 PM UTC
Thank You very much Robert, for your kind words.

Yes, the WNW kits are simply superb in terms of build ability, engineering design and accuracy + a whole lot of fun to build! You should get one or two, they do bring out the best of any builders abilities – so even if you are a beginner, they are a good starting point.

Mikael
phantom_phanatic309
#372
_VISITCOMMUNITY
United Kingdom
Joined: March 10, 2010
KitMaker: 2,568 posts
AeroScale: 1,619 posts
Posted: Monday, April 22, 2013 - 08:52 AM UTC
Coming together nicely. I really have to get myself one of these one day.
rochaped
_VISITCOMMUNITY
Lisboa, Portugal
Joined: August 27, 2010
KitMaker: 679 posts
AeroScale: 669 posts
Posted: Monday, April 22, 2013 - 12:45 PM UTC
Mikael,

The level of detail and awesome paint work really makes your fokker unique. Gonna keep following your progress for sure

Cheers
Pedro
OEFFAG_153
_VISITCOMMUNITY
Västra Götaland, Sweden
Joined: February 19, 2010
KitMaker: 1,473 posts
AeroScale: 1,450 posts
Posted: Thursday, April 25, 2013 - 03:05 AM UTC
Pedro and Stephen – Thank You so very much for your kind words

@ Stephen – Do, you wo'nt regret it

Mikael
DrIAce
_VISITCOMMUNITY
California, United States
Joined: August 14, 2011
KitMaker: 59 posts
AeroScale: 56 posts
Posted: Friday, April 26, 2013 - 10:34 AM UTC
Mikael,

Your work as always -- great, and Stephen thanks for those pics !

Ed