1:32 Salmson 2-A2 USAS build
West Virginia, United States
Joined: December 18, 2006
KitMaker: 1,121 posts
AeroScale: 1,063 posts
Posted: Friday, December 27, 2013 - 06:09 AM UTC
Hi all,
It's been a while since I've posted due to work responsibilities. I wanted to jump in again with the new, fantastic Wingnut Wings Salmson.

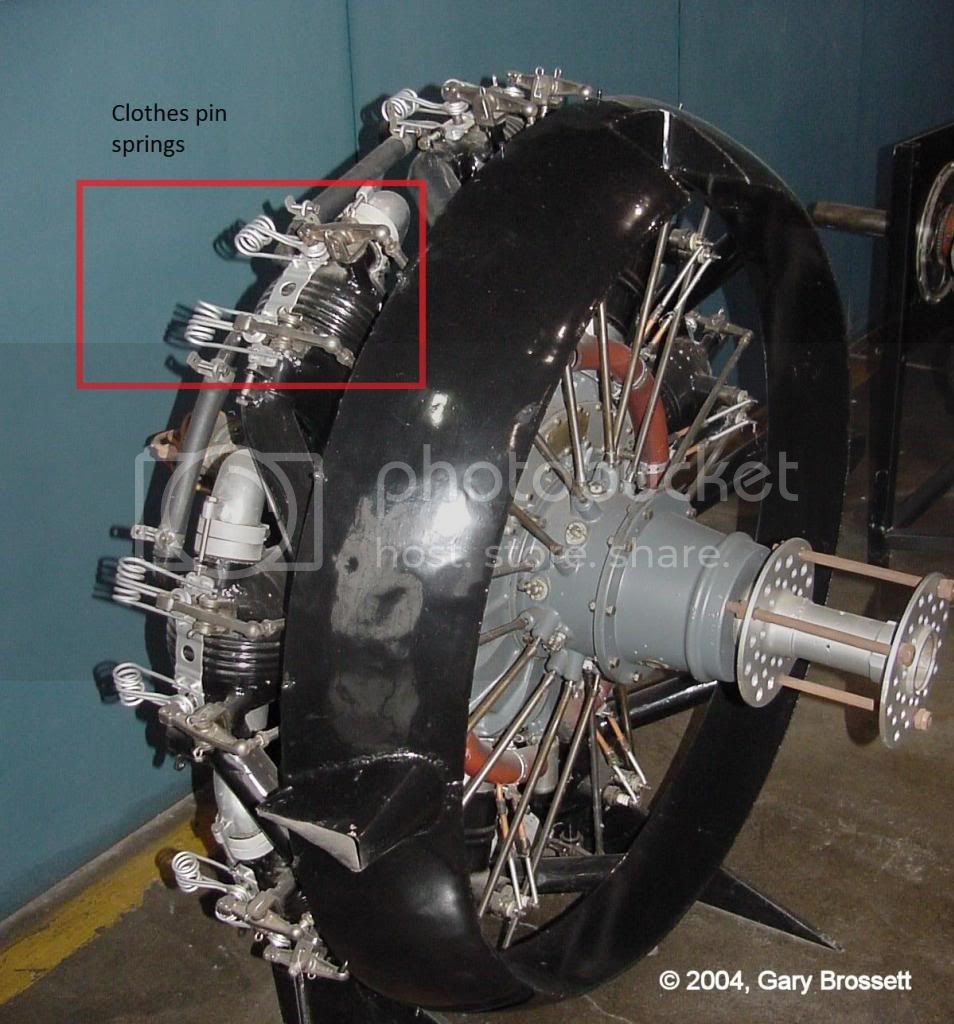
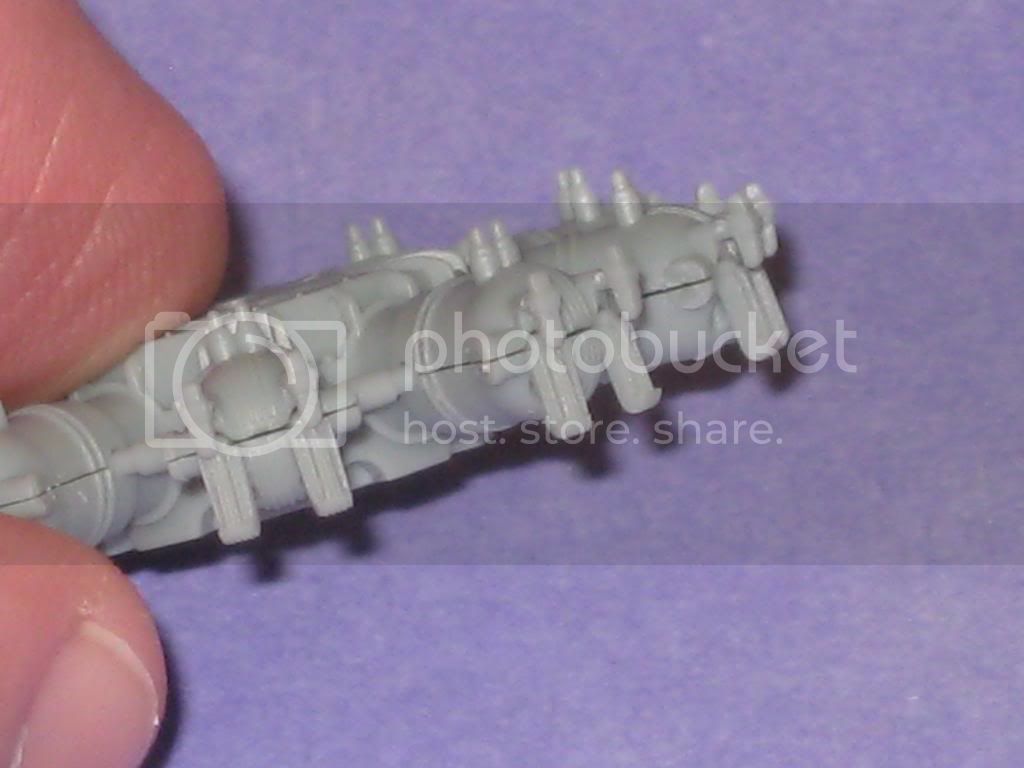
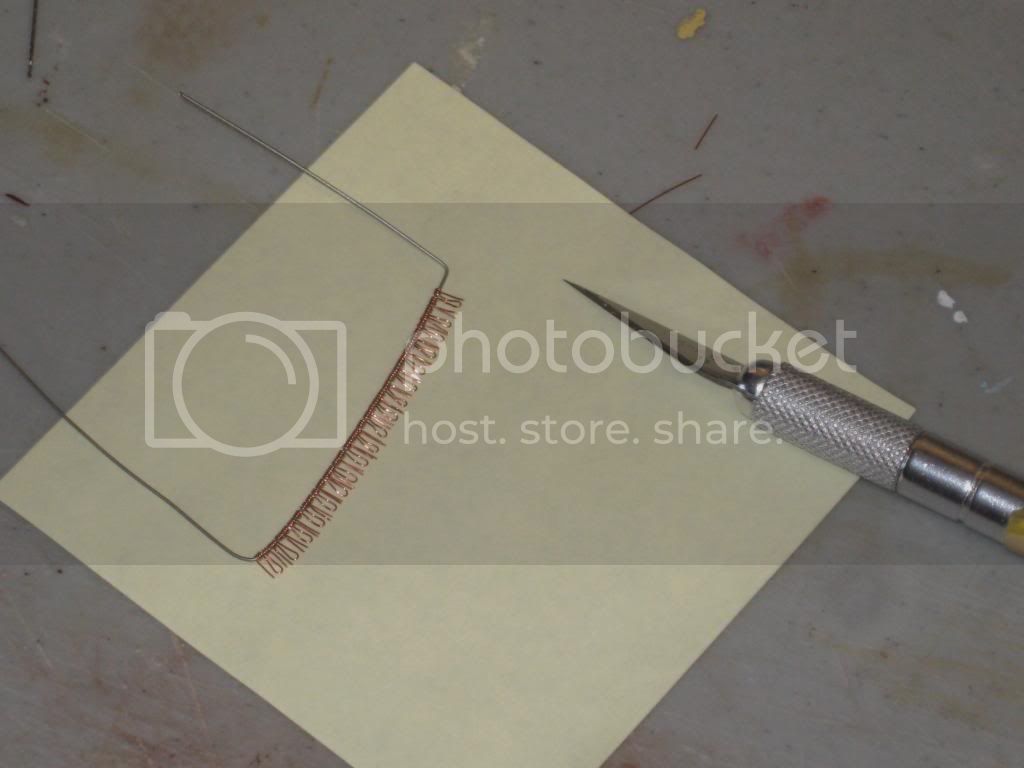
I want to super detail this build so I'll start with the engine. The Salmson engine has clothes pin springs that are moulded as a solid part on the kit engine...........
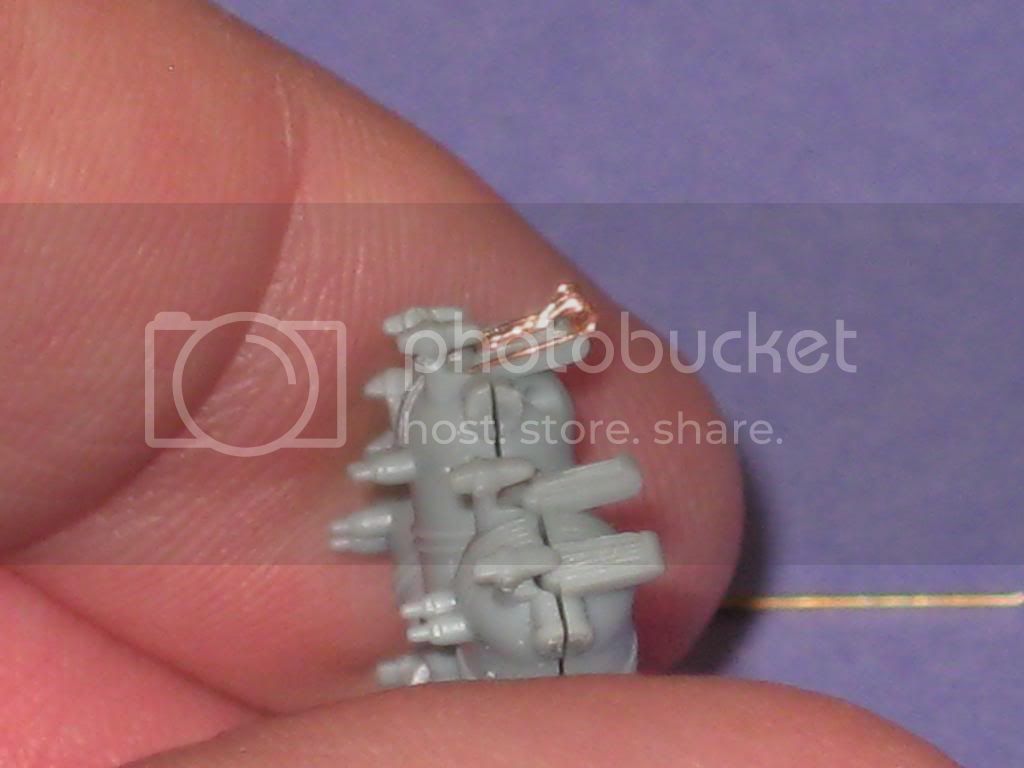
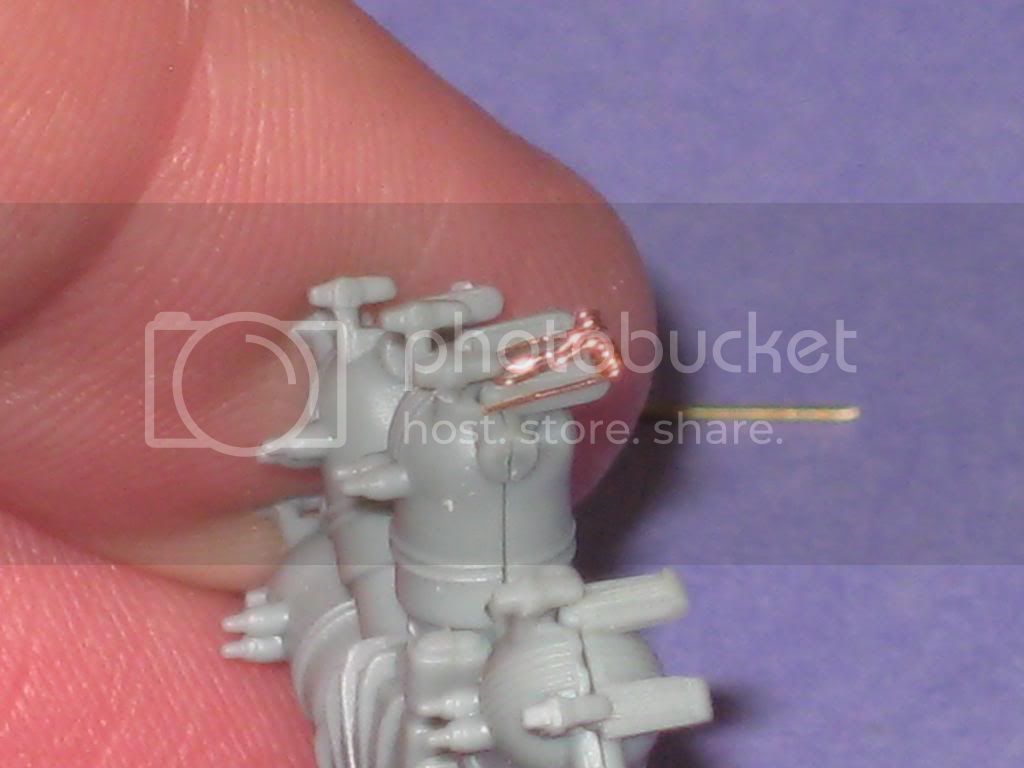
So I made a jig out of plastic and metal rod and made a spring to see how it would turn out..............

Here's the result, I'm happy with it.............

Here is where it will go after I modify the kit part.......
]
thanks for checking in,
Mark
Merlin
 Senior Editor
#017
United Kingdom
Joined: June 11, 2003
KitMaker: 17,582 posts
AeroScale: 12,795 posts
Posted: Friday, December 27, 2013 - 07:09 AM UTC
Nice one Mark
Fantastic work on the springs. I'll be following your progress avidly!

All the best
Rowan
BEWARE OF THE FEW...
As I grow older, I regret to say that a detestable habit of thinking seems to be getting a hold of me. - H. Rider Haggard
West Virginia, United States
Joined: December 18, 2006
KitMaker: 1,121 posts
AeroScale: 1,063 posts
Posted: Friday, December 27, 2013 - 07:18 AM UTC
Quoted Text
Nice one Mark
Fantastic work on the springs. I'll be following your progress avidly!
All the best
Rowan
Thanks Rowan, I can't rave enough about this kit.
Mark
California, United States
Joined: April 26, 2010
KitMaker: 346 posts
AeroScale: 292 posts
Posted: Friday, December 27, 2013 - 07:38 AM UTC
X2 on the spring jig and the resulting springs!
Following progress with great interest.
Thank you for inspiration to go further with my builds!
Like, follow, find out what I've had for breakfast - your large scale frenemy starter kit.
Colorado, United States
Joined: January 25, 2004
KitMaker: 11,669 posts
AeroScale: 11,011 posts
Posted: Friday, December 27, 2013 - 07:49 AM UTC
Very timely Mark. Model On Please!
". . .The most important thing is to know why you build and then get the most that you can out of building." via D.D.
Merlin
Senior Editor #017
United Kingdom
Joined: June 11, 2003
KitMaker: 17,582 posts
AeroScale: 12,795 posts
Posted: Friday, December 27, 2013 - 07:51 AM UTC
Quoted Text
Thanks Rowan, I can't rave enough about this kit.
Mark
Hi Mark
Me likewise about the French version - it's simply gorgeous!
I've got a few other build commitments I need to complete first, but I'm itching to try my hand at it.

All the best
Rowan
BEWARE OF THE FEW...
As I grow older, I regret to say that a detestable habit of thinking seems to be getting a hold of me. - H. Rider Haggard
Alberta, Canada
Joined: January 19, 2008
KitMaker: 6,743 posts
AeroScale: 6,151 posts
Posted: Friday, December 27, 2013 - 12:49 PM UTC
I'm really looking forward on watching this one develop Mark .
Terri
West Virginia, United States
Joined: December 18, 2006
KitMaker: 1,121 posts
AeroScale: 1,063 posts
Posted: Saturday, December 28, 2013 - 01:58 AM UTC
Thanks guys!
The jig I made is helping a lot, I have 18 of these things to make (and a few extra to feed the carpet monster, of course) and I'm almost done. Then I'll have to remove the molded on springs from the kit part.
I'm not sure when I'll put the springs on at this point as they can't be handled very much, so probably after some painting and assembly. I'll have to do some more thinking on that.
Mark
Västra Götaland, Sweden
Joined: February 19, 2010
KitMaker: 1,473 posts
AeroScale: 1,450 posts
Posted: Monday, December 30, 2013 - 10:35 PM UTC
Very nice start Mark, I'll be following this with interest!
Mikael
_________________________________________________________
Just finished the Wingnut Wings Taube. On to the Junkers D.1
West Virginia, United States
Joined: December 18, 2006
KitMaker: 1,121 posts
AeroScale: 1,063 posts
Posted: Sunday, January 05, 2014 - 12:52 PM UTC
Many thanks for the comments everyone!
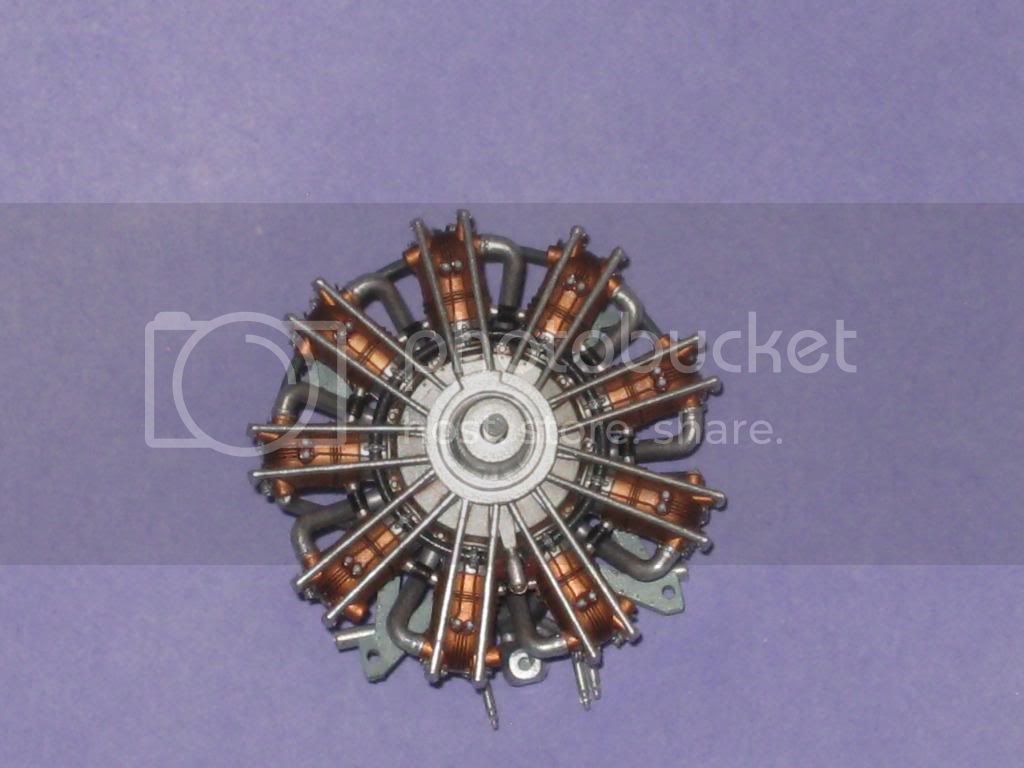
The Guitarlute "Salmson Engine Factory" has been hard at work and I've enjoyed every minute. The engine goes together like a dream and is a little model in itself. I've done a lot of the detail painting and I've added ignition wires to the back of the engine (I'll do the front tomorrow). So here is how it stands right now..................
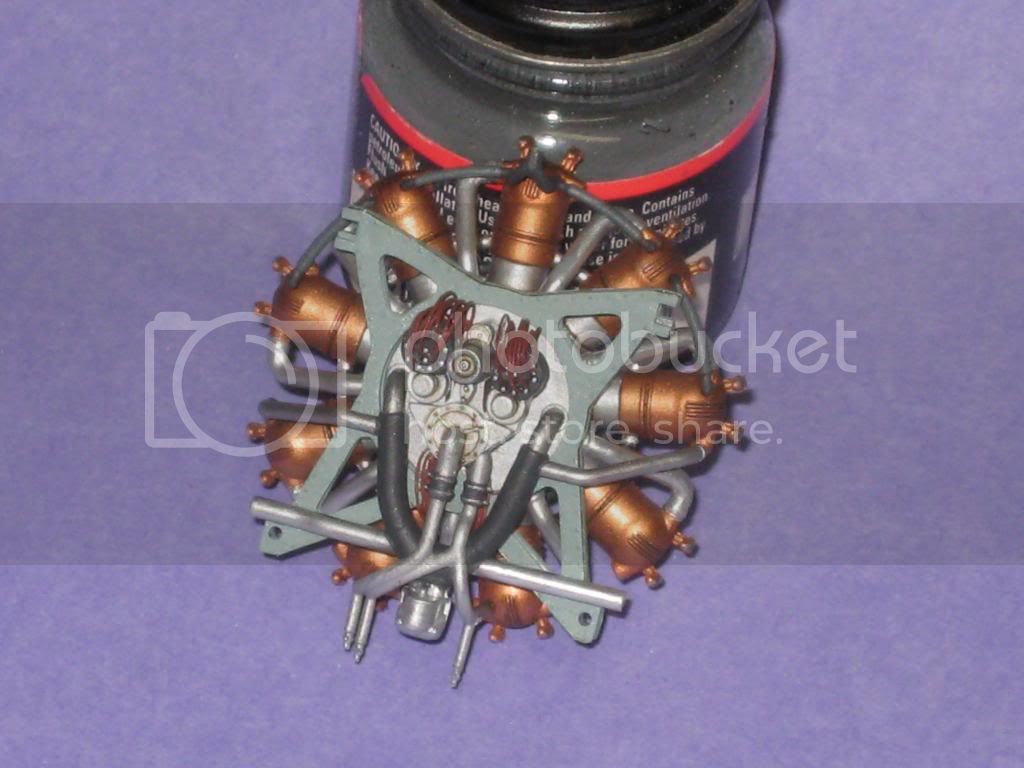

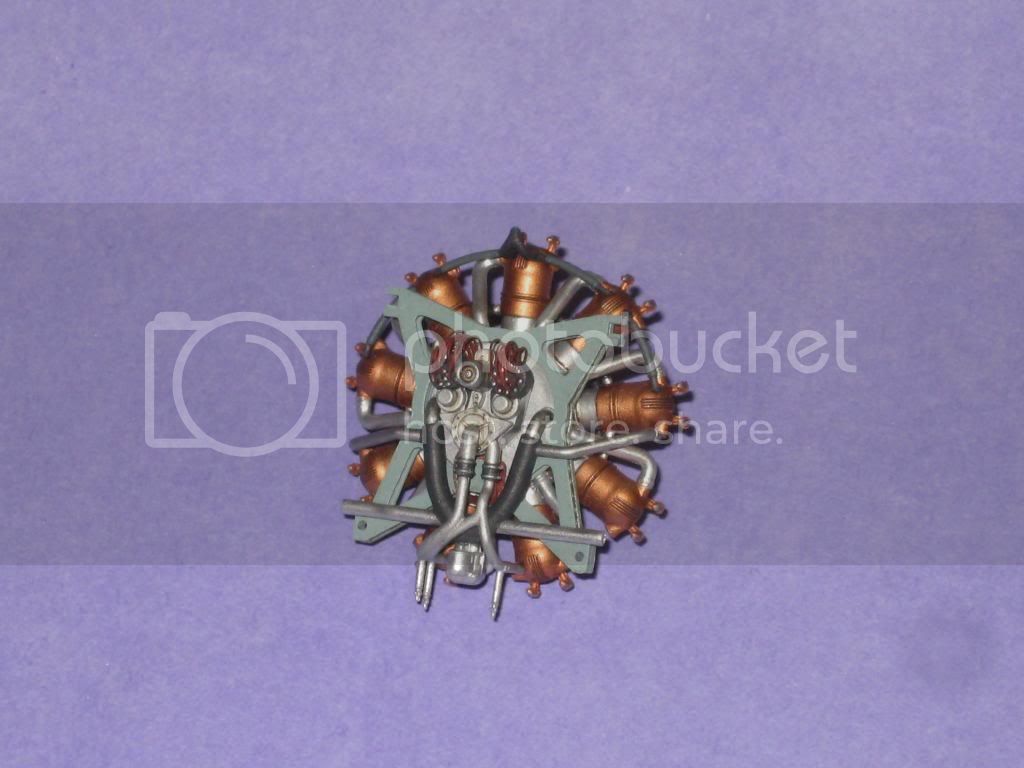

I'll add the springs once I'm ready to mount the engine to the fuselage.
Thanks for checking in!!
Mark
Alberta, Canada
Joined: January 19, 2008
KitMaker: 6,743 posts
AeroScale: 6,151 posts
Posted: Sunday, January 05, 2014 - 01:33 PM UTC
Very nice job on the detailing painting Mark !The cylinders tops remind me a an aliens antenna ...
Terri
West Virginia, United States
Joined: December 18, 2006
KitMaker: 1,121 posts
AeroScale: 1,063 posts
Posted: Sunday, January 05, 2014 - 01:43 PM UTC
Ha ha, I like that Terri, you are right!
Mark
Västra Götaland, Sweden
Joined: February 19, 2010
KitMaker: 1,473 posts
AeroScale: 1,450 posts
Posted: Sunday, January 05, 2014 - 10:26 PM UTC
Oh that is so nice Mark! I hope you plan to leave some of the engine covers off!
Mikael
_________________________________________________________
Just finished the Wingnut Wings Taube. On to the Junkers D.1
West Virginia, United States
Joined: December 18, 2006
KitMaker: 1,121 posts
AeroScale: 1,063 posts
Posted: Monday, January 06, 2014 - 02:05 AM UTC
Thanks Mikael. I sure will. I'm also detailing the belt driven wireless area too.
Mark
Merlin
Senior Editor #017
United Kingdom
Joined: June 11, 2003
KitMaker: 17,582 posts
AeroScale: 12,795 posts
Posted: Monday, January 06, 2014 - 09:43 AM UTC
Hi Mark
Wow! Fantastic!
Do you know anything about the preserved engine in your reference photo? It's much duller than the colours WNW specify (black painted cylinders and grey crankcase?). It's a classic example of why sometimes you don't want references!

- now I'm wondering what a typical period finish was?...
All the best
Rowan
BEWARE OF THE FEW...
As I grow older, I regret to say that a detestable habit of thinking seems to be getting a hold of me. - H. Rider Haggard
West Virginia, United States
Joined: December 18, 2006
KitMaker: 1,121 posts
AeroScale: 1,063 posts
Posted: Monday, January 06, 2014 - 09:57 AM UTC
Hi Rowan,
I found that pic on a Google search.
I think many of the very early Salmson engines I've seen were not painted, like on the Voisin.
Some of the period pictures of the Salmson engines for the 2-A2 look to be painted in some way to me but I like the color variation of the copper and steel so I went with the kit instructions.
Mark
Merlin
Senior Editor #017
United Kingdom
Joined: June 11, 2003
KitMaker: 17,582 posts
AeroScale: 12,795 posts
Posted: Monday, January 06, 2014 - 10:06 AM UTC
Hi Mark
I have to say I think I'll follow you - it's so much prettier!
Great work on the ignition wiring - could you tell us what you used? I can't imagine you painted each strand, but the finish doesn't look like copper wire. Brown stretched sprue?
All the best
Rowan
BEWARE OF THE FEW...
As I grow older, I regret to say that a detestable habit of thinking seems to be getting a hold of me. - H. Rider Haggard
West Virginia, United States
Joined: December 18, 2006
KitMaker: 1,121 posts
AeroScale: 1,063 posts
Posted: Monday, January 06, 2014 - 11:15 AM UTC
Quoted Text
Hi Mark
I have to say I think I'll follow you - it's so much prettier!
Great work on the ignition wiring - could you tell us what you used? I can't imagine you painted each strand, but the finish doesn't look like copper wire. Brown stretched sprue?
All the best
Rowan
Hi Rowan,
It's just thin copper wire painted Vallejo 343 "Shadows Flesh". Yep, painted each strand before gluing and touch up after.
regards,
Mark
Holdfast
President #056
England - South West, United Kingdom
Joined: September 30, 2002
KitMaker: 8,581 posts
AeroScale: 4,913 posts
Posted: Monday, January 06, 2014 - 07:22 PM UTC
Hi Mark,
That engine is looking really good, I love the springs the painting and the ignition harness; judging by this this is going to turn into a very interesting build
errrrrr, that isn't saying that it isn't already
MAL the MASK
BULLDOG # 6 (President)
BEWARE OF THE FEW
Sappers: First in, last out. (UBIQUE)
It's not the same, better, but not the same.
West Virginia, United States
Joined: December 18, 2006
KitMaker: 1,121 posts
AeroScale: 1,063 posts
Posted: Tuesday, January 07, 2014 - 06:50 AM UTC
Quoted Text
Hi Mark,
That engine is looking really good, I love the springs the painting and the ignition harness; judging by this this is going to turn into a very interesting build errrrrr, that isn't saying that it isn't already
Thanks Mal! I'm really having fun with this.
I've wired up the front of the engine.........................
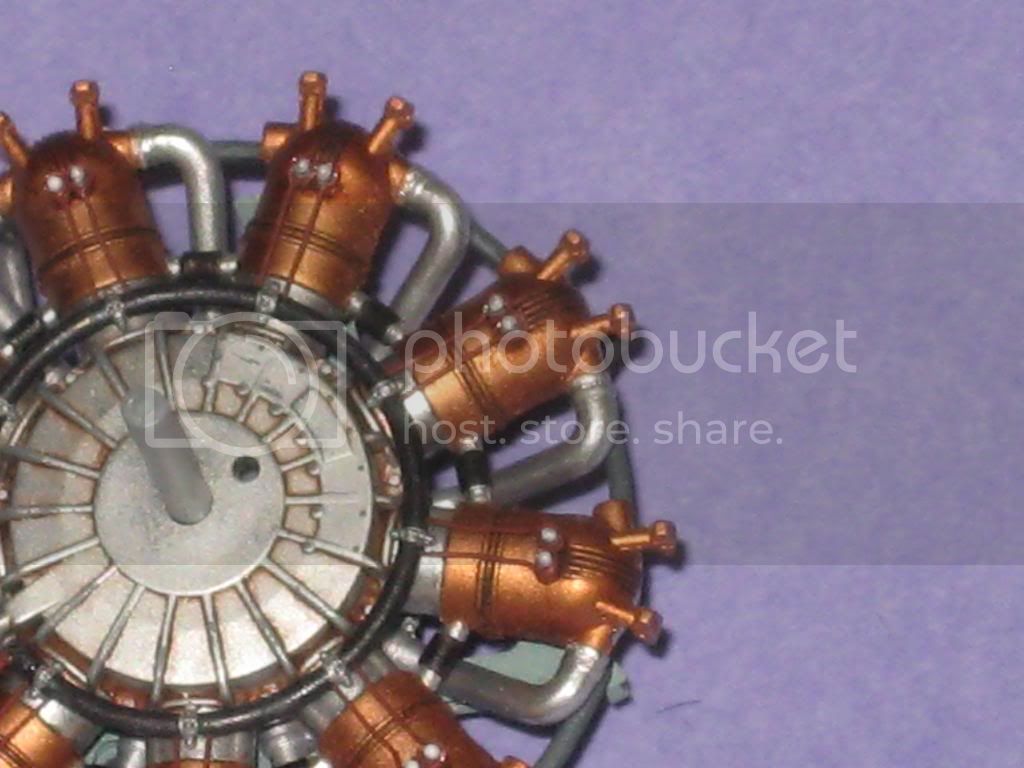
and all of the springs are ready for painting.............................
Thanks for checking in!
Mark
West Virginia, United States
Joined: December 18, 2006
KitMaker: 1,121 posts
AeroScale: 1,063 posts
Posted: Tuesday, January 07, 2014 - 09:12 AM UTC
I've actually had time to paint and put the springs on before I go to work. Here's where the engine stands so far..............
The engine front................
and the side....................
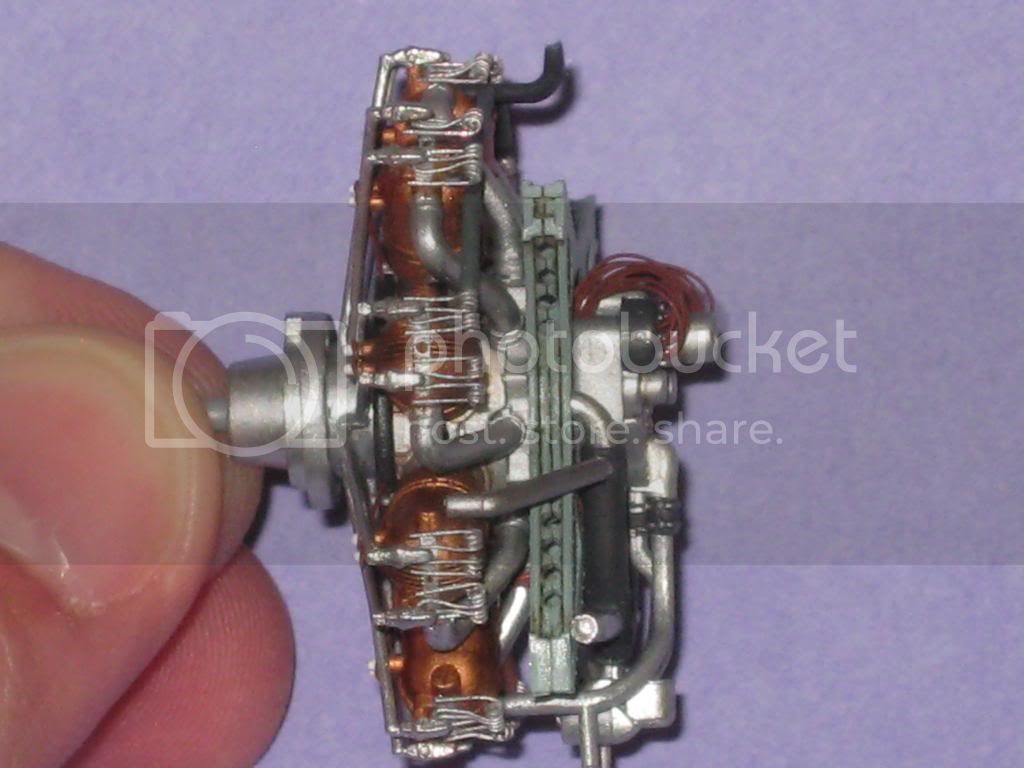
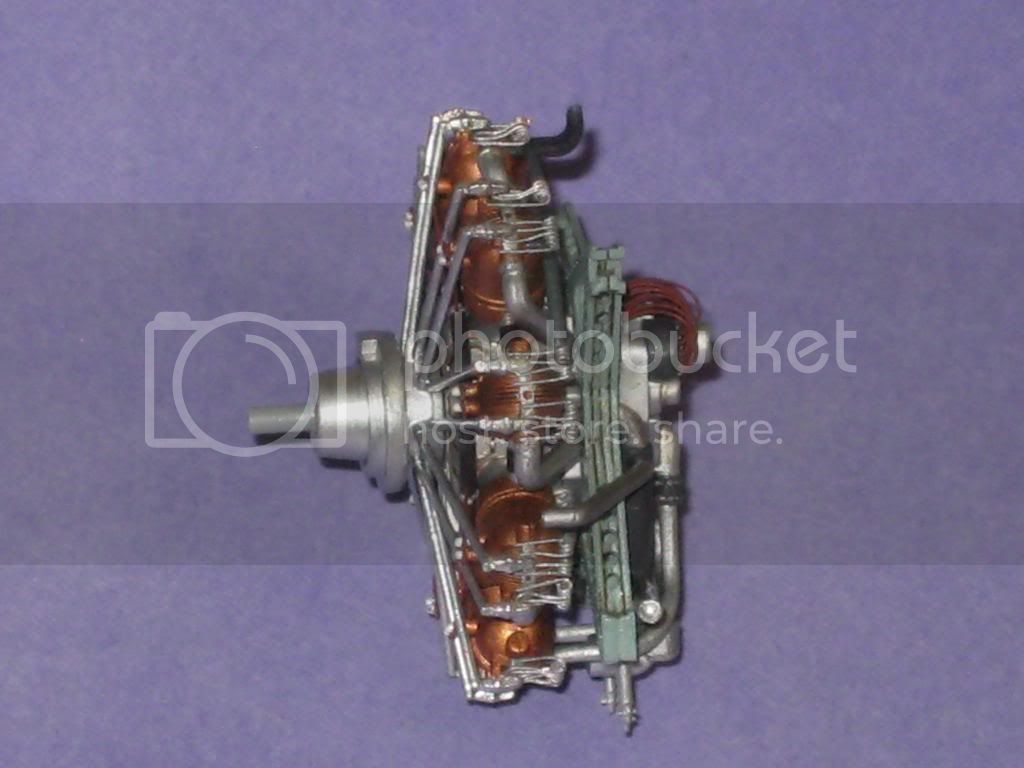
Just a little more work to do and it's done............
Mark
Merlin
Senior Editor #017
United Kingdom
Joined: June 11, 2003
KitMaker: 17,582 posts
AeroScale: 12,795 posts
Posted: Tuesday, January 07, 2014 - 09:15 AM UTC
Quoted Text
Quoted Text
Hi Mark
I have to say I think I'll follow you - it's so much prettier!
Great work on the ignition wiring - could you tell us what you used? I can't imagine you painted each strand, but the finish doesn't look like copper wire. Brown stretched sprue?
All the best
Rowan
Hi Rowan,
It's just thin copper wire painted Vallejo 343 "Shadows Flesh". Yep, painted each strand before gluing and touch up after.
regards,
Mark
Hi Mark
Superb! I was thinking they couldn't be painted
in situ, or the paint would clog the gaps - they're so close together.
All the best
Rowan
BEWARE OF THE FEW...
As I grow older, I regret to say that a detestable habit of thinking seems to be getting a hold of me. - H. Rider Haggard
Holdfast
President #056
England - South West, United Kingdom
Joined: September 30, 2002
KitMaker: 8,581 posts
AeroScale: 4,913 posts
Posted: Tuesday, January 07, 2014 - 08:19 PM UTC
A wonderful looking engine
Do you have a scheme in mind for this?
MAL the MASK
BULLDOG # 6 (President)
BEWARE OF THE FEW
Sappers: First in, last out. (UBIQUE)
It's not the same, better, but not the same.
West Virginia, United States
Joined: December 18, 2006
KitMaker: 1,121 posts
AeroScale: 1,063 posts
Posted: Wednesday, January 08, 2014 - 04:15 AM UTC
Thanks for the comments guys! I appreciate everyone checking in on the build.
@ Mal -- Next I'll be moving on to the belt driven wireless and it's equipment. There is an excellent picture of this area on page 17 of the "Salmson Aircraft of World War 1" book by Flying Machines Press. The belt driven wireless replaced the propeller driven wireless that was mounted to the starboard side of the fuselage. Profiles A,B,E and possibly D use the Prop wireless. So that leaves me with Profile C (possibly D) to use which was my first choice anyway so it worked out fine.
I'll have an update soon.
Mark
North Carolina, United States
Joined: June 19, 2007
KitMaker: 604 posts
AeroScale: 600 posts
Posted: Thursday, January 09, 2014 - 02:34 AM UTC
Mark,
Echoing what all of the others have already said: Brilliant work on the jig! Your color choices and detailing are quite striking!
RAGIII


 ]
]


