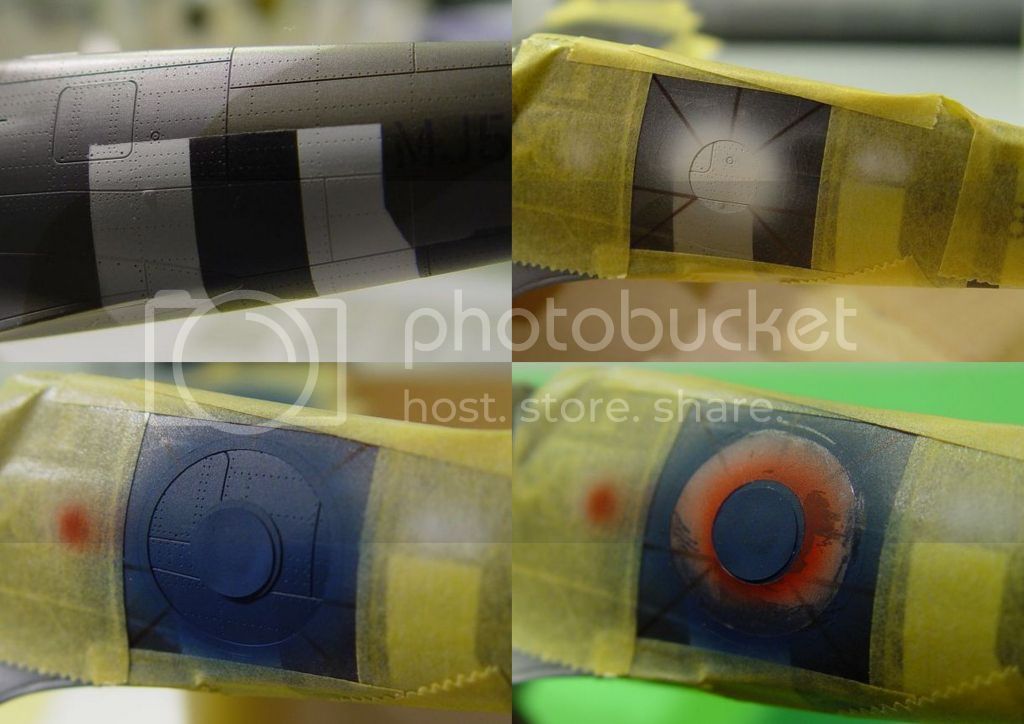
So, for those of you who have read earlier posts, it's been a couple of days and due to some confusion about markers and masks here are a few pictures and some text about that.
When placing the masks there are two things to think about. The first is that you want the masks placed where you want them. For this reason I try to find some sort of a physical feature on the model that can be used as a reference for placing the mask. This physical feature is usually a panel line. In this example I'm placing the serial number and you can see on Eduard's profile that the serial is supposed to sit on such a line.

The next step is to add a guiding line on the surface of the mask. I have been doing this using a permanent marker and a ruler. So, just for clarification, the marker or the marks made with it will never touch the actual model.

And here the marker line is aligned with the panel line. After this particular mask I have changed my method though. I am now using a very thin pencil instead, basically a regular 0.5mm pencil that I have sharpened a little bit extra. The reason for this change is that I want these placement lines to be more precise and as they don't have to be visible after painting the first colour(s), it doesn't matter if the pencil line is very light compared to the permanent marker.

The second thing to think about, is that some masks have to be repositioned. Such as the roundel masks seen below and this is what Mal describes in his post above. That means that these lines have to be visible even after one or two layers of paint and therefore I still use the permanent marker here.

I hope that clarified things with the masking process. It really isn't that difficult and Mal provides very good step by step instructions for each kind of mask supplied.
So apart from this I have been making my way forward with the models. The Clostermann Spitfire has been given a set of no walk lines. This time no masks were used, but it is a fairly straight forward procedure and the results are very pleasing. There really isn't any reason to use decals for these lines and the anti-slip area at the wing root.


The other Spit - the one with the nose art, which you can see a couple of pictures further up in this post - has been given all of its roundels and fin flashes. The procedure was very much the same as the one I've already shown, so no pictures on that. However, there are some more interesting masks on this one given that it has a Polish checkerboard and the nose art on the nose. And although I find Mal's roundel masks excellent, they are pretty straight forward. The masks for the checkerboard and the nose art are much more complicated and this is where Mal's genius shows through.
The checkerboard has been painted all white, some very small masks have been added and red has been applied. Remove all mask elements and you get a very nice looking checkerboard.


If the checkerboard was a slightly more complicated mask due to its size, or lack of it. Then the nose art is slightly more complicated because of its many different colours. I think that the nose art is made up by five different masks. So compared to the roundel masks that have three or four pieces but really are just one mask, this mask is made up by several consecutive masks placed in the same space. The genius bit with this mask is that it has a box, also made of masking material, that provides exact locationing for the different elements. You can see the positioning box just inside the yellow masking tape. So first you add this box and the first mask in one go, spray a bit of yellow. Remove the mask, add the new one and spray some red.


Remove the second mask and dance a little happy dance.

Results are still fantastic! Next up is some naked skin...

Mvh
/Fred
Apart from the crispness of the underlying details, the thing I appreciate the most is the lack of carrier film. Painting the markings also give superior results where there otherwise would have been several decals on top of each other.


