


Modern (1975-today)
Discuss the modern aircraft age from 1975 thru today.
Discuss the modern aircraft age from 1975 thru today.
Hosted by Jim Starkweather
Dual build Boeings: 777 and 777

tinbanger

Joined: February 04, 2008
KitMaker: 2,507 posts
AeroScale: 1,814 posts

Posted: Sunday, April 27, 2014 - 05:23 AM UTC
Looking good Ben!


Mcleod
Joined: April 07, 2010
KitMaker: 1,028 posts
AeroScale: 939 posts
Posted: Friday, May 02, 2014 - 12:50 PM UTC
The only update I can offer is that I've completed the engines:

The grey wings of the aircraft are being masked carefully; I'm finding out just how many curves are on a triple 7. It would torment me to see paint bleed onto the grey, so I'm just taking my time.
More soon. Ben

The grey wings of the aircraft are being masked carefully; I'm finding out just how many curves are on a triple 7. It would torment me to see paint bleed onto the grey, so I'm just taking my time.
More soon.
Ben
Jessie_C

Joined: September 03, 2009
KitMaker: 6,965 posts
AeroScale: 6,247 posts

Posted: Sunday, May 25, 2014 - 11:39 AM UTC
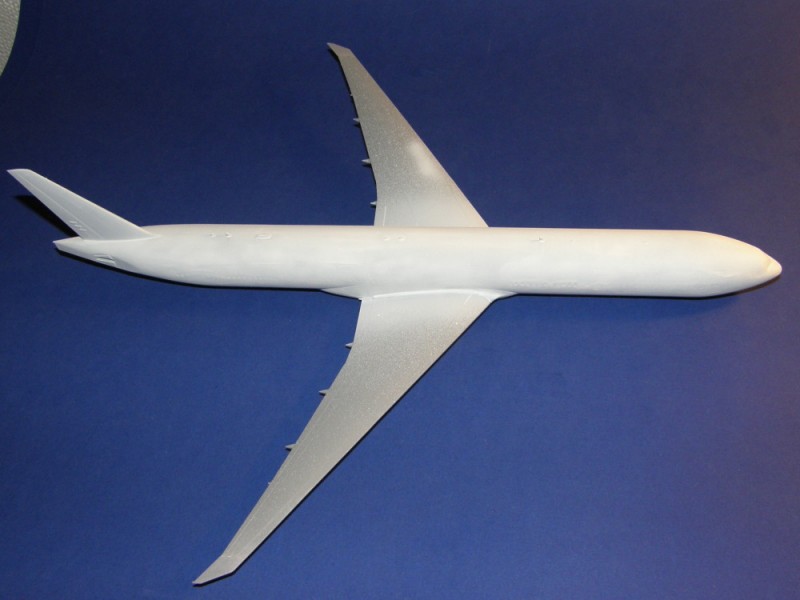
Catching up. Basic white primer and major assembly finished. I still need to do a bunch of sanding to smooth things down.

Joel_W

Joined: December 04, 2010
KitMaker: 11,666 posts
AeroScale: 7,410 posts
Posted: Monday, May 26, 2014 - 02:00 AM UTC
Jessica,
Looks pretty good in its primer coat. Looking forward to seeing it painted in its Airline glossy finish.
Joel
Looks pretty good in its primer coat. Looking forward to seeing it painted in its Airline glossy finish.
Joel
Mcleod
Joined: April 07, 2010
KitMaker: 1,028 posts
AeroScale: 939 posts
Posted: Thursday, May 29, 2014 - 05:47 AM UTC
There is a slight learning curve in using aerosol paints to finish a model, but, the benefits are real. Especially cost effectiveness and ease when painting a larger model. Usually, spray cans are only useful for the basic colors.

I remain very pleased with the final(mostly) finish results:


One of the problems with aerosol paints, is that they can actually take days to set properly where tacky fingerprints are no longer an issue. That's OK, as drying time allows working time for other neglected pieces. Like landing gear.
First, I primed all these parts before giving them a squirt of Humbrol 147 light grey.
As far as the aircraft model painting goes; I still have to put a darker grey on the wing undersides and do the de-icing boots in silver, as per the kit instructions. Then I can install some engines.

I remain very pleased with the final(mostly) finish results:


One of the problems with aerosol paints, is that they can actually take days to set properly where tacky fingerprints are no longer an issue. That's OK, as drying time allows working time for other neglected pieces. Like landing gear.
First, I primed all these parts before giving them a squirt of Humbrol 147 light grey.

As far as the aircraft model painting goes; I still have to put a darker grey on the wing undersides and do the de-icing boots in silver, as per the kit instructions. Then I can install some engines.
Jessie_C
Joined: September 03, 2009
KitMaker: 6,965 posts
AeroScale: 6,247 posts
Posted: Saturday, June 07, 2014 - 11:38 AM UTC
I've got the gloss white and "Boeing grey"* on now

Next I need to do the corrogard on the wings, and the natural metal leading edges, but I have to let the grey cure first.
*I used some of my dwindling supply of Model Master Canadian Voodoo Grey, which is a near exact match to Boeing #708 grey.
Next I need to do the corrogard on the wings, and the natural metal leading edges, but I have to let the grey cure first.
*I used some of my dwindling supply of Model Master Canadian Voodoo Grey, which is a near exact match to Boeing #708 grey.
Jessie_C
Joined: September 03, 2009
KitMaker: 6,965 posts
AeroScale: 6,247 posts
Posted: Saturday, June 07, 2014 - 05:45 PM UTC
I painted the corrogard using Testors Steel in the small square bottle (remember those?)

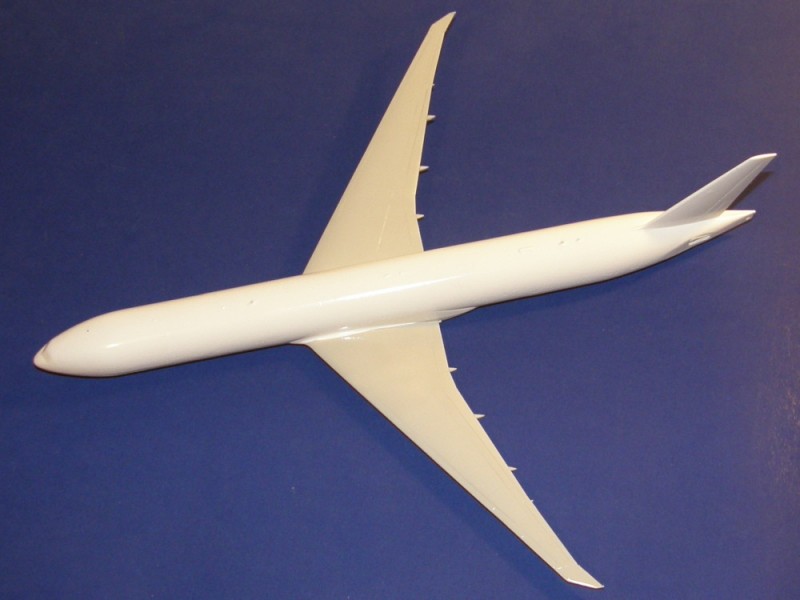
Once I got all the masking off I couldn't resist hanging it all together to see what it looks like. I can't glue the engines in place until I do the leading edges, and the stabilisers need to wait until the decals are dry.
Still, it's beginning to look like an airliner.
Once I got all the masking off I couldn't resist hanging it all together to see what it looks like. I can't glue the engines in place until I do the leading edges, and the stabilisers need to wait until the decals are dry.
Still, it's beginning to look like an airliner.
Joel_W
Joined: December 04, 2010
KitMaker: 11,666 posts
AeroScale: 7,410 posts
Posted: Sunday, June 08, 2014 - 04:55 AM UTC
Jessica,
Your 777 really looks quite good in the final set of pictures.
Ben
Your 777 really looks quite good in the final set of pictures.
Ben
Jessie_C
Joined: September 03, 2009
KitMaker: 6,965 posts
AeroScale: 6,247 posts
Posted: Sunday, June 08, 2014 - 07:02 AM UTC
Now I have the leading edges finished
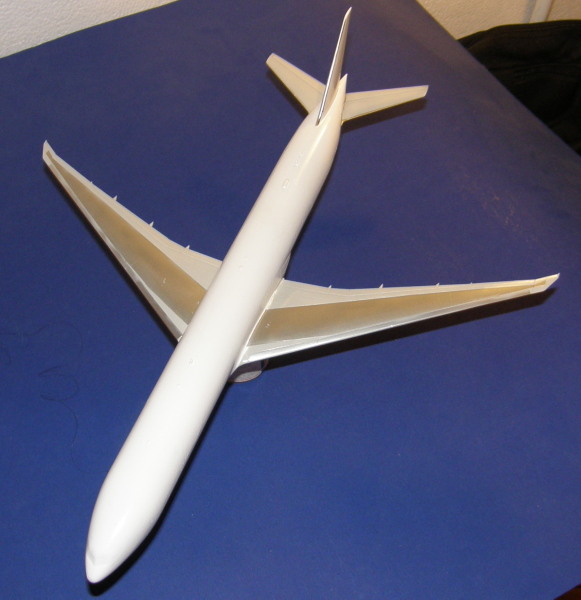
I could have used some micromesh to smooth everything down
But that's really only apparent under magnification.
Next, decals.
I could have used some micromesh to smooth everything down
But that's really only apparent under magnification.
Next, decals.
Jessie_C
Joined: September 03, 2009
KitMaker: 6,965 posts
AeroScale: 6,247 posts
Posted: Sunday, June 08, 2014 - 10:17 AM UTC
As promised

Now I have to let that side dry before I tackle the other side.
The Hasegawa decals are fairly thick, but they react well to Solvaset and snuggle down into the surface detail nicely. I'm going to need to do a few touch-ups here and there once the decals are dry.
Now I have to let that side dry before I tackle the other side.
The Hasegawa decals are fairly thick, but they react well to Solvaset and snuggle down into the surface detail nicely. I'm going to need to do a few touch-ups here and there once the decals are dry.
tinbanger
Joined: February 04, 2008
KitMaker: 2,507 posts
AeroScale: 1,814 posts
Posted: Sunday, June 08, 2014 - 10:22 AM UTC
Nice work Jessica!
Joel_W
Joined: December 04, 2010
KitMaker: 11,666 posts
AeroScale: 7,410 posts
Posted: Sunday, June 08, 2014 - 10:38 AM UTC
Jessica,
Very impressive to say the least.
Joel
Very impressive to say the least.
Joel
Jessie_C
Joined: September 03, 2009
KitMaker: 6,965 posts
AeroScale: 6,247 posts
Posted: Sunday, June 08, 2014 - 02:22 PM UTC
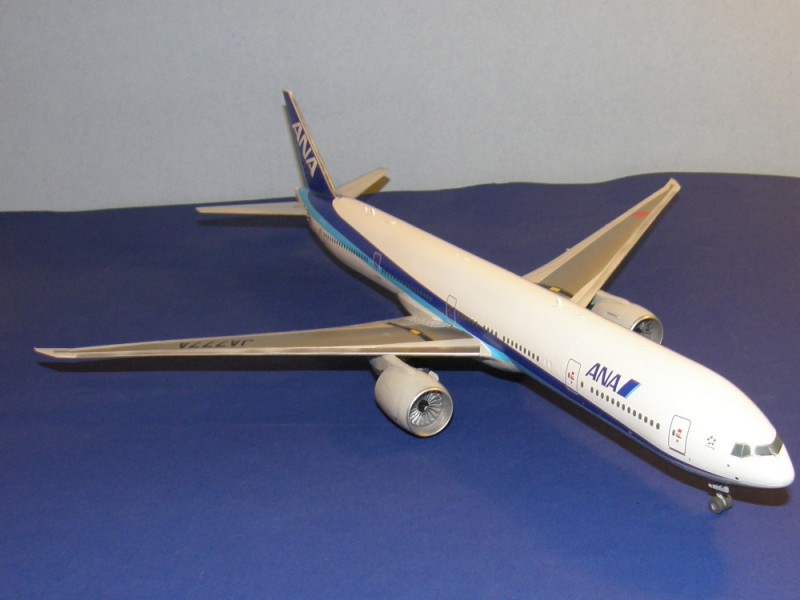
Almost finished

The decals at the tail pulled apart slightly as they dried, and the corners of the cheat line overlapped a bit. They'll need some touching up

It's long and skinny, even in 1/200 scale

The decals at the tail pulled apart slightly as they dried, and the corners of the cheat line overlapped a bit. They'll need some touching up
It's long and skinny, even in 1/200 scale
Joel_W
Joined: December 04, 2010
KitMaker: 11,666 posts
AeroScale: 7,410 posts
Posted: Monday, June 09, 2014 - 12:58 AM UTC
Jessica,
Nicely done. The decaling really brought it to life.
Joel
Nicely done. The decaling really brought it to life.
Joel
Mcleod
Joined: April 07, 2010
KitMaker: 1,028 posts
AeroScale: 939 posts
Posted: Monday, June 09, 2014 - 07:31 AM UTC
Obviously, Jessica is doing a wonderful job on her triple 7, and has begun to leave me in the dust. That's OK, I'm not in any race here; so long as I do a reasonably nice job on the kit. It's coming,
I notice Jessica put a 2nd grey on the upper wings simulating corroguard. My kit does not call for that, and I'm trying to build strictly OOB, except for exact paint match.

I really wish that I'd left off those under-wing attachments like I did the engines; now those will have to be masked to maintain the instructions paint call out.
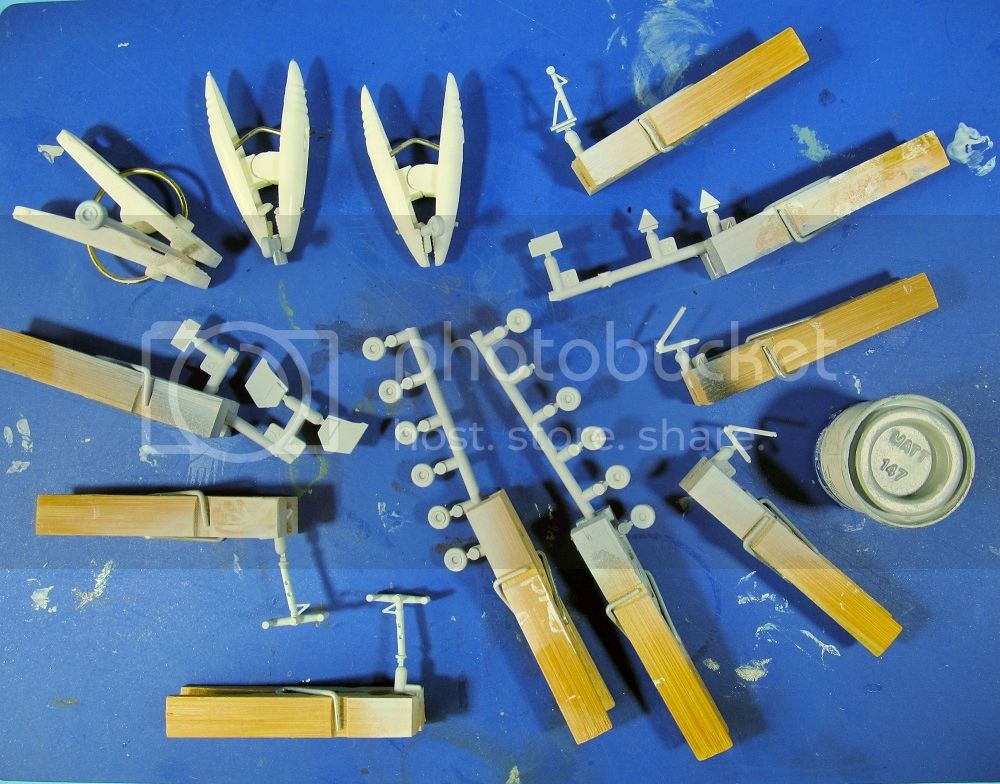
The landing gear is completed at this time. Just thought I'd show the process I choose to accomplish it, which is self explanatory:


Once all the wheels are glued and dried, a small brush takes care of clean-up to make everything look nice.
Should have more photos showing a model near completion later this week.
I notice Jessica put a 2nd grey on the upper wings simulating corroguard. My kit does not call for that, and I'm trying to build strictly OOB, except for exact paint match.

I really wish that I'd left off those under-wing attachments like I did the engines; now those will have to be masked to maintain the instructions paint call out.
The landing gear is completed at this time. Just thought I'd show the process I choose to accomplish it, which is self explanatory:


Once all the wheels are glued and dried, a small brush takes care of clean-up to make everything look nice.
Should have more photos showing a model near completion later this week.
Jessie_C
Joined: September 03, 2009
KitMaker: 6,965 posts
AeroScale: 6,247 posts
Posted: Monday, June 09, 2014 - 01:01 PM UTC
I think that JAL overpaints the upper wings of their 777s while ANA apparently does not, so we're both correct 
As I mentioned earlier, I used Testors Steel in the small square bottle to do the corrogard; it's as good a match as any given that each batch of corrogard is mixed up on the spot and therefore has no standard. You can use a darkish grey if you like, since one of the things corrogard is famous for is a rather chameleon-like ability to change colour depending on the ambient light.
As I mentioned earlier, I used Testors Steel in the small square bottle to do the corrogard; it's as good a match as any given that each batch of corrogard is mixed up on the spot and therefore has no standard. You can use a darkish grey if you like, since one of the things corrogard is famous for is a rather chameleon-like ability to change colour depending on the ambient light.

JClapp

#259
Joined: October 23, 2011
KitMaker: 2,265 posts
AeroScale: 1,715 posts

Posted: Tuesday, June 10, 2014 - 09:02 AM UTC
Quoted Text
...depending on the ambient light
that.
possibly the longest thread in all of model railroading forums is about how to create the "right" shades of gray under various lighting conditions.

Mcleod
Joined: April 07, 2010
KitMaker: 1,028 posts
AeroScale: 939 posts
Posted: Tuesday, June 10, 2014 - 10:18 AM UTC
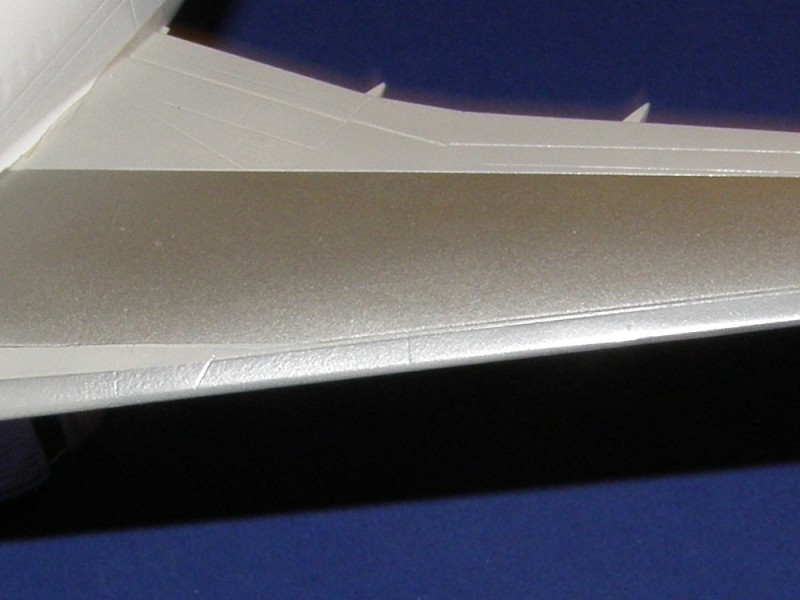
Just a small update. Wing leading edges are on:

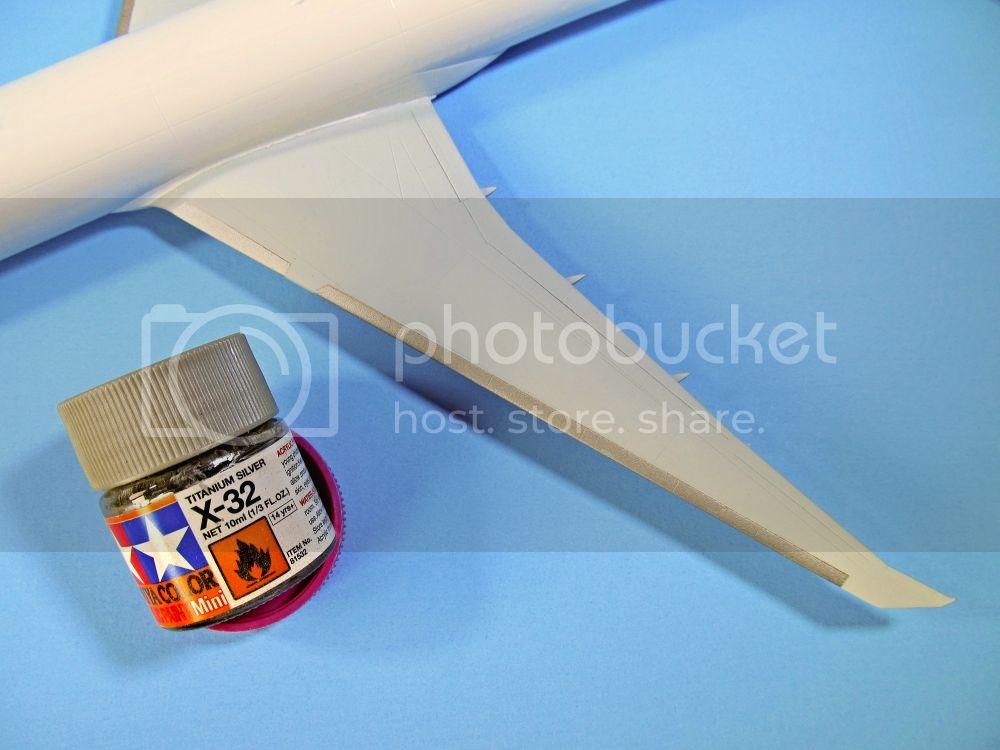
On this evening, I'll be masking for the under-wing grey. Hoping I'll get photo's for tomorrow; it all depends on whether the grandson will let me get there.


On this evening, I'll be masking for the under-wing grey. Hoping I'll get photo's for tomorrow; it all depends on whether the grandson will let me get there.

Joel_W
Joined: December 04, 2010
KitMaker: 11,666 posts
AeroScale: 7,410 posts
Posted: Wednesday, June 11, 2014 - 01:41 AM UTC
Ben,
Those leading edge slats really look good. I too much prefer Tamiya's Titanium Silver to their very course pigmented Flat Aluminum. Next try a Alcad 11 shade, you'll be glade you did.
Joel
Those leading edge slats really look good. I too much prefer Tamiya's Titanium Silver to their very course pigmented Flat Aluminum. Next try a Alcad 11 shade, you'll be glade you did.
Joel
Jessie_C
Joined: September 03, 2009
KitMaker: 6,965 posts
AeroScale: 6,247 posts
Posted: Wednesday, June 11, 2014 - 02:36 PM UTC
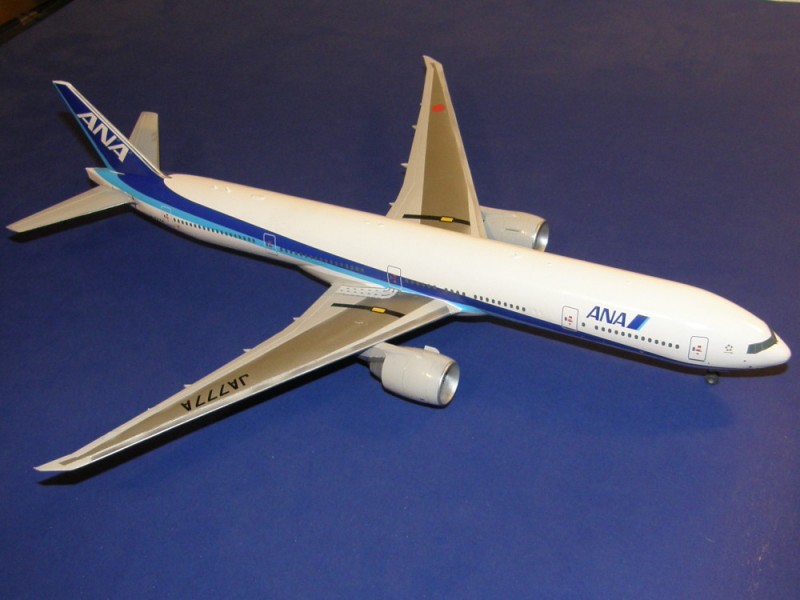
I'm calling it done


I'm a bit surprised how the flash shows up the touch-ups. They're not nearly as visible in ambient light.
I'm a bit surprised how the flash shows up the touch-ups. They're not nearly as visible in ambient light.
Mcleod
Joined: April 07, 2010
KitMaker: 1,028 posts
AeroScale: 939 posts
Posted: Wednesday, June 11, 2014 - 02:47 PM UTC
Very nice, Jessica. my decals are not so complicated as yours; I should be right behind you, likely within a week.

magnusf

Joined: May 02, 2006
KitMaker: 1,953 posts
AeroScale: 1,902 posts
Posted: Thursday, June 12, 2014 - 08:33 AM UTC
Good work both of you, that's a really cool airliner! Emirates operate a Stockholm-Dubai route once a day with the 777.

Here is one pulling vapour in the murky November weather last year!
It's got long legs (especially the ER) as well: every now and then I check what's overhead on the Flightradar 24 app: just a few days ago there was a 777 en route. From Houston to Dubai... That's a 15 hr flight!

Magnus
Here is one pulling vapour in the murky November weather last year!
It's got long legs (especially the ER) as well: every now and then I check what's overhead on the Flightradar 24 app: just a few days ago there was a 777 en route. From Houston to Dubai... That's a 15 hr flight!
Magnus
Joel_W
Joined: December 04, 2010
KitMaker: 11,666 posts
AeroScale: 7,410 posts
Posted: Thursday, June 12, 2014 - 10:20 AM UTC
Quoted Text
Good work both of you, that's a really cool airliner! Emirates operate a Stockholm-Dubai route once a day with the 777.
Here is one pulling vapour in the murky November weather last year!
It's got long legs (especially the ER) as well: every now and then I check what's overhead on the Flightradar 24 app: just a few days ago there was a 777 en route. From Houston to Dubai... That's a 15 hr flight!
Magnus
Magnus,
Nice to see you back with us. I for one have missed you and your excellent, modeling.
Lonest flight I ever took was New York/Chicago/Hawaii. 13 hours in the air. Needless to say, we haven't been back since. Although it wouldn't take very much to convince me.
Joel

bdanie6
Joined: November 09, 2008
KitMaker: 615 posts
AeroScale: 459 posts

Posted: Thursday, June 12, 2014 - 04:01 PM UTC
@Jessica, touch ups not withstanding, you did an excellent job (as usual) on this build. Congrats on another beauty.
Later
ps- come on Ben, git'er done

Later
ps- come on Ben, git'er done
Mcleod
Joined: April 07, 2010
KitMaker: 1,028 posts
AeroScale: 939 posts
Posted: Saturday, June 14, 2014 - 02:05 AM UTC
Little by little she moves forward:
I didn't have Aircraft Grey as the instruction call-outs ask for, so I used the Tamiya medium. Its likely somewhat dark; it grew on me, though, and I'm happy with it. As you can see, there is some small touch ups required.
I'd like to get some future on today, before I begin the decals. So unless I want to rush it, the decals won't happen before tomorrow.
 |

WEB HOSTING BY


Copyright ©2021 AeroScale and Kitmaker Network, a subsidiary of Silver Star Enterprises
All Rights Reserved. Please read our Conditions of Use and Privacy Policy.
All Rights Reserved. Please read our Conditions of Use and Privacy Policy.