Correction regarding Netherlands Civil aircraft registration codes - I incorrectly stated DF, this is wrong of course, my apologies, it is really PH. So for my faux Fokker the registration would have been PH-OKR (FOKKER) had I used it.
Also it is the Royal Netherlands Air Force, not the Dutch Air Force. My apologies.
Air Campaigns
Want to start or join a group build? This is where to start.
Want to start or join a group build? This is where to start.
Hosted by Frederick Boucher, Michael Satin
OFFICIAL: Hairy Stick Campaign

Bink123

Joined: June 23, 2008
KitMaker: 414 posts
AeroScale: 364 posts

Posted: Sunday, March 22, 2015 - 09:51 PM UTC

DaveCox

Joined: January 11, 2003
KitMaker: 4,307 posts
AeroScale: 272 posts

Posted: Tuesday, March 24, 2015 - 09:44 PM UTC
The 1/32 Hunter is finished, apart from the stencils and other tiny decals. Maybe one day if I'm really bored.
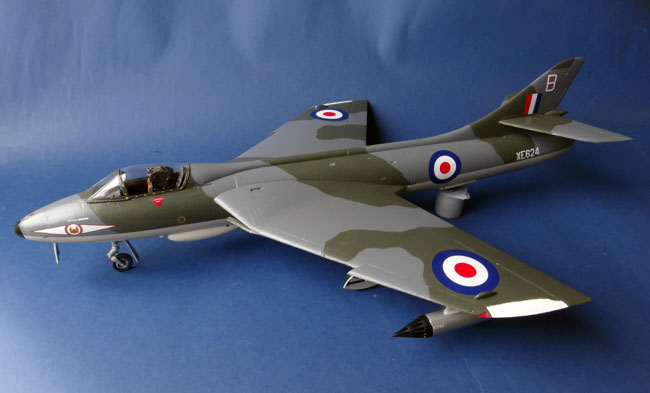
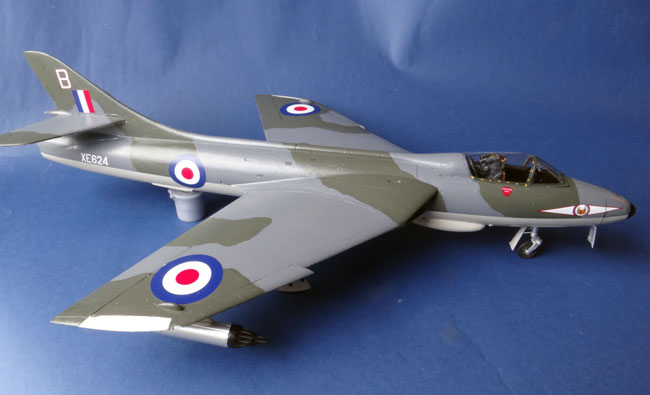
Paint is Humbrol acrylics. Never again - even when well thinned it was like spreading filler with a brush, and almost dry between jar and plastic! It's a tailsitter, even with weight in the nose - if you build one then the 40g on the instruction sheet is too little.


Paint is Humbrol acrylics. Never again - even when well thinned it was like spreading filler with a brush, and almost dry between jar and plastic! It's a tailsitter, even with weight in the nose - if you build one then the 40g on the instruction sheet is too little.
Posted: Tuesday, March 24, 2015 - 10:04 PM UTC
Dave that's dedication !
You said at the weekend
"I've got a week off to finish this"
So three days left to still go shopping for easter eggs.
Well done mate!
Final result looks good to me, how can you get over a tail sitting problem like this afterwards, will it have to be
'stand mounted' or something?
Paul
You said at the weekend
"I've got a week off to finish this"
So three days left to still go shopping for easter eggs.
Well done mate!
Final result looks good to me, how can you get over a tail sitting problem like this afterwards, will it have to be
'stand mounted' or something?
Paul


DaveCox

Joined: January 11, 2003
KitMaker: 4,307 posts
AeroScale: 272 posts

Posted: Tuesday, March 24, 2015 - 10:21 PM UTC
Quoted Text
Dave that's dedication !
You said at the weekend
"I've got a week off to finish this"
So three days left to still go shopping for easter eggs.
Well done mate!
Final result looks good to me, how can you get over a tail sitting problem like this afterwards, will it have to be
'stand mounted' or something?
Paul
Paul, it'll have a prop made from clear sprue glued under the tail - when it's on the shelf not many people will notice.
Posted: Tuesday, March 24, 2015 - 10:40 PM UTC
Aah I see.
That's bit of a bugger though, you must only find out once everything's attached!
At least with a figure a bit of brass rod secured into the groundwork means the pose can be as extreme as we like.
All the best
Paul
That's bit of a bugger though, you must only find out once everything's attached!
At least with a figure a bit of brass rod secured into the groundwork means the pose can be as extreme as we like.
All the best
Paul

Posted: Tuesday, March 24, 2015 - 11:06 PM UTC
Nice model Dave to bad about the tail sitting.


Bink123

Joined: June 23, 2008
KitMaker: 414 posts
AeroScale: 364 posts

Posted: Tuesday, March 24, 2015 - 11:44 PM UTC
Re: scratch-built 1926 faux Fokker.
I think the images are a little small in the build log, so here below are several larger images. I did an overcoat of Vallejo satin clear finish - you can see faint brush marks on the wings.


Photos are by iPad2 under natural light.
Markings are Royal Netherlands Air Force.
I think the images are a little small in the build log, so here below are several larger images. I did an overcoat of Vallejo satin clear finish - you can see faint brush marks on the wings.


Photos are by iPad2 under natural light.
Markings are Royal Netherlands Air Force.
Posted: Wednesday, March 25, 2015 - 01:47 AM UTC
Great build Richard!


Posted: Wednesday, March 25, 2015 - 02:12 AM UTC
Quoted Text
Great build Richard!

I agree, and I thought "the faint brush marks on the wings"
Was weathering.
I'm going to be suspicious of others claims of hours spent weathering in future ha haar
Paul


Bink123

Joined: June 23, 2008
KitMaker: 414 posts
AeroScale: 364 posts

Posted: Wednesday, March 25, 2015 - 08:06 AM UTC
Thanks for your kind remarks.
If I would have taken a photo of the fuselage sides, the brush marks would have been very obvious - kind of like on an oil painting. Clear coat evens things out nicely.
My brushes have just about had it, and I was scraping the bottom of my paint pots so I was picking up little bits of stuff. I also had to deal with pet hair (two cats and one dog) and dust.
Regarding weathering - it is great for hiding all kinds of flaws, I've even used it for disguising not so perfect decals.
 Cheers!
If I would have taken a photo of the fuselage sides, the brush marks would have been very obvious - kind of like on an oil painting. Clear coat evens things out nicely.
My brushes have just about had it, and I was scraping the bottom of my paint pots so I was picking up little bits of stuff. I also had to deal with pet hair (two cats and one dog) and dust.
Regarding weathering - it is great for hiding all kinds of flaws, I've even used it for disguising not so perfect decals.
 Cheers!
Posted: Friday, March 27, 2015 - 07:59 AM UTC
Here is my entry. I decided to do an automobile to be slightly different. I chose the MPC lotus Turbine car.Since most are doing armour or aircraft I thought a car would be an interesting build.


Posted: Wednesday, April 08, 2015 - 01:16 AM UTC
Welcome Darrell!.
Here is an update on my build:-


Here is an update on my build:-


Bigrip74

Joined: February 22, 2008
KitMaker: 5,026 posts
AeroScale: 2,811 posts

Posted: Saturday, April 11, 2015 - 11:16 PM UTC
@Dave: nice job on the Hunter.
@bink123: really interesting subject you built and the scheme is one that would not have wanted to attempt. Nice job.
I HAVE A QUESTION: what clear flat/satin is able to be brushed onto the surface without leaving streaks or the mess that I've had in my past experiences. I am at the point of applying some wash then a flat overcoat if I am able to find one that may be brush applied.
Bob

Thudius

Joined: October 22, 2012
KitMaker: 1,194 posts
AeroScale: 19 posts

Posted: Saturday, April 11, 2015 - 11:45 PM UTC
Bob, try Vallejo Matt Varnish. It brushes nicely with just a bit of water and dries dead flat. It also dries quite quickly so you can apply a second coat in about 15 minutes, it needs to cure overnight for any heavy action if you have to sand or something like that.
Kimmo
Kimmo

Bigrip74

Joined: February 22, 2008
KitMaker: 5,026 posts
AeroScale: 2,811 posts

Posted: Saturday, April 11, 2015 - 11:56 PM UTC
Kimmo: thanks for the advice, just ordered Valljeo's Satin varnish. I did not see the Matt, but this should do the trick. Again thanks for the help.
Bob
Bob

Bigrip74

Joined: February 22, 2008
KitMaker: 5,026 posts
AeroScale: 2,811 posts

Posted: Saturday, April 18, 2015 - 10:55 PM UTC
Posted: Tuesday, April 21, 2015 - 05:39 AM UTC
Coming along nicely Bob!
Here is an update on my build:-

Decals on,next up detail parts and varnish.

Here is an update on my build:-

Decals on,next up detail parts and varnish.


Bigrip74

Joined: February 22, 2008
KitMaker: 5,026 posts
AeroScale: 2,811 posts

Posted: Friday, April 24, 2015 - 09:18 PM UTC
Kimmo, I took your advice and used the Vallejo Matt Varnish instead of their Satin Varnish. It went on smooth and as it dries I see that it will be just fine. Photos soon.
Richard, nice job with the Typhoon and those invasion stripes (which I avoid like the plague)
Bob
Richard, nice job with the Typhoon and those invasion stripes (which I avoid like the plague)
Bob

Thudius

Joined: October 22, 2012
KitMaker: 1,194 posts
AeroScale: 19 posts

Posted: Friday, April 24, 2015 - 10:14 PM UTC
Quoted Text
Kimmo, I took your advice and used the Vallejo Matt Varnish instead of their Satin Varnish. It went on smooth and as it dries I see that it will be just fine. Photos soon.
Richard, nice job with the Typhoon and those invasion stripes (which I avoid like the plague)
Bob
It really is nice stuff, the bonus is how quickly it dries to the touch so you don't have to worry too much about damaging the finish or waiting ages to get more layers on.
Kimmo

Bigrip74

Joined: February 22, 2008
KitMaker: 5,026 posts
AeroScale: 2,811 posts

Posted: Friday, April 24, 2015 - 10:21 PM UTC

Thudius

Joined: October 22, 2012
KitMaker: 1,194 posts
AeroScale: 19 posts

Posted: Friday, April 24, 2015 - 11:13 PM UTC
The finish is certainly flat  Photography is the biggest challenge for most modelers. Getting a decent camera and lighting is something that is very often overlooked, and you don't need to spend a fortune either. Just don't expect professional results with a $50 camera and desk lamp. Otherwise, a nice looking build.
Kimmo
 Photography is the biggest challenge for most modelers. Getting a decent camera and lighting is something that is very often overlooked, and you don't need to spend a fortune either. Just don't expect professional results with a $50 camera and desk lamp. Otherwise, a nice looking build.
Kimmo

Bigrip74

Joined: February 22, 2008
KitMaker: 5,026 posts
AeroScale: 2,811 posts

Posted: Friday, April 24, 2015 - 11:40 PM UTC
Quoted Text
The finish is certainly flatPhotography is the biggest challenge for most modelers. Getting a decent camera and lighting is something that is very often overlooked, and you don't need to spend a fortune either. Just don't expect professional results with a $50 camera and desk lamp. Otherwise, a nice looking build.
Kimmo
What do you mean $50.00 camera
 it was only $30.00
  . Kimmo, you are correct re: the camera and lighting. I have a photo booth which is a pain to set up and I have a Nikon D90 which I got off my brother but do not know how to use yet. But someday.
Bob

Thudius

Joined: October 22, 2012
KitMaker: 1,194 posts
AeroScale: 19 posts

Posted: Saturday, April 25, 2015 - 12:05 AM UTC
Quoted Text
Quoted TextThe finish is certainly flatPhotography is the biggest challenge for most modelers. Getting a decent camera and lighting is something that is very often overlooked, and you don't need to spend a fortune either. Just don't expect professional results with a $50 camera and desk lamp. Otherwise, a nice looking build.
Kimmo
What do you mean $50.00 camerait was only $30.00
. Kimmo, you are correct re: the camera and lighting. I have a photo booth which is a pain to set up and I have a Nikon D90 which I got off my brother but do not know how to use yet. But someday.
Bob
I'm pleasantly surprised with my IXUS something or other (less than 80 euros, a real bargain), it has enough settings and a long enough exposure time that I can get pretty good shots that can be tweaked in photoshop. I need to build a collapsible light box/tent and get some better bulbs. It sucks not having a dedicated work area.
Kimmo

Bigrip74

Joined: February 22, 2008
KitMaker: 5,026 posts
AeroScale: 2,811 posts

Posted: Saturday, April 25, 2015 - 08:18 AM UTC
[quote] It sucks not having a dedicated work area. Kimmo[quote]
I know what you mean.
Bob
I know what you mean.
Bob
Posted: Saturday, April 25, 2015 - 01:51 PM UTC
Nice progress on the hurricane, Bob. I only really set the big photo rig up when finished. Too time consuming and a hassle for in progress shots.
 |


