Air Campaigns
Want to start or join a group build? This is where to start.
Want to start or join a group build? This is where to start.
Hosted by Frederick Boucher, Michael Satin
OFFICIAL: Vac and Resin Campaign

Ranger74

Joined: April 04, 2002
KitMaker: 1,290 posts
AeroScale: 87 posts

Posted: Monday, April 13, 2015 - 06:54 PM UTC
Finally made some more progress on the Curtiss A-8. Yard work/gardening is taking more time. I have the air frame together . Required a lot of Milliput in the fuselage/wing joints. As can be seen in the photos, still smoothing those joints. Need to blend in the wheel pants into lower wing.


Removed by original poster on 04/14/15 - 19:30:43 (GMT).
Removed by original poster on 04/14/15 - 19:33:10 (GMT).
Removed by original poster on 04/14/15 - 19:35:38 (GMT).

Ranger74

Joined: April 04, 2002
KitMaker: 1,290 posts
AeroScale: 87 posts

Posted: Tuesday, April 14, 2015 - 12:38 AM UTC
Another try to get larger photoes for your viewing:


I have been having problems with consistency when loading photos from my Kit Maker Album. Sometimes small other times large. Photos in the album are all generally same size. Any recommendations?
I used Photo Bucket for this set of photos.
Jeff


I have been having problems with consistency when loading photos from my Kit Maker Album. Sometimes small other times large. Photos in the album are all generally same size. Any recommendations?
I used Photo Bucket for this set of photos.
Jeff

Jessie_C


Joined: September 03, 2009
KitMaker: 6,965 posts
AeroScale: 6,247 posts

Posted: Tuesday, April 14, 2015 - 12:50 AM UTC
The problem you're having is that the URLs of the small photos have the "thumbs" still in them, like this:
http://gallery.kitmaker.net/data/500/thumbs/DSC01479.JPG
To get the big photos, you need to delete the "thumbs" when you paste the URL into your post:
http://gallery.kitmaker.net/data/500/DSC01479.JPG
Make certain that you delete either the slash (/) just before or just after "thumbs" (but only one, not both). If you leave two slashes like this
http://gallery.kitmaker.net/data/500//DSC01479.JPG
it breaks the URL. If you erase both, it also breaks the URL
http://gallery.kitmaker.net/data/500DSC01479.JPG
Posted: Thursday, April 16, 2015 - 08:17 AM UTC
OK this is where I am at now....
Got the engine cowling on and since this kit did not really have any exhausts I scratch some.
I still have a lot of sanding to do around the front Cockpit canopy. And more filling as well......
But small steps.

Got the engine cowling on and since this kit did not really have any exhausts I scratch some.
I still have a lot of sanding to do around the front Cockpit canopy. And more filling as well......
But small steps.
Posted: Thursday, April 16, 2015 - 04:44 PM UTC
Oh good, we have some airframes coming together. Both wonderful rarely modeled prototypes.
Ranger74 - the Shrike kit looks to be a good representation. You have some bondo fairing work ahead, that is certainly part of the game for both vac and resin kits.
BoiseBlade - that Breda is shaping up very nicely. the exhaust pipe fits perfectly. added details like that are eye candy.
Anyone else in here moving forward? I have two weeks of liberty ahead of me now, hope to get some decals on my DC-7 among other things.

Ranger74

Joined: April 04, 2002
KitMaker: 1,290 posts
AeroScale: 87 posts

Posted: Thursday, April 16, 2015 - 09:41 PM UTC
Roger, thank you.
Posted: Tuesday, April 21, 2015 - 02:54 AM UTC
Thanks Jonathan
I have almost finished the scratch landing gears and covers hope to post more images soon.
I have almost finished the scratch landing gears and covers hope to post more images soon.
Posted: Friday, April 24, 2015 - 05:31 AM UTC
OK, here is where I am at now landing Gear built and on and tail wing wires added. I will finish up the bottom clear piece then start painting.....


Posted: Sunday, April 26, 2015 - 12:25 PM UTC
Coming along nicely, the landing gear looks good.
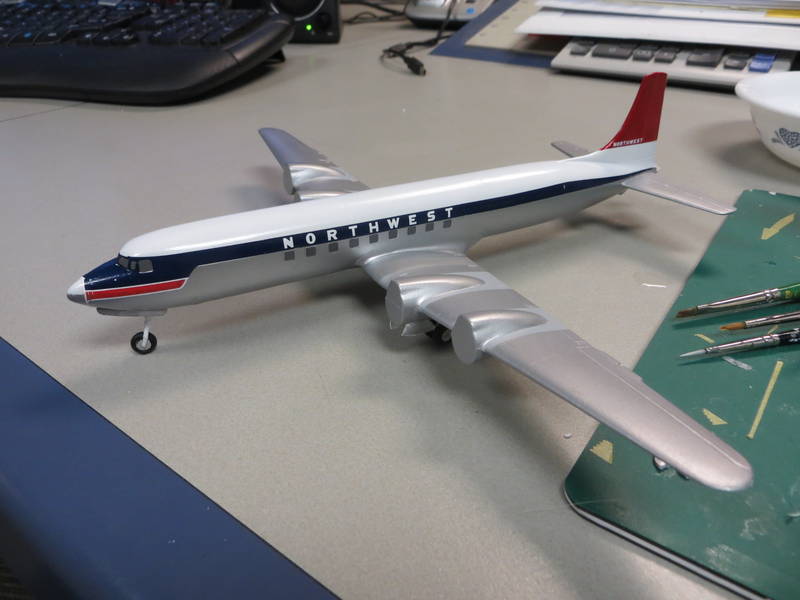
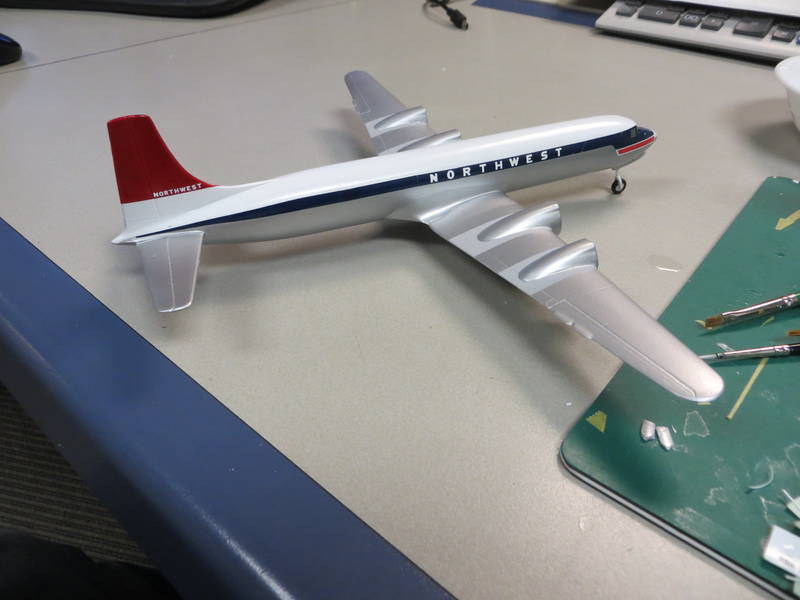
I got the tail painted,and a good start on the decals on the DC-7.


unfortunately these decals are crumbly and curly, those long blue stripes broke in numerous places and little chips floated away.
Interestingly the sheet includes several inches of extra blue stripe, and a couple of extra windows.
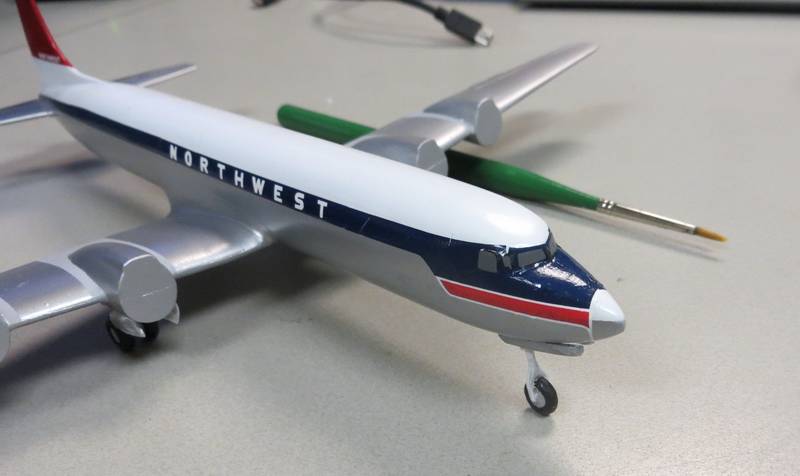
I almost lost this wrap around nose decal.

it broke into several pieces, and it still needs some repairs. Fortunatley it does work nicely with Micro Sol, so all the bit seem to be welded together and settled down solidly.
I got the tail painted,and a good start on the decals on the DC-7.
unfortunately these decals are crumbly and curly,
 those long blue stripes broke in numerous places and little chips floated away.
Interestingly the sheet includes several inches of extra blue stripe, and a couple of extra windows.

I almost lost this wrap around nose decal.
it broke into several pieces, and it still needs some repairs. Fortunatley it does work nicely with Micro Sol, so all the bit seem to be welded together and settled down solidly.
Posted: Monday, April 27, 2015 - 12:26 PM UTC
Finished


The kit was as good as a vacuform kit gets. the decal was difficult to work with, but ended up ok.
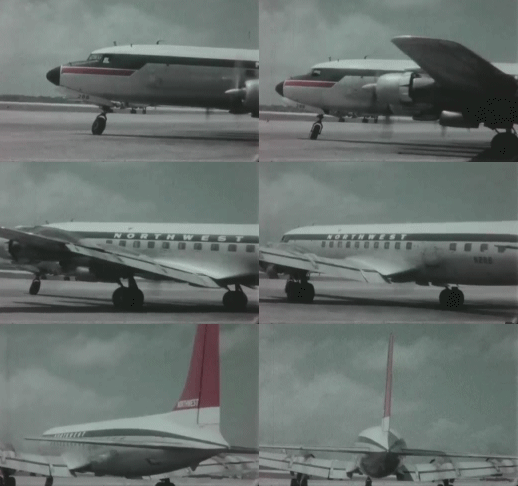
Northwest bought eight DC-7Cs in 1957. Two of them crashed in the ocean with loss of life in 1962 and 1963. The rest were sold off into freight service. the last one, also the first, N284 was off the roster in 11/68. N288 seen on Kwajalein in this bit of film left the roster in 5/68.

I believe but cannot prove, that my family and I flew on this aircraft at least once between Kwajalein and Honolulu in 1967 or 68.


The kit was as good as a vacuform kit gets. the decal was difficult to work with, but ended up ok.
Northwest bought eight DC-7Cs in 1957. Two of them crashed in the ocean with loss of life in 1962 and 1963. The rest were sold off into freight service. the last one, also the first, N284 was off the roster in 11/68. N288 seen on Kwajalein in this bit of film left the roster in 5/68.

I believe but cannot prove, that my family and I flew on this aircraft at least once between Kwajalein and Honolulu in 1967 or 68.
Posted: Monday, April 27, 2015 - 12:54 PM UTC
Since its a Vac and Resin campaign, I guess I should build a resin kit.
I have this adorable Cessna UC-35

I have this adorable Cessna UC-35

Posted: Monday, April 27, 2015 - 10:44 PM UTC
Finished
http://i894.photobucket.com/albums/ac147/Jonathan_Clapp/Bucholz%20Army%20Airfield/DC7_2638_zpsxrbjv7xr.jpg

http://i894.photobucket.com/albums/ac147/Jonathan_Clapp/Bucholz%20Army%20Airfield/DC7_2642_zps5o1cippa.jpg

test
Ive been faithful for many years, but Photobucket is starting to annoy me.
http://i894.photobucket.com/albums/ac147/Jonathan_Clapp/Bucholz%20Army%20Airfield/DC7_2638_zpsxrbjv7xr.jpg

http://i894.photobucket.com/albums/ac147/Jonathan_Clapp/Bucholz%20Army%20Airfield/DC7_2642_zps5o1cippa.jpg

test
Ive been faithful for many years, but Photobucket is starting to annoy me.

Jessie_C


Joined: September 03, 2009
KitMaker: 6,965 posts
AeroScale: 6,247 posts

Posted: Monday, April 27, 2015 - 11:23 PM UTC
Quoted Text
Ive been faithful for many years, but Photobucket is starting to annoy me.
Only starting? They've been annoying for years!
Posted: Tuesday, April 28, 2015 - 09:25 PM UTC
Really Nice Jonathan!
I hope mine comes out as well.......
I know what you mean, this may be my "First" and "Last" Vacu-form kit....even though I have 2 more in my stock......
BTW, I like the Terminal and small diorama.
Is that kit or scratch?
Regards
Jeff D
I hope mine comes out as well.......
I know what you mean, this may be my "First" and "Last" Vacu-form kit....even though I have 2 more in my stock......
BTW, I like the Terminal and small diorama.
Is that kit or scratch?
Regards
Jeff D
Posted: Wednesday, April 29, 2015 - 01:22 AM UTC
The diorama is scratch built from Evergreen styrene.
you can see more of it here.
It's a model of a real place.

you can see more of it here.
It's a model of a real place.

Posted: Wednesday, April 29, 2015 - 01:34 AM UTC
Quoted Text
Quoted TextIve been faithful for many years, but Photobucket is starting to annoy me.
Only starting? They've been annoying for years!
Only as annoying as the rest of the internet.
Even KitMaker bugs me from times to time.

by the way, you're an editor here, could you possibly fix the spelling error in the the title of this thread?


Jessie_C


Joined: September 03, 2009
KitMaker: 6,965 posts
AeroScale: 6,247 posts

Posted: Wednesday, April 29, 2015 - 02:31 AM UTC
Quoted Text
by the way, you're an editor here, could you possibly fix the spelling error in the the title of this thread?
Oh my, what an offial mistake! I don't have editing privileges in this forum, but I know someone who does

Posted: Wednesday, April 29, 2015 - 06:46 PM UTC
Jonathan;
That is awesome work and way nice terminal scratch, good job BZ
Jeff D
That is awesome work and way nice terminal scratch, good job BZ
Jeff D
Posted: Monday, May 04, 2015 - 02:40 AM UTC
Fantastic build Jonathan. It's a very smart looking aeroplane. And I like your airport terminal too. If space was no problem I'd love to do something like that to display my builds.
I'm hoping to make a start on my build in the next week or so, although I am now leaning towards the Albatros J1. I seem to have caught the bug for WW1 recently . I think I like the challenge. I might still make a start on the Skywarrior if that one goes well.
I'm hoping to make a start on my build in the next week or so, although I am now leaning towards the Albatros J1. I seem to have caught the bug for WW1 recently
 . I think I like the challenge. I might still make a start on the Skywarrior if that one goes well.
 Posted: Thursday, May 14, 2015 - 09:04 AM UTC
Just started to build my entry, Planet Models 1/72 Heinkel He119 V4. 


Posted: Thursday, May 28, 2015 - 01:30 AM UTC
Here's my build.
The Joystick Models 1/72 Albatros J.1.
The J.1 was an armoured battlefield support aircraft introduced in late 1917. The cockpit section of the aircraft was covered in 5mm steel plate to protect the crew from ground fire. Only the rear gunner was armed with a Parabellum machine gun and grenades. A handful of aircraft had the machine gun replaced with a 20mm Becker cannon and were among first tank-busters. Although successful, the lack of armour plating around the engine and radiator left these areas vulnerable. Albatros later redesigned it as the J.II with more armour plating and even fitted 2 downward firing MG08's for strafing missions, while a few had a belly mounted 20mm cannon on a flexi mount.
So, an interesting type that the mainstream manufacturers have not touched. So far anyway. I can certainly see Wingnut Wings doing one if they continue their trend of kitting the more unusual types.
So onto the plastic.


And that's it for the instructions. 2 small sized plans and a written instructions. The decals are quite nice though and give the option wartime German or post-war Polish air forces.
My main reference is Jack Herris' German Armoured Warplanes of WW1, which contains sets of 1/48 plans for the J.1 and some very useful reference photo's. I was able to scan, reduce and print a set to 1/72.


Now, the struts seemed like they could be a problem, but using my new set of plans I compared them against the spare struts in a couple of Roden Albatros kits in my stash. To my amazement the V-struts and longer wing struts, intended for the D.1 boxing, are exactly the right size! Problem solved.
First step tonight has been to mark out the parts. I'll start cutting tomorrow.

The Joystick Models 1/72 Albatros J.1.
The J.1 was an armoured battlefield support aircraft introduced in late 1917. The cockpit section of the aircraft was covered in 5mm steel plate to protect the crew from ground fire. Only the rear gunner was armed with a Parabellum machine gun and grenades. A handful of aircraft had the machine gun replaced with a 20mm Becker cannon and were among first tank-busters. Although successful, the lack of armour plating around the engine and radiator left these areas vulnerable. Albatros later redesigned it as the J.II with more armour plating and even fitted 2 downward firing MG08's for strafing missions, while a few had a belly mounted 20mm cannon on a flexi mount.
So, an interesting type that the mainstream manufacturers have not touched. So far anyway. I can certainly see Wingnut Wings doing one if they continue their trend of kitting the more unusual types.
So onto the plastic.


And that's it for the instructions. 2 small sized plans and a written instructions. The decals are quite nice though and give the option wartime German or post-war Polish air forces.
My main reference is Jack Herris' German Armoured Warplanes of WW1, which contains sets of 1/48 plans for the J.1 and some very useful reference photo's. I was able to scan, reduce and print a set to 1/72.


Now, the struts seemed like they could be a problem, but using my new set of plans I compared them against the spare struts in a couple of Roden Albatros kits in my stash. To my amazement the V-struts and longer wing struts, intended for the D.1 boxing, are exactly the right size! Problem solved.
First step tonight has been to mark out the parts. I'll start cutting tomorrow.

Posted: Thursday, May 28, 2015 - 01:54 AM UTC
excellent.  This campaign has been very quiet recently, will be good to see another project get underway.
 This campaign has been very quiet recently, will be good to see another project get underway.
 |


