

Dave,
Glad to see that you're back working on the Jug. The Fw190-A5 looks fantastic. The paint scheme really looks exceptional.
Joel
World War II
Discuss WWII and the era directly before and after the war from 1935-1949.
Discuss WWII and the era directly before and after the war from 1935-1949.
Hosted by Rowan Baylis
Hasegawa 1/48 P-47D-25 USAAF 9th Air force
Joel_W

Joined: December 04, 2010
KitMaker: 11,666 posts
AeroScale: 7,410 posts
Posted: Wednesday, April 01, 2015 - 09:30 PM UTC


Totalize

Joined: February 04, 2009
KitMaker: 743 posts
AeroScale: 151 posts
Posted: Sunday, April 05, 2015 - 06:56 AM UTC
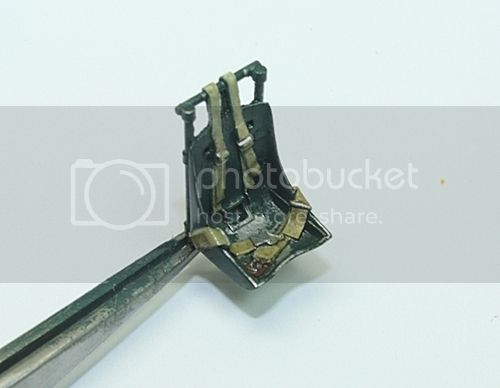
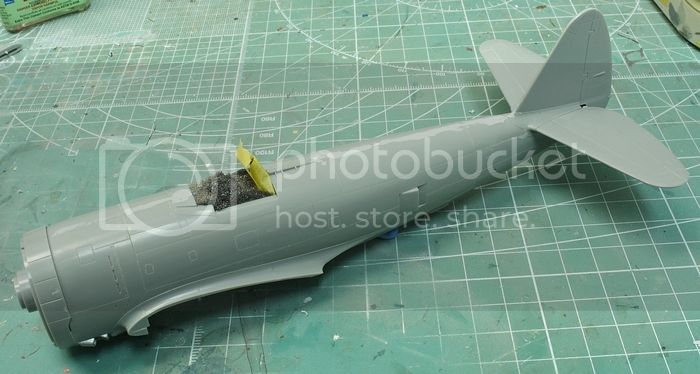
Further progress. Just added some finishing touches including the head rest, throttle quadrant, some PE from the Eduard set and instrument panel. The IP bezel is from the Eduard set the instrument panel is the kit decal. Finally, I dry brushed the panels and added an oil wash to the seat. As you can see I didn't go for a super detailing job of this part of the build as much of it wont' be seen and I want to get to detailing the air frame and the overall look of the aircraft. Next up is to add the joystick then glue everything together and mount the pit to the air frame.

Dave.
Dave.
Joel_W
Joined: December 04, 2010
KitMaker: 11,666 posts
AeroScale: 7,410 posts
Posted: Sunday, April 05, 2015 - 06:19 PM UTC
Dave,
Very nice work on the Pit. And your seat is just outstanding.
Joel
Very nice work on the Pit. And your seat is just outstanding.
Joel
Totalize
Joined: February 04, 2009
KitMaker: 743 posts
AeroScale: 151 posts
Posted: Sunday, April 19, 2015 - 09:20 PM UTC
Thanks Joel,
Much appreciated.
Some more progress on Coffey's Pot.
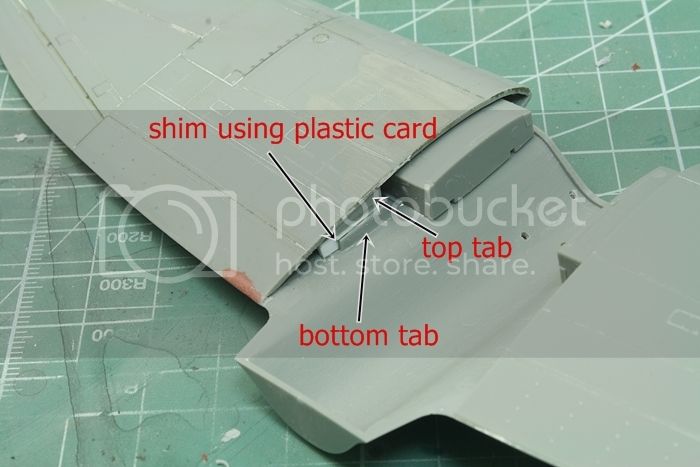
Here are the wings.
I glued them together and dry-fitted this section to the fuselage which revealed that the left wing root and wing joint were mis-matched, the wing root sat much higher than the wing. This was due to the mis-alignment of the top wing tab and bottom wing tab. I created a shim to fix this which brought the top wing up higher and even with the wing root. The white stuff you see in the panel lines is Tamiya finishing polish. I used this stuff to polish the plastic in some areas as the kit had a lot of scratches on it.
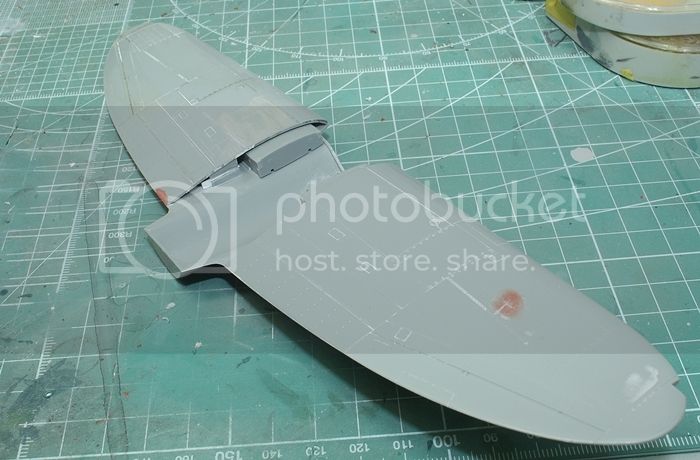
I also added a panel line and a line of (druze) rivets along the top of engine panel.
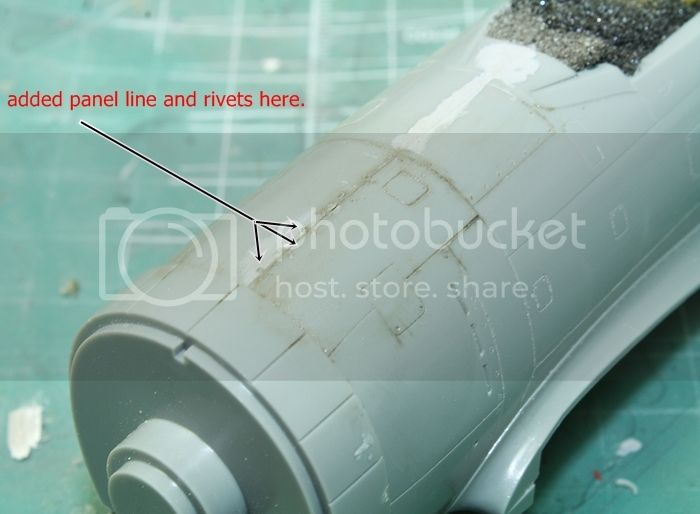
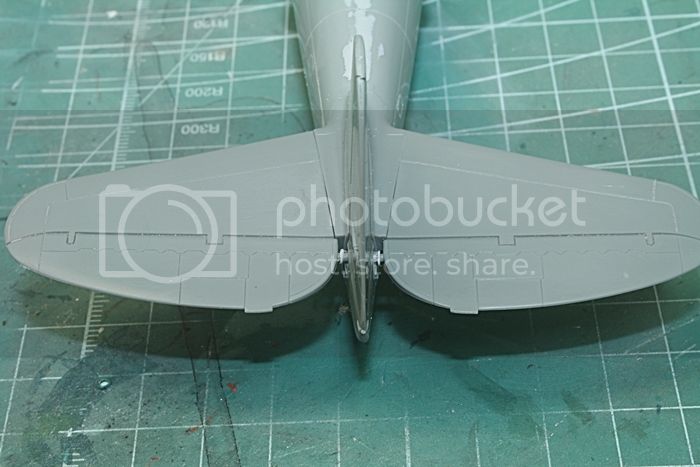
I thinned the intercooler doors as well and added some circular rings to the horizontal stabs using my punch and die set. I noticed these in a few pictures of P47D's and decided to add them.
Much appreciated.
Some more progress on Coffey's Pot.
Here are the wings.
I glued them together and dry-fitted this section to the fuselage which revealed that the left wing root and wing joint were mis-matched, the wing root sat much higher than the wing. This was due to the mis-alignment of the top wing tab and bottom wing tab. I created a shim to fix this which brought the top wing up higher and even with the wing root. The white stuff you see in the panel lines is Tamiya finishing polish. I used this stuff to polish the plastic in some areas as the kit had a lot of scratches on it.
I also added a panel line and a line of (druze) rivets along the top of engine panel.
I thinned the intercooler doors as well and added some circular rings to the horizontal stabs using my punch and die set. I noticed these in a few pictures of P47D's and decided to add them.
Totalize
Joined: February 04, 2009
KitMaker: 743 posts
AeroScale: 151 posts
Posted: Sunday, April 19, 2015 - 09:24 PM UTC
I worked on mounting the fuselage to the wings then priming up the P-47D-25 this weekend and re-scribing the panel lines. I focused on prepping the surface by getting rid any visible, bumps, scratches, faults, etc. Not much to show as its just primer but just a couple of progress shots showing the starboard, gun camera side.The cowling of course is just dry fitted.

Joel_W
Joined: December 04, 2010
KitMaker: 11,666 posts
AeroScale: 7,410 posts
Posted: Monday, April 20, 2015 - 02:14 AM UTC
Dave,
Excellent progress. I'm really impressed with how you adjusted the wing to the wing root.
The only suggestion I can offer, but it's too late now is the Inter Cooler doors should be closed (flush with the fuselage) when the engine is off. They open and close automatically without the need for the pilot to modulate them.
Joel
Totalize
Joined: February 04, 2009
KitMaker: 743 posts
AeroScale: 151 posts
Posted: Tuesday, April 21, 2015 - 01:41 AM UTC
Hey Joel,
Thanks a bunch for taking the time to check in on the build and post your comments. They are very much appreciated.
I am not sure I understand but for the intercooler doors I have a number of reference pictures of P47D's on the ground not running from the war and of restored ones showing the intercooler doors in the same semi open position as I have. My only thought would be they stayed open after landing and shut down?
Joel_W
Joined: December 04, 2010
KitMaker: 11,666 posts
AeroScale: 7,410 posts
Posted: Tuesday, April 21, 2015 - 05:32 PM UTC
Quoted Text
Hey Joel,
Thanks a bunch for taking the time to check in on the build and post your comments. They are very much appreciated.
I am not sure I understand but for the intercooler doors I have a number of reference pictures of P47D's on the ground not running from the war and of restored ones showing the intercooler doors in the same semi open position as I have. My only thought would be they stayed open after landing and shut down?
The only reason I even noticed it is because I didn't know how to set mine in the parked position. Basically what I found out is that they're auto controlled by the turbo pressure, the more pressure pushed through the vent, the doors just open up wider. Of course this is with properly maintained doors and systems, which was a crap shoot at best. As for the restored aircraft, seams that almost all of them either removed or just disconnected the turbos, so that there was no reason to have functioning doors. Set them and secure them in that position. Same for some of the intakes.
In between working and waiting on the Spit Mk.IXc build, I've started one of two Tamiya P-47D kits. Since the turbo doors are separate on these kits, I'll have them in the neutral position. If anything, it will just make painting and decaling that much easier.
Joel
Totalize
Joined: February 04, 2009
KitMaker: 743 posts
AeroScale: 151 posts
Posted: Tuesday, April 21, 2015 - 09:53 PM UTC
Got it! Thanks for the additional info Joel.
One of the differences I noticed from this kit versus the academy/Eduard kit is the oil coolers doors/vents. This area on the academy kit is molded in. On the Hase kit they are seperate pieces and open, Similar to the Tamiya kit. you can't see it but I added the quickboost oiler cooler mesh to the oil coolers.
In hindsight I wouldn't go for this uprade as you cant really see them once they are in place even with the doors open.
Totalize
Joined: February 04, 2009
KitMaker: 743 posts
AeroScale: 151 posts
Posted: Thursday, April 30, 2015 - 10:07 PM UTC
Back with an update with some minor work I did this past weekend.
I began work on the drop tank by adding some alum foil (The wrapper stuff from a wine bottle) and doing some sculpting of the lines on the drop tank. For this I used a round blade to get the effect you see in the picture I posted above. I also added some lead wire for the fuel line and for what I would imagine is the air line. still a bit more work to do here but let me know what you think. I used one of the drop tanks from my Tamiya kit.
I also added the anti sway connections but I chopped off the ends with the round flat discs as I am making my own out of punched discs using my Waldron P&D set, some .5mm plastic rod (the part of the brace just above the flat round plate) and some .3mm brass rod that will go above the .5mm plastic rod which are the adjusting rods. Sorry if I am not using the right terms here. The ones in the kit can't be used because they are all the same length and I will need to have the braces at different lengths so to that all four touch the tank with the round base plate. You can get an idea of what I am talking about by looking at the picture I and Andy posted of the 75 gallon metal tank.
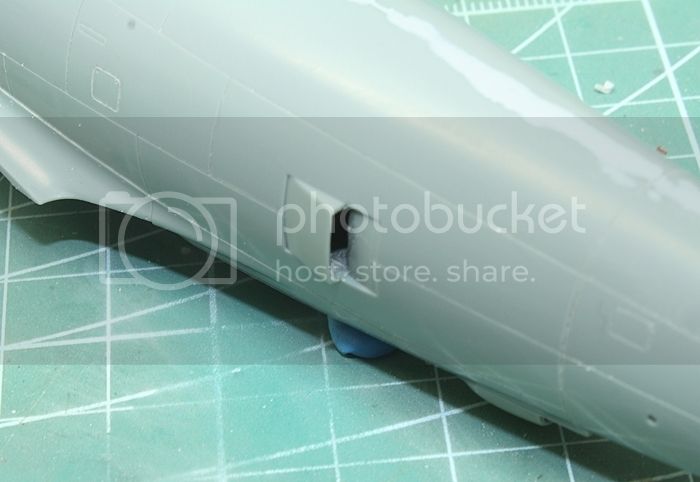
Thirdly, I was looking over the instructions and could see where its says to add the landing light on the bottom port wing near the tip of the wing but what about the big gaping hole behind the landing gear bay? Turns out the instructions refer to P-47D's of the -28 block and higher whilst the those blocks below the D28's had the landing light positioned behind the landing gear bay. I did some searching on line and found out that Hasegawa includes a blanking disc to cover up the appropriate hole. This information they left out in their instructions. Luckily, I found the blanking disk on one of the sprues and added it to the hole near the wing tip as Coffey's pot had the landing light by the gear bay as it is a -D25 block. See pics below of what I am talking about.
[imghttp://i700.photobucket.com/albums/ww8/DAVIDD_09/P47D%20Coffeys%20Pot/_MG_2232a700a_zpsuzjmgow1.jpg][/img]
[imghttp://i700.photobucket.com/albums/ww8/DAVIDD_09/P47D%20Coffeys%20Pot/_MG_2234a600_zpsnlb4hsoh.jpg][/img]
I began work on the drop tank by adding some alum foil (The wrapper stuff from a wine bottle) and doing some sculpting of the lines on the drop tank. For this I used a round blade to get the effect you see in the picture I posted above. I also added some lead wire for the fuel line and for what I would imagine is the air line. still a bit more work to do here but let me know what you think. I used one of the drop tanks from my Tamiya kit.
I also added the anti sway connections but I chopped off the ends with the round flat discs as I am making my own out of punched discs using my Waldron P&D set, some .5mm plastic rod (the part of the brace just above the flat round plate) and some .3mm brass rod that will go above the .5mm plastic rod which are the adjusting rods. Sorry if I am not using the right terms here. The ones in the kit can't be used because they are all the same length and I will need to have the braces at different lengths so to that all four touch the tank with the round base plate. You can get an idea of what I am talking about by looking at the picture I and Andy posted of the 75 gallon metal tank.
Thirdly, I was looking over the instructions and could see where its says to add the landing light on the bottom port wing near the tip of the wing but what about the big gaping hole behind the landing gear bay? Turns out the instructions refer to P-47D's of the -28 block and higher whilst the those blocks below the D28's had the landing light positioned behind the landing gear bay. I did some searching on line and found out that Hasegawa includes a blanking disc to cover up the appropriate hole. This information they left out in their instructions. Luckily, I found the blanking disk on one of the sprues and added it to the hole near the wing tip as Coffey's pot had the landing light by the gear bay as it is a -D25 block. See pics below of what I am talking about.
[imghttp://i700.photobucket.com/albums/ww8/DAVIDD_09/P47D%20Coffeys%20Pot/_MG_2232a700a_zpsuzjmgow1.jpg][/img]
[imghttp://i700.photobucket.com/albums/ww8/DAVIDD_09/P47D%20Coffeys%20Pot/_MG_2234a600_zpsnlb4hsoh.jpg][/img]
Joel_W
Joined: December 04, 2010
KitMaker: 11,666 posts
AeroScale: 7,410 posts
Posted: Thursday, April 30, 2015 - 11:13 PM UTC
Dave,
I'm really impressed with your detailing of the drop tank. Those aluminum clamps look absolutely fantastic. Going to "steal" your method for my drop on the Tamiya P-47-D Bubble which is next on my to build list.
Joel
I'm really impressed with your detailing of the drop tank. Those aluminum clamps look absolutely fantastic. Going to "steal" your method for my drop on the Tamiya P-47-D Bubble which is next on my to build list.
Joel
Totalize
Joined: February 04, 2009
KitMaker: 743 posts
AeroScale: 151 posts
Posted: Wednesday, May 13, 2015 - 09:56 PM UTC
Glad to share Joel,
Looking forward to seeing it in action.
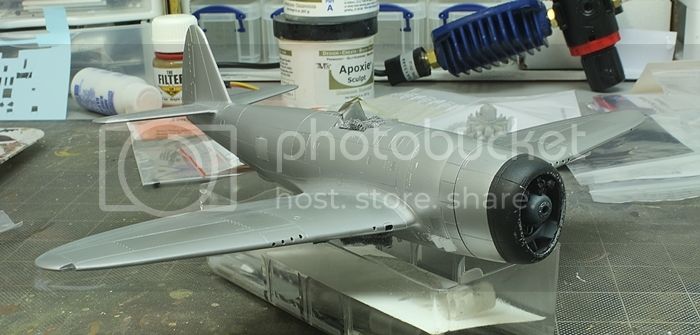
Okay. Further progress.
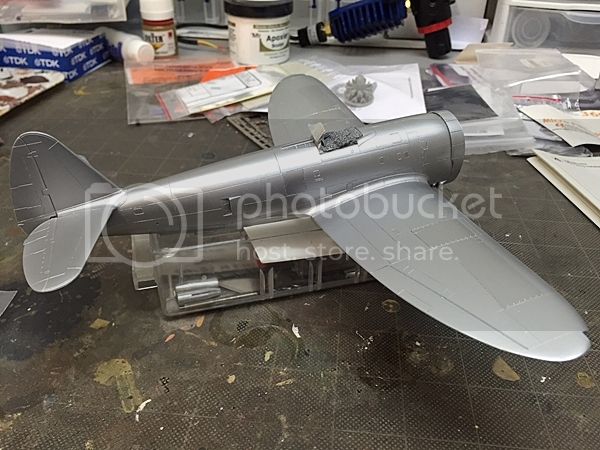
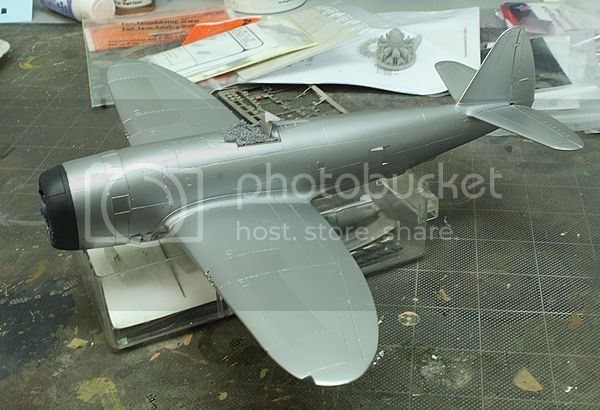
Alclad Aluminum was sprayed on the airframe and I have begun to add some variation in the colour of the NMF to access panels etc. I used Alclad Duraluminum for this by masking off the targeted area and making a couple of passes with my airbrush. So far she looks fairly good and the trick is not to overdue it. Next up some engine shots.


Looking forward to seeing it in action.
Okay. Further progress.
Alclad Aluminum was sprayed on the airframe and I have begun to add some variation in the colour of the NMF to access panels etc. I used Alclad Duraluminum for this by masking off the targeted area and making a couple of passes with my airbrush. So far she looks fairly good and the trick is not to overdue it. Next up some engine shots.
Totalize
Joined: February 04, 2009
KitMaker: 743 posts
AeroScale: 151 posts
Posted: Wednesday, May 13, 2015 - 10:06 PM UTC
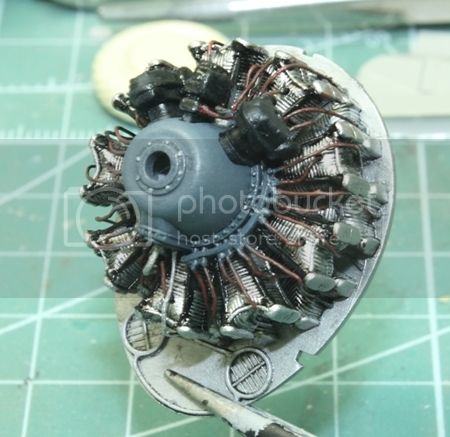
And the engine.
It's not completely finished but I got the washes on and dry brushing, just need to touch up the some of the reduction gear housing rivets and add the P/W logo but she's basically done.
Engine firewall painted Alclad dull aluminum and the cylinder housings were painted Alclad duraluminum. Reduction gear housing done by mixing black, grey, white and blue.
The Magnetos that came with the kit were nothing I have ever seen on a P/W 2800 engine so I cut them off and added the appropriate Turtle back Magnetos from a Tamiya kit which are conversant with a P/W 28000 R-59 type engine that the P-47D-25 carried.
That's it for now.
Cheers,
Dave.
Joel_W
Joined: December 04, 2010
KitMaker: 11,666 posts
AeroScale: 7,410 posts
Posted: Wednesday, May 13, 2015 - 10:15 PM UTC
Dave,
Wow!!
Your NMF is amazing. It looks smooth as silk. What primer or base coat did you use? I've stopped using Tamiya Gray primer. Now I just use Alcad's Gloss Black as the base coat.
Your engine looks fantastic. Love the detailing.
Joel
Wow!!
Your NMF is amazing. It looks smooth as silk. What primer or base coat did you use? I've stopped using Tamiya Gray primer. Now I just use Alcad's Gloss Black as the base coat.
Your engine looks fantastic. Love the detailing.
Joel

thegirl
Joined: January 19, 2008
KitMaker: 6,743 posts
AeroScale: 6,151 posts
Posted: Friday, May 15, 2015 - 06:19 AM UTC
Very nice so far 
Terri
Terri
Totalize
Joined: February 04, 2009
KitMaker: 743 posts
AeroScale: 151 posts
Posted: Friday, May 15, 2015 - 04:13 PM UTC
Quoted Text
Dave,
Wow!!
Your NMF is amazing. It looks smooth as silk. What primer or base coat did you use? I've stopped using Tamiya Gray primer. Now I just use Alcad's Gloss Black as the base coat.
Your engine looks fantastic. Love the detailing.
Joel
Hi Joel,
Tamiya Grey primer was used. Sanded with 3200, 6000 then 12000 grit micromesh sand paper.
I think if you sanded down and buffed up your alcad black primer it would also provide a very good base for the Alcad stuff.
Totalize
Joined: February 04, 2009
KitMaker: 743 posts
AeroScale: 151 posts
Posted: Friday, May 15, 2015 - 04:14 PM UTC
Quoted Text
Very nice so far
Terri
Terry,
Thanks a bunch for taking the time to have a look and post your comments.
Totalize
Joined: February 04, 2009
KitMaker: 743 posts
AeroScale: 151 posts
Posted: Friday, May 15, 2015 - 04:20 PM UTC
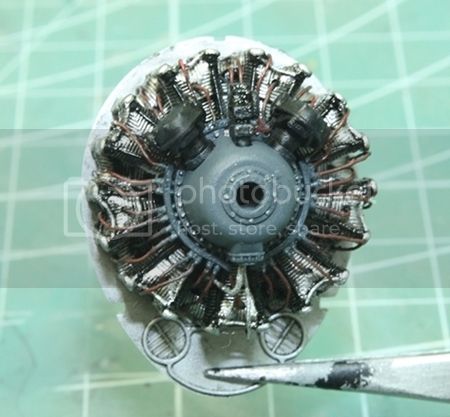
While I got photobucket open here are some more progress pics.
R2800-59 complete Engine done and cowl as well. I added the P/W eagle decal to the reduction housing. Chipping done with AK worn effects. Inside of Cowl painted dull aluminum and airscoop in grey per Republic's paint practices for these first bubbletops.
Airfrmae now finished as I have completed the highlights using Alclad Duraluminium
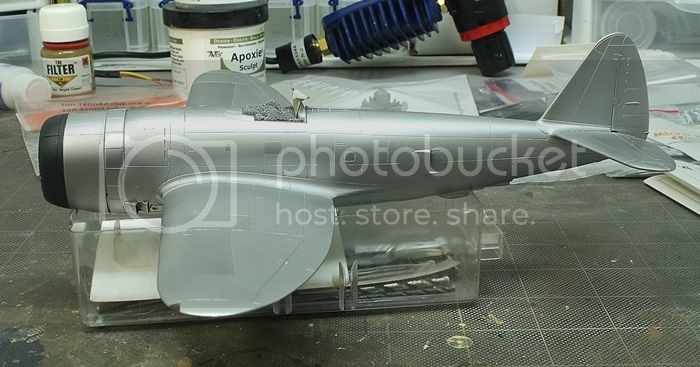
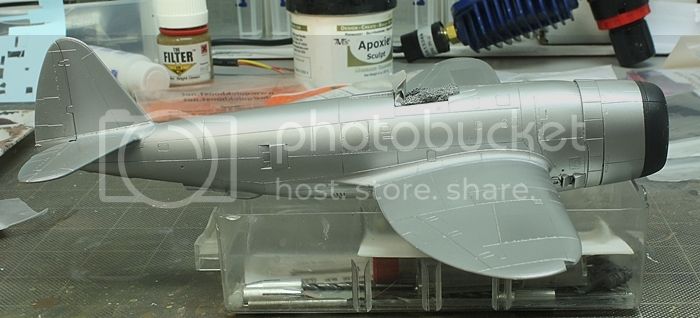
iakarch
Joined: May 19, 2007
KitMaker: 459 posts
AeroScale: 13 posts

Posted: Friday, May 15, 2015 - 04:56 PM UTC
Dave,
Excellent job!
Irvin
Excellent job!
Irvin
iakarch
Joined: May 19, 2007
KitMaker: 459 posts
AeroScale: 13 posts
Posted: Friday, May 15, 2015 - 05:04 PM UTC
Quoted Text
Quoted TextDave,
Wow!!
Your NMF is amazing. It looks smooth as silk. What primer or base coat did you use? I've stopped using Tamiya Gray primer. Now I just use Alcad's Gloss Black as the base coat.
Your engine looks fantastic. Love the detailing.
Joel
Hi Joel,
Tamiya Grey primer was used. Sanded with 3200, 6000 then 12000 grit micromesh sand paper.
I think if you sanded down and buffed up your alcad black primer it would also provide a very good base for the Alcad stuff.
I thought that the black primer is for chrome only, thats what i use it for. the grey is for the alum and steel finishes.
Joel_W
Joined: December 04, 2010
KitMaker: 11,666 posts
AeroScale: 7,410 posts
Posted: Friday, May 15, 2015 - 06:35 PM UTC
Dave,
Gloss Black gives you a deeper shine. I kind of use it for all NMF's.
I really like how the AK Worn effects leaves the painted surface. I gather you dap it on, paint over it, and rub it off.
Joel
Gloss Black gives you a deeper shine. I kind of use it for all NMF's.
I really like how the AK Worn effects leaves the painted surface. I gather you dap it on, paint over it, and rub it off.
Joel
Totalize
Joined: February 04, 2009
KitMaker: 743 posts
AeroScale: 151 posts
Posted: Sunday, May 17, 2015 - 07:12 PM UTC
Quoted Text
Dave,
Excellent job!
Irvin
Thanks a bunch Irvin and thanks for posting your comments. They are very much appreciated
Totalize
Joined: February 04, 2009
KitMaker: 743 posts
AeroScale: 151 posts
Posted: Sunday, May 17, 2015 - 07:14 PM UTC
Quoted Text
Dave,
Gloss Black gives you a deeper shine. I kind of use it for all NMF's.
I really like how the AK Worn effects leaves the painted surface. I gather you dap it on, paint over it, and rub it off.
Joel
Hey Thanks Joel,
Yeah I went with the worn effects instead of the heaving chipping solution due to the scale. Thanks again for posting your comments.
Totalize
Joined: February 04, 2009
KitMaker: 743 posts
AeroScale: 151 posts
Posted: Sunday, May 17, 2015 - 07:19 PM UTC
Hi Folks,
Back with another update. I got the invasion stripes on the aircraft and the ETO stripes as well though I still have to do the bottom wing stripes. However, I decided to take a break from doing these stripes. I haven't done this many measurements on a model. A ton of work.
Anyway, here are some shots.
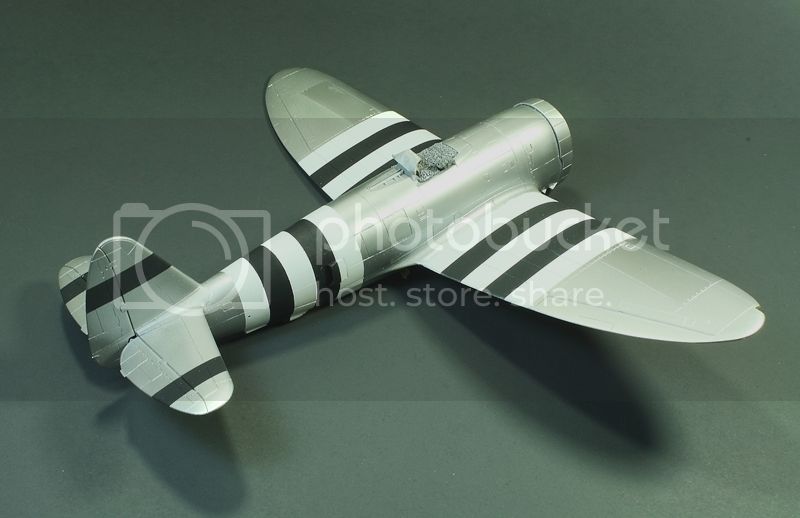
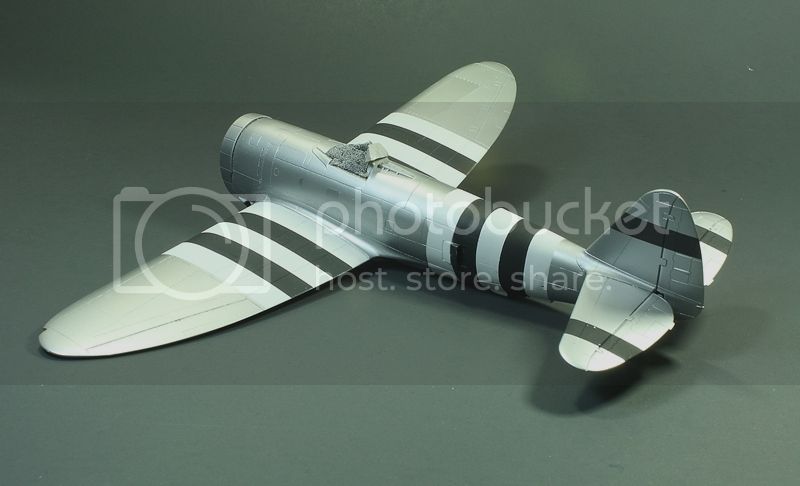
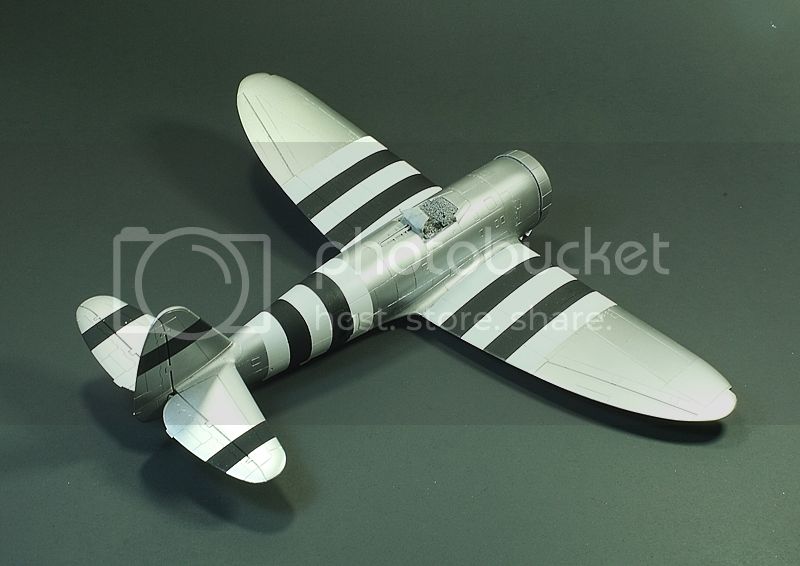
Joel_W
Joined: December 04, 2010
KitMaker: 11,666 posts
AeroScale: 7,410 posts
Posted: Sunday, May 17, 2015 - 07:55 PM UTC
Dave,
Outstanding. They look absolutely perfect.
Joel
Outstanding. They look absolutely perfect.
Joel
 |

WEB HOSTING BY


Copyright ©2021 AeroScale and Kitmaker Network, a subsidiary of Silver Star Enterprises
All Rights Reserved. Please read our Conditions of Use and Privacy Policy.
All Rights Reserved. Please read our Conditions of Use and Privacy Policy.