Pre-Flight Check
Constructive critique of your finished or in-progress photos.
Building the Supermodel Blohm und Voss Bv-138
Joel_W
Staff MemberAssociate Editor
AUTOMODELER
_VISITCOMMUNITY
New York, United States
Joined: December 04, 2010
KitMaker: 11,666 posts
AeroScale: 7,410 posts
Posted: Tuesday, May 05, 2015 - 06:06 PM UTC

Quoted Text

Hi Joel,
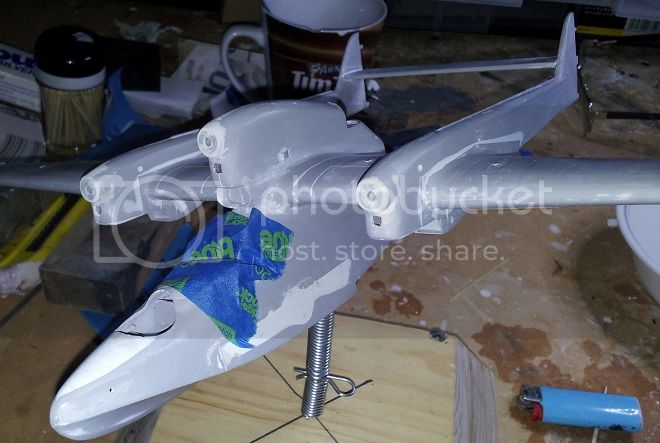
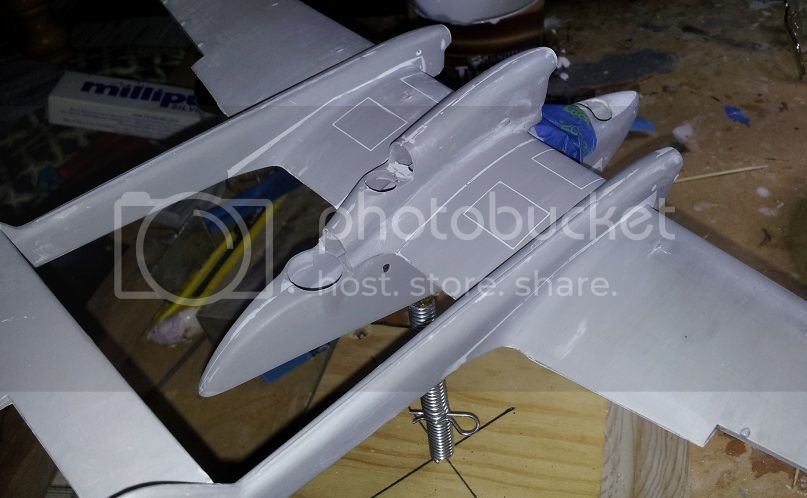
Thanks for your response. I fear staining/fogging the canopy with whichever solvent I might use. Seems to my memory that was what would happen years ago. I imagine I could experiment by painting on some sprue.

Thank you for reading!

Gary


Gary,
If you used an acrylic base paint, then Iso Alcohol or Denatured Alcohol should remove it, and not fog or damage the canopies.

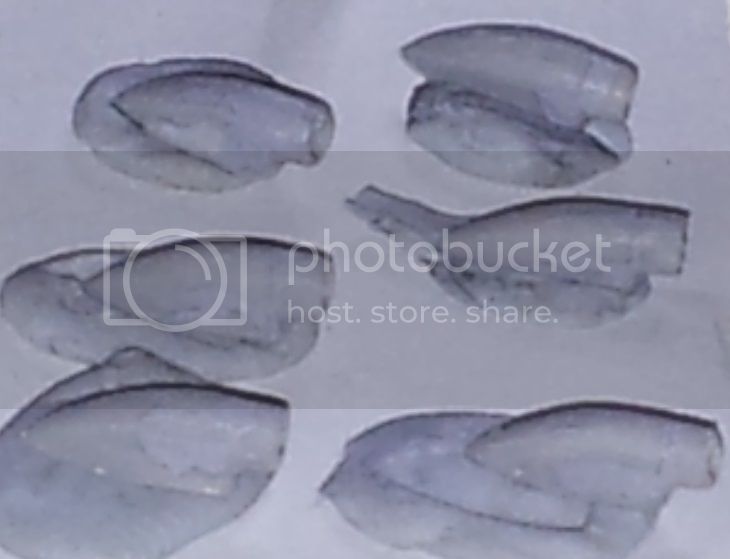
Another option could be to just use masking tape on both sides of each canopy frame as you work that area, and lightly sand with 400-600 wet emery cloth, with the goal to just get it smoother, then do a complete re-masking and repaint.

Joel
GazzaS
#424
_VISITCOMMUNITY
Queensland, Australia
Joined: April 23, 2015
KitMaker: 4,648 posts
AeroScale: 1,938 posts
Posted: Friday, May 08, 2015 - 05:44 AM UTC
Thanks for responding again, Joel. I'm going to let the canopy and turrets sit for a while. I'm not overly keen to redo them at this moment. We'll see if I'm up to it when they are closer to being needed on the model.

If you love putty, this plane would make you happy. The hull is drying after a second application of putty whilst I've been working on the wings.

I've been sanding the trailing edges because they're more akin to cliff's than edges. No pictures for that, but some for the radiator scoops on both outboard engines.

The scoop itself is a block-ish affair that has no business on an aircraft without lots of reshaping.

Like many things on this kit, it fits edge-to-flat-surface with no guides, supports, or slots. Still, they didn't fit well:


After being shaped, glued, puttied and sanded, the result looks more like something you'd find on an airplane.


Thanks for reading!
AussieReg
Staff MemberAssociate Editor
AUTOMODELER
#007
_VISITCOMMUNITY
Victoria, Australia
Joined: June 09, 2009
KitMaker: 8,156 posts
AeroScale: 3,756 posts
Posted: Friday, May 08, 2015 - 07:49 AM UTC
I'm loving the extra effort you're putting in on this build Gary, it's a unique looking aircraft and looks awesome in the display cabinet so I am sure you will find it all worthwhile in the end!

With regard to the gaps on the mating surfaces, I find keeping a stock of stretched Sprue or fine Evergreen strips saves a lot of time. Just glue them into the gaps, knife off the excess and a light sand, I find it much easier than puttying in these areas.

Cheers, D
GazzaS
#424
_VISITCOMMUNITY
Queensland, Australia
Joined: April 23, 2015
KitMaker: 4,648 posts
AeroScale: 1,938 posts
Posted: Friday, May 08, 2015 - 11:32 AM UTC
G'day Damian,
Thank you for that awesome tip! I've been saving sprue since I got back into model building. I'm glad to learn another use for it. I'm certain it will save me some Agro/work/time as I join the main parts and the floats.

Thank you for reading!

Gary
GazzaS
#424
_VISITCOMMUNITY
Queensland, Australia
Joined: April 23, 2015
KitMaker: 4,648 posts
AeroScale: 1,938 posts
Posted: Saturday, May 09, 2015 - 09:49 AM UTC
Hello Fellow Model Builders!
The BV 138 is taking a bit more time than I ever envisaged. Right now it's another edition of: death by putty.

Let's talk divots. Removing the raised panel and rivet lines brought out the low spots on all of the control surfaces:

Due to a bit of unhappiness in finding a quick small-use putty at my LHS I settled for Revell putty. It smells startlingly similar to Testors Green putty. It adheres well but sometimes changes the shape of the plastic. I'm pretty sure that it caused some divots to move, change shape, or disappear completely as it melded itself with the styrene. But at least it sanded smooth and left little light spots for me to contemplate.

Oh no! I have a big hole in the side of my plane/boat!
It wasn't the destroyer of all things known as Gypsy...


There are cheek pieces on either side of the hull. Like other places, they fit edge to flat side without locators or support. So, between sanding and the chemical action of putty and styrene we ended up with a huge spot that was too soft to use.

I didn't notice the problem until the first day of sanding...then the centers of each cheek started to flex and wobble as the glue bond was too thin. I remedied it at first by drilling some small holes at the edges of the cheek pieces and filling them with putty.

Anyway, it worked great for the starboard side but not the port side. Had I been thinking and more patient, I would have put in some support before I glued the cheek pieces in place. I could have used either brass, putty, or even sprue. Anyway, the port side will have a few days for the milliput to dry before I sand it.

Thank you for reading!

Gary

Edit: Typo
chris1
_VISITCOMMUNITY
Auckland, New Zealand
Joined: October 25, 2005
KitMaker: 949 posts
AeroScale: 493 posts
Posted: Saturday, May 09, 2015 - 10:30 AM UTC
Hi there Gary.
Welcome to Aeroscale, (I realise I'm a late with the welcome)
You seem to haven bitten off a fair bit with this build.

You'll find the fellas' & ladies here really helpful.
I've pulled up my chair and following along.

Cheers


Chris
Joel_W
Staff MemberAssociate Editor
AUTOMODELER
_VISITCOMMUNITY
New York, United States
Joined: December 04, 2010
KitMaker: 11,666 posts
AeroScale: 7,410 posts
Posted: Sunday, May 10, 2015 - 03:23 AM UTC
Gary,
You're still making progress no matter how small the steps are.

I use the same filling procedure that Damian does with evergreen strips and stretched sprue I blend with putty, then a final coating of CA glue, and you'd never know that there was a major fit issue.
Joel
GazzaS
#424
_VISITCOMMUNITY
Queensland, Australia
Joined: April 23, 2015
KitMaker: 4,648 posts
AeroScale: 1,938 posts
Posted: Tuesday, May 12, 2015 - 11:34 AM UTC
Hi Chris and Joel! Thanks for your replies and welcome. After a few days working overtime, a little time for modelling. I sanded down the huge lump I'd made to patch the hole in the hull. Then glued the cockpit in place, holding the fuselage halves together with rubber bands. I hate it when you join fuselage halves together and the cockpit decides to go mobile.

Nothing worth taking pictures of. The cockpit is very basic. Fortunately I have crew members who will spice it up with a dash of color.

Thank you for reading.

Gary
GazzaS
#424
_VISITCOMMUNITY
Queensland, Australia
Joined: April 23, 2015
KitMaker: 4,648 posts
AeroScale: 1,938 posts
Posted: Wednesday, May 13, 2015 - 01:43 PM UTC
Because it's a seaplane, I would love a diorama that has the aircraft as it leaps from the water. However, it's a big plane, and my water skills are undeveloped. I've build one warship and water diorama so far. Please pardon my shameless self-promotion:


However, my storage and display space is limited. An aircraft diorama wouldn't have a 'skinny' side, and my water isn't quite up to snuff. So, I have two options. I could put it on a stand, or put it on the rickety looking trolley that is part of the kit.

I assembled the kit with masking tape(leaving small details off), then held the fuselage between finger and thumb. When I found a spot where she sat relatively horizontal, I marked the spot with an 'x' and drilled a 5mm hole. I used a brass bolt and a rubber grommet split in half to make the mounting post. I chose brass because it solders well and also bonds well to CA. The backdrop for the image is the assembly instructions for the carrying trolley.

Thank you for reading!
GazzaS
#424
_VISITCOMMUNITY
Queensland, Australia
Joined: April 23, 2015
KitMaker: 4,648 posts
AeroScale: 1,938 posts
Posted: Thursday, May 14, 2015 - 11:08 AM UTC
Hello Friends,
Today is the biggest joining of plastic so far. Joined both fuselage halves and both wings. On the diagrams I've seen, the upper surface of the wings forms a straight line and the dihedral is made up in the taper of the wings. Using an AEG plunge router and a piece of scrap I made a jig that would accommodate the aircraft's unusual configuration.

One thing I've found on every large mating surface are small protuberances (too small for me to see) that make it seem as if the parts wont fit edge to edge. With the boom halves I had to run an ex-acto knife between the pieces before the cement settled. Forewarned, I scraped the hull/fuselage halves before trying to cement them together. I'm happy to have progressed to this point. I'll let the aircraft dry overnight, then attach the booms and vertical stabilizer tomorrow. I'm hoping that this jig will help me keep everything square and level.

Thanks for reading.

Gary

Edit: Grammar
AussieReg
Staff MemberAssociate Editor
AUTOMODELER
#007
_VISITCOMMUNITY
Victoria, Australia
Joined: June 09, 2009
KitMaker: 8,156 posts
AeroScale: 3,756 posts
Posted: Thursday, May 14, 2015 - 11:18 AM UTC
Very nice jig solution Gary.

Those of us with kids running around tend to steal LEGO blocks and bases and build up jigs from that!

Cheers, D
GazzaS
#424
_VISITCOMMUNITY
Queensland, Australia
Joined: April 23, 2015
KitMaker: 4,648 posts
AeroScale: 1,938 posts
Posted: Thursday, May 14, 2015 - 11:27 AM UTC
Hah! I saw somebody's lego jig, and thought it a great idea. My missus told me her building blocks were reserved for the nephews and nieces when they came over.
GazzaS
#424
_VISITCOMMUNITY
Queensland, Australia
Joined: April 23, 2015
KitMaker: 4,648 posts
AeroScale: 1,938 posts
Posted: Friday, May 15, 2015 - 06:16 AM UTC
Hello Friends,
Some pre-detail, detail work:
As mentioned before, each engine nacelle had a raised squared about 3mmX3mm where there was a type of intake or vent directly below the propeller boss. These were sanded off when I removed the kits raised details which should have been sub-surface details.


After masking off the area, I drilled a hole in each corner and cut out the excess which to my naked eye looked quite square. The camera is not my friend!

In the middle of each of these vent or intake holes is either a support, or a forward part of the engine. a lack of detail photos hinders me deciding. Guessing that it is a vent, and that the engine requires airflow, I chose 'engine part' and fashioned the piece with brass rod.

At the front of each boom, where the propeller boss will go, the styrene is very thin. During the sanding, these edges retreated and had to be puttied into existence...hence all of the white stuff.

Special thanks to Aussiereg for the tip on using stretched sprue to fill in gaps! Between the wing root, and the wing proper were gaps that tapered from nothing to over 1mm.

Under the red ovals, you can see where the stretched sprue has melted into place after being painted with Tamiya plastic cement and shoved in with the back of the x-acto blade. This is one occasion where the 'nail polish-like' bottle and brush were more handy than the old tube of Testors. Again, you can see I made a hole in the nacelle and glued in a piece of brass rod.

...I gotta use lower definition...

Thanks for reading!
Joel_W
Staff MemberAssociate Editor
AUTOMODELER
_VISITCOMMUNITY
New York, United States
Joined: December 04, 2010
KitMaker: 11,666 posts
AeroScale: 7,410 posts
Posted: Friday, May 15, 2015 - 06:55 PM UTC
Gary,
The stretched plastic works great. So does plastic sheet. I can't believe all the work you need to do to get everything glued up. But the end results should make it well worth your efforts.
Joel
GazzaS
#424
_VISITCOMMUNITY
Queensland, Australia
Joined: April 23, 2015
KitMaker: 4,648 posts
AeroScale: 1,938 posts
Posted: Wednesday, May 20, 2015 - 03:51 PM UTC
Hi Friends,
A busy week. Overtime at work, with some small time each day to putty and sand. I'm at the point where I'm going to spray the entire thing black and look for the many small faults that I know must lie in the gray and white modelscape. I wish my 20/20 vision hadn't departed. Some photos and maybe a few thoughts as I go.


There are no radiator details on the kit. What you see now is all that there is. I received a book on the plane by Nowarra last week which will help me scratch something together. Also, the nose as out-of-the-box looked a bit wedge-ish. I built up a more rounded look with milliput.


Under the engines, I used a layer of putty to smooth things out and even out differences. I think if I felt like doing it all over again I would have been more bold in removing plastic between wing and boom.


After sanding with 1200 grit wet/dry paper I was able to put a light sheen on the plastic by buffing it with newspaper. If there is a competition for messiest work area, I'm a shoo-in!


One thing I wish I'd have thought of before assembling was putting in some bulkheads to prevent light passing through the a/c. Hopefully it won't be too long before I can post pictures of the plane in a less disheveled state.

Nowarra's book details the plane from it's origins and has some useful details. In one picture, all three propeller spinners of a machine have the white spiral we associate with the fighters.

Thank you for looking!

Gary
AussieReg
Staff MemberAssociate Editor
AUTOMODELER
#007
_VISITCOMMUNITY
Victoria, Australia
Joined: June 09, 2009
KitMaker: 8,156 posts
AeroScale: 3,756 posts
Posted: Wednesday, May 20, 2015 - 07:27 PM UTC
Nice work Gary, getting the major assembly together is always a good feeling, especially when you have so many fit issues to deal with.

Looking forward to seeing this one with paint on.

Cheers, D
GazzaS
#424
_VISITCOMMUNITY
Queensland, Australia
Joined: April 23, 2015
KitMaker: 4,648 posts
AeroScale: 1,938 posts
Posted: Thursday, May 21, 2015 - 03:39 AM UTC
Heh, you're not the only one, mate! My local IPMS hosted a sale where vendors or blokes who wanted to sell off some of their stashes could get rid of stuff for a small fee. We buyers paid a smaller fee and I walked out with some great kits which are now pulling at my 'build-me-now' strings.
GazzaS
#424
_VISITCOMMUNITY
Queensland, Australia
Joined: April 23, 2015
KitMaker: 4,648 posts
AeroScale: 1,938 posts
Posted: Thursday, May 21, 2015 - 12:37 PM UTC
Hello again Friends,
I painted the thing matte black and found about a dozen things to fix. It looked alright all black. Anyway, it's drying as I experiment with fillers for the tiny problems. I tried using CA for the small problems, but I wasn't happy with it. It seemed eager to detach itself from milliput, and much harder to remove from plastic than I liked. I fear that in some places, the styrene is getting mighty thin.

Anyway, I set to scratching together some radiators. Unfortunately, Nowarra's book doesn't give a detailed radiator shot, and I haven't seen any online for the JUMO 205. It does show that the outboard radiators have a small fillet bisecting the inlets vertically. The real radiators may be honeycombed for all I know.

I made four though I only need three. They are thin brass rods soldered together. I'm only new to soldering, so they look a little rough. I've scratchbuilt some warship masts before, but not much else. I'm not sure if I'll paint them black and sand off the high areas or what. They'll be one of the last pieces added to the build since I don't want them to catch RLM65 over-spray. The shapeless border above is some resin sheet I made by pouring excess resin onto some cellophane wrap and spreading it with a spatula. It's my answer to styrene sheet. It's very thin and loves CA. It will form the vertical fillets immediately in front of the radiators once inserted.

Thank you for reading!

Gary
Joel_W
Staff MemberAssociate Editor
AUTOMODELER
_VISITCOMMUNITY
New York, United States
Joined: December 04, 2010
KitMaker: 11,666 posts
AeroScale: 7,410 posts
Posted: Thursday, May 21, 2015 - 09:57 PM UTC
Gary,
Getting to the point of putting on a coat of primer is certainly a major accomplishment considering all the corrections you've had to deal with. Looking forward to seeing it with the primer on.
Joel
GazzaS
#424
_VISITCOMMUNITY
Queensland, Australia
Joined: April 23, 2015
KitMaker: 4,648 posts
AeroScale: 1,938 posts
Posted: Sunday, May 24, 2015 - 03:05 PM UTC
Hello Friends,
I've spent a lot of time putting panel lines on the beast. After spraying with a coat of Tamiya fine white primer I put the ventral lines on with a mechanical pencil, and the dorsal lines on with a very fine tipped magic marker.


There are a lot of pieces to add to the surface excluding armament. Each engine has two little intakes on top. Each one has two filler flaws, and the opening of the scoop is glued to the front and will require pretty-ing up. Then I'll have to glue them on and fare...fair? them in. There are actuators for the ailerons, and weird little things that may have been horn balances, but they actually appear to be little square fins. DF loop, floats, supports...you get the picture.

I've been trolling the forums and been inspired by things I've read and seen. Particularly salt chipping. In Nowarra's book are some pictures of severely worn BV-138's. I'm not going to be so bold. But I don't want it looking factory new. There's still plenty of room for me to screw this thing up.

Thanks for reading!
Joel_W
Staff MemberAssociate Editor
AUTOMODELER
_VISITCOMMUNITY
New York, United States
Joined: December 04, 2010
KitMaker: 11,666 posts
AeroScale: 7,410 posts
Posted: Monday, May 25, 2015 - 07:41 PM UTC
Gary,
Your hard work and perseverance certainly has paid off with the Bv-138 in primer and the panel lines inked in. My only concern/question is leaving all the clear glass off. Since the fit of most pieces was less then exceptional, I'm guessing that the glass will have it issues as well. Masking and gluing them in position now just might be the prudent way to go.

That's how I did my P-61, and I'm glad I took that option as I had quite a bit of glass issues.

Joel
GazzaS
#424
_VISITCOMMUNITY
Queensland, Australia
Joined: April 23, 2015
KitMaker: 4,648 posts
AeroScale: 1,938 posts
Posted: Tuesday, May 26, 2015 - 09:59 AM UTC
Hi Joel,
Thank you for your insight. The canopy comes in three pieces. Two pieces represent sliding windows which sit in recesses along the fuselage. If they were left in the closed position, the recesses would be very out of scale, and very un-aerodynamic.
The main piece has already received a fair amount of filing to ensure it will come close to fitting. On at least one edge, a fine line of PVA will have to fill a gap, because I don't dare file away more.
Before I paint, I have to attach a lot of parts and do some shading and texturing with the airbrush. And some of those parts are delicate. So I really have to pay attention to the order which I do things. Heck, I haven't painted the crew yet.
A lot of This is all new terriritory for me. I've never tried under-shading before. Never tried faking panel lines. Way back when, as bold as I got was dry brushing. Even if a lot of what I'm doing is new or experimental, I'm hoping it turns out decently.

Gary
magnusf
_VISITCOMMUNITY
Stockholm, Sweden
Joined: May 02, 2006
KitMaker: 1,953 posts
AeroScale: 1,902 posts
Posted: Tuesday, May 26, 2015 - 12:51 PM UTC
Gary! You're a very brave man!

Regarding the canopies and turrets: they are available from Falcon in "Set No.29: Luftwaffe, World War II (part 6)". They could be worth getting!

Link to Falcon website.


Magnus
GazzaS
#424
_VISITCOMMUNITY
Queensland, Australia
Joined: April 23, 2015
KitMaker: 4,648 posts
AeroScale: 1,938 posts
Posted: Tuesday, May 26, 2015 - 02:23 PM UTC
Magnus,
That is an awesome find. Thank you! I can't really complain about the quality of the 'glass' on this kit. Though in my inexperience I may have ruined them a few weeks ago.

Today's model work was a little small. I received some Mr. Surfacer 1000 (bottle) yesterday and applied it to a few areas that showed faults in white where I hadn't seen them in black. So, I'll have to sand, touch up, and replace lines blotted out. ...yet again.

Thank you for reading!

GazzaS
#424
_VISITCOMMUNITY
Queensland, Australia
Joined: April 23, 2015
KitMaker: 4,648 posts
AeroScale: 1,938 posts
Posted: Wednesday, May 27, 2015 - 12:00 PM UTC
G'day friends!

Last night I embarked on a journey to build the six small intakes that sit atop the three engines...two per engine.

Each intake arrives in two pieces on the sprue. There is a slightly conical barrel which forms the intake and the teardrop shaped piece which joins the barrel to the engine nacelle. Each barrel piece is about 2mm by 2mm...give or take some immeasurable amount.


Purposely I glued the barrel piece with the smaller end attached to the teardrop. My logic was that since the walls of the barrel were quite thick, I could fill the reverse taper with Mr. Surfacer and have more success making the things look like the aerofoil shape I believe them to have.

But they are small, and I dropped each of them repeatedly. I have a very bright handheld lamp which helps me rescue parts from the carpet monster. Each is no bigger than a watermelon seed split in half.

Here they are from the side. I wear 1.5X reading glasses while I work.

To my reinforced eye, they look ready for attachment and painting. Of course, they look pretty rough to the digital eye.


From the front, they now look much cleaner. After filing and sanding to reverse the taper and make the sides close-to-uniform roundness, I used a 1.5mm drill bit and rotated it with my fingers to widen the original hole.

Am I going into too much detail with this report? Lemme know.

Thanks for reading!

Gary