_GOTOBOTTOM
Pre-Flight Check
Constructive critique of your finished or in-progress photos.
Building the Supermodel Blohm und Voss Bv-138
AussieReg
Staff MemberAssociate Editor
AUTOMODELER
#007
_VISITCOMMUNITY
Victoria, Australia
Joined: June 09, 2009
KitMaker: 8,156 posts
AeroScale: 3,756 posts
Posted: Wednesday, May 27, 2015 - 07:53 PM UTC

Quoted Text

Am I going into too much detail with this report? Lemme know.


Definitely not! I have an ulterior motive, having this in the stash, so I will refer back to this thread when the time comes.

Apart from that, I always enjoy seeing how others solve problems or create finishes and effects in these Build Log threads, and I always learn some new tricks along the way.

Keep the detail coming mate, you're going along just fine!

Cheers, D
GazzaS
#424
_VISITCOMMUNITY
Queensland, Australia
Joined: April 23, 2015
KitMaker: 4,648 posts
AeroScale: 1,938 posts
Posted: Thursday, May 28, 2015 - 04:14 PM UTC
Hello Friends,
The Devil is in the details. I've mentioned before that there are few locator pins and locator holes in this kit. The dorsal engine intakes sit atop the engines with no support except for glue.
I know this is the kind of part that is easily knocked off while handling. And I have way too much handling left to do before I can mount this thing on it's stand and let it collect dust.
My idea was to mark my places and drill two holes into the top of each engine nacelle. Then I glued a small length of .5mm brass rod into the nacelle with CA leaving a bit sticking out as a locator pin.

I also scraped off a little paint so the glue would adhere to plastic. Here's a side view.

Into the underside of each intake I drilled a larger ovoid hole allowing me to shift the intake a little since I'm sure one hole or a pin might not mate up perfectly. I had to do it quickly, because the CA set really fast.
Sadly, one of my intakes wasn't perfectly placed. I decided I'd redo it. Unfortunately, my joint was so strong that I could not shear the CA bond before the nacelle stared to separate. ...more to fix! And I think I'll leave the intake right where she sits.

Anyway, here's all intakes in place. I still have to make the exhaust tubes. They will be brass tube as well.

The A/C has three cleats. Cleats are used to quickly loop rope around so you can tie a vessel to something like a dock, or a friendly U-boat...
The cleats in the kit look more like teardrops than cleats. They are a bit over-scale as well.

For comparison I've placed a crewman's arm next to the two cleats I've made so far and placed the kit cleat below the elbow. My cleats are still a little too big. I feared that the kit cleats would look more like recognition light blisters that had been painted over.

Made of soldered brass, my cleats won't look like blisters. Now I just have to hope that my clumsy hands don't knock them off.
This is the part of model building I always have the most difficulty with. Where you have to decide which details to add and which to withhold before you do the main body painting. Despite having few pieces left on the sprue, I feel I have a long way to go before she is done.

Thank you for reading!

Gary
GazzaS
#424
_VISITCOMMUNITY
Queensland, Australia
Joined: April 23, 2015
KitMaker: 4,648 posts
AeroScale: 1,938 posts
Posted: Friday, May 29, 2015 - 12:04 PM UTC
G'day Friends,
More little stuff today. lol... I still haven't attached a control surface. Seriously, though I spent a lot of time on the armament and replacing the exhaust pipes that had arrived molded to the nacelles with brass.

Inset left is a dorsal shot, and inset right, the ventral exhausts of the center line engine. Because the engines are diesel, I'm imagining a lot of soot streaking.

Because the original kit's MG 131 looks like a cross between a Nambu, an M2 .50 cal, and a crossbow (in the red border) I bought these resin MG 131's through mailorder.

Unfortunately, they arrive ready to be used in a fixed firing position.

The first thing I added was the forward gunsight. It's a little out of scale but looks more interesting than nothing. The sight actually is a hand wheel for a 1/350 scale destroyer. Inset yellow.

I also replaced the mounting arm which was heavily molded plastic with .5mm brass rod bent into shape and painted RLM Black Green. The kit 20 mm MG 151's have been replaced with beautifully made brass weapons.

Here are all of the guns painted up. For the MG 131 you can see that I added a pistol grip, rear sight post, and khaki cloth tube for ejected shell casings. The rear sight post and pistol grip were flat brass taken from the fret of some saved PE. The khaki tube is actually the original barrel of the MG 131 supplied with the kit.

To copy the finish I imagine I see in B and W photos of the time on the guns I've mixed some Tamiya Aluminum with Tamiya rubber black. After they dried, I dry brushed them with Tamiya aluminum to bring out some detail.
...I think I'm gonna do a little more work on the pinion joint for the MG 131. Dang digital eye showing me stuff I can't see otherwise.

Thanks for reading!

Gary
Joel_W
Staff MemberAssociate Editor
AUTOMODELER
_VISITCOMMUNITY
New York, United States
Joined: December 04, 2010
KitMaker: 11,666 posts
AeroScale: 7,410 posts
Posted: Saturday, May 30, 2015 - 03:42 AM UTC
Gary,
Nicely done detailing on the MGs, they do look so much better then how they originally came.
Joel
magnusf
_VISITCOMMUNITY
Stockholm, Sweden
Joined: May 02, 2006
KitMaker: 1,953 posts
AeroScale: 1,902 posts
Posted: Saturday, May 30, 2015 - 11:24 AM UTC
You're really not giving up on this one no matter how much it fights back! I hope you're not all burned-out when you get to the painting stage, this kind of invested work deserves a good paint-job as well!


Magnus
GazzaS
#424
_VISITCOMMUNITY
Queensland, Australia
Joined: April 23, 2015
KitMaker: 4,648 posts
AeroScale: 1,938 posts
Posted: Saturday, May 30, 2015 - 11:40 AM UTC
Thank you both for your kind words and encouragement. Honestly, the paint job is where I fear I'll mess up the most.

Having been out of modelling for so long, I'm basically a newbie. The best thing is, that when I was a kid and couldn't afford much, I had to accept a model as it came. My only resource was the local library.

Now the Internet and a shed full of tools allows me to envision and attempt to create or replace even the smallest of parts.

I will finish this kit. I'm in the process of fabricating two replacement parts which will be the last of the scratch built stuff.

Thank you for reading.

Gary
Joel_W
Staff MemberAssociate Editor
AUTOMODELER
_VISITCOMMUNITY
New York, United States
Joined: December 04, 2010
KitMaker: 11,666 posts
AeroScale: 7,410 posts
Posted: Saturday, May 30, 2015 - 09:09 PM UTC
Gary,
The overall final presentation is all about the painting, decaling, and weathering. Prime and fix till your satisfied, then take your time and don't rush the painting process. I'm quite sure that your finished replica be deserving of a feature article here on Aeroscale.

Joel
GazzaS
#424
_VISITCOMMUNITY
Queensland, Australia
Joined: April 23, 2015
KitMaker: 4,648 posts
AeroScale: 1,938 posts
Posted: Sunday, May 31, 2015 - 02:49 PM UTC
Thank you, Joel. Honestly, though it's all educational for me, while I try to keep it fun. I'll admit straightaway to extreme use of the Mk 1 eyeball.

Cheers,

Gary
GazzaS
#424
_VISITCOMMUNITY
Queensland, Australia
Joined: April 23, 2015
KitMaker: 4,648 posts
AeroScale: 1,938 posts
Posted: Tuesday, June 02, 2015 - 10:59 AM UTC
G'day Friends,
Slow work as I slog my way through some details. The last two parts I fabricated were the df loop and the aerial mast. There was really nothing wrong with the mast except for the fact that the mast was always getting broken on earlier models.

The DF loop was another item all together.

One thing I heartily dislike about the kit is the thickness of attachment points. On big pieces it doesn't prove a problem. But when your pieces are delicate, it's easy to ruin them. And since the base of the kit df loop really doesn't look like anything...you'd expect a blister or some kind of aerodynamic fitting... I decided to make my own of AWG 30 (.25mm) copper wire. I made a blister from putty that is already attached to the aircraft. There is a distinct lack of detail photos for that area of the a/c.

I spent a lot of time painting the crew. I cheated and didn't take close-up photos. I will tell you this: I painted many uniform details with a toothpick, and many facial details with a piece of hair donated by one of my dogs.

I went light on the face shading. A bit of pink for the lips and some reddened flesh for the cheeks. In macro view they look not-so-handsome. I varied the uniforms a little for interest though it really increased my amount of wasted paint and effort. I've never detail-painted figures smaller than 1/35 scale before. So, I'm not totally pleased with my effort, but I'm not going to spend more time on the wee fellas.
If you build this kit, don't put in the steering yokes before you put in the crew as I did. Now I will have to fabricate new yokes.

Thank you for reading!

Gary
Joel_W
Staff MemberAssociate Editor
AUTOMODELER
_VISITCOMMUNITY
New York, United States
Joined: December 04, 2010
KitMaker: 11,666 posts
AeroScale: 7,410 posts
Posted: Tuesday, June 02, 2015 - 06:27 PM UTC
Gary,
Nice job on the DF loop. Looks a millions times better then the poorly molded part.

I feel exactly as you do about how small delicate parts that are just attached to sprue trees. Even with a smaller attaching point, the odds of bending, or breaking those parts happens way too often for me.

I find my best success rate is when the part is only attached at one point. For those parts that are attached at two or more points, bending and breaking is a sure thing as the laws of physics seem to dictate that the pressure cutting the tree, equally forces the part in the opposite direction up against the still secured sprue.

Joel
GazzaS
#424
_VISITCOMMUNITY
Queensland, Australia
Joined: April 23, 2015
KitMaker: 4,648 posts
AeroScale: 1,938 posts
Posted: Friday, June 05, 2015 - 08:02 AM UTC
Hello Friends,
I've been slowly plugging along the last few days. Waiting for putty to dry, and I spent all of yesterday afternoon trying to save the canopy... You may remember that I wasn't happy with my masking and painting job.

I tried to do a bit of cleaning with a little turpentine. In seconds, we had major fogging. My memories of being a kid came flooding back. Is there any solvent that won't ruin a canopy when you are trying to remove oils?

I did a little research and found that some guy had done a little salvaging using toothpaste. I tried that alone and with baking powder and saw that I was very slowly making headway. So, I realized that abrasion was the key.

I set to first with 1200 grit sandpaper, then baking soda on a q-tip, and finally grabbing the Dremel when my patience began to wane. BTW, I ordered a Vacu-formed canopy set by Falcon from Modelcrafts and Hobbies in New Zealand... Thanks Magnus!

I tried various buffing and polishing attachments that came with the Dremel that I hadn't until now an occasion to use.
and came to an 'almost' condition.


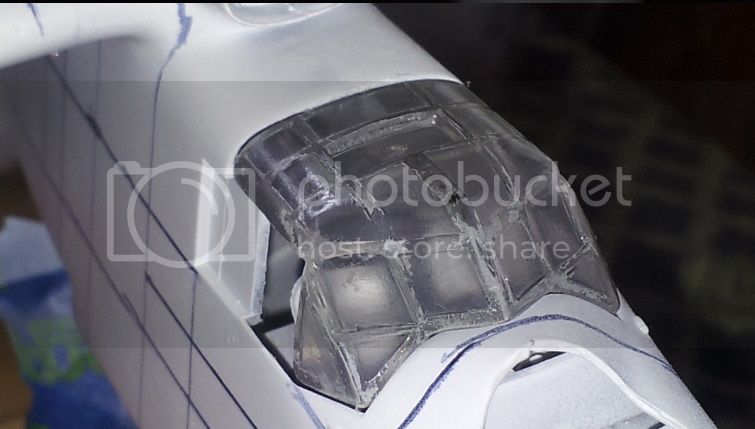
After doing major damage (I was experimenting after all) with a couple of buffing heads, I determined that one made of layers of soft cloth to be most effective. Dipping the canopy in thinned Future actually made some pieces of the canopy completely transparent and shiny.

But the canopy has some molding flaws, and a small crack from before I ever laid my hands on it. I reckon if I were to sand away all of the details and bring the lowered panels flush with the raised panels, I might have a chance with anything but the crack. So, it's toast.

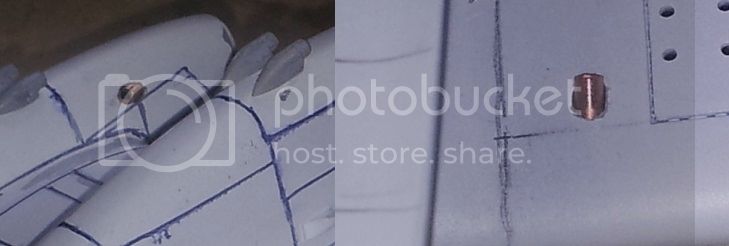
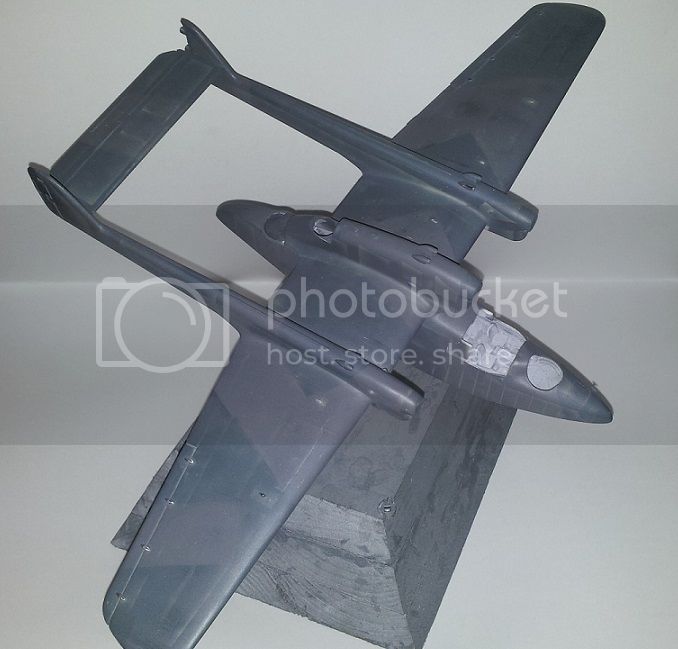
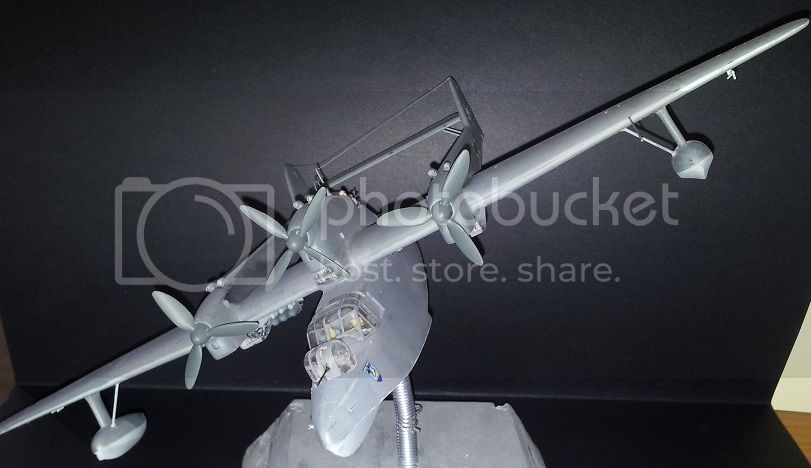
Today I added the tail control surfaces. Just like the intakes placed above the engine I used pieces of brass rod to make alignment pins and drilled holes to make it all fit together.

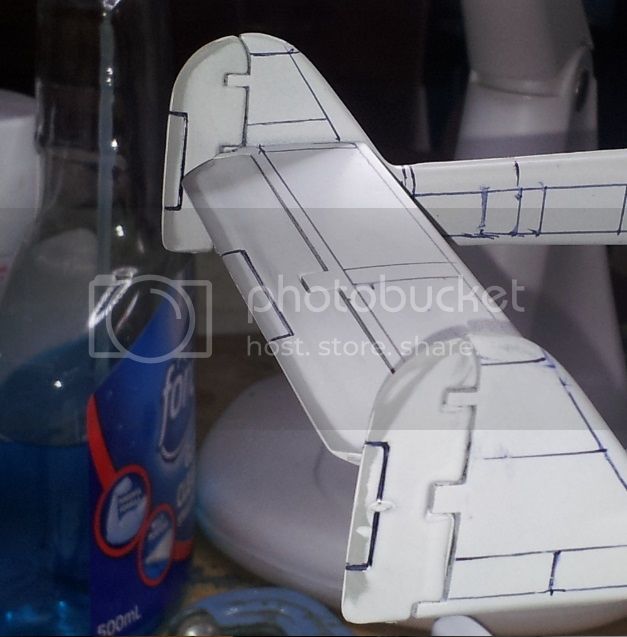
All three pieces required sanding to get the trailing edges to feather sharpness. You can see by the thin lines of primer on the rudders that all three pieces seem to have slipped in the mold. ...or something like that.

I have a problem with both ailerons. There is a gap at the top which I don't want to fill with putty, but cannot leave open.

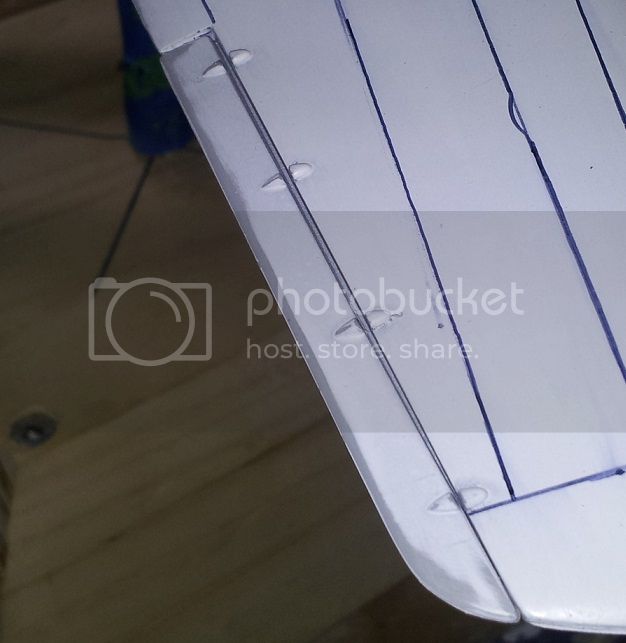
I have thought about drilling holes in each of the four blisters on either side and inserting brass rod to simulate moving parts within the structure.
Or, I can try to add some sheet material and hope that I don't ruin the blisters while I try to make the sheet look exactly like the blisters. I've never had a model plane take so much effort.

Any advice?

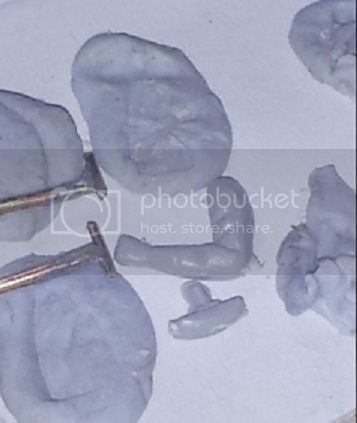
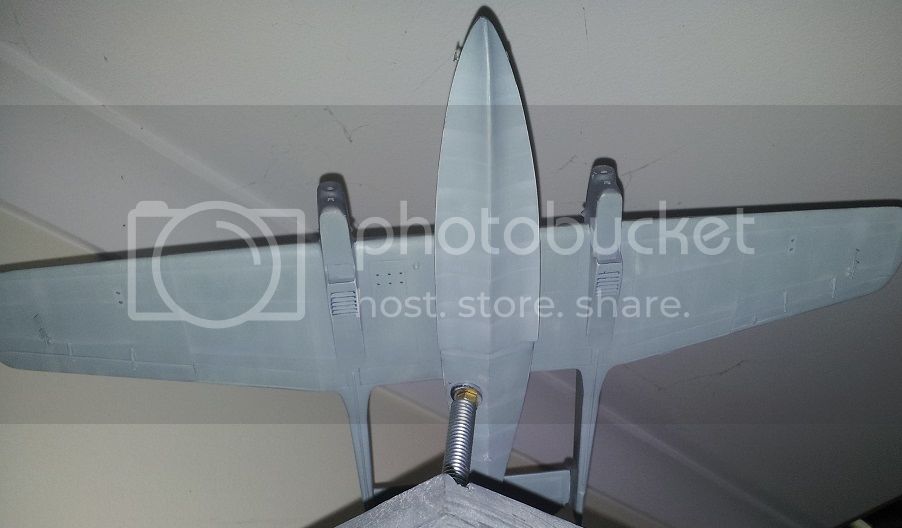
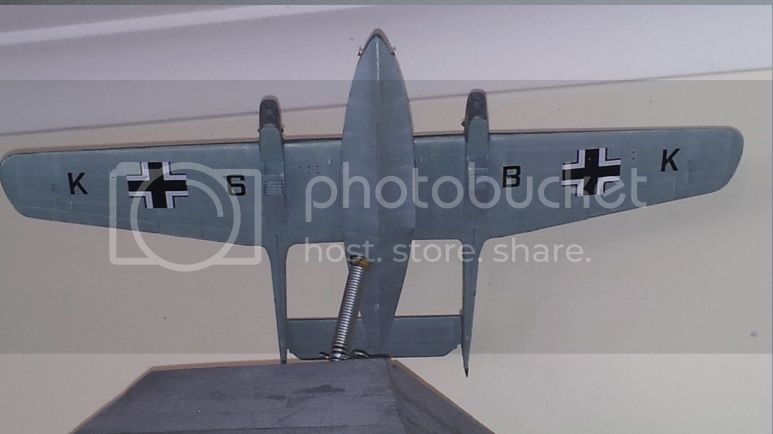
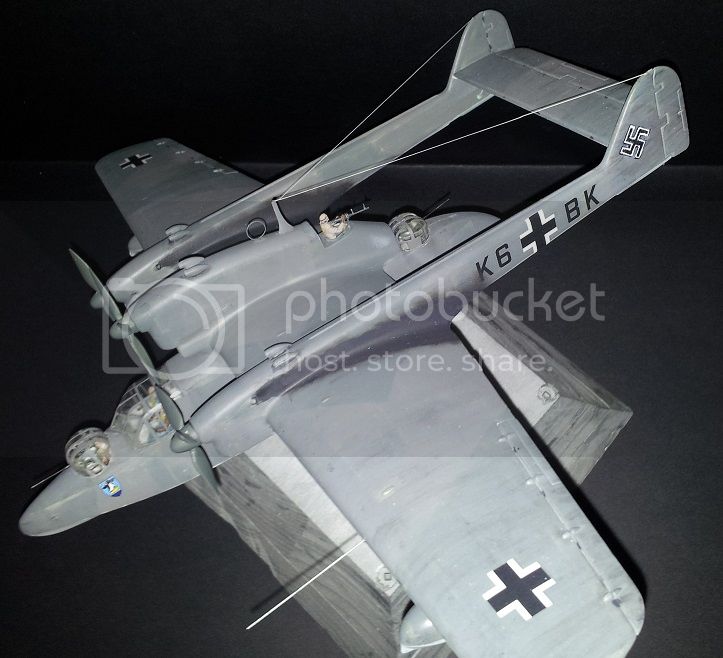
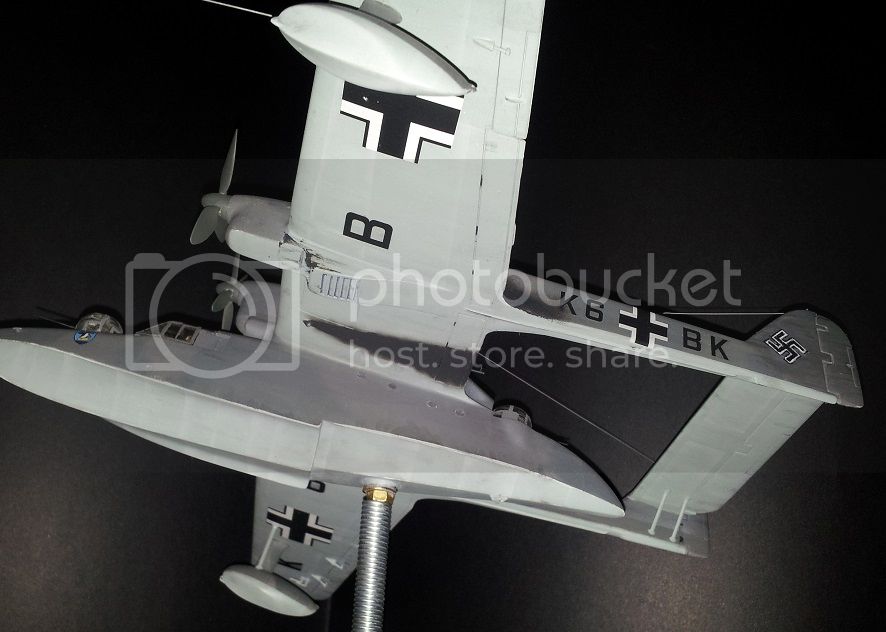
I thought I'd add a shot of my home-made blister, aerial mast, and dry-fitted DF loop just to show some progress.

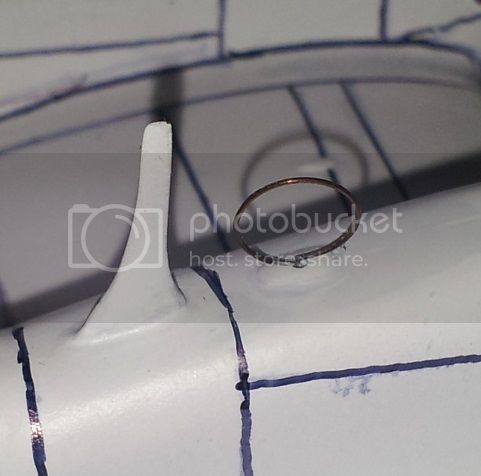
...I gotta quit taking pictures in macro-vision...otherwise I'll never finish this thing.

Thank you for reading!

Gary

Edit: Spelling
GazzaS
#424
_VISITCOMMUNITY
Queensland, Australia
Joined: April 23, 2015
KitMaker: 4,648 posts
AeroScale: 1,938 posts
Posted: Saturday, June 06, 2015 - 07:43 AM UTC
Hello Everyone!
Finally getting somewhere. Today using the airbrush I added rivet lines and shading. Possibly too many of the former, and not enough of the latter. Heck, who knows, my painting could be so bad that nothing shows but RLM72/73/65.

Even though I used an airbrush, I reckon I might have done as well(or better) with a pencil or pen. However, pencil or pen allows a lot more skin oil to get deposited on the primer.
As you can see, I haven't devoted much effort to the cockpit. My RLM 02 is probably a bit light and once the pilot and copilot are in and the canopy on, there won't be much to see.


See the two little square flappy looking things indicated by the red arrow? Anyone know what they are, and what purpose they serve? I've yet to see them on another aircraft.

Thank you for reading!

Gary
Joel_W
Staff MemberAssociate Editor
AUTOMODELER
_VISITCOMMUNITY
New York, United States
Joined: December 04, 2010
KitMaker: 11,666 posts
AeroScale: 7,410 posts
Posted: Saturday, June 06, 2015 - 08:41 PM UTC
Gary,
You're making excellent progress, and certainly winning each battle in this war.

As for stripping paint, I only use Acrylics these days, and I can safely remove it with plain old cheap as dirt Denatured Alcohol without it fogging the clear parts. Enamels back in the old days (the 70's), I'm pretty sure that oven cleaner worked ok.

If you're going to be using sheet to fill in that gap, just use a straight piece to fill in the gap. Then cut little triangles to build up the blister. I use Bondo to blend everything, then very careful and slow sanding. Take your time, and you should be ok. The only other alternative is to cut off the blisters, then make new ones from reshaped plastic rod.

Joel
GazzaS
#424
_VISITCOMMUNITY
Queensland, Australia
Joined: April 23, 2015
KitMaker: 4,648 posts
AeroScale: 1,938 posts
Posted: Monday, July 13, 2015 - 12:40 PM UTC
Hi Everyone!
It's been a while since my last post here, but I can't claim life got in the way. It was more like my inspiration got diverted due to a lack of success and knowledge. I received my new canopy in the mail the day after I started working on my NMF Jug, but couldn't bring myself to get into the heavy task of masking it. Thanks to Merlin who in a thread titled "Canopy Tips" left a tip which worked for both my skill level and temperament.
I really got hung up in my failure to show detail through the dark shades of the paint scheme. When I bought this kit I had a Badger knock-off airbrush which didn't work too well. It was a siphon type and I was using a hodge-podge air system to boot. Anyway... a poor workman blames his tools. I've since got a nice Iwata NEO which hooks up to my shop compressor and my results got a little better but I still couldn't defeat the darkness of the camo despite adding enough white for scale.

I read a thread the other day http://aeroscale.kitmaker.net/forums/236894&page=1 that talked about panel lines, details, and dark schemes. Found some great pictures of a nicely presented P-61 (Thanks Joel!) and got re-inspired to start work on this bird.
The upper wing surface and the tailplane are ready for touch up painting. The booms and hull are ready to abuse with steel wool.

My process is 1. Mask lines I want to show, 2. spray the edge of the tape that is where I want the line to be (this means that most of the paint goes on the tape and only very little on the plane, 3. remove unwanted paint with steel wool, 4. Add more lines if necessary, then remove more paint, and 5. buff with newspaper.
...then I'll touch up with more paint, and hopefully find myself applying decals in the near future.

Line drawings available online aren't very helpful. I bought a book by Nowarra, but the line drawings in it are not very helpful at all. It does have some good pictures of the bird that aren't online and useful for weathering and staining.

Thank you for reading!

Gary
Joel_W
Staff MemberAssociate Editor
AUTOMODELER
_VISITCOMMUNITY
New York, United States
Joined: December 04, 2010
KitMaker: 11,666 posts
AeroScale: 7,410 posts
Posted: Monday, July 13, 2015 - 07:21 PM UTC
Gary,
Glad you're back at the bench to finish your most difficult build. Just getting to this point, which I know I wouldn't of have, disserves a medal. From your latest posted pictures, you're doing a fantastic job.

Masking for panel lines is very, very time consuming, and it's very difficult to keep the lines the proper width. A pin wash is the easiest way to accomplish it, just make sure that that you seal the paint and decals 1st. The wash has to be of a base that won't react to the base of the sealer. It's much easier then it sounds. Let the pin wash dry, the lightly remove the excess with a damp Qtip.

Joel
GazzaS
#424
_VISITCOMMUNITY
Queensland, Australia
Joined: April 23, 2015
KitMaker: 4,648 posts
AeroScale: 1,938 posts
Posted: Wednesday, July 15, 2015 - 10:01 AM UTC
Hi Everyone!
Thank you for the pin wash tip, Joel. I've seen pin wash mentioned a few times as I've read threads, but hadn't taken time to figure out what it was because I was somewhere else in the building process. I watched a video this morning, and will try to make it work on this relatively un-detailed bird. Throughout the entire process I've resisted the desire to scribe the thing. It hasn't been easy.
I had to use the same techniques on the lower portion of the plane as I did the top.

For the light lines I added more white to the already lightened-for-scale RLM hellblau and added a little aluminum...though I doubt the aluminium color did much.

The sharp edge of the hull side and bottom has proven difficult to cover and mask. I'm wishing I had primed this plane in some shade of polished aluminum. I've touched it up since with the primary colors, but I fear it's going to show through no matter what I do. I'll be covering the thing with glosskote in a little bit. Then it's decal time!

Thank you for reading.

Gary

Edit: content
magnusf
_VISITCOMMUNITY
Stockholm, Sweden
Joined: May 02, 2006
KitMaker: 1,953 posts
AeroScale: 1,902 posts
Posted: Wednesday, July 15, 2015 - 01:21 PM UTC
You're actually almost there: impressive! I think that with some more weathering after the decals you might very well be able to cover up some of the things that you point out as mistakes!

Hang in there!


Magnus
GazzaS
#424
_VISITCOMMUNITY
Queensland, Australia
Joined: April 23, 2015
KitMaker: 4,648 posts
AeroScale: 1,938 posts
Posted: Wednesday, July 15, 2015 - 06:51 PM UTC
Hi Magnus!
Long time! I was beginning to think you'd given up on us. I meant to have finished the decals earlier. Unfornately my aftermarket decals have gone missing so I've been spending hours making 10mmX10mm hakenkreuz stencils. I hope they turn out ok. At any rate, I've got the first layer down and therefor committed all of the way.

Best Wishes!

Gary
Joel_W
Staff MemberAssociate Editor
AUTOMODELER
_VISITCOMMUNITY
New York, United States
Joined: December 04, 2010
KitMaker: 11,666 posts
AeroScale: 7,410 posts
Posted: Wednesday, July 15, 2015 - 09:02 PM UTC
Gary,
Getting to the decal stage is certainly a well deserved milestone. Congratulations.

Looking forward to seeing your home made decals. That's something I've never accomplished.

Joel
GazzaS
#424
_VISITCOMMUNITY
Queensland, Australia
Joined: April 23, 2015
KitMaker: 4,648 posts
AeroScale: 1,938 posts
Posted: Thursday, July 16, 2015 - 07:51 AM UTC
Hi Joel,
You remember the movie 'Patton'? In an early scene, just as Patton arrives in North Africa after the loss at Kasserine Pass to Rommel, there is one of those old He-111's that the Spanish used equipped with Rolls Royce engines. Anyway...my swastikas are only slightly better than the one on that bird.

Hi Everyone!
The decal sheet that comes with this plane is very basic.

Furthermore there is no decal placement guide in the instructions and I couldn't find enough useful images to induce me to search for an aftermarket set made for this model.

After I glosskoted the model yesterday I noticed that the underside had taken on a very dark appearance. Not very happy about that.

After finding a guide on using 3m blue masking tape for stencils (bear in mind, the stencils were a lot bigger), I decided to try my own. I downloaded some from the net, sized them appropriately using MS Paint, printed em and carved em up. I think some nylon material like those used on canopy masks would have been better.


I think I'm going to buy some decal paper, and make my own decals next time. I saw a tutorial months ago that made it look easy...

After all of my painting, sanding, re-painting, the demarcations between the colors of the splinter scheme had virtually disappeared. Glosskote changed that and made the demarcations much clearer.

Now I have to weather the bird and add final details. This plane has been handled so much that it's suffering wear of it's own. Seams have popped, been re-glued, and popped again. And smaller parts are starting to get broken. I dropped it yesterday.

Anyway...almost finished.

Thank you for reading!

Gary

Edit: content
Joel_W
Staff MemberAssociate Editor
AUTOMODELER
_VISITCOMMUNITY
New York, United States
Joined: December 04, 2010
KitMaker: 11,666 posts
AeroScale: 7,410 posts
Posted: Thursday, July 16, 2015 - 08:53 PM UTC

Quoted Text

Hi Joel,
Thanks for your response. I fear staining/fogging the canopy with whichever solvent I might use. Seems to my memory that was what would happen years ago. I imagine I could experiment by painting on some sprue.

Thank you for reading!

Gary


Gary,
Outside of a sludge wash, you're not going to be covering the canopy with the wash as a general rule. I've been using washes, filters, sealers, and of course air brushing canopies since I've returned to the hobby, and never had any issues with canopy/glass fogging. Of course the canopy/glass has been masked except for the frame areas.

If you're concerned about issues caused by various solvents, you could just use acrylic based filters and washes, where water or Iso alcohol is the base.

Joel
GazzaS
#424
_VISITCOMMUNITY
Queensland, Australia
Joined: April 23, 2015
KitMaker: 4,648 posts
AeroScale: 1,938 posts
Posted: Friday, July 17, 2015 - 02:59 PM UTC
Hi Joel,
I bought some artist acrylics a couple of weeks ago with a mind to getting away from brand-name paints. Having RLM such and such or US DDG available at the twist of the wrist is nice. But in the end it isn't very cost effective. Except for the cleanup and curing times I rather enjoyed the Model Master paints. I did the pin wash with artist acrylics. unfortunately I didn't get enough of it off. Things look so different after you apply the dullkote.

Anyway, Everyone...It's done!
I spent much of the day on it, and I'm not spending a minute more. I ruined a lot, and I learned a lot. The finish is far from perfect, or polished. I went too heavy on the exhaust stain, and am not convinced by my oil streaking. I could go back and redo, but the poor thing has been over-handled already. I think my panel line goal was almost accomplished.


I think the paddle bladed props are a bit too broad.

The kit gives you four figures. None to man the turrets. I took the radio operator who would forever be hidden and glued him into the nose turret.


Thank you for looking and for commenting!

Gary

Edit: Spelling
AussieReg
Staff MemberAssociate Editor
AUTOMODELER
#007
_VISITCOMMUNITY
Victoria, Australia
Joined: June 09, 2009
KitMaker: 8,156 posts
AeroScale: 3,756 posts
Posted: Friday, July 17, 2015 - 06:47 PM UTC
Congrats on getting finished Gary, it looks good!

We are always our own worst critics, but as long as you have learned a few new things and improved your skills the build is a success.

I will certainly be referring back to this thread when I get to my build on this kit.

Cheers, D
Joel_W
Staff MemberAssociate Editor
AUTOMODELER
_VISITCOMMUNITY
New York, United States
Joined: December 04, 2010
KitMaker: 11,666 posts
AeroScale: 7,410 posts
Posted: Friday, July 17, 2015 - 08:12 PM UTC
Gary,
Congratulations on crossing the finish line. You did a most remarkable job on what is a very difficult kit.

I prefer to paint with Tamiya Acrylics but that's just me. For washes I use either MM enamel paints or artist oils. I do like the Flory acrylic sludge washes, easy on and easy off.

Each model is a learning experience that you'll apply to your next build. Looking forward to your next build blog.

Joel
GazzaS
#424
_VISITCOMMUNITY
Queensland, Australia
Joined: April 23, 2015
KitMaker: 4,648 posts
AeroScale: 1,938 posts
Posted: Saturday, July 18, 2015 - 03:20 AM UTC
Hey Gentlemen,
Thank you for you kind words. I might not have finished without your inspiration and helpful hints.

Damian,
While I was adding the exhaust stains I referred back to some photos and realized that the exhausts on the outer engines were too high even though I had used the original pipes to drill. In reality they are quite low and close to the leading edge.

Best wishes,

Gary
 _GOTOTOP