Mike,
I didn't get to vote, but finishing the invasion stripes now will save time down the road, and a little less masking. Toning down the stark white is a excellent decision. I usually get a slight toning effect by air brushing it over primer with light coats.
Is the effect you're after by masking off around the exhaust headers for a carbon smoke effect, or for a burnt effect from the heat of the exhaust?
Joel
World War II
Discuss WWII and the era directly before and after the war from 1935-1949.
Discuss WWII and the era directly before and after the war from 1935-1949.
Hosted by Rowan Baylis
Hasegawa 1/72 P51b
Joel_W

Joined: December 04, 2010
KitMaker: 11,666 posts
AeroScale: 7,410 posts

Posted: Monday, July 20, 2015 - 12:54 AM UTC
mrockhill

Joined: June 17, 2009
KitMaker: 566 posts
AeroScale: 507 posts

Posted: Monday, July 20, 2015 - 06:01 AM UTC
The panels around the exhaust typically appear darker in photos. I believe these panels were either stainless or a different alloy to deal with the heat in this area. Ill bring this pic back to illustrate.
Im hoping this will peek through just enough to be noticeable. If not there is a plan B. I got the masking situation back under control and everything is ready to go for AS12 I just have to make sure all the surfaces are cleaned of prints and buffed up

Im hoping this will peek through just enough to be noticeable. If not there is a plan B. I got the masking situation back under control and everything is ready to go for AS12 I just have to make sure all the surfaces are cleaned of prints and buffed up
Joel_W

Joined: December 04, 2010
KitMaker: 11,666 posts
AeroScale: 7,410 posts

Posted: Wednesday, July 22, 2015 - 03:16 AM UTC
Mike,
Excellent observation. I never noticed that, and I'm sure a lot of guys haven't either.
Joel
Excellent observation. I never noticed that, and I'm sure a lot of guys haven't either.
Joel
mrockhill

Joined: June 17, 2009
KitMaker: 566 posts
AeroScale: 507 posts

Posted: Thursday, July 23, 2015 - 03:36 AM UTC
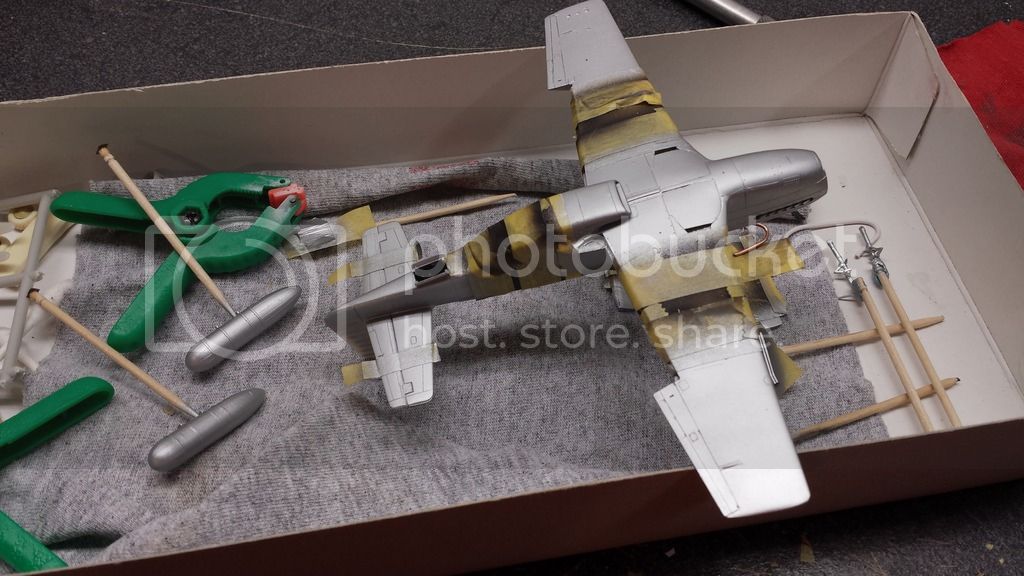
My NMF adventure has begun! The good news is everything worked great and the paint sprayed well for the most part. The not so great, which was actually expected, is I have some blems to address and shoot the AS12 again, mainly the 108gal paper tanks. Also my preshading of the exhaust panels didn't turn out, which I again pretty much expected but I had to try. I'll just mask them off again and tint the as12 to respray them slightly darker

Joel_W

Joined: December 04, 2010
KitMaker: 11,666 posts
AeroScale: 7,410 posts

Posted: Thursday, July 23, 2015 - 04:33 AM UTC
Mike,
Overall all the NMF base looks good. Everything else is just time consuming to bring it up to your standards. Well done.
Joel
Overall all the NMF base looks good. Everything else is just time consuming to bring it up to your standards. Well done.
Joel
thegirl

Joined: January 19, 2008
KitMaker: 6,743 posts
AeroScale: 6,151 posts

Posted: Thursday, July 23, 2015 - 05:15 AM UTC
Hi Mike ,
I pick up a can of Tamiya's AS-12 and tried it out on the drop tank of the P47 I'm very slowly trying to build . I wasn't over pleased with this . Did you de-can it and shoot it through an airbrush ?
So far she is looking really good Mike . For tinting the panels around the exhaust , Tamiya smoke or any other manufacture who makes smoke . Build it up using light pass's until you have the desired effect . This is how I do it and works rather well .
Terri
mrockhill

Joined: June 17, 2009
KitMaker: 566 posts
AeroScale: 507 posts

Posted: Thursday, July 23, 2015 - 06:22 AM UTC
Its tough to keep my hands off this thing and get painting some OD! But I think I need to let this paint dry for a day or so. I need to get the trouble light from the garage and speed this process up. In the mean time I guess its drop tank redux time.
Terri, I did decant it, went smoothly. It went through the airbrush pretty well and covered quickly. Looks best where the plastic got polished. So far I'm happy with how it looks, worth the effort. I need to get busy building a paint booth so I can try out some alclad.
And thank you very much for the idea to use tamiya smoke! Nothing could be simpler than that, youve saved me a bit of time and effort

mrockhill

Joined: June 17, 2009
KitMaker: 566 posts
AeroScale: 507 posts

Posted: Saturday, July 25, 2015 - 06:44 PM UTC
I had thought I would have all weekend to work on my lil mustang, but a suprise family gathering arose and all I managed yesterday was masking and sprayingy OD basecoat which is tamiya OD lightened 25% with tamiya dark yellow.
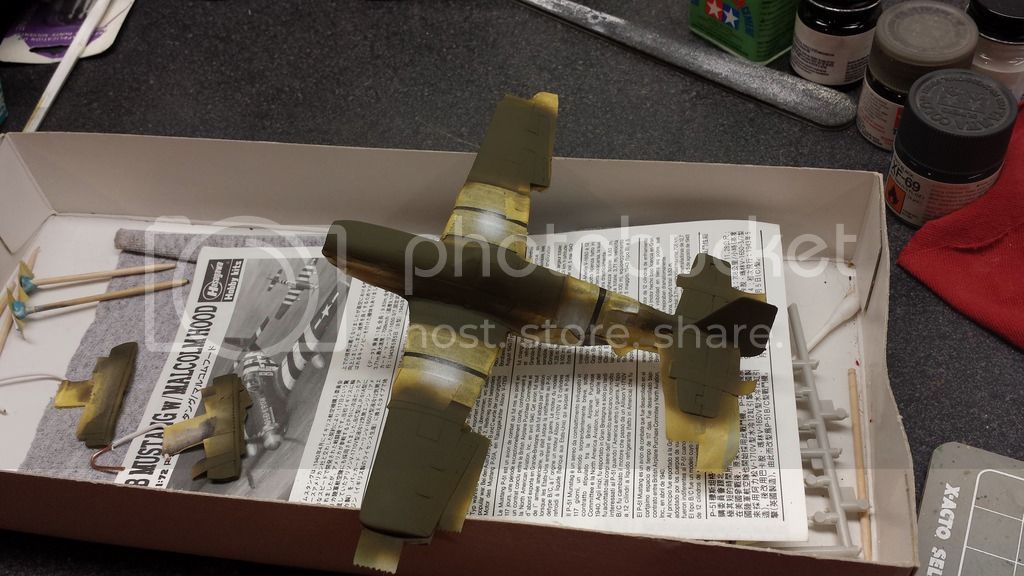
Ill probably do some highlighting with dark yellow and mist some more OD mix back over it and get the wing tip I missed the first time around. Then I can peel this masking mess off and see what I have to work with. The deadline looms ahead but I'm not goin to cut corners or rush to finish. Painting the 3 striped spinner is the next obstacle for me

Ill probably do some highlighting with dark yellow and mist some more OD mix back over it and get the wing tip I missed the first time around. Then I can peel this masking mess off and see what I have to work with. The deadline looms ahead but I'm not goin to cut corners or rush to finish. Painting the 3 striped spinner is the next obstacle for me

Joel_W

Joined: December 04, 2010
KitMaker: 11,666 posts
AeroScale: 7,410 posts

Posted: Sunday, July 26, 2015 - 05:05 AM UTC
Mike,
It's looking good from what I can see. I would reconsider over misting and trying to cover up a few missed spots with a different color, and just apply the same color again as needed. Believe me, I do it all the time.
Joel
It's looking good from what I can see. I would reconsider over misting and trying to cover up a few missed spots with a different color, and just apply the same color again as needed. Believe me, I do it all the time.
Joel
mrockhill

Joined: June 17, 2009
KitMaker: 566 posts
AeroScale: 507 posts

Posted: Monday, July 27, 2015 - 08:46 AM UTC
Ive come back with a vegeance tonite! I needed results tonite to make up for the lost time this weekend and to keep my mojo up. So I kicked off with more OD to touch up some misses and thin areas and then try some highlighting. I started again with my lightened tamiya OD and did my repairs. Then I started adding more dark yellow and thinner as I went along. I think it turned out pretty well.
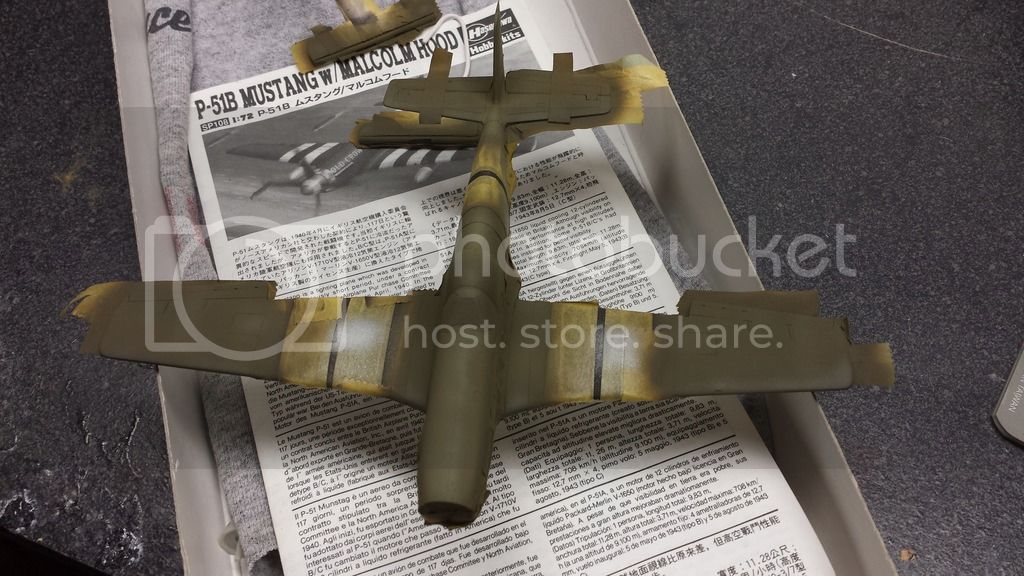
Then the moment I've been waiting for, the great tape removal. There are some more touch ups still needed, but there always are. Still, I'm extremely happy with what I found under the mile of tiny bits of tamiya tape.
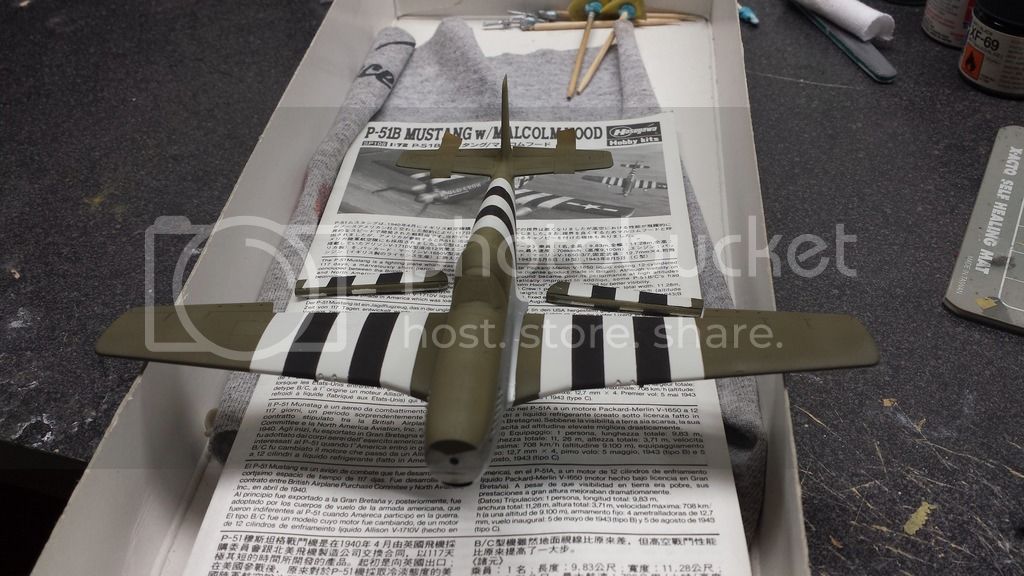
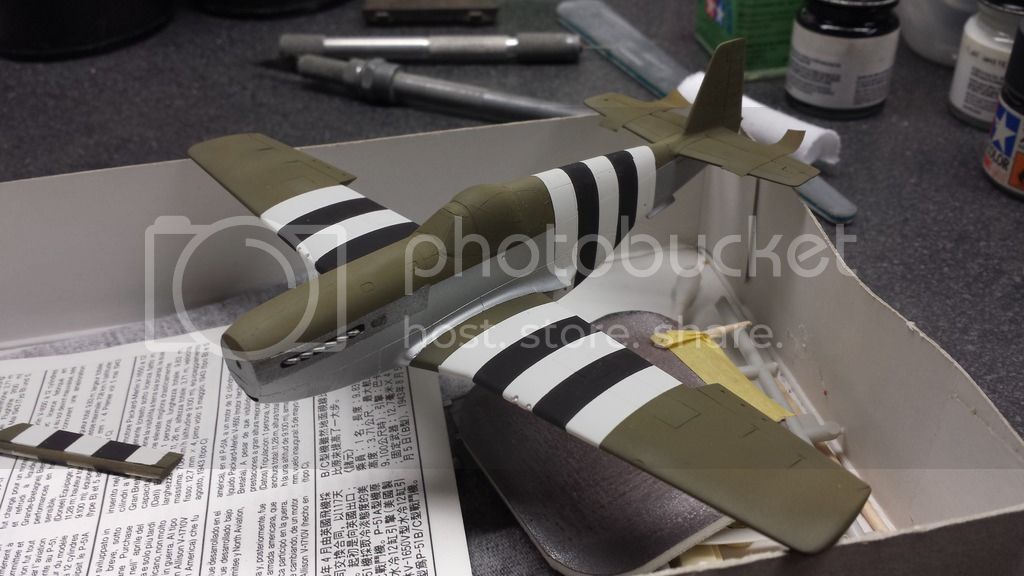
So this will get to sit overnight while I continue to square away the landing gear, drop tanks, props and spinner. So close, yet so far

Then the moment I've been waiting for, the great tape removal. There are some more touch ups still needed, but there always are. Still, I'm extremely happy with what I found under the mile of tiny bits of tamiya tape.


So this will get to sit overnight while I continue to square away the landing gear, drop tanks, props and spinner. So close, yet so far

Posted: Monday, July 27, 2015 - 02:54 PM UTC
Hi Mike,
Your invasion stripes look great! It's one feature I've always avoided in modelling. you're doing great things with such a small scale kit.
Gary
Your invasion stripes look great! It's one feature I've always avoided in modelling. you're doing great things with such a small scale kit.
Gary
Joel_W

Joined: December 04, 2010
KitMaker: 11,666 posts
AeroScale: 7,410 posts

Posted: Tuesday, July 28, 2015 - 02:40 AM UTC
Mike,
the OD touch ups look great. And I'll 2nd what Gary said about your invasion stripes, they do look flawless.
Joel
the OD touch ups look great. And I'll 2nd what Gary said about your invasion stripes, they do look flawless.
Joel
mrockhill

Joined: June 17, 2009
KitMaker: 566 posts
AeroScale: 507 posts

Posted: Tuesday, July 28, 2015 - 06:26 AM UTC
Gary, Thanks for the compliments! Im not going to lie, the stripes were quite a task. I didnt have any paint bleeds, just 4 or 5 spots where the tape edges got uneven or didn't round a curve well. Im currently straightening these out, thankfully I think they can all be fixed with black. Just finished up a 2nd round of OD touch ups
Joel, They do look great but arent quite flawless as mentioned above, but they exceeded my expectations, especially how my black and white mixes turned out. Im hoping I dont loose too much of the subtle OD shading when I gloss coat.
While the paint dries I've been working on the prop and spinner. The blades dont look bad aside from being thick. If I had more time Id replace them or maybe try thinning them myself. However, with things being what they are I'm using them. If they actually end up bugging me I can replace them later. Im not even sure if there is a set

mrockhill

Joined: June 17, 2009
KitMaker: 566 posts
AeroScale: 507 posts

Posted: Thursday, July 30, 2015 - 11:04 PM UTC
Today is the deadline for the campaign! I wont be making it 
I finally finished the touch ups and this time Im confident that I've got them all. While my touch ups were set aside to dry I got to work on my spinner striping. I covered the spinner in neat pieces of tamiya tape. I drilled a small hole into my bench that the spinner shaft could drop into and leave the spinner to sit flat on the bench. Using thin bits of balsa I made a spacer to sit a #11 blade on and ran it around the spinner to cut the tape evenly, then spaced it up more and cut again. Then I peeled the base and the tip portion and sprayed red. I didnt get my proportions right and it looked obvious to me so I stripped it back down to start over.
I had been looking at photos to check out how much droop to give the flaps I noticed the red warning stripes in period photos appeared to be beneath any wing stripes that were applied. Being the red was already out for the spinner I decided a quick detour was in order to address this and save myself from trying to cut decals to fit, so I masked it up quickly and sprayed it with red. They turned out great!
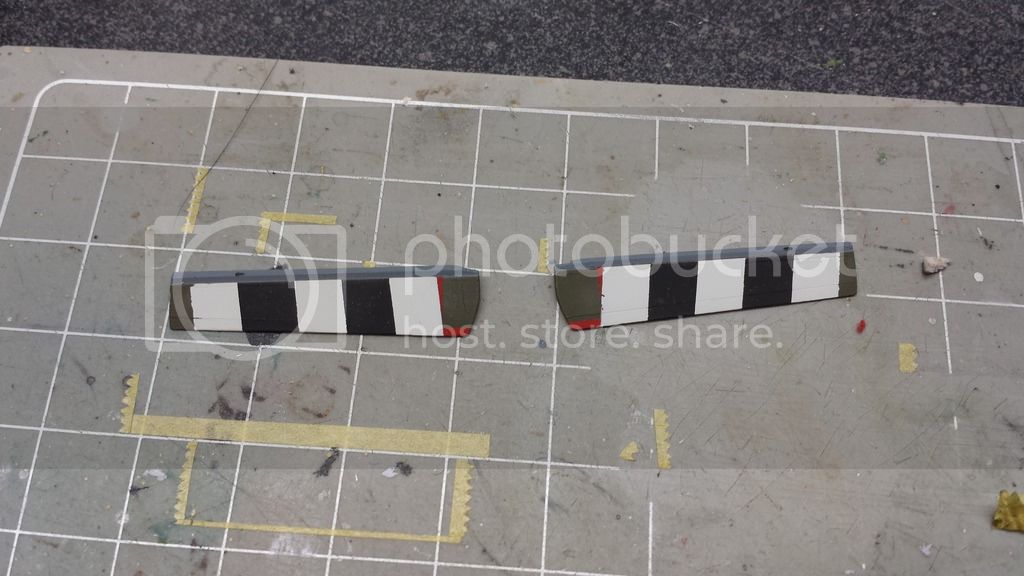
This has been a build full of masking which I really hope is done. However Ive been working on a plan to mask and paint the nose checkers if the decals should decide not to work or look horrible. Fingers crossed!

I finally finished the touch ups and this time Im confident that I've got them all. While my touch ups were set aside to dry I got to work on my spinner striping. I covered the spinner in neat pieces of tamiya tape. I drilled a small hole into my bench that the spinner shaft could drop into and leave the spinner to sit flat on the bench. Using thin bits of balsa I made a spacer to sit a #11 blade on and ran it around the spinner to cut the tape evenly, then spaced it up more and cut again. Then I peeled the base and the tip portion and sprayed red. I didnt get my proportions right and it looked obvious to me so I stripped it back down to start over.
I had been looking at photos to check out how much droop to give the flaps I noticed the red warning stripes in period photos appeared to be beneath any wing stripes that were applied. Being the red was already out for the spinner I decided a quick detour was in order to address this and save myself from trying to cut decals to fit, so I masked it up quickly and sprayed it with red. They turned out great!

This has been a build full of masking which I really hope is done. However Ive been working on a plan to mask and paint the nose checkers if the decals should decide not to work or look horrible. Fingers crossed!
Joel_W

Joined: December 04, 2010
KitMaker: 11,666 posts
AeroScale: 7,410 posts

Posted: Friday, July 31, 2015 - 02:53 AM UTC
Mike,
As far as glosscoating goes, it will darken up all the colors, so you'll loose a little of the tone differences, but once Dullcoated you'll be right back to how it was.
I'm really impressed with your method for cutting the masks for your spinner. I really need to try that out.
Joel
As far as glosscoating goes, it will darken up all the colors, so you'll loose a little of the tone differences, but once Dullcoated you'll be right back to how it was.
I'm really impressed with your method for cutting the masks for your spinner. I really need to try that out.
Joel
mrockhill

Joined: June 17, 2009
KitMaker: 566 posts
AeroScale: 507 posts

Posted: Friday, July 31, 2015 - 04:54 AM UTC
Joel,
Thanks for poking your head in to check out my progress! I got the gloss coat done on the upper surfaces and so far I'm happy with the level of contrast.
About the spinner masking, I originally read about it using a book to hold the blade and adjust the height with the pages. I changed it so that I can hold the tiny spinner stationary and run the blade around it. My notes for next time include watching blade pressure, I marked up the spinner and had to fill and sand it before repainting. However I was really stoked that it cut straight!!!
Posted: Friday, July 31, 2015 - 09:43 AM UTC
Thank you for the technique, Mike. I know it will come in handy.
Gary
Gary
mrockhill

Joined: June 17, 2009
KitMaker: 566 posts
AeroScale: 507 posts

Posted: Tuesday, August 04, 2015 - 07:16 AM UTC
About last night...
Last night was a not so great night in modeling. With my gloss coat of future sufficiently dried and the nose checker decals adequately installed (In case they failed or looked/fit terrible, then I would paint them)
I began the rest of the decals with all the major markings on the upper port side. With only the sightest of difficulties I got the major decals on the port side. The national insignia is super transparent which I expected but these are much more so than other hasegawa decals ive used. I'll survive, I can overlay them with other decals later or some careful airbrushing. I also think the tail numbers look off, but that may just be me. Still I was overall pretty happy with how it was all looking.
After an hour of tinkering with my 1/48 mustang build I decided to call it a night and take a pic of the fresh decals for an update. I went to brush an eyelash off the nose of the mustang when suddenly my finger grew to 3X its normal size and smashed the now too close "You've had it!" Making it read more like "You've had #!" My heart dropped. I didnt loose nerve just calmly went about trying to push bits back into order but to no avail, it was toast. I decided to remove the decal which didnt come easily and marred the surrounding future and scuffed the NMF. Thouroughly disgusted, I went to bed.
It hung like a cloud over my head all day as my mind kept wandering off about how Id fix this mess, find decals buy another sp128 off ebay, post want adds. I finally stumbled upon usk decals? I dont know how they are but are the only "You've had it!" I could find in 1/72 and $9.99 shipped was money well spent just for the peace of mind.
My only other possibility is to buy another kit of which only 1 sp128 is for auction and I'm not sure if sp108 has the decal I need, s o pickings are slim. Either way another kit is going to be near $20 shipped. But now that I feel a little better I need to get back into paint retouch mode

Joel_W

Joined: December 04, 2010
KitMaker: 11,666 posts
AeroScale: 7,410 posts

Posted: Tuesday, August 04, 2015 - 11:49 PM UTC
Mike,
Sure sorry to hear that decal disaster. At least you found another decal sheet with the right marking. Hopefully, whatever damage to the NMF can easily be repaired.
Joel
Sure sorry to hear that decal disaster. At least you found another decal sheet with the right marking. Hopefully, whatever damage to the NMF can easily be repaired.
Joel
bzak

Joined: June 07, 2006
KitMaker: 264 posts
AeroScale: 87 posts

Posted: Wednesday, August 05, 2015 - 02:46 AM UTC
Howdy,
If all you need is the nose art (U've Had It!), I have an old Superscale sheet with the markings you can have for England's P-51B.
email: [email protected]
Let me know if you want them.
Brian Riedel
If all you need is the nose art (U've Had It!), I have an old Superscale sheet with the markings you can have for England's P-51B.
email: [email protected]
Let me know if you want them.
Brian Riedel
mrockhill

Joined: June 17, 2009
KitMaker: 566 posts
AeroScale: 507 posts

Posted: Wednesday, August 05, 2015 - 06:16 AM UTC
Brian, Thank you very much for the generous offer! I have some decals on the way already but I will surely keep you in mind if problems persist. Hell or high water I will have a "U've had it!" Mustang on the shelf! 
Im starting to see this as a blessing in disguise. I think the serial numbers look odd and too lemony yellow. The national insignia have a darker blue outline more appropriate for a summer of 1943 aircraft with over painted red border. So while im already doing touch ups I found an inexpensive decal set with nice replacement insignia(plus 2 other interesting p51b schemes!). The usk set has decent looking serials and mission/kill marks. Ive noticed however that none of these have the white cross by the data stencil signifying the fuselage tank installation but this should be simple enough to do myself

Im starting to see this as a blessing in disguise. I think the serial numbers look odd and too lemony yellow. The national insignia have a darker blue outline more appropriate for a summer of 1943 aircraft with over painted red border. So while im already doing touch ups I found an inexpensive decal set with nice replacement insignia(plus 2 other interesting p51b schemes!). The usk set has decent looking serials and mission/kill marks. Ive noticed however that none of these have the white cross by the data stencil signifying the fuselage tank installation but this should be simple enough to do myself
mrockhill

Joined: June 17, 2009
KitMaker: 566 posts
AeroScale: 507 posts

Posted: Thursday, August 06, 2015 - 10:55 AM UTC
Finally back to heading in the right direction! Decals are still a couple days out 

lfetz145

Joined: May 18, 2014
KitMaker: 69 posts
AeroScale: 67 posts

Posted: Thursday, August 06, 2015 - 09:02 PM UTC
I've been following your build, and I must say, it looks great! I plan on building "Old Crow" one of these days, so I'll definitely be using your blog as a reference 

mrockhill

Joined: June 17, 2009
KitMaker: 566 posts
AeroScale: 507 posts

Posted: Friday, August 07, 2015 - 01:52 AM UTC
Thanks for following along Logan! Best of luck on your build, hope to see it on here. If for some reason you fumble any "Old Crow" decals Ive got spares for you 
This has been a pretty good kit to me but I have heard the academy is a little better and plan to try one for the next b/c mustang I build in this scale. Still, I'm sure I wont hesitate to add another one of these hasegawa mustangs to the stash

This has been a pretty good kit to me but I have heard the academy is a little better and plan to try one for the next b/c mustang I build in this scale. Still, I'm sure I wont hesitate to add another one of these hasegawa mustangs to the stash
Joel_W

Joined: December 04, 2010
KitMaker: 11,666 posts
AeroScale: 7,410 posts

Posted: Friday, August 07, 2015 - 07:32 PM UTC
Mike,
Those decals look really quite good to me.
Joel
Those decals look really quite good to me.
Joel
 |


