

Hi Joel,
Thank you for stopping by and liking my efforts. I'm always glad to find your input in my topics.
As far as I can tell, the US was hands-down ahead of the rest of the world in radial engine design and construction. Even the famous BMW 801 of Fw 190 fame was copied in part from Pratt and Whitney. For their part, the Japanese Strove to reduce weight and I think a lot of their radials may have been developed from British designs. So whether double ignition occurred to them or not, I have no idea.
Gary
World War II
Discuss WWII and the era directly before and after the war from 1935-1949.
Discuss WWII and the era directly before and after the war from 1935-1949.
Hosted by Rowan Baylis
1/48 scale ARII Ki-44 Shoki

GazzaS

#424

Joined: April 23, 2015
KitMaker: 4,648 posts
AeroScale: 1,938 posts

Posted: Friday, November 27, 2015 - 07:58 AM UTC
GazzaS
#424
Joined: April 23, 2015
KitMaker: 4,648 posts
AeroScale: 1,938 posts
Posted: Friday, November 27, 2015 - 08:53 AM UTC
Mike and Damian,
As two guys who seem to be seriously into Mustangs and Jugs, I'm glad to see your interest in foiling. Those two planes look awesome in sunlight, IMHO.
The tools and supplies for foiling are amazingly inexpensive.
Instead of one big tools and supplies list, I'll break it into a use-it-as-you-need-it series of small lists and tasks.
1. Foil preparation:
Aluminum foil: Cheapest, and thinnest is what you want. Bought mine from a discount store for 2.25$. ....all prices given in Aussie dollars. Made in the Peoples Republic of China.
Liquid bleach and tap water in equal amounts poured into a shallow baking tray.
If you want to stain your foil, pennies, brass scrap, or lead sinkers can be laid in the pan.
Cut your foil into the largest size pieces that will fit in your baking tray or into the container where you will store your foil.
Keep a hot skillet on the stovetop. Your foil should be cut to fit into this as well. If you have a flat electric cooktop, better still
You will need a timer. If you soak the foil over 4.5 minutes, it will become unusable. I soak it at various times up to 4 minutes to get various stains and finishes.
After soaking, put your foil in clean tap water to rinse off the bleach. Then place it on your cooktop or skillet so that the water steams off. Flip it over and steam off any more water. While doing these steps, try not to put deep wrinkles or folds in the foil. Shallow wrinkles are no problem.
Hold up to the light. If you see pinholes, throw the sheet away, and decrease your soaking time. Prepare about 4 times the foil as you think you will need to cover the plane.
2. Appying the glue to the foil.
The glue is Microscale Micro Metal Foil Adhesive. BNA model world sells it for 5.50$. I reckon one bottle will do about ten 1/48 scale single engined fighters. Always shake well.
You'll want a 10mm wide flat brush to apply the glue to the foil. Spread it thin quickly, trying to avoid leaving streaks on a sheet you find easy enough to manipulate. I usually use a piece no bigger than my hand. Let the glue dry for a few minutes in a flat, lidded container with the glued side facing upward. I use a rectangular disposable container that once held beef and black bean. Once the glue is dry, it will be tacky and have a milky appearance. Leave your brush to soak in tap water.
Gonna page break here.
GazzaS
#424
Joined: April 23, 2015
KitMaker: 4,648 posts
AeroScale: 1,938 posts
Posted: Friday, November 27, 2015 - 09:51 AM UTC
Foiling continued...
3. Burnishing the foil to the plastic. A bottle of Isopropyl alcohol will be necessary. I always wipe the plastic with it to remove skin oils. The alcohol is also your solvent for dried glue.
You want a low dust setting. I make sure the dogs are out side and nobody has just swept the floor. A mote of dust under your burnished foil will show up like a monster pimple.
I use three tools for burnishing: A wooden coffee stirrer lightly sanded to ensure there are no splinters or sharp parts that will snag. This is best for areas where the foil is going to be stretched the most.
Cotton buds aka Q-tips. Best for broader, flatter, quicker applications where the foil isn't stressed much. Once the end get fuzzy, use the other end until it gets fuzzy then chuck it. You don't want the stem tearing the foil.
Round tooth pics. Best used to press your foil deeper into panel lines, gun troughs, etc.
4. Trimming. You need a sharp blade, but not neccessarily ultra new. Lamp oil. It's clear, thin, and doesn't leave a heavy residue. I put a few drops in a beer bottle cap, and lightly dip the very tip of the blade into the oil. I gently touch it to a piece of paper towel to grab any excess. Drag your oiled blade along the panel line lightly. Don't press. Gently pull at the waste foil. If you haven't cut deeply enough, don't expect the foil to tear where you have cut. It will ruin your mood. Try cutting gently again. If the foil doesn't part where you want it, it's time for a new blade. I use 4-5 blades per 1/48 scale model.
5. Clean up after each piece of foil is applied. Because your foil will always be bigger than the panel you are applying, glue and aluminum oxide will leave grey-black sticky stains on bare styrene. Lightly dampen a paper towel with Isopropyl and remove the mess. You don't want Isopropyl oozing under your new panels, so don't go crazy with it. Cotton buds or q-tips can be used for this in smaller areas.
6. Finishing. 1500 grit wet/dry paper used dry is better than 0000 steel wool. Other ppl use steel wool, but it leaves directional striations. I found it at Cheapa auto parts for under 2$ per 22cm X 28cm sheet. Gentle sanding can hide unwanted seams or small flaws.
Aluminum polish. Also from Cheapa Auto Parts. Used for those pretty aluminum alloy rims. The more you use and the longer you rub, the higher sheen you will get.
Using it will leave residue behind in recesses or adjacent areas. I used turpentine to remove excess and leave the foil clean. 9$ a tube, and the most expensive thing on the list. With it, you could conceivably make mirrors.
Alclad Polished Aluminium. Sometimes your actions leave a small spot or panel line uncovered. Because it's so thin, a little on a brush will flow into an area and make small faults disappear.
Wipe down again with Isopropyl to remove fingerprints and other finish-ruining stuff.
7. Sealing. Aluminum will continue to oxidize if not sealed. Future or lacquer applied by air brush will seal the foil. Each coat you apply will dull the sheen. enough coats plus weathering can give you that long-term operational look.
8. Photography. Real metal loves real light.
Further reading: Google the name Bucky Sheftall or terms like aluminum foil aircraft model to learn more. Without his blogs, I'd not be writing this one.
Happy model building!
Gary
GazzaS
#424
Joined: April 23, 2015
KitMaker: 4,648 posts
AeroScale: 1,938 posts
Posted: Friday, November 27, 2015 - 12:01 PM UTC
Quoted Text
Gary, your shoki is looking great! Watching you build a ki-44 struck a nerve and a hasegawa 1/48 shoki came home with me from the LHS as a result. Pugnacious looking little thing isnt it, Trying hard not to build it for the 1945 campaign, dont want to crowd the shoki field! Still vascililating over my many applicable choices
Your foil work looks outstanding. Ive always found it intriguing and I'm bound to try it sometime but I certainly appreciate getting to read about your experiences for now. That was a nice tutorial you did above, thank you!

Hey Mike,
I think I'll eventually get a Hasegawa Shoki. I really like the look of it. I got this kit dirt cheap, and although it didn't requie much seam work, the molding flaws were hard for me to fix well.
The amazing thing about the plane was that they took down B-29's with it with only 4 .50 cals. I hear there is a conversion kit for 2 40mm caseless ammunition machine cannons.
Don't let my build prevent you from building yours. I think the plane is under-covered by history and modellers,
Gary
GazzaS
#424
Joined: April 23, 2015
KitMaker: 4,648 posts
AeroScale: 1,938 posts
Posted: Wednesday, December 02, 2015 - 11:36 AM UTC
Hi Everyone,
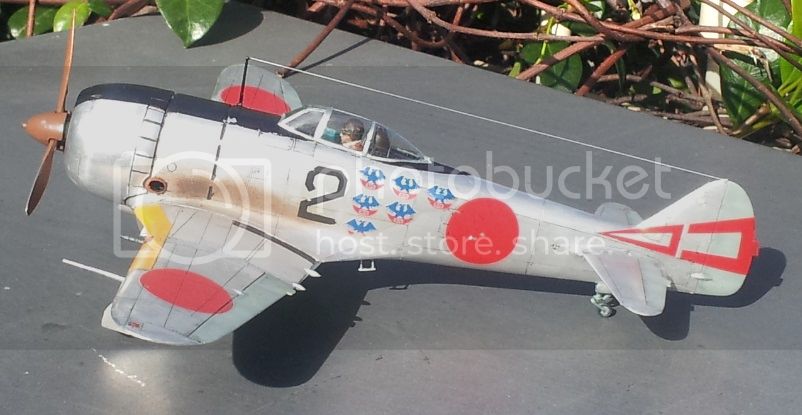
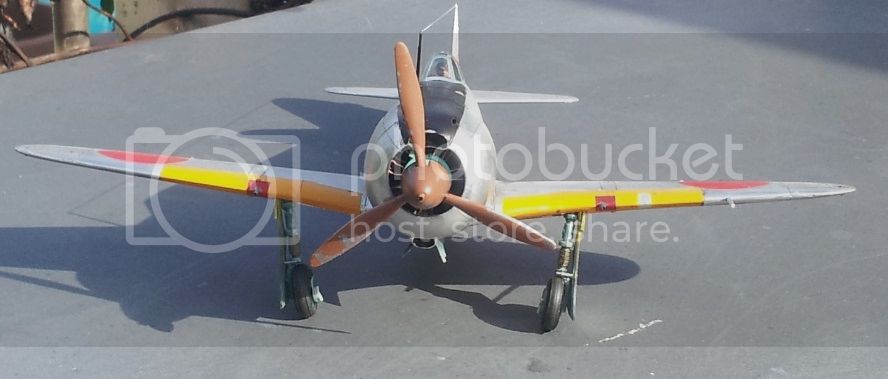
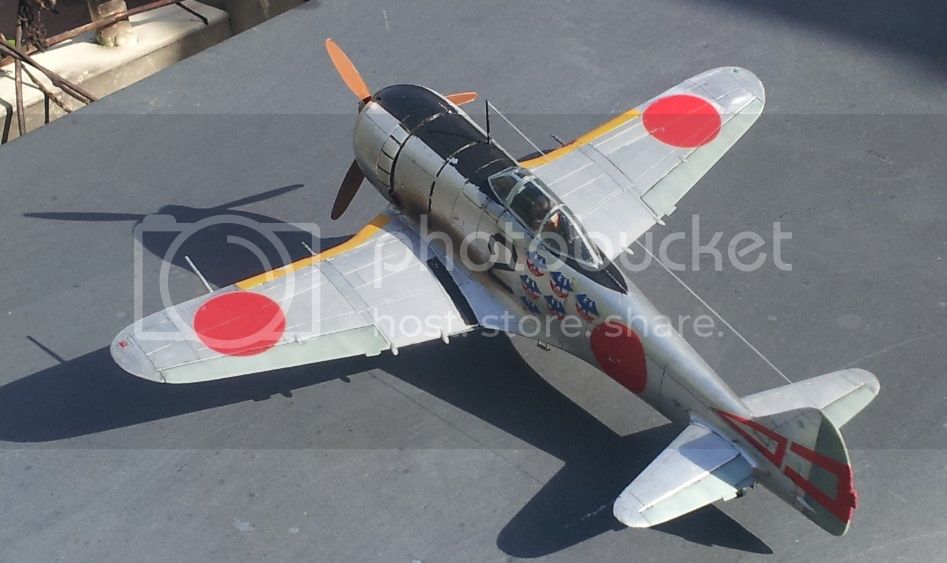
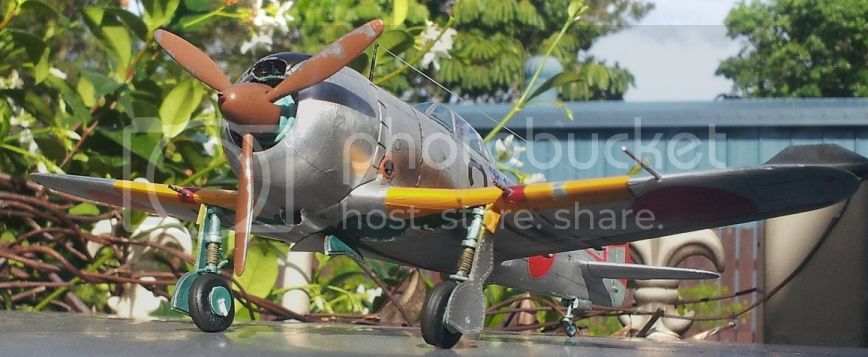
I finally finished this bird. I have to say, the more I worked on this plane, the more it's looks appealed to me.
I found one image of this plane in flight from below. It's a modern image, so it's either CGI, or a restored, unpainted aircraft.
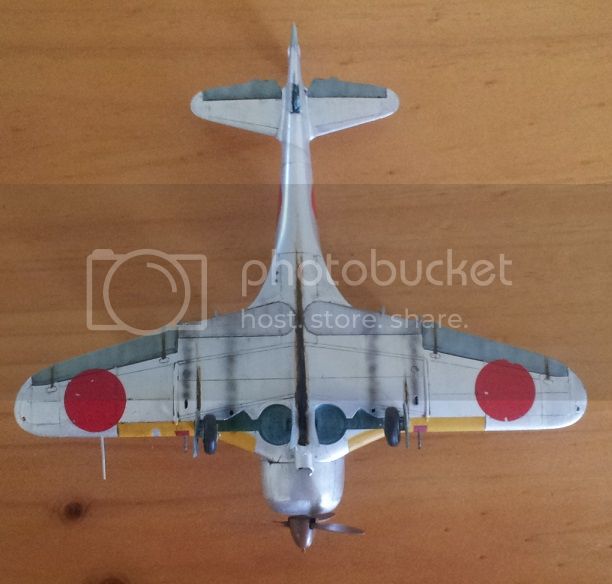
On that image, there was a long broad streak from the oil cooler, and little else. I augmented it with streaks from access ports and gunsmoke smudges.
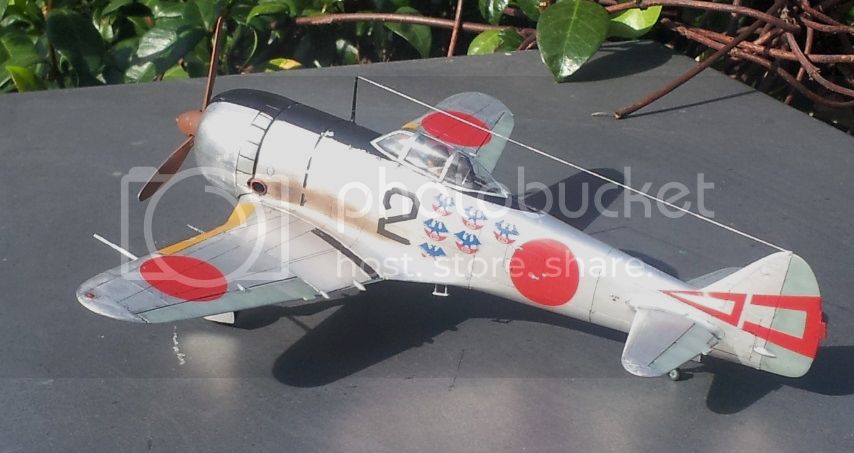
As I've said before, NMF deserves to be pictured in real light.
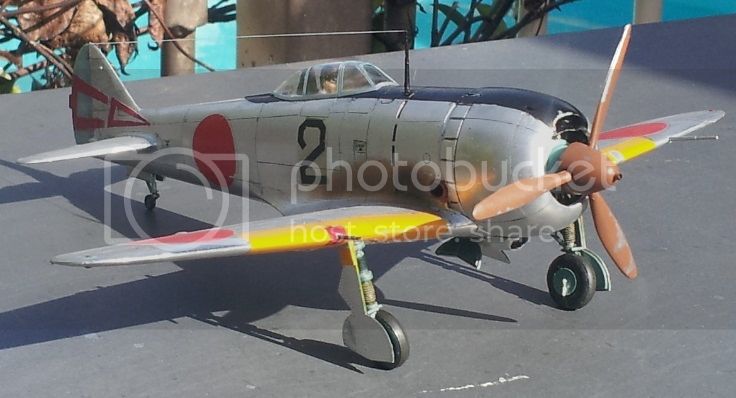
The kit pilot had a really large head. Even so, the view into the cockpit is so confined that were he not there you wouldn't see much.
The decals were in a very delicate state. I had to soak them about 4 times as long to get them to slide, and even then they tore easily. Usually I try to trim of any excess film, but just getting from paper to plastic was very tedious.
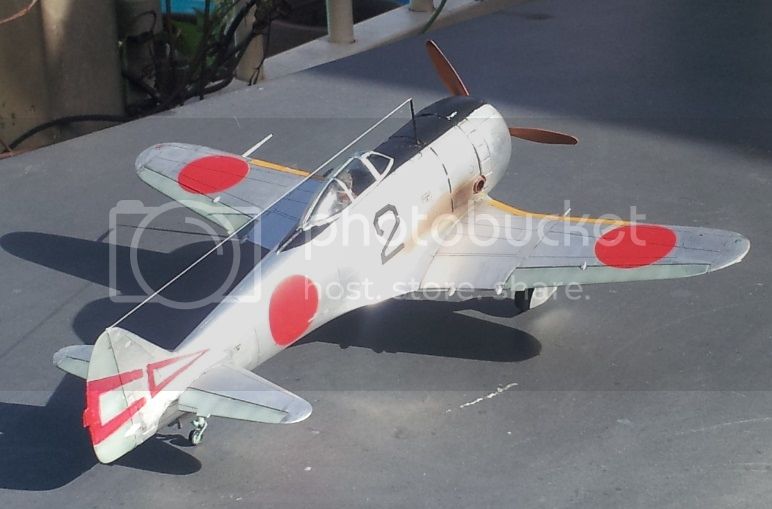
I came to love the plane. But didn't really like the model kit. I think I'll try it with Hasegawa in the future. It's really a great looking little plane.
Thanks for looking!
Gary
I finally finished this bird. I have to say, the more I worked on this plane, the more it's looks appealed to me.
I found one image of this plane in flight from below. It's a modern image, so it's either CGI, or a restored, unpainted aircraft.
On that image, there was a long broad streak from the oil cooler, and little else. I augmented it with streaks from access ports and gunsmoke smudges.
As I've said before, NMF deserves to be pictured in real light.
The kit pilot had a really large head. Even so, the view into the cockpit is so confined that were he not there you wouldn't see much.
The decals were in a very delicate state. I had to soak them about 4 times as long to get them to slide, and even then they tore easily. Usually I try to trim of any excess film, but just getting from paper to plastic was very tedious.
I came to love the plane. But didn't really like the model kit. I think I'll try it with Hasegawa in the future. It's really a great looking little plane.
Thanks for looking!
Gary
Joel_W

Joined: December 04, 2010
KitMaker: 11,666 posts
AeroScale: 7,410 posts
Posted: Wednesday, December 02, 2015 - 10:21 PM UTC
Gary,
Another outstanding NMF foil build. You're rapidly becoming the expert with that media here on Aeroscale. I'm truly amazed at your skills to date. And with every build they just continue to get better and better.
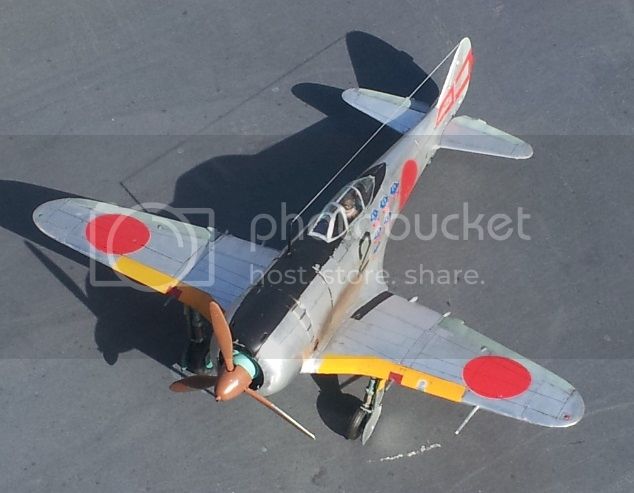
The overall effect you achieved with your weathering does indeed show off your build as an operational aircraft that has seen its fair share of combat missions. I particularly like the overall effect you achieved on the bottom of the aircraft.
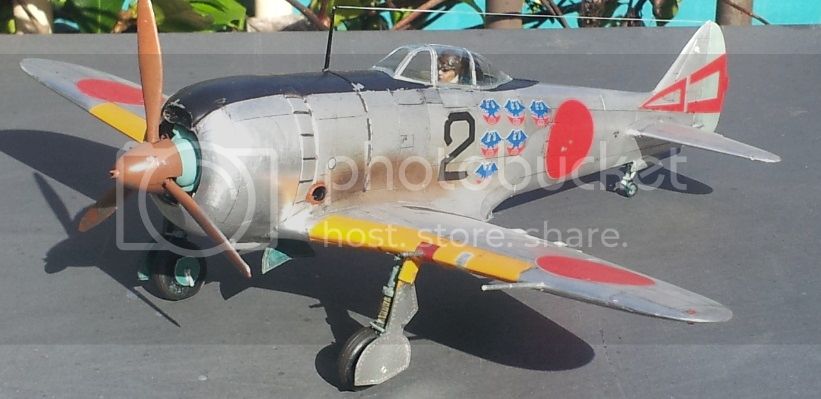
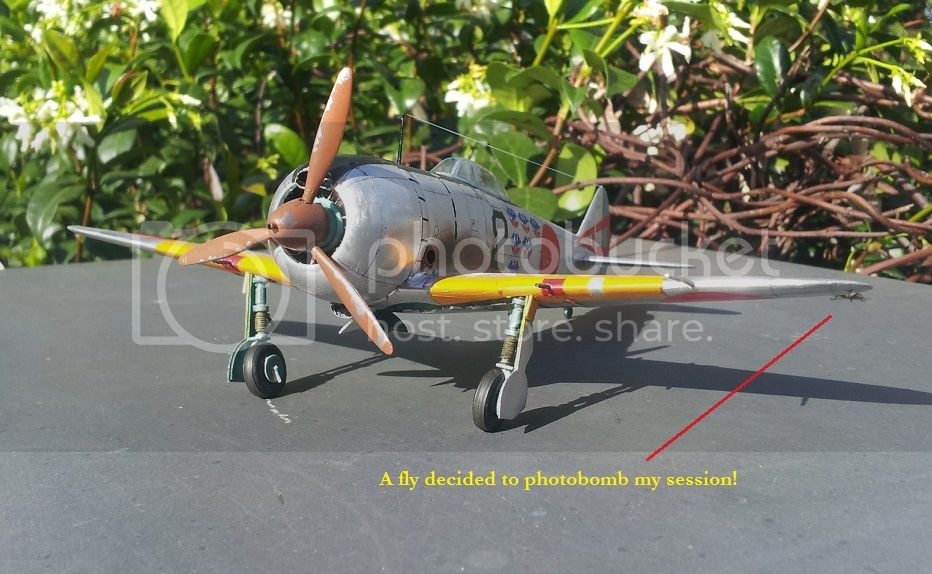
My only question concerns the angle of the gear struts. Just seems a little too much, but I'm usually wrong as that's the way that the manufacture has engineered them.
Looking forward to your next foil build.
Joel
Another outstanding NMF foil build. You're rapidly becoming the expert with that media here on Aeroscale. I'm truly amazed at your skills to date. And with every build they just continue to get better and better.
The overall effect you achieved with your weathering does indeed show off your build as an operational aircraft that has seen its fair share of combat missions. I particularly like the overall effect you achieved on the bottom of the aircraft.
My only question concerns the angle of the gear struts. Just seems a little too much, but I'm usually wrong as that's the way that the manufacture has engineered them.
Looking forward to your next foil build.
Joel

GazzaS
#424
Joined: April 23, 2015
KitMaker: 4,648 posts
AeroScale: 1,938 posts
Posted: Wednesday, December 02, 2015 - 11:13 PM UTC
Hi Joel,
Thank you your kind praise. I'm still learning things about working with foil and I'm sure there is much more to learn.
One of those things is assembly after foiling. The gear struts you mentioned are a case in point. There just wasn't enough room to fit the two pieces of landing gear cover and strut in place. I should have dry fitted it all before I did the foiling. As it is, they are crammed in after slight trimming to get them to stay in place. I had to trim the covers, and the outer edge of the well. I was dicey about the angle, but since they were more or less the same, and I didn't want to dig deeper into the foil, I left them as is.
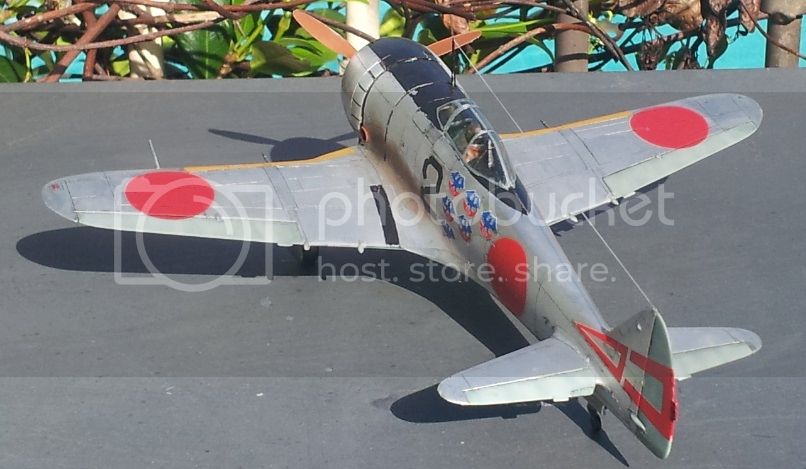
Amother lesson was provided by the very fine wingtips and vertical stab. Some edges are just too fine to foil nicely, and it points out that I wouldn't want to try it in a smaller scale.
Gary
Thank you your kind praise. I'm still learning things about working with foil and I'm sure there is much more to learn.
One of those things is assembly after foiling. The gear struts you mentioned are a case in point. There just wasn't enough room to fit the two pieces of landing gear cover and strut in place. I should have dry fitted it all before I did the foiling. As it is, they are crammed in after slight trimming to get them to stay in place. I had to trim the covers, and the outer edge of the well. I was dicey about the angle, but since they were more or less the same, and I didn't want to dig deeper into the foil, I left them as is.
Amother lesson was provided by the very fine wingtips and vertical stab. Some edges are just too fine to foil nicely, and it points out that I wouldn't want to try it in a smaller scale.
Gary
Joel_W
Joined: December 04, 2010
KitMaker: 11,666 posts
AeroScale: 7,410 posts
Posted: Wednesday, December 02, 2015 - 11:47 PM UTC
Quoted Text
Hi Joel,
Thank you your kind praise. I'm still learning things about working with foil and I'm sure there is much more to learn.
One of those things is assembly after foiling. The gear struts you mentioned are a case in point. There just wasn't enough room to fit the two pieces of landing gear cover and strut in place. I should have dry fitted it all before I did the foiling. As it is, they are crammed in after slight trimming to get them to stay in place. I had to trim the covers, and the outer edge of the well. I was dicey about the angle, but since they were more or less the same, and I didn't want to dig deeper into the foil, I left them as is.
Amother lesson was provided by the very fine wingtips and vertical stab. Some edges are just too fine to foil nicely, and it points out that I wouldn't want to try it in a smaller scale.
Gary
Gary,
I see. Nothing wrong with the landing gear other then the angle which could actually be more right then wrong. I'd leave it as is.
As for foiling those fine or sharp edges, I still say that those panels just might be a natural for Alcad Aluminum in a shade that closely matches the shine of the foil you're using.
Joel
GazzaS
#424
Joined: April 23, 2015
KitMaker: 4,648 posts
AeroScale: 1,938 posts
Posted: Thursday, December 03, 2015 - 12:27 PM UTC
Hi Joel,
I'm not having much luck combining Alclad and foil. If you look at the butterfly flaps on the underside photo, you'll see how dull they look. Because I couldn't think of a decent way to foil it that wouldn't roll later, I used Alclad there. It's been this way anywhere where I've combined foil and Alclad for anything other than minor flaws along a panel line.
Now, I'm not gonna claim to be an Alclad expert. But I've primed with the Alclad II black Primer & Microfiller then painted with Alclad Polished Aluminum, and I just can't make it shine in small, flat areas. I did large coverage on a model and got it to shine before, but sitting next real metal it looks grainy and dull. I really can't think of a way to get more out of it.
Any advice?
Gary

Redhand

#522
Joined: January 20, 2013
KitMaker: 1,460 posts
AeroScale: 1,443 posts
Posted: Thursday, December 03, 2015 - 05:25 PM UTC
Nice build, Gary. This aluminum foiling stuff is waaaaaay out of my labor grade. It always seems impossible to me yet you pull it off.
A few small, constructive comments.
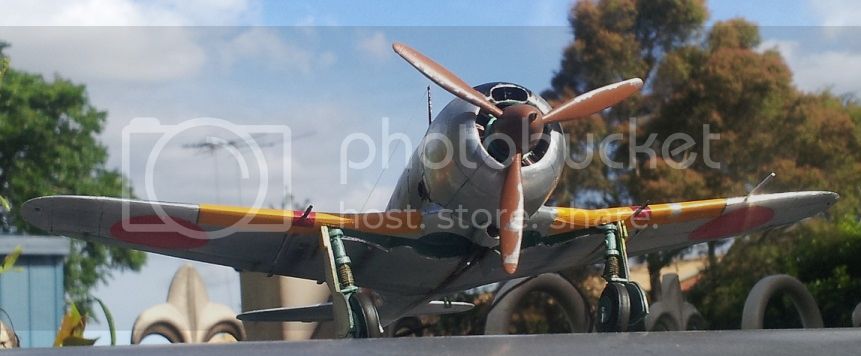
On the prop I would paint that starter dog steel of some other metal color. It will make a difference. Also, shouldn't the prop blades have double yellow warning lines near the tips? That could easily be done with some decals. Maybe it wasn't on the real A/C however.
Finally, what color is the front of the engine?
One of these days I have to build one of these.
A few small, constructive comments.
On the prop I would paint that starter dog steel of some other metal color. It will make a difference. Also, shouldn't the prop blades have double yellow warning lines near the tips? That could easily be done with some decals. Maybe it wasn't on the real A/C however.
Finally, what color is the front of the engine?
One of these days I have to build one of these.

Joel_W
Joined: December 04, 2010
KitMaker: 11,666 posts
AeroScale: 7,410 posts
Posted: Thursday, December 03, 2015 - 09:01 PM UTC
Gary,
While I'm no expert on Alcad NMF's, my brother sure is. The trick is a super shiny gloss black base if you're going for a high a gloss finish. He primers with AMMO acrylic gray primer, then rubs it out with 4,000 grit micro mesh pads. Then prefers Tamiya acrylic black gloss, and when dry after a few days to cure, rubs that out as well. The smoothness and glossiness of the base Gloss Black is the secret.
Joel

BlackWidow

Joined: August 09, 2009
KitMaker: 1,732 posts
AeroScale: 1,336 posts
Posted: Thursday, December 03, 2015 - 11:59 PM UTC
Nicely done, Gary! If one keeps in mind how old this kit is, you've done a great job. Especially your foiling looks impressive. I guess I'll never try that .... A few years ago I've also build Ogawa's "Black 2" but for me of course in a far cleaner state. I've used the Hasegawa kit, which you want to try next time. I can recommend that kit, though it's not in their standard programm anymore. But every now and then you can get a limited edition. I think I have 3 more Shokis in my stash. As Brian already mentioned I would also paint the engine starter at the propeller hub in a metallic colour.
Torsten
Torsten

GazzaS
#424
Joined: April 23, 2015
KitMaker: 4,648 posts
AeroScale: 1,938 posts
Posted: Friday, December 04, 2015 - 01:51 AM UTC
Hi guys,
Thank you for your kind words and helpful critiques.
@ Brian, I doubt foiling is as intensive as your fantastic detailing on your B-17. I should some day like to cover all of the US bombers that flew and fought unpainted in WW2.
I took liberties with the front of the engine. I'm really weak in my knowledge of Japanese building practices so I took a stab with what I thought my eyes saw. Below, Torsten recommends a metallic color.
On the Shoki, the propeller blades get a large-ish rectangular flash near the base of the blade, and a broad band near the tip. Painting small and painting straight are weak areas for my unsteady hands. There were no decals for these on the kit and I was getting fed up with the kit's flaws.
@ Joel, thank you for that info. I'll have to get more materials especially ultra fine grit paper. Also I'll have to plan and prepare to paint before I lay any foil.
@ Torsten, thank you for the recommendations. I'll definitely build more Shoki's someday. As for foiling, a lot of people seem reticent to try it. Even as a teen building models I was disappointed with metallic paints.
I know there are some late war FW 190's that had unpainted undersides. I may do it to a Wurger some day.
Best wishes,
Gary

litespeed


Joined: October 15, 2009
KitMaker: 1,976 posts
AeroScale: 1,789 posts
Posted: Friday, December 04, 2015 - 01:57 AM UTC
Excellent looking Shoki Gary and a great build blog as well. Just been catching up on your progress. I feel inspired to acquire a Sword or Hasegawa's version of this fine looking aircraft.
tim
tim
GazzaS
#424
Joined: April 23, 2015
KitMaker: 4,648 posts
AeroScale: 1,938 posts
Posted: Friday, December 04, 2015 - 02:04 AM UTC
Hi Tim,
Thank you! I'm glad you enjoyed the blog. The Shoki is a very impressive looking aircraft, and causing me to rearrange my list of favorite aircraft. I may have to build it in several incarnations. I've never heard of Sword, so I will have a look.
Best wishes,
Gary
Thank you! I'm glad you enjoyed the blog. The Shoki is a very impressive looking aircraft, and causing me to rearrange my list of favorite aircraft. I may have to build it in several incarnations. I've never heard of Sword, so I will have a look.
Best wishes,
Gary

AussieReg

#007
Joined: June 09, 2009
KitMaker: 8,156 posts
AeroScale: 3,756 posts
Posted: Friday, December 04, 2015 - 06:49 AM UTC
Lovely build Gary, I've really enjoyed following your thread here and I really appreciate the amount of effort that you put in to your tutorial posts. I am impressed by the NMF finish that the foiling technique gives you and I will certainly give it a try at some stage ( in the distant future the way things are right now).
That little sentence dragged back a thought that I had a couple of years back. I thought that it might be an interesting discussion thread to get everybody to nominate their top 5 favourite aircraft from any era, and why, and possibly build this up to a "Campaign of Personal Favourites."
Hmmmmmmm, mind ticking over, this is sure to cause some lively discussion
Cheers, D
Quoted Text
The Shoki is a very impressive looking aircraft, and causing me to rearrange my list of favorite aircraft.
That little sentence dragged back a thought that I had a couple of years back. I thought that it might be an interesting discussion thread to get everybody to nominate their top 5 favourite aircraft from any era, and why, and possibly build this up to a "Campaign of Personal Favourites."
Hmmmmmmm, mind ticking over, this is sure to cause some lively discussion
Cheers, D

GazzaS
#424
Joined: April 23, 2015
KitMaker: 4,648 posts
AeroScale: 1,938 posts
Posted: Saturday, December 05, 2015 - 04:39 AM UTC
Hi Damian,
Thank you very much! Personally, I'd love to see you foil a large scale P-47. I took my Shoki, a bf-109, and the Jug I built and photographed them together yesterday. The enormity of the jug, and it's weight in styrene really strike home when compared to two smaller fighters.
I'd fo for a favorites campaign in a while...I'm already commited to two as well as a gift build I must complete by early March. It'd be interesting to see what the enlistees come up with.
Gary

JPTRR
#051
Joined: December 21, 2002
KitMaker: 7,772 posts
AeroScale: 3,175 posts
Posted: Saturday, December 05, 2015 - 05:50 AM UTC
Your Shoki is beautiful. I think the burnishing of the foil makes it look more authentic like machined aluminum.

GazzaS
#424
Joined: April 23, 2015
KitMaker: 4,648 posts
AeroScale: 1,938 posts
Posted: Saturday, December 05, 2015 - 07:12 AM UTC
Frederick,
Thank you! This is finally the effect I've been looking for as I learn to work alumuinum foil.
Gary
Thank you! This is finally the effect I've been looking for as I learn to work alumuinum foil.
Gary
heavyjagdpanzer
Joined: February 17, 2013
KitMaker: 173 posts
AeroScale: 108 posts
Posted: Saturday, December 05, 2015 - 09:59 PM UTC
Gary, another beautiful model! 
GazzaS
#424
Joined: April 23, 2015
KitMaker: 4,648 posts
AeroScale: 1,938 posts
Posted: Saturday, December 05, 2015 - 11:07 PM UTC
Thank you, Bill!

Twentecable

Joined: September 13, 2003
KitMaker: 339 posts
AeroScale: 244 posts
Posted: Sunday, December 06, 2015 - 01:25 AM UTC
Gary, lovely model... and in the meantime I havent put the basic camo on mine... impressive!
gr TC
gr TC
GazzaS
#424
Joined: April 23, 2015
KitMaker: 4,648 posts
AeroScale: 1,938 posts
Posted: Sunday, December 06, 2015 - 11:08 PM UTC
Hi Lars,
Thank you!
Bw
Gs
Thank you!
Bw
Gs

billflorig
Joined: January 20, 2015
KitMaker: 152 posts
AeroScale: 5 posts
Posted: Monday, December 07, 2015 - 02:05 AM UTC
Gary, great work! I just acquired the Otaki P-40 with the Aleutians markings for 11th Air force. Can't wait to build it. I finished the Arii P-51 a few years ago, it was my first kit after a 25 year hiatus! I built the Otaki "Jack" as a kid. I love these old kits. Is there a vendor that is still selling the Arii versions online?
Best, Bill
Best, Bill
Joel_W
Joined: December 04, 2010
KitMaker: 11,666 posts
AeroScale: 7,410 posts
Posted: Monday, December 07, 2015 - 08:36 AM UTC
Quoted Text
Gary, great work! I just acquired the Otaki P-40 with the Aleutians markings for 11th Air force. Can't wait to build it. I finished the Arii P-51 a few years ago, it was my first kit after a 25 year hiatus! I built the Otaki "Jack" as a kid. I love these old kits. Is there a vendor that is still selling the Arii versions online?
Best, Bill
Bill,
You're making me feel really old. I was already married when the Otaki kits 1st hit the shelves at my local Squadron Shop in Syosset New York.
Joel
 |

WEB HOSTING BY


Copyright ©2021 AeroScale and Kitmaker Network, a subsidiary of Silver Star Enterprises
All Rights Reserved. Please read our Conditions of Use and Privacy Policy.
All Rights Reserved. Please read our Conditions of Use and Privacy Policy.