World War II: USA
Aircraft of the United States in WWII.
Hosted by Rowan Baylis
1/48 B17G Chow Hound
Redhand
#522
_VISITCOMMUNITY
New Jersey, United States
Joined: January 20, 2013
KitMaker: 1,460 posts
AeroScale: 1,443 posts
Posted: Saturday, January 02, 2016 - 03:05 AM UTC

Quoted Text


Thank you for following, posting and any suggestion / additional info.

Cheers,
Gabriel


REALLY nice, and boy am I jealous about the speed with which you've gotten this done. My only constructive comment deals with the brass color on the bracket for the ball turret. Honestly, I think that that is a flexible oxygen hose that should be painted a greenish olive drab.
Szmann
_VISITCOMMUNITY
Netherlands Antilles
Joined: September 02, 2014
KitMaker: 1,977 posts
AeroScale: 295 posts
Posted: Saturday, January 02, 2016 - 03:12 AM UTC
Thanks, Brian.

The build instructions are listing the item as "brass shells" and specifically indicate brass color. Now I remember another reference drawing that lists a similar connection as an electrical cable. Somewhere must be a confusion. Anyhow, the mold is clearly a MG shell belt, but the connection with the frame and with the whole assembly is at least dubious.

???

Thank you,
Gabriel
KPHB17FE
_VISITCOMMUNITY
Illinois, United States
Joined: January 12, 2015
KitMaker: 292 posts
AeroScale: 292 posts
Posted: Saturday, January 02, 2016 - 04:51 AM UTC
On the ball turret structure, that is in fact electric wiring inside a flexible conduit. And the only hydraulics on the gear would be the brake lines. The gear, along with the flaps and the bomb bay doors, is electric. Glad to see you continuing on!
Redhand
#522
_VISITCOMMUNITY
New Jersey, United States
Joined: January 20, 2013
KitMaker: 1,460 posts
AeroScale: 1,443 posts
Posted: Saturday, January 02, 2016 - 04:56 AM UTC
I stand corrected then. Will have to look closer, though undoubtedly Karl is correct.
Joel_W
Staff MemberAssociate Editor
AUTOMODELER
_VISITCOMMUNITY
New York, United States
Joined: December 04, 2010
KitMaker: 11,666 posts
AeroScale: 7,410 posts
Posted: Saturday, January 02, 2016 - 09:10 PM UTC
Gabriel,
Been following along since your 1st post in the build thread. Nice, clean, and neat work to date.

Joel
Scrodes
_VISITCOMMUNITY
Ontario, Canada
Joined: July 22, 2012
KitMaker: 771 posts
AeroScale: 763 posts
Posted: Sunday, January 03, 2016 - 03:56 AM UTC
The colours you chose (on the spoon) look good, they are on the light side, so I assume you will want to pre-shade as opposed to post shading.


As for the props, the problem you're having is probably the colour is too stark, I recommend Tamiya's XF-69 Nato Black for a scale black, that way the chipping you want wont look so stark. Chip with a light grey.


Looks good my friend.
Szmann
_VISITCOMMUNITY
Netherlands Antilles
Joined: September 02, 2014
KitMaker: 1,977 posts
AeroScale: 295 posts
Posted: Sunday, January 03, 2016 - 08:23 AM UTC
@ Brian & Karl: Thank you, gentlemen, for casting light on the issue. I guess that the right color will be black? For sure I will soldier on - it's a commissioned work and the owner asks for periodic updates

@ Joel: Thank you. Your latest published work it's a good example for quality finishing. Trying hard to emulate.

@ Matt: You're absolutely correct, sir. I choose light tones because I intend to use pre-shading, a little color modulation and light washes. As for props, I guess you're right again. I have used a sort of smoke enamel from Krylon line over light gray primer - I never expected the mirror black finish. Perhaps I will redo the weathering with some darker grey. I cannot change the base color because of decals. Also I know the hubs supposed to be black, but I indulged myself a little license for added visual interest (not sure Karl is going to agree with).

@ ALL: Thank you so much, gents, for feed-back. I installed the hydraulics on landing gears today, but the painting not finished. Question: the air intakes on the wing edge were protected with grilles?

Cheers,
Gabriel
Scrodes
_VISITCOMMUNITY
Ontario, Canada
Joined: July 22, 2012
KitMaker: 771 posts
AeroScale: 763 posts
Posted: Sunday, January 03, 2016 - 08:27 AM UTC
There's an easier fix to make the blade colour less stark. I use this technique directly on decals when I don't airbrush the markings on:

Thin a coat of clear flat, or dullcote if you prefer, add a single drop of a light gray. build up in layers.

That's how I painted this prop.

Joel_W
Staff MemberAssociate Editor
AUTOMODELER
_VISITCOMMUNITY
New York, United States
Joined: December 04, 2010
KitMaker: 11,666 posts
AeroScale: 7,410 posts
Posted: Sunday, January 03, 2016 - 11:01 PM UTC
The prop color issue has really been a issue with me. I don't much care for the final color on the PV-1 props as they're just to stark. a good dullcoat helped to tone that down, but switching to a Nato Black is the answer for me.

As for Matts process of adding black to a clear flat coat, I'm going to try that as well.

Joel
Redhand
#522
_VISITCOMMUNITY
New Jersey, United States
Joined: January 20, 2013
KitMaker: 1,460 posts
AeroScale: 1,443 posts
Posted: Sunday, January 03, 2016 - 11:22 PM UTC

Quoted Text

The prop color issue has really been a issue with me. I don't much care for the final color on the PV-1 props as they're just to stark. a good dullcoat helped to tone that down, but switching to a Nato Black is the answer for me.

As for Matts process of adding black to a clear flat coat, I'm going to try that as well.

Joel


For what it's worth Tamiya NATO black is my default color for props, but recently I have experimented a bit with that as a base color while using Tamiya flat black sprayed on parts of the prop blade to create a discoloration and wear effect. It is worth considering, I think.
Scrodes
_VISITCOMMUNITY
Ontario, Canada
Joined: July 22, 2012
KitMaker: 771 posts
AeroScale: 763 posts
Posted: Monday, January 04, 2016 - 12:48 AM UTC
If I use Nato Black for a base, then I add a drop of tan to the clear flat.
Joel_W
Staff MemberAssociate Editor
AUTOMODELER
_VISITCOMMUNITY
New York, United States
Joined: December 04, 2010
KitMaker: 11,666 posts
AeroScale: 7,410 posts
Posted: Monday, January 04, 2016 - 04:11 AM UTC

Quoted Text


Quoted Text

The prop color issue has really been a issue with me. I don't much care for the final color on the PV-1 props as they're just to stark. a good dullcoat helped to tone that down, but switching to a Nato Black is the answer for me.

As for Matts process of adding black to a clear flat coat, I'm going to try that as well.

Joel


For what it's worth Tamiya NATO black is my default color for props, but recently I have experimented a bit with that as a base color while using Tamiya flat black sprayed on parts of the prop blade to create a discoloration and wear effect. It is worth considering, I think.


Brian,
Interesting technique. The reverse could also work of primer then flat black applied in a random pattern. Then Nato Black air brushed on in very thin light coats. Kind of Black Basing the prop blades.
Joel
KPHB17FE
_VISITCOMMUNITY
Illinois, United States
Joined: January 12, 2015
KitMaker: 292 posts
AeroScale: 292 posts
Posted: Tuesday, January 05, 2016 - 04:53 PM UTC
There are no grills on the leading edge air intakes. Some currently flying aircraft have those but they are not WW II.
Szmann
_VISITCOMMUNITY
Netherlands Antilles
Joined: September 02, 2014
KitMaker: 1,977 posts
AeroScale: 295 posts
Posted: Wednesday, January 13, 2016 - 02:18 AM UTC
Hello, gents.

Update time.

@Karl: Thanks again for generously sharing your knowledge.

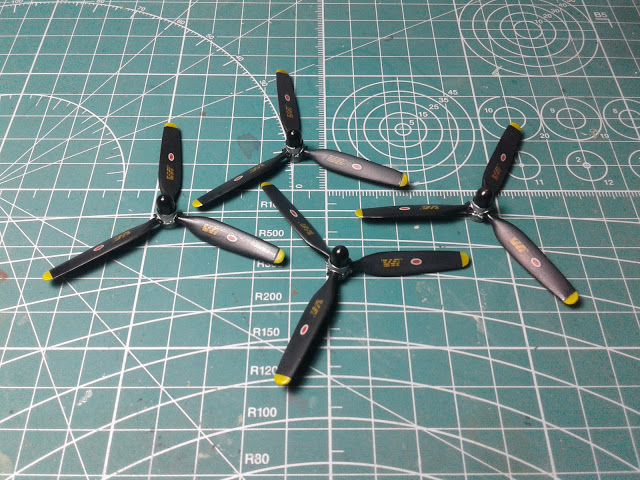
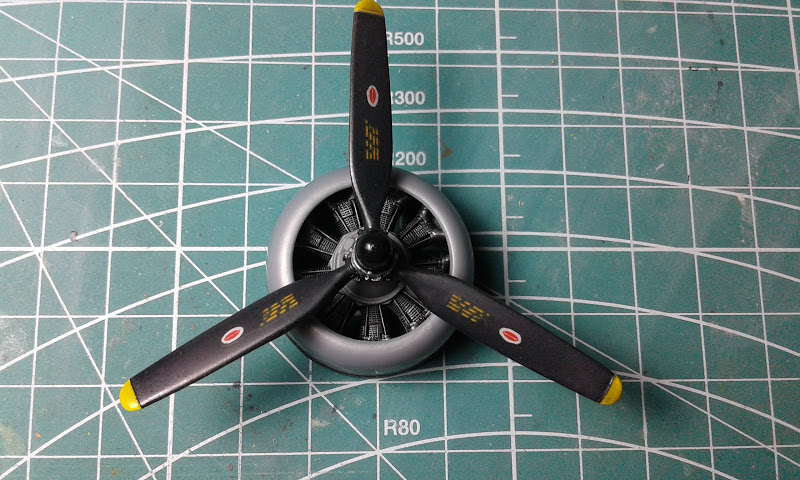
@All: inspired by your post and comments, I changed the appearance of propellers by applying a dark satin filter. I am quite happy with the result; anyhow, it could be I'll add some final "scratches"


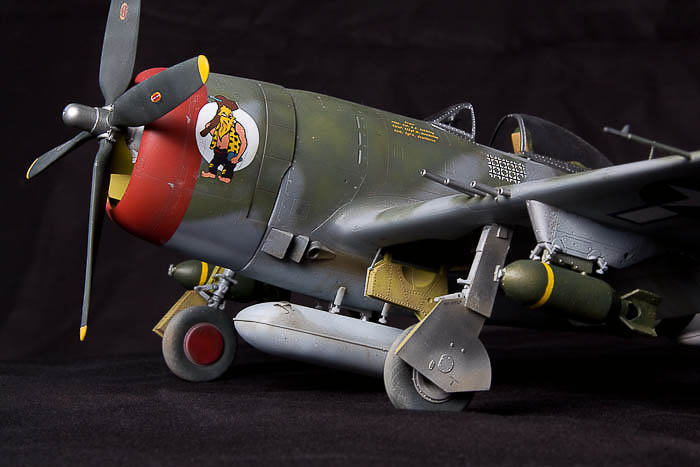
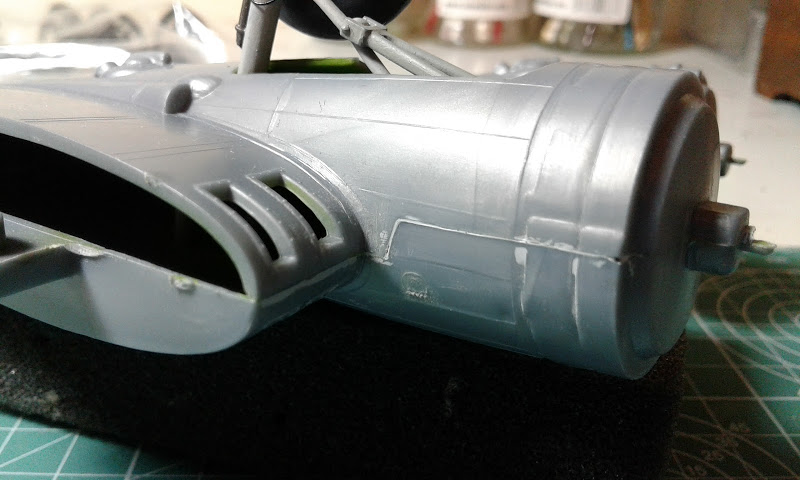
Again thanks to your comments, I changed the copper color on the "ammunition belt / oxygen hose" with brown, as seen on references. My last opinion is that the mold is awfully wrong. If my references are correct, the gun was fed from aluminum canisters, not from the belts. If the mold represents the sleeve protecting the cable, again is out of shape by way too much. Perhaps the best solution is to completely remove the detail and to replace it with a scratch build "sleeve". Anyhow, there is the pic:


I scratch built the hydraulic hoses from fishing line. The result is satisfying, unfortunately marred by the poorly molded detail:


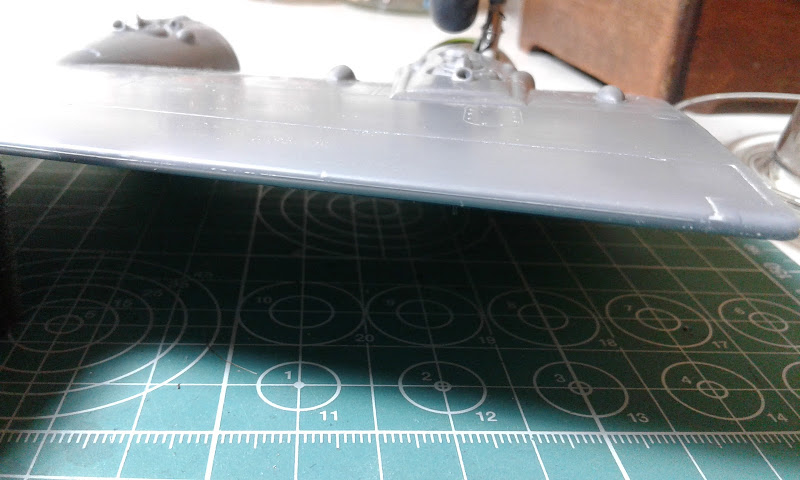
Overall view with the wheel assembly. You can see also the air scoops were re-worked...


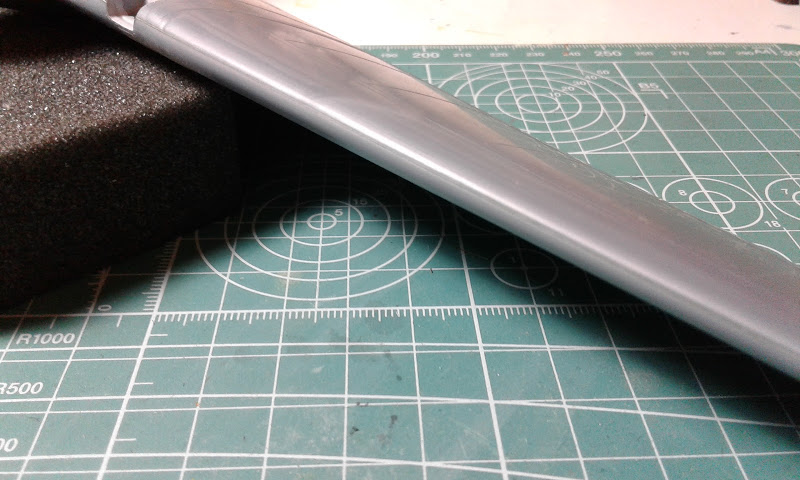
... and same thing with the turbo exhausts:


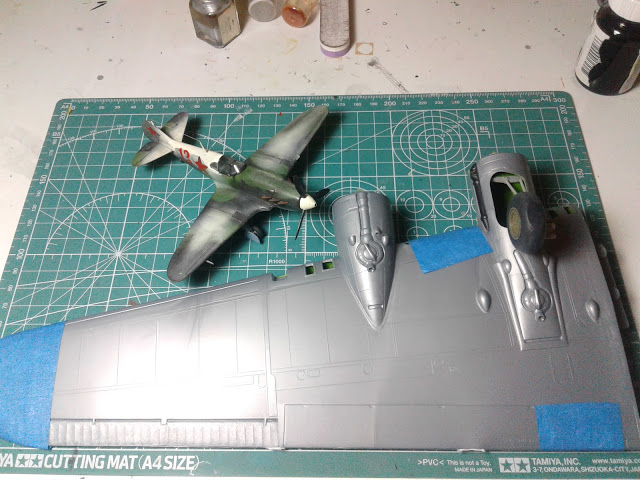
Only now I fully started to realize the sheer size of this thing. I think I need to expand my bench, or at least to radically re-organize it just to be able to handle this build . For comparison, a 1/72 LaGG 3-35


Thank you so much for your valuable comments. Indeed, they were very helpful.

Cheers,
Gabriel
KPHB17FE
_VISITCOMMUNITY
Illinois, United States
Joined: January 12, 2015
KitMaker: 292 posts
AeroScale: 292 posts
Posted: Wednesday, January 13, 2016 - 05:31 AM UTC
Just an FYI moment: The ball turret had ammo cans inside the unit which fed to each gun.


The external cans seen on some restorations and the HK 1/32nd kit and Revell 1/72nd kit were used in B-24's. There is mention of the external cans here, but I have talked to a number of WW II ball gunners and they never saw them in a 17.
Joel_W
Staff MemberAssociate Editor
AUTOMODELER
_VISITCOMMUNITY
New York, United States
Joined: December 04, 2010
KitMaker: 11,666 posts
AeroScale: 7,410 posts
Posted: Wednesday, January 13, 2016 - 06:16 AM UTC
Gabriel,
I know the feeling. I'm already trying to figure out If the B-25B will fit on my display shelving. Going to be close one way or the other.

when I get around to finally building a B-17, it will certainly be in 1/72 scale.
Joel
greif8
_VISITCOMMUNITY
Bayern, Germany
Joined: January 17, 2006
KitMaker: 673 posts
AeroScale: 492 posts
Posted: Wednesday, January 13, 2016 - 12:53 PM UTC
Wow, that thing is going to be hugh when finished. Nice progress and some excellent scratch building.

Ernest
GazzaS
#424
_VISITCOMMUNITY
Queensland, Australia
Joined: April 23, 2015
KitMaker: 4,648 posts
AeroScale: 1,938 posts
Posted: Wednesday, January 13, 2016 - 02:20 PM UTC
Gawd, I've got a Superfortress to do in this scale!
Joel_W
Staff MemberAssociate Editor
AUTOMODELER
_VISITCOMMUNITY
New York, United States
Joined: December 04, 2010
KitMaker: 11,666 posts
AeroScale: 7,410 posts
Posted: Thursday, January 14, 2016 - 12:11 AM UTC

Quoted Text

Gawd, I've got a Superfortress to do in this scale!


Gary,
So when are you building the extension to the house?

Joel
Szmann
_VISITCOMMUNITY
Netherlands Antilles
Joined: September 02, 2014
KitMaker: 1,977 posts
AeroScale: 295 posts
Posted: Thursday, January 14, 2016 - 02:21 AM UTC
@Karl: Case closed. Revell / Monogram is wrong. Thank you.

@Joel: Indeed. If I'll ever build a Flying Fortress for myself, is going to be in 1/72 scale.

@Ernest: Thank you, Ernest. Huge she is. Fortunately I don't need to build a display base too (pfew!)

Thank you all for posting.

Cheers,
Gabriel
Redhand
#522
_VISITCOMMUNITY
New Jersey, United States
Joined: January 20, 2013
KitMaker: 1,460 posts
AeroScale: 1,443 posts
Posted: Thursday, January 14, 2016 - 06:08 PM UTC
Coming along nicely, Gabriel.
Szmann
_VISITCOMMUNITY
Netherlands Antilles
Joined: September 02, 2014
KitMaker: 1,977 posts
AeroScale: 295 posts
Posted: Sunday, January 24, 2016 - 01:50 AM UTC
Hello, Gents

Time for another update:

Engines painted with frames. There is some really nice small detail, like the ignition wires, that I couldn't paint as per instructions. There is the result:


There are two sets of decals for detailing the engine, but "EE" series are completely useless. I decided not to apply them:


Test fit with the cowlings - OK. I wonder what is the "natural" position with the engines stopped. Have the props enough weight to turn the crankshaft and to balance themselves with two blades down?


Some fitting issues on the nacelles. Based on this image, there seems to be just a little gap to be filled in. Actually, the two halves were pretty much offset laterally and it was a prominent "step," difficult to sand with all surrounding detail:
Those "steps" can be seen clearly on the box art...

The seam between the wing halves were reasonably small and easy to deal with; only the trailing edge on the right wing gave me a little trouble, nothing out of ordinary though:


I am bond to move now to the ball turret and interior detail painting; maybe I'll do the landing lights too...

Thank you for following,
Cheers! Gabriel
KPHB17FE
_VISITCOMMUNITY
Illinois, United States
Joined: January 12, 2015
KitMaker: 292 posts
AeroScale: 292 posts
Posted: Sunday, January 24, 2016 - 02:27 AM UTC
Looking good Gabriel! The props could end up any direction. The compression of the engine will not allow them to rotate freely after shutdown. They can be pulled through by hand, but trust me, it ain't easy !

The fit of the nacelles is one downfall of this kit but you have handled it well.

The bit at the top of each cylinder and the ring they attach to could be painted flat black. Those items sort of represent the baffling on the engine. And a wash of burnt umber oil paint would kind of bring out the detail a bit and give them a bit of a "used" look if you want. Keep going, you are well on your way.
Szmann
_VISITCOMMUNITY
Netherlands Antilles
Joined: September 02, 2014
KitMaker: 1,977 posts
AeroScale: 295 posts
Posted: Sunday, January 24, 2016 - 02:33 AM UTC
Excellent tips, Karl. Thank you.

Regarding the props: they are synchronized or not?

Thanks again,
Gabriel
KPHB17FE
_VISITCOMMUNITY
Illinois, United States
Joined: January 12, 2015
KitMaker: 292 posts
AeroScale: 292 posts
Posted: Sunday, January 24, 2016 - 02:41 AM UTC
Nope, the props would not be synchronized when they wound down. Put them any place you want. But they would only all end up the same if the ground crew were to take the time and effort to put them so.

And if you want to do a little detail with the landing lights that few people know about, in the LEFT side only was what was called a passing light. It was red and I have no idea how it was supposed to be used. But it was in B-17's through Serial Number 42-31845. "Chow Hound" was S/N 42-31367 so it would have had it. You won't see it on any flying restored airplanes because they are all much later. This photo is of the installation on the real "Memphis Belle":