Fw 190A-4 Siegfried Schnell - Hasegawa 1/48
Germany
Joined: September 07, 2005
KitMaker: 5,609 posts
AeroScale: 5,231 posts
Posted: Friday, September 09, 2016 - 02:18 AM UTC
Hello mates,
So here is another one started. Originally I wanted something more complex but the Bronco P-40 is annoying enough so something easy is fits the bill...
Here is what we have

Hasegawa Special Edition with markings for Joseof Priller and Siegfried Schnell. Decals by Cartograf! Eduard zoom (sadly for Tamiya but I'll make that fit), Eduard masks. Master barrels and Pitot and some Eduard wheels.
So it is more or less oob. I only have a week of vacation left ... hope that is enough but we will see. I have many of such projects.
Here is a bit of research on the camo
http://www.ipmsstockholm.org/magazine/2004/08/stuff_eng_profile_fw190a4.htmI am not fully sure, but I think this machine had cooling slots and not flaps (Hasegawa instructions call for flaps)
all the best
Steffen
DULCE ET DECORUM EST PRO HOBBY MORI
Germany
Joined: September 07, 2005
KitMaker: 5,609 posts
AeroScale: 5,231 posts
Posted: Friday, September 09, 2016 - 01:06 PM UTC
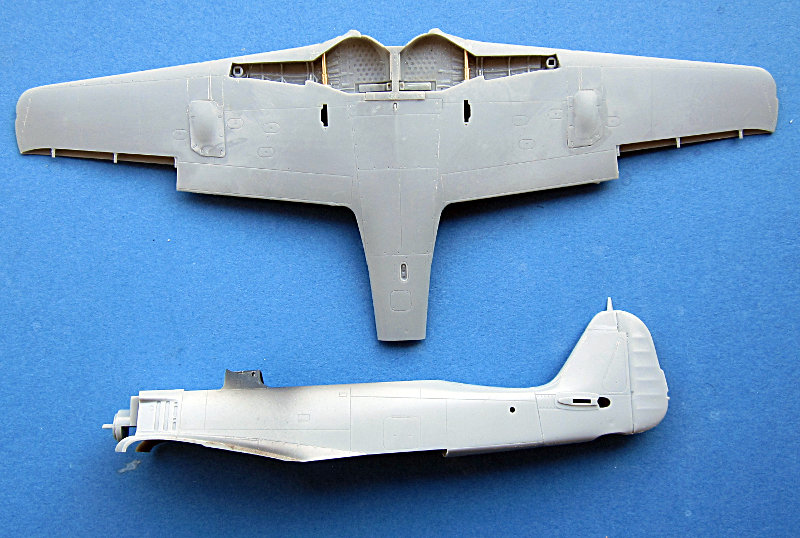
As I wanted a deviation from the P-40 I started with the wing ... the fit was much better than I had remembered. Even the loose ends fit perfectly to the upper wings. Of course teh proof comes when the cowling will be attached.
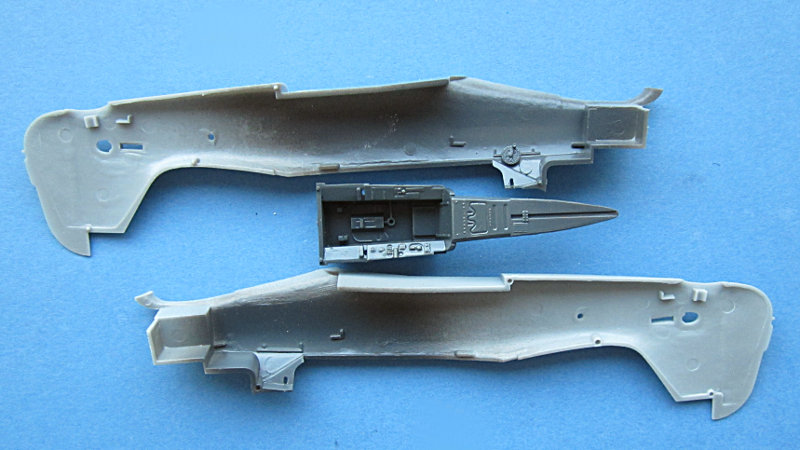
only the plastic gun mounts had to be shortened by the conical part. I will not replace this dust/dirt cover but just leave the gun barrel as is. Ah, and I drilled out the ammo chutes on part c22 which is mounted in the wheels bay.
all the best
Steffen
DULCE ET DECORUM EST PRO HOBBY MORI

#424
Queensland, Australia
Joined: April 23, 2015
KitMaker: 4,648 posts
AeroScale: 1,938 posts
Posted: Friday, September 09, 2016 - 02:06 PM UTC
Steffen,
Looking forward to this build.
Cheers!
Gaz
"Artillery adds dignity, to what would otherwise be an ugly brawl."
Frederick The Great
Germany
Joined: September 07, 2005
KitMaker: 5,609 posts
AeroScale: 5,231 posts
Posted: Friday, September 09, 2016 - 04:23 PM UTC
Again: thanks for joining the build, Gaz!
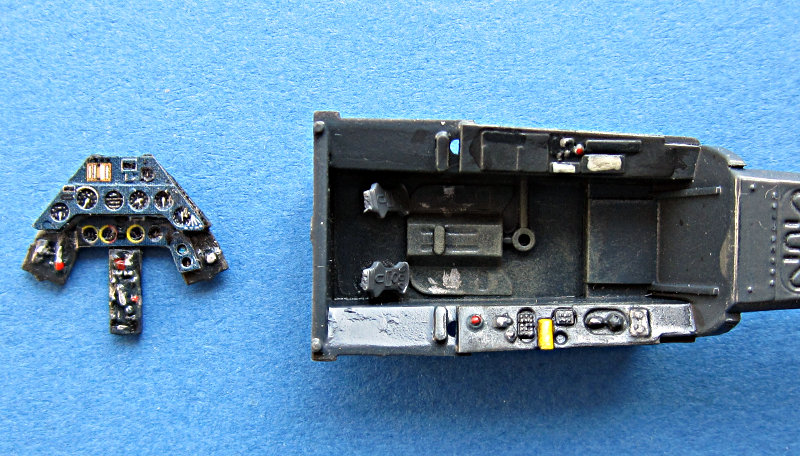
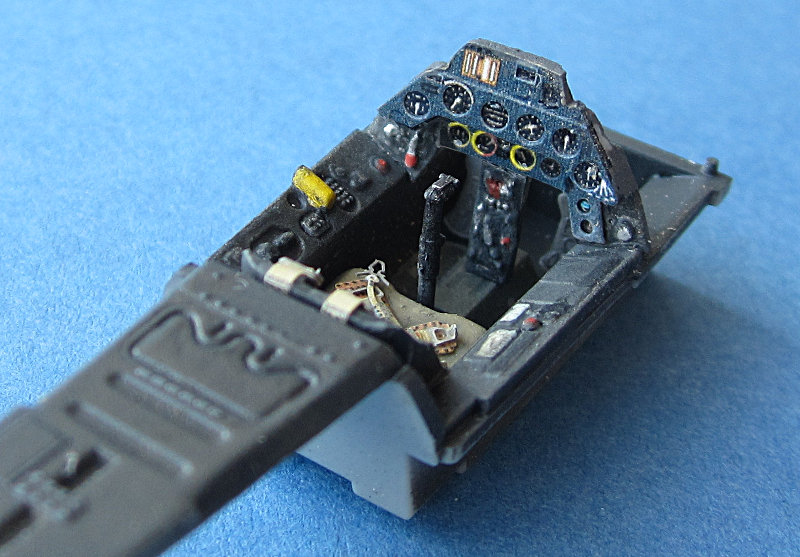
So next is the rather un pleasant work of building the cockpit. Using a set for a different kit does not make things easier, but I think I got it o.k. and you really cannot see much in this dark pit.
As Eduard used a rather dark RLM 66 on this set I used Jens Popp's RLM 66 which has no scale effect and thus is rather dark.
The IP had to be cut in two and the upper/front part sanded flat then the PE was attached (this one fit quite well. The rear/lower part is much bigger than the Hasegawa and had to be cut smaller. I also did not sand everything flat but kept a bit of the kit part which had to be painted. I then glued both parts together again. All in all I am o.k. with the look. (I did not used the PE rudder pedals as I think this is wasted time)...
all the best
Steffen
DULCE ET DECORUM EST PRO HOBBY MORI
Germany
Joined: September 07, 2005
KitMaker: 5,609 posts
AeroScale: 5,231 posts
Posted: Friday, September 09, 2016 - 06:10 PM UTC
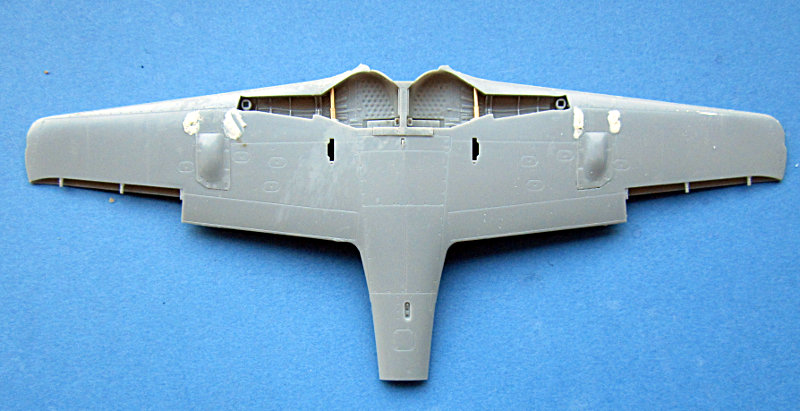
So with the cockpit on its way I have completed the fuselage. I have added the cooling slots and glued the halfs together. Then I have added the A-4 fin with the antenna mast. This part has slight sink maks and needs to be sanded smooth.
On the wings I have closed the panel lines. The filler was not sufficient so I also used CA glue to fill the faint gaps. The whole wing was then cleaned using Hiroboys "Key and Clean".
all the best
Steffen
DULCE ET DECORUM EST PRO HOBBY MORI
Joel_W
 Associate Editor
New York, United States
Joined: December 04, 2010
KitMaker: 11,666 posts
AeroScale: 7,410 posts
Posted: Friday, September 09, 2016 - 10:20 PM UTC
Steffen,
I haven't been on the site in just a day or so due to that nasty issue called work. So I'm having my morning cups of coffee and see yet the start to another excellent build by you. You've really have turned up the production quotas. The progress in one day's time is quite amazing.
Nice job on the IP and pit.
Joel
On my Workbench:
Monogram 1/24 scale 427 Shelby Cobra
Just Completed:
Beemax 1/24 scale BMW M3 E30 1992 Evolution II
Germany
Joined: September 07, 2005
KitMaker: 5,609 posts
AeroScale: 5,231 posts
Posted: Friday, September 09, 2016 - 11:01 PM UTC
Cheers Joel,
well it is actually two days here: I started on friday and today I have the main airframe together. I'll let it dry overnight. Also I got some motivation back which will hopefully pay off tomorrow on my AVG bird cockpit.
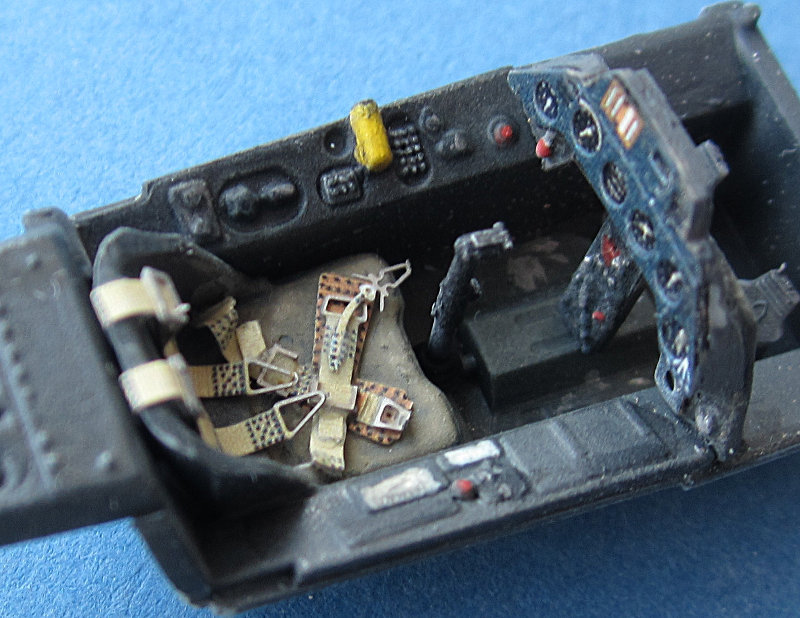
BTW Here are two pictures of the finished cockpit, not stellar, but o.k. for my taste
Furthermore I have another new project up the sleeve, but I first want to see how this one goes.
all the best
Steffen
DULCE ET DECORUM EST PRO HOBBY MORI
Merlin
Senior Editor #017
United Kingdom
Joined: June 11, 2003
KitMaker: 17,582 posts
AeroScale: 12,795 posts
Posted: Saturday, September 10, 2016 - 01:24 AM UTC
Hi Steffen
Nice start.

I wonder if a touch of very dilute clear yellow would kill the blue tinge of the Eduard pre-coloured parts? Worth a try, at least.
I'm the opposite to you when it comes to etched Luftwaffe rudder pedals - I reckon they add a lot to the look of a cockpit, and they're such an easy addition, I can't resist them.

All the best
Rowan
BEWARE OF THE FEW...
As I grow older, I regret to say that a detestable habit of thinking seems to be getting a hold of me. - H. Rider Haggard
Germany
Joined: September 07, 2005
KitMaker: 5,609 posts
AeroScale: 5,231 posts
Posted: Saturday, September 10, 2016 - 01:54 AM UTC
Cheers Rowan
Hmm: Blue + yellow = green ... not a good choice IMHO
The contrast is exaggerated in the picture and the stuff is buried deeeeeep inside the kit ... as are the rudder pedals. I doubt anyone can see the latter once the kit is finished, not speaking of telling if it is PE or plastic. But thats just my two cent ..
BTW how many models have you finished this year? Maybe focussing on other things than details not to be seen will help

I am sorry, you know I value your comments high, but I could not resist.
I agree with you on Bombers and other glass nose a/c, but German fighters are rather small and fit tightly around the pilot so it is just a waste of time and ressources (and the PE pedals only faintly represent the real thing)
all the best
Steffen
DULCE ET DECORUM EST PRO HOBBY MORI
Merlin
Senior Editor #017
United Kingdom
Joined: June 11, 2003
KitMaker: 17,582 posts
AeroScale: 12,795 posts
Posted: Saturday, September 10, 2016 - 02:55 AM UTC
Hi Steffen
Wow! Sorry I tried to help. What did I do to warrant that dig? If you knew what my girlfriend's been going through lately, perhaps you'd be a bit more considerate. Once she's well enough, I hope to have some time to spend at home modelling.
But look at a colour wheel. What's the opposite of blue? I'm talking 5 or 10% and it should work.
All the best
Rowan
BEWARE OF THE FEW...
As I grow older, I regret to say that a detestable habit of thinking seems to be getting a hold of me. - H. Rider Haggard
Joel_W
Associate Editor New York, United States
Joined: December 04, 2010
KitMaker: 11,666 posts
AeroScale: 7,410 posts
Posted: Saturday, September 10, 2016 - 04:55 AM UTC
I tend to agree with Steffen of no longer wasting time on details or detailing anything that can't be seen easily by the viewer. I went through so much of that with the PV-1 for virtually nothing.
As far as the Eduard color PE IPs, the ones I've used are usually a off black color. I'm wondering if the color shift has more to do with how Steffen's camera handled the WB of the light source.
Rowan, sorry to hear (read) of your significant others medical issues. Hope all is well in the near future. I've also been spending a lot of time for the last year taking my wife back and forth to doctors, hospitals, medical tests, etc. and she's still fighting just to stay where she is now. So believe me, I know how you feel at times. But modeling is for me a replacement to TV that lets me forget about reality for a little while.
Joel
On my Workbench:
Monogram 1/24 scale 427 Shelby Cobra
Just Completed:
Beemax 1/24 scale BMW M3 E30 1992 Evolution II
Germany
Joined: September 07, 2005
KitMaker: 5,609 posts
AeroScale: 5,231 posts
Posted: Saturday, September 10, 2016 - 12:10 PM UTC
Hi again,
@Rowan: PM sent, better handled off board.
colour: the difference is not that strong in real life. The surface of the printed paint is just a little rougher and has more light scatter thus standing out more in teh photographs. It is a bit more blueish though, but I still think blue and yellow will turn green.
detailing: this is really up to ones personal taste. I know people who just like to know it is there. I do not have fun in such things (in most cases) and thus try to focus on things that can be seen (and I make enough mistakes with these).
Personally modelling is rather therapeutic if/when I get into the "flow"... doing cockpits is not helpful.
all the best
Steffen
DULCE ET DECORUM EST PRO HOBBY MORI
Germany
Joined: September 07, 2005
KitMaker: 5,609 posts
AeroScale: 5,231 posts
Posted: Saturday, September 10, 2016 - 01:44 PM UTC
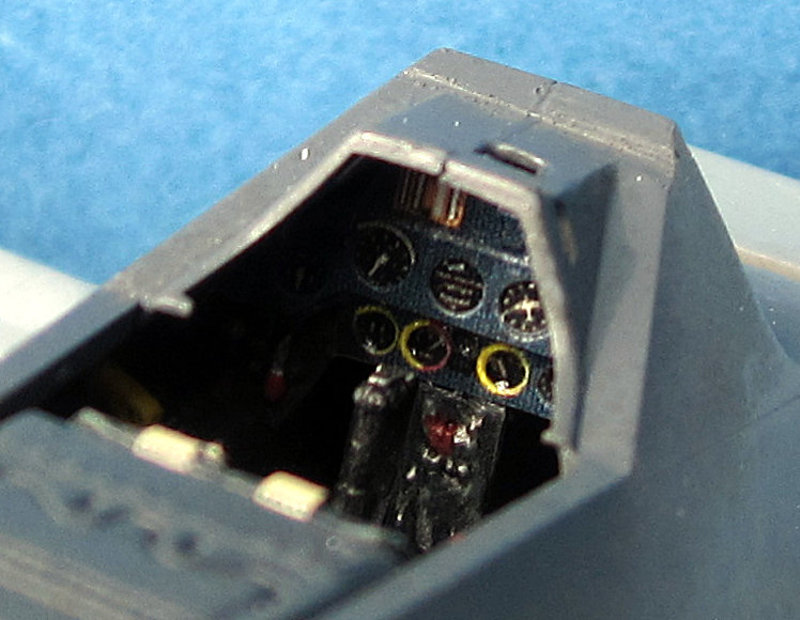
So here is a picture of the pit when teh fuselage is closed. Of course it is also an example of bad photography, but I just could not get it better.
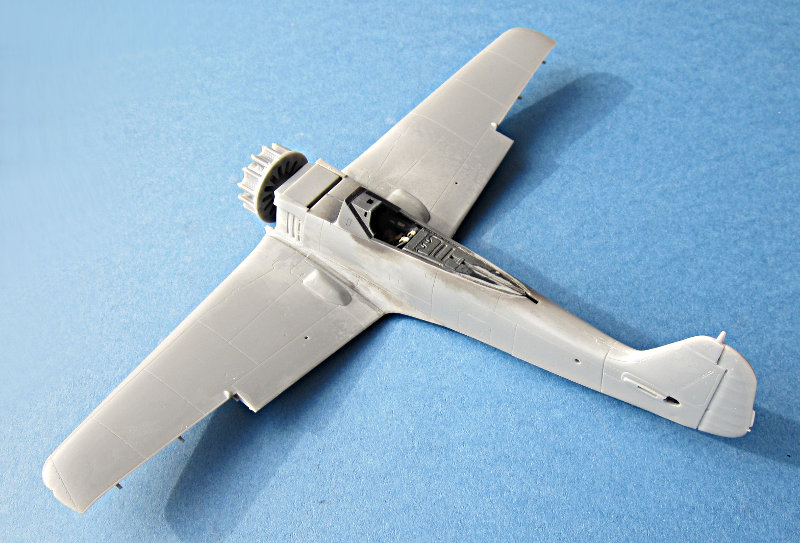
and here is the airframe as it looks now. The wingroot was filled with a bit of superglue and sanded. Maybe there is still a bit of rework necessary, which I will see after some primer.
all the best
Steffen
DULCE ET DECORUM EST PRO HOBBY MORI
Merlin
Senior Editor #017
United Kingdom
Joined: June 11, 2003
KitMaker: 17,582 posts
AeroScale: 12,795 posts
Posted: Saturday, September 10, 2016 - 03:49 PM UTC
Cheers Joel and Steffen
I'm afraid I'm over at my girlfriend's most of the time, so I don't have a chance to get to my workroom for some "proper" modelling. Working on a tea-tray on a couple of armour kits is OK, but I'm itching to get back to the aircraft kits that are sitting waiting for me.
All the best
Rowan
BEWARE OF THE FEW...
As I grow older, I regret to say that a detestable habit of thinking seems to be getting a hold of me. - H. Rider Haggard
Germany
Joined: September 07, 2005
KitMaker: 5,609 posts
AeroScale: 5,231 posts
Posted: Sunday, September 11, 2016 - 01:21 AM UTC
God speed, Rowan! Hope everything will get better soon!
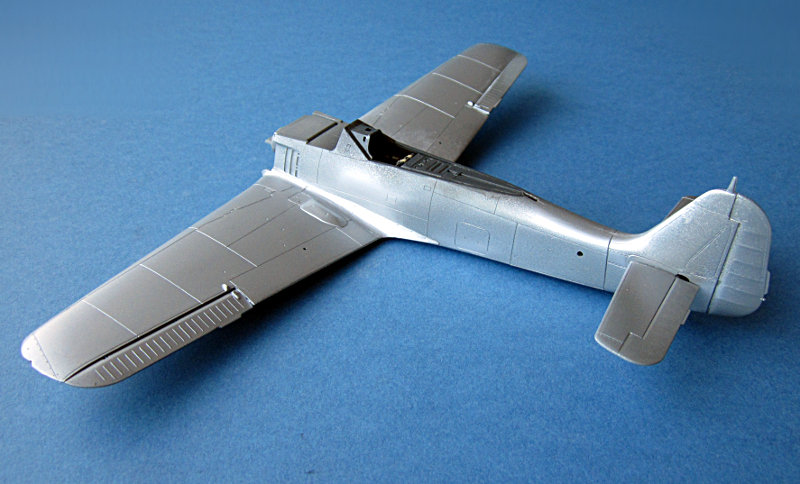
Progress is rather slim today. I worked on the wing to fuselage join, which turned out quite well. The silver paint is just applied to check for imperfections
I also did some stuff on the engine. But no additions here. When Eduard brings out their new Fw 190 A-3/4 I will probably build one with the Brassin engine/guns opened, but when everything is closed one gets just a faint idea what is behind the Lüfterrad .. and Hasegawa supplied sufficient stuff to make it look interesting.
all the best
Steffen
DULCE ET DECORUM EST PRO HOBBY MORI
Germany
Joined: September 07, 2005
KitMaker: 5,609 posts
AeroScale: 5,231 posts
Posted: Sunday, September 11, 2016 - 08:56 PM UTC
hi again,
no in progress shots to avoid discussions abou to few details

The engine is good enough as long as propeler and Lüfterrad stay on. I used both to center the engine insid the cowl. This was built up first (yesterday) and glued then to the airframe which makes things a little complicated in some places but avoids misaligning the bulges.
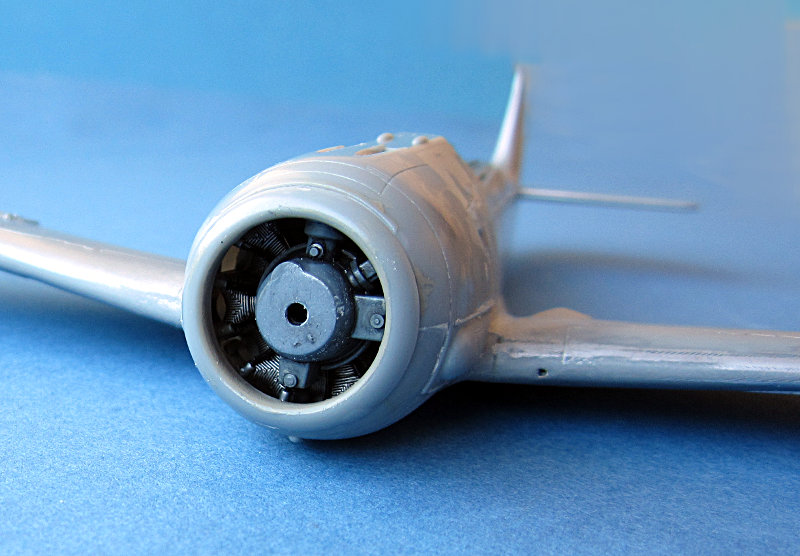
A bit of cleanup was required but nothing too seriuos. Tamiya is easier to handle though. Curious how Eduard will tackle this on the new kit...
Still need to apply another primer coat to check for blemishes. I'll probably take RLM 02...
all the best
Steffen
DULCE ET DECORUM EST PRO HOBBY MORI
Joel_W
Associate Editor New York, United States
Joined: December 04, 2010
KitMaker: 11,666 posts
AeroScale: 7,410 posts
Posted: Sunday, September 11, 2016 - 09:56 PM UTC
Progress for sure.
Just one question. The cowl ring at the very front of the cowl seems to be slightly larger then the rest of the cowl. Will you be truing it up to match the main section, or is it supposed to be that way?
Joel
On my Workbench:
Monogram 1/24 scale 427 Shelby Cobra
Just Completed:
Beemax 1/24 scale BMW M3 E30 1992 Evolution II
Germany
Joined: September 07, 2005
KitMaker: 5,609 posts
AeroScale: 5,231 posts
Posted: Sunday, September 11, 2016 - 10:30 PM UTC
Hi Joel,
it must be there. That is the "Panzerring" which means armour ring and protects the engine. It is even larger on later variants.
The step between the enging and the weapons bay should not be there, but I'll leave that(probably) as it is
1. exeggarated by the shadow
2. the cowling is engine mounted and there could be a slight step on the real thing
3. very hard to fix
have to work tomorrow, so no progress then.
all the best
Steffen
DULCE ET DECORUM EST PRO HOBBY MORI
Joel_W
Associate Editor New York, United States
Joined: December 04, 2010
KitMaker: 11,666 posts
AeroScale: 7,410 posts
Posted: Monday, September 12, 2016 - 01:32 AM UTC
Quoted Text
Hi Joel,
it must be there. That is the "Panzerring" which means armour ring and protects the engine. It is even larger on later variants.
The step between the enging and the weapons bay should not be there, but I'll leave that(probably) as it is
1. exeggarated by the shadow
2. the cowling is engine mounted and there could be a slight step on the real thing
3. very hard to fix
have to work tomorrow, so no progress then.
all the best
Steffen
Steffen,
Thank you for that explanation.
Joel
On my Workbench:
Monogram 1/24 scale 427 Shelby Cobra
Just Completed:
Beemax 1/24 scale BMW M3 E30 1992 Evolution II
Germany
Joined: September 07, 2005
KitMaker: 5,609 posts
AeroScale: 5,231 posts
Posted: Wednesday, September 14, 2016 - 01:15 PM UTC
Hi again
over the past days I worked a bit more on the cockpit to close it for the coming paint sessions. I added the Revi and painted the cushion leather. The wind shield was dipped in clear as it had a few marks and was added. When dry I applied teh masks. The head armour was not added yet so the sliding hood was just washed and mounted with Maskol. Again when the Maskol had set the Canopy was masked with Eduards set.... I am a big fan of these masks and will always spend some before I cut them myself.
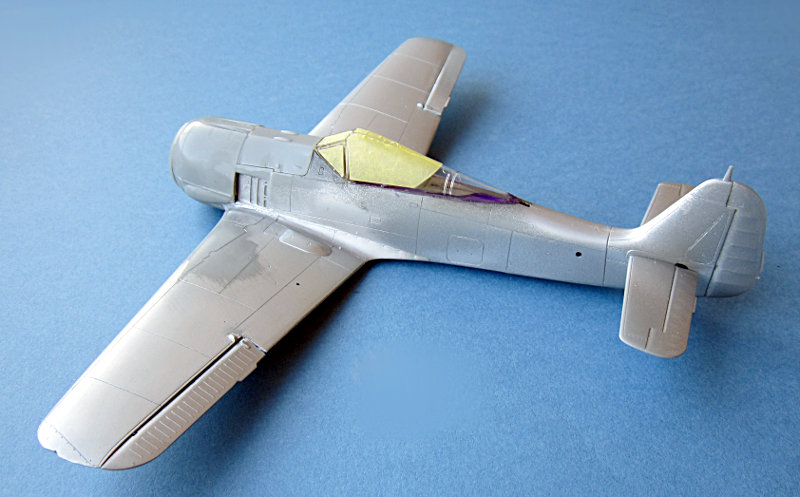
Now follows some paint. RLM 66 for the canopy and RLM 02 for the wheel bay/ nose. I will have to work the latter again as i already see a blemish.
All the best
Steffen
(P.S. it is very warm in Germany these days so working on model kits is not as nice as sitting just there enjoing the fan working... )
DULCE ET DECORUM EST PRO HOBBY MORI
Joel_W
Associate Editor New York, United States
Joined: December 04, 2010
KitMaker: 11,666 posts
AeroScale: 7,410 posts
Posted: Wednesday, September 14, 2016 - 07:40 PM UTC
Steffen,
Like you, if Eduard has a mask set for the model I'm building, I most certainly will buy it. They always fit perfectly, and do a much better job of conforming to the various angles that one often finds on the canopy frame.
Joel
On my Workbench:
Monogram 1/24 scale 427 Shelby Cobra
Just Completed:
Beemax 1/24 scale BMW M3 E30 1992 Evolution II
New Jersey, United States
Joined: June 02, 2006
KitMaker: 1,212 posts
AeroScale: 468 posts
Posted: Wednesday, September 14, 2016 - 08:58 PM UTC
Glad I am able to jump in on this one before it was completely done.
Looks great
Berlin, Germany
Joined: October 12, 2008
KitMaker: 709 posts
AeroScale: 651 posts
Posted: Wednesday, September 14, 2016 - 09:30 PM UTC
Quoted Text
Hi Joel,
it must be there. That is the "Panzerring" which means armour ring and protects the engine. It is even larger on later variants.
...
It's not any armour-protection for the engine. The "Panzerring" or "Nasenspaltring" ("armoured ring" or "nose-gap-cowlring")is a part of the special oil cooling system to control the temperature.
The ring was able to move some centimeters up/down/around and foreward to leave out the hot air in the cowling. So in fact it was not larger but by moving around it can happen that it shows outside the cowling on one side.
Thomas

Sometimes you need to distance yourself to see things clearly - Lao Tzu -
... in scale and in real life -T.
Germany
Joined: September 07, 2005
KitMaker: 5,609 posts
AeroScale: 5,231 posts
Posted: Wednesday, September 14, 2016 - 09:47 PM UTC
Hi Thomas,
Thanks for the additional explanation! But, at least for the later variants it is an armoured ring. I have just seen the one on the Fw 190A in Gatow and this was no funny gadget but heavy...
Marc & Joel: thanks for your kind comments!
all the best
Steffen
DULCE ET DECORUM EST PRO HOBBY MORI
Germany
Joined: September 07, 2005
KitMaker: 5,609 posts
AeroScale: 5,231 posts
Posted: Tuesday, September 20, 2016 - 09:19 PM UTC
Hello again,
despite my problematic P-40B project I was not idle on this one. I sprayed lower cowl and rudder first white then yellow. As this was glossy paint I let it dry for a few days.
Then the areas were masked and the model got the first camo colour RLM 76. When this was dry I started with the top camo and RLM 75.
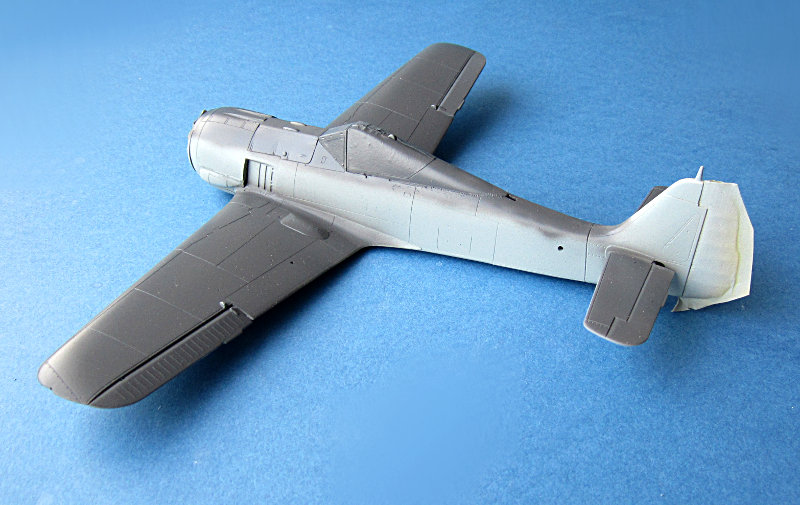
Surely not much but at least some progress.
All the best
Steffen
DULCE ET DECORUM EST PRO HOBBY MORI


