Fw 190A-4 Siegfried Schnell - Hasegawa 1/48
Germany
Joined: September 07, 2005
KitMaker: 5,609 posts
AeroScale: 5,231 posts
Posted: Monday, October 17, 2016 - 02:30 AM UTC
Hi again,
just to show that I am still building model kits:
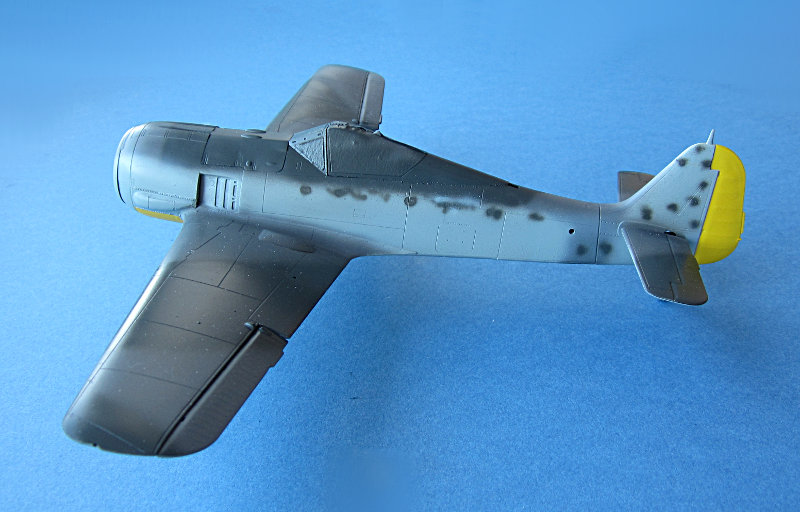

basic paint job is done next is a Klear layer and then decals, progress is slow but I am happy with every bit distracting from the annoying P-40 build. (also started a new one .. it's a disease. You can guess if you want but probably won't find out)
all the best
Steffen
DULCE ET DECORUM EST PRO HOBBY MORI
Germany
Joined: September 07, 2005
KitMaker: 5,609 posts
AeroScale: 5,231 posts
Posted: Tuesday, October 18, 2016 - 12:59 AM UTC
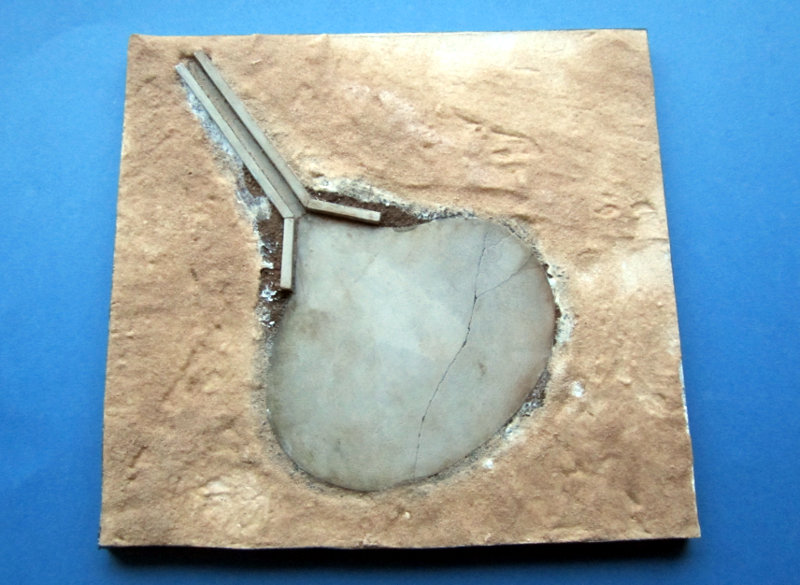
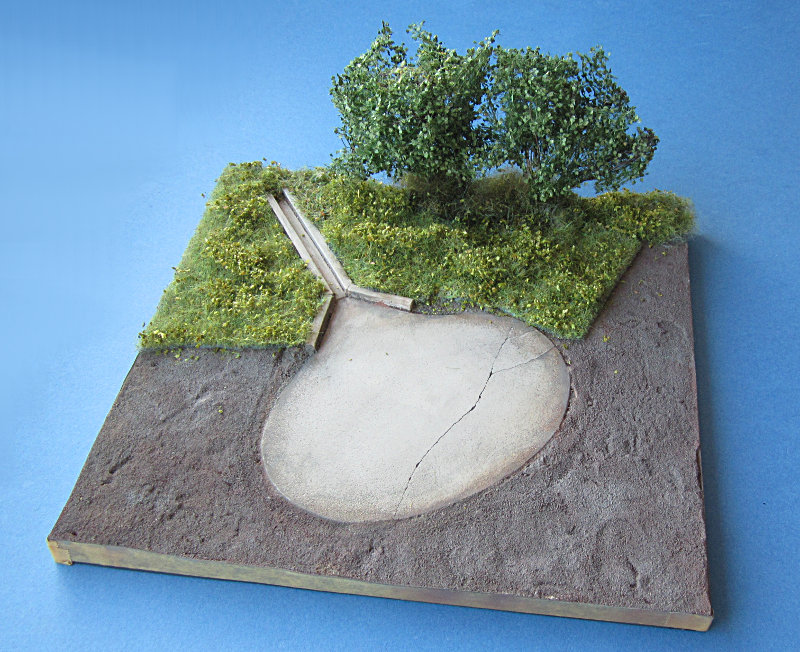
I also started to build a small base for the kit.
Key part is the JG 2 ground plate from Mark58. This has about a cm soil all around but i found that a bit too small. I cut out the shape from 5mm Tamiya foam board and glued the the concrete plate and the foam board to a thin MDF-like board. The I ironed som edge band all around.
I used Deluxe Materials create & shape to fill the gaps and crate some structure. (my example went bad over the time, but I could make it work with some water) on top I sprinkled some sand. When everythin was dry I added some more sand and Ballast Magic (again from Deluxe) ... this is pretty cool stuff! I spayed on some water and let it dry ... et voila:
More to come when grass and bushes arrive...
all the best
Steffen
DULCE ET DECORUM EST PRO HOBBY MORI
Australia
Joined: October 15, 2016
KitMaker: 62 posts
AeroScale: 36 posts
Posted: Tuesday, October 18, 2016 - 04:38 PM UTC
Thanks for posting your progress and providing supporting info Steffen. High calibre modelling so far. Looking forward to seeing the final product
Simon
Germany
Joined: September 07, 2005
KitMaker: 5,609 posts
AeroScale: 5,231 posts
Posted: Tuesday, October 18, 2016 - 09:56 PM UTC
Thank you Simon!
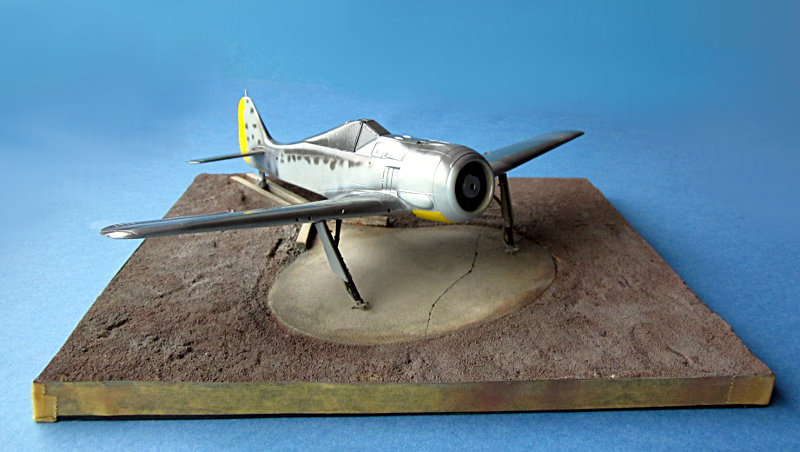
Not much progress but I airbrushed the model with Klear and while I had the thing working I also gave the base an earthy colour.
Today arrived the stuff for the environment, but I am not totally happy with it. It will probably take the whole weekend to figure out a nice setup and I will try out the electro tool for grass application that a friend built for me.
all the best
Steffen
DULCE ET DECORUM EST PRO HOBBY MORI
New Jersey, United States
Joined: June 02, 2006
KitMaker: 1,212 posts
AeroScale: 468 posts
Posted: Tuesday, October 18, 2016 - 10:30 PM UTC
Interesting base. looking good all around.
Merlin
 Senior Editor
#017
United Kingdom
Joined: June 11, 2003
KitMaker: 17,582 posts
AeroScale: 12,795 posts
Posted: Friday, October 21, 2016 - 01:46 AM UTC
Hi Steffen
Nice work on the Würger and the base.

Your mention of Mk58 makes me realise that I've still got some of their excellent bases that Jean-Luc kindly sent me, still packed in the boxes I brought down to the Island from London seven years ago! I can't believe how time has flown by...
I'm keen to see how your electric gizmo works with the grass. That sounds like a potential Feature topic, because I'm sure we have many readers who could learn a lot from it.

All the best
Rowan
BEWARE OF THE FEW...
As I grow older, I regret to say that a detestable habit of thinking seems to be getting a hold of me. - H. Rider Haggard
Germany
Joined: September 07, 2005
KitMaker: 5,609 posts
AeroScale: 5,231 posts
Posted: Saturday, October 22, 2016 - 02:05 PM UTC
Hi Rowan,
nice try! But honestly I am lacking the time to write extensive reports .. even for my site I have a huge backlog of things to review and build articles to write.
Yesterday I started to apply the decals. Not much to tell about it. I night have gotten one or another angle wrong, but it looks o.k. so far.
all the best
Steffen
DULCE ET DECORUM EST PRO HOBBY MORI
Merlin
Senior Editor #017
United Kingdom
Joined: June 11, 2003
KitMaker: 17,582 posts
AeroScale: 12,795 posts
Posted: Saturday, October 22, 2016 - 03:20 PM UTC
Hi Steffen
So long as the pics are clear, it could be almost self-explanatory as a step by step guide.

All the best
Rowan
BEWARE OF THE FEW...
As I grow older, I regret to say that a detestable habit of thinking seems to be getting a hold of me. - H. Rider Haggard
Germany
Joined: September 07, 2005
KitMaker: 5,609 posts
AeroScale: 5,231 posts
Posted: Saturday, October 22, 2016 - 06:29 PM UTC
Hmm,
there is really not much to show. I started with two bushes from Silhouette and glued them where I found them appropriate. around the trunks I applied some "Wildgras" from Heki. Then I cout out some pieces of Model Scene "low bushes summer". I removed some of the fleece and glued it to the base with white glue. No big deal so far.
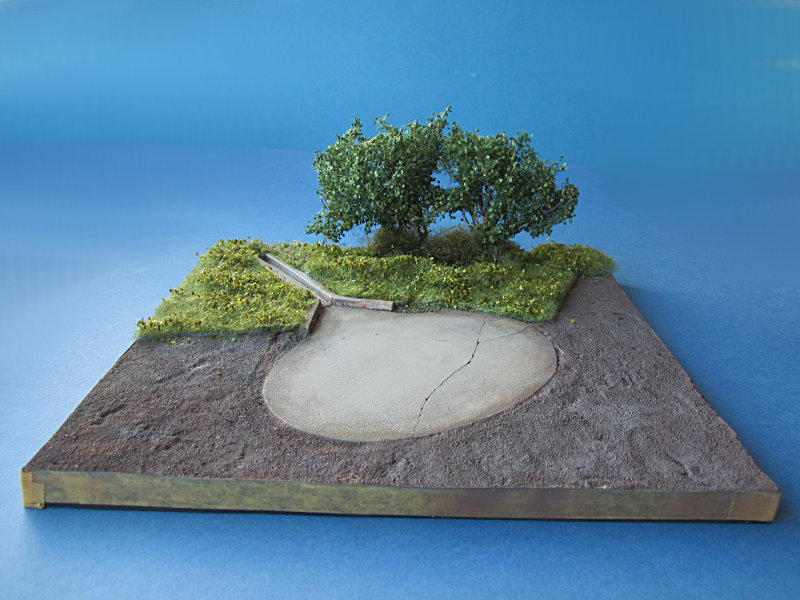
The foreground will get low grass with some spaces uncovered. A challenge will be the transition from this low grass to the high grass area, but as this is no rocket science it will work out one way or another.
all the best
Steffen
DULCE ET DECORUM EST PRO HOBBY MORI
Merlin
Senior Editor #017
United Kingdom
Joined: June 11, 2003
KitMaker: 17,582 posts
AeroScale: 12,795 posts
Posted: Saturday, October 22, 2016 - 07:59 PM UTC
Hi again Steffen
That looks really good.
All the best
Rowan
BEWARE OF THE FEW...
As I grow older, I regret to say that a detestable habit of thinking seems to be getting a hold of me. - H. Rider Haggard
Germany
Joined: September 07, 2005
KitMaker: 5,609 posts
AeroScale: 5,231 posts
Posted: Sunday, October 23, 2016 - 09:47 PM UTC
Hi again.
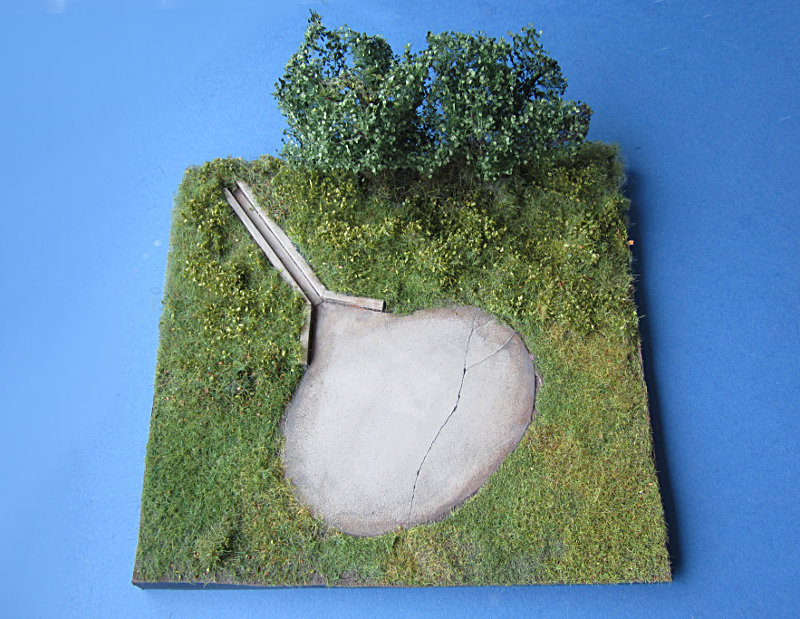
yesterday I procedded with the grass. It did not work out perfectly which is probably a problem with teh consistency or layer thickness of teh white glue, but I think it looks o.k. and i will not do much more on the base. Initially I wanted to adde a tree right of the bushes to show this is an apron at a border of a wood but I think the tree would reach too far out of the base.
all the best
Steffen
DULCE ET DECORUM EST PRO HOBBY MORI
Joel_W
Associate Editor New York, United States
Joined: December 04, 2010
KitMaker: 11,666 posts
AeroScale: 7,410 posts
Posted: Sunday, October 23, 2016 - 10:54 PM UTC
Steffen,
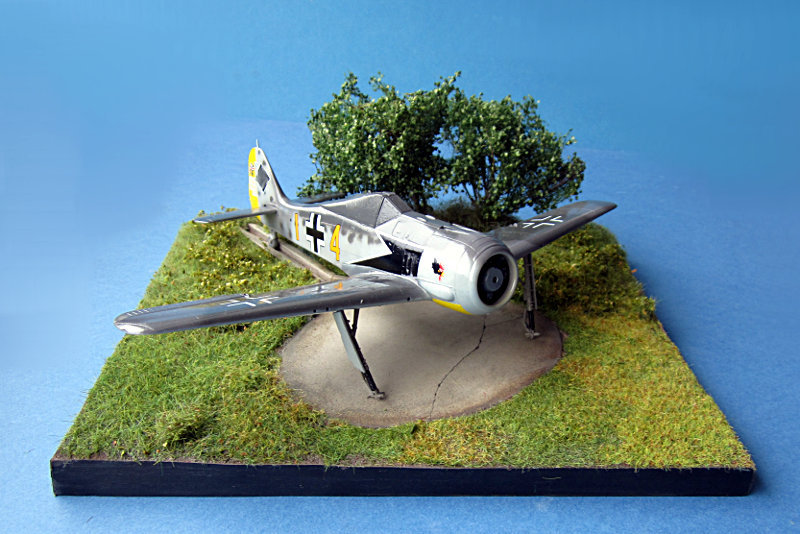
Nice progress on both the vignette and the Fw 190A-4. Just an observation from looking at the scene as it stands now. What struck me as being a little odd is that the aircraft moved back and forth, but there are no tire tracks in the grass, nor is the grass matted down further then the surrounding grass areas.
Joel
On my Workbench:
Monogram 1/24 scale 427 Shelby Cobra
Just Completed:
Beemax 1/24 scale BMW M3 E30 1992 Evolution II
Germany
Joined: September 07, 2005
KitMaker: 5,609 posts
AeroScale: 5,231 posts
Posted: Sunday, October 23, 2016 - 11:06 PM UTC
Hi Joel,
The grass is brown in that area .. maybe not that visible in the pix... and as it is rather lawn than grass that should be sufficient. This is just a camouflaged parking lot (so to say) and no maintenance area. Timeframe around late spring early summer...
I tried to find an online version of the pic I used as a guide but no luck so far
all the best
Steffen
DULCE ET DECORUM EST PRO HOBBY MORI
European Union
Joined: August 09, 2009
KitMaker: 1,732 posts
AeroScale: 1,336 posts
Posted: Monday, October 24, 2016 - 12:10 AM UTC
Steffen, a nice vignette for a small aircraft like the Fw 190. I like it.
I have about 20 bases from Mark58 but not this one. Too bad, that he doesn't produce them anymore. Or maybe it's better - otherwise I would have around 50 then ....

Torsten

My campaigns for 2020:
MiGs - Done !
The Big Three - Done !
65 years Bundeswehr - Done !
40 years Leopard 2 - Done !
Land Lease - Done !
United Kingdom
Joined: August 19, 2013
KitMaker: 29 posts
AeroScale: 23 posts
Posted: Tuesday, November 01, 2016 - 11:20 PM UTC
Looks realy good to me on that base, a great way to display your 190

Germany
Joined: September 07, 2005
KitMaker: 5,609 posts
AeroScale: 5,231 posts
Posted: Wednesday, November 02, 2016 - 02:46 AM UTC
Thank you Torsten and Simon,
I am pretty happy with my base and won't change much on it. Maybe adding a starter cart.
I am struggeling my way through the stencils on the kit and I need to find some other markings for the tally. I tried to position them as much up as possible but it still sits to low. I have a 2nd Hasegawa kit but I will probably try my luck with something else.
all the best
Steffen
DULCE ET DECORUM EST PRO HOBBY MORI
Germany
Joined: September 07, 2005
KitMaker: 5,609 posts
AeroScale: 5,231 posts
Posted: Thursday, November 03, 2016 - 09:12 PM UTC
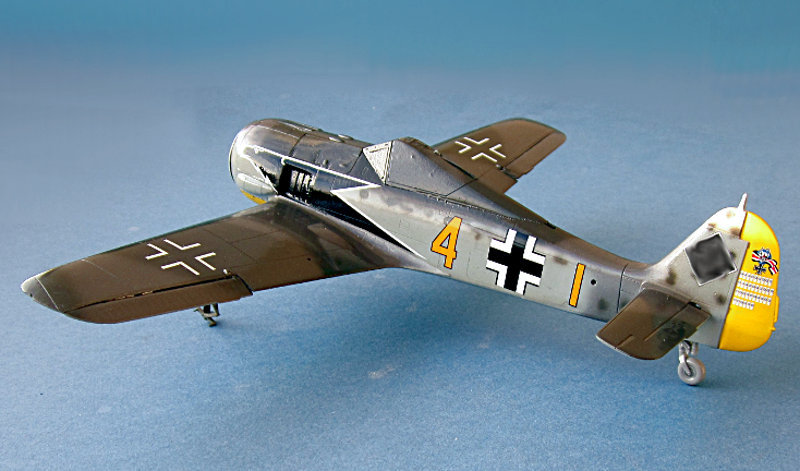
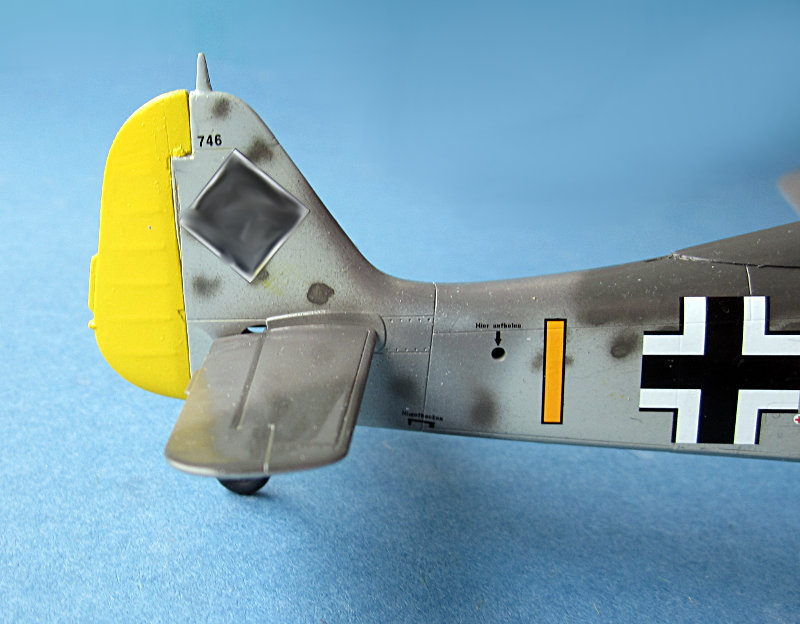
So here is the current state.
Today I cut off the rudder and stripped it from paint and decal. Then I resprayed it white and yellow and attached it again. There is some minor damage, but I think it will not be that visible. I also aded the Brassin wheels and the u/c doors plus some touch ups with paint:

all the best
Steffen
DULCE ET DECORUM EST PRO HOBBY MORI
Merlin
Senior Editor #017
United Kingdom
Joined: June 11, 2003
KitMaker: 17,582 posts
AeroScale: 12,795 posts
Posted: Friday, November 04, 2016 - 02:41 AM UTC
Hi Steffen
That's a harsh call refinishing the rudder, but full credit for doing so in the interests of accuracy. 99% of people probably wouldn't have noticed, but you'd have known and it would have bugged you - and it's ourselves we build for at the end of the day.
All the best
Rowan
BEWARE OF THE FEW...
As I grow older, I regret to say that a detestable habit of thinking seems to be getting a hold of me. - H. Rider Haggard
Germany
Joined: September 07, 2005
KitMaker: 5,609 posts
AeroScale: 5,231 posts
Posted: Saturday, November 05, 2016 - 02:21 PM UTC
Thank's for watching Rowan!
Well, some things bother myself more than others and I already had a bad feeling when I attached the sticker and could not get it farther up (instructions advised this low position too). So after checking pix and thinking back and forth I thought it would be easier to cut off the rudder than to try to remove the paint in situ.
This worked out well so far though I have a small cut on the rhs.
Next is to apply the Lifelike decal ... these guys normally get many things correct.
all the best
Steffen
DULCE ET DECORUM EST PRO HOBBY MORI
Berlin, Germany
Joined: October 12, 2008
KitMaker: 709 posts
AeroScale: 651 posts
Posted: Saturday, November 05, 2016 - 03:20 PM UTC
So much work and leaving a well noticable cut only for correcting a decal's position? OK, ambitious.
Why didn't you try simultaneously to match the yellow color with the decal's register? Not sure if the real a/c showing this difference by using RLM 04 all the way?
Thomas
Sometimes you need to distance yourself to see things clearly - Lao Tzu -
... in scale and in real life -T.
Germany
Joined: September 07, 2005
KitMaker: 5,609 posts
AeroScale: 5,231 posts
Posted: Saturday, November 05, 2016 - 03:32 PM UTC
Hi Thomas,
not sure I really understand your point .. shoot me a PM in German for better understanding.
The colour difference between code and rudder is intentional because to my eye the codes look slightly darker on the pictures than the rudder...
all the best
Steffen
DULCE ET DECORUM EST PRO HOBBY MORI
Joel_W
Associate Editor New York, United States
Joined: December 04, 2010
KitMaker: 11,666 posts
AeroScale: 7,410 posts
Posted: Tuesday, November 08, 2016 - 04:05 AM UTC
Steffen,
That's a lot of work just to correct a decal position. But I shouldn't talk, as I did the same exact thing with the tail codes on my B-25B. I removed both vertical tails, striped them, repainted them, then redid the numbers by cutting up the decals to one number at a time.
It bothered me that much, so I went that route too. Looking forward to your finished corrected pictures.
Joel
On my Workbench:
Monogram 1/24 scale 427 Shelby Cobra
Just Completed:
Beemax 1/24 scale BMW M3 E30 1992 Evolution II
Germany
Joined: September 07, 2005
KitMaker: 5,609 posts
AeroScale: 5,231 posts
Posted: Tuesday, November 08, 2016 - 04:20 PM UTC
Hi again,
well, Thomas did not write back so I am not sure what really was/is his concern. Of course I will not leave the cut as is. Actually I have already touched it up, still on very close inspection one can see a small defect. OTOH I could see the wrongly placed decal from 3m away so redoing it is the far better option for me.
Joel, it actually was not that much work. I am still struggling my way through the stencils, never liked it but it has to be done .. still hope I can finish it for Telford (starting my trip tomorrow evening).
all the best
Steffen
DULCE ET DECORUM EST PRO HOBBY MORI
Berlin, Germany
Joined: October 12, 2008
KitMaker: 709 posts
AeroScale: 651 posts
Posted: Tuesday, November 08, 2016 - 07:08 PM UTC
Quoted Text
Steffen,
That's a lot of work just to correct a decal position.
... well, Thomas did not write back
Sorry Steffen, my bad. I forgot

Joel pointed out what I meant and the matter with the color was explained by yourself.
Have a nice trip, Thomas
Sometimes you need to distance yourself to see things clearly - Lao Tzu -
... in scale and in real life -T.
Germany
Joined: September 07, 2005
KitMaker: 5,609 posts
AeroScale: 5,231 posts
Posted: Wednesday, November 09, 2016 - 02:52 AM UTC
Cheers Thomas,
what "a lot of work" is really is in the eye of the beholder.
The cuts were done in a couple of minutes and removing the paint was easy with Revells new Airbrush cleaner for acrylic paints. Respraying took 5 minutes plus drying time, seconds to glue it back on with CA (yes i noticed the spot and removed it after the pic was taken) and the new decals were on in seconds...
all in all maybe half an hour (plus drying time) no big deal .. doing a cockpit takes me days and weeks just to find the motivation.
All decals are on now and the thing got a good layer of Klear. I'll let it dry over night just to be sure the Klear has fully cured before the sludge wash. It is too dark to take a proper picture so I will do that tomorrow.
all the best
Steffen
DULCE ET DECORUM EST PRO HOBBY MORI


