England - South West, United Kingdom
Joined: January 06, 2007
KitMaker: 3,661 posts
AeroScale: 369 posts
Posted: Wednesday, November 23, 2016 - 02:57 AM UTC
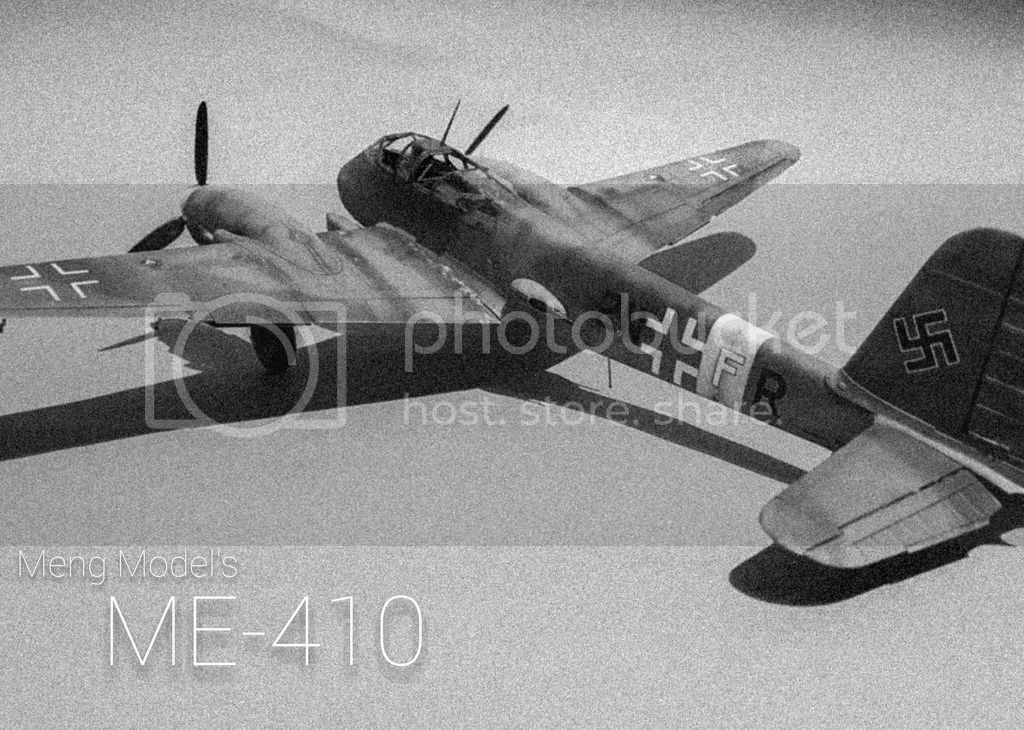
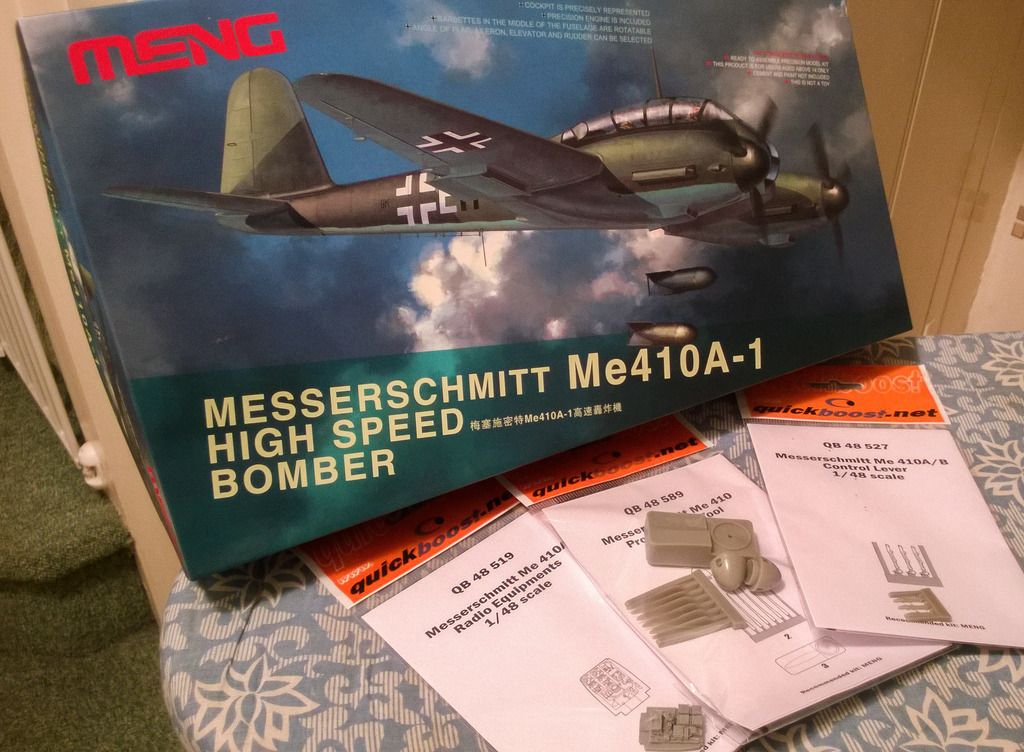
Next up.. Meng Me410 with a few quickboost goodies. I will be starting this up properly over the next few days.
Support Our Troops! Hit the Yes button If you find reviews or features helpful.
Alberta, Canada
Joined: January 19, 2008
KitMaker: 6,743 posts
AeroScale: 6,151 posts
Posted: Wednesday, November 23, 2016 - 05:45 AM UTC
Will follow along on this build James , have this in the stash as well . It's a beautiful kit . Are you going to replace the rads ?
Terri
Joel_W
 Associate Editor
New York, United States
Joined: December 04, 2010
KitMaker: 11,666 posts
AeroScale: 7,410 posts
Posted: Wednesday, November 23, 2016 - 06:28 AM UTC
James,
Have only heard great things about this kit. Like Terri, ,I'll be following right along.
Joel
On my Workbench:
Monogram 1/24 scale 427 Shelby Cobra
Just Completed:
Beemax 1/24 scale BMW M3 E30 1992 Evolution II
Ontario, Canada
Joined: July 06, 2014
KitMaker: 63 posts
AeroScale: 10 posts
Posted: Wednesday, November 23, 2016 - 11:04 AM UTC
I'd like to know how it compares to the Pro Modeler 410- which is an excellent kit...
AussieReg
Associate Editor 
#007
Victoria, Australia
Joined: June 09, 2009
KitMaker: 8,156 posts
AeroScale: 3,756 posts
Posted: Wednesday, November 23, 2016 - 11:25 AM UTC
I'm on board for this one, love the heavy twin fighter-bombers!
Best of luck with the build.
Cheers, D
ON the bench
Revell 1/24 '53 Corvette (building as '54)
Revell 1/24 BMW 507 Coupe and Cabrio
Italeri 1/48 Me262 B-1a/U1 Nightfighter
Monogram 1/24 '57 Chevy Nomad
Dragon 1/350 USS Frank Knox DD-742
Noord-Holland, Netherlands
Joined: January 28, 2007
KitMaker: 1,945 posts
AeroScale: 388 posts
Posted: Wednesday, November 23, 2016 - 03:12 PM UTC
Wow! Looks really nice! I add myself to the crowed of followers!

Jelger
On the workbench:
- Tamiya P-47D 1/48
- Eduard Mig21 1/144
New Jersey, United States
Joined: February 06, 2015
KitMaker: 1,098 posts
AeroScale: 900 posts
Posted: Wednesday, November 23, 2016 - 03:31 PM UTC
I'll be peeking about as well - count me in !
Richard
Germany
Joined: September 07, 2005
KitMaker: 5,609 posts
AeroScale: 5,231 posts
Posted: Wednesday, November 23, 2016 - 05:36 PM UTC
Nice one James!
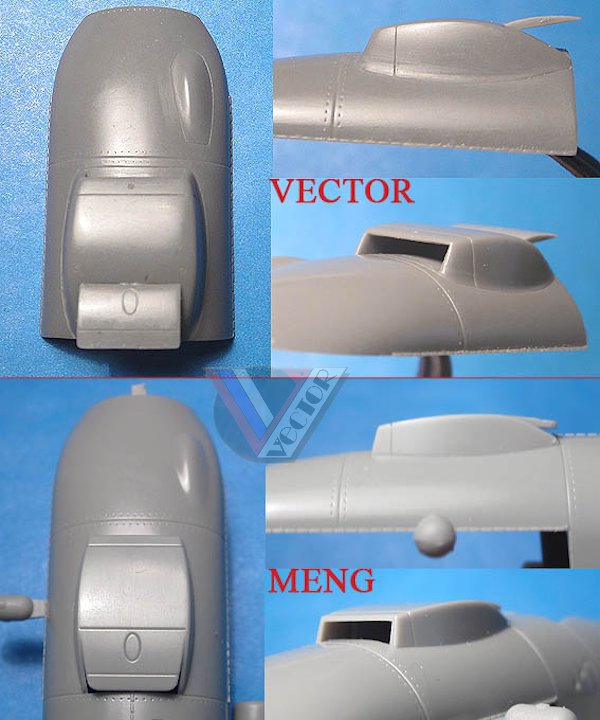
You should consider Sergey's Vector VDS 48070 cowl correction set....
all the best
Steffen
DULCE ET DECORUM EST PRO HOBBY MORI
England - South West, United Kingdom
Joined: January 06, 2007
KitMaker: 3,661 posts
AeroScale: 369 posts
Posted: Thursday, November 24, 2016 - 04:30 AM UTC
Thanks guys for stopping in !. Steffen, I'd love to use the cooler set but I don't think I can justify spending that on the kit spent enough already !
Edit.. I may try and modify it myself !
Support Our Troops! Hit the Yes button If you find reviews or features helpful.
Alberta, Canada
Joined: January 19, 2008
KitMaker: 6,743 posts
AeroScale: 6,151 posts
Posted: Thursday, November 24, 2016 - 05:58 AM UTC
I understand where you are coming from on justifying the extra add cost on a price kit already . I'm also surprised that for a pretty good detail kit , it doesn't have any instrument decals . I picked up airscales German instruments dials . Another than that , I'm not going to stress myself over the corrections on the kit(s). Sometimes it's just fun to build something out of the box .I'm looking forward on seeing what you do if you decide on doing the mods yourself .
Terri
Joel_W
Associate Editor New York, United States
Joined: December 04, 2010
KitMaker: 11,666 posts
AeroScale: 7,410 posts
Posted: Thursday, November 24, 2016 - 06:26 AM UTC
James,
Lately, I've been spending way more on AM parts then I care to admit. About half are worth it, while the other half isn't any better then the kit parts, or I could have done equal or better. Like you, I'm trying to really limit the use of AM moving forward.
With that being said, the differences Between the Vector cowl and the Ming cowl really is quite apparent, and the work involved to do the correction looks to be quite extensive.
Joel
On my Workbench:
Monogram 1/24 scale 427 Shelby Cobra
Just Completed:
Beemax 1/24 scale BMW M3 E30 1992 Evolution II
England - South West, United Kingdom
Joined: January 06, 2007
KitMaker: 3,661 posts
AeroScale: 369 posts
Posted: Thursday, November 24, 2016 - 03:12 PM UTC
if it comes down to it i will probably make sure the back is squared and add a bit more bulk on the sides. nothing major, this is the first time i have spent more than £15 on a kit since getting back into it and I don't want to fritter my £££ away! I'm hoping to make a start on the office later.
Support Our Troops! Hit the Yes button If you find reviews or features helpful.
England - South West, United Kingdom
Joined: January 06, 2007
KitMaker: 3,661 posts
AeroScale: 369 posts
Posted: Friday, November 25, 2016 - 05:41 AM UTC
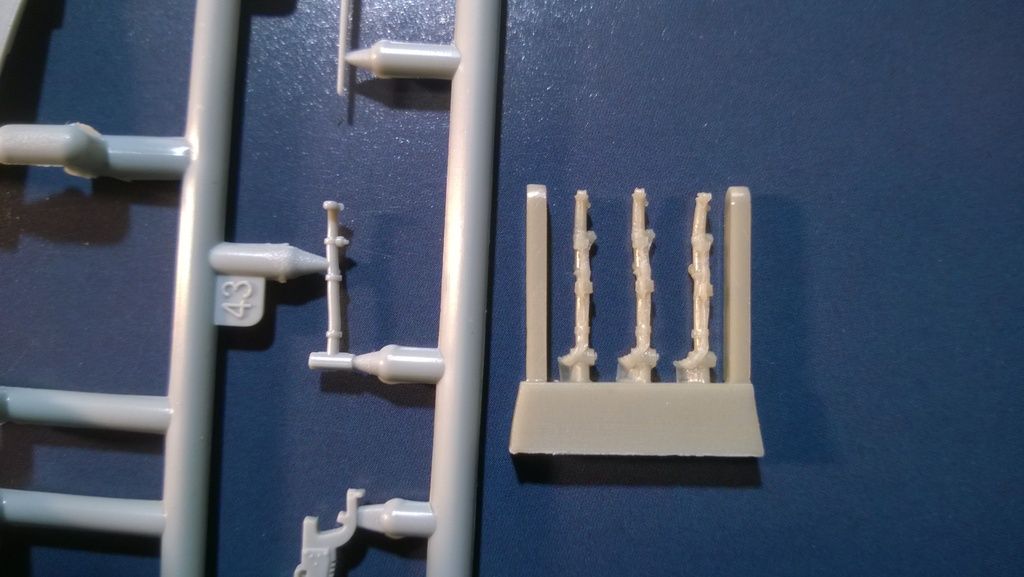
I have made a start!
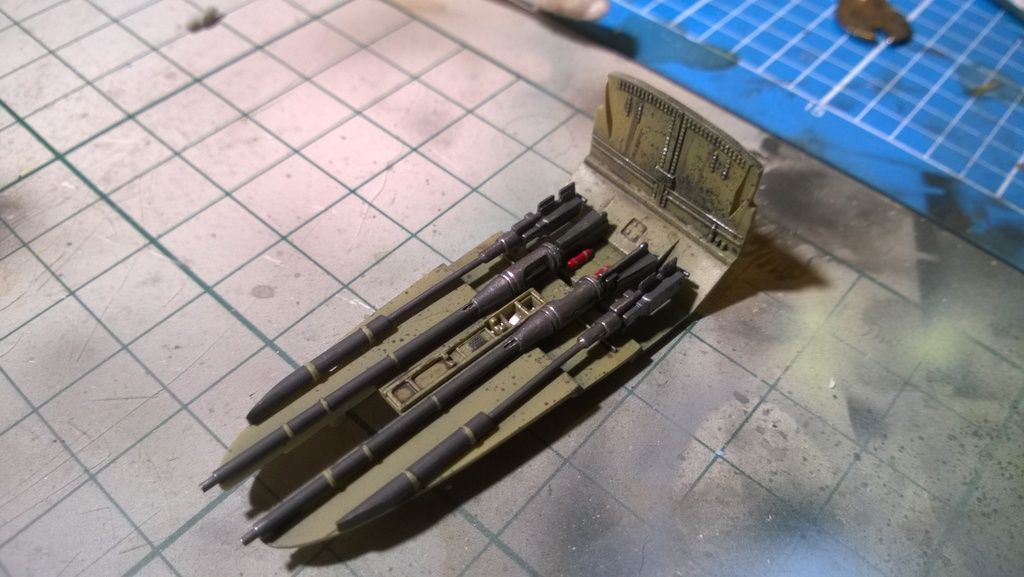
firstly,the quickboost parts look great, the radio stack is just a drop in replacement, which is nice, i was worried about arduously chipping away at resin.and the sticks are fantastic.
here are some side by side images..
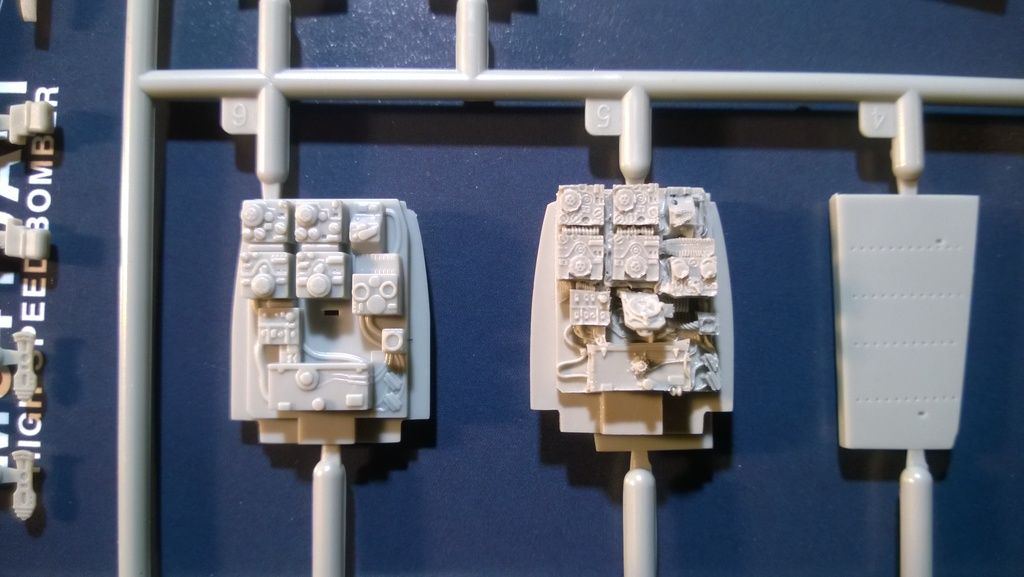
I have put together the first 6 parts in the shape of the gun bay. pre shaded black with lifecolour RL02 lightly sprayed, chipped with a lighter and darker shade of rlm02. the guns were painted humbrol metalcote gunmetal and polished steel and then highlighted with polished aluminium.( they still need to dry properly and be buffed to a sheen)
Support Our Troops! Hit the Yes button If you find reviews or features helpful.
Alberta, Canada
Joined: January 19, 2008
KitMaker: 6,743 posts
AeroScale: 6,151 posts
Posted: Friday, November 25, 2016 - 05:50 AM UTC
Joel_W
Associate Editor New York, United States
Joined: December 04, 2010
KitMaker: 11,666 posts
AeroScale: 7,410 posts
Posted: Friday, November 25, 2016 - 06:13 AM UTC
James,
The gun bay is really impressive. Very nicely done. the resin replacement radio equipment is a step up for sure. But if you went with the kit parts, detail painting and weathering would have done wonders too.
Joel
On my Workbench:
Monogram 1/24 scale 427 Shelby Cobra
Just Completed:
Beemax 1/24 scale BMW M3 E30 1992 Evolution II
AussieReg
Associate Editor #007
Victoria, Australia
Joined: June 09, 2009
KitMaker: 8,156 posts
AeroScale: 3,756 posts
Posted: Friday, November 25, 2016 - 06:14 PM UTC
Off to a great start, very nice!
Cheers, D
ON the bench
Revell 1/24 '53 Corvette (building as '54)
Revell 1/24 BMW 507 Coupe and Cabrio
Italeri 1/48 Me262 B-1a/U1 Nightfighter
Monogram 1/24 '57 Chevy Nomad
Dragon 1/350 USS Frank Knox DD-742
Noord-Holland, Netherlands
Joined: January 28, 2007
KitMaker: 1,945 posts
AeroScale: 388 posts
Posted: Friday, November 25, 2016 - 06:59 PM UTC
Great work on the gunbay. The Quickboost Radiostack has some very nice detail, which will come out nicely when painted.
Jelger
On the workbench:
- Tamiya P-47D 1/48
- Eduard Mig21 1/144
England - South West, United Kingdom
Joined: January 06, 2007
KitMaker: 3,661 posts
AeroScale: 369 posts
Posted: Saturday, November 26, 2016 - 09:00 PM UTC
Thanks guys. I'm really hoping to take time to make this my best yet. (just cursed myself there..) the only place that needs work are the sidewalls . And I need to wire the back of dials. Does anyone have any images of the back of the low centre console ? Reference is hard to find for this one.
Support Our Troops! Hit the Yes button If you find reviews or features helpful.
England - South West, United Kingdom
Joined: January 06, 2007
KitMaker: 3,661 posts
AeroScale: 369 posts
Posted: Monday, November 28, 2016 - 05:08 AM UTC
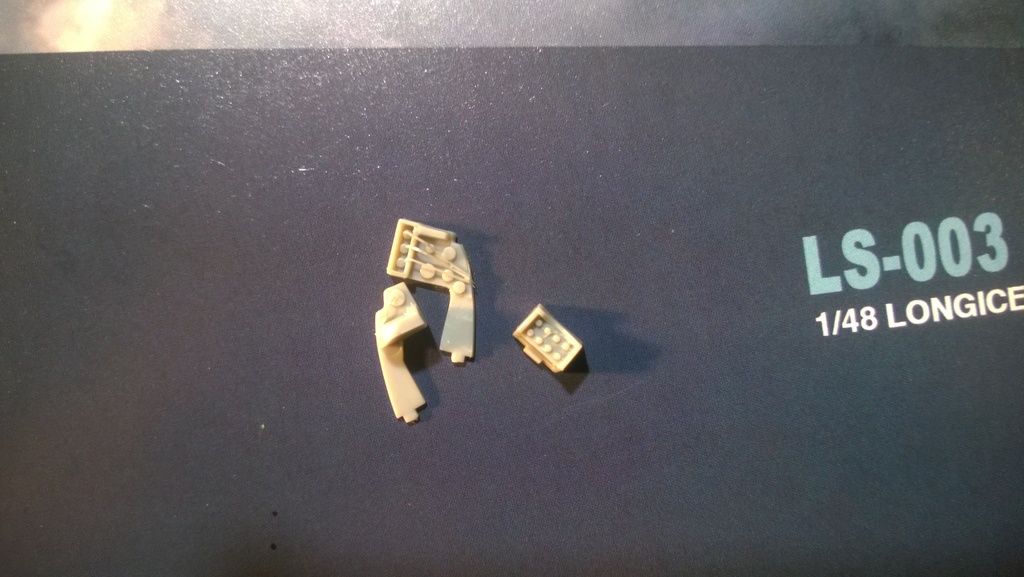
Been a busy weekend so little progress.. The pe belts I didn't like. Maybe next time ill cut off the metal fittings and attach them to tape.
Painted in Tamiya German grey with some light shading. The rudder pedals was sprayed with alclad duraluminum and them misted over with polished aluminium.

Can an admin please change the thread status to blog please. I forgot !
Support Our Troops! Hit the Yes button If you find reviews or features helpful.
Joel_W
Associate Editor New York, United States
Joined: December 04, 2010
KitMaker: 11,666 posts
AeroScale: 7,410 posts
Posted: Monday, November 28, 2016 - 10:31 PM UTC
James,
The floor with the seat, stick, and rudder pedals really are weathered quite effectively.
Joel
On my Workbench:
Monogram 1/24 scale 427 Shelby Cobra
Just Completed:
Beemax 1/24 scale BMW M3 E30 1992 Evolution II
Nordrhein-Westfalen, Germany
Joined: March 22, 2015
KitMaker: 671 posts
AeroScale: 614 posts
Posted: Tuesday, November 29, 2016 - 01:50 AM UTC
James,
nice work place and the gun bay looks great. I will follow this with pleasure!
Oliver
On the desk: Probably a Panzer III.
California, United States
Joined: November 28, 2007
KitMaker: 817 posts
AeroScale: 729 posts
Posted: Tuesday, November 29, 2016 - 09:52 PM UTC
What a lovely choice of subject!

Watching with interest- you're off to a good start. Cheers!
[url]http://chukw.blogspot.com/[/url]
England - South West, United Kingdom
Joined: January 06, 2007
KitMaker: 3,661 posts
AeroScale: 369 posts
Posted: Sunday, December 04, 2016 - 03:42 AM UTC
Thanks guys! Chuck i have your build bookmarked for reference !
Wash in the pit
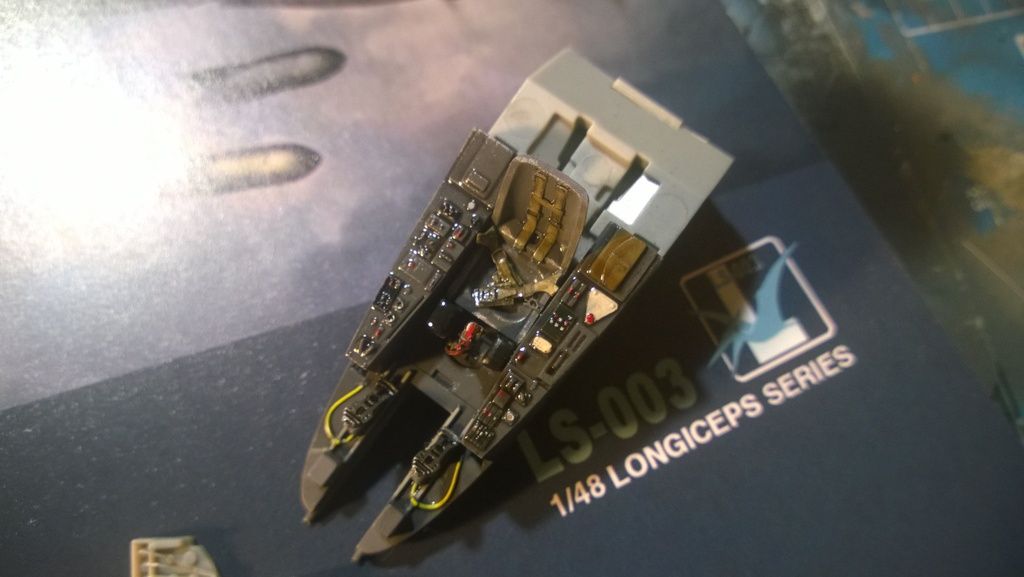
And a little wiring.
More soon !
Support Our Troops! Hit the Yes button If you find reviews or features helpful.
Joel_W
Associate Editor New York, United States
Joined: December 04, 2010
KitMaker: 11,666 posts
AeroScale: 7,410 posts
Posted: Sunday, December 04, 2016 - 10:15 PM UTC
James,
You've done a 1st rate job on the cockpit. that over head shot really is quite effective.
Joel
On my Workbench:
Monogram 1/24 scale 427 Shelby Cobra
Just Completed:
Beemax 1/24 scale BMW M3 E30 1992 Evolution II
England - South West, United Kingdom
Joined: January 06, 2007
KitMaker: 3,661 posts
AeroScale: 369 posts
Posted: Wednesday, December 07, 2016 - 06:33 AM UTC
Thanks Joel ! Bench time has been few and far between this week but i'm hoping to get on with the radio/gunner position soon
Support Our Troops! Hit the Yes button If you find reviews or features helpful.


