Dassault Mirage III/5BA Heller 1/72
Berlin, Germany
Joined: October 12, 2008
KitMaker: 709 posts
AeroScale: 651 posts
Posted: Thursday, November 23, 2017 - 10:51 PM UTC
Hello mates!
Thanks for still following

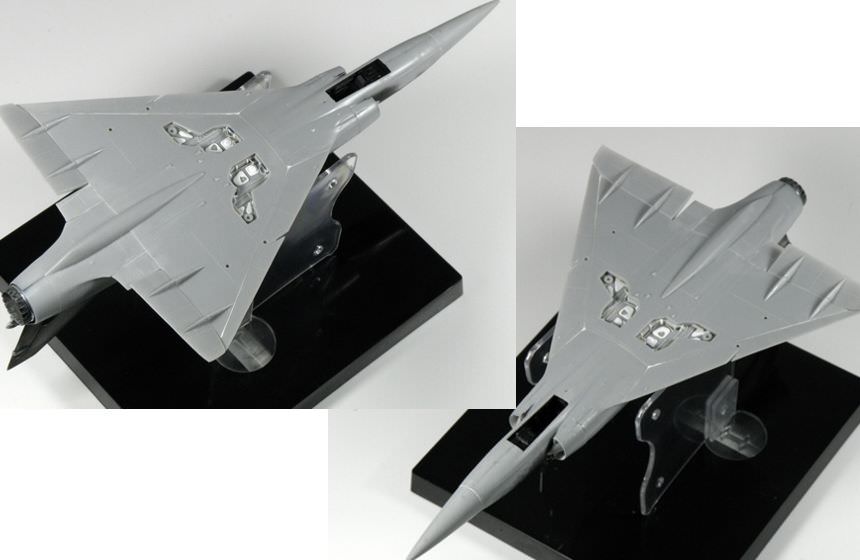
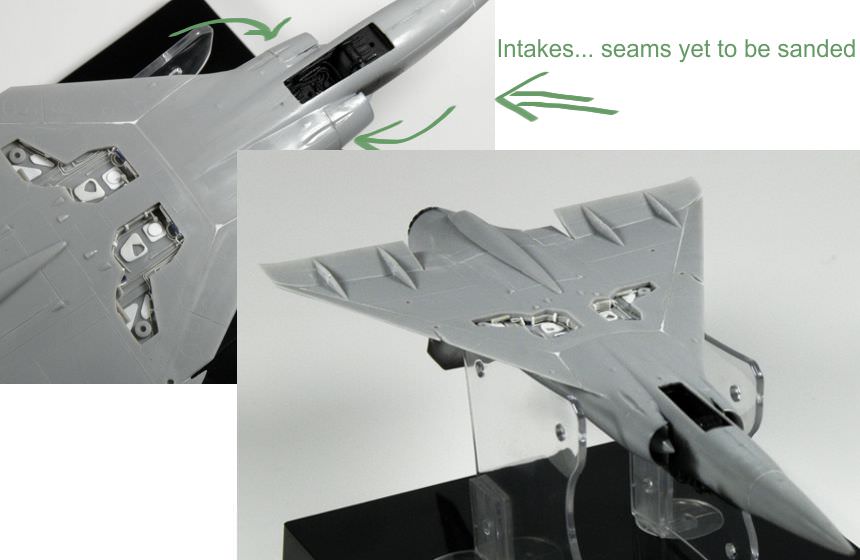
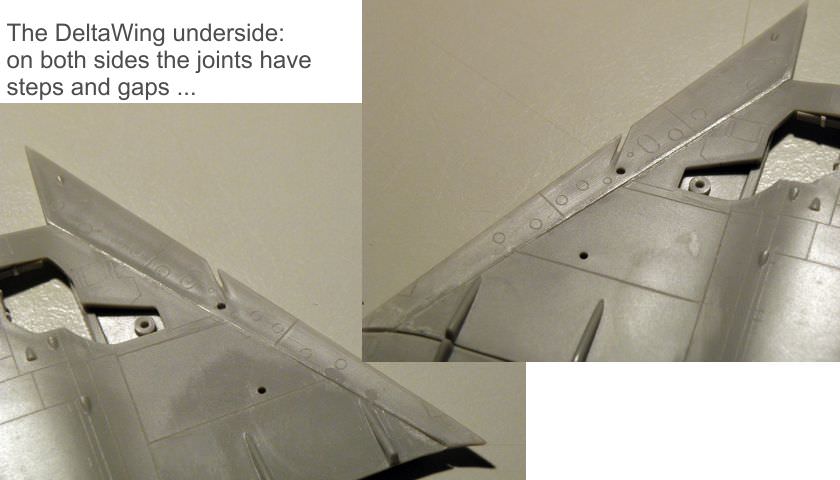
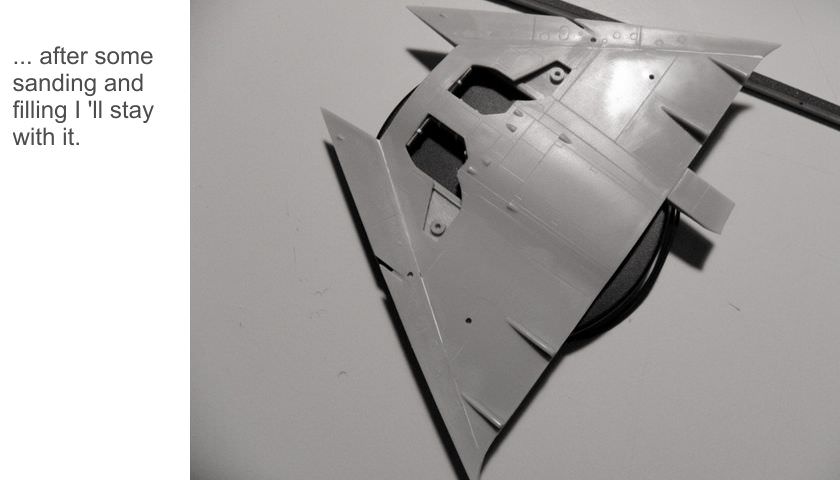
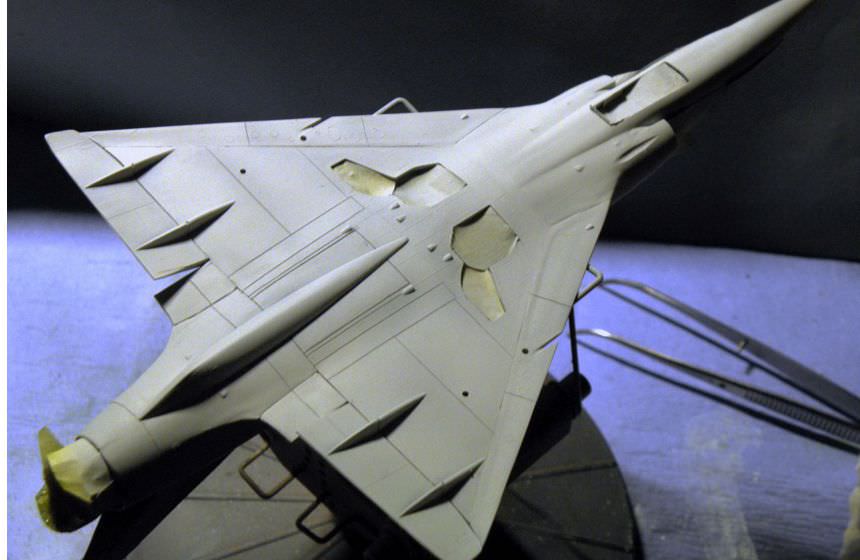
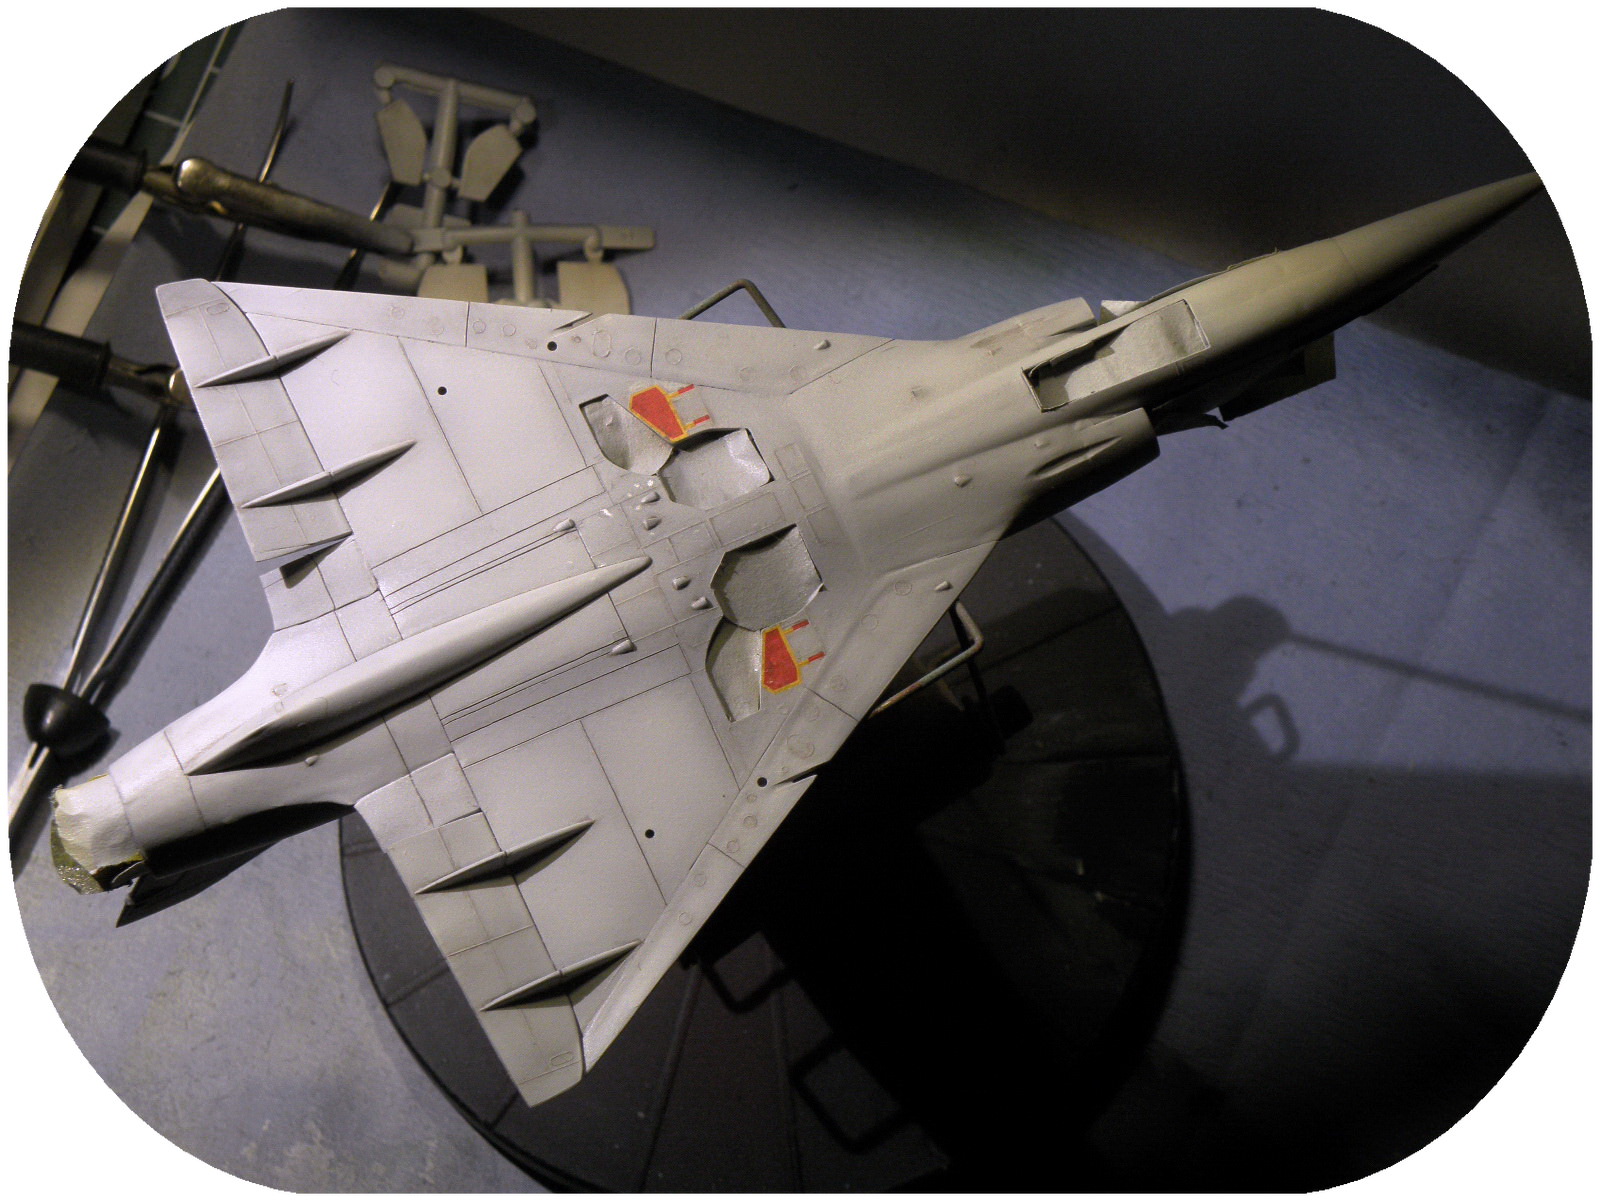
Here's just a small update. Before moving on with the wheel wells (won't do too much there) I had to check the Delta Wing connections and the fuselage since it will be the base of the wells.
While dry fitting I already recognized the gaps and steps
but after glueing, sanding and a bit of filler I'm o.k. with it.
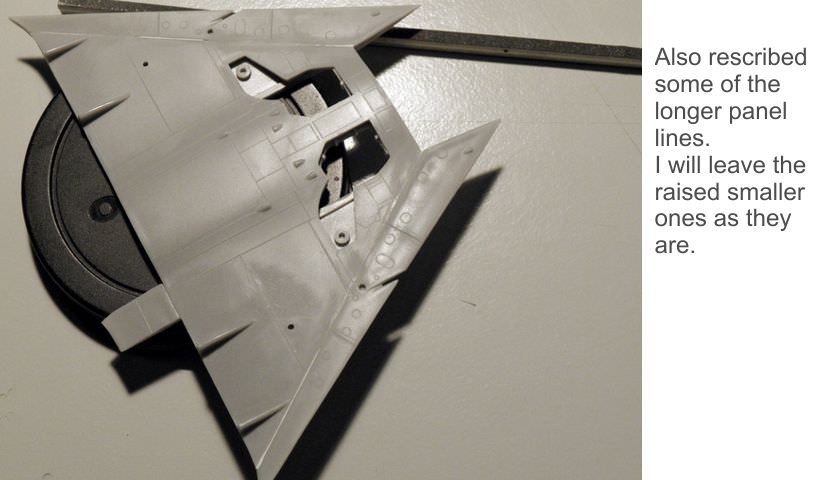
Don't want to rescribe all the raised panel lines as it would be a disaster - so I just choose the longer ones and the ones that needed a touch up.
Finally a dry fit just snapped together - Wings/fuselage joints need later attention.

Thanks for looking,
Thomas

Sometimes you need to distance yourself to see things clearly - Lao Tzu -
... in scale and in real life -T.
Nordrhein-Westfalen, Germany
Joined: March 22, 2015
KitMaker: 671 posts
AeroScale: 614 posts
Posted: Saturday, November 25, 2017 - 05:33 AM UTC
Quoted Text
Don't want to rescribe all the raised panel lines as it would be a disaster - so I just choose the longer ones and the ones that needed a touch up.
Hallo Thomas,
this is really an interesting aspect, to rescribe only a part of the panel lines. I never thought of this before, but it could work very well. Inspiring!
Oliver
On the desk: Probably a Panzer III.
Rio de Janeiro, Brazil
Joined: May 26, 2005
KitMaker: 47 posts
AeroScale: 11 posts
Posted: Saturday, November 25, 2017 - 06:00 AM UTC
It is inspiring to follow this assembling process.
Congratulations!
Berlin, Germany
Joined: October 12, 2008
KitMaker: 709 posts
AeroScale: 651 posts
Posted: Thursday, November 30, 2017 - 12:54 AM UTC
Hi guys! Here's just a quick stop over.
Thanks Oliver and alves for your support!
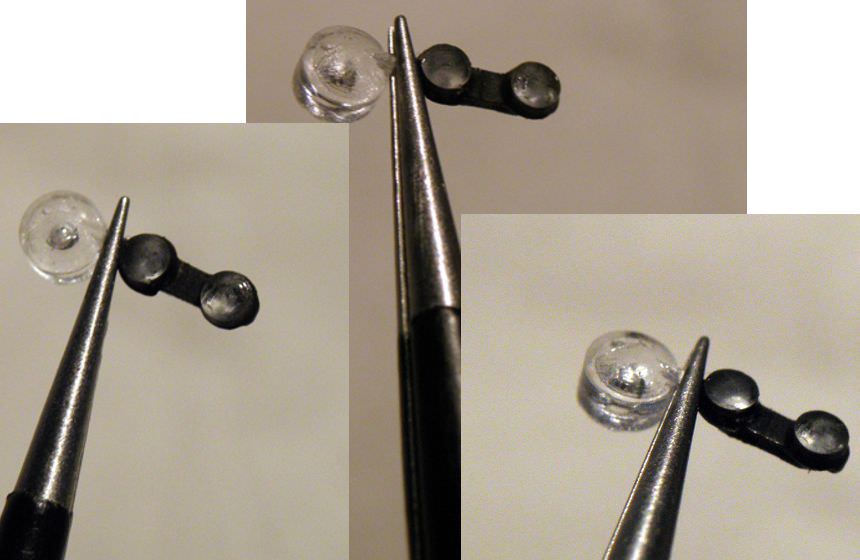
Please all of you keep in mind, that this build is more a practising object. The age of this kit is always present but I try out what is manageable and easy for me with the given parts and decided not to use copper wire or similar and handling with CA.
Even the most of the tiny stretched sprue I used so far are from the kit's sprues. Depending on it abilities. I think, best to glue together is the always the original kit's styrene. On the other hand, there's much difference comparing other company's styrene when it comes to forming, stretching or bending. So a lot of trial and error while assembling (and lots of "snip-of-the-tweezer" for a hungry carpet monster

)
Okay, back.
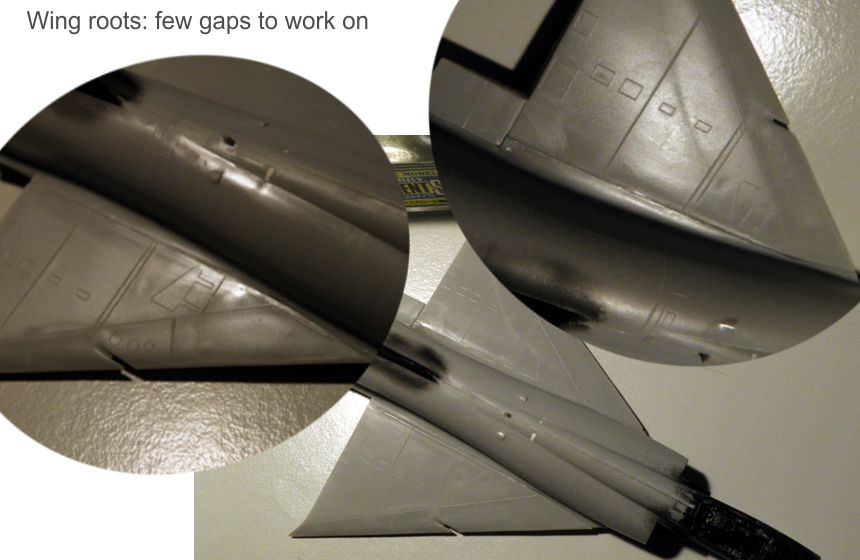
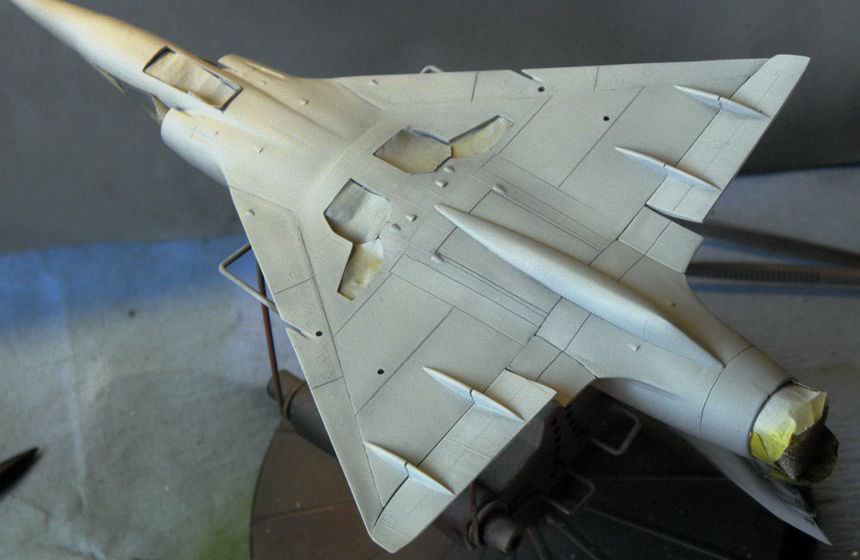
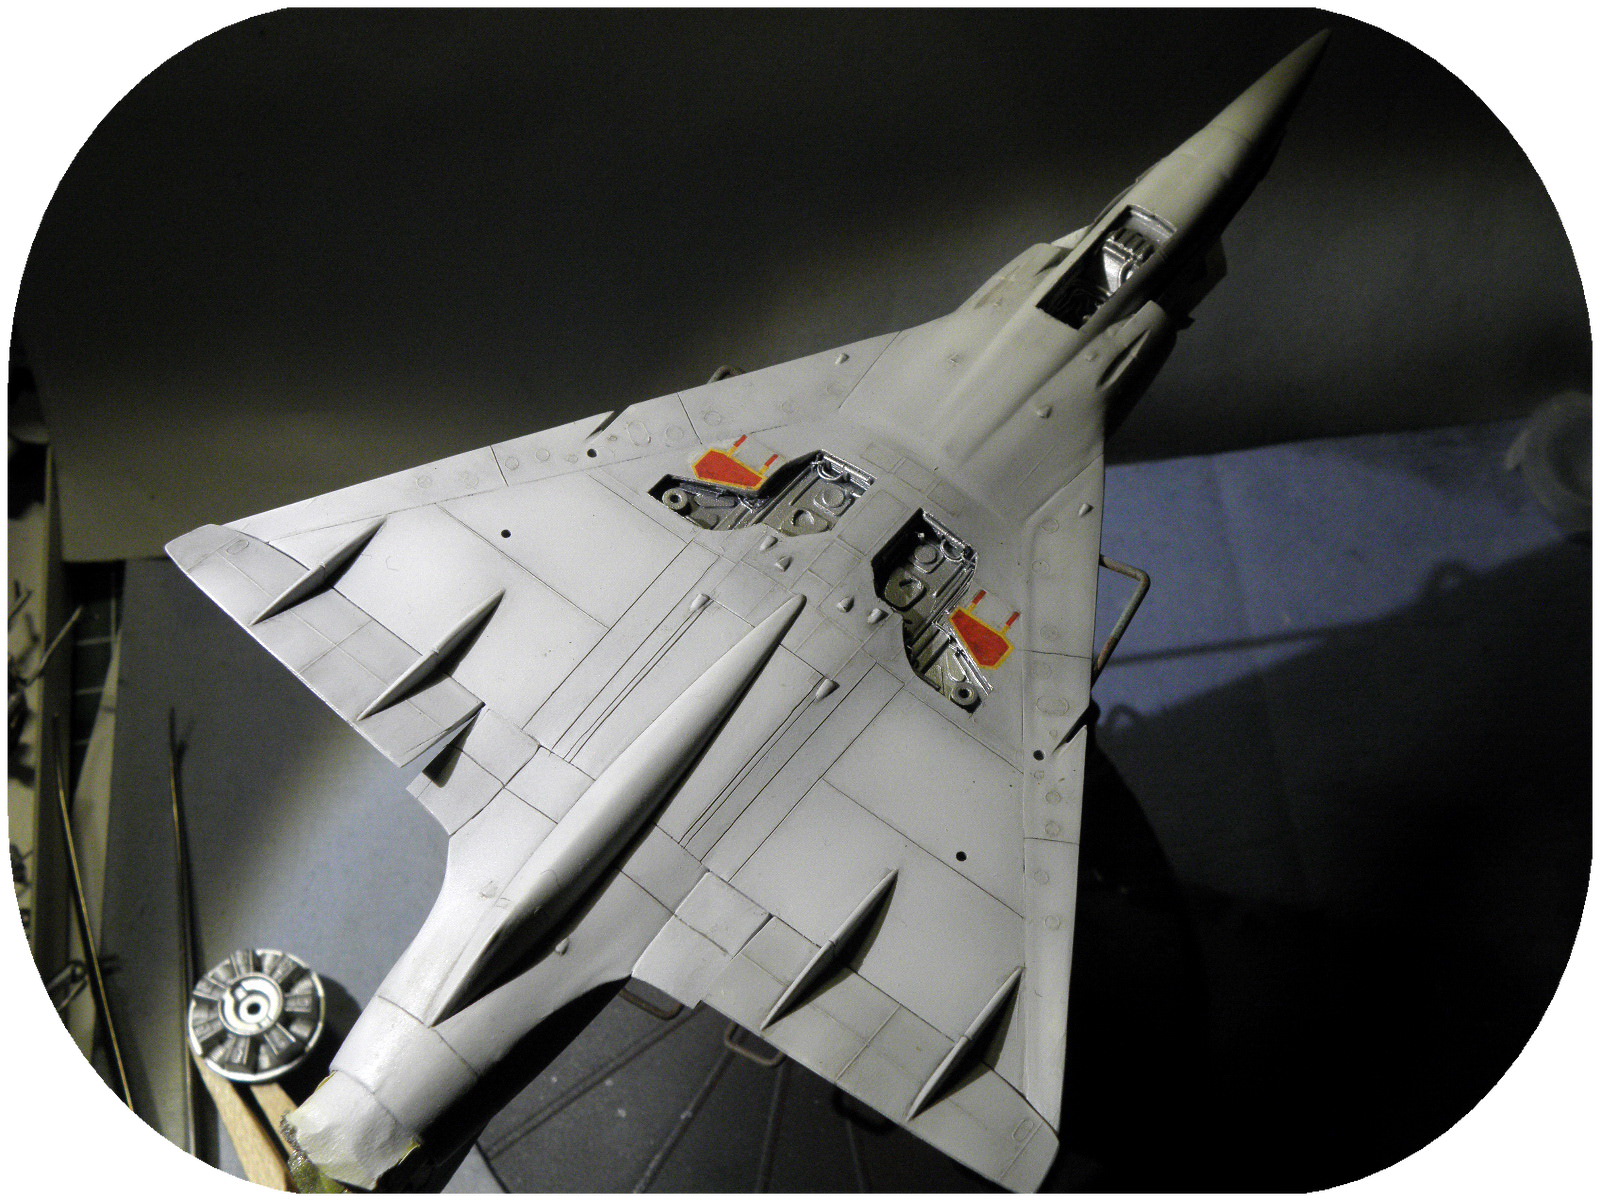
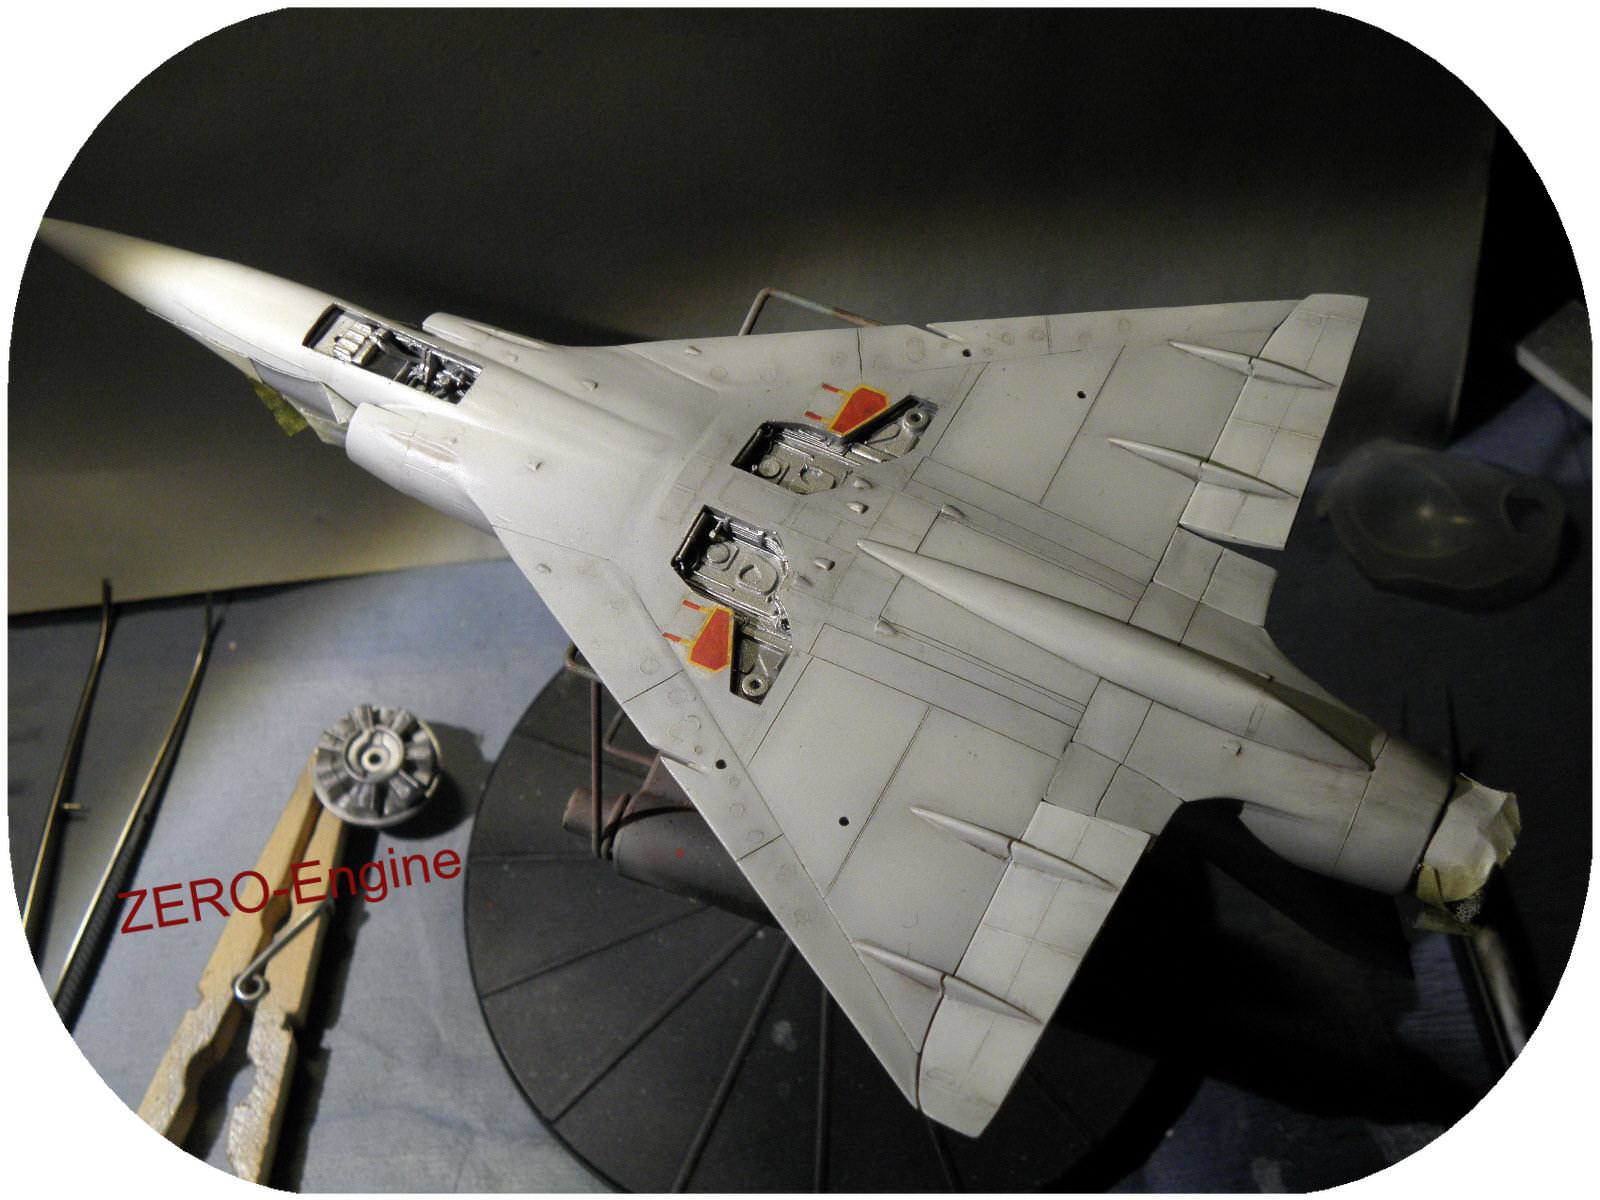
Wings are on, fitting is not too bad but gaps to be managed on the wing roots and fuselage connection on the underside..
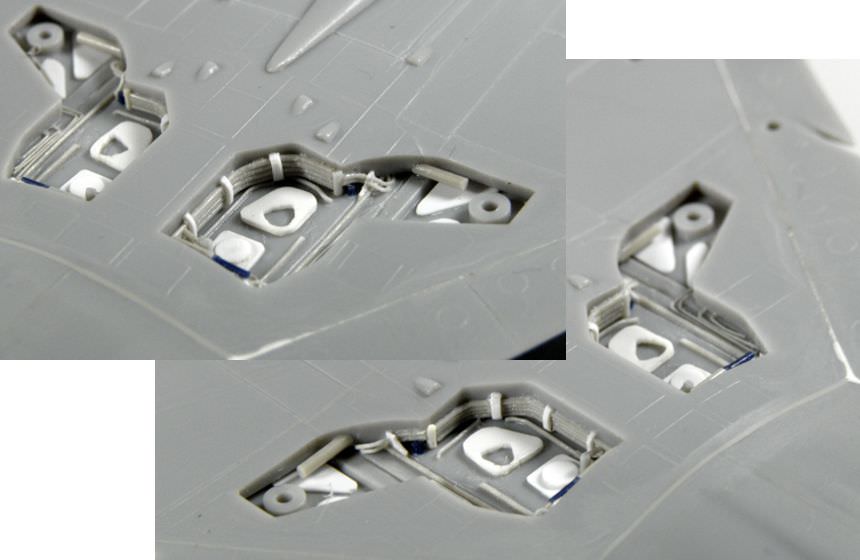
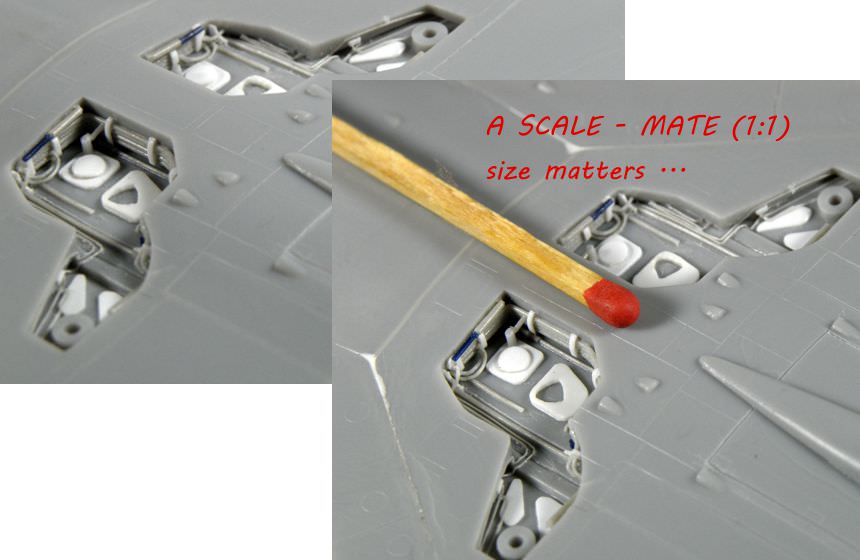
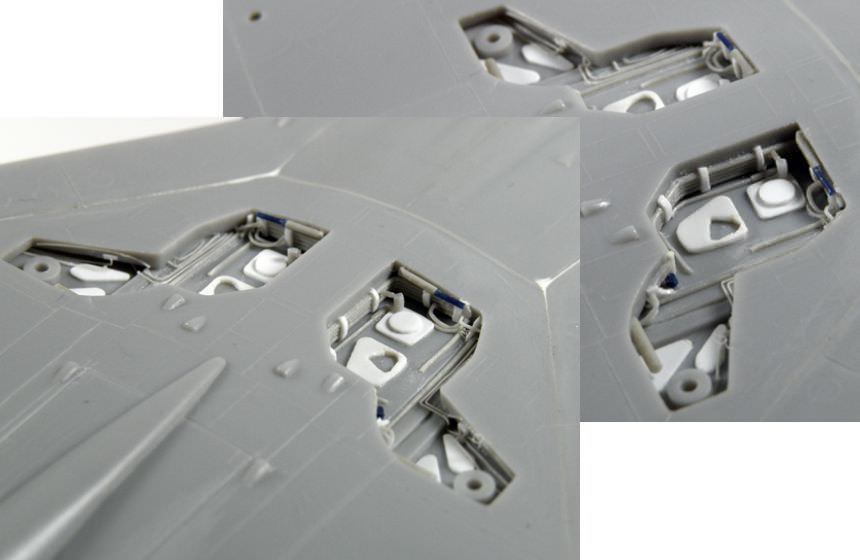
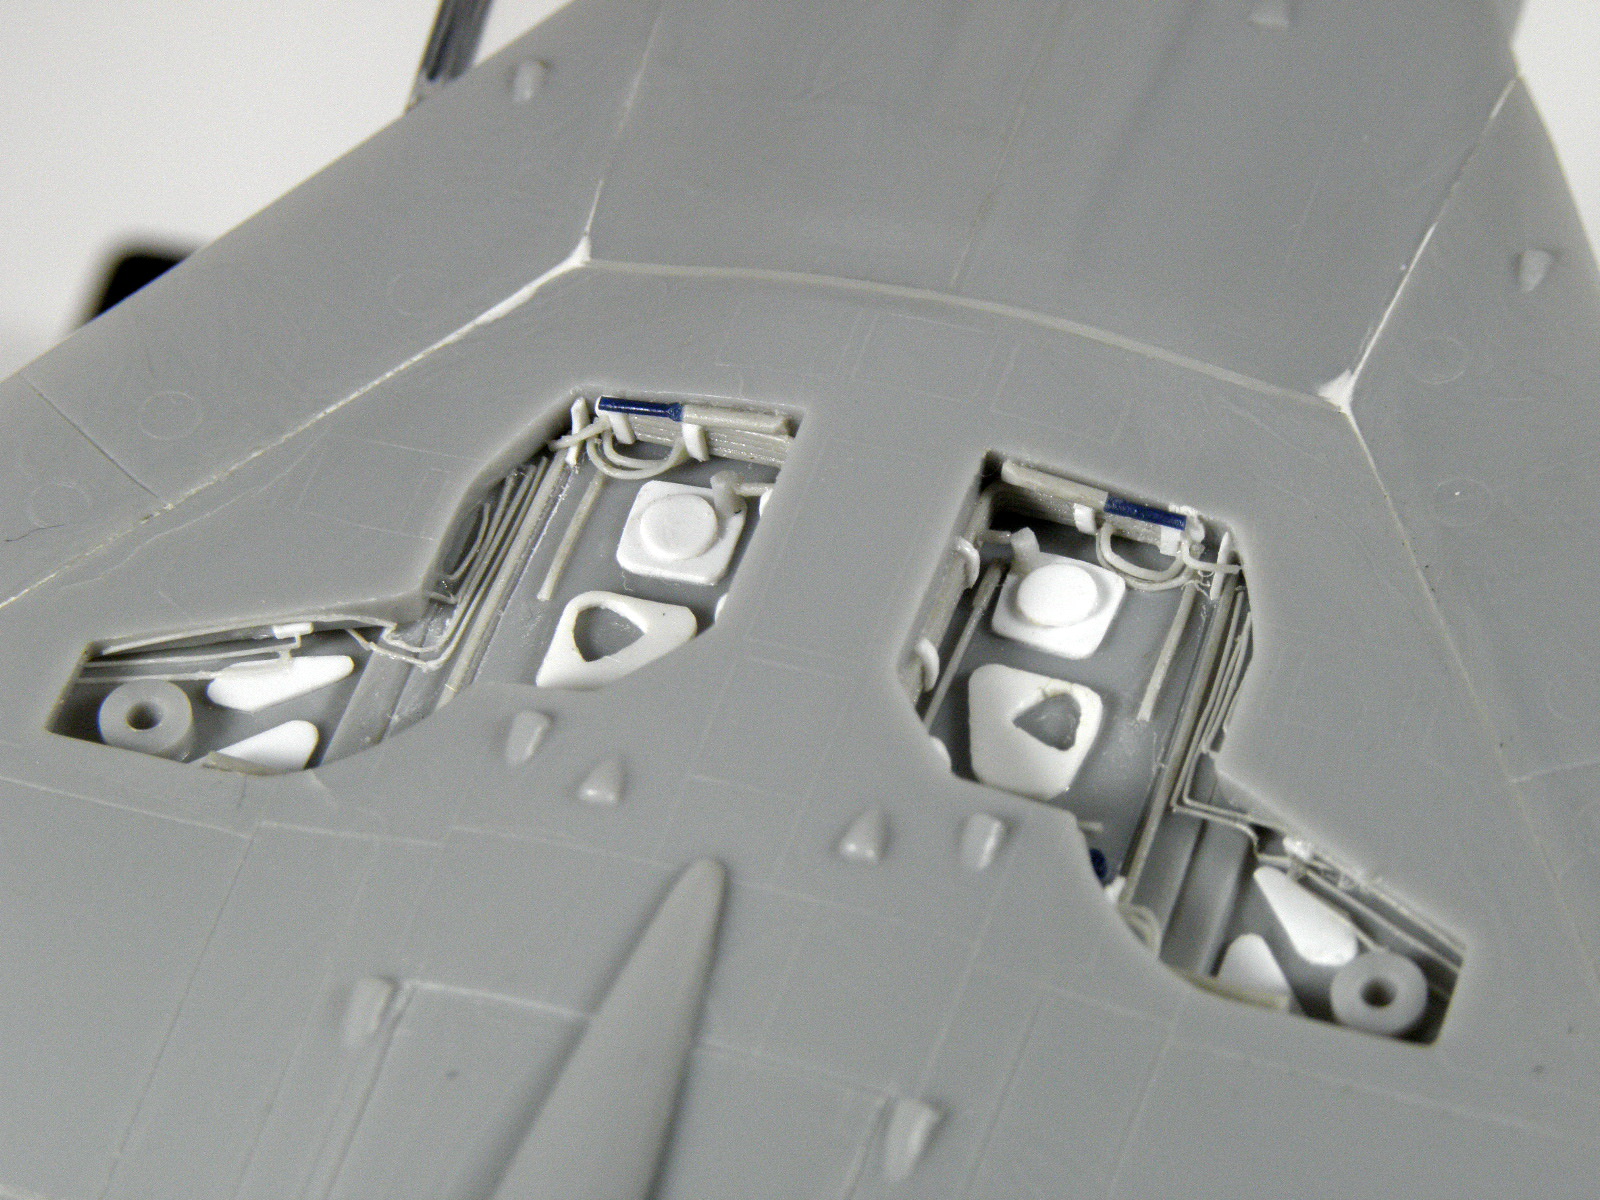
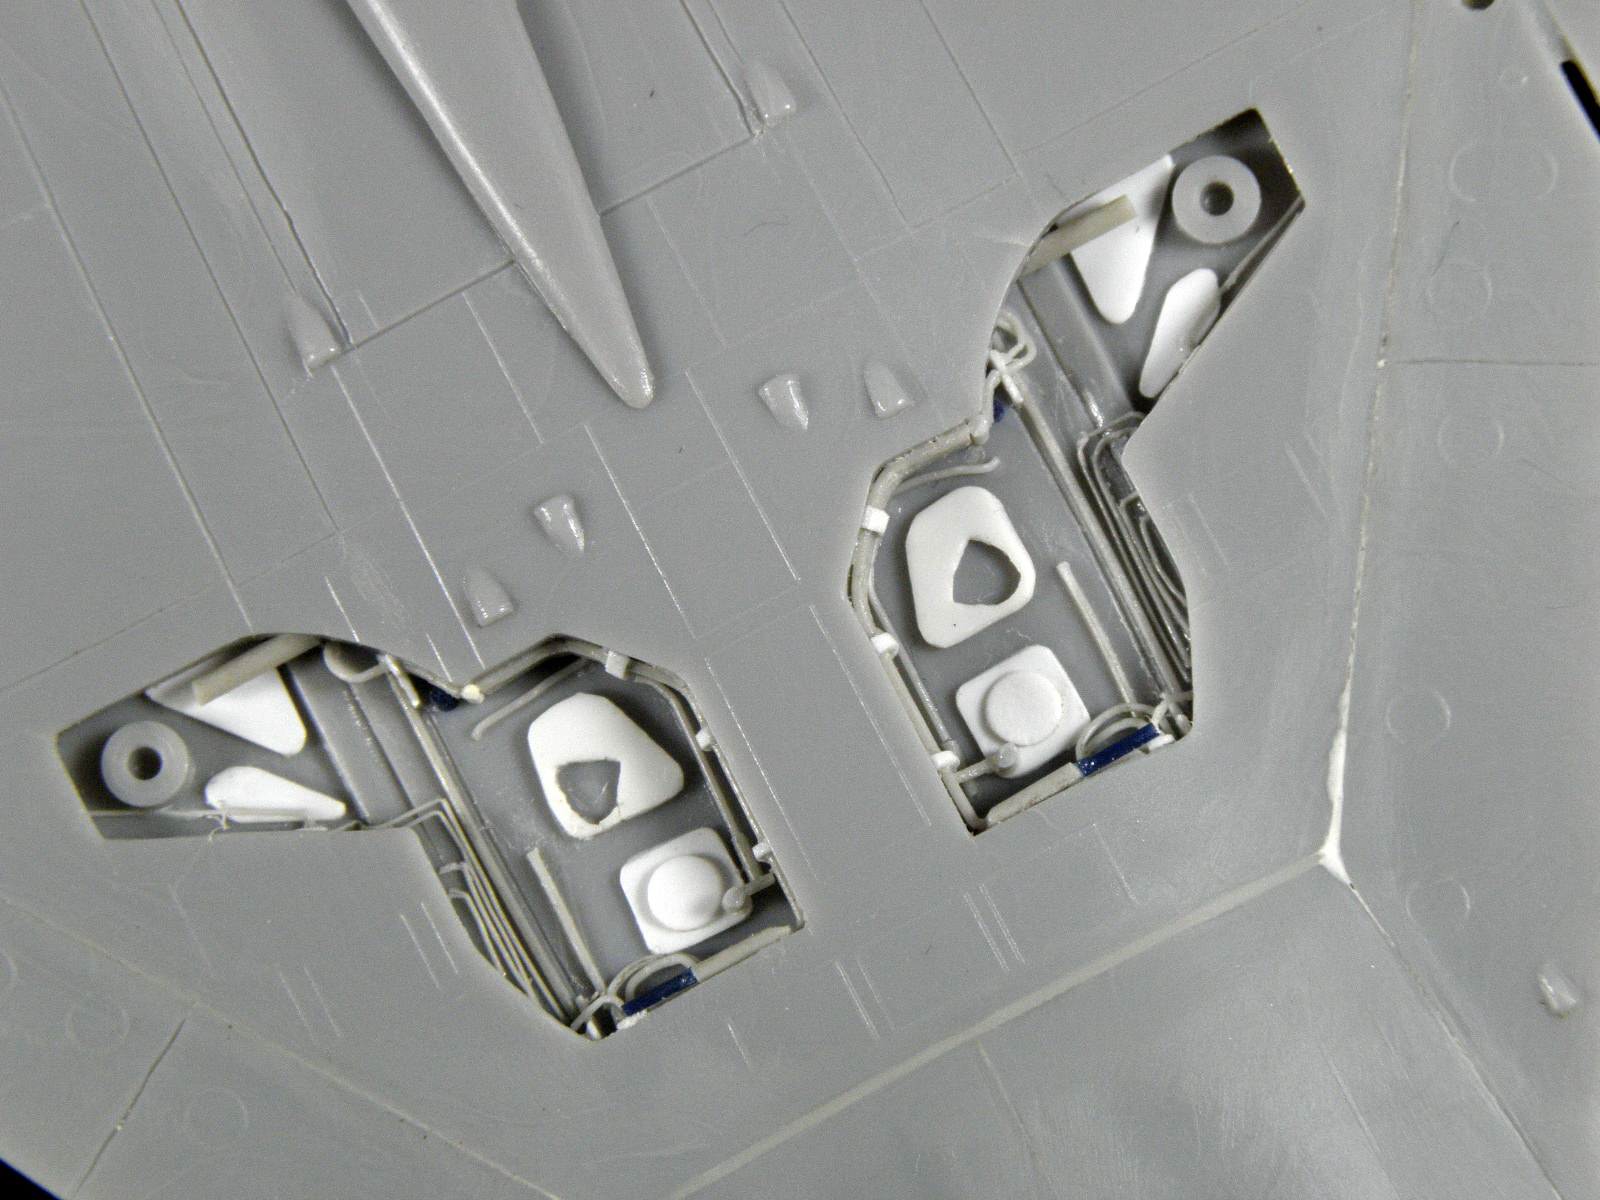
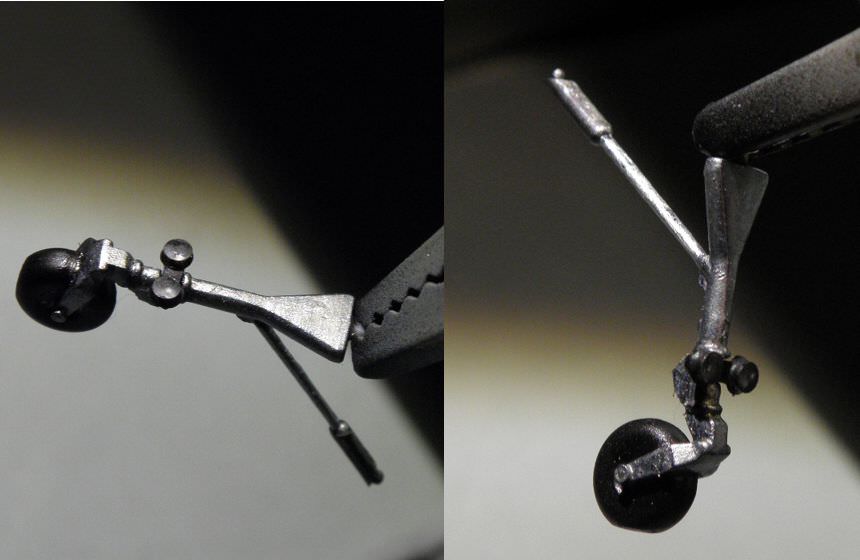
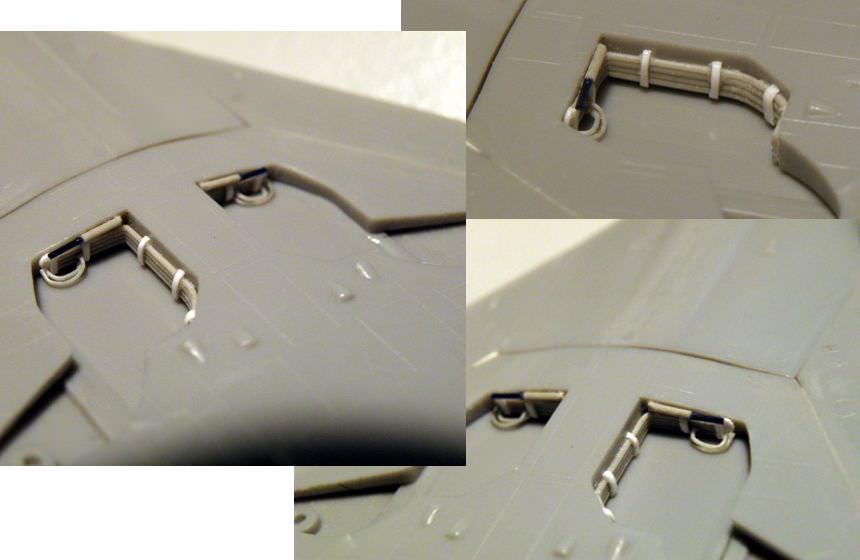
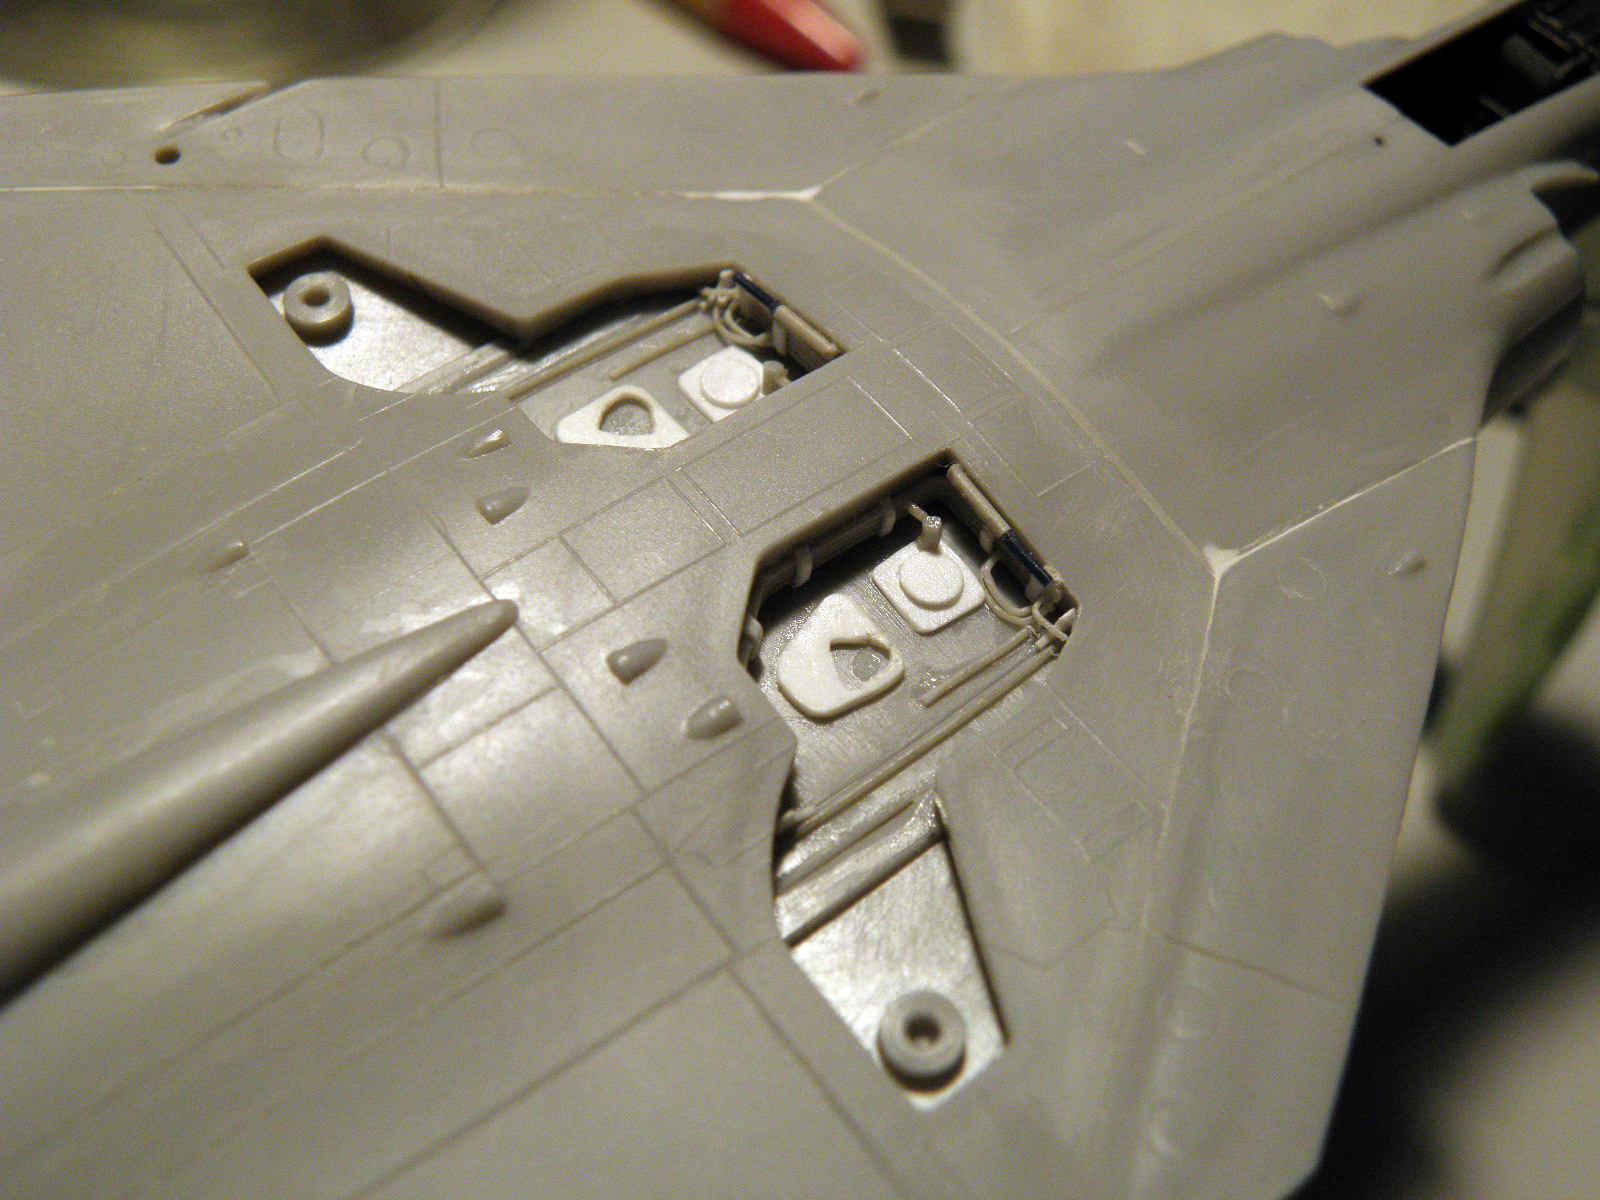
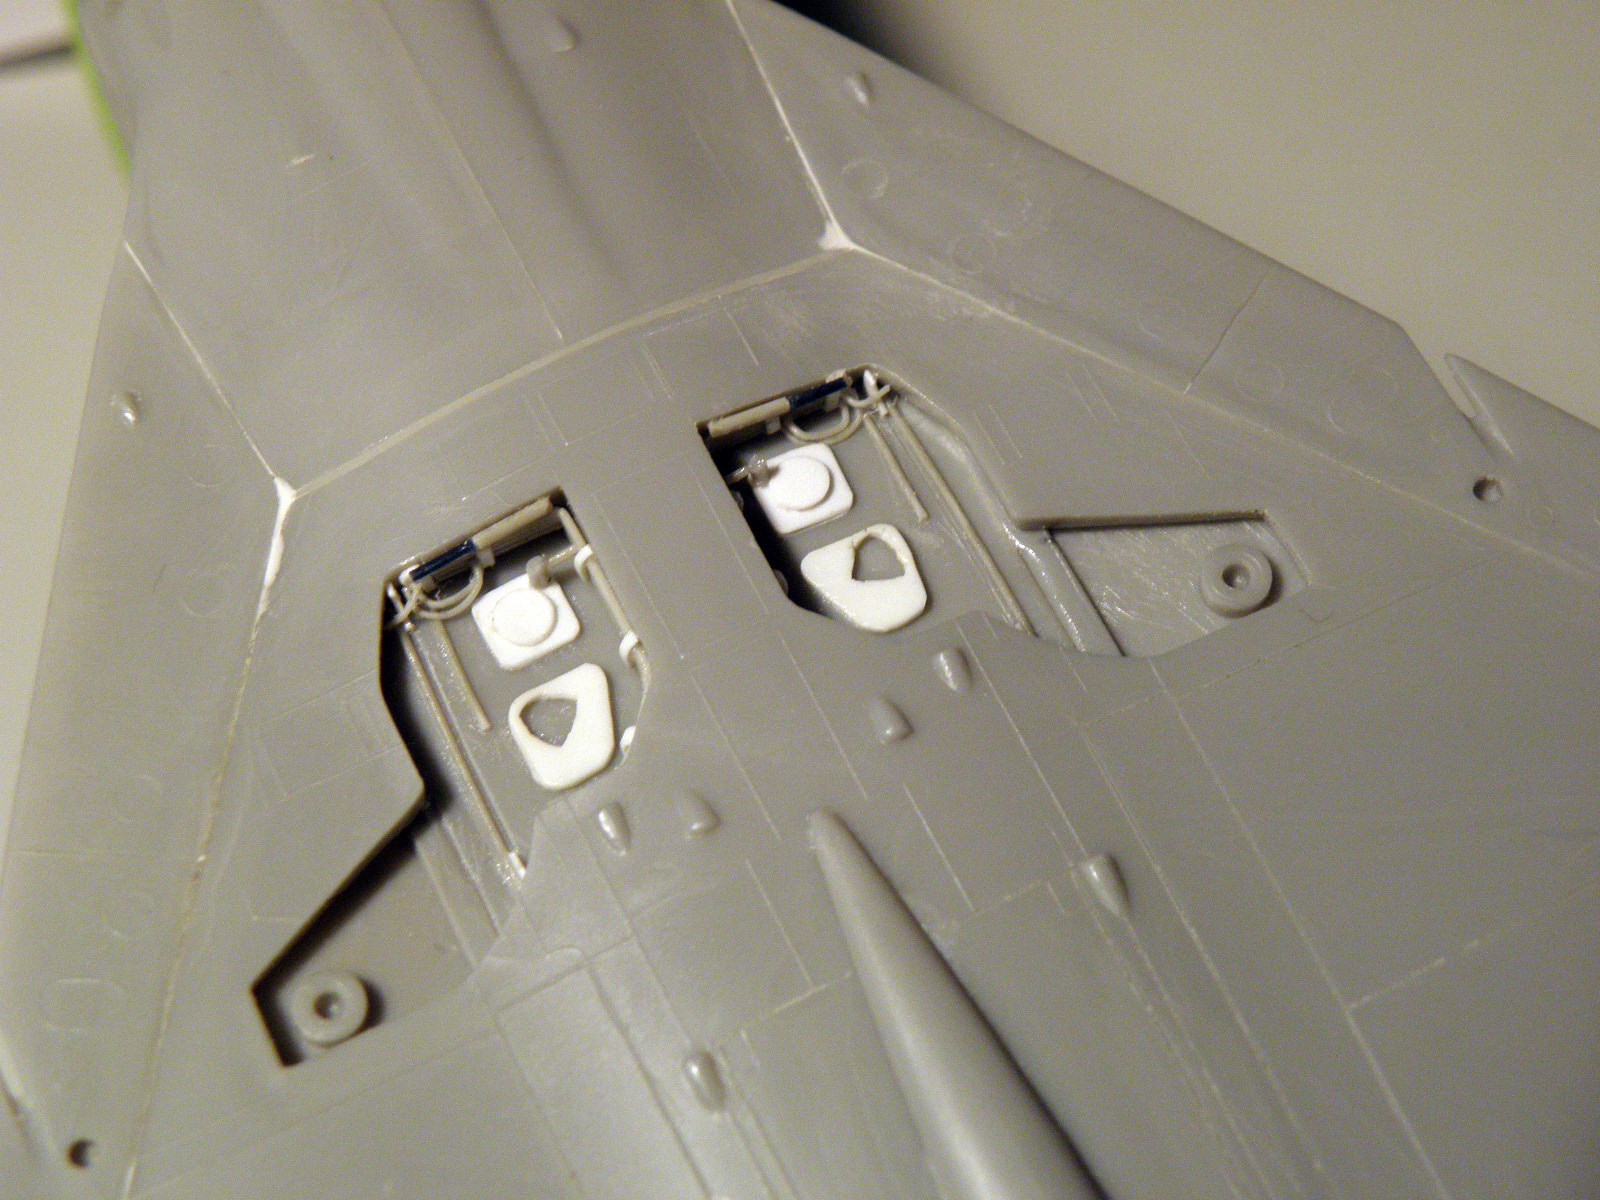
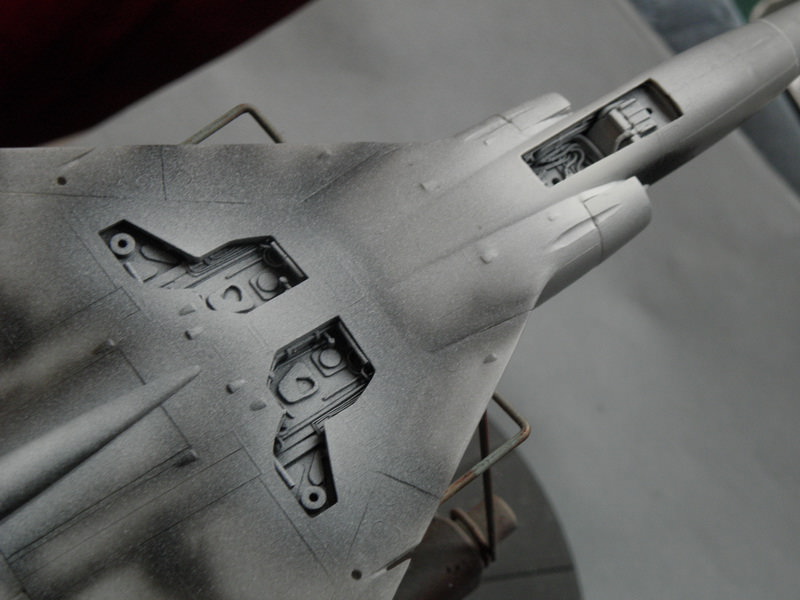
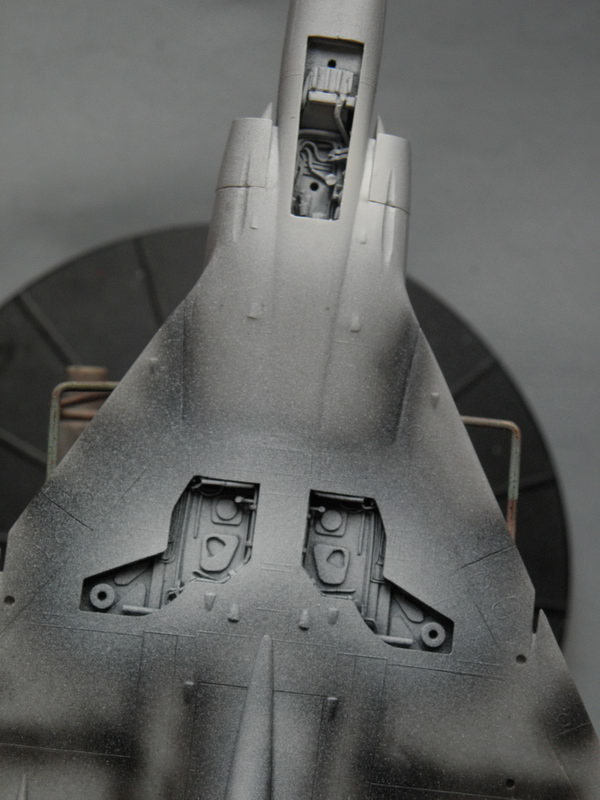
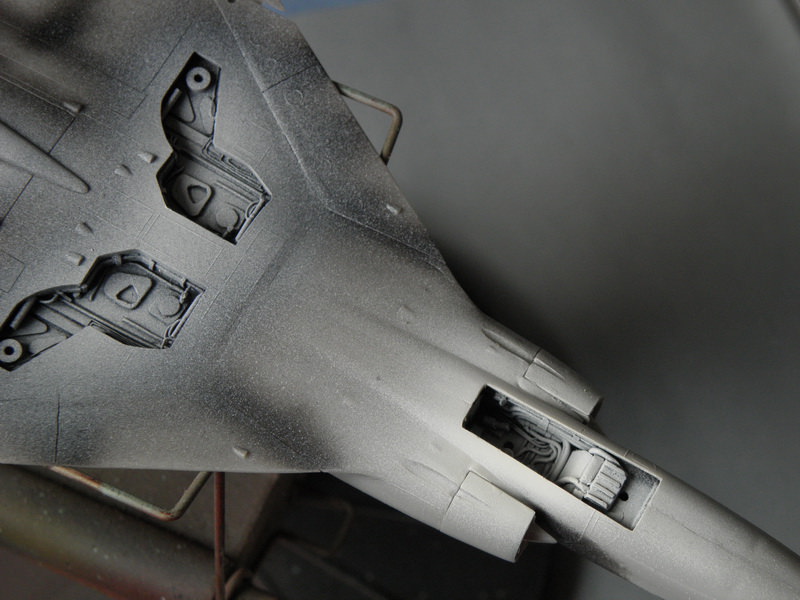
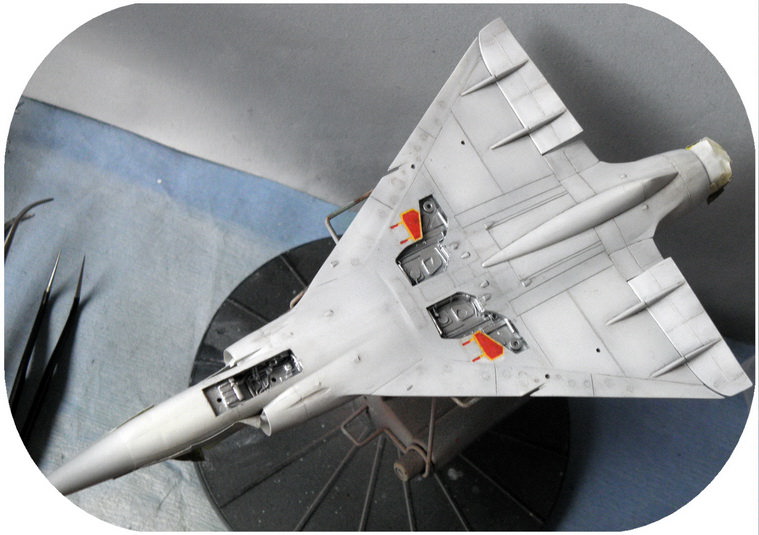
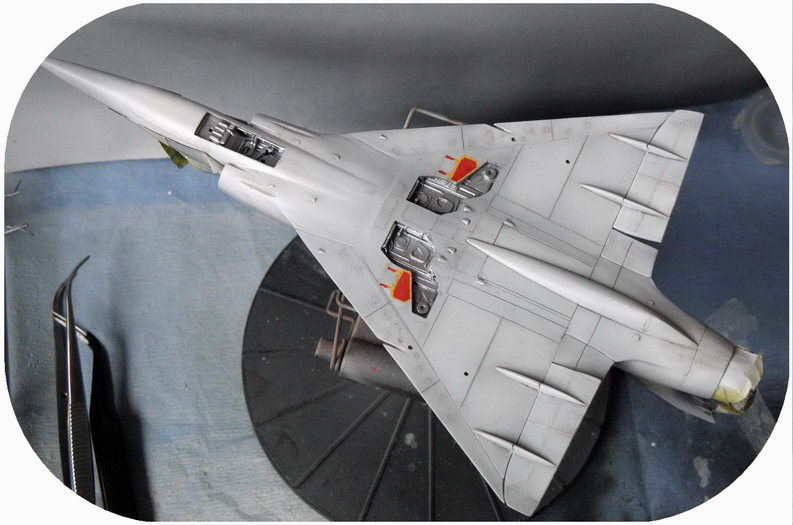
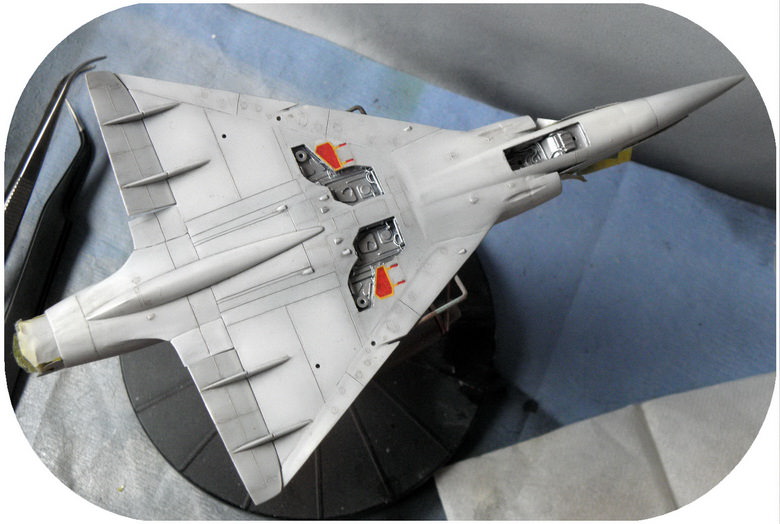
Started also with some add-ons at the wheel wells..

appreciate your stopping by,
Thomas
Sometimes you need to distance yourself to see things clearly - Lao Tzu -
... in scale and in real life -T.
Stockholm, Sweden
Joined: May 02, 2006
KitMaker: 1,953 posts
AeroScale: 1,902 posts
Posted: Thursday, November 30, 2017 - 01:19 AM UTC
Thomas! A few years ago, a friend of mine who is a very good modeller showed some of his tricks during a one-hour session at a modelling competition. Apart from commercially available photo-etch he mostly uses styrene for detailing. His ideas was that it is cheap, easy to carv and sculpt and easy to glue (something that metal of any kind is NOT!). And if you happen to break it during handling it is very easy to fix! So, you can't go wrong with the sprue and your work sure looks good!
Here's a link to
one of his builds. It doesn't fly very well but it is both Swedish and interesting
! Note that it is actually nearly all-plastic!
Magnus
Press banner to the right to follow my trail to the new forums!
Berlin, Germany
Joined: October 12, 2008
KitMaker: 709 posts
AeroScale: 651 posts
Posted: Wednesday, December 13, 2017 - 11:47 PM UTC
Hi all! Thanks for peeking!
Sorry for a progress-delay - but life, you know.
Magnus: Thank you very much for your post and the link. That is awesome work and far from my abilities. Great work on a unique vehicle - really love that.
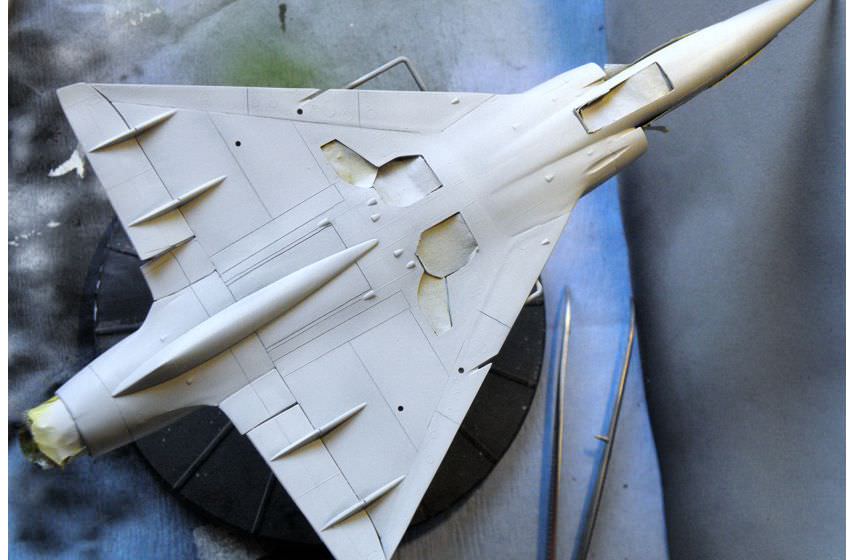
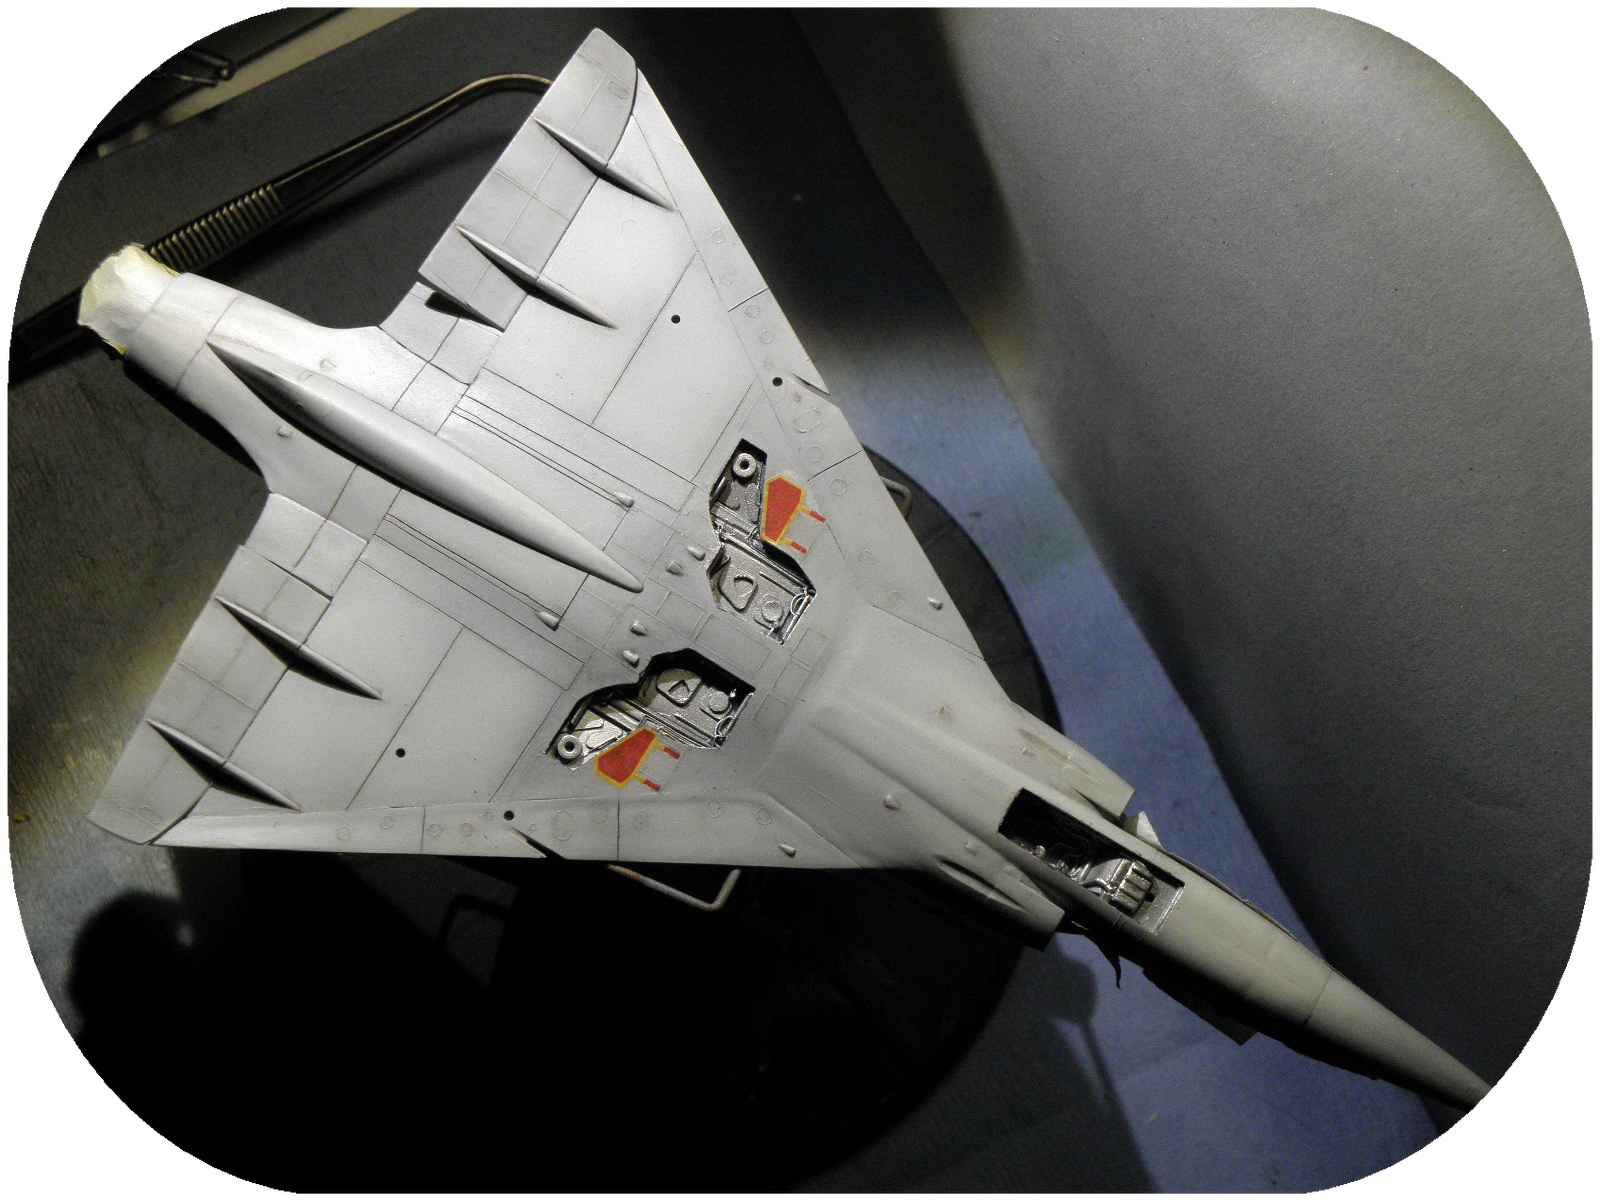
Had some bench time to mange the seams and gaps. Sanding, filling, rescribing etc...
I filled the bigger gap on the underside with a piece of

sprue
, than sanded and a bit of filler at the joints. For gaps without tension "Perfect Plastic Putty" works best for me.
So slowly it comes to shape.
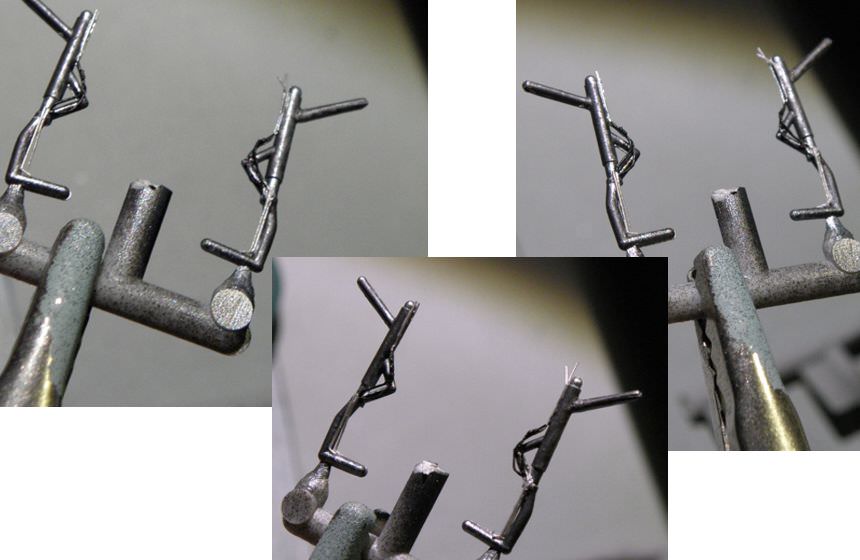
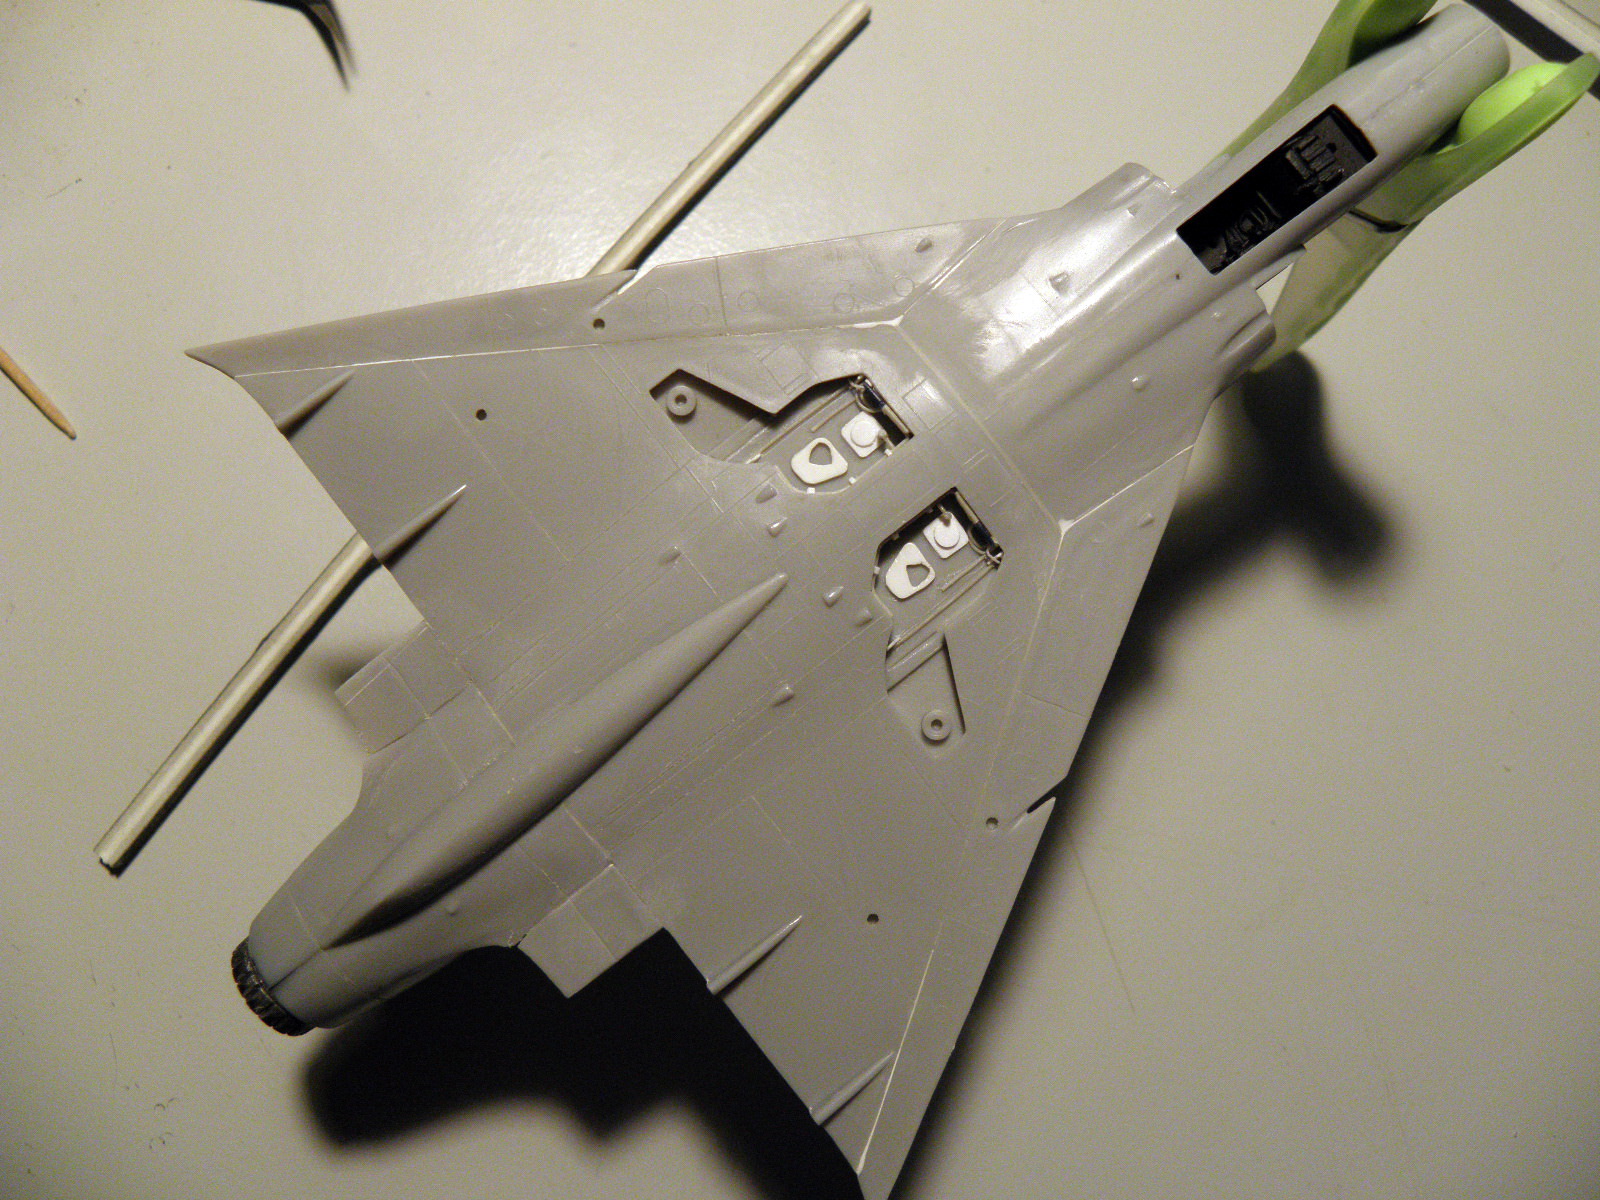
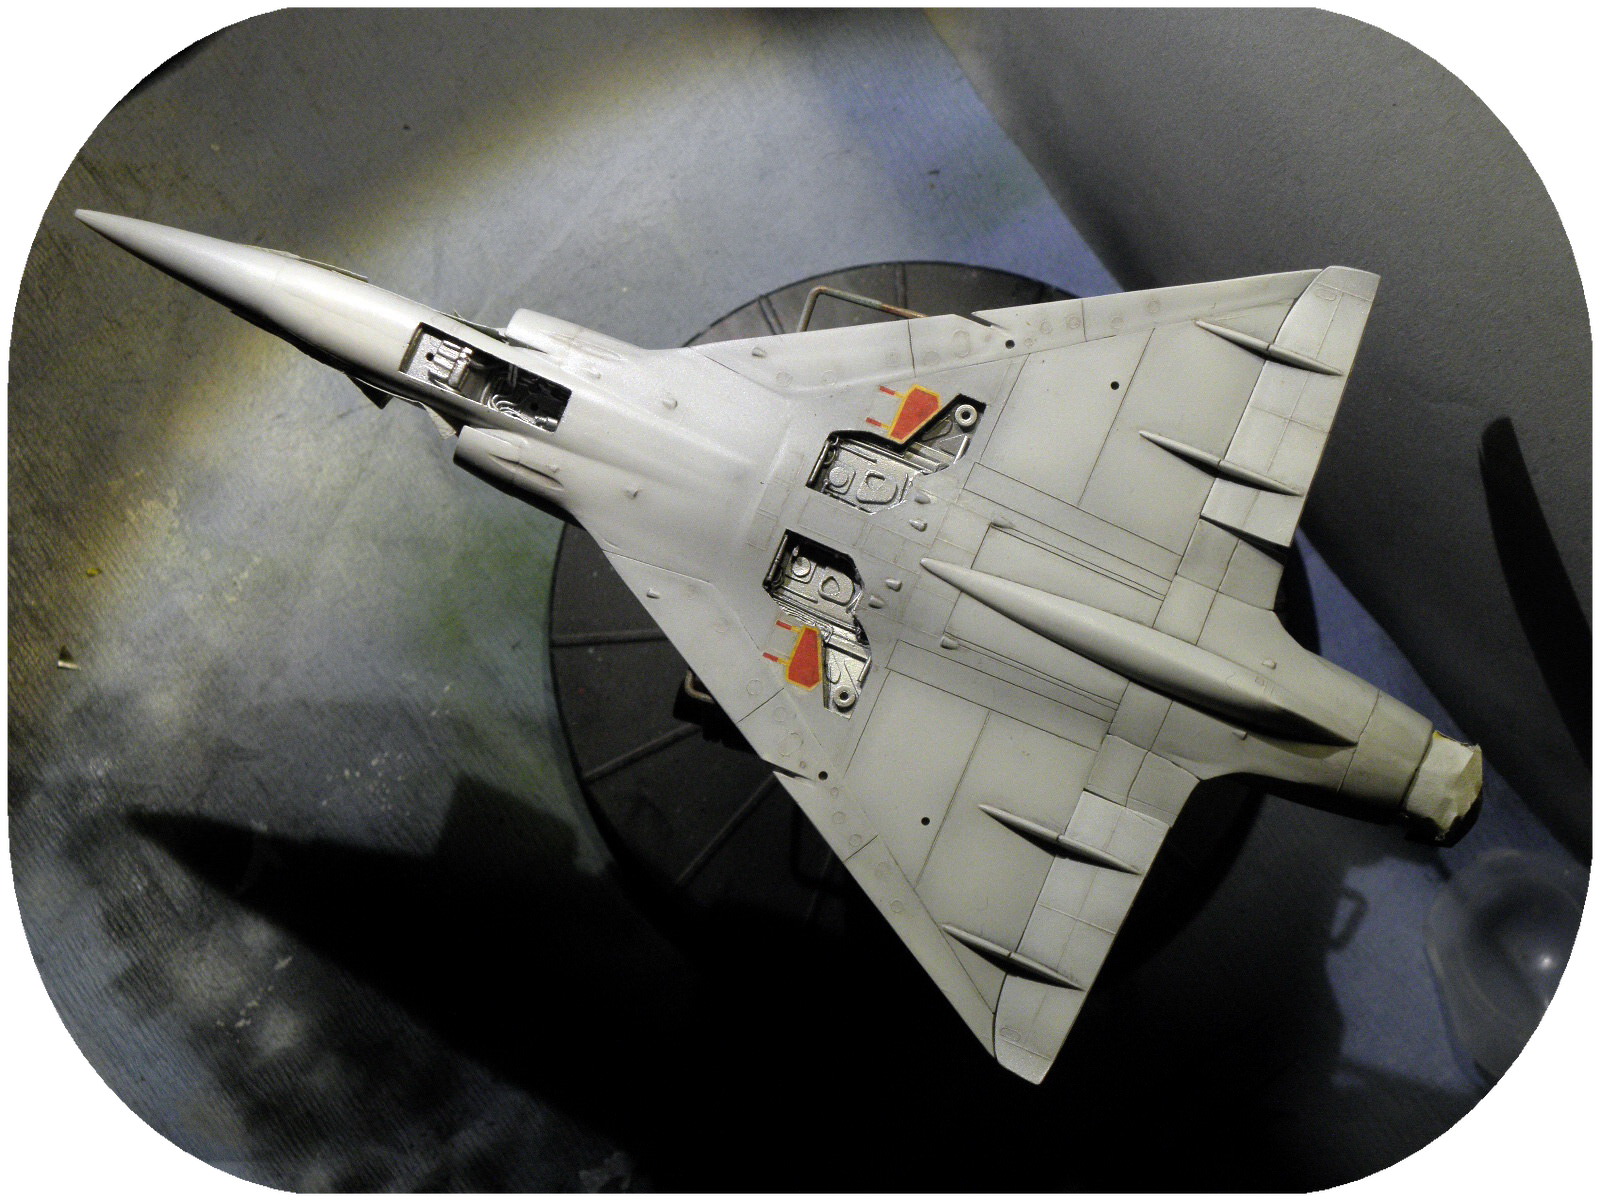
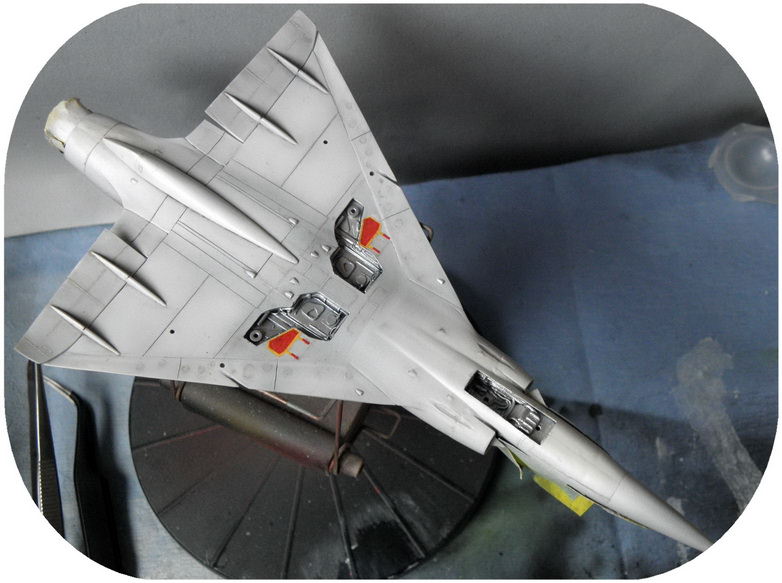
Added also some more small stuff to the wheel wells. Still few to go.
Cheers, Thomas
Sometimes you need to distance yourself to see things clearly - Lao Tzu -
... in scale and in real life -T.
Joel_W
 Associate Editor
New York, United States
Joined: December 04, 2010
KitMaker: 11,666 posts
AeroScale: 7,410 posts
Posted: Saturday, December 16, 2017 - 08:57 PM UTC
Thomas,
Just got a chance to read through your entire build, and to say that I'm impressed is putting it rather mildly. The amount of added detail to ah 1/72 scale kit is more then I thought possible. Your cockpit and seat really has kicked it up a few notches. just one question. You mentioned that you're not going to be making seatbelts and harnesses. Will you be using AM ones instead?
I'm also just as impressed with the level of detail added to the front and main wheel wells.
Joel
On my Workbench:
Monogram 1/24 scale 427 Shelby Cobra
Just Completed:
Beemax 1/24 scale BMW M3 E30 1992 Evolution II
Berlin, Germany
Joined: October 12, 2008
KitMaker: 709 posts
AeroScale: 651 posts
Posted: Tuesday, December 19, 2017 - 12:35 AM UTC
Joel, thank you very much indeed for your more than friendly comment!
It means a lot to me and turned out like a birthday present as it was exactly that day.
I can hardly imagine, that a skilled modeler like you can still be impressed by anything made of styrene.
On the other hand, it tells me that Im not too bad in doing this extra work what Ive never done before.
Since I have little time for modelling I almost use my recent builds for practice new techniques as well instead of trying out on any trash-kit aside. So it will keep my concentration high, otherwise all previous efforts will suffer.
For the belts:
mmmh, if I had AM belts I would use them but do not have

The seats harness (what I saw in pics) is quite complex, so I think I cant do it myself in a good scale manner.
Not sure if AM parts will be worth or give an extra upgrade to that old Heller kit.
Thomas
Sometimes you need to distance yourself to see things clearly - Lao Tzu -
... in scale and in real life -T.
Joel_W
Associate Editor New York, United States
Joined: December 04, 2010
KitMaker: 11,666 posts
AeroScale: 7,410 posts
Posted: Tuesday, December 19, 2017 - 12:55 AM UTC
Quoted Text
Joel,
thank you very much indeed for your more than friendly comment!
It means a lot to me and turned out like a birthday present as it was exactly that day.
I can hardly imagine, that a skilled modeler like you can still be impressed by anything made of styrene.
On the other hand, it tells me that Im not too bad in doing this extra work what Ive never done before.
Since I have little time for modelling I almost use my recent builds for practice new techniques as well instead of trying out on any trash-kit aside. So it will keep my concentration high, otherwise all previous efforts will suffer.
For the belts:
mmmh, if I had AM belts I would use them but do not have
The seats harness (what I saw in pics) is quite complex, so I think I cant do it myself in a good scale manner.
Not sure if AM parts will be worth or give an extra upgrade to that old Heller kit.
Thomas
Thomas,
A happy belated birthday well wishes.
Thank you for that complement, but my modeling skills are nothing but average at best. the key to my modeling is to try and get to as near perfect with the basics as I can. That usually will cover up any goofs, admissions, or general screw ups, of which I'm no stranger to.
As far as seatbelts and Harnesses go. I've made them out of masking tape that I tape two pieces together so that it's sticky side to sticky side. I do make each section some what longer, so that I can bent and shape them for added interest. A drop of CCA or White glue will hold them firmly in place. Most jets used a 6 point built system with what looks like additional securing straps here and there. Use thinner pieces of tape for the pull straps, and you're ready to go. As for buckles and latches, some silver paint or very thing aluminum wire like .2mm or so will do nicely.
Steve Andrews did a video on how he makes belts out of Aluminum foil. Great video and a great technique. I'm going to give it a try on my next build.
The whole concept is to fool the viewers eye.
Joel
On my Workbench:
Monogram 1/24 scale 427 Shelby Cobra
Just Completed:
Beemax 1/24 scale BMW M3 E30 1992 Evolution II
Berlin, Germany
Joined: October 12, 2008
KitMaker: 709 posts
AeroScale: 651 posts
Posted: Friday, January 05, 2018 - 08:42 PM UTC
Joel, thanks a lot for your response!
Still not made a decision about the belts, so let's see.
I already recognized Steve Andrews' build and what he greatly did. Anyway thank you for the hints and tips and I hope you stay tuned although it's truly not your scale.
Thomas
Sometimes you need to distance yourself to see things clearly - Lao Tzu -
... in scale and in real life -T.
Berlin, Germany
Joined: October 12, 2008
KitMaker: 709 posts
AeroScale: 651 posts
Posted: Friday, January 05, 2018 - 08:44 PM UTC
Sometimes you need to distance yourself to see things clearly - Lao Tzu -
... in scale and in real life -T.
Scotland, United Kingdom
Joined: May 11, 2015
KitMaker: 768 posts
AeroScale: 656 posts
Posted: Friday, January 05, 2018 - 09:18 PM UTC
HI Thomas, sorry I've missed your topic up to now but I see that you've been doing some excellent scratch stuff in a tiny scale !
Stretching sprue is a technique I've never more than dabbled in but I'm considering using it more to get a better variety of thickness for tube and circle shapes.
Still amazed that this isn't 48th !

Pax & Pallets: Revell 1/48 Dakota
Terrible Teens : Revell 1/48 F15E Strike Eagle
Airfix IV : Airfix 1.72 Vulcan
Berlin, Germany
Joined: October 12, 2008
KitMaker: 709 posts
AeroScale: 651 posts
Posted: Saturday, January 06, 2018 - 12:04 AM UTC
Paul, thank you for stopping by and your kind words!
While the process I sometimes wonder myself why the f*** I'm doing this in that scale - maybe practising the hard way first makes it easier for the coming builds in bigger scale.
You should definetely try out sprues on your Dakota for detailing although your scratch skills are already great.
Thomas
Sometimes you need to distance yourself to see things clearly - Lao Tzu -
... in scale and in real life -T.
Joel_W
Associate Editor New York, United States
Joined: December 04, 2010
KitMaker: 11,666 posts
AeroScale: 7,410 posts
Posted: Saturday, January 06, 2018 - 07:31 AM UTC
Thomas,
That's really amazing detail even before one considers that fact that this is 1/72 scale.
Joel
On my Workbench:
Monogram 1/24 scale 427 Shelby Cobra
Just Completed:
Beemax 1/24 scale BMW M3 E30 1992 Evolution II
Berlin, Germany
Joined: October 12, 2008
KitMaker: 709 posts
AeroScale: 651 posts
Posted: Sunday, January 07, 2018 - 11:19 PM UTC
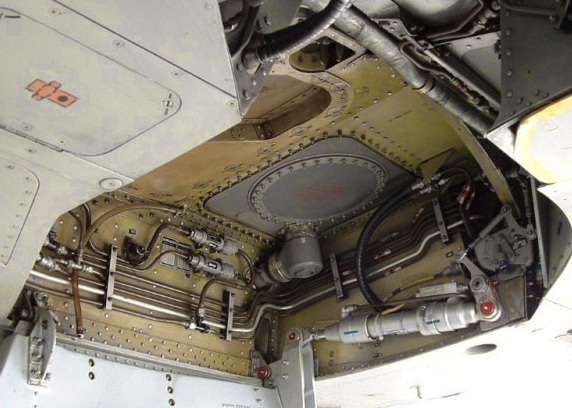
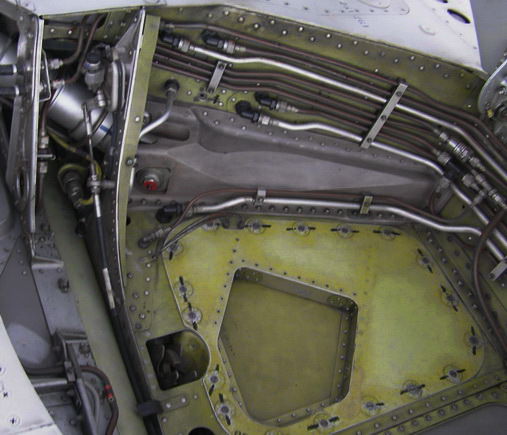
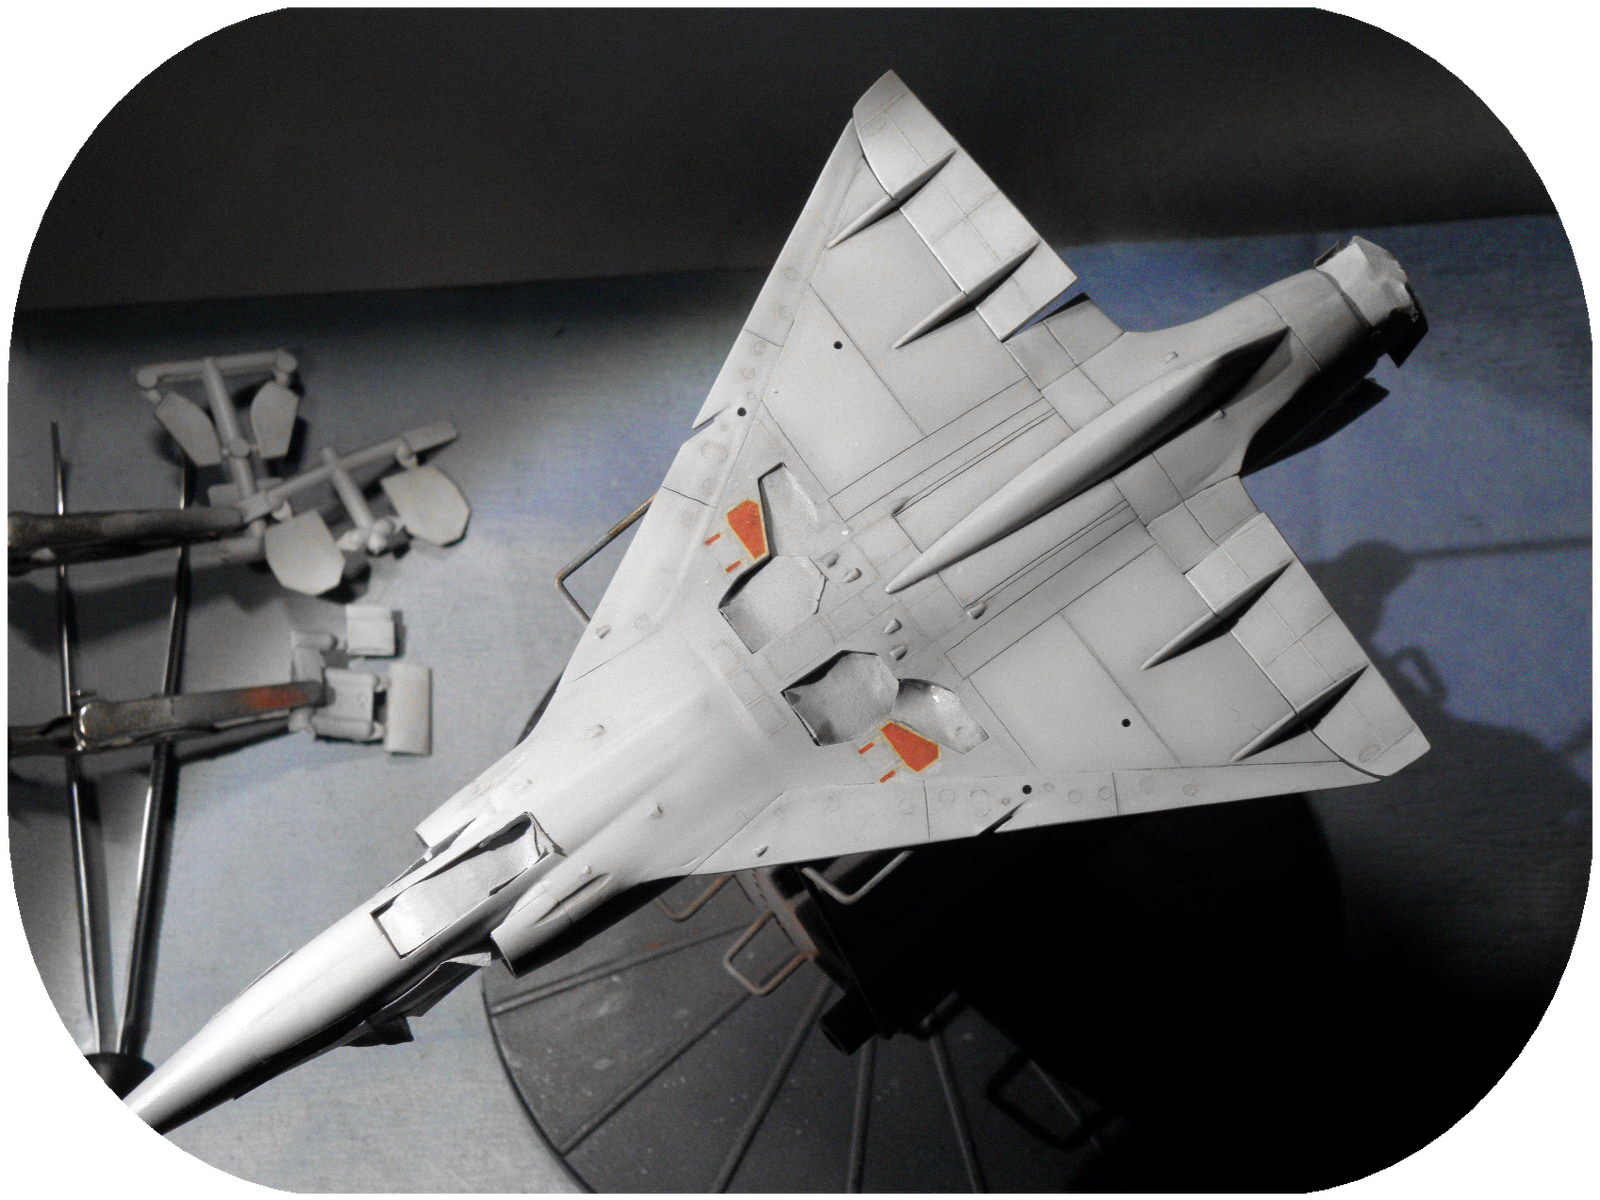
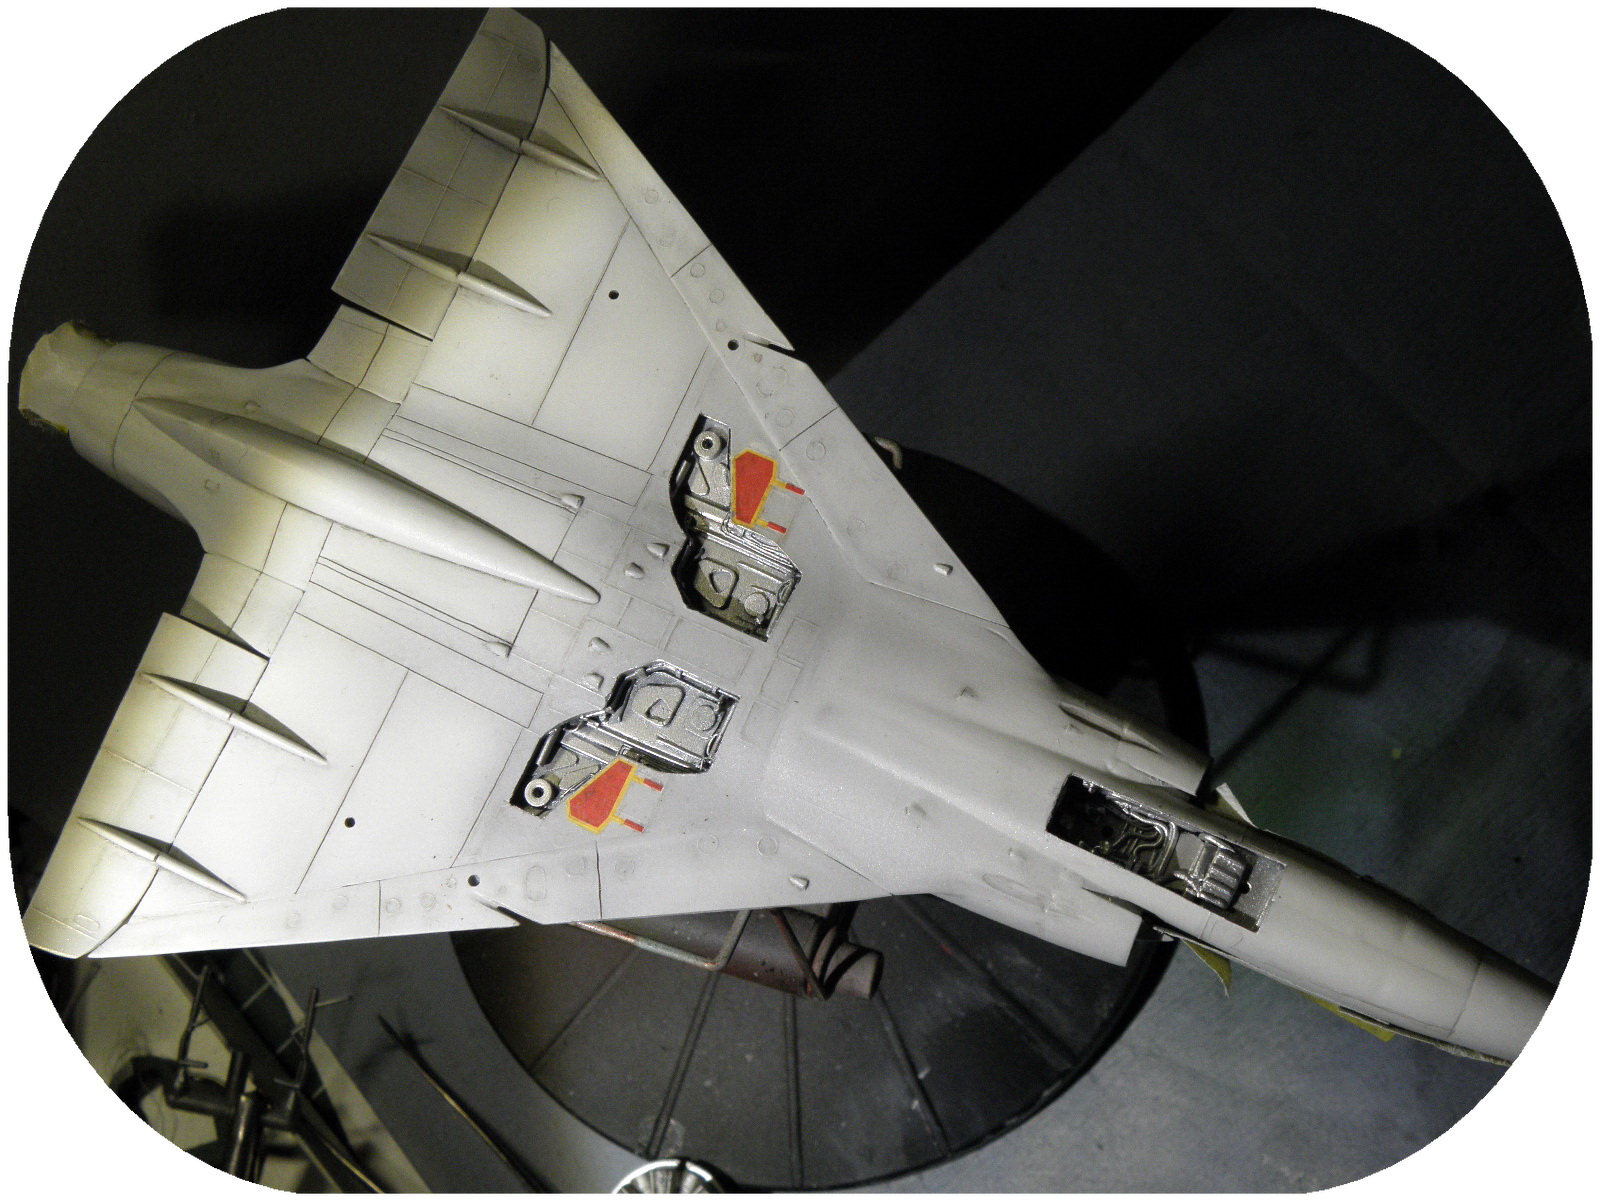
Joel, maybe some details are out of of scale and not matching the real a/c but I'm quite happy about the outcome.
Before moving on I gave all wheel bays a quick (with one of my cheaper tools - so it's a bit sparkling) a/b-shots with black primer/flat white acrylic to see how the depth aspect works.
Thomas
Sometimes you need to distance yourself to see things clearly - Lao Tzu -
... in scale and in real life -T.
Joel_W
Associate Editor New York, United States
Joined: December 04, 2010
KitMaker: 11,666 posts
AeroScale: 7,410 posts
Posted: Monday, January 08, 2018 - 10:38 PM UTC
Thomas,
The primer coat really helps to tie it all together. Those wells really do look good.
Joel
On my Workbench:
Monogram 1/24 scale 427 Shelby Cobra
Just Completed:
Beemax 1/24 scale BMW M3 E30 1992 Evolution II
Berlin, Germany
Joined: October 12, 2008
KitMaker: 709 posts
AeroScale: 651 posts
Posted: Sunday, January 14, 2018 - 10:59 PM UTC
Quoted Text
Thomas,
The primer coat really helps to tie it all together. Those wells really do look good.
Joel
Thanks a lot, Joel!
And indeed a quick primer session on scratched parts is very helpful for a better overview although you can't really correct or add/remove something in that scale.
Thomas
Sometimes you need to distance yourself to see things clearly - Lao Tzu -
... in scale and in real life -T.
Berlin, Germany
Joined: October 12, 2008
KitMaker: 709 posts
AeroScale: 651 posts
Posted: Sunday, January 14, 2018 - 10:59 PM UTC
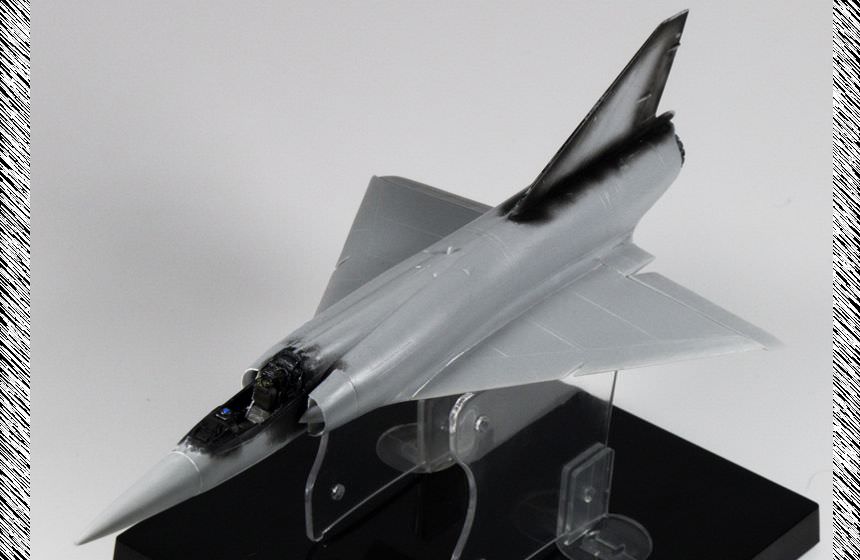
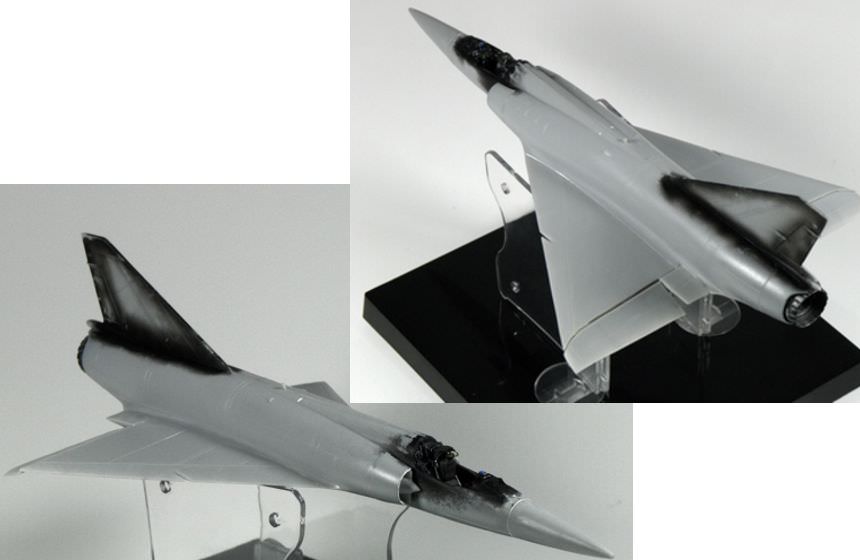
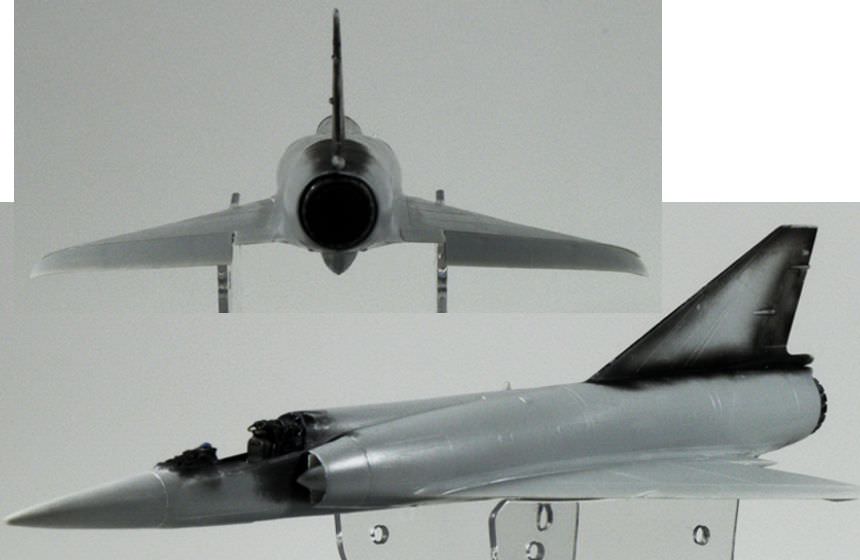
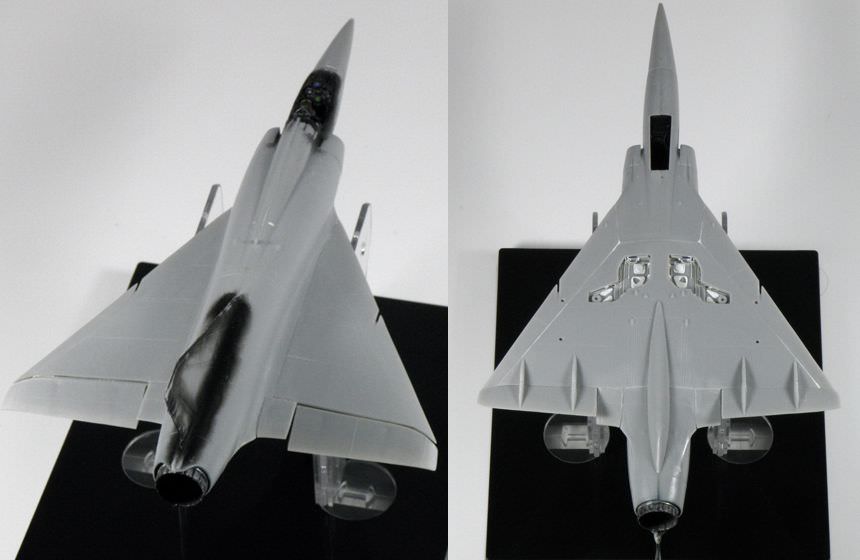
Hi there!
A little more progress on the paint side.
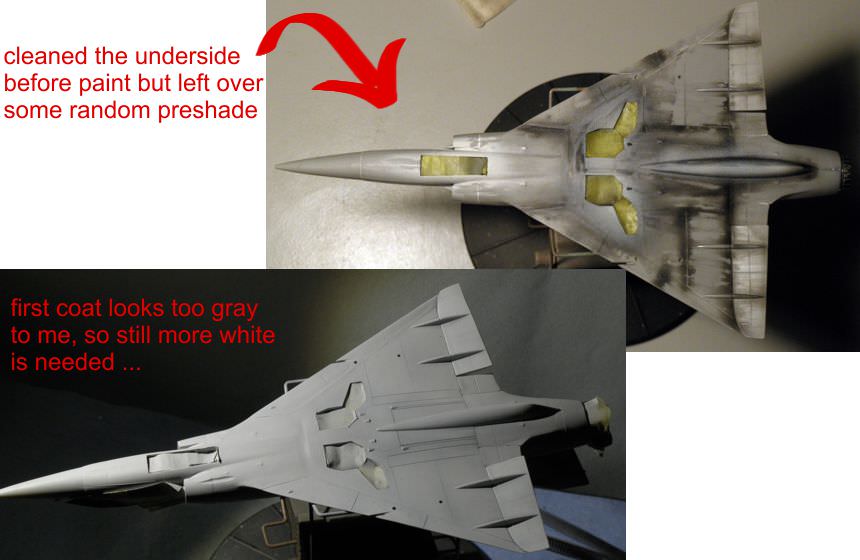
Started with the underside and while cleaning it up I decided to leave some color as preshade residues.
Roughly covered up the wells that will be done later on to avoid too much color overlay on the tiny details inside.
Since I'll go for the 5BA most of the pics (depending on the exposure) showing a range from very light gray to nearly white.
My first a/b shots look too greyish to me, so I went for more lightening up with 1:1 diluted white coats (Revell acrylics - running quite smooth). After all it turns out ok to me.
Thanks for interest, Thomas
Sometimes you need to distance yourself to see things clearly - Lao Tzu -
... in scale and in real life -T.
Joel_W
Associate Editor New York, United States
Joined: December 04, 2010
KitMaker: 11,666 posts
AeroScale: 7,410 posts
Posted: Monday, January 15, 2018 - 12:03 AM UTC
Thomas,
I'm just lovin' your shading and fading paint technique. Now that's thinking out of the box and it not only works, it looks great.
I'm a firm believer in a varied, non-pattern form of pre-shading where the end result that shows through the color coats looks random but realistic due whatever external factors would come into play. And you've achieved that.
As you've seen, many light coats works so much better then a few heavier coats.
Looking forward to your top color coats.
Joel
On my Workbench:
Monogram 1/24 scale 427 Shelby Cobra
Just Completed:
Beemax 1/24 scale BMW M3 E30 1992 Evolution II
Berlin, Germany
Joined: October 12, 2008
KitMaker: 709 posts
AeroScale: 651 posts
Posted: Thursday, January 25, 2018 - 10:52 PM UTC
Joel, thank you so much for your kind words!
That means much to me and your judging is a real compliment
Whenever I follow your builds I'm always impressed about your sense and skill for painting and your good eye for bringing the colors to life finally.
Since I made less than 10 builds (and 4 hangar queens) after returning to scale modelling I´m happy so far.
Nevertheless I have to improve my skills and learning curve in many ways.
Thomas
Sometimes you need to distance yourself to see things clearly - Lao Tzu -
... in scale and in real life -T.
Berlin, Germany
Joined: October 12, 2008
KitMaker: 709 posts
AeroScale: 651 posts
Posted: Thursday, January 25, 2018 - 10:55 PM UTC
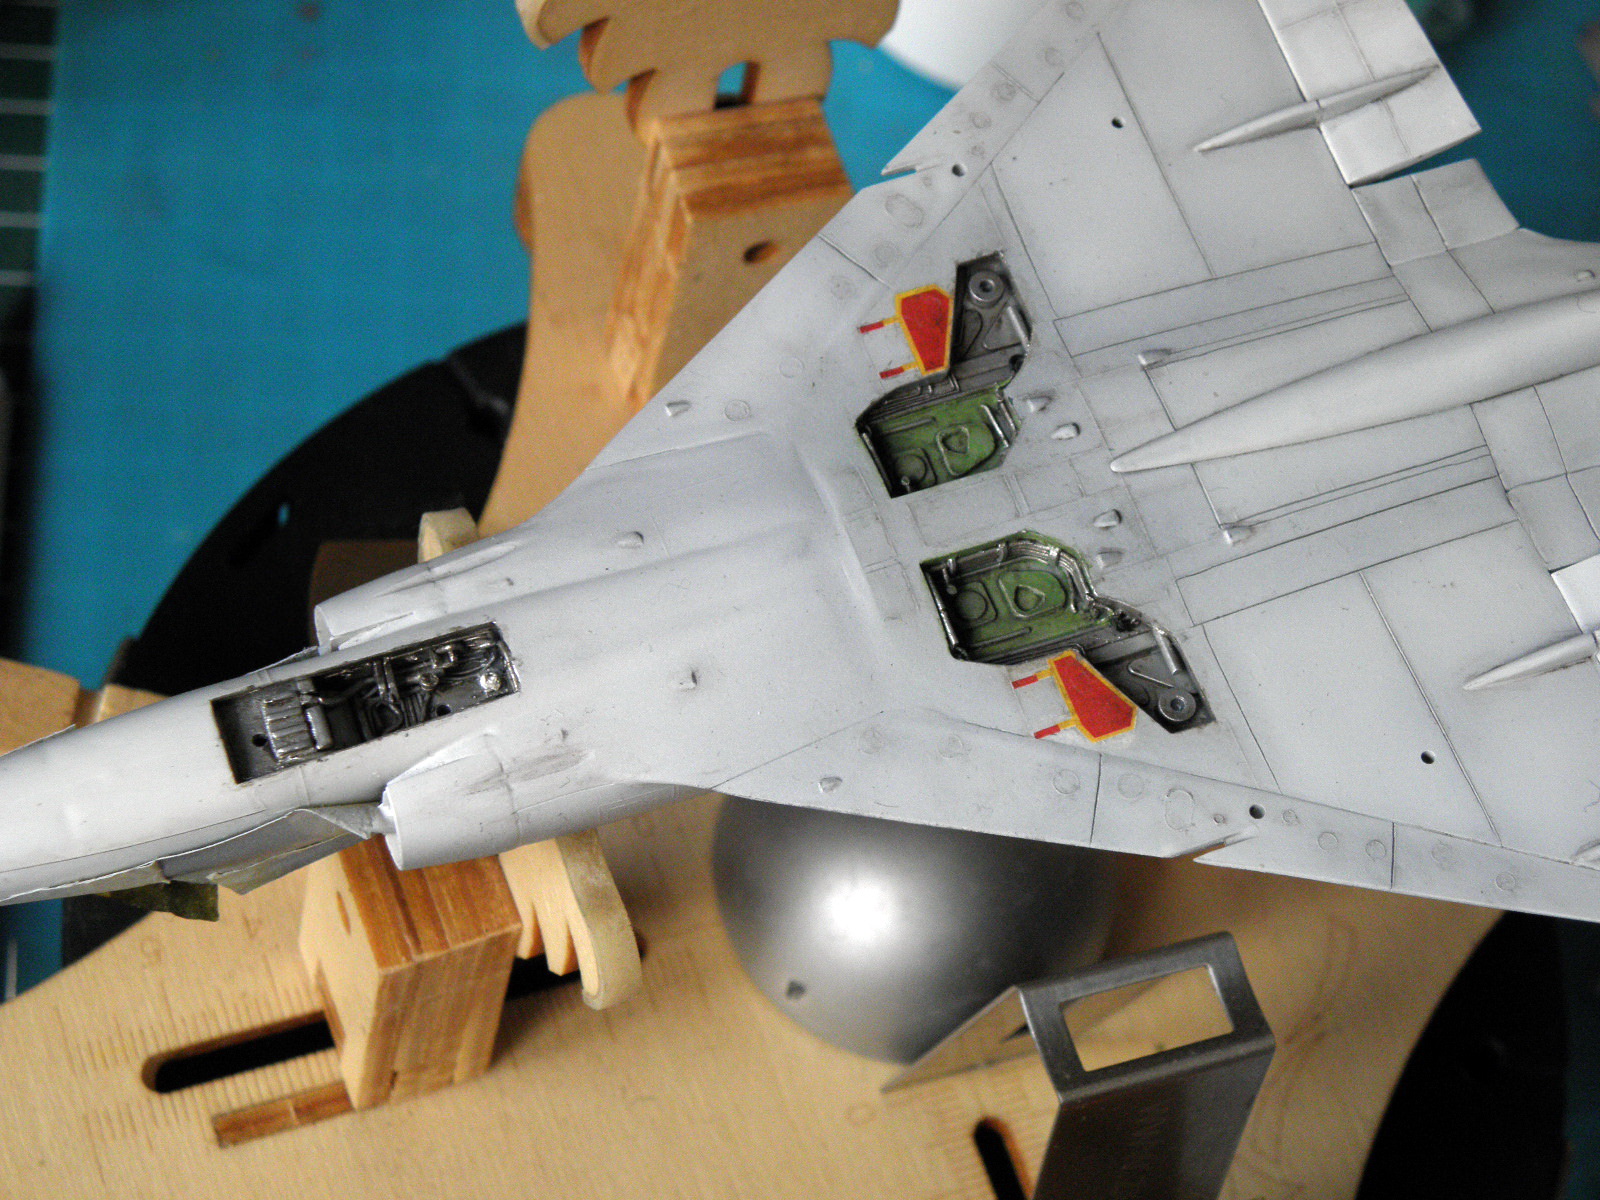
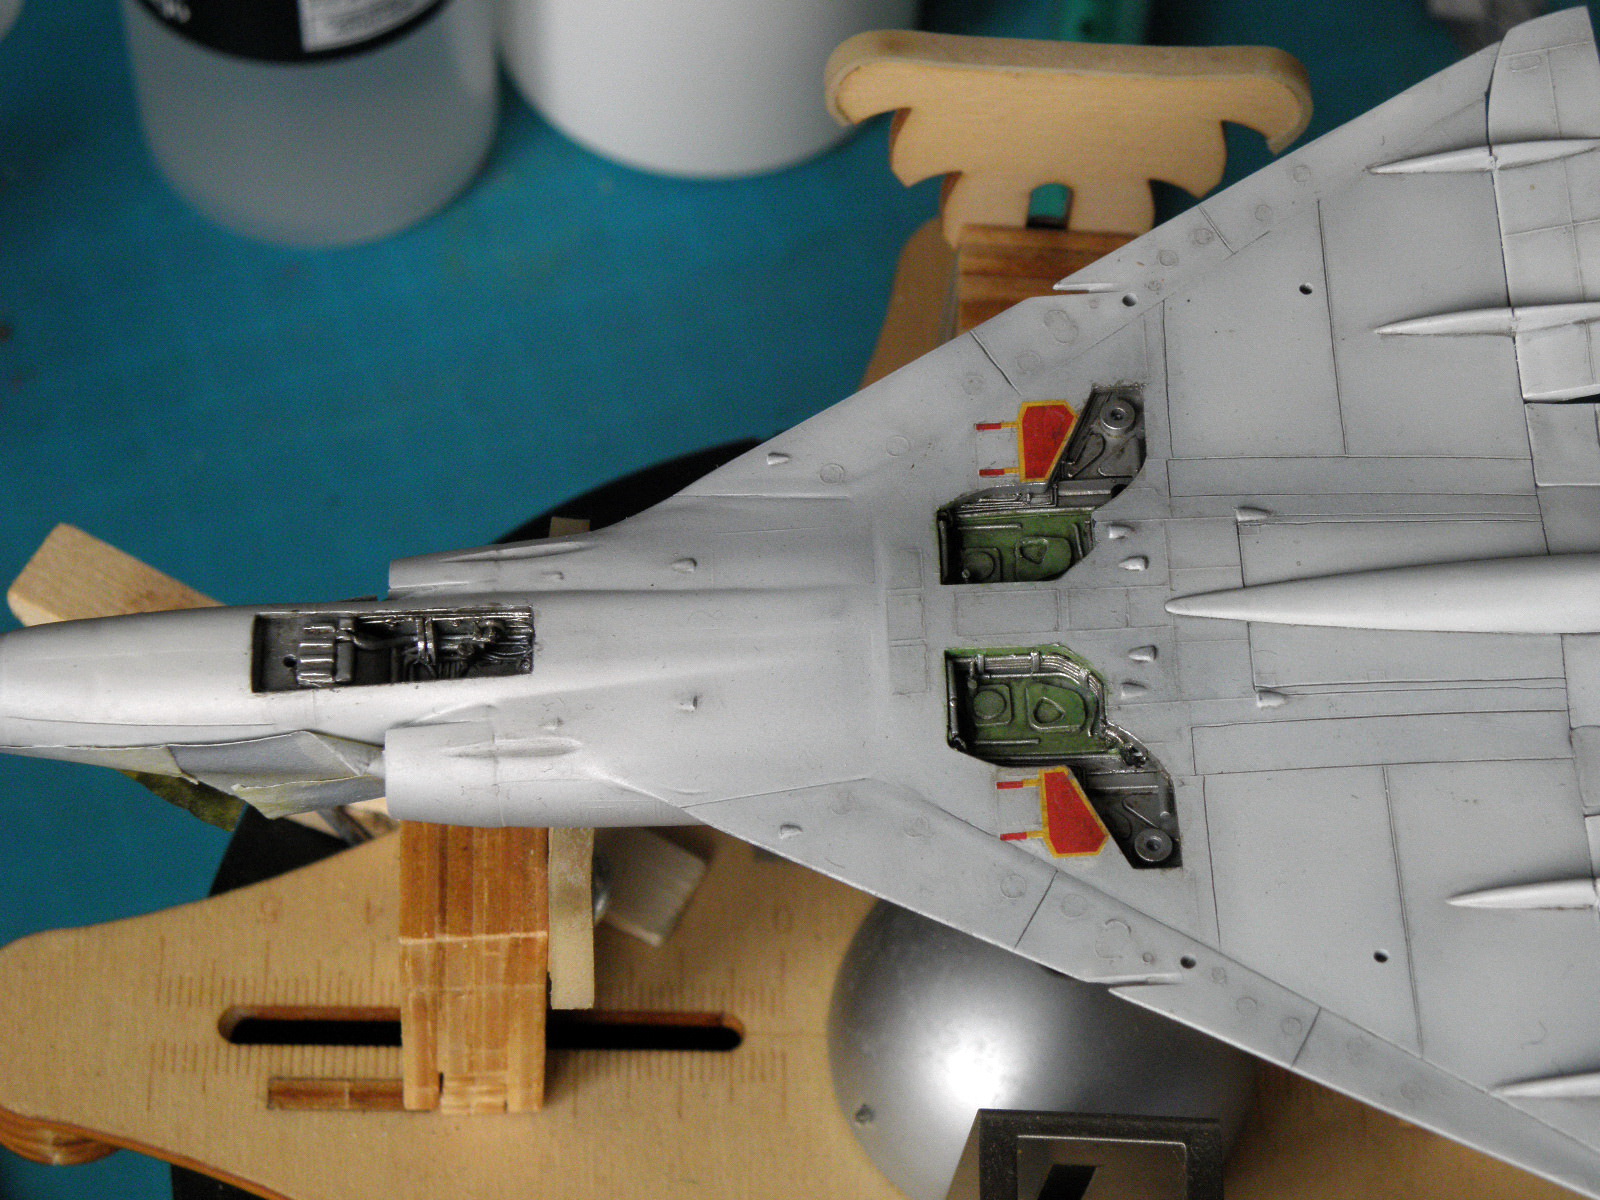
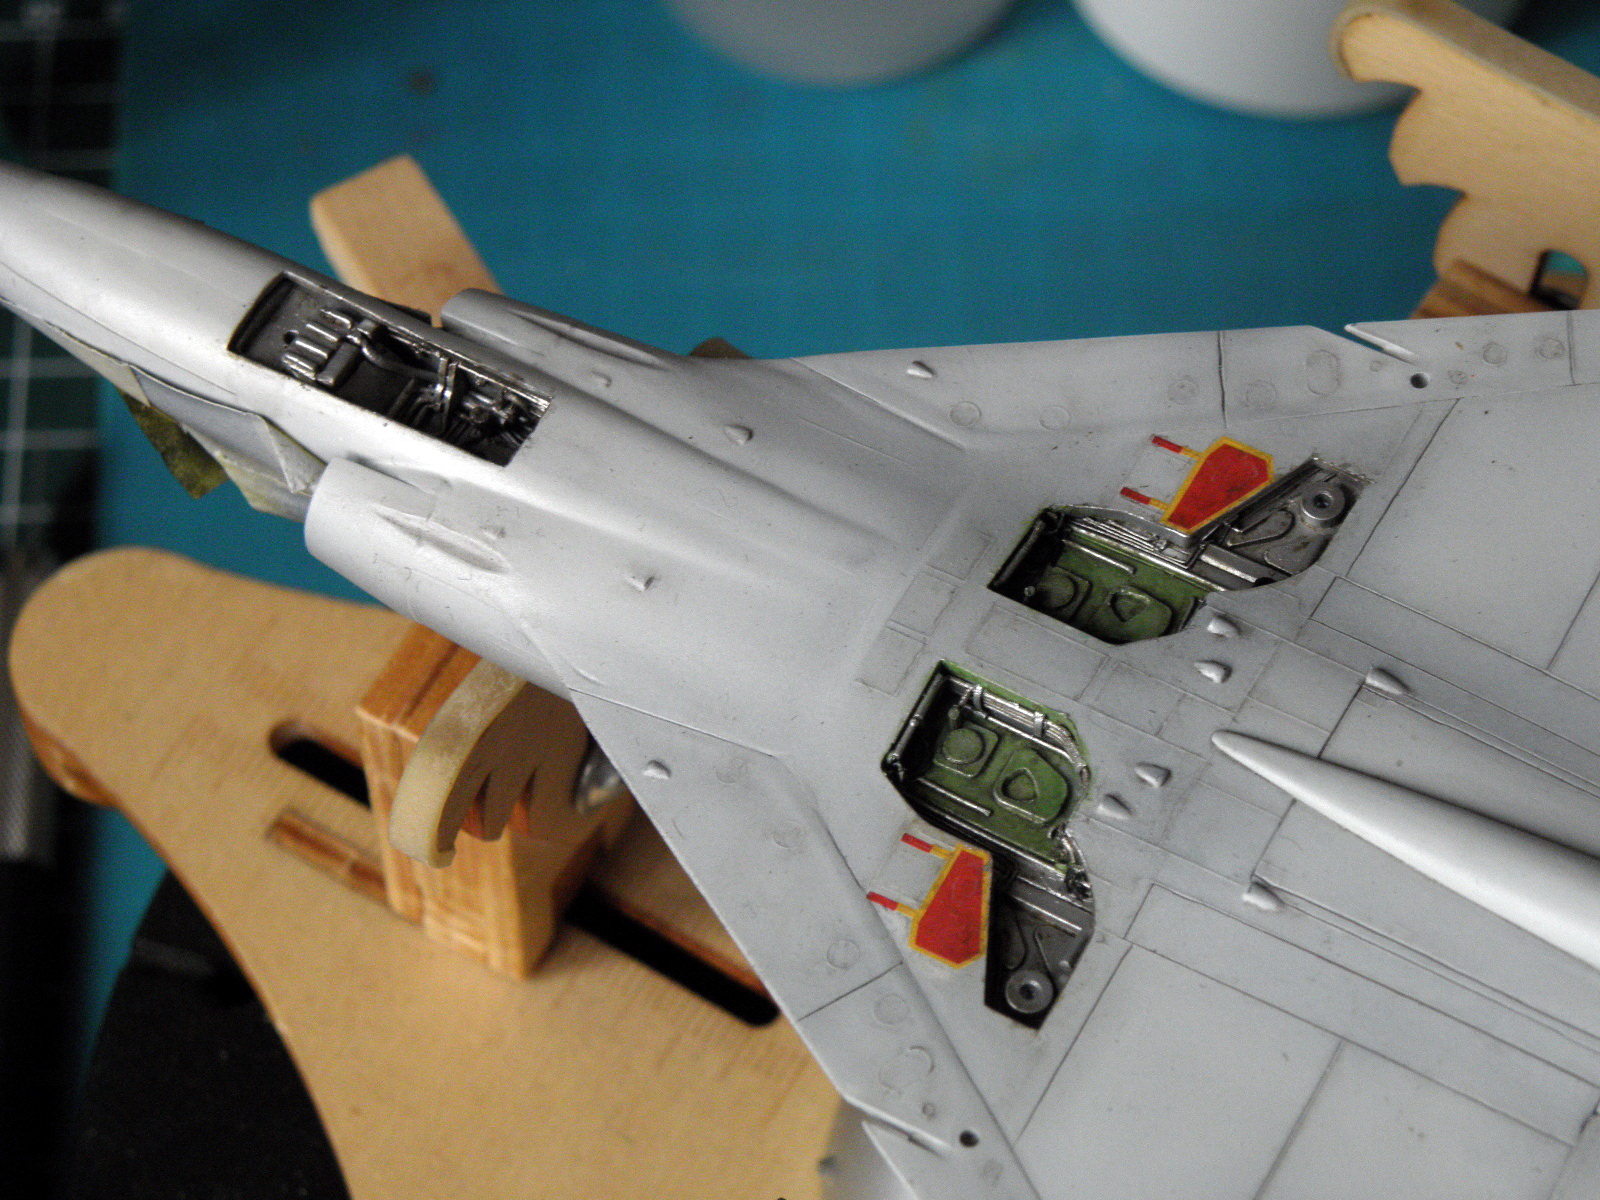
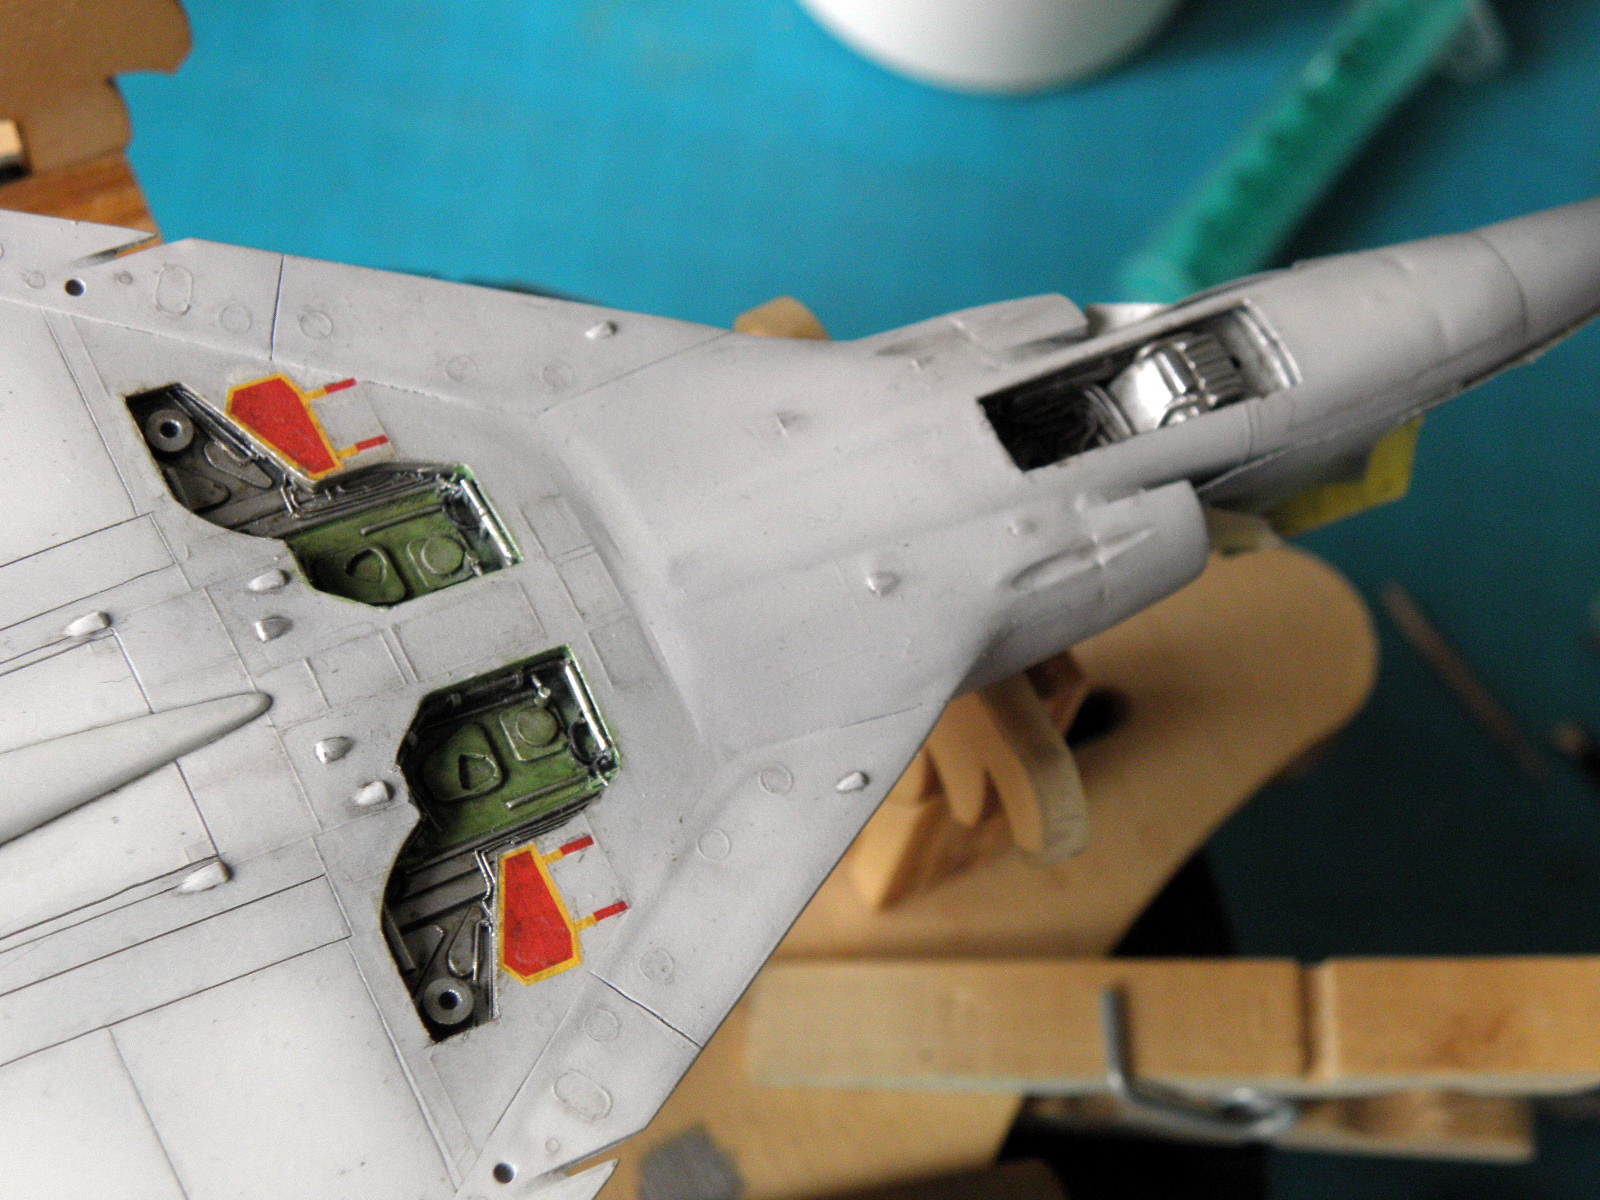
Hi again!
Little more progress.
Decided to work through the underside first before moving on to the top.
Glossy clear coated (tried out "Winsor & Newton" Acrylics coat, yellow cap; mixed with Vallejo a/b thinner) worked fine and I did some light washing and varying (Flory`s gray and a own mixture). Applied the 2 decals (Remember? 1973...!)that were a bit out of size but to late to correct. Fragile but snuggling down with some help.
Finally covered with satin gloss (again "W&N")than removed the tape from the wells and masked them from the outer lines.
All covered up and some coats of a primary silver shine.
Now I have to modify the wells color partially and bring the details more out.
btw: the rest of the paint I used as a first coat for the Zero-Engine for the PTO cpgn. ...
Didn't want to do too much weathering nor a factory fresh a/c.
Surely you can find much more used/abused units ...
The latest from today in natural daylight.
Appreciate your stopping by, Thomas
Sometimes you need to distance yourself to see things clearly - Lao Tzu -
... in scale and in real life -T.
Berlin, Germany
Joined: October 12, 2008
KitMaker: 709 posts
AeroScale: 651 posts
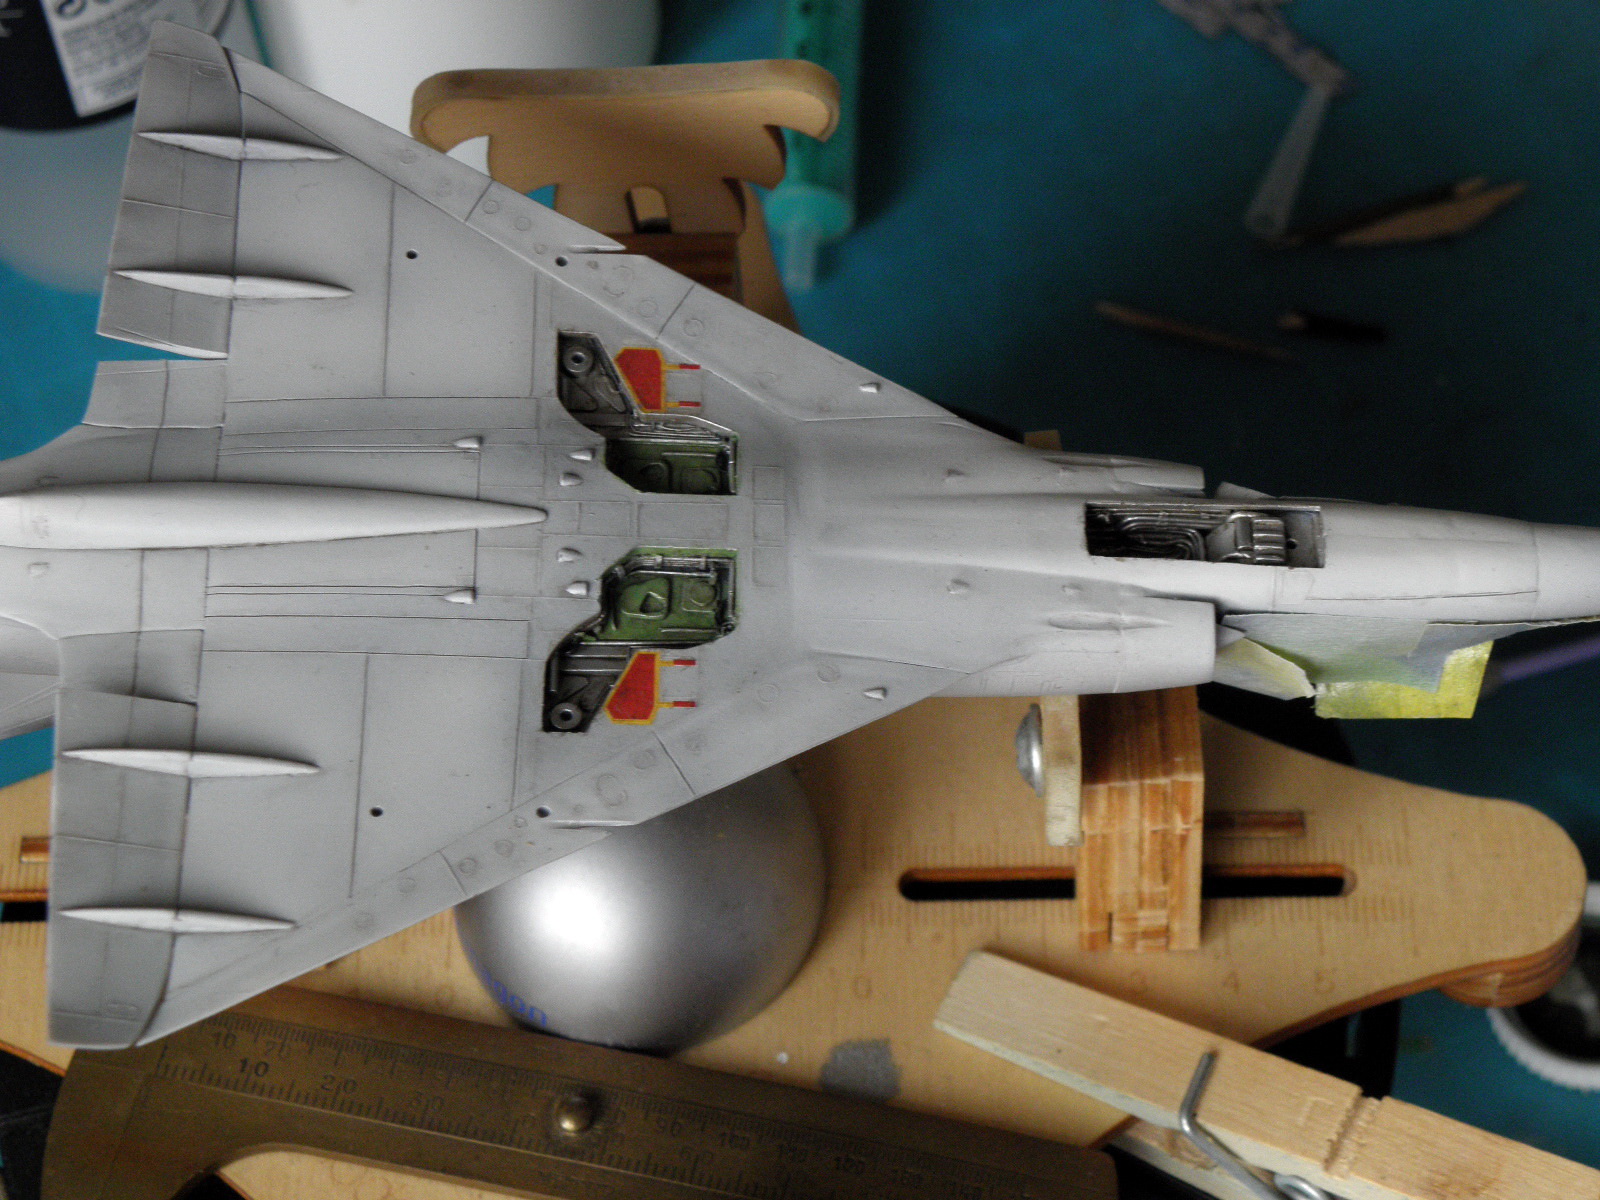
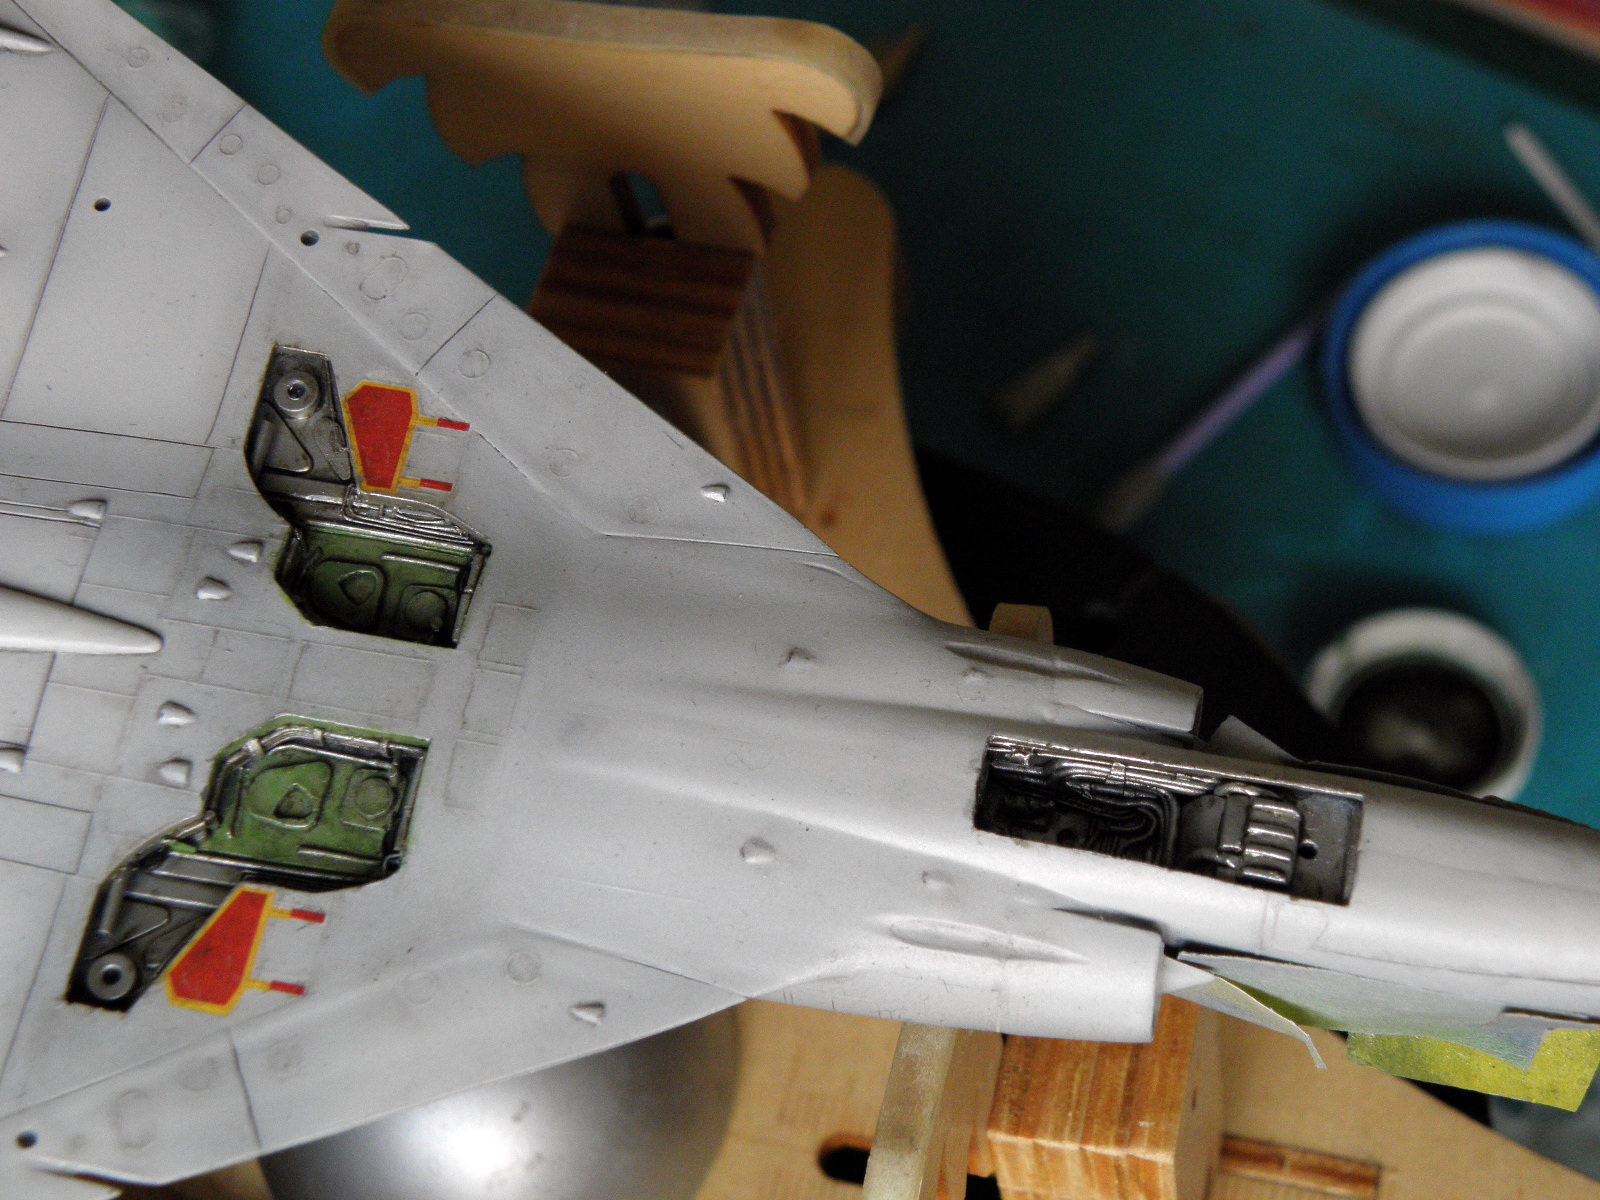
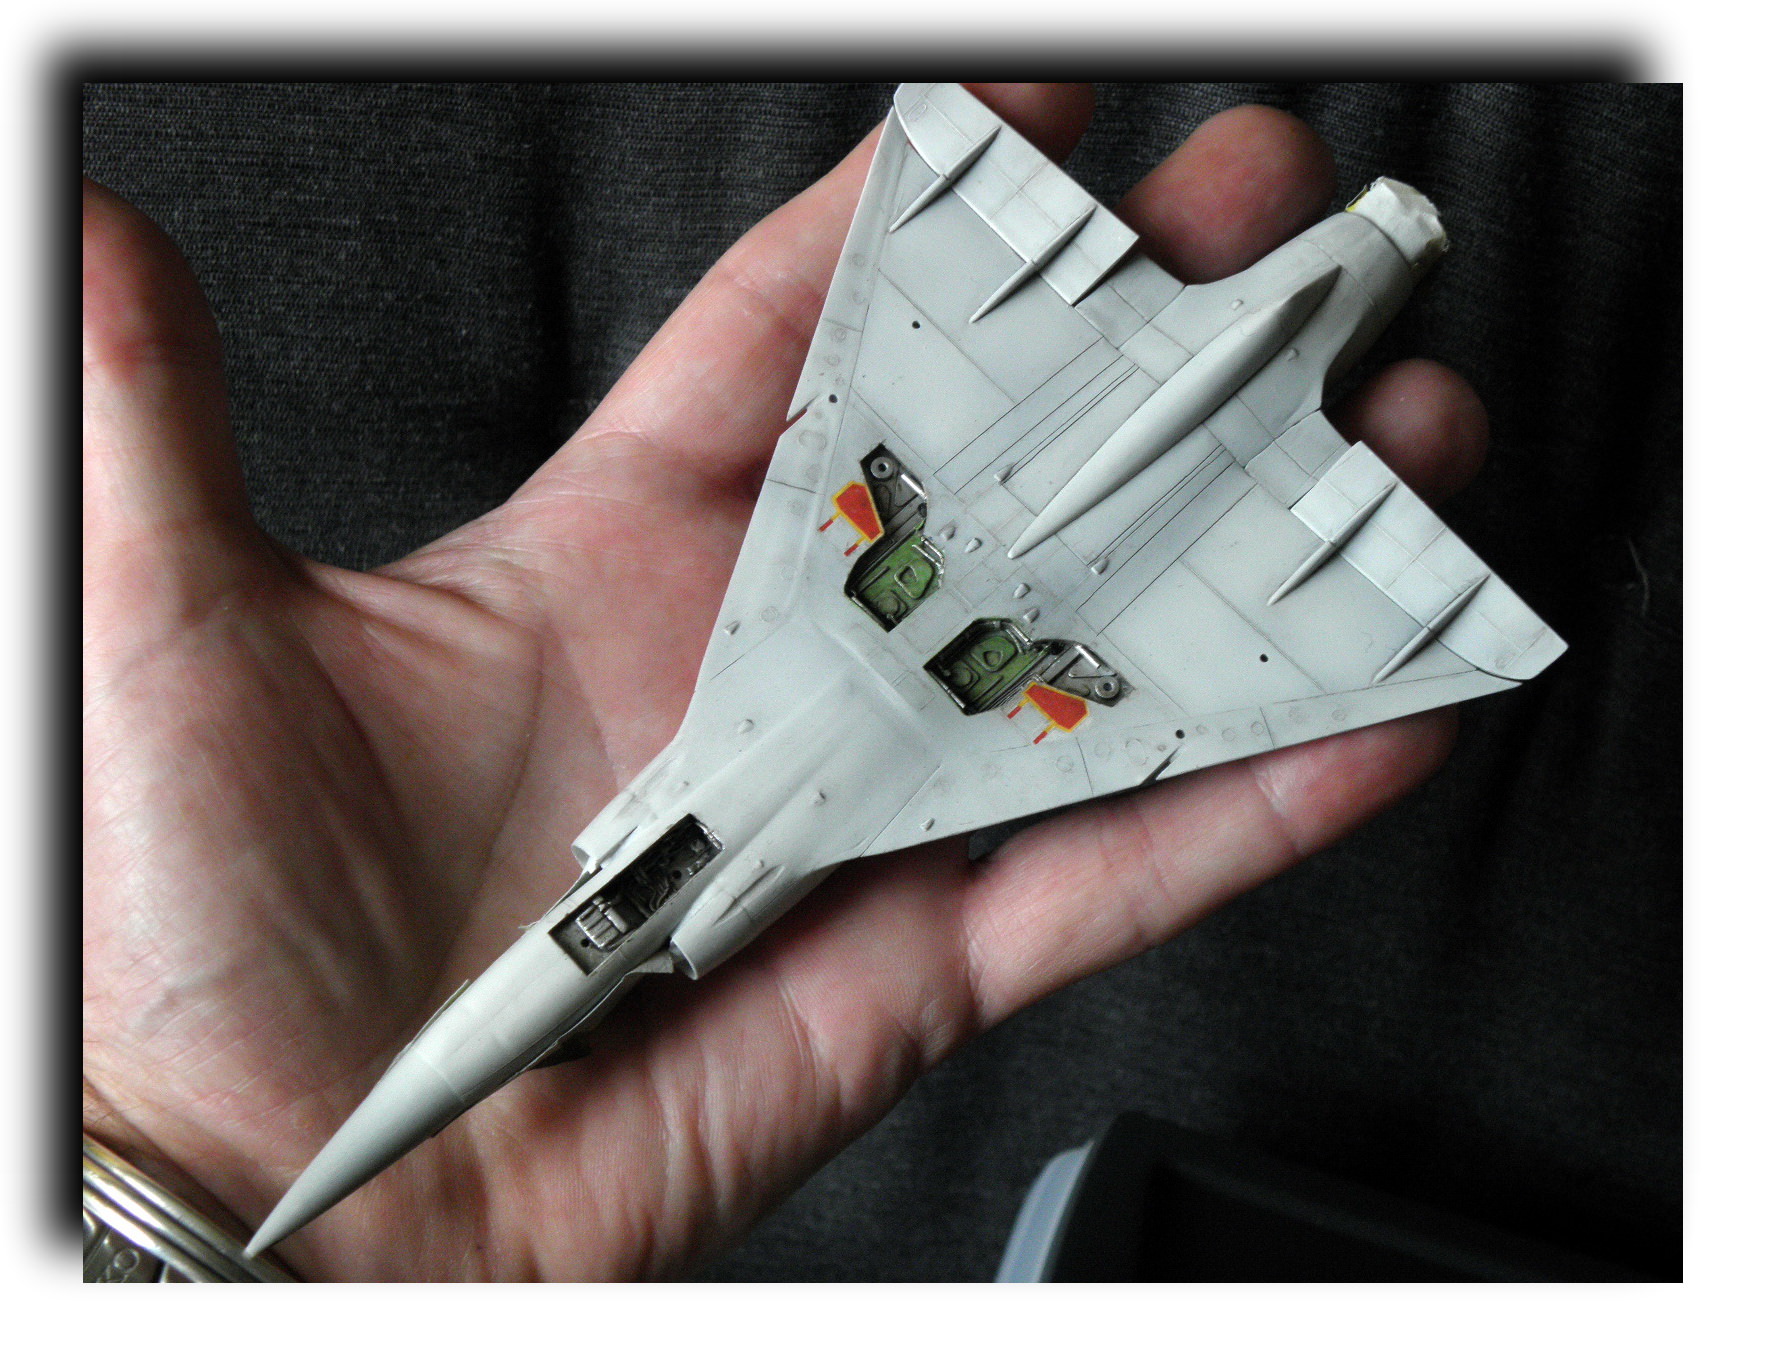
Posted: Monday, January 29, 2018 - 10:33 PM UTC
Sometimes you need to distance yourself to see things clearly - Lao Tzu -
... in scale and in real life -T.
Joel_W
Associate Editor New York, United States
Joined: December 04, 2010
KitMaker: 11,666 posts
AeroScale: 7,410 posts
Posted: Tuesday, January 30, 2018 - 03:39 AM UTC
Thomas,
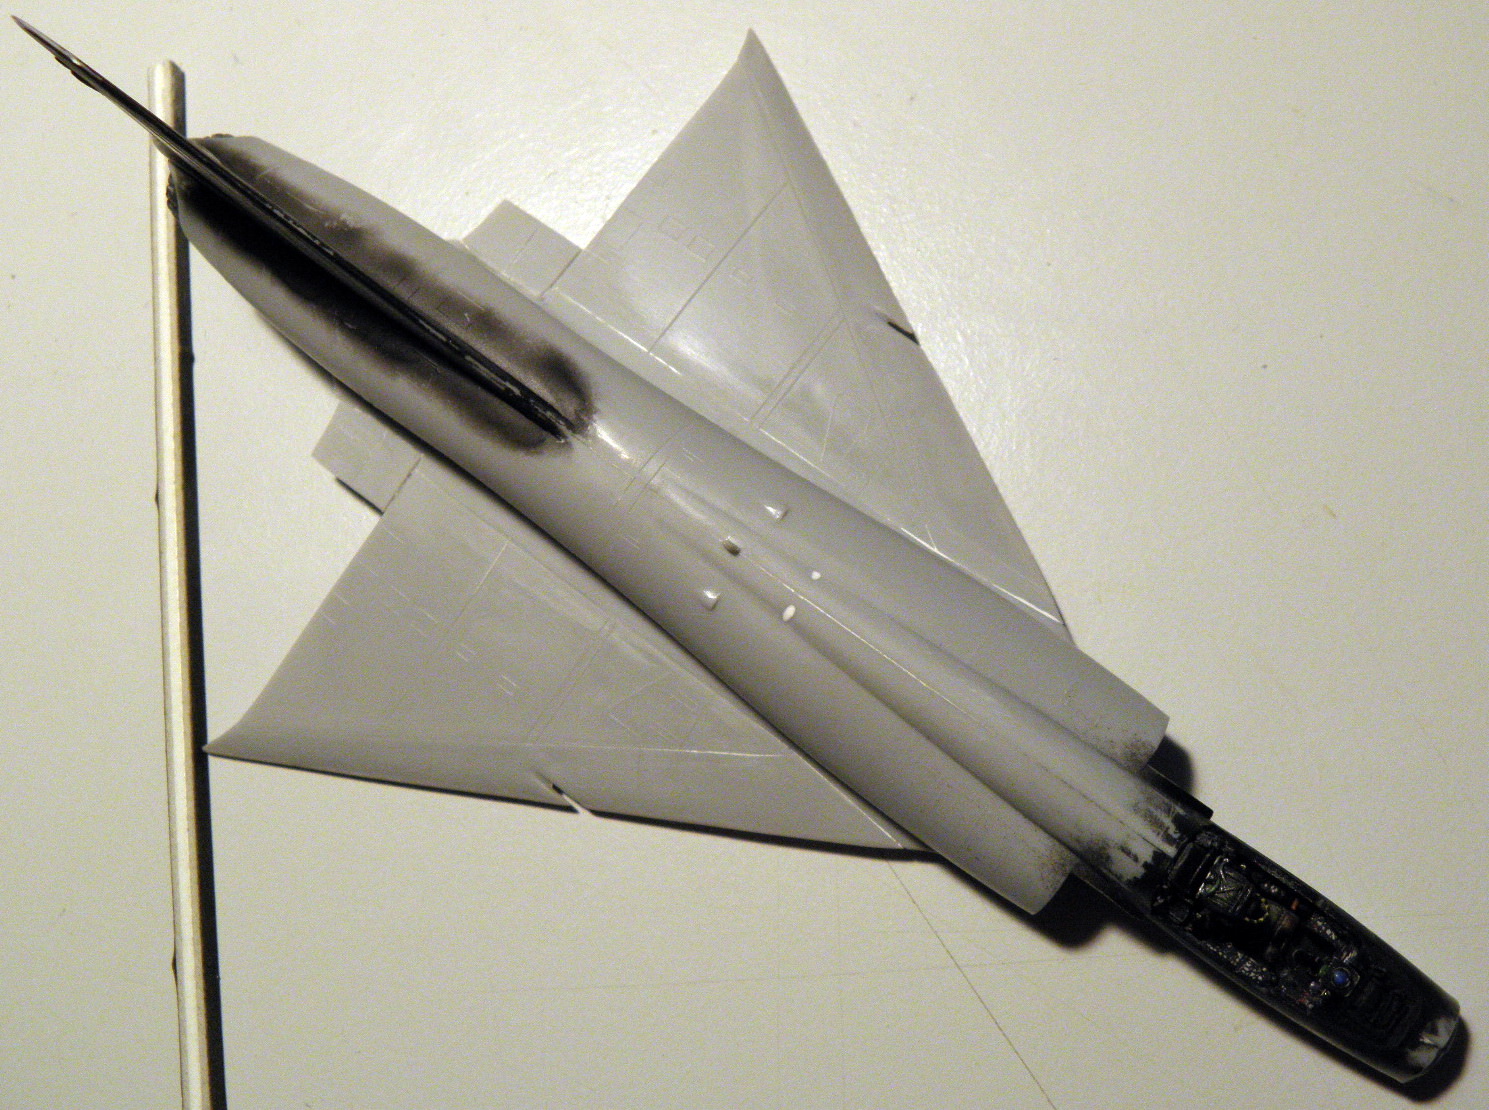
Even though I've been along for the ride since the beginning, and knew that your build is in 1/72 scale, seeing it laying in the palm of your hand is the 1st time that I actually realized just how small the Mirage III is. And then to see all that added detail is even more amazing.
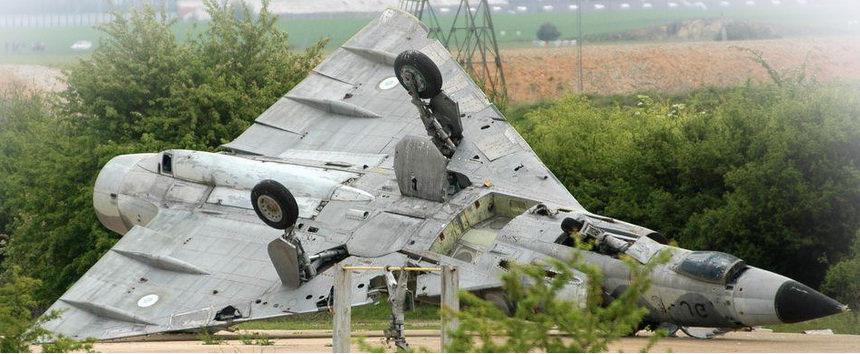
Your gray paint and weathering really turned out quite well. Not overly done by any means. Just enough so that one gets the sense of a maintained operational aircraft. Your main wheel wells really closely match up to the picture that you posted, both in detail, colors, and weathering. Impressive to say the least.
Looking forward to your next update.
Joel
On my Workbench:
Monogram 1/24 scale 427 Shelby Cobra
Just Completed:
Beemax 1/24 scale BMW M3 E30 1992 Evolution II
Berlin, Germany
Joined: October 12, 2008
KitMaker: 709 posts
AeroScale: 651 posts
Posted: Wednesday, January 31, 2018 - 11:05 PM UTC
Joel, very kind words indeed!
I really appreciate your sidestep from your own (not always silky) road and resting a few minutes here.
It' more than motivating.
As for the colors I think I didn't really justice the "lighten up the paint in scale-ratio"-rules ...

The greenish looked different when I mixed and tried it and is even more intense on the pics. Maybe I manage to tone it down.
But you see the size - imagine brush work inside ...
Thomas
Sometimes you need to distance yourself to see things clearly - Lao Tzu -
... in scale and in real life -T.
Scotland, United Kingdom
Joined: May 11, 2015
KitMaker: 768 posts
AeroScale: 656 posts
Posted: Thursday, February 01, 2018 - 03:06 PM UTC
I agree with Joel about the hand photo! Suddenly the scale becomes obvious and makes your efforts all the more impressive.

Pax & Pallets: Revell 1/48 Dakota
Terrible Teens : Revell 1/48 F15E Strike Eagle
Airfix IV : Airfix 1.72 Vulcan