

Now youve done it - I have not two but THREE to keep track of !
Exhausting ! LOL
Keep at it it and surely you have a fourth one somewhere ?
RT
World War II
Discuss WWII and the era directly before and after the war from 1935-1949.
Discuss WWII and the era directly before and after the war from 1935-1949.
Hosted by Rowan Baylis
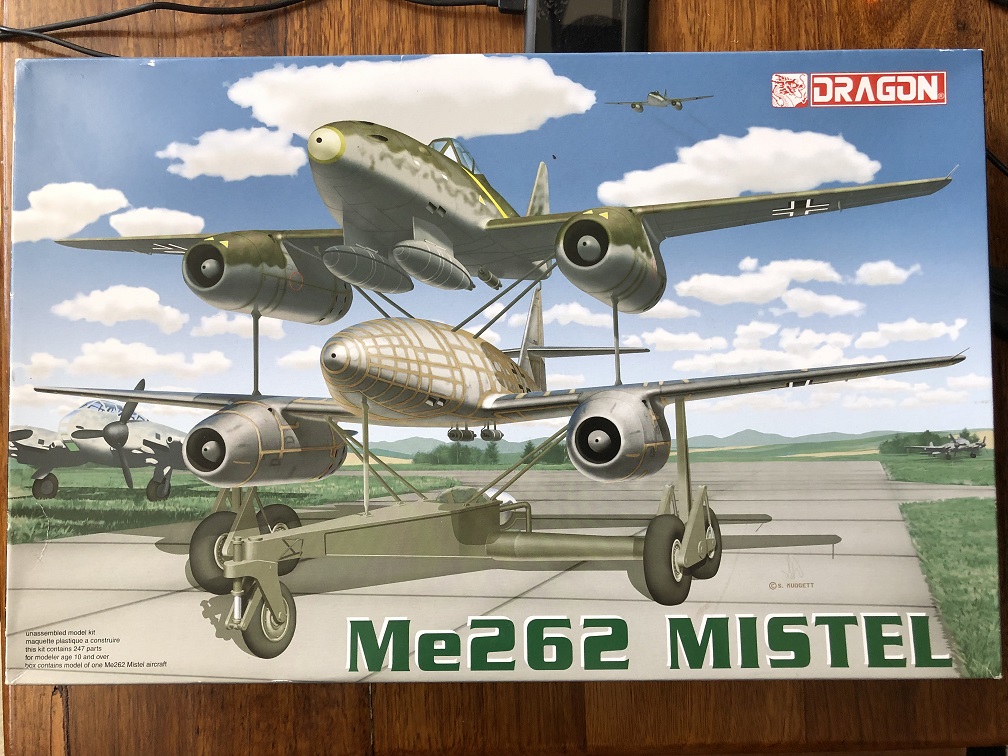
Messerschmitt Me 262 A-2a/U2 1/48 Dual Build

rdt1953

Joined: February 06, 2015
KitMaker: 1,098 posts
AeroScale: 900 posts
Posted: Tuesday, September 15, 2020 - 11:15 PM UTC

AussieReg

#007

Joined: June 09, 2009
KitMaker: 8,156 posts
AeroScale: 3,756 posts
Posted: Thursday, September 17, 2020 - 12:13 AM UTC
Thanks for checking in Richard!
Yeah, I've got to keep you guys on you toes!
Somewhere indeed. I've got 5 more 1/48 kits stashed away, including this one
or does that count as two? OK, I've got 6 more 1/48 kits stashed away, plus 3 in 1/32 scale.
Maybe I could just . . . . . . . no, I won't

Cheers, D
Quoted Text
Now youve done it - I have not two but THREE to keep track of ! Exhausting ! LOL
Yeah, I've got to keep you guys on you toes!
Quoted Text
Keep at it it and surely you have a fourth one somewhere ?
RT
Somewhere indeed. I've got 5 more 1/48 kits stashed away, including this one
or does that count as two? OK, I've got 6 more 1/48 kits stashed away, plus 3 in 1/32 scale.
Maybe I could just . . . . . . . no, I won't
Cheers, D

AussieReg
#007
Joined: June 09, 2009
KitMaker: 8,156 posts
AeroScale: 3,756 posts
Posted: Friday, September 25, 2020 - 01:47 PM UTC
Some progress on the Dragon kit. First I painted the RLM65 on the underside and pre-shaded the top (using Gunze Aqueous Hobby Colour H67 thinned with MLT).


Next up was a paint mix for the top colour. I used Tamiya XF-64/49/64 in about a 3/1/1 ratio. Built up slowly to allow the pre-shading to give it some variation for a fading effect.
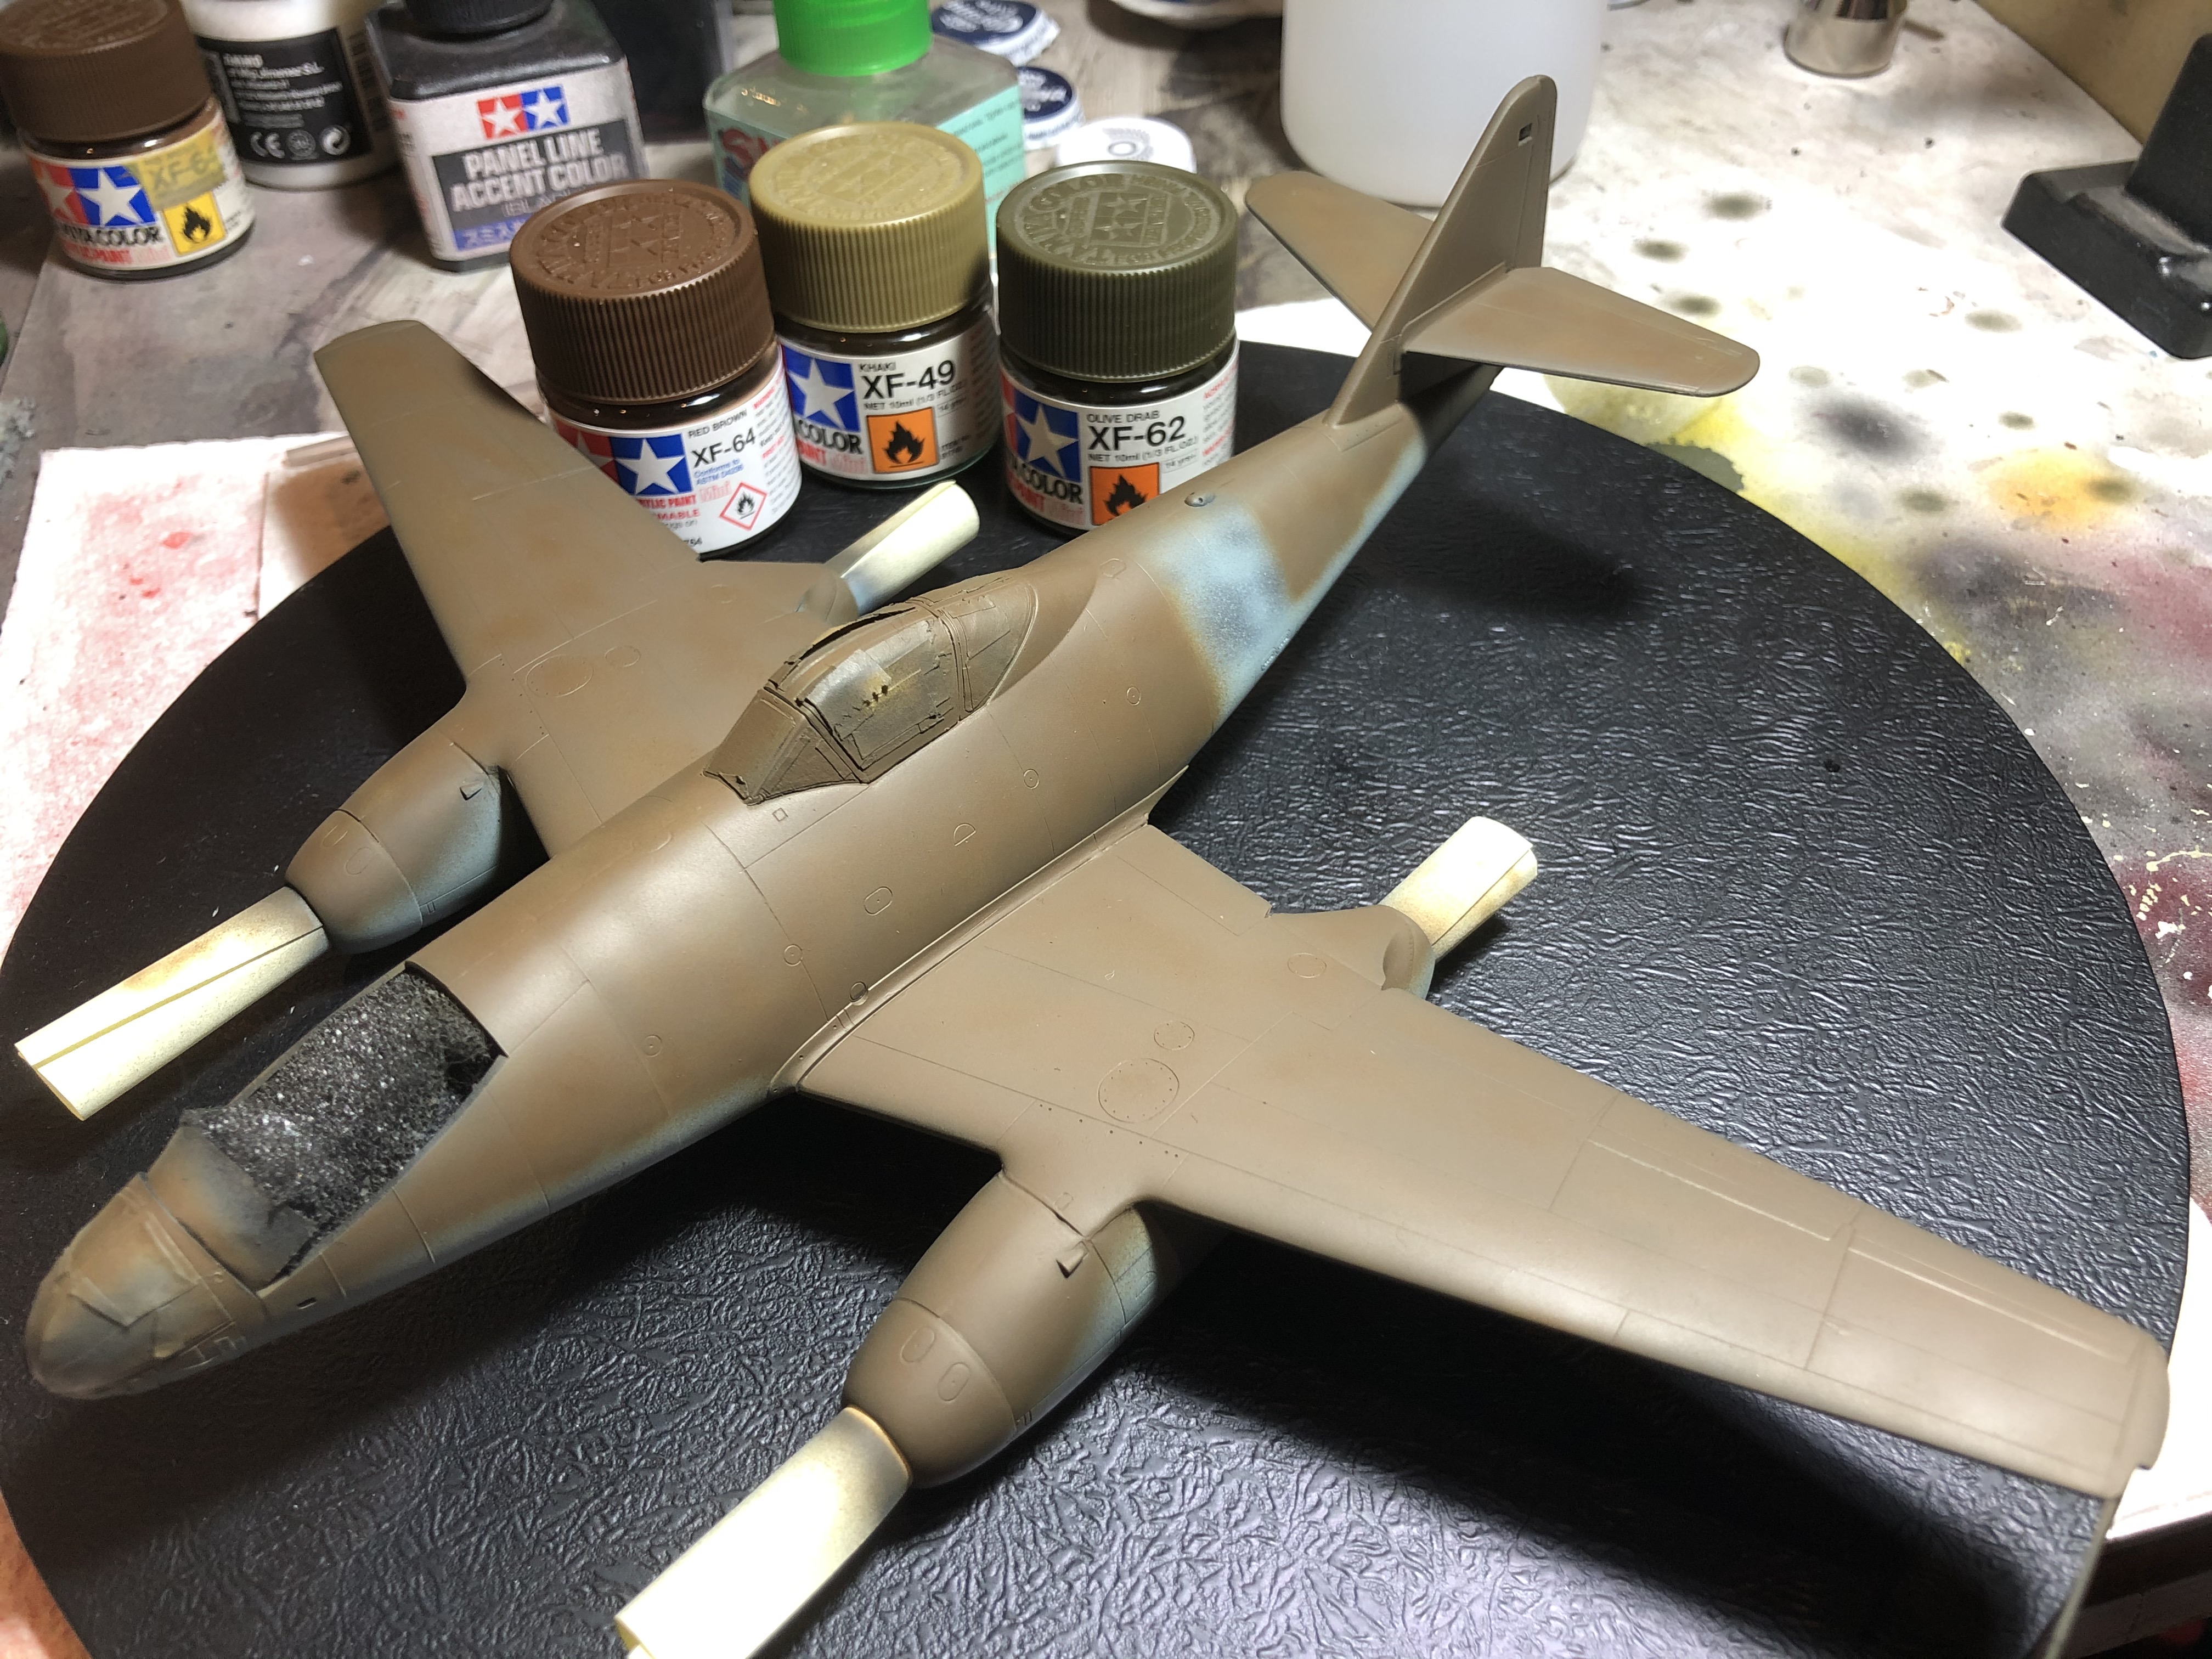
Next I masked for a couple of replacement panels to be done in NMF using the ugly-but-effective PostIt Notes for overspray protection.

And there we are, ready for decals, Dullcote and further weathering.


Cheers, D
Next up was a paint mix for the top colour. I used Tamiya XF-64/49/64 in about a 3/1/1 ratio. Built up slowly to allow the pre-shading to give it some variation for a fading effect.
Next I masked for a couple of replacement panels to be done in NMF using the ugly-but-effective PostIt Notes for overspray protection.
And there we are, ready for decals, Dullcote and further weathering.
Cheers, D

BlackWidow

Joined: August 09, 2009
KitMaker: 1,732 posts
AeroScale: 1,336 posts
Posted: Friday, September 25, 2020 - 10:09 PM UTC
Just catched up with your builds after returning from holidays. Great progress on those oldies so far!
To me this camo looks a lot alike the Tamiya He 219, which I have in the pipeline soon. Underside black, upperside RLM 76 with RLM 75 "worms". If you're afraid of spraying RLM 75 freehand, you might try to go "reverse mottling". First RLM 75, than cover the lines with thin long "sausages" of UHU Tack or similar and than spray RLM 76. I've seen this technique on a 1/72 Ju 88 with Mäander camo once. Awesome! Never tried it though, I sprayed it freehand some years ago on my Tamiya Fw 190 F-8. Was my first try on such a camouflage.
Quoted Text
.... For the Italeri, I'm liking the box art scheme with the fine lines all over (a bit scary, never attempted this type of pattern) but interestingly the instructions don't show this scheme ....
To me this camo looks a lot alike the Tamiya He 219, which I have in the pipeline soon. Underside black, upperside RLM 76 with RLM 75 "worms". If you're afraid of spraying RLM 75 freehand, you might try to go "reverse mottling". First RLM 75, than cover the lines with thin long "sausages" of UHU Tack or similar and than spray RLM 76. I've seen this technique on a 1/72 Ju 88 with Mäander camo once. Awesome! Never tried it though, I sprayed it freehand some years ago on my Tamiya Fw 190 F-8. Was my first try on such a camouflage.

AussieReg
#007
Joined: June 09, 2009
KitMaker: 8,156 posts
AeroScale: 3,756 posts
Posted: Sunday, September 27, 2020 - 04:37 PM UTC
Quoted Text
Just catched up with your builds after returning from holidays. Great progress on those oldies so far!
Torsten, thanks for checking in mate! I hope you enjoyed your holidays.
Thanks also for the info on the camouflage pattern options, very interesting to see another "reverse" method of achieving the result. The Blue-Tac worms would need to be very consistent in diameter to get the desired effect.
I'm going to try freehand and see how it looks, after doing a bit of practice first of course.
Next step is decals on the Dragon A-2a/U2 kit, then flat clear and some weathering.
Cheers, D

litespeed


Joined: October 15, 2009
KitMaker: 1,976 posts
AeroScale: 1,789 posts
Posted: Sunday, September 27, 2020 - 09:19 PM UTC
Hi Damian... Yeah I would definitely try to do the Mäander camouflage freehand. Its is the simplest solution if you have a steady hand. I tried a few ways to achieve the same effect on one of my Wildesau Bf 109G's: freehand using a paint brush as well as a air brush, masking tape, blue tack sausages, etc., but I think the best way to achieve it is using steady hand and a paint brush or airbrush.
T
T

RussellE

#306
Joined: June 27, 2010
KitMaker: 3,959 posts
AeroScale: 598 posts
Posted: Monday, September 28, 2020 - 11:19 PM UTC
Gosh Damian... I'm nervous about that paint scheme and I'm only watching 

AussieReg
#007
Joined: June 09, 2009
KitMaker: 8,156 posts
AeroScale: 3,756 posts
Posted: Wednesday, September 30, 2020 - 02:08 AM UTC
Tim, Russ, many thanks as always for checking in! I am playing with thinning ratio, airbrush setup and air pressure to see if I can get a result I like.
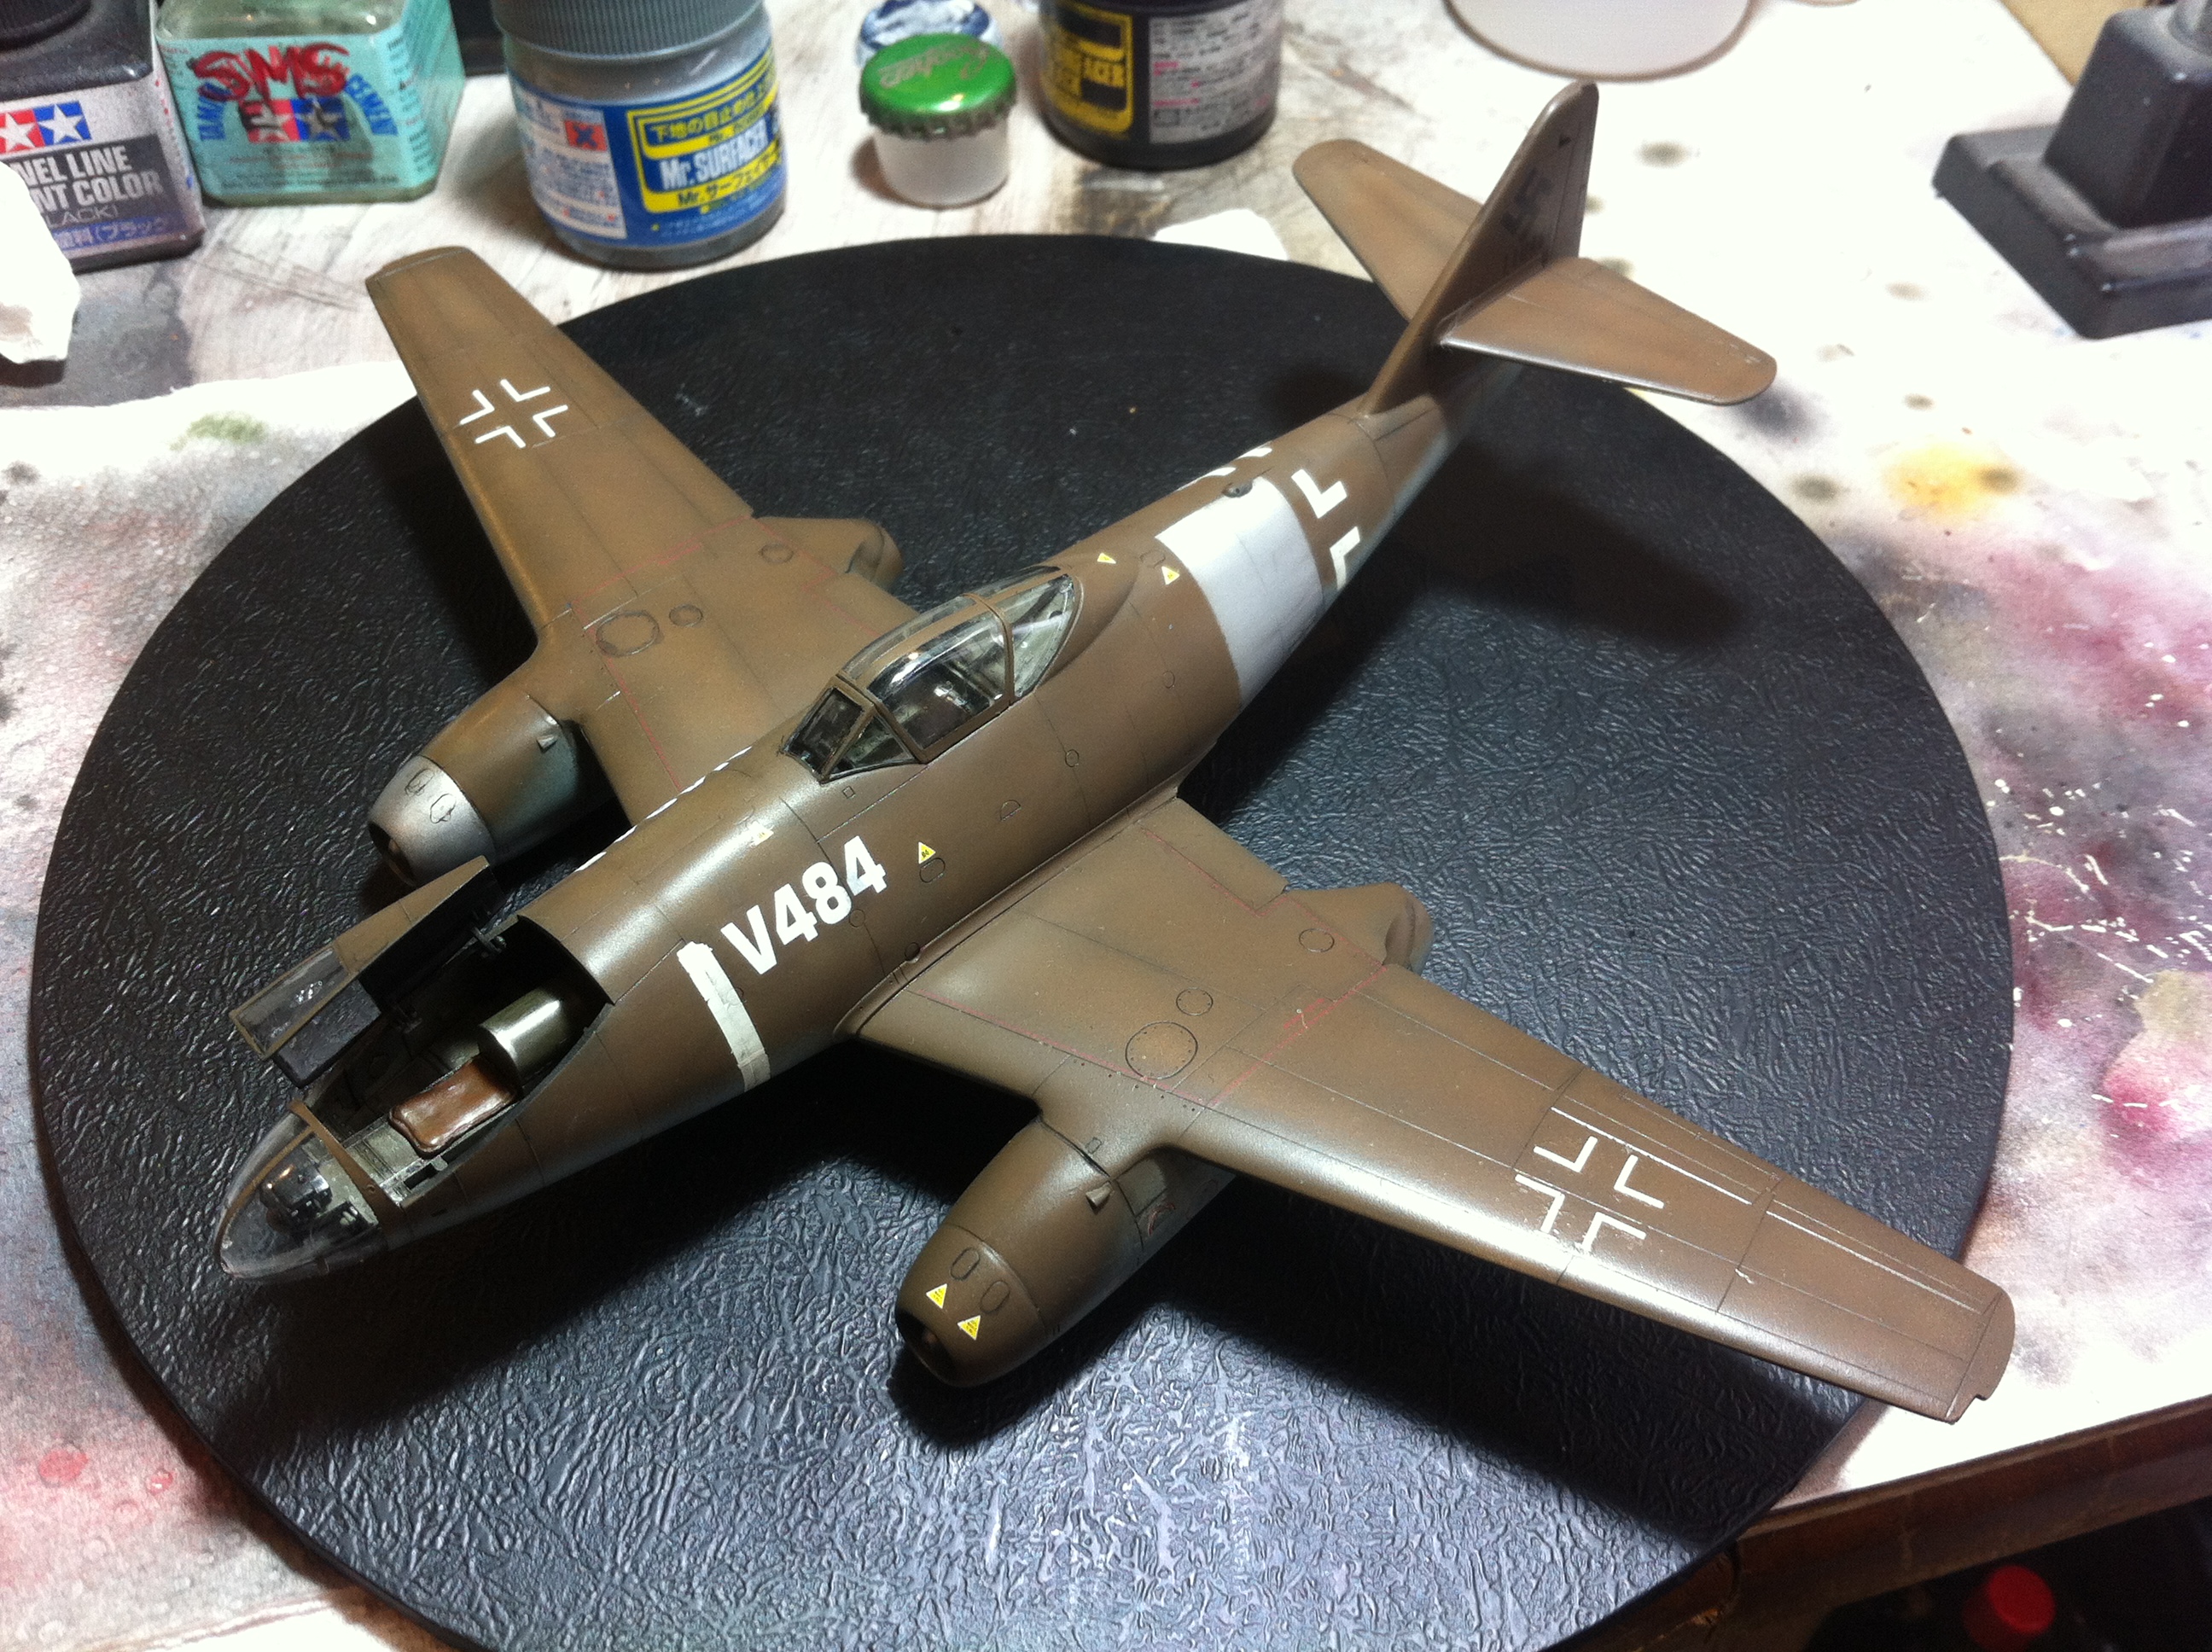
Meanwhile, some progress on the Dragon A-2a/U2. This was an exercise in patience to say the least! The decals shattered on contact with water, so I had to cobble together a set of markings using the Dragon set plus leftovers from the Hobby Boss set. I had to apply a very light drop of Mr Mark Setter to settle the decals on to the surface, then delicately apply the Mr Mark Softer with a very soft brush to get the pieces to conform without splitting up.
In the end I managed to get the major markings and the most significant stencils in place, with a few chips and scratches (which actually fits with the story I'm telling here), and once they had cured overnight I gave the whole shooting match a coat of Alclad AquaGloss to seal the deal!


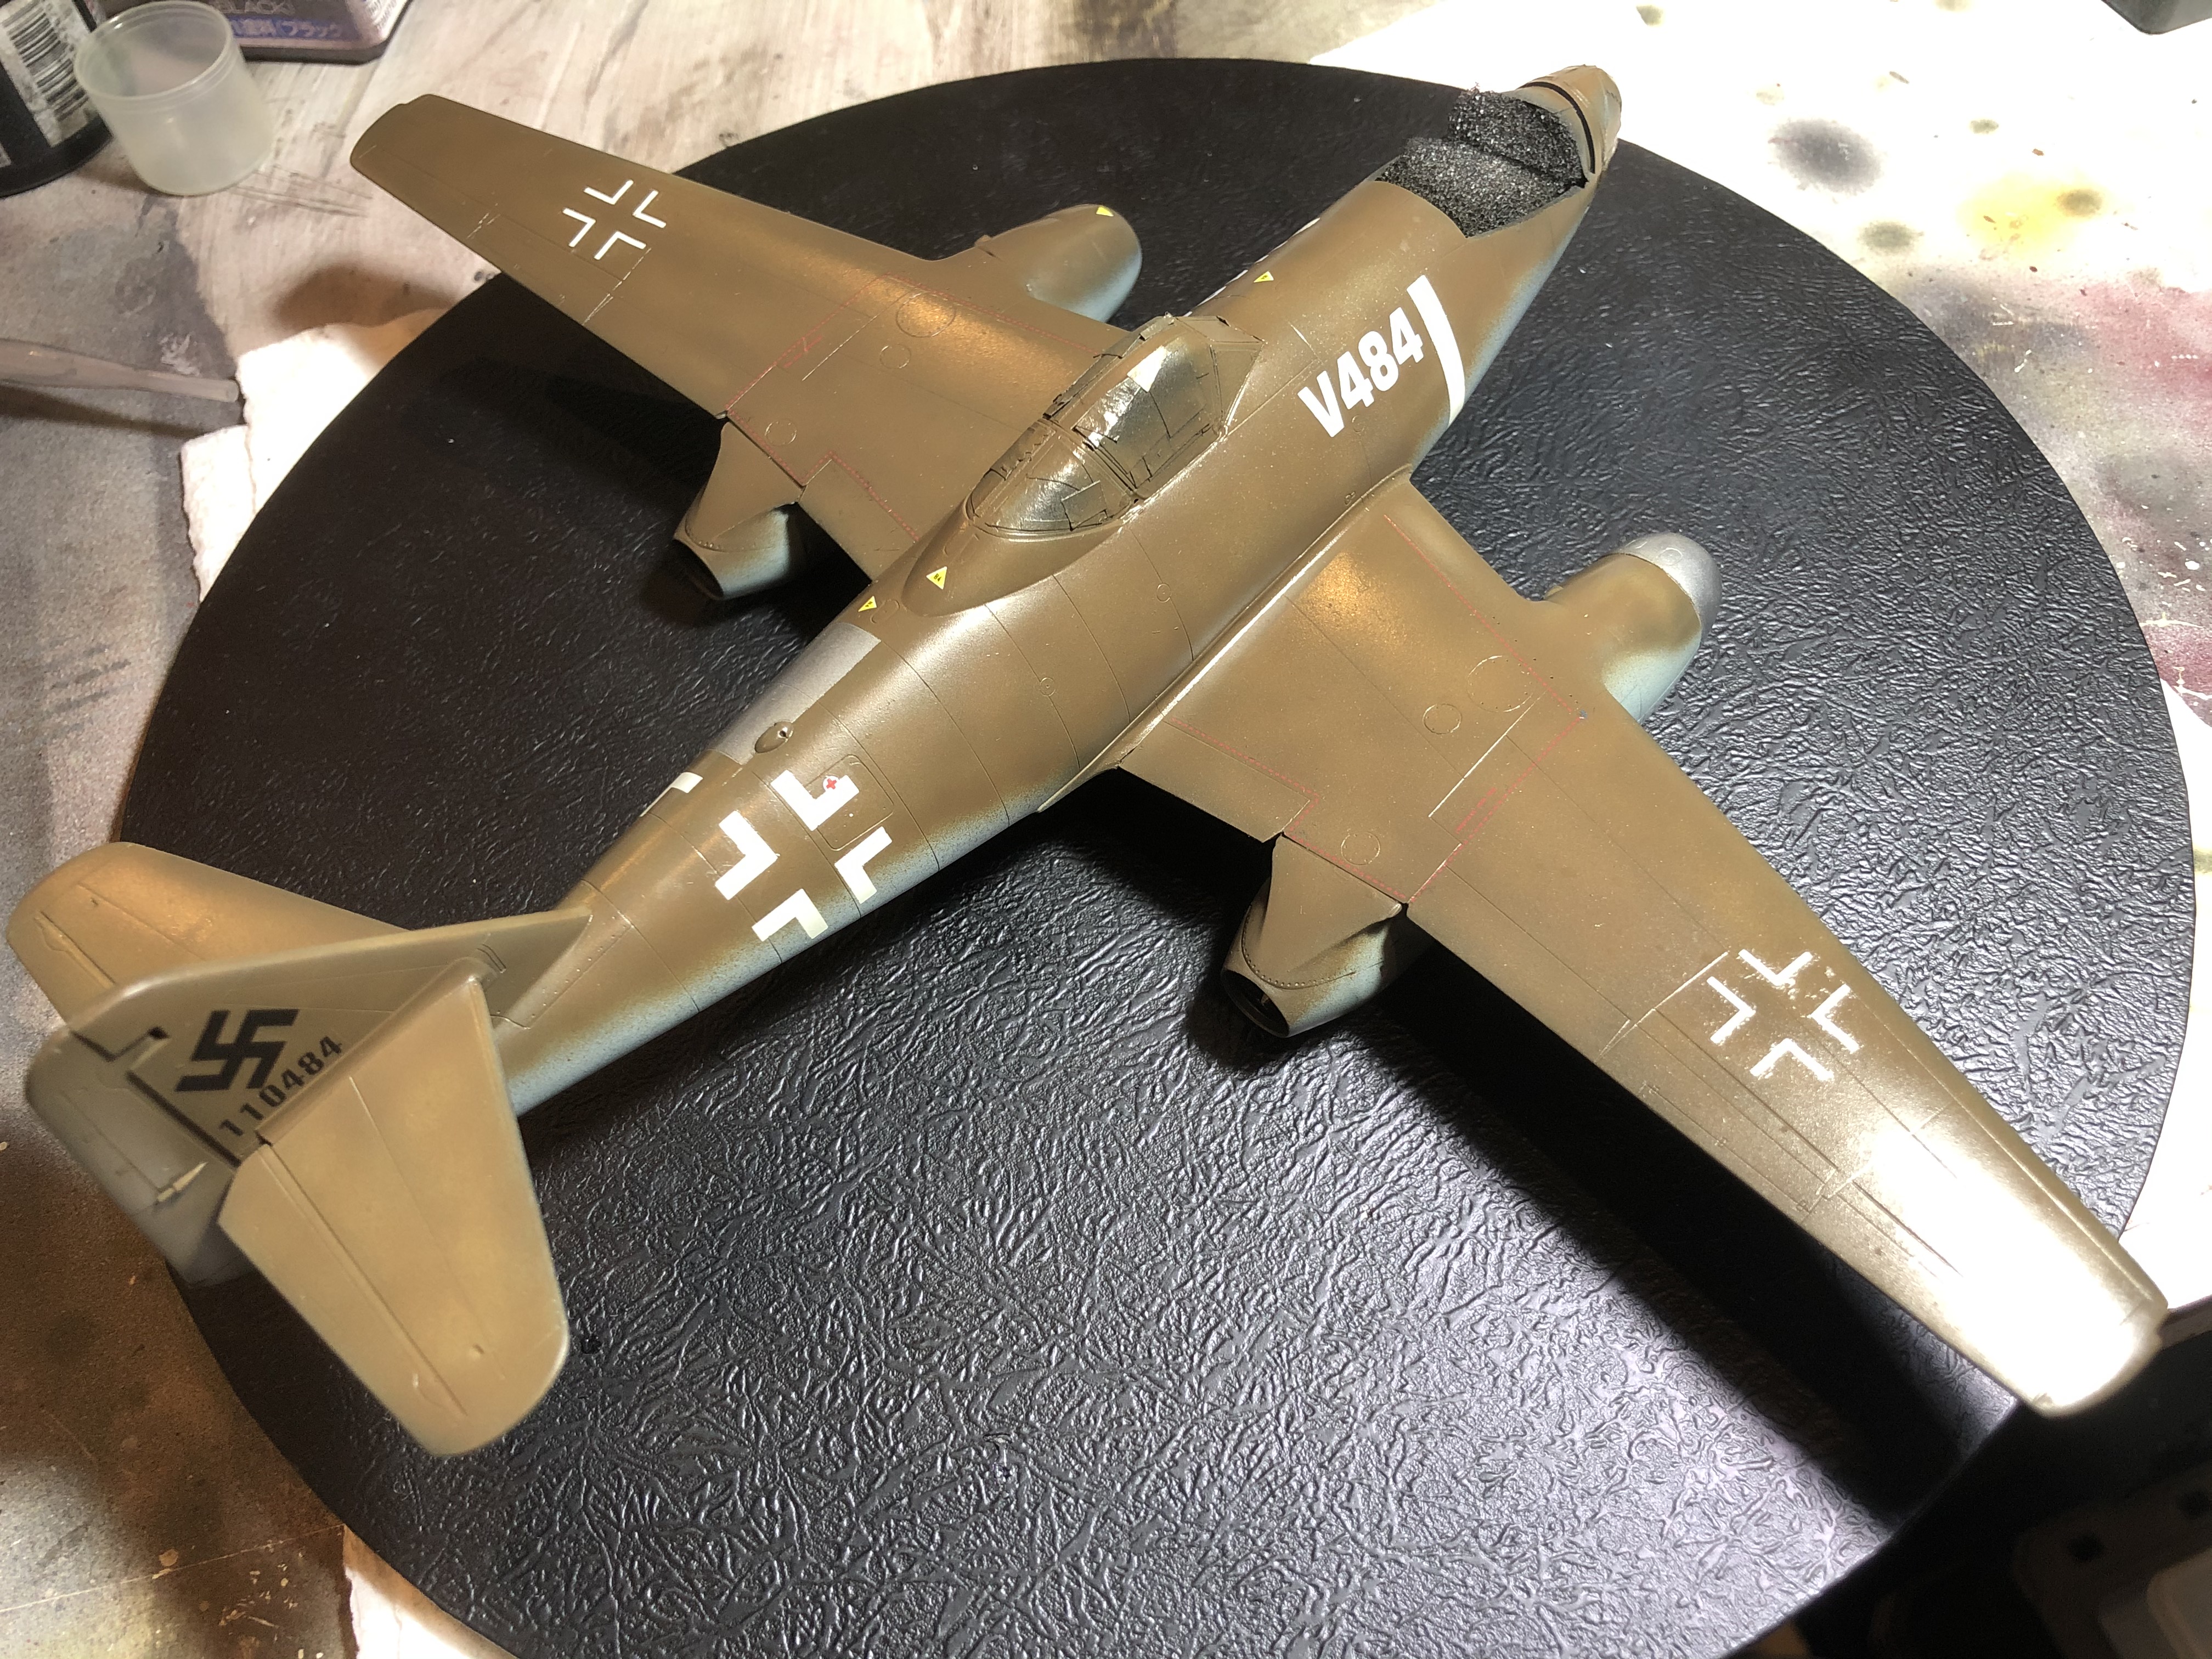


Next up is a light panel line wash and Dullcote, then on to the weathering!
Cheers, D
Meanwhile, some progress on the Dragon A-2a/U2. This was an exercise in patience to say the least! The decals shattered on contact with water, so I had to cobble together a set of markings using the Dragon set plus leftovers from the Hobby Boss set. I had to apply a very light drop of Mr Mark Setter to settle the decals on to the surface, then delicately apply the Mr Mark Softer with a very soft brush to get the pieces to conform without splitting up.
In the end I managed to get the major markings and the most significant stencils in place, with a few chips and scratches (which actually fits with the story I'm telling here), and once they had cured overnight I gave the whole shooting match a coat of Alclad AquaGloss to seal the deal!
Next up is a light panel line wash and Dullcote, then on to the weathering!
Cheers, D
AussieReg
#007
Joined: June 09, 2009
KitMaker: 8,156 posts
AeroScale: 3,756 posts
Posted: Friday, October 02, 2020 - 03:03 AM UTC
It gets ugly at this stage, panel line wash applied and drying. I will take to it with a Q-Tip and a drop of Odourless White Spirit in the next days or so.


Once this is done it will be shot with Dullcote and then further weathering. This Schwalbe will be dirty!
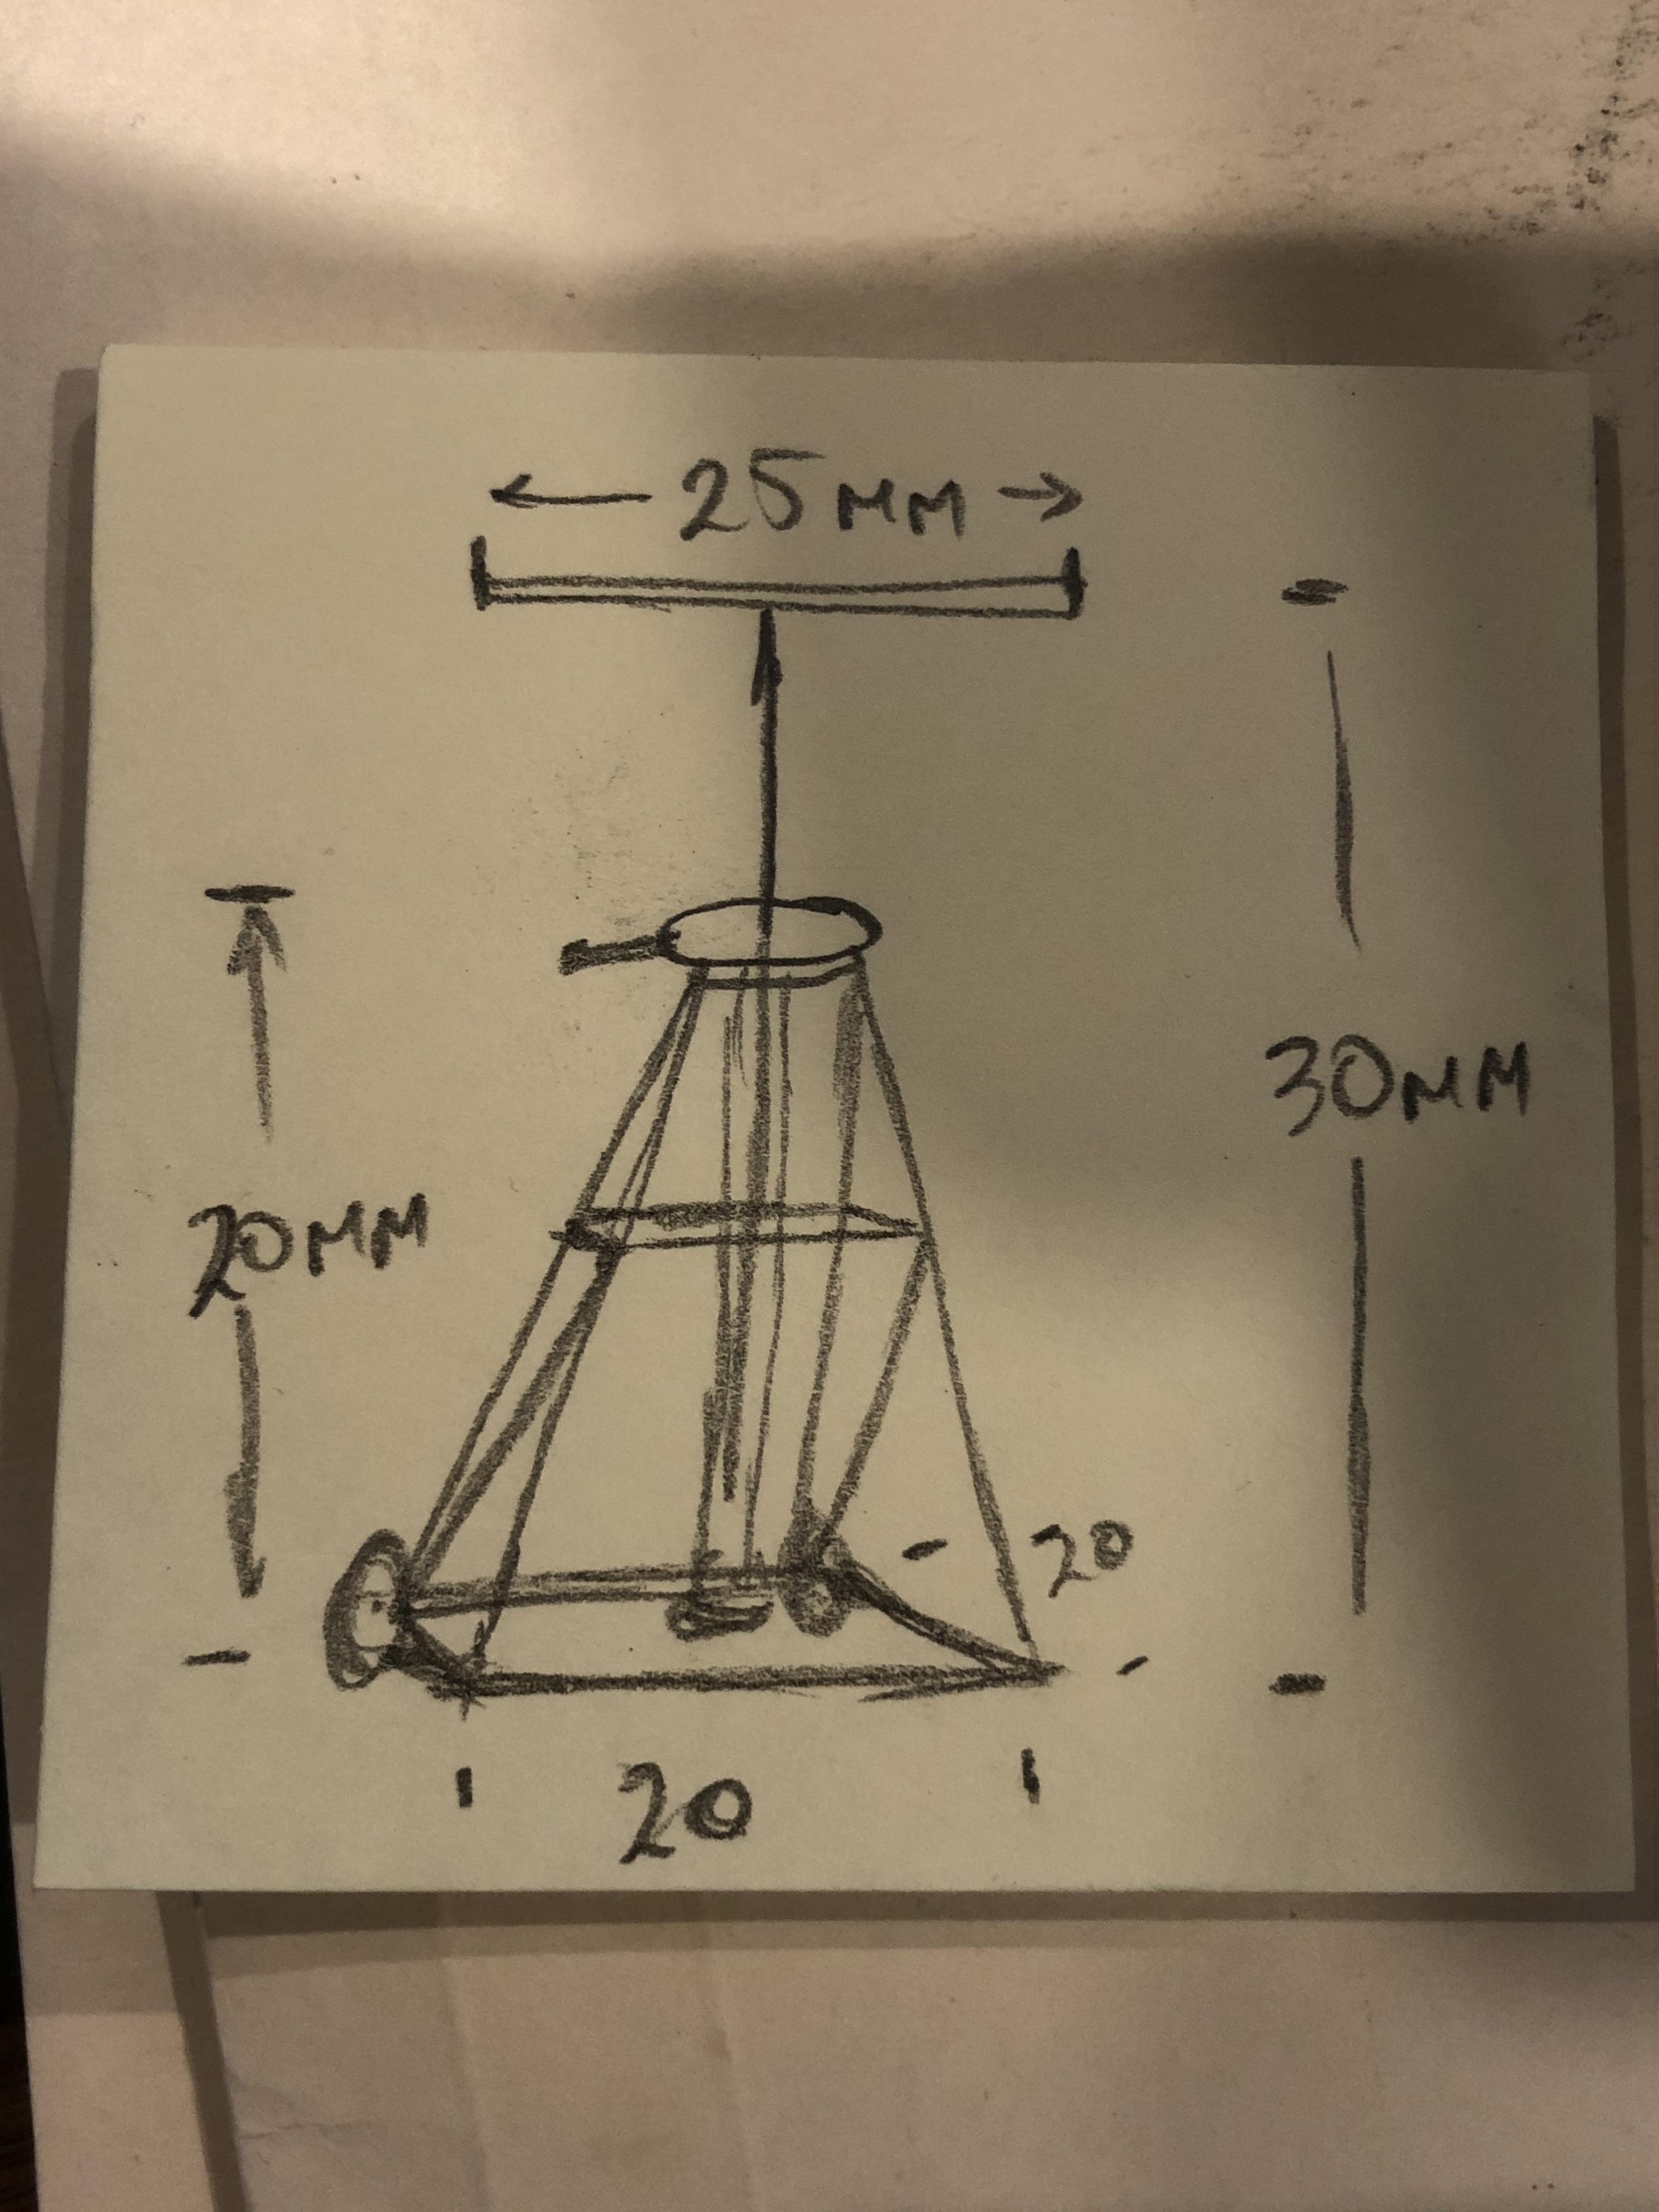
The other thing I am working on is a set of maintenance stands for this build, as I am telling the story that this is a bit war-weary and sitting waiting on parts beside the strip, while the HB kit (a newer production) is being towed past.


And some rough initial plans to try a test-build.
Cheers, D
Once this is done it will be shot with Dullcote and then further weathering. This Schwalbe will be dirty!
The other thing I am working on is a set of maintenance stands for this build, as I am telling the story that this is a bit war-weary and sitting waiting on parts beside the strip, while the HB kit (a newer production) is being towed past.
And some rough initial plans to try a test-build.
Cheers, D
AussieReg
#007
Joined: June 09, 2009
KitMaker: 8,156 posts
AeroScale: 3,756 posts
Posted: Friday, October 02, 2020 - 01:56 PM UTC
A fun little diversion from the kit progress using scraps of stock and spare parts, plus a short length of an old guitar string.

It's taking shape and will look the part once it's painted up and weathered.
Cheers, D
It's taking shape and will look the part once it's painted up and weathered.
Cheers, D
RussellE
#306
Joined: June 27, 2010
KitMaker: 3,959 posts
AeroScale: 598 posts
Posted: Friday, October 02, 2020 - 06:56 PM UTC
me likey lots! 
AussieReg
#007
Joined: June 09, 2009
KitMaker: 8,156 posts
AeroScale: 3,756 posts
Posted: Tuesday, October 06, 2020 - 05:36 PM UTC
Quoted Text
me likey lots!
Thanks Russ!
Ok, the PLW has been mostly wiped away in the direction of airflow using a Q-tip dampened with white spirits. I've left a bit of streaking to add to the overall war-weary look. I Dullcoted the whole thing after the spirits had dried off for a day or two, then unmasked the clear parts.


Next up is a workover with highly thinned Tamiya Smoke, again in streaking in the direction of airflow and building up some tonal variation in places.
Cheers, D
AussieReg
#007
Joined: June 09, 2009
KitMaker: 8,156 posts
AeroScale: 3,756 posts
Posted: Friday, October 09, 2020 - 01:55 AM UTC
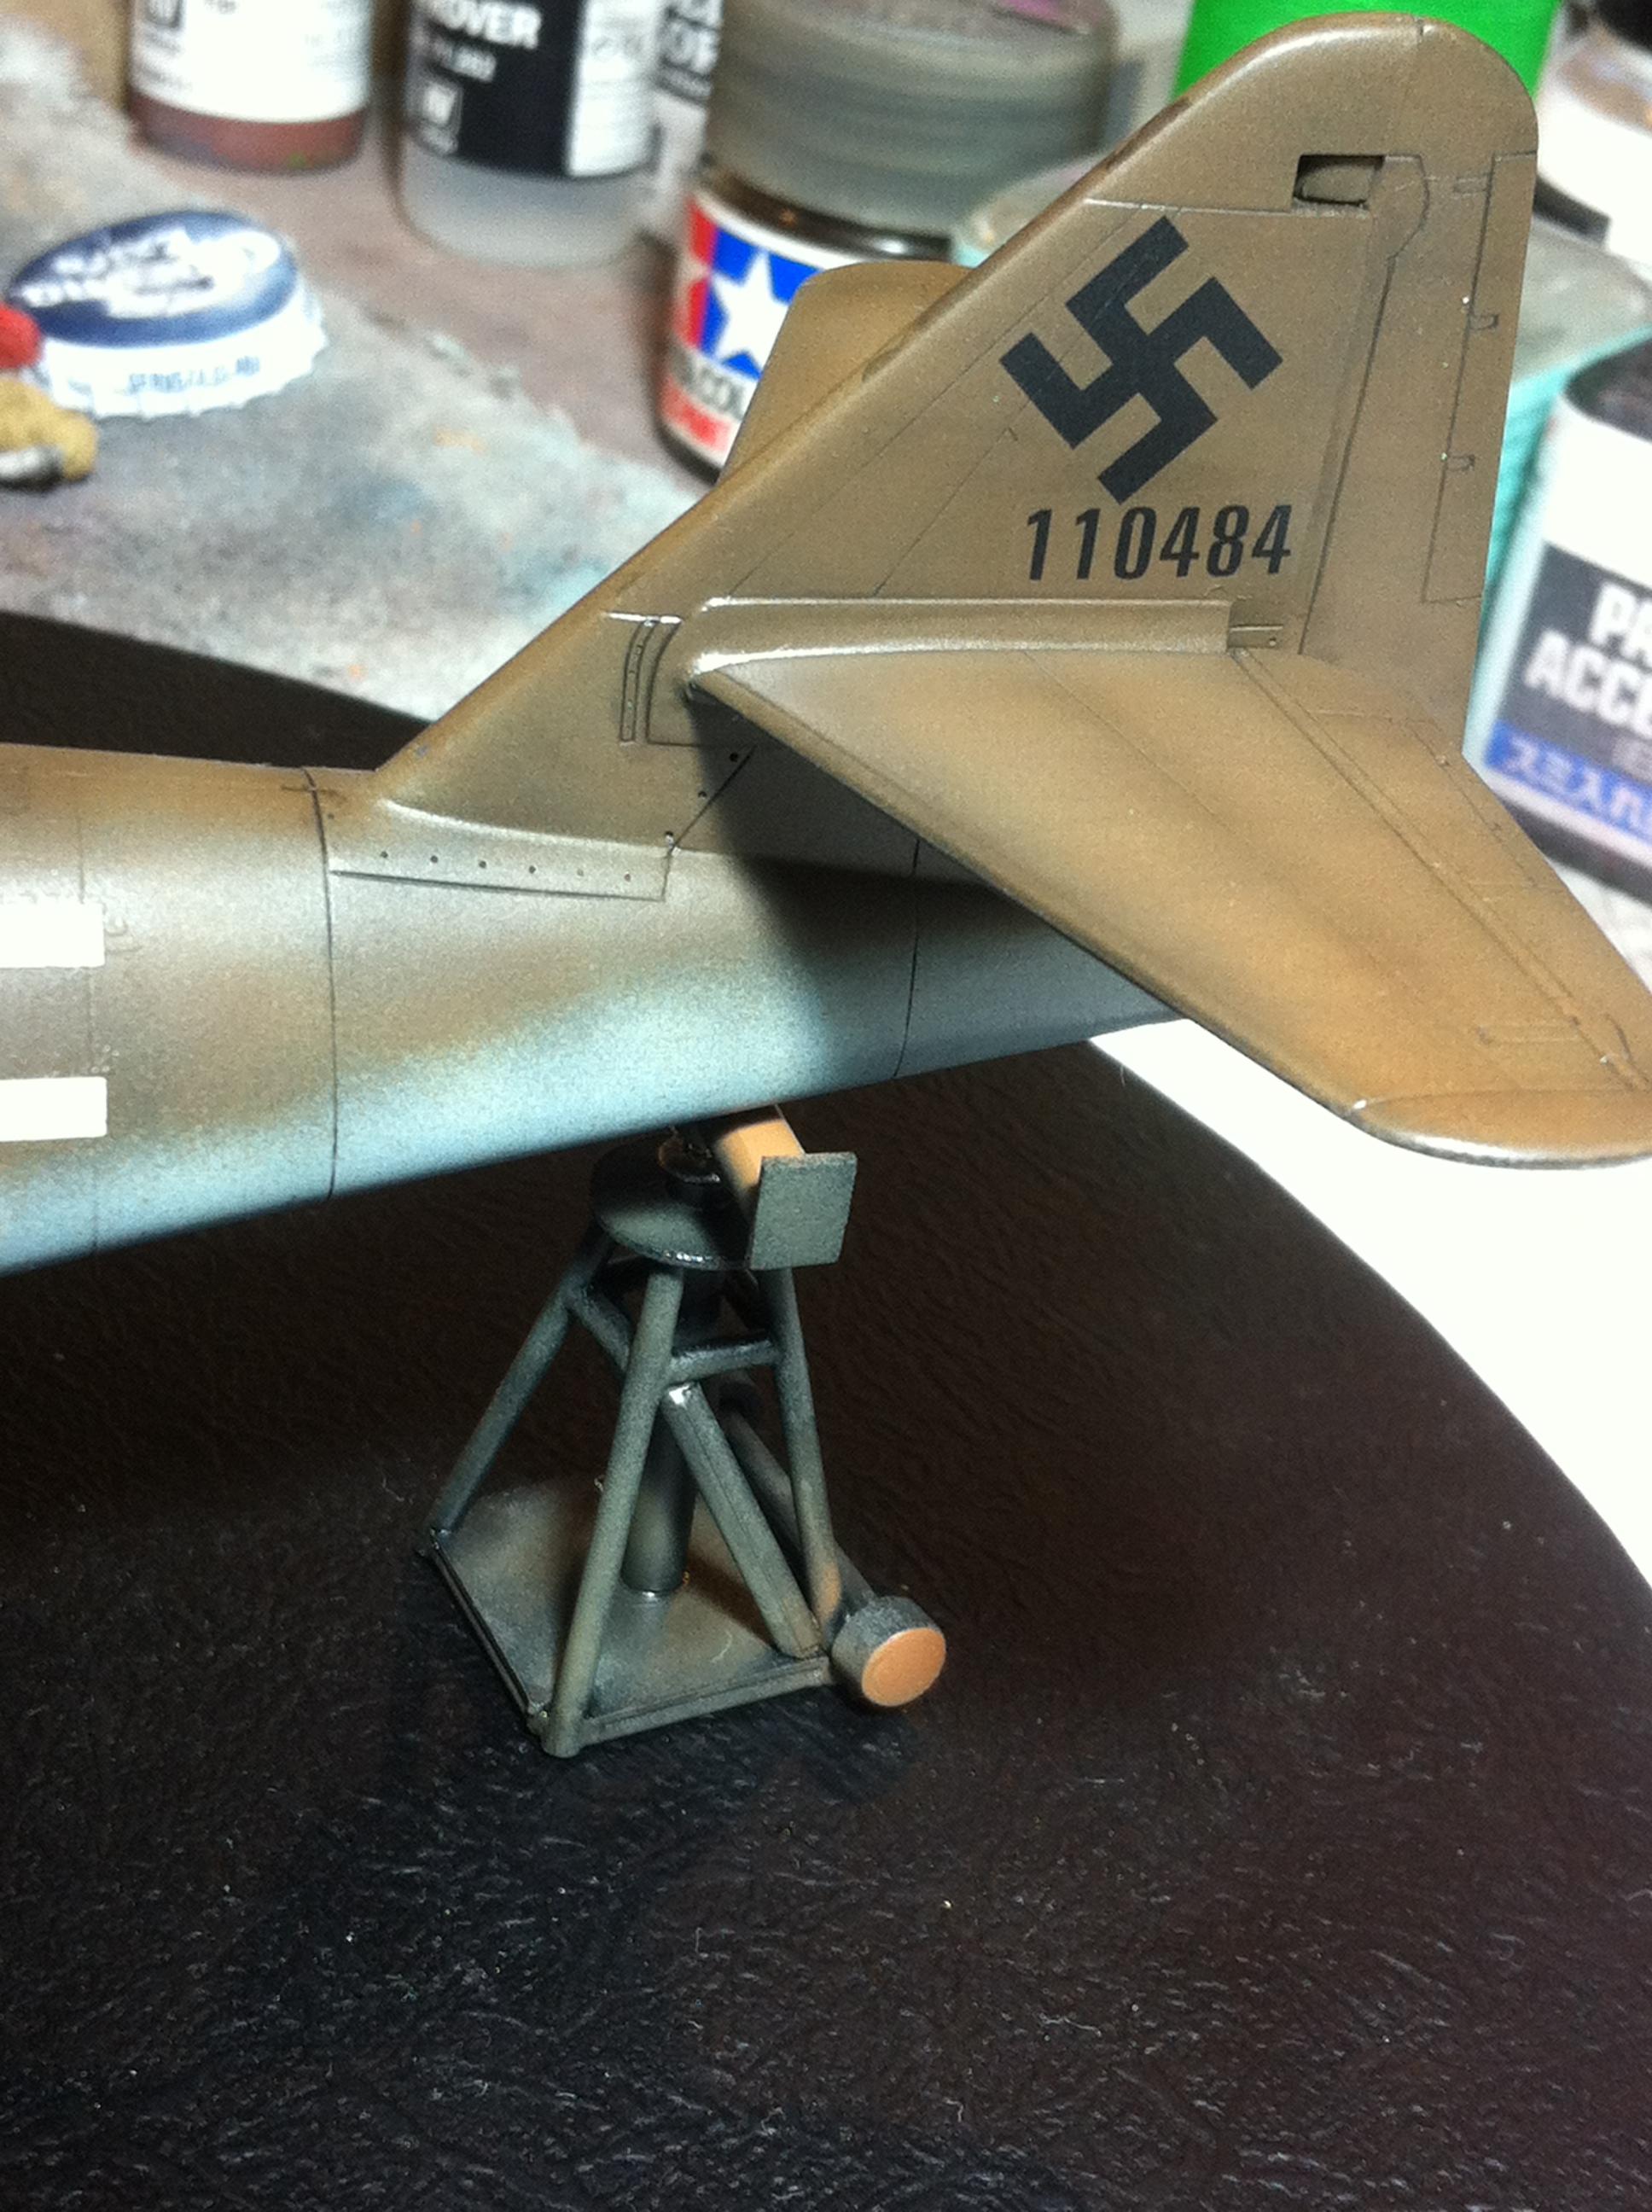
More work on the Dragon kit tonight. I gave the whole airframe a workover with thinned Tamiya Smoke to increase the variation in tone and I'm happy with how it's looking now. I'm planning to really dirty up the wheels, and also the starboard wing with some oils above the engine line.
The undercarriage is all fitted off along with more of the antennas and wingtip lights.

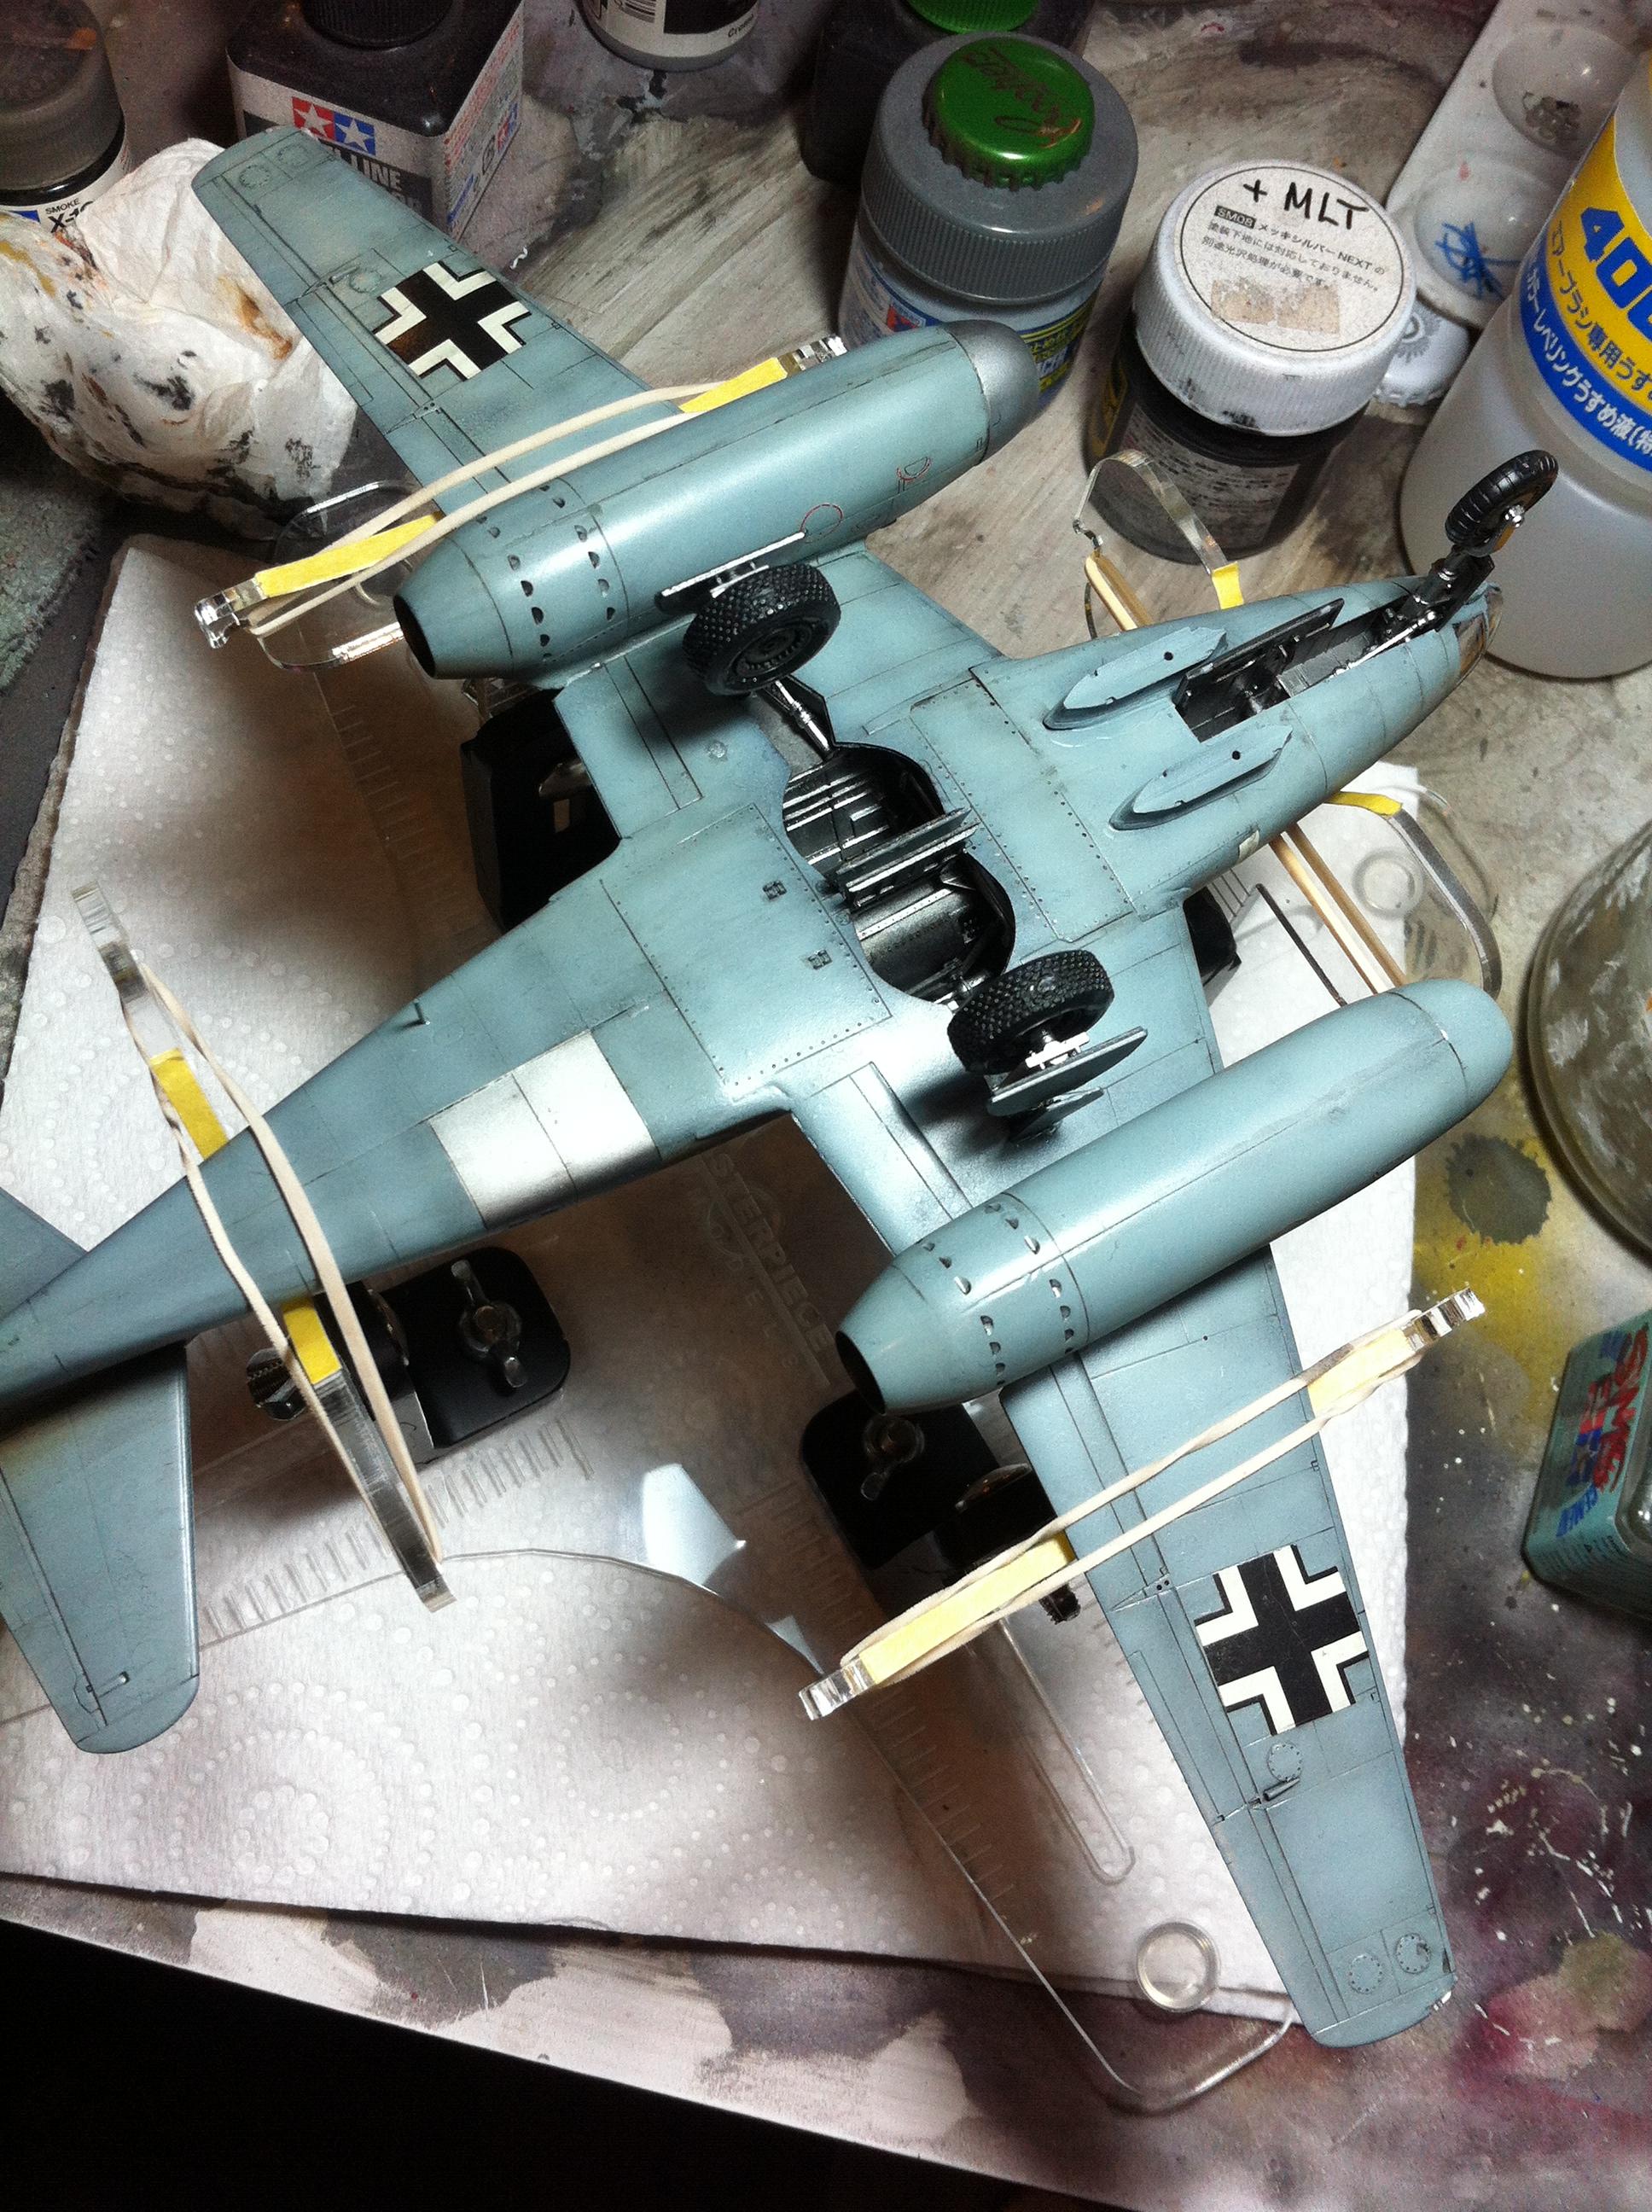


Not much left to do now. I've also finished and painted up the scratch-built stand, just need to adjust the height to fit once the aircraft is on it's legs.
Cheers, D
The undercarriage is all fitted off along with more of the antennas and wingtip lights.
Not much left to do now. I've also finished and painted up the scratch-built stand, just need to adjust the height to fit once the aircraft is on it's legs.
Cheers, D
AussieReg
#007
Joined: June 09, 2009
KitMaker: 8,156 posts
AeroScale: 3,756 posts
Posted: Sunday, October 11, 2020 - 03:10 AM UTC
The construction side of the Dragon kit is finished now. I still want to do some more weathering with oil paints but that will wait until I get the diorama base made and the little Kettenkraftrad built so that I can weather them all together.


That brings my "Completed Kits" tally for 2020 to 9 (3 aircraft and 6 cars), closing in on my target of 1 per month with as many Hangar and Garage Queens as possible.
I will get back to the Italeri night fighter now and try to get it completed by the end of October.
Thanks for tuning in.
Cheers, D
That brings my "Completed Kits" tally for 2020 to 9 (3 aircraft and 6 cars), closing in on my target of 1 per month with as many Hangar and Garage Queens as possible.
I will get back to the Italeri night fighter now and try to get it completed by the end of October.
Thanks for tuning in.
Cheers, D
RussellE
#306
Joined: June 27, 2010
KitMaker: 3,959 posts
AeroScale: 598 posts
Posted: Sunday, October 11, 2020 - 10:58 AM UTC
9 kits for the year hey?
Well, lockdown has had it's upsides I guess!
Congratulations on another fine build D
Crack open those and commission this great work, but not too many, as you've still got time to finish the Italeri kit off before the end of the year to go the round 10!
Well, lockdown has had it's upsides I guess!
Congratulations on another fine build D
Crack open those
and commission this great work, but not too many, as you've still got time to finish the Italeri kit off before the end of the year to go the round 10!  |

WEB HOSTING BY


Copyright ©2021 AeroScale and Kitmaker Network, a subsidiary of Silver Star Enterprises
All Rights Reserved. Please read our Conditions of Use and Privacy Policy.
All Rights Reserved. Please read our Conditions of Use and Privacy Policy.