

Hi Rowan
I am glad you are a few steps ahead of me :-) :-) :-) Many thanks!!!!!
Today I put in 2 short bits of a hypodermic needle to replace the sanded cowling MG. Also I took some care of the engine replica (just some black and Alu).
Furthermore I followed your advice and shortend the cockpit floor and drilled the lighting holes (photos tomorrow, as it is too dark now)
Keep the updates coming so I can avoid mistakes ;-)
best wishes
Steffen
Air Campaigns
Want to start or join a group build? This is where to start.
Want to start or join a group build? This is where to start.
Hosted by Frederick Boucher, Michael Satin
Duel: Polikarpov I-16 vs. Fw 190 A-3

alpha_tango

Joined: September 07, 2005
KitMaker: 5,609 posts
AeroScale: 5,231 posts
Posted: Sunday, June 11, 2006 - 01:15 AM UTC


Merlin

#017


Joined: June 11, 2003
KitMaker: 17,582 posts
AeroScale: 12,795 posts

Posted: Sunday, June 11, 2006 - 01:22 AM UTC
Hi Steffen
Touché! I just asked your advice on tackling the cowling in your thread - because you're ahead of me there! :-)
I've just juggled the cockpit into position - it's quite a tight fit (maybe the instrument panel would be better fitted last - it could be worth a look when you get to that point) - and cemented the fuselage and wings together to set overnight.
All the best
Rowan

alpha_tango
Joined: September 07, 2005
KitMaker: 5,609 posts
AeroScale: 5,231 posts
Posted: Sunday, June 11, 2006 - 02:11 AM UTC
Quoted Text
I've just juggled the cockpit into position - it's quite a tight fit (maybe the instrument panel would be better fitted last - it could be worth a look when you get to that point) - and cemented the fuselage and wings together to set overnight.
Hi again
Hmm, this might be the first mistake I made ... I glued the cockpit floor to the wing (the only place with an alignment help). Test fit show it will go in ok, but of course I have not test fit the instrument panel so there might be a future problem. I just had no idea how to glue it to that point later ...
you see I seldom consult the instructions
 ... of course I'll complain later that the instructions were not clear enough :-) :-) :-) :-)
 cheers
Steffen
Merlin
#017
Joined: June 11, 2003
KitMaker: 17,582 posts
AeroScale: 12,795 posts
Posted: Sunday, June 11, 2006 - 02:29 AM UTC
Quoted Text
I glued the cockpit floor to the wing (the only place with an alignment help).
Hi Steffen
Yes - I looked at that indendation... and decided to ignore it! :-) I found the armour plate fitted perfectly into the headreast and the "spar" was a nice tight fit across the fuelage without any glue, so I wedged it in place and then flowed cement around it.
Quoted Text
you see I seldom consult the instructions...
LOL! I must admit I read them - and then usually decide on my own construction sequence anyway (which occasionally backfires on me badly!
 )!
)!All the best
Rowan
Merlin
#017
Joined: June 11, 2003
KitMaker: 17,582 posts
AeroScale: 12,795 posts
Posted: Sunday, June 11, 2006 - 09:54 PM UTC
Hi again
Back home from work early and raring to go!
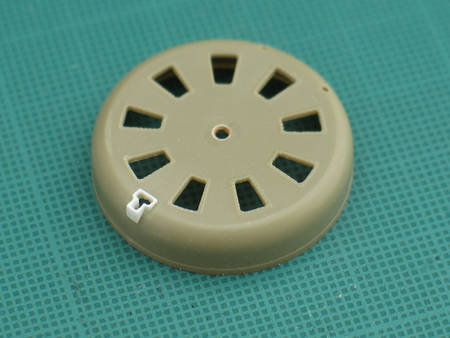
I came up with the solution for what I'll do about the cowling. Because this is supposed to be basically an OOB build, I'll keep the Type 10 cowl as supplied and try to modify the late style cowl to improve the profile. That way I can be sure of finishing the kit and also have the modified cowl for comparison shots.
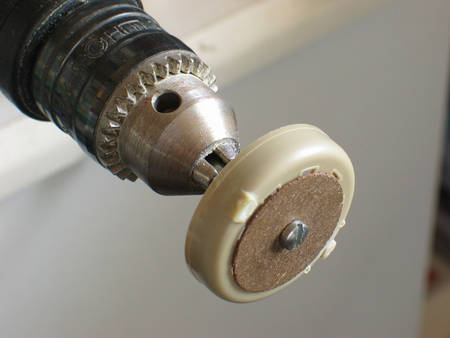
I quickly made a rather rough T-shaped air-intake out of brass sheet. I'll do this again more carefully, or try making the intake out of plastic - this was really just to prove to myself that I had a method ready before going ahead. I also filled the existing intakes with "supafilla" (talc+CA) and drilled out the gun-ports so they don't get lost when I start sanding:
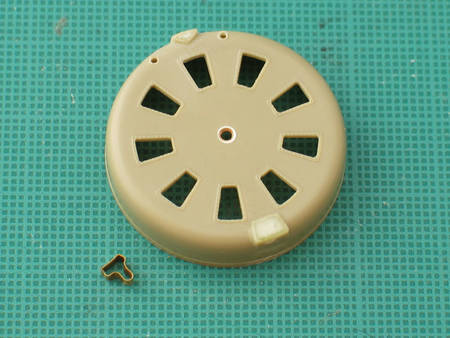
I've mounted the cowling on a drill - so time to stop typing and get sanding!
All the best
Rowan
Back home from work early and raring to go!
I came up with the solution for what I'll do about the cowling. Because this is supposed to be basically an OOB build, I'll keep the Type 10 cowl as supplied and try to modify the late style cowl to improve the profile. That way I can be sure of finishing the kit and also have the modified cowl for comparison shots.
I quickly made a rather rough T-shaped air-intake out of brass sheet. I'll do this again more carefully, or try making the intake out of plastic - this was really just to prove to myself that I had a method ready before going ahead. I also filled the existing intakes with "supafilla" (talc+CA) and drilled out the gun-ports so they don't get lost when I start sanding:
I've mounted the cowling on a drill - so time to stop typing and get sanding!
All the best
Rowan
Merlin
#017
Joined: June 11, 2003
KitMaker: 17,582 posts
AeroScale: 12,795 posts
Posted: Sunday, June 11, 2006 - 11:16 PM UTC
Hi again
So far, so good... the cowling's definitely got a rounder profile (although, as Steffen pointed out in his excellent build-thread, the difference is easier to see and feel than to photograph):
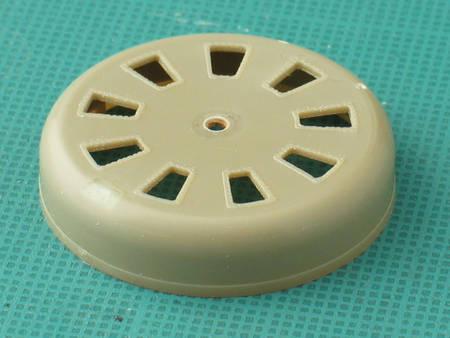
Now to try to add a new air-intake and guns...
All the best
Rowan
So far, so good... the cowling's definitely got a rounder profile (although, as Steffen pointed out in his excellent build-thread, the difference is easier to see and feel than to photograph):
Now to try to add a new air-intake and guns...
All the best
Rowan
alpha_tango
Joined: September 07, 2005
KitMaker: 5,609 posts
AeroScale: 5,231 posts
Posted: Monday, June 12, 2006 - 12:32 AM UTC
THANK YOU, Rowan!!!
You are a great inspiration! ... "Konkurrenz belebt das Geschäft", I guess
After seeing your results I re-did my cowling (again) with a motortool and now I am happy with it. At least I know this is as far as I can get.
I omit a photo as we both came to the same result: "it resists being photographed" :-) :-) :-)
go back to work, I am almost as far as you
cheers and
Steffen
BTW today I started a Skybow Tiger I for the "Tank ace" campaign and I came very far, what a nice little model!!!
Merlin
#017
Joined: June 11, 2003
KitMaker: 17,582 posts
AeroScale: 12,795 posts
Posted: Monday, June 12, 2006 - 08:25 PM UTC
Hi Steffen
We make a good double act - each inspiring the other on this build!
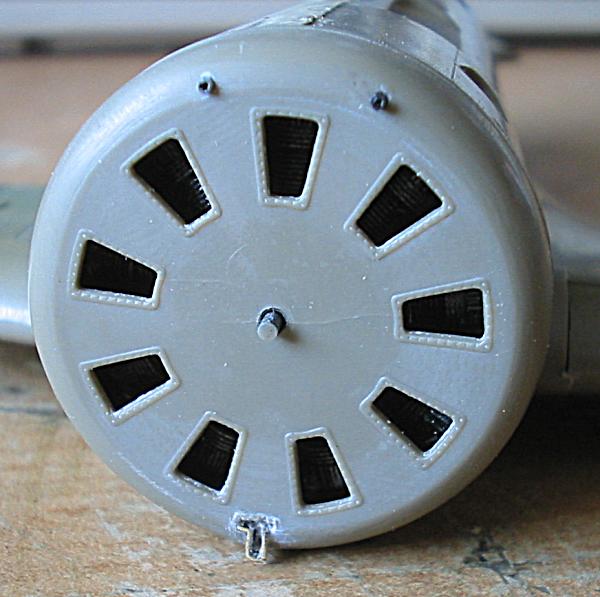
I've tackled the bit that worried me most in modifying the cowling - replacing the air intake. I scrapped the folded-brass idea and went with a piece of plastic rod carved into a T-shape and sanded to match the contour of the cowling.
Once it was in place, I drilled some small holes and opened them up with an extra-fine needle file:
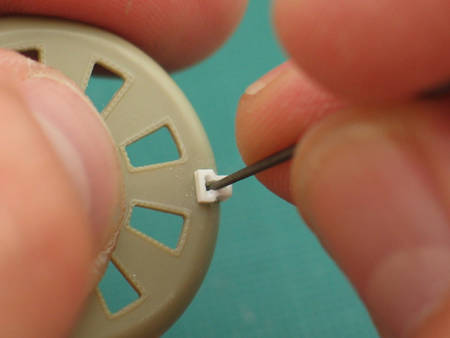
Here's the intermediate result:
I may thin the lips of the intake down a little more, but I'm basically happy with it and can get on with adding the guns.
With the cowling mods done - and the basic airframe assembled, I think the most difficult parts of the construction should be out of the way. Now that's tempted fate!
All the best
Rowan
We make a good double act - each inspiring the other on this build!
I've tackled the bit that worried me most in modifying the cowling - replacing the air intake. I scrapped the folded-brass idea and went with a piece of plastic rod carved into a T-shape and sanded to match the contour of the cowling.
Once it was in place, I drilled some small holes and opened them up with an extra-fine needle file:
Here's the intermediate result:
I may thin the lips of the intake down a little more, but I'm basically happy with it and can get on with adding the guns.
With the cowling mods done - and the basic airframe assembled, I think the most difficult parts of the construction should be out of the way. Now that's tempted fate!
All the best
Rowan
alpha_tango
Joined: September 07, 2005
KitMaker: 5,609 posts
AeroScale: 5,231 posts
Posted: Monday, June 12, 2006 - 11:17 PM UTC
Hi Rowan
mine is not looking as good, but as my cowling will be black, I can live with it. Just a little clean up with a tooth brush required.
keep it comming
cheers
Steffen
mine is not looking as good, but as my cowling will be black, I can live with it. Just a little clean up with a tooth brush required.
keep it comming
cheers
Steffen
Merlin
#017
Joined: June 11, 2003
KitMaker: 17,582 posts
AeroScale: 12,795 posts
Posted: Monday, June 12, 2006 - 11:25 PM UTC
Hi Steffen
That's looking a neat bit of repair work! I think my intake is a tad too large - it's attached with CA, so I could de-bond it - but I'll probably live with it in the interests of moving on.
All the best
Rowan
That's looking a neat bit of repair work! I think my intake is a tad too large - it's attached with CA, so I could de-bond it - but I'll probably live with it in the interests of moving on.
All the best
Rowan

TedMamere

Joined: May 15, 2005
KitMaker: 5,653 posts
AeroScale: 4,347 posts

Posted: Tuesday, June 13, 2006 - 02:25 AM UTC
Quoted Text
Hi Rowan!
You are doing a nice job on the I-16. This kit seems to have success amongst Armorama members! :-)
I have a question about the picture above: how do you shoot pictures while you are working with two hands on a model? Do you have a third hand? Does your girlfriend shoot the picture? Do you use a camera tripod? Do you hold the camera with your chin and use your tongue to press the button?
Just curious!

Jean-Luc


Merlin
#017
Joined: June 11, 2003
KitMaker: 17,582 posts
AeroScale: 12,795 posts
Posted: Tuesday, June 13, 2006 - 02:31 AM UTC
Quoted Text
I have a question about the picture above: how do you shoot pictures while you are working with two hands on a model? Do you have a third hand? Does your girlfriend shoot the picture? Do you use a camera tripod? Do you hold the camera with your chin and use your tongue to press the button?
Or none of the above...
Hi Jean-Luc
When the robbery at Madame Tussaud's hits tomorrow's newspapers my secret will be out!
All the best
Rowan
alpha_tango
Joined: September 07, 2005
KitMaker: 5,609 posts
AeroScale: 5,231 posts
Posted: Tuesday, June 13, 2006 - 02:38 AM UTC
Hi Jean-Luc
I like this picture because it shows how small the intake really is. While the large pictures are good to see details, they also overexpose some "mistakes", as e.g. that I forgot to clean the intake of some sanding residue...
I think Rowan bought himself a ghost writer ... how else could he manage to build so much first class models in such a short time --> hence 4 hands to work and photograph
cheers
Steffen
Merlin
#017
Joined: June 11, 2003
KitMaker: 17,582 posts
AeroScale: 12,795 posts
Posted: Tuesday, June 13, 2006 - 02:56 AM UTC
Quoted Text
I think Rowan bought himself a ghost writer ...
Hi Steffen
Actually, I think it just proves how stupid I was to turn down the opportunity to build a Wyvern with Jean-Luc for the Suez Campaign!
 Maybe I've found the answer to my modelling-block - working alongside a modeller of your calibre has provided the fun and inspiration needed to get me building again. I was infamous on Armorama for once saying the UK crowd needed a rocket up the whatsit - well it looks like I'm now on the receiving end and it's done me the world of good! :-)
All the best
Rowan

newtothegame

Joined: October 05, 2003
KitMaker: 588 posts
AeroScale: 468 posts
Posted: Tuesday, June 13, 2006 - 04:23 AM UTC
Wow another great I-16 build-up. I am just coming across yours and Steffen's. Maybe we should have a campaign or group build where people build the exact same kit. It is really neat to see your individual takes on things.
Great stuff.
Leon
Great stuff.
Leon

Merlin
#017
Joined: June 11, 2003
KitMaker: 17,582 posts
AeroScale: 12,795 posts
Posted: Friday, June 16, 2006 - 12:56 PM UTC
Hi again
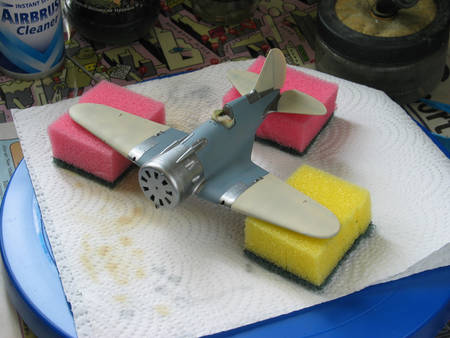
A last look at my little Ishak before painting:
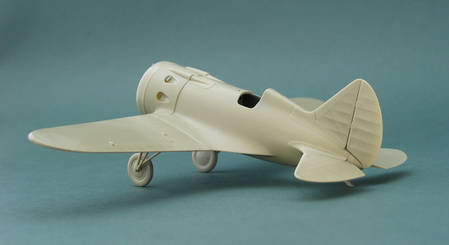
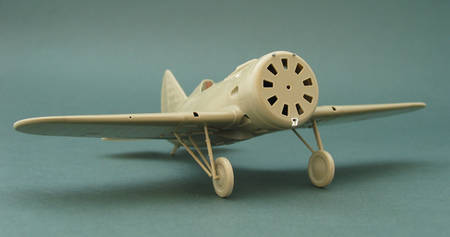
The undercarriage is only fitted temporarily for the photos and I've left the cowling loose so I can add the exhausts and engine after I've done the basic camouflage.
Airframe construction went smoothly, with no filler needed at all on the fuselage and just a touch of "supafilla" (talk + CA) at the wing roots, where I spent a few minutes getting everything smooth before re-scribing the joint.
All the best
Rowan
A last look at my little Ishak before painting:
The undercarriage is only fitted temporarily for the photos and I've left the cowling loose so I can add the exhausts and engine after I've done the basic camouflage.
Airframe construction went smoothly, with no filler needed at all on the fuselage and just a touch of "supafilla" (talk + CA) at the wing roots, where I spent a few minutes getting everything smooth before re-scribing the joint.
All the best
Rowan
alpha_tango
Joined: September 07, 2005
KitMaker: 5,609 posts
AeroScale: 5,231 posts
Posted: Friday, June 16, 2006 - 01:31 PM UTC
Hi Rowan
I hope you will not regret you did not build in the stacks before painting ... they are not easy to fit even when the fuselage and wing are 3 parts and not one....
I wish you: "Go(o)d speed!" :-) :-) :-) :-) :-)
cheers
Steffen
I hope you will not regret you did not build in the stacks before painting ... they are not easy to fit even when the fuselage and wing are 3 parts and not one....
I wish you: "Go(o)d speed!" :-) :-) :-) :-) :-)
cheers
Steffen
Merlin
#017
Joined: June 11, 2003
KitMaker: 17,582 posts
AeroScale: 12,795 posts
Posted: Friday, June 16, 2006 - 04:13 PM UTC
Hi Steffen
Thanks for the heads-up. I've done a quick check to make sure I haven't messed up and you'll be glad to know the exhausts slot in fine through the open front.
All the best
Rowan
Thanks for the heads-up. I've done a quick check to make sure I haven't messed up and you'll be glad to know the exhausts slot in fine through the open front.
All the best
Rowan
Merlin
#017
Joined: June 11, 2003
KitMaker: 17,582 posts
AeroScale: 12,795 posts
Posted: Saturday, June 17, 2006 - 01:13 AM UTC
Hi again
I couldn't resist trying the same basic "primer" technique as on my Yak 1. This is stage 1 - after a combination base coat/pre-shade of gloss black, I've sprayed Alclad II Dark Aluminium on the metal panels.
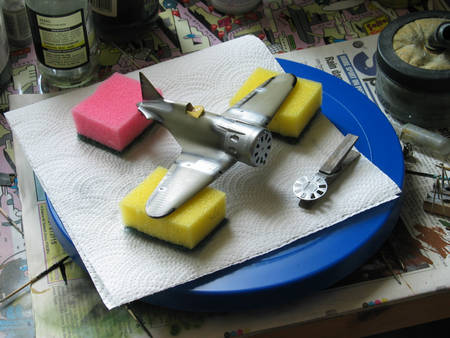
I've since masked them off and the next stage will be to paint the fuselage and wing-roots with WEM's grey wood primer. The wings? Well I'm going to treat the fabric differently this time. Pics of unpainted Spanish-built I-16s and a modern restoration show what appear to be clear-doped fabric areas, so I'll give the red-oxide a miss and go for a linen colour. Once again this is Eeducated guesswork" - so treat it with caution.
And lastly - a big thank you to Dave (Grumpy) for the latest addition to my workshop! The lazy susan is getting its first outing this weekend and is proving very useful already.Thanks Dave!
All the best
Rowan
I couldn't resist trying the same basic "primer" technique as on my Yak 1. This is stage 1 - after a combination base coat/pre-shade of gloss black, I've sprayed Alclad II Dark Aluminium on the metal panels.
I've since masked them off and the next stage will be to paint the fuselage and wing-roots with WEM's grey wood primer. The wings? Well I'm going to treat the fabric differently this time. Pics of unpainted Spanish-built I-16s and a modern restoration show what appear to be clear-doped fabric areas, so I'll give the red-oxide a miss and go for a linen colour. Once again this is Eeducated guesswork" - so treat it with caution.
And lastly - a big thank you to Dave (Grumpy) for the latest addition to my workshop! The lazy susan is getting its first outing this weekend and is proving very useful already.Thanks Dave!
All the best
Rowan

Grumpyoldman
Joined: October 17, 2003
KitMaker: 15,338 posts
AeroScale: 836 posts

Posted: Saturday, June 17, 2006 - 04:03 PM UTC
Use it in good health....
Looks good so far.
Looks good so far.

Holdfast
#056

Joined: September 30, 2002
KitMaker: 8,581 posts
AeroScale: 4,913 posts
Posted: Saturday, June 17, 2006 - 04:19 PM UTC
Very neat Rowan another stunner in the making
I know the rocket that you talk about, I think I rquire one, do they sell 'em at Screw fix? :-)
Mal
I know the rocket that you talk about, I think I rquire one, do they sell 'em at Screw fix? :-)
Mal

Merlin
#017
Joined: June 11, 2003
KitMaker: 17,582 posts
AeroScale: 12,795 posts
Posted: Saturday, June 17, 2006 - 05:13 PM UTC
Cheers Dave and Mal
Here's the result of the "primer" stage:
I haven't worried about getting a particularly even finish (especially on the fabric areas) because all that'll be seen of these colours on the finished kit is where there's paint-chipping.
Time for lunch and then to start on the latex stippling before applying the camouflage...
All the best
Rowan
P.S. - Mal, I got a few funny looks wandering 'round trailing smoke - but I'm certainly enjoying building again! :-)
alpha_tango
Joined: September 07, 2005
KitMaker: 5,609 posts
AeroScale: 5,231 posts
Posted: Saturday, June 17, 2006 - 05:29 PM UTC
Hi Rowan
now you are really ahead of me ... although mine wont get that treatment, just a layer of black primer ... trying to do some "reverse preshading"
Sadly now WEM parcel yet .... hopefully tomorrow OTOH giving me the chance doing some website update ...
cheers
Steffen
now you are really ahead of me ... although mine wont get that treatment, just a layer of black primer ... trying to do some "reverse preshading"
Sadly now WEM parcel yet .... hopefully tomorrow OTOH giving me the chance doing some website update ...
cheers
Steffen
TedMamere
Joined: May 15, 2005
KitMaker: 5,653 posts
AeroScale: 4,347 posts
Posted: Saturday, June 17, 2006 - 05:42 PM UTC
Hi Rowan!
Looks very good so far and this one will be another great model for sure... but now you can give the sponge pieces to your girlfriend so she can finish to wash the dishes! I hear her screaming "were the hell did you put the new sponges I just bought Rowan!" :-)
Jean-Luc
Looks very good so far and this one will be another great model for sure... but now you can give the sponge pieces to your girlfriend so she can finish to wash the dishes! I hear her screaming "were the hell did you put the new sponges I just bought Rowan!" :-)
Jean-Luc
alpha_tango
Joined: September 07, 2005
KitMaker: 5,609 posts
AeroScale: 5,231 posts
Posted: Saturday, June 17, 2006 - 05:52 PM UTC
Hi Jean-Luc
you jingoistic (++) ... of course Rowan will do the dishes himself :-) :-) :-) :-) :-) (LMAO) ... sorry I could not resist
cheers
Steffen
you jingoistic (++) ... of course Rowan will do the dishes himself :-) :-) :-) :-) :-) (LMAO) ... sorry I could not resist
cheers
Steffen
 |

WEB HOSTING BY


Copyright ©2021 AeroScale and Kitmaker Network, a subsidiary of Silver Star Enterprises
All Rights Reserved. Please read our Conditions of Use and Privacy Policy.
All Rights Reserved. Please read our Conditions of Use and Privacy Policy.