Washington, United States
Joined: September 23, 2006
KitMaker: 432 posts
AeroScale: 360 posts
Posted: Friday, February 16, 2007 - 01:53 AM UTC
Hi all,
Finally got started on my P-39 last night and thought I would start a build log. I have never documented a build before, so we will see how I do. :-)
So far this kit is really good. The P.E. has been behaving itself and the fit has been great. The down side has been the instructions. I glued the seat belts in wrong because I just could not get my mind around what it was they were trying to explain. They are just vague enough to cause a newbie like me to make mistakes. Oh well, at least I got them in there! So here are the first pics and let me know what you think, and any advise you have as I'm doing this build.
-Derek


They too will be ground up to lubricate the gears of progress.
North Carolina, United States
Joined: November 28, 2005
KitMaker: 2,216 posts
AeroScale: 1,080 posts
Posted: Sunday, February 18, 2007 - 03:59 AM UTC
Nice work so far Derek.
If the rest of the plane looks as good as the cockpit does already, she should be a beauty.
One thought, if you have a bottle of Future at your workbench, take a small paint brush or toothpick and put just a drop on each of the dials on the instrument panel. When it dries it'll look just like glass over the dials. Nothing wrong with yours as it is......the Future dials are just a personal preference.
Hermon

"Those who would give up Essential Liberty
to purchase a little Temporary Safety,
deserve neither Liberty nor Safety."
Benjamin Franklin
Washington, United States
Joined: September 23, 2006
KitMaker: 432 posts
AeroScale: 360 posts
Posted: Sunday, February 18, 2007 - 04:42 AM UTC
Hermon,
Thanks for the encouragement!
In the pics the silver weathering looks more extreme than in person. It's funny you mention Future, I actually did appply Future, but as I dried it leaked behind the PE. I know I should have applied more coats than I did. I have the fuse put togther and the wings on, but will not be able to get pics up until tomorrow.
-Derek
They too will be ground up to lubricate the gears of progress.
Virginia, United States
Joined: April 03, 2006
KitMaker: 1,158 posts
AeroScale: 73 posts
Posted: Sunday, February 18, 2007 - 04:54 AM UTC
Derek,
Looks good so far. Keep us posted...
Washington, United States
Joined: September 23, 2006
KitMaker: 432 posts
AeroScale: 360 posts
Posted: Wednesday, February 21, 2007 - 02:22 AM UTC
Hi all,
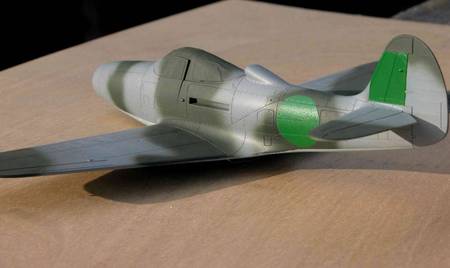
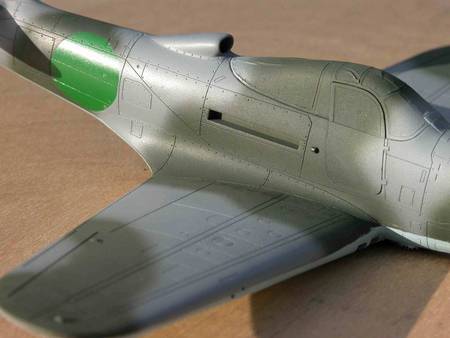
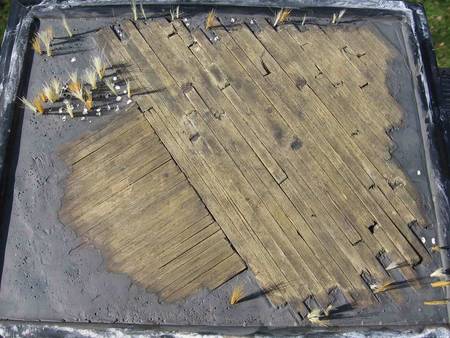
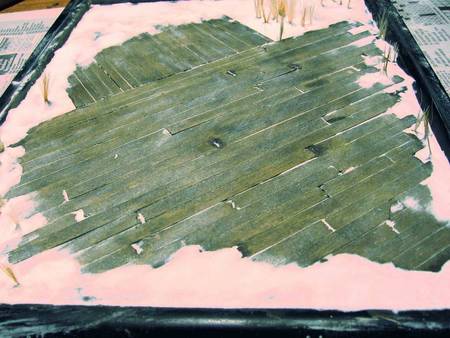
I have been making a bit of progress on the P-39 and making my first diorama as well. I should get most of the diorama finished up today. I will be adding snow to cover most of the swampy mud looking stuff. Really this went together easily and I'm hoping that it will end up looking like I have it pictured in my mind. With how much I have been running my mouth about my "butt kicking" P-39 it had better!
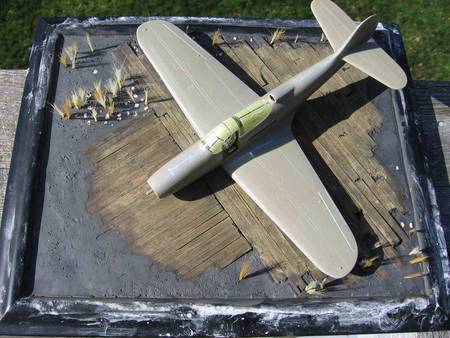
Now this here shows some problem areas I ran into. The wing/fuse joints required a bit of sanding and cutting also the fuse sides were a bit out of shape, requiring putty. Really, so far these have been the biggest obstacles, which is not much. I hope to get paint on it soon, maybe Friday.
They too will be ground up to lubricate the gears of progress.
Moselle, France
Joined: May 15, 2005
KitMaker: 5,653 posts
AeroScale: 4,347 posts
Posted: Wednesday, February 21, 2007 - 03:37 AM UTC
Hi Derek!
Nice build so far! The diorama base looks very good!

I will follow your build with great interest as I plan to build two P-39s as well this year... so keep on posting your progress

Jean-Luc

Better think one hour and build five minutes...
Than think five minutes and build an hour!
Washington, United States
Joined: September 23, 2006
KitMaker: 432 posts
AeroScale: 360 posts
Posted: Wednesday, February 21, 2007 - 06:11 AM UTC
O.k.,
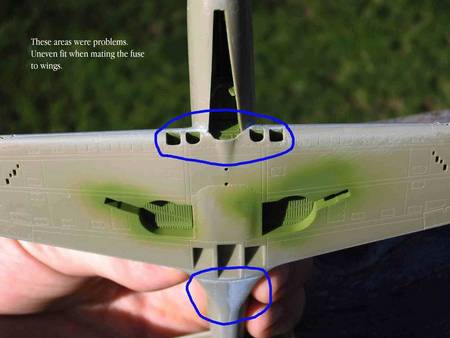
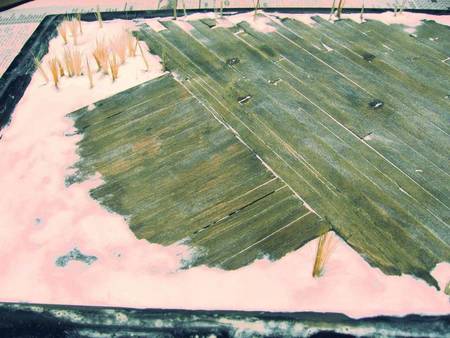
So I got the diorama done. The camera seems to have a hard time getting the white balance right under certain lighting conditions, hence the odd looking snow! I used baking soda, which worked very well. However, anyone reading this know the best way to keep the soda from blowing away? I spread thinned white glue down first, but that will only partially hold things down. What should I use?
-Derek
They too will be ground up to lubricate the gears of progress.
Buenos Aires, Argentina
Joined: December 27, 2002
KitMaker: 1,941 posts
AeroScale: 1,040 posts
Posted: Wednesday, February 21, 2007 - 06:33 AM UTC
Hi Derek:
Nice job you´re doing with that P 39. Love the base, it looks fantastic.
Keep on posting please.

"Never in the field of human conflict was so much owed by so many to so few"
Winston Spencer Churchill
Idaho, United States
Joined: May 16, 2003
KitMaker: 895 posts
AeroScale: 457 posts
Posted: Wednesday, February 21, 2007 - 09:12 AM UTC
Hello Derek.
You might try thinning some white glue (Elmers) with water and apply several light mist coats with a hand spray bottle.
Sincerely,
Brian
There is only two kinds of fires. Those that use less than 500 gallons of water too extinguish and those that use WAY MORE!
Washington, United States
Joined: September 23, 2006
KitMaker: 432 posts
AeroScale: 360 posts
Posted: Wednesday, February 21, 2007 - 10:09 AM UTC
Brian,
Yeah, I though of that, as well as using hair spray. I tested the hairspray on a piece of paper and it cause some parts of the soda to ball up. I'm worried that thinned white glue would do the same. The soda has such a nice "snowy crystal" look to it if I messed it up at this stage I would be......highly discouraged

Thank you all for your encouragement and comments. This is a really fun build and I'm having a blast participating in a campaign.
-Derek
They too will be ground up to lubricate the gears of progress.

#041
Kobenhavn, Denmark
Joined: July 20, 2006
KitMaker: 10,069 posts
AeroScale: 3,788 posts
Posted: Wednesday, February 21, 2007 - 12:43 PM UTC
Great base for your bird.
It looks really good despite the pinkish snow :-) I know some people use spay glue to fix the baking soda in place but I have not tried it myself. So test it on someelse than your diorama first.
Looking forward to see more
Campaign'oholic - 252+ campaigns completed
Washington, United States
Joined: September 23, 2006
KitMaker: 432 posts
AeroScale: 360 posts
Posted: Wednesday, February 21, 2007 - 11:17 PM UTC
Hi all,
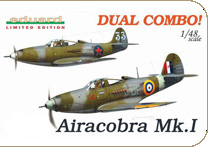
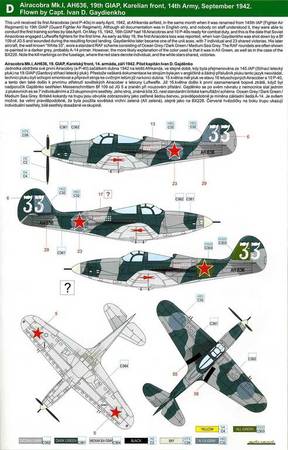
This is the scheme I'm going for, or a close facsimile of it. I will have to do a little paint mixing as I don't have the exact colors they call for. I'm still hoping to get most of the paint on by tomorrow. Hats off to Eduard for including these nice color fold outs, it really helps get an idea of how things should look.
I also had a bit of a set back as a nose wheel well part broke free and slid into the rear fuselage. I was able to get it out but it will take some "creative plastic work" to get it where it needs to be again.
-Derek
They too will be ground up to lubricate the gears of progress.
Scotland, United Kingdom
Joined: June 01, 2006
KitMaker: 1,707 posts
AeroScale: 1,119 posts
Posted: Thursday, February 22, 2007 - 12:05 AM UTC
"I´m going back to the front to relax"
"THE BLACK CATS FLIES TONIGHT"
"Find your enemy and shoot him down - everything else is unimportant"
"When you're out of F-8's... You're out of fighters!"
#041
Kobenhavn, Denmark
Joined: July 20, 2006
KitMaker: 10,069 posts
AeroScale: 3,788 posts
Posted: Thursday, February 22, 2007 - 01:23 PM UTC
It will be great.
Nice choice of colour scheme. Does the decals come with the dark circular background?
Campaign'oholic - 252+ campaigns completed
Washington, United States
Joined: September 23, 2006
KitMaker: 432 posts
AeroScale: 360 posts
Posted: Thursday, February 22, 2007 - 02:14 PM UTC
Quoted Text
It will be great. Nice choice of colour scheme. Does the decals come with the dark circular background?
Jesper,
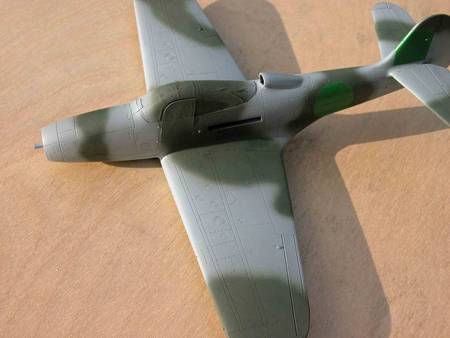
No they don't, the stars for the lower wings do have a light background though. I'm going with the green back ground and shot the paint today for the stars background and have it masked accordingly. If all goes well I should have the upper done tomorrow. This kit includes decals for SIX planes, really a sweet deal. Eduard I think, is really on to something offering these kits with so many options.
-Derek
They too will be ground up to lubricate the gears of progress.
Washington, United States
Joined: September 23, 2006
KitMaker: 432 posts
AeroScale: 360 posts
Posted: Monday, February 26, 2007 - 07:00 AM UTC
They too will be ground up to lubricate the gears of progress.
#041
Kobenhavn, Denmark
Joined: July 20, 2006
KitMaker: 10,069 posts
AeroScale: 3,788 posts
Posted: Monday, February 26, 2007 - 12:36 PM UTC
Very nice work
I think the green used to paint over the US markings is a bit bright, but weathering will probably take care of that.
To me the camouflage colours look just fine.
I have always thought the colour discussion were more academic than practical. I have been in the Danish army for two years and seen how much colours can look different in peacetime even though it is supposed to be the same colour. There are probably even more variations in wartime.
Good job so far. Thanks for sharing
Campaign'oholic - 252+ campaigns completed
North Carolina, United States
Joined: November 28, 2005
KitMaker: 2,216 posts
AeroScale: 1,080 posts
Posted: Tuesday, February 27, 2007 - 05:33 AM UTC
She's looking really good now Derek. As Jesper said, the colors look fine to me. Just an idea, but just before, or after you do the wash for weathering, try using a little Tamiya Smoke color on and around some of the panel lines. Joe (Mother-the helicopter guy) does this and it makes his helos look so real it's scary.
"Those who would give up Essential Liberty
to purchase a little Temporary Safety,
deserve neither Liberty nor Safety."
Benjamin Franklin
Washington, United States
Joined: September 23, 2006
KitMaker: 432 posts
AeroScale: 360 posts
Posted: Tuesday, February 27, 2007 - 08:37 PM UTC
Quoted Text
Very nice work I think the green used to paint over the US markings is a bit bright, but weathering will probably take care of that. To me the camouflage colours look just fine.
I have always thought the colour discussion were more academic than practical. I have been in the Danish army for two years and seen how much colours can look different in peacetime even though it is supposed to be the same colour. There are probably even more variations in wartime.
Good job so far. Thanks for sharing
Jesper,
I agree, the green is a bit brighter than I would have liked, and I think once I get a oil wash and put the decals on it will look more appropriate. Also, what do you do in the Army?
Quoted Text
She's looking really good now Derek. As Jesper said, the colors look fine to me. Just an idea, but just before, or after you do the wash for weathering, try using a little Tamiya Smoke color on and around some of the panel lines. Joe (Mother-the helicopter guy) does this and it makes his helos look so real it's scary.
Hermon,
I have heard about using Smoke around the panel lines, but at this stage I'm not sure if I want to chance it. My airbrush skills are still in the "rookie" category and I just know something horribly tragic would happen. :-) Especially after how much I've been running my mouth about my incredible P-39! I hope to get decals on tonight and finish the landing gear.
Thanks again guys for your advise and pointers, it is greatly appreciated.
-Derek
They too will be ground up to lubricate the gears of progress.
North Carolina, United States
Joined: November 28, 2005
KitMaker: 2,216 posts
AeroScale: 1,080 posts
Posted: Wednesday, February 28, 2007 - 05:41 AM UTC
Quoted Text
My airbrush skills are still in the "rookie" category and I just know something horribly tragic would happen.
Yeah, well I hate to break the news to ya Derek.....but that P-39 of yours ain't exactly wearing a "rookie" paint job. I've been at this game steady now for 2 years practicing and learning everything I can and what you have displayed here is as good if not better than anything I've produced so far. No kidding, great job man.
Now, as for the "smoke" thing. I tried something a bit different a while back on a Macci 202 Folgore. The camo scheme was little bitty green squiggels over a base of desert tan. I painted the tan base, then applied several coats of Future. I then did my little green squiggles in Model Masters Enamel. Any mistakes I made were easily touched up with a Q-tip dipped in thinner/brush cleaner. The Future protected the tan base coat and it actually turned out great. Well, it's something I'll remember in the future.
Anyway, great job!
"Those who would give up Essential Liberty
to purchase a little Temporary Safety,
deserve neither Liberty nor Safety."
Benjamin Franklin
Washington, United States
Joined: September 23, 2006
KitMaker: 432 posts
AeroScale: 360 posts
Posted: Wednesday, February 28, 2007 - 09:07 AM UTC
Quoted Text
Quoted Text
My airbrush skills are still in the "rookie" category and I just know something horribly tragic would happen.
Yeah, well I hate to break the news to ya Derek.....but that P-39 of yours ain't exactly wearing a "rookie" paint job. I've been at this game steady now for 2 years practicing and learning everything I can and what you have displayed here is as good if not better than anything I've produced so far. No kidding, great job man.
Now, as for the "smoke" thing. I tried something a bit different a while back on a Macci 202 Folgore. The camo scheme was little bitty green squiggels over a base of desert tan. I painted the tan base, then applied several coats of Future. I then did my little green squiggles in Model Masters Enamel. Any mistakes I made were easily touched up with a Q-tip dipped in thinner/brush cleaner. The Future protected the tan base coat and it actually turned out great. Well, it's something I'll remember in the future.
Anyway, great job!
Hermon,
Thank you for your kind compliment, it is VERY much appreciated.
The real test will be putting a winter white wash on it with out ruining what I have going. I got the idea from an article in Fine Scale Modeler, a guy did a KILLER Trumpeter Yak-3 in 1/32. I'm going to try to replicate it.
I have been using acrylic paint so far, as I'm a bit nervous diving into the enamels. The ease of clean up with the acrylics can't be beat. I like being able to wash my brushes and air brush with out causing a massive haz-mat disaster in the kitchen
It's funny you mention the Folgore, I just picked up the "Italian Aces" Hase kit and have a bunch of after market stuff on the way. I would love to hear about your kit and any pics. It may be a while before I get to it though, as I'm signed up the Helicopter campaign and will start on a Italeri V-22 Osprey.
Thanks again!
-Derek
They too will be ground up to lubricate the gears of progress.
Ohio, United States
Joined: November 20, 2002
KitMaker: 1,038 posts
AeroScale: 285 posts
Posted: Wednesday, February 28, 2007 - 06:11 PM UTC
The future on the dials is a really good tip, thanks for sharing
Quoted Text
Nice work so far Derek.
If the rest of the plane looks as good as the cockpit does already, she should be a beauty.
One thought, if you have a bottle of Future at your workbench, take a small paint brush or toothpick and put just a drop on each of the dials on the instrument panel. When it dries it'll look just like glass over the dials. Nothing wrong with yours as it is......the Future dials are just a personal preference.
Hermon
The War Zone is
HERE, Tons of 1/48 Scale Prop Planes, Color Schemes, Tips and Tricks.
Washington, United States
Joined: September 23, 2006
KitMaker: 432 posts
AeroScale: 360 posts
Posted: Sunday, March 04, 2007 - 03:25 AM UTC
Hi all,
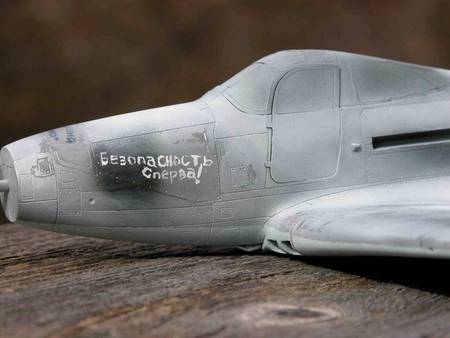
Here are some update pics of the mighty P-39. Top side decals are on, and I still have the lower decals to do. Winter paint is MM Acryl flat white applied with many coats thinned to about 20/80 with plain water. I have used a cotton swab to wear the paint back down to the base colors, I still have a few spots I want to get to, but will wait for now.
Also, I want to thank my lovely wife for doing the Cryllic slogan on the nose. She is an accomplished artist and has a much steadier hand than I. Her web site is my "selected link". Again, comments demanded ;-)


They too will be ground up to lubricate the gears of progress.
#041
Kobenhavn, Denmark
Joined: July 20, 2006
KitMaker: 10,069 posts
AeroScale: 3,788 posts
Posted: Sunday, March 04, 2007 - 12:46 PM UTC
Hi Derek
Looks really good. Nice touch with the slogan
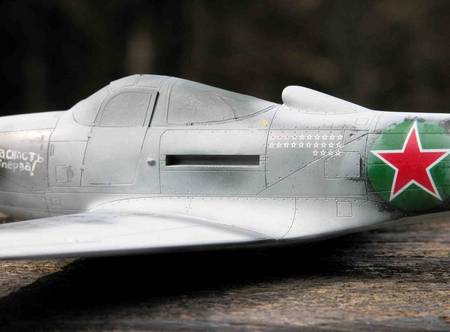
The green backgrounds behind the decals look very good now.
I am not in the Army anymore. I were in the motorized infantry ending up as a sergeant leading a 10 man standard infantry team. Pretty cool, but not something I would build the rest of my life on, so went on got a MSc in int. Marketing and Management and is now in the private business. Anyway before I have my whole CV here; buttomline is that paints can change much depending on weather, age of the paint job, conditions under which the paint job is done etc.
Campaign'oholic - 252+ campaigns completed
North Carolina, United States
Joined: November 28, 2005
KitMaker: 2,216 posts
AeroScale: 1,080 posts
Posted: Monday, March 05, 2007 - 05:47 AM UTC
Wow! It's like a completely different plane with the white wash applied. It really helped to tone down the green under the red star markings as well.
While it has turned out great, it's almost a shame that you had to cover up a well done camo job. A panel line wash will REALLY bring out the details now, especially with the whitewash applied.
Great job! And kudo's to your wife on the slogan applied to the nose. Looks like the real deal.
Hermon
"Those who would give up Essential Liberty
to purchase a little Temporary Safety,
deserve neither Liberty nor Safety."
Benjamin Franklin