Hasegawa Fw 190A-4 and Fw 190F-1 (Down Low)
Germany
Joined: September 07, 2005
KitMaker: 5,609 posts
AeroScale: 5,231 posts
Posted: Monday, May 07, 2007 - 02:25 PM UTC
Hi All
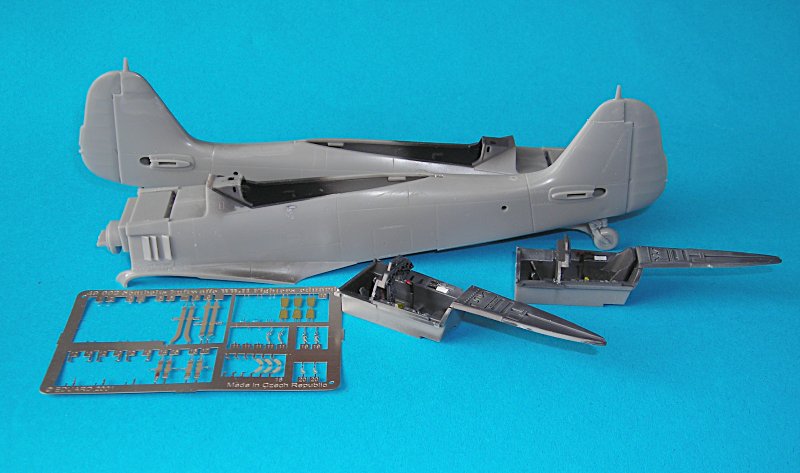
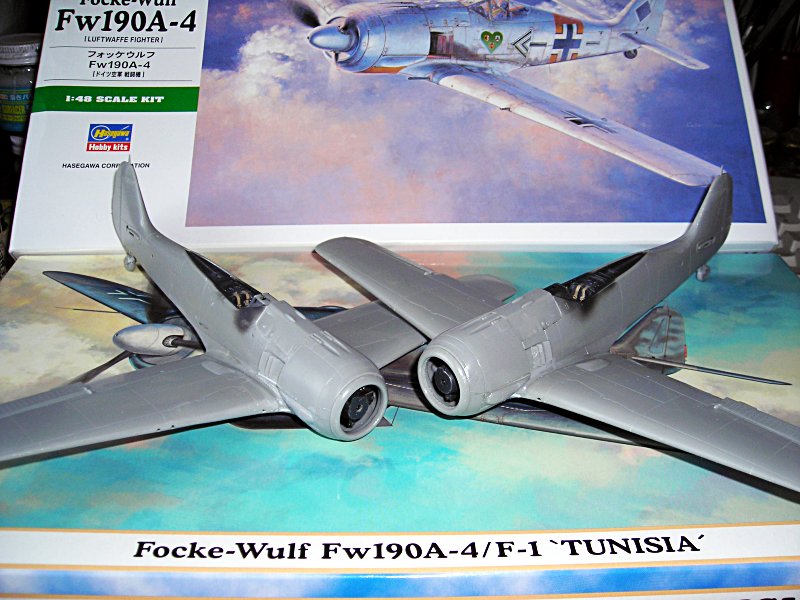
Finally I started my Down Low Fw 190 F-1 . As it is very similar to the A-4 I decided to build both kits parallel ... so I hope I can finish at least one of them this month ...
The Hasegawa kit is quite easy to buld and I will not add much aftermarket stuff. Just the seat belts and maybe a 500kg bomb for the fighter bomber (if I can find one). The F-1 will be done with the kit decals (Tunesia, III./SKG 10), while I am still undecided on which
Front the A-4 will be deployed ...
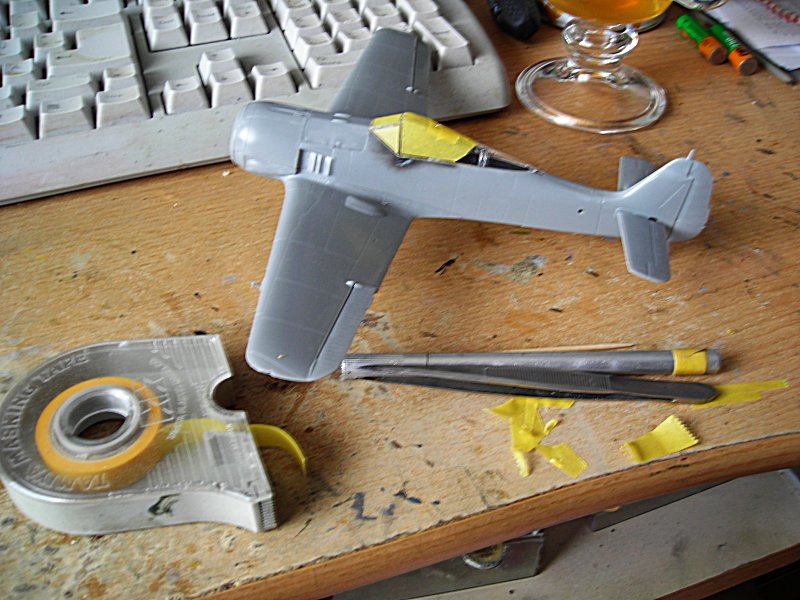
Yesterday I built the wings. The F-1 has no outer wing weapons but a bomb rack, while the A-4 has the MG FF (maybe it will also get the rack for a fuel tank later)

I sprayed the cockpit parts RLM 66 and will do the detail painting soon (hopefully) ...
more to come
Steffen
DULCE ET DECORUM EST PRO HOBBY MORI
Moselle, France
Joined: May 15, 2005
KitMaker: 5,653 posts
AeroScale: 4,347 posts
Posted: Monday, May 07, 2007 - 04:50 PM UTC
Hi steffen!
Nice way to show the differences between the two variants!

I hope you will continue that way during your build. It's vey informative!

I will follow this thread with great interest...
Jean-Luc

Better think one hour and build five minutes...
Than think five minutes and build an hour!
Germany
Joined: September 07, 2005
KitMaker: 5,609 posts
AeroScale: 5,231 posts
Posted: Monday, May 07, 2007 - 05:20 PM UTC
Hi Jean-Luc
well, there is not much difference. The Fw 190 F-1 is just a Fw 190 A-4 wich was used differently. The outboard MG FF are optional also for fighters and could be built in or not (feldmäßig = by frontline unit)
i will try to make a little difference with the camo. The Fw 190 F-1 and A-4 will be both painted in 74/75/76 camo, but I try to achieve a more dusted and faded look on the Tunesian machine.
We'll see.
best wishes
Steffen
DULCE ET DECORUM EST PRO HOBBY MORI
Germany
Joined: September 07, 2005
KitMaker: 5,609 posts
AeroScale: 5,231 posts
Posted: Monday, May 07, 2007 - 10:29 PM UTC
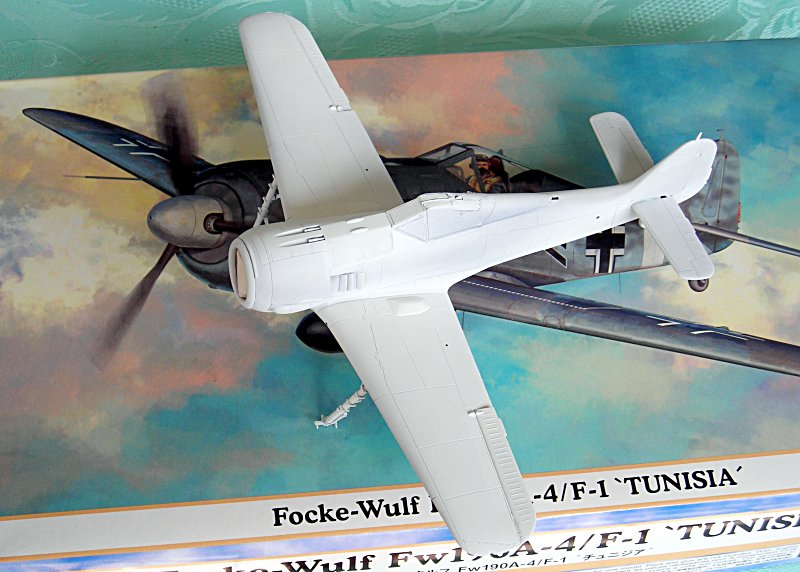
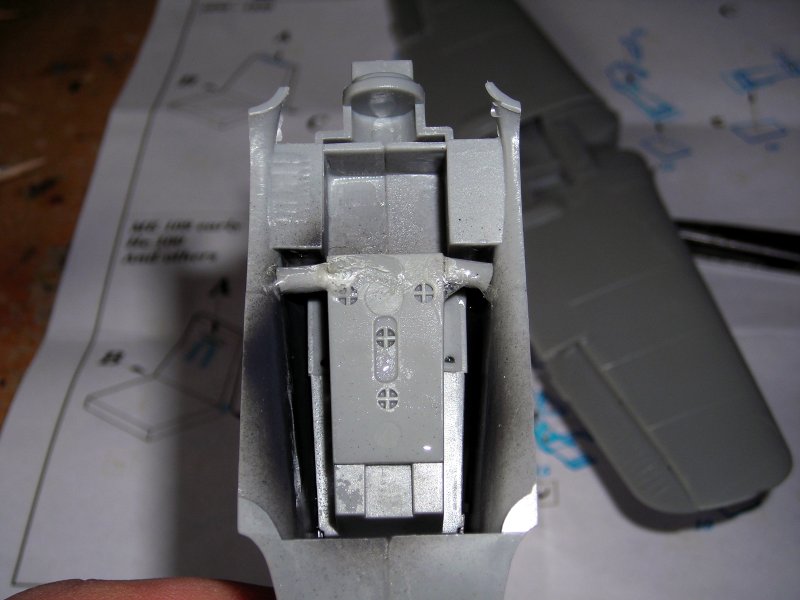
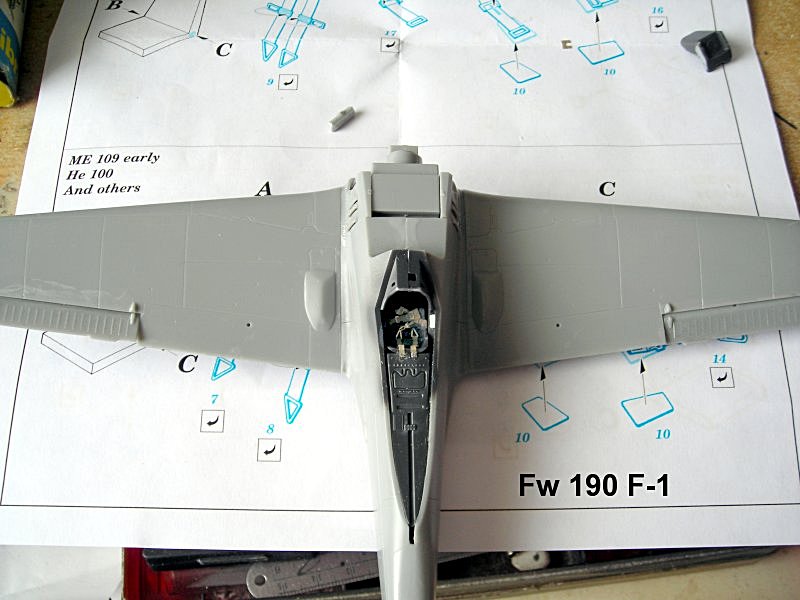
Day 2: Cockpits
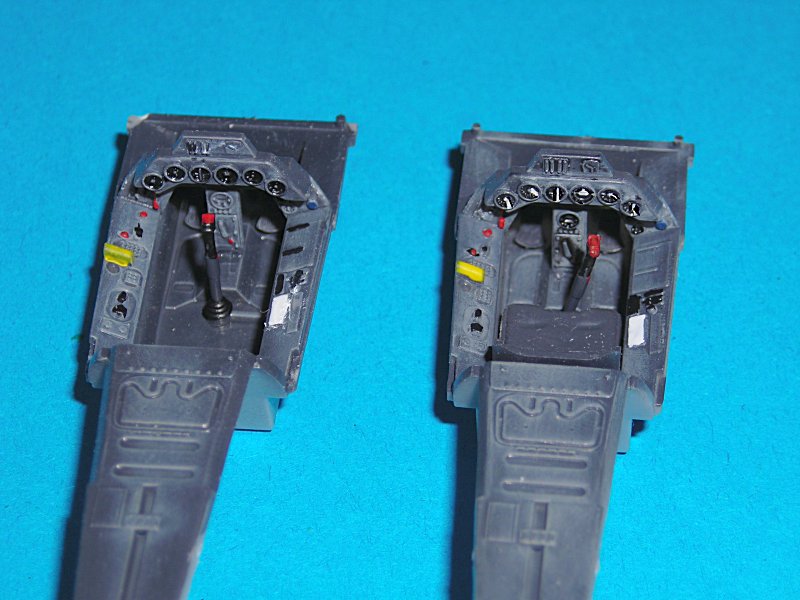
I do not know if I can keep this pace, but today I finished the cockpits and attached the wings to the fuselages. I airbrushed all necassary parts RLM 66 yesterday and today I just added generic detail with some GW colours (good stuff BTW). And of course some Eduard seat belts were also used.
The fuselages were also glued together yesterday and the fins were added and sanded in. Some filler was required (as on the underwing panels, see post above). I first tried Tamiyas Light curing stuff, but it did not stick very well to such a small gap, so I used my usual Mr.Surfacer 500 .. sanding and polishing it today.
I inserted two small spreaders left and right from the cockpit tub to spread the fuselage just 1/2 mm on each side .. the wing to fuselage join is much better after this easy improvement. Still I needed some clamps and inserts on one of the fuselages ... this will make a little trouble when fitting the cowl (not too much, already did that on the Fw 190 A-3)
comments welcome
best wishes
Steffen
DULCE ET DECORUM EST PRO HOBBY MORI
Germany
Joined: September 07, 2005
KitMaker: 5,609 posts
AeroScale: 5,231 posts
Posted: Tuesday, May 08, 2007 - 10:55 PM UTC
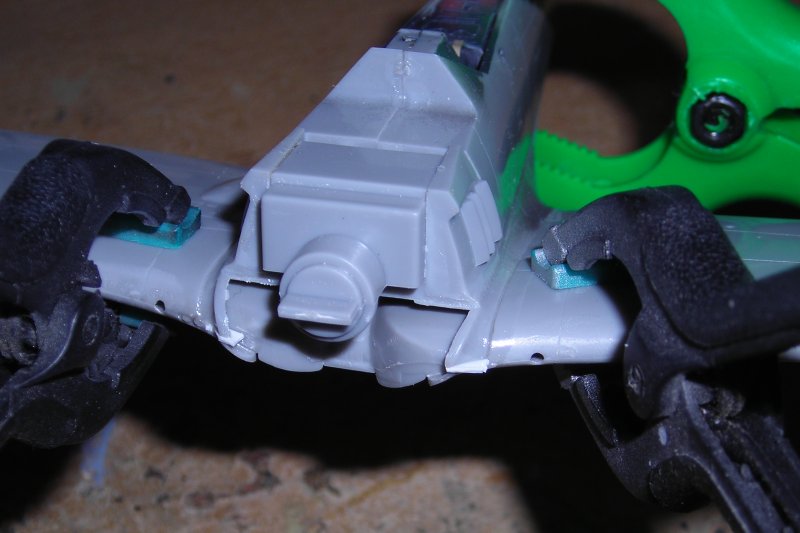
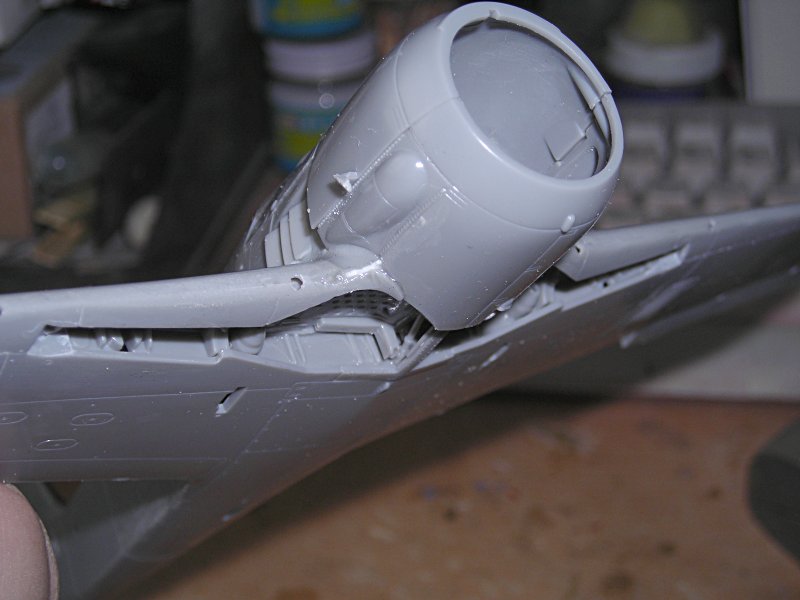
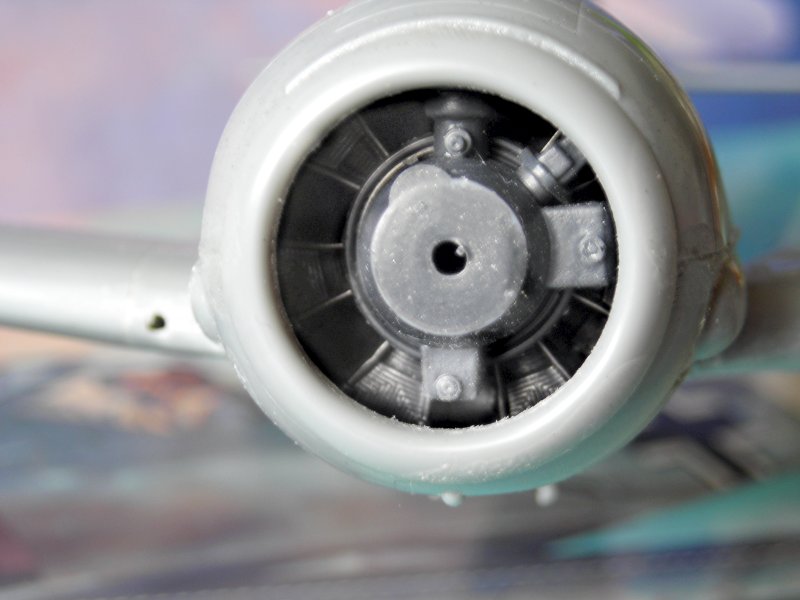
Little progress on Day3: the nose
Today I added the powerplants and cowlings. The engine replicas were painted RLM 66 and polished with MiG pigments "gun metal", then I glued them into place. All parts of the cowling were cleaned up and then fit into place .. some small gaps at the lower engine to fuselage join were filled with Tamiya putty and Mr Surfacer ...
Please keep silent until a cannot change the mistakes I did

...
model on Wayne ...
Steffen
DULCE ET DECORUM EST PRO HOBBY MORI
Moselle, France
Joined: May 15, 2005
KitMaker: 5,653 posts
AeroScale: 4,347 posts
Posted: Tuesday, May 08, 2007 - 11:45 PM UTC
Hi Steffen!
You're kidding!

Quoted Text
Please keep silent until a cannot change the mistakes I did ...
I don't see any mistakes... yet!
But it's nice to see that not only FM kits need strong clamps to keep the main parts together!

By the way, did you already used that new Tamiya Light Curring Putty?
Jean-Luc
Better think one hour and build five minutes...
Than think five minutes and build an hour!
Germany
Joined: September 07, 2005
KitMaker: 5,609 posts
AeroScale: 5,231 posts
Posted: Wednesday, May 09, 2007 - 12:02 AM UTC
Hi Jean-Luc
thanks for the reply ... I started to think I am mobbed ...
the clamps are not very strong .. just to keep it together ...
I used the putty on the small gaps at the lower wing inserts. .. It did not stick enocgh to the plastic surface and was ripped off during sanding. I guess the gaps were too small to give a good grip to the stuff...
cheers
Steffen
DULCE ET DECORUM EST PRO HOBBY MORI
England - East Anglia, United Kingdom
Joined: November 09, 2006
KitMaker: 295 posts
AeroScale: 276 posts
Posted: Wednesday, May 09, 2007 - 05:23 PM UTC
Looks really good Alpha, I'll be following this thread with interest. I have already noticed one thing. I've just started building a Dragon 190 and I wish it had the Hasegawa cowling on it. Alot easier to align and get right.
Nice work though
H
Germany
Joined: September 07, 2005
KitMaker: 5,609 posts
AeroScale: 5,231 posts
Posted: Wednesday, May 09, 2007 - 05:43 PM UTC
Hi Howard
many thanks for your kind comment! I am not sure if you would be much happier with the Hasegawa cowl, as it is the same style (though it has some alignment lugs)
You have the lower part, separate bulges on each side, the top and the armour ring on the front. the parts do not sit on the engine plate, but must be aligned separately. I had to use some fancy attachment strategies and filler on both models (one has the plastic sheet inserts you can see in the pix above and the other not)
It has been a lonng time since i built my last Dragon Fw 190 kit but I do not think this is much easier ... but it is not very hard either. Just take your time and dry fit and sand a few times, before you glue. No shake'n'bake kit, but I like it better than the Tamiya (which builds easier)
I am really looking forward to Hasegawas Fw 190 A-5 (esp. because of the BMW) but also how it compares to the Eduard kit ... which I also have to build soon and not to forget the Fw 190 A-8 which still is not finished, because I find the wind shield very strange ... but I digress
best wishes
Steffen
DULCE ET DECORUM EST PRO HOBBY MORI
Västra Götaland, Sweden
Joined: September 25, 2006
KitMaker: 321 posts
AeroScale: 5 posts
Posted: Wednesday, May 09, 2007 - 06:16 PM UTC
Guten Tag genosse Steffen.
Have been following you build for Down Low and it looks very good so far if i may say so.
Cant wait untill you slap on some paint and a bit of weathering when it´s done.
I myself am in the process of building a Hasegawa 1:48 Mitsibischi Zero Fighter but, sadly, unable to compete in the Down Low campaign since the Zero wasnt used for tank busting... at least to my knowledge.
Anyhow, i must say that the cockpit of the FW looks ALOT "crispier" then the Zero cockpit im currently slaving to get ready

Keep it up Steffen.
Härtlischen Grüße von Schweden
/
Christian
Germany
Joined: September 07, 2005
KitMaker: 5,609 posts
AeroScale: 5,231 posts
Posted: Wednesday, May 09, 2007 - 06:53 PM UTC
Dorogoy Tovarish Chistian.
Bolshoye spassiba! Well I keep it English as my Russian is very rus-ty ..
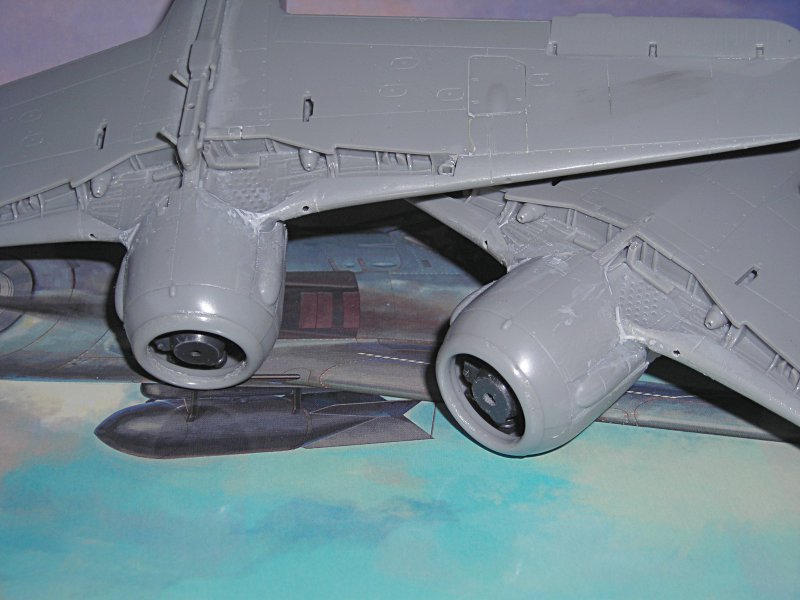
It may take a while until I can spray some paint on, as I am a very slow builder. At the moment I am attaching the main wheel legs on the fighter bomber, as I like to have them on for painting (so I do not need a special holder or stand), but I leave off the covers until after airbrushing the camo. As you see I have also attached the elevators ...
Here you see, that you can't see much of the engine. Consider the "Lüfterrad" and prop in place and everything inside is invisible
Will do the same for the 2nd machine later today.
Vsyevo khoroshevo!
Steffen
DULCE ET DECORUM EST PRO HOBBY MORI
Germany
Joined: September 07, 2005
KitMaker: 5,609 posts
AeroScale: 5,231 posts
Posted: Thursday, May 10, 2007 - 08:44 PM UTC
Day 5: canopies
very little progress today. I started to mount the canopies. First all 4 parts got a bath in Klear, then I mounted the gunsight and the windshield. Now the problems started.
The fighter is always a little ahead and I wanted to research the type of canopy armour I would have to install. Well, the machine I wanted to build ("Wumm" Schnell's a/c of JG 2) does not have the cooling flaps but the "Kiemenspalten" (cooling "holes") --- those are in the Fw 190 A-3 kit but not in the A-4 kits. O.k., I thought, take another Luftwaffe celebrity ... I found two, which I will hardly do:
Johannes Trautloft Kdre. machine of JG 54 all white ... sadly I already have a model of his Bf 109 E-1 (no doubles in my collection, there are faaaar to much others)
Erich Rudorffer, a person with a very dubious reputation .. still, not all of his claims might be made-up, but then the c&m of this crate is very unclear...
"Hier steh' ich nun ich armer Tor und bin so klug als wie zuvor" ... any input appreciated
LUCKILY the F-1 seems to have the cooling louvres
best wishes
Steffen
DULCE ET DECORUM EST PRO HOBBY MORI
Germany
Joined: September 07, 2005
KitMaker: 5,609 posts
AeroScale: 5,231 posts
Posted: Friday, May 11, 2007 - 10:06 PM UTC
DULCE ET DECORUM EST PRO HOBBY MORI
Västra Götaland, Sweden
Joined: September 25, 2006
KitMaker: 321 posts
AeroScale: 5 posts
Posted: Friday, May 11, 2007 - 11:39 PM UTC
Good job Steffen.
Your build shure looks ace!
Did you use the "Skull White" Primer from Games-Workshop?(wargamer ?)
P.S
BTW, i dont know a word of russian
D.S
Germany
Joined: September 07, 2005
KitMaker: 5,609 posts
AeroScale: 5,231 posts
Posted: Friday, May 11, 2007 - 11:56 PM UTC
Hi Christian
I am no wargamer, but I have some figure builders among my club mates here in Schwerin and they love that stuff .. I tried it and now I love it too. ... I would just need a grey primer to go with chaos black (first class primer for Alclad and co. !) and skull white.
I know there is this "space wolves grey"(?) but I had the impression it is not semi gloss/flat as the other two .. this gives good bite for the acrylics I use. (BTW the large 400ml spray cans are my weapon of choice)
Well, my russian was not soo bad once ... it's been a looooooong while since

Alles Gute! (thats what I wrote in Russian above)
Steffen
DULCE ET DECORUM EST PRO HOBBY MORI
Germany
Joined: September 07, 2005
KitMaker: 5,609 posts
AeroScale: 5,231 posts
Posted: Sunday, May 13, 2007 - 03:05 PM UTC
Hi all
Guess I should write something meaningful in my 1000th Network post ... errr .. what the heck
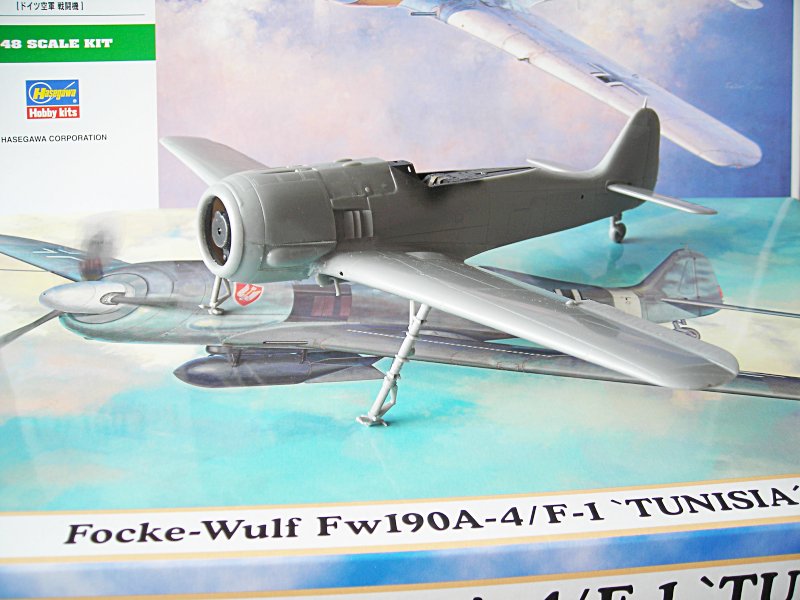
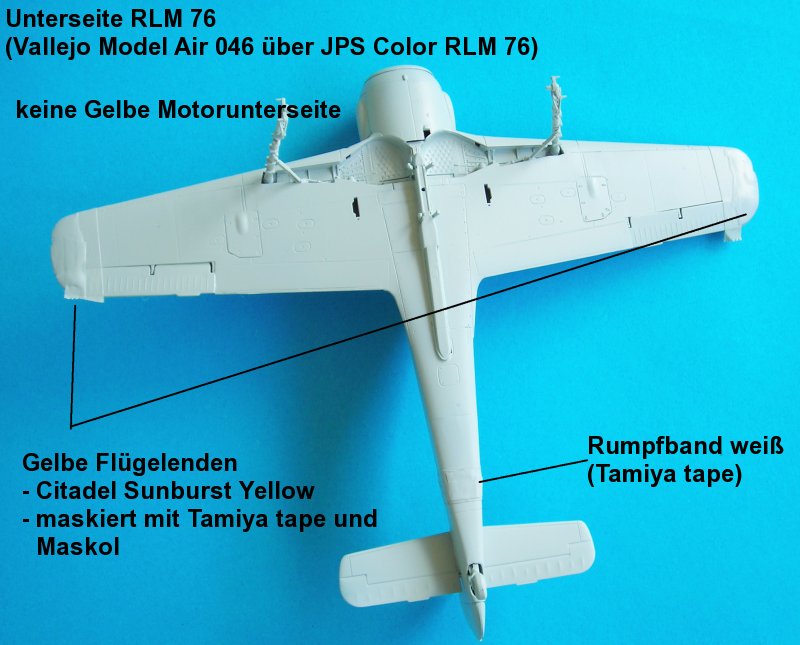
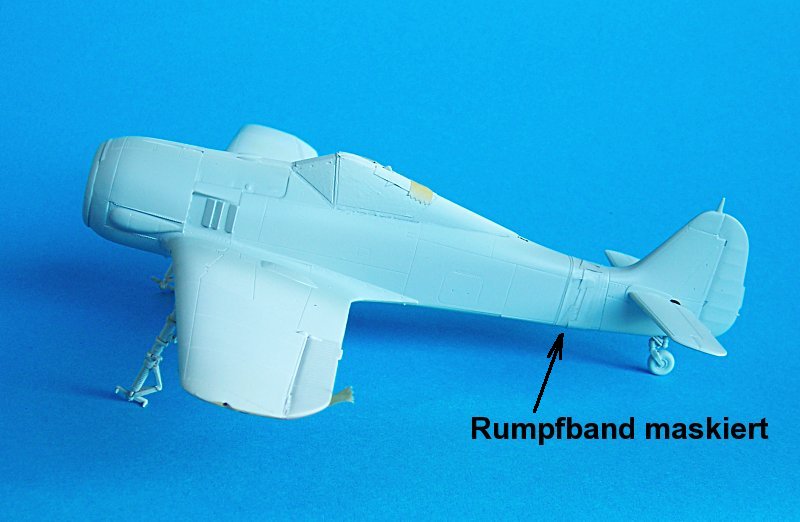
Day 7: Fw 190 F-1 colour
Yesterday (sunday) I first masked off the white fuselage (theatre recognition) band with Tamiya tape. Then I sprayed Citadel Sunburst Yellow on the lower wingtips. Pictures in "Fw 190 in North Africa"(Arthy/Jessen) pg. 133-135 indcate this, though it could be a misinterpretation. The same pictures do not show a yellow lower cowling (in my opinion). The wing tips were masked with Tamiya and Maskol.
Now comes the funny part. I first wanted to try the new JPS Color. It is not brightend for a scale effect and Jens Popp is know to be "anal retentive" when it comes to colour shades (= good representation of the original colour). When I had it on, it looked much to blue for my taste, which could be either a problem of not shaking the bottle not long enough (although my arm fell almost off, and yes I had put in two bearring balls) or of omissed scale brightening. However, I like the hue of the Vallejo Model Air and thus I sprayed a light coat over the JPS layer, which gave a slightly more blue hue than I normally use (to my eye) ... which is what I wanted for my Africa machine.
stay tuned ... and please do not hesitate to comment on my poor craftsmenship!
best wishes
Steffen
DULCE ET DECORUM EST PRO HOBBY MORI
Moselle, France
Joined: May 15, 2005
KitMaker: 5,653 posts
AeroScale: 4,347 posts
Posted: Sunday, May 13, 2007 - 04:31 PM UTC
Hi Steffen!
Congrats for you 1000th post!
I like the "although my arm fell almost off" comment!
It's difficult for me to say something about the accuracy of the colors you've used:
- because I'm not a Luftwaffe colors specialist
- I don't trust computer pics
- the blue background may alter the hue of the colors
Having said that, the model looks very promising and I'm sure you will make the best choices for the paintsheme...
Jean-Luc
Better think one hour and build five minutes...
Than think five minutes and build an hour!
Germany
Joined: September 07, 2005
KitMaker: 5,609 posts
AeroScale: 5,231 posts
Posted: Sunday, May 13, 2007 - 06:09 PM UTC
Many thanks, Captain! hope I do not write too much BS ...
Regarding the colour .. well, it looks o.k.

RLM 76 is very difficult, because the official mixture changed once in the war and the different aircraft manufacturer had different colour suppliers (not to mention the many subcontractors) so there is room for speculation.
And your remarks are also very valid (see my comment to Vulcans Academy Bf 109E) even in his pictures the colours differ significantly ...
Just sprayed RLM 75 which ha s a very lilac shade .. trying to avoid calling it mauve
cheers
Steffen
DULCE ET DECORUM EST PRO HOBBY MORI
England - East Anglia, United Kingdom
Joined: November 09, 2006
KitMaker: 295 posts
AeroScale: 276 posts
Posted: Sunday, May 13, 2007 - 06:15 PM UTC
More fantastic work Mr Alpha
I'm really looking forward to how these birds turn out. At current I have shelved my Dragon A7 as it needs spacing around the fuselage to wings and after a rather extensive ICM P-51 III build I fancied something easier and "fun" to build so have dragged a Dragon 163 Komet out of the stash.
I continue to look forward to what you achieve next
As always, Fine work sir
H
Germany
Joined: September 07, 2005
KitMaker: 5,609 posts
AeroScale: 5,231 posts
Posted: Monday, May 14, 2007 - 06:04 PM UTC
Many thanks for your kind comments!
@Howard: just an explanation alpha tango (AT) were my initials with GAF as AS was already given and sierra alpha has some bad reputation in Germany
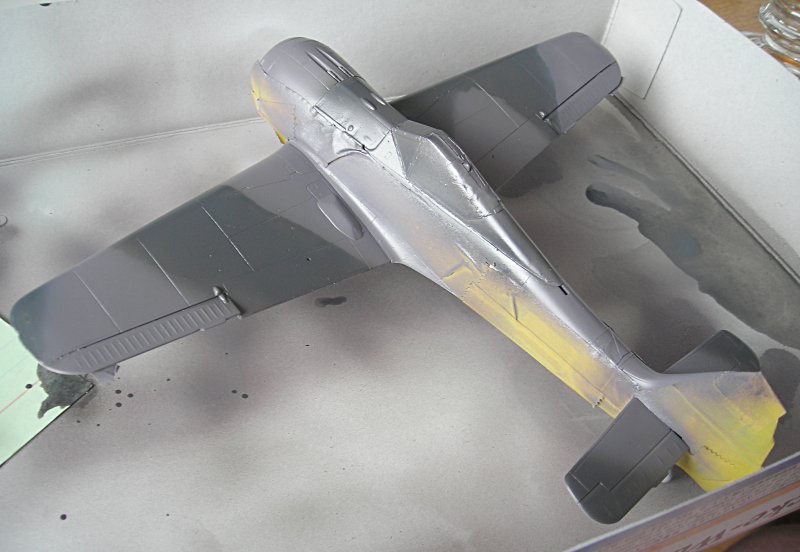
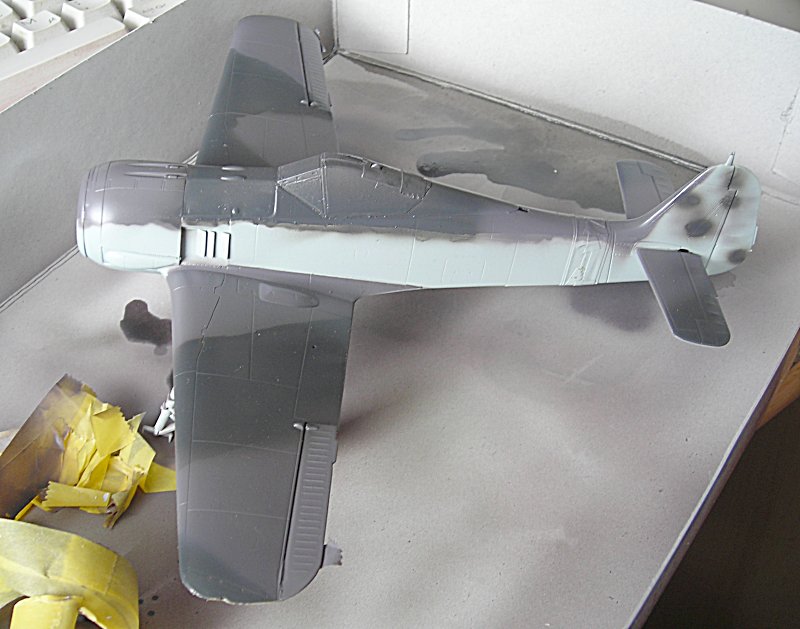
Day 8 and 9: more colour
Yesterday I masked the fuselage sides and tail and sprayed the upper side RML 75 grauviolett (JPS colour). I had to polish and respray some areas, but nothing too serious. I have a batch of those new colours, which was not fully tested and has some problems staying on the model, so I mix in 50% Klear for better adherance and sealing . This works fine but the colour is of course much less opaque, which makes controlling the layer thicknes a little difficult. Especially the RLM 74 that i spryed on today was not really easy and will require som more fine tuning with sealing polishing and weathering to look o.k.
Here some pictures. first the 74/75 camo is on with the maskin still in place and then without masks and after I softened the edges a little. As written above i have a ridge on the fuselage due to the thicker layers . I will try to eliminate this tomorrow when the colour is fully cured.
BTW for the soft edge camo on the wings I uses a paper card with a ripped edge holding it a few millimeters above the model.
A remarke: all my pictures are scaled 800px width, but somehow during the uploading process here on kitmaker they are rescaled ???
happy modelling
Steffen
DULCE ET DECORUM EST PRO HOBBY MORI
Buenos Aires, Argentina
Joined: December 27, 2002
KitMaker: 1,941 posts
AeroScale: 1,040 posts
Posted: Monday, May 14, 2007 - 07:31 PM UTC
Hi Steffen:
The two FW´s are coming out very well.
It seems that you´re in a building marathon
lot of progress in few days.
Congratulations

"Never in the field of human conflict was so much owed by so many to so few"
Winston Spencer Churchill
Germany
Joined: September 07, 2005
KitMaker: 5,609 posts
AeroScale: 5,231 posts
Posted: Monday, May 14, 2007 - 07:37 PM UTC
Hi Carlos
thanks mate!
Sadly it is just one Fw 190 that is progressing ... but as you said : not bad considering I normally need several months to finsh a model ... OTOH it is not done yet
best wishes
Steffen
DULCE ET DECORUM EST PRO HOBBY MORI
Merlin
 Senior Editor
#017
United Kingdom
Joined: June 11, 2003
KitMaker: 17,582 posts
AeroScale: 12,795 posts
Posted: Tuesday, May 15, 2007 - 03:29 AM UTC
Nice one Stephen!
I'm really interested to see how you're getting on with JPS paints. I've never used them, but the range on their website looks really interesting - I think they're the first company I've seen produce a set of Australian WW2 colours and I'm definitely tempted to try their French colours on my Azur Potez 631...
In view of the problems with adhesion that you hit, are you using their own thinner?
All the best
Rowan
BEWARE OF THE FEW...
As I grow older, I regret to say that a detestable habit of thinking seems to be getting a hold of me. - H. Rider Haggard
Germany
Joined: September 07, 2005
KitMaker: 5,609 posts
AeroScale: 5,231 posts
Posted: Tuesday, May 15, 2007 - 12:02 PM UTC
Quoted Text
Nice one Stephen!
I'm really interested to see how you're getting on with JPS paints. I've never used them, but the range on their website looks really interesting - I think they're the first company I've seen produce a set of Australian WW2 colours and I'm definitely tempted to try their French colours on my Azur Potez 631...
In view of the problems with adhesion that you hit, are you using their own thinner?
All the best
Rowan
Hi Rowan
it is strange how my name changes all the time from Steffen to Steffan, Stephan and Stephen or Mr. Alpha
Regarding your questions: Jens has over 1000 colour mixtures in his archive (including the full RLM, ANA and FS-range) , but not all are permanently available. JPS do no longer sell directly to customers only to dealers/distributors. The main outlet being
http://48specialmodels.com/ .. there is not all in the catalogue permanently because of shop size restrictions, so ask for what you want!!!
I normally thin acrylics (Tamiya/Gunze) with Aztek Airbrush Cleaner (Brett Green once mentioned this in his tutorials). This is surely not recommended by the manufacturer but works for me. Others like Vallejo or old JPS (did not try the new) emulgate whith any form of alcohol (Aztek, IPA, Tamiya X-20A) so I mostly use plain water, as their own thinner is expensive and is no real "thinner", but some kind of "clear varnish", read it does not really make the mix thinner in terms of consistency (esp. vallejo). ---> I thin the JPS colours with water. but not the "old-new" packages (which was only a review sample and did not get onto the market) I use only Klear for the above mentined reasons. His thinner smells like IPA or methylated spirits, but I have not tried it yet.
best wishes
Steffen
DULCE ET DECORUM EST PRO HOBBY MORI
Merlin
Senior Editor #017
United Kingdom
Joined: June 11, 2003
KitMaker: 17,582 posts
AeroScale: 12,795 posts
Posted: Tuesday, May 15, 2007 - 12:08 PM UTC
Quoted Text
Hi Rowan
it is strange how my name changes all the time from Steffen to Steffan, Stephan and Stephen or Mr. Alpha
Hi Steffen
Sorry about that! It was a long day at work yesterday and I was in the middle of sorting some WW1 stuff... I'll have to get Stephen's name wrong to balance things!
All the best
Rowan
BEWARE OF THE FEW...
As I grow older, I regret to say that a detestable habit of thinking seems to be getting a hold of me. - H. Rider Haggard