WNW GB 2009 - 10 LVG C.VI Mark
West Virginia, United States
Joined: December 18, 2006
KitMaker: 1,121 posts
AeroScale: 1,063 posts
Posted: Tuesday, May 12, 2009 - 05:59 AM UTC
West Virginia, United States
Joined: December 18, 2006
KitMaker: 1,121 posts
AeroScale: 1,063 posts
Posted: Tuesday, May 12, 2009 - 06:44 AM UTC
And here are the panel lines accented with tamiya Smoke.........................................


Mark
England - South East, United Kingdom
Joined: November 06, 2005
KitMaker: 1,667 posts
AeroScale: 1,551 posts
Posted: Tuesday, May 12, 2009 - 06:53 AM UTC
she's looking mighty nice mark. Coming along very well, mine is slow, I've been working more on the SE5a and neglected her a little...but I'm building optionC for the stripes in the sky campaign.
How did you find the decals size wize....my band seemed too small to fit and I had to cut amd touch up the missing portions, on the SE some seem a little oversized? It's probably me though
Keith
Still can't cure the AMS even with sausage finger implants & olde eyes.
Colorado, United States
Joined: January 25, 2004
KitMaker: 11,669 posts
AeroScale: 11,011 posts
Posted: Tuesday, May 12, 2009 - 06:57 AM UTC
Fine work Mark fine work!
". . .The most important thing is to know why you build and then get the most that you can out of building." via D.D.
Alberta, Canada
Joined: January 19, 2008
KitMaker: 6,743 posts
AeroScale: 6,151 posts
Posted: Tuesday, May 12, 2009 - 07:06 AM UTC
Most impressive Mark ! I sit here and all I can say is WOW , what a fantastic take on this project ....................................
Will you leave of the engine cowl on this one ?
Thessaloniki, Greece / Ελλάδα
Joined: April 15, 2008
KitMaker: 90 posts
AeroScale: 89 posts
Posted: Tuesday, May 12, 2009 - 08:14 AM UTC
Hey Mark, i've just seen this thread, WOW ..........buddy you have done a marvelous job here, please accept my congratulations.
The wood grain with acrylics looks perfect, keep on the good job friend.

http://www.facebook.com/pages/Agioplanes/353328611448659
West Virginia, United States
Joined: December 18, 2006
KitMaker: 1,121 posts
AeroScale: 1,063 posts
Posted: Tuesday, May 12, 2009 - 08:31 AM UTC
Thanks for the encouraging words everyone. I'm really enjoying this build.
Keith, I do find some of the decals a little larger than what are represented on the profiles. Some of the curves of the model are a little different than the profile too, but I really don't worry about it too much. Your SE5 looks great!!
Terri, I'll be closing the engine up on this one. Perhaps I'll superdetail the next build and go the whole 9 yards. If you have the datafile, check out the engine pics in the "Details" section. There's a lot of room for tiny pieces........
Dimitris, thanks for the kind words. I'm just hoping it turns out as well as your Albatros W4. It is absolutely stunning.
Mark
West Virginia, United States
Joined: December 18, 2006
KitMaker: 1,121 posts
AeroScale: 1,063 posts
Posted: Wednesday, May 13, 2009 - 06:17 AM UTC
Here's the engine test fit..........................


Mark
New York, United States
Joined: December 15, 2006
KitMaker: 365 posts
AeroScale: 344 posts
Posted: Wednesday, May 13, 2009 - 01:14 PM UTC
Wow, looking extra cool! Very very nice.
Keep it going, Dwayne
Mendoza, Argentina
Joined: June 14, 2006
KitMaker: 222 posts
AeroScale: 219 posts
Posted: Wednesday, May 13, 2009 - 06:51 PM UTC
Beautiful, Mark!
I will have to order this kit also.....
I have always imagined that Paradise will be a kind of library.
Siempre imagine que el paraíso sería algún tipo de biblioteca.
Jorge Luis Borges
Alberta, Canada
Joined: January 19, 2008
KitMaker: 6,743 posts
AeroScale: 6,151 posts
Posted: Thursday, May 14, 2009 - 02:14 AM UTC
Most excellent Mark , this is more exciting than a kid in a candy store ! The engine looks really great nesting in her place .
West Virginia, United States
Joined: December 18, 2006
KitMaker: 1,121 posts
AeroScale: 1,063 posts
Posted: Thursday, May 14, 2009 - 09:09 AM UTC
OK then, Terri, here's a little more. I've started the lower lozenge on the wings...............


The decals go down great. You have to be careful cutting along the leading and trailing edges.
Mark
England - South East, United Kingdom
Joined: November 06, 2005
KitMaker: 1,667 posts
AeroScale: 1,551 posts
Posted: Thursday, May 14, 2009 - 06:59 PM UTC
Mark....be careful they also come off great....if you are cack handed like me

But looking very good there.
Keith
Still can't cure the AMS even with sausage finger implants & olde eyes.
Alberta, Canada
Joined: January 19, 2008
KitMaker: 6,743 posts
AeroScale: 6,151 posts
Posted: Thursday, May 14, 2009 - 07:53 PM UTC
The colours for the lozenge are very good . The hues have a fair tone to them , almost like microsculpt . Wingnuts have done an excellent job on their decals .
How thin are the decals , would this be something to watch for when applying them ?
Looking might fine mark ...........don't stop on us now !!! Hanging out at the candy store will not do my figure any good ............
West Virginia, United States
Joined: December 18, 2006
KitMaker: 1,121 posts
AeroScale: 1,063 posts
Posted: Sunday, May 17, 2009 - 12:37 PM UTC
Here's a little more of the decaling. I've finished the bottom of the lower wings. I'm really taking my time with these. I'm giving the decals 24 to 36 hrs to set.


You are given just enough lozenge with maybe one full length, vertical wing size "panel" of extra. Keep your spare decal scraps. You can use them to cut small pieces off th "touch up" any nicks to the lozenge.

Here you can see the raised detail in the top of the lower wing.

The bottom of the upper wings have this detail. You have to cut out holes for it while applying the decals. It's a little tricky here but just takes patience. Here they are on the decaled wing.


Mark
West Virginia, United States
Joined: December 18, 2006
KitMaker: 1,121 posts
AeroScale: 1,063 posts
Posted: Monday, May 18, 2009 - 10:35 AM UTC
Hi everyone,
Slow and steady. Here is some of the upper lozenge applied.....................

Here you can see the upper and lower lozenge......................

And some details.................

Mark
California, United States
Joined: April 01, 2002
KitMaker: 4,287 posts
AeroScale: 1,164 posts
Posted: Monday, May 18, 2009 - 11:35 AM UTC
Looking great Mark. This settles it for me...I'll be buying one soon. Thanks and keep up the good work. "Q"
"Don't fear the night, fear what hunts at night"
Alberta, Canada
Joined: January 19, 2008
KitMaker: 6,743 posts
AeroScale: 6,151 posts
Posted: Monday, May 18, 2009 - 12:03 PM UTC
Very sweet Mark . The lozenge is most excellent . How do you feel about the colours compared to other lozenge decals ?
this one is getting closer and closer on being finished , looking forward to more pic's .....
Östergötland, Sweden
Joined: April 04, 2006
KitMaker: 1,058 posts
AeroScale: 1,004 posts
Posted: Wednesday, May 20, 2009 - 05:19 AM UTC
Thats lozenge is just locking pefect. Only seen the decals in Roggas kit, but they look to got on very easy.
nice work
Larsa Q
Alberta, Canada
Joined: January 19, 2008
KitMaker: 6,743 posts
AeroScale: 6,151 posts
Posted: Friday, May 22, 2009 - 11:11 AM UTC
West Virginia, United States
Joined: December 18, 2006
KitMaker: 1,121 posts
AeroScale: 1,063 posts
Posted: Friday, May 22, 2009 - 11:17 AM UTC
terri,
I should have the flying surfaces done by Sunday. Struts and cowlings are painted.
Mark
England - South East, United Kingdom
Joined: November 06, 2005
KitMaker: 1,667 posts
AeroScale: 1,551 posts
Posted: Friday, May 22, 2009 - 09:47 PM UTC
you over took and passed me leaving me standing.... Lovely work Mark
Still can't cure the AMS even with sausage finger implants & olde eyes.
Alberta, Canada
Joined: January 19, 2008
KitMaker: 6,743 posts
AeroScale: 6,151 posts
Posted: Saturday, May 23, 2009 - 04:12 AM UTC
Looking forward to them pic's Mark !
West Virginia, United States
Joined: December 18, 2006
KitMaker: 1,121 posts
AeroScale: 1,063 posts
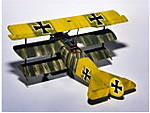
Posted: Saturday, May 23, 2009 - 06:42 AM UTC
Terri,
Here's a "proof of life" picture for you.

The decals go down well and conform very well with the features. I think one of the hardest things about the decal application it trying to cut the decals around the curved edges of the wingtips and not get wrinkled or jagged edges. It definitely takes time and patience.

Mark
Indiana, United States
Joined: May 14, 2007
KitMaker: 3,117 posts
AeroScale: 2,270 posts
Posted: Saturday, May 23, 2009 - 07:46 AM UTC
It looks like it is almost ready to be moved out to the flight line. Are you going to put some of those texture decals on it? They really do add a lot to a lozenge scheme. Super build so far.
"Treat 'em Rough", Current Builds--Wingnut Rumpler
I am frequently seen with blood shot eyes from staying up past my nap time to get the right colour scheme on my latest WWI model?