

Thanks guys.
Yes it's a lot of work, but enjoyable especially adding the details that can't be moulded in the kit. Also I love the challenge of all the little detail changes between different manufacturers, some very subtle, but now I can spot an OAW Albie far easier.
Roden's use of a generic fuselage for the DI-DIII (OAW Excepted) has thrown a few curve balls too. Nothing that a little head scratching and reading and measuring couldnt overcome.
Once a ggain thanks for the encouraging comments.
Keith
Early Aviation
Discuss World War I and the early years of aviation thru 1934.
Discuss World War I and the early years of aviation thru 1934.
Hosted by Jim Starkweather
KotS GB 2011 Albatros D.II Kornbeef

Kornbeef

Joined: November 06, 2005
KitMaker: 1,667 posts
AeroScale: 1,551 posts

Posted: Thursday, April 28, 2011 - 08:08 PM UTC
mtnflyer

Joined: March 08, 2009
KitMaker: 394 posts
AeroScale: 360 posts
Posted: Sunday, May 01, 2011 - 07:16 AM UTC
Keith, it's Sunday, I'm relaxed, and pouring over your post looking for any hints-n-tips in anticipation of the future of my little build. I'm just wondering how are you going to get that engine in there? It seems like a smart idea, what you are doing, considering the application of exterior paint issues and masking. I'm wondering if it will work for me.
You are doing such a wonderful job. Me thinks you are a magician.
Kornbeef
Joined: November 06, 2005
KitMaker: 1,667 posts
AeroScale: 1,551 posts
Posted: Sunday, May 01, 2011 - 09:27 AM UTC
Guy, Hi. thanks.
Ref the engine what I did was cut the cylinders off the block, as she is cowled up the amount of detail you can see is quite limited. In this case of course the engine is a resin addition to the normal Roden kit. So I had a spare Roden engine I cut the case off and fixed it long ago giving it a rudementary coat of paint. The cylinder assembly complete with manifold and exhaust can be twiddled and eased in once she is built and painted (hopes as it fits now) With my DI which I built the conventional way I had a daymare trying to line up the cowls/spinner etc and thought this a easier way..in my opinion only.
Now no pics but a bit of an update, got the cowl catches done, a few final tweaks here and there, primed her and shot the underside blue on.... I ground to a halt though when I realised I was out of thinners...sighs...forward planning not!
The blue, I mixed, it came out nice at first very close to the blue used on the Windsock datafile. BUT in the morning, it had dried overnight and took on a vivid hue, so will need blending somewhat.
Hopefully tomorrow will be good weather and I can take a few snaps...speaking of which, thats what happened to the U/c leg, minor surgery turned into major surgery... lol
TKS K
mtnflyer
Joined: March 08, 2009
KitMaker: 394 posts
AeroScale: 360 posts
Posted: Sunday, May 01, 2011 - 10:03 AM UTC
Thankyou for the answer, Keith.
I was wondering, but, now I see that you are a greater modeler than I. I'm going to have to take my chances with Rodens engineering and my alignment ability. If I'm going to cut-up an engine, it'll have to wait until I earn experience equal to your own.
Perhaps some day. Happy modeling!
I was wondering, but, now I see that you are a greater modeler than I. I'm going to have to take my chances with Rodens engineering and my alignment ability. If I'm going to cut-up an engine, it'll have to wait until I earn experience equal to your own.
Perhaps some day. Happy modeling!
dmopath

Joined: July 02, 2010
KitMaker: 175 posts
AeroScale: 174 posts
Posted: Sunday, May 01, 2011 - 12:26 PM UTC
Hi Keith
All I can say is --- wow!!!
Your eyes are much better than mine-even with the trusty Optivisor.
All I can say is --- wow!!!
Your eyes are much better than mine-even with the trusty Optivisor.
Kornbeef
Joined: November 06, 2005
KitMaker: 1,667 posts
AeroScale: 1,551 posts
Posted: Monday, May 02, 2011 - 02:52 AM UTC
Guy & Dennis I wish what you say were true on both or either account.
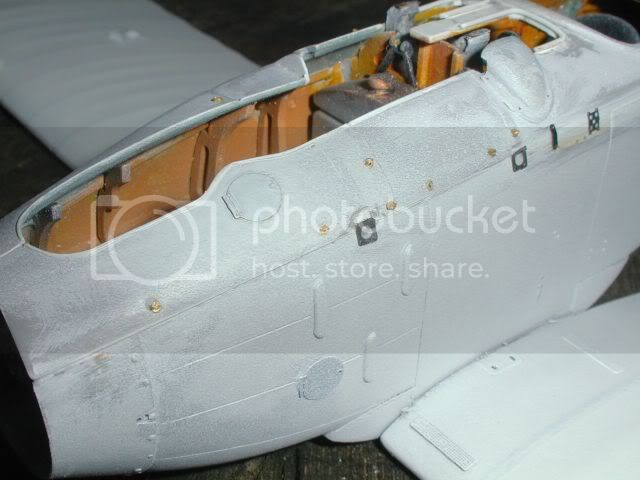
Heres a couple of pics, Taken today amazing how pics show every flaw so vividly, anyway I got the final PE and scratched cowling catches on, a couple of tiny PE went walkies already, so I decided to addthem and the few missing ones after she is painted.
These pics show my glowing blue underside and if you look closely the pale green upperside is done too. so once the rest is on the red/brown and deep green I'll assess whether to lighten the underside and deepen the light green. The colours as they are pretty much match the colours on the windsock datafile so I'm waiting till she is all done before deciding, The act of weathering and such might well draw all closer together.
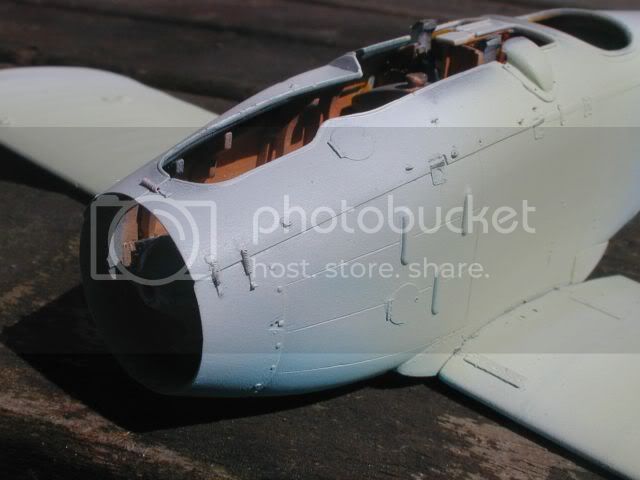
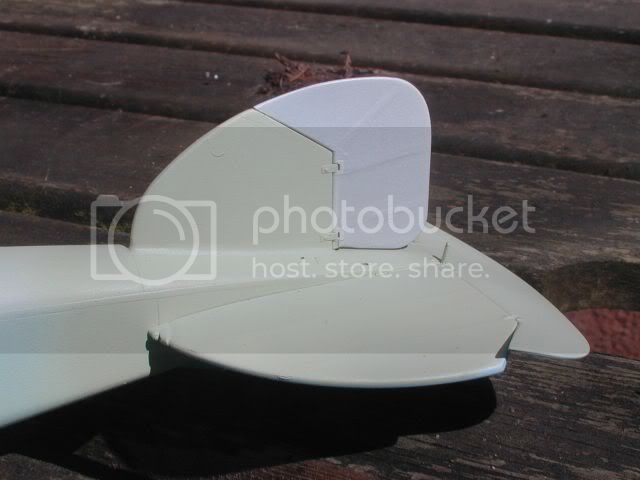

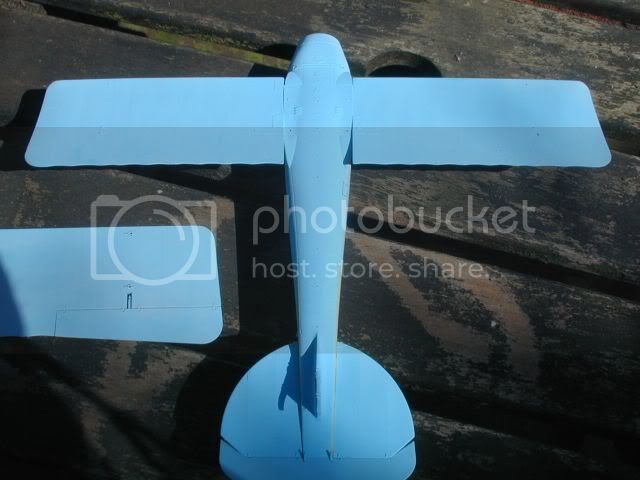
Ideas and comments always welcome of course.
Keith
Heres a couple of pics, Taken today amazing how pics show every flaw so vividly, anyway I got the final PE and scratched cowling catches on, a couple of tiny PE went walkies already, so I decided to addthem and the few missing ones after she is painted.
These pics show my glowing blue underside and if you look closely the pale green upperside is done too. so once the rest is on the red/brown and deep green I'll assess whether to lighten the underside and deepen the light green. The colours as they are pretty much match the colours on the windsock datafile so I'm waiting till she is all done before deciding, The act of weathering and such might well draw all closer together.
Ideas and comments always welcome of course.
Keith
dmopath
Joined: July 02, 2010
KitMaker: 175 posts
AeroScale: 174 posts
Posted: Tuesday, May 03, 2011 - 08:01 AM UTC
Hi Keith
Only comment is still "WOW."
Question: Is the edge between the wood fuselage and the blue underside going to be sharp, faded or a compromise between the two (I guess the question could also be applied to the wing camouflage)?
Only comment is still "WOW."
Question: Is the edge between the wood fuselage and the blue underside going to be sharp, faded or a compromise between the two (I guess the question could also be applied to the wing camouflage)?
Kornbeef
Joined: November 06, 2005
KitMaker: 1,667 posts
AeroScale: 1,551 posts
Posted: Tuesday, May 03, 2011 - 12:22 PM UTC
Quoted Text
Hi Keith
Only comment is still "WOW."
Question: Is the edge between the wood fuselage and the blue underside going to be sharp, faded or a compromise between the two (I guess the question could also be applied to the wing camouflage)?
Dennis TY.
Well the reference shows a sharp line between the blue and the upper surfaces but the cammo is soft edged, in some pics it looks badly sprayed (speckled) though it's said it was brush applied, perhaps it was muddied together when wet.
Anyway I've sprayed the green and brown, had a couple of incidents and had to recover a bit of overspray here and there, now it's drying, tomorrow night it might get glosscoated so I can try decalling before blending and weathering. those decals are a mix and match of Rodens and various WNW ones *kind of hoping the LVG upper wing ones sort of fit with not too much bodging...trust me to choose to do something that wont use the kit supplied markings.
K

RAGIII
Joined: June 19, 2007
KitMaker: 604 posts
AeroScale: 600 posts
Posted: Wednesday, May 04, 2011 - 02:32 PM UTC
In a word, gorgeous!
RAGIII
RAGIII

lcarroll
Joined: July 26, 2010
KitMaker: 1,032 posts
AeroScale: 1,025 posts

Posted: Wednesday, May 04, 2011 - 03:36 PM UTC
Keith,
Every time I look it's better; keep those reports coming! (learning a lot from this build)
On another note, if I may......................I agree with your assesment of the u'side blue, too bright and too blue is my vote as well. Here's a quote from notes I took from a painting manual years ago that may be helpful."Albatros Bottom Blue cross references to Methuen 25B5 (WWII Sky Type S is close) This can be matched by mixing 2 parts Humbrol WWI Blue HU 109 with one part white. It is also fairly light thus good for scale effect."
I have this mix on my 1/48th DVa and really like the effect.
Cheers,
Lance
Kornbeef
Joined: November 06, 2005
KitMaker: 1,667 posts
AeroScale: 1,551 posts
Posted: Wednesday, May 04, 2011 - 10:18 PM UTC
Hi Rick, many thanks, it's a build I'm really enjoying and learning from all those little differences between Albatros and OAW built machines.
Lance, yes thats the standard but OAW used a different blue it seems Methuen code 23A3... I have no idea hoow that bears out though, I was matching the colours to the windsock file and they are quite close...enough for me anyway a little weathering, fading, lightening when the national markings are on (hopefully today, if I can fir the time in while the light is good).
Incidentally I'm using the excellent DII paint guide available on the Aerodrome website by Dan San Abbott for a guide to cammo and markings. It's well worth a read even if you are building any type of Albatros.
http://www.theaerodrome.com/forum/aircraft-articles/26276-camouflage-markings-albatros-d-ii-aircraft.html
Thanks again guys for the encouragement.
Keith

thegirl
Joined: January 19, 2008
KitMaker: 6,743 posts
AeroScale: 6,151 posts
Posted: Thursday, May 05, 2011 - 01:11 AM UTC
It has been some time since I last drop in here to see what you have been up to here .
Most excellent job so far Keith ! Your attention to the details has really paid off
Most excellent job so far Keith ! Your attention to the details has really paid off
Kornbeef
Joined: November 06, 2005
KitMaker: 1,667 posts
AeroScale: 1,551 posts
Posted: Monday, May 16, 2011 - 08:11 PM UTC
Kornbeef apologises for the lack of posts, had some probs and havent had my Mojo working, progress has been made, will post pics soon
Keith
Keith

JackFlash
Joined: January 25, 2004
KitMaker: 11,669 posts
AeroScale: 11,011 posts
Posted: Monday, May 16, 2011 - 10:43 PM UTC
No worries sir. Life intervenes sometime. Check out the WNW new release thread. That will fix your Mojo!

OEFFAG_153

Joined: February 19, 2010
KitMaker: 1,473 posts
AeroScale: 1,450 posts
Posted: Monday, May 16, 2011 - 11:50 PM UTC
Hi Keith Lost Mojo is never fun hope you find it soon! 
Mikael
Mikael

Mgunns
Joined: December 12, 2008
KitMaker: 1,423 posts
AeroScale: 1,319 posts

Posted: Tuesday, May 17, 2011 - 07:06 AM UTC
Hi Keith:Like you I am also in the doldrums. Don't know if it is the weather or what. I hope to get back on it this week and make some progress. Hope you do too.
Best
Mark
lcarroll
Joined: July 26, 2010
KitMaker: 1,032 posts
AeroScale: 1,025 posts
Posted: Tuesday, May 17, 2011 - 03:39 PM UTC
Quoted Text
Kornbeef apologises for the lack of posts, had some probs and havent had my Mojo working, progress has been made, will post pics soon
Keith
Keith,
This loss of Mojo must be very well traveled and quite epidemic in nature; there are several coincident cases revealed in just the last 24 hours so don't feel too badly, apparently you are not alone. Hope the cause of the symptom is not too serious and you get back to the bench asap; I'll be watching for your next update.
Cheers,
Lance
Kornbeef
Joined: November 06, 2005
KitMaker: 1,667 posts
AeroScale: 1,551 posts
Posted: Wednesday, May 25, 2011 - 08:02 PM UTC
Update time.
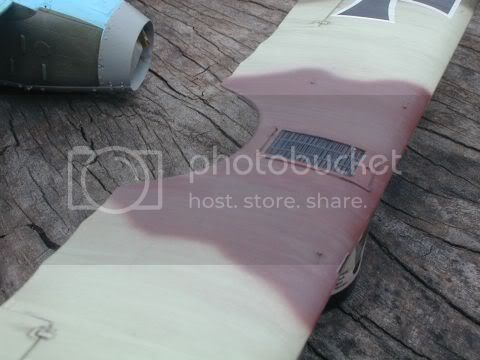
Decals are a mixed bag of Roden and WNW, the upper wing crosses are actually off thw WNW LVG... I realised after they sit a little too far back though. the Underwing ones were Roden... old type, fracturous to say the least, I found hot water the best to ease that pain.
weathering is rough, it isnt as rough as it looks in the pic and is more toned in now, pics are about 9 days old, progress is slow, I'm busy with other things that draw my attention from the bench and leave me a little to tired to concentrate.. but such is life
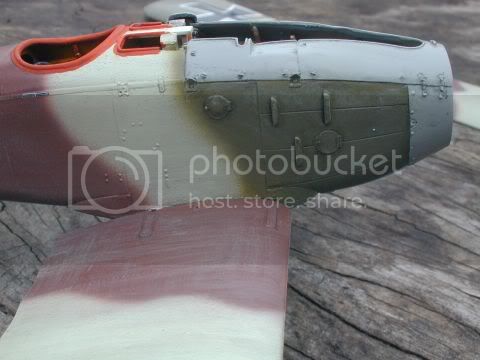
Lets play spot the OAW mods?
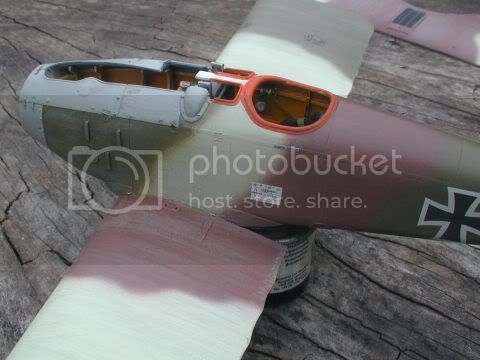
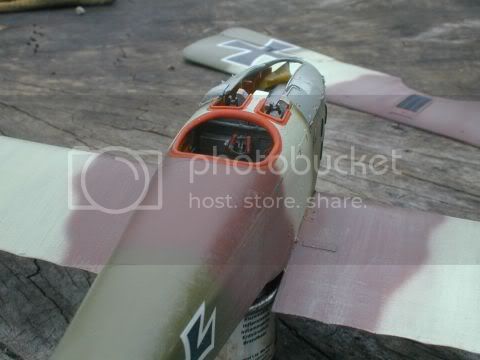
Yes I knocked the rear maxim suport off again.
I'm so pleased with the rad, shame you can't see it.

U/c to finish, Maxims to detail hopefully I'll find time to do them soon.
TY for looking, all comments welcome
Decals are a mixed bag of Roden and WNW, the upper wing crosses are actually off thw WNW LVG... I realised after they sit a little too far back though. the Underwing ones were Roden... old type, fracturous to say the least, I found hot water the best to ease that pain.
weathering is rough, it isnt as rough as it looks in the pic and is more toned in now, pics are about 9 days old, progress is slow, I'm busy with other things that draw my attention from the bench and leave me a little to tired to concentrate.. but such is life
Lets play spot the OAW mods?
Yes I knocked the rear maxim suport off again.
I'm so pleased with the rad, shame you can't see it.
U/c to finish, Maxims to detail hopefully I'll find time to do them soon.
TY for looking, all comments welcome

wing_nut
Joined: June 02, 2006
KitMaker: 1,212 posts
AeroScale: 468 posts
Posted: Friday, May 27, 2011 - 01:33 AM UTC
So that's what you get when you're tired and can't concentrate? Pretty darn sweet.
OEFFAG_153
Joined: February 19, 2010
KitMaker: 1,473 posts
AeroScale: 1,450 posts
Posted: Friday, May 27, 2011 - 02:46 AM UTC
Hi Keith,
This is looking very, very good whats your medium for the weathering? Keep up the good work
Mikael
This is looking very, very good whats your medium for the weathering? Keep up the good work
Mikael
Kornbeef
Joined: November 06, 2005
KitMaker: 1,667 posts
AeroScale: 1,551 posts
Posted: Saturday, May 28, 2011 - 10:40 AM UTC
Quoted Text
Mikael its a mix of Klear...like future. and citadel bleached bone, I was trying for a watered in dust , storm after a dryspell type effect..lies badly Hi Keith,
This is looking very, very good whats your medium for the weathering? Keep up the good work
Mikael
Once I get to my LHS and buy some thinners I'll tone it in with smoke and various other shades.
Got the U/c finished and base painted now, I wanted to add the boots over the bungees but can't find a decent reference for them.
ho hum
K
dmopath
Joined: July 02, 2010
KitMaker: 175 posts
AeroScale: 174 posts
Posted: Saturday, May 28, 2011 - 11:08 AM UTC
Hi Keith
She is really starting to take shape. I can't wait for the next update.
She is really starting to take shape. I can't wait for the next update.
Kornbeef
Joined: November 06, 2005
KitMaker: 1,667 posts
AeroScale: 1,551 posts
Posted: Saturday, May 28, 2011 - 09:44 PM UTC
TY Dennis
I spent a while last night making rigging eyes in preparation though thats a while away yet.
I spent a while last night making rigging eyes in preparation though thats a while away yet.
lcarroll
Joined: July 26, 2010
KitMaker: 1,032 posts
AeroScale: 1,025 posts
Posted: Sunday, May 29, 2011 - 05:13 AM UTC
Keith,
Nice to see you back in action; she's looking very nice. Particularly like the way you've enhanced the fasteners and fuselage hardware etc.
Very "real" appearance even at this stage.
Cheers,
Lance
Nice to see you back in action; she's looking very nice. Particularly like the way you've enhanced the fasteners and fuselage hardware etc.
Very "real" appearance even at this stage.
Cheers,
Lance
Kornbeef
Joined: November 06, 2005
KitMaker: 1,667 posts
AeroScale: 1,551 posts
Posted: Tuesday, June 07, 2011 - 08:36 AM UTC
Thanks Lance,
I've got thinners at last... Sorry state of affairs being skint..
Meanwhile I have the guns done, the engine in and the undercarriage ready for fitting, rigging points are on the lower wing and hopefully if the sun's out tomorrow I'll get a few shots of her as she stands now.
K
I've got thinners at last... Sorry state of affairs being skint..
Meanwhile I have the guns done, the engine in and the undercarriage ready for fitting, rigging points are on the lower wing and hopefully if the sun's out tomorrow I'll get a few shots of her as she stands now.
K
 |

WEB HOSTING BY


Copyright ©2021 AeroScale and Kitmaker Network, a subsidiary of Silver Star Enterprises
All Rights Reserved. Please read our Conditions of Use and Privacy Policy.
All Rights Reserved. Please read our Conditions of Use and Privacy Policy.