

Air Campaigns
Want to start or join a group build? This is where to start.
Want to start or join a group build? This is where to start.
Hosted by Frederick Boucher, Michael Satin
OFFICIAL Matchbox Flying Nostalgia Campaign

c4willy

#305

Joined: February 01, 2006
KitMaker: 1,673 posts
AeroScale: 1,517 posts

Posted: Wednesday, April 18, 2012 - 07:49 AM UTC
@Daniel: Go the RNZAF way Daniel .... LOL not that I'm biased at all!
SGTJKJ

#041

Joined: July 20, 2006
KitMaker: 10,069 posts
AeroScale: 3,788 posts

Posted: Wednesday, April 18, 2012 - 07:51 AM UTC
Wow, a lot of progress in this campaign!
Looking forward to follow your build(s), Warren. Chinook first if you ask me.
Nice remodelling job on the shelves, Allen. The lightning looks good. As long as the decals ends up looking good, a few water changes is a small price to pay
Nice camo on the Ju 188, Phil. Looking forward to see more.
Great result on the Fiat, Ken. It looks very authentic.


oraora

Joined: June 19, 2002
KitMaker: 216 posts
AeroScale: 128 posts

Posted: Wednesday, April 18, 2012 - 12:37 PM UTC
Thanks Damian and Jesper. Looking forward to more builds

agtquimi

Joined: September 08, 2005
KitMaker: 117 posts
AeroScale: 42 posts

Posted: Friday, April 20, 2012 - 11:08 AM UTC
It's late yet for a new participant?
A friewnd of mine has give me a Brand New Wellington, with a missing propellor
I'll try with the kit decal, the one of the COastal Command, Another friend has offered me another propellor he has, but perhaps an "in flight" with no porpellors


A friewnd of mine has give me a Brand New Wellington, with a missing propellor
I'll try with the kit decal, the one of the COastal Command, Another friend has offered me another propellor he has, but perhaps an "in flight" with no porpellors


AussieReg
#007

Joined: June 09, 2009
KitMaker: 8,156 posts
AeroScale: 3,756 posts
Posted: Friday, April 20, 2012 - 12:07 PM UTC
Hi Alvaro, and thanks for joining us. It's never too late for another builder, I'm looking forward to watching your progress. Please don't forget to go the the Campaign Page and enlist.
Cheers, D
Cheers, D

c4willy
#305
Joined: February 01, 2006
KitMaker: 1,673 posts
AeroScale: 1,517 posts
Posted: Friday, April 20, 2012 - 03:19 PM UTC
Awesome! Welcome Alvaro always good to see more participants in a group build!
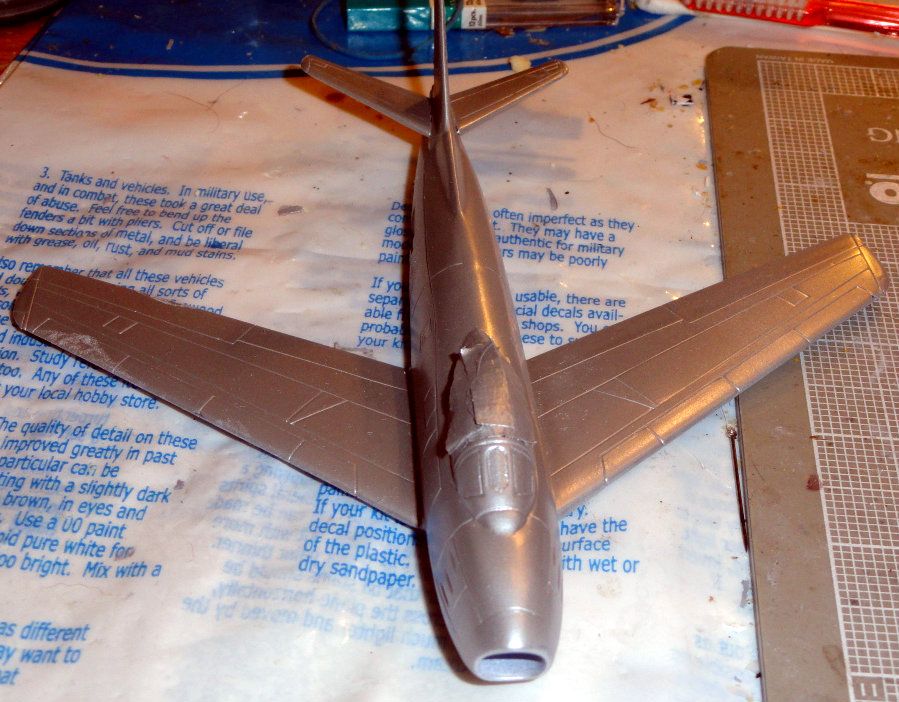
Time for an update on my build guys and girls! I'm around 90 percent complete got a few things to add and some touch ups to be done. I'm really happy with the build, it was easy not to complicated and the fit is pretty darn good! As long as you take your time and work through the assembly process. I do recommend that you follow the instructions when it comes to building and installing the engine as it really only goes together best in the order they would have you do it. I tried a couple of times to step outside this process to provide a flat mating surface only to find that intakes wont fit through the plate once assembled. (So much for that idea!) The engine goes together well with a minimum of fuss and it seems to set up pretty darn well. (Well at least mine did) I really like these old Matchbox kits they were a no frills easy build and they remind me of a simpler time when I built them as a young adult. (Mind you if you talk with my children I was apparently never young and my wife complains she has three kids, me being the biggest!)
Another few hours of work possibly and I'll be done and remove the masks I'll then post pics to the gallery and call it well done!

md72
#439

Joined: November 05, 2005
KitMaker: 4,950 posts
AeroScale: 3,192 posts

Posted: Friday, April 20, 2012 - 05:01 PM UTC
Well Avlaro, I'm not much into British bombers, I think the last one was a Revell Lanc back in the early '70's. But, that one sure looks interesting. 

agtquimi
Joined: September 08, 2005
KitMaker: 117 posts
AeroScale: 42 posts
Posted: Friday, April 20, 2012 - 06:46 PM UTC
Thanks to all, I forgot to enlist....
This will be a very quick built...
This will be a very quick built...
c4willy
#305
Joined: February 01, 2006
KitMaker: 1,673 posts
AeroScale: 1,517 posts
Posted: Saturday, April 21, 2012 - 07:02 PM UTC
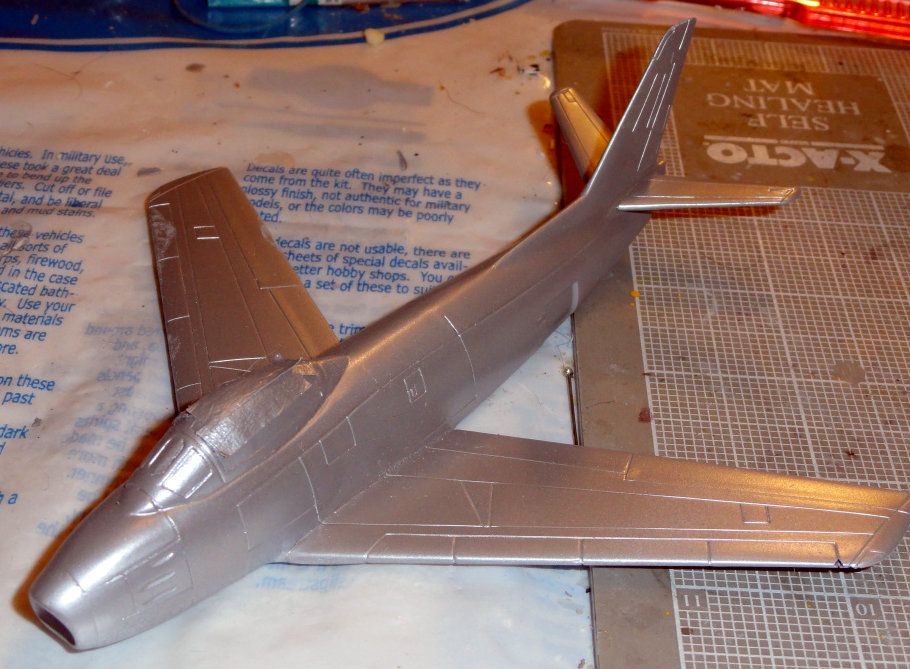
Okay I'm calling this done! I've got her sealed and the stores added and the various touch ups done. Thanks Damian I've really enjoyed this group build my thanks to all for a damn good campaign! Now where am I going to put her? Hey Damian! Does Josh need another aircraft for his ceiling? 


AussieReg
#007
Joined: June 09, 2009
KitMaker: 8,156 posts
AeroScale: 3,756 posts
Posted: Saturday, April 21, 2012 - 07:14 PM UTC
Congrats on a great build Chris. I'm really glad you've enjoyed it, and thanks for sharing your work with us.
Josh doesn't tend to hang his models from the ceiling, they get flown around the house in hectic dogfights with little brother Liam and generally end up shedding parts quite often. The battles are epic, and the repair sessions (by Dad) afterwards equally epic at times !
Cheers, D
Josh doesn't tend to hang his models from the ceiling, they get flown around the house in hectic dogfights with little brother Liam and generally end up shedding parts quite often. The battles are epic, and the repair sessions (by Dad) afterwards equally epic at times !
Cheers, D

almonkey

Joined: March 23, 2003
KitMaker: 2,124 posts
AeroScale: 788 posts

Posted: Saturday, April 21, 2012 - 11:51 PM UTC
got a little further with the 188 in that I've started to get the transfers on......
however after getting the left underside transfers on, while i was holding it by the wing and teasing the right hand cross on i heard a fairly loud "crack!"
remember those two piece wings i wasn't too keen on, well at first i thought i'd totally bust the join open, but as luck would have it it appears that the filler has only slightly cracked right through the cross-

luckily its barely noticeable and its on the underside so i'll just leave it as it is, than risk the possibility of further damage whilst repairing it.
from a distance it doesn't look too bad!-

btw damien, i'm not actually using the stand as a paint stand, its just put on it to look cool when i'm not working on it
however after getting the left underside transfers on, while i was holding it by the wing and teasing the right hand cross on i heard a fairly loud "crack!"
remember those two piece wings i wasn't too keen on, well at first i thought i'd totally bust the join open, but as luck would have it it appears that the filler has only slightly cracked right through the cross-
luckily its barely noticeable and its on the underside so i'll just leave it as it is, than risk the possibility of further damage whilst repairing it.
from a distance it doesn't look too bad!-
btw damien, i'm not actually using the stand as a paint stand, its just put on it to look cool when i'm not working on it

AussieReg
#007
Joined: June 09, 2009
KitMaker: 8,156 posts
AeroScale: 3,756 posts
Posted: Sunday, April 22, 2012 - 12:34 AM UTC
Quoted Text
btw damien, i'm not actually using the stand as a paint stand, its just put on it to look cool when i'm not working on it
Oh well now you've gone and ruined the whole moment for me. Scrap it and start again Phil !
Seriously, the scheme looks great and once it's on the stand who's gunna see a hairline crack? If you're really worries perhaps a drop of thin CA will capillary along the crack and give it some strength. The clear coat and weathering will cover it nicely. Keep up the great work.
Cheers, D
agtquimi
Joined: September 08, 2005
KitMaker: 117 posts
AeroScale: 42 posts
Posted: Tuesday, April 24, 2012 - 02:23 AM UTC
Wellington "in progress"

1975 quite old, nearly as much as I am

The OOTB cockpit

Smoked parts for not viewing inide of the airplane

Closed body

No "M"-stand in this kit, but my own wood and steel stand

1975 quite old, nearly as much as I am
The OOTB cockpit
Smoked parts for not viewing inide of the airplane
Closed body
No "M"-stand in this kit, but my own wood and steel stand
AussieReg
#007
Joined: June 09, 2009
KitMaker: 8,156 posts
AeroScale: 3,756 posts
Posted: Tuesday, April 24, 2012 - 03:29 AM UTC
Good progress Alvaro, and I really like the innovations there, the smoked glass and "scratchbuilt" stand. Keep up the great work.
Cheers, D
Cheers, D
SGTJKJ
#041
Joined: July 20, 2006
KitMaker: 10,069 posts
AeroScale: 3,788 posts
Posted: Saturday, April 28, 2012 - 12:53 PM UTC
Great build, Chris. It looks great finished!
Close call on the JU 188 wing, Phil. Seems like it is better to leave as it instead of repairing it. Looking forward to see the final result.
Nice stand, Alvaro. The smoked glass is a nice touch, but might not be necessary. The thickness of the Matchbox glazing normally makes it very difficult to see through it anyway.
Looking forward to see more
AussieReg
#007
Joined: June 09, 2009
KitMaker: 8,156 posts
AeroScale: 3,756 posts
Posted: Sunday, May 13, 2012 - 10:36 PM UTC
Apologies for my absence folks, real life commitments have taken me away from the bench for a while. I will have some time this week to get back on to my 109.
How is everybody else going ?
Cheers, D
How is everybody else going ?
Cheers, D
md72
#439
Joined: November 05, 2005
KitMaker: 4,950 posts
AeroScale: 3,192 posts
Posted: Wednesday, May 16, 2012 - 05:13 PM UTC
Two steps forward, one step back.
Got silver paint on the plane.
But somewhere in the paint shop the card with the LG doors and one of the drive brakes went missing.
Got silver paint on the plane.
But somewhere in the paint shop the card with the LG doors and one of the drive brakes went missing.
SGTJKJ
#041
Joined: July 20, 2006
KitMaker: 10,069 posts
AeroScale: 3,788 posts
Posted: Tuesday, May 22, 2012 - 08:58 AM UTC
Uhhh... Too bad, Mark. Hope you will find the missing parts.

Tomcat31
#042

Joined: November 18, 2006
KitMaker: 2,828 posts
AeroScale: 1,720 posts

Posted: Tuesday, May 22, 2012 - 10:23 PM UTC
Quoted Text
No updates from me as yet as I haven't been near the bench in over six weeks now due to work and life commitments too. Hopefully I'll get back to the bench soon so I can finish the decalling and start the weatheringApologies for my absence folks, real life commitments have taken me away from the bench for a while. I will have some time this week to get back on to my 109.
How is everybody else going ?
Cheers, D


phantom_phanatic309
#372

Joined: March 10, 2010
KitMaker: 2,568 posts
AeroScale: 1,619 posts

Posted: Thursday, May 24, 2012 - 09:16 AM UTC
Jesper, great work on the Hellcat. That was the first model I ever built so I've always had a soft spot for that kit. I remember finishing it in the FAA markings and following the painting instructions to the letter - 2 shades of grey and silver udersides. If only I knew then what I know now lol.
Also good to see the 1:32 Sea Venom coming along. I have a part built Matchbox original that my Dad started and never finished.
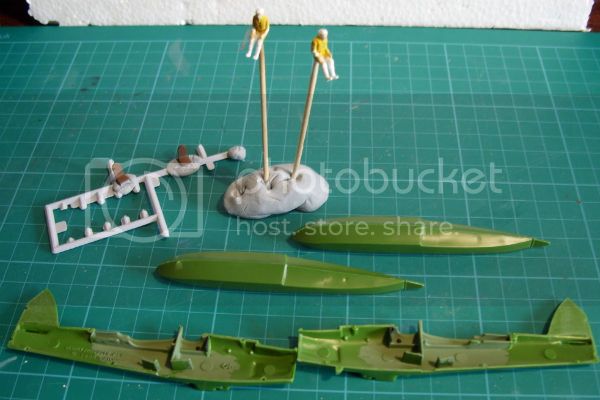
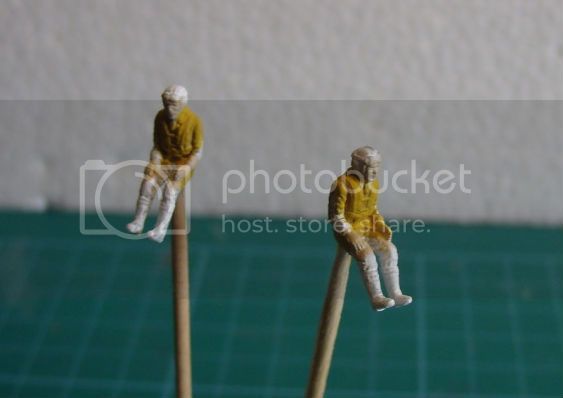
Anyway, works started on the Seafox.
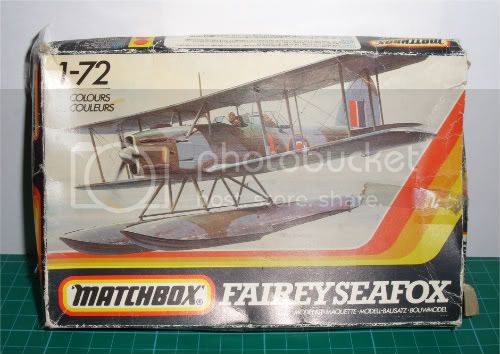
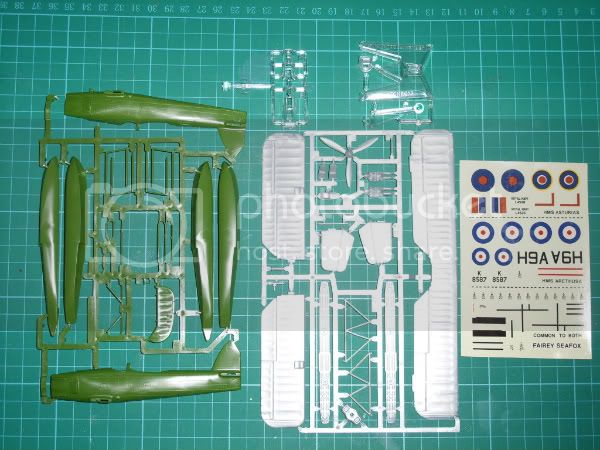
Cockpit painted, floats assembled and pilots have been started. They look like they're in USAAF flying gear to me and if it were not for the OOB rules I would probably swap them for Airfix brits. Anyone know what colour FAA flying suits actually were?
Also good to see the 1:32 Sea Venom coming along. I have a part built Matchbox original that my Dad started and never finished.
Anyway, works started on the Seafox.
Cockpit painted, floats assembled and pilots have been started. They look like they're in USAAF flying gear to me and if it were not for the OOB rules I would probably swap them for Airfix brits. Anyone know what colour FAA flying suits actually were?

SGTJKJ
#041
Joined: July 20, 2006
KitMaker: 10,069 posts
AeroScale: 3,788 posts
Posted: Friday, May 25, 2012 - 01:40 PM UTC
Thanks for the comments, Stephen. The nostalgia of these kits cannot be beat.
Nice choice of kit. Looking forward to follow your build.
Nice choice of kit. Looking forward to follow your build.

amegan
#243
Joined: March 21, 2008
KitMaker: 996 posts
AeroScale: 915 posts

Posted: Saturday, June 02, 2012 - 10:14 PM UTC
After seeing Warren's Heyford in KOTS I had to find one, I thought I was too late for this campaign but no, so here it is. 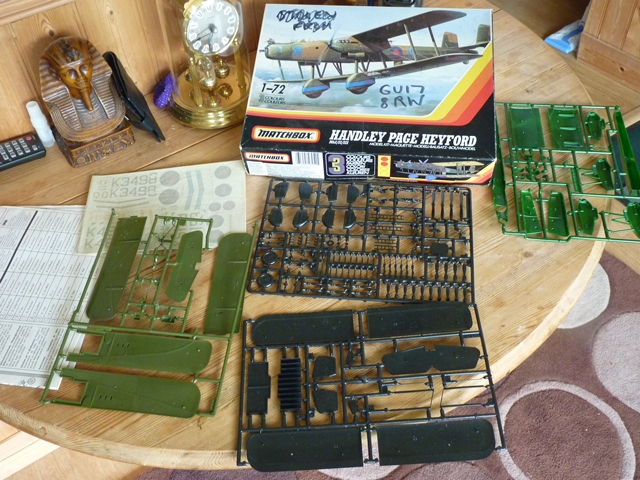
Won't be starting it for a couple of weeks. Can't find a date of the kit, instructions or box.
Won't be starting it for a couple of weeks. Can't find a date of the kit, instructions or box.
SGTJKJ
#041
Joined: July 20, 2006
KitMaker: 10,069 posts
AeroScale: 3,788 posts
Posted: Thursday, June 07, 2012 - 01:59 AM UTC
Andrew, nice choice of kit. I have the same kit in my stash, but have never had a chance to build it. It will be interesting to follow your build. It definitely is a unique airplane.
almonkey
Joined: March 23, 2003
KitMaker: 2,124 posts
AeroScale: 788 posts
Posted: Saturday, June 09, 2012 - 02:49 AM UTC
not an actual update on my 188, just a quick line to say, i thought i was the only one away from the bench for the last few weeks.
with a rare bout of good weather enabling me to do some garden and house maintenance, family visits, and discovering world of tanks, i haven't been near anything plastic for a good while!
however i'm back modelling, but not the 188, i have another campaign build that has to be finished for the 15th of June, soon as that's done i can swing back to the 188.
also, today this arrived-

via eBay for the princely sum of £4 inc postage, just has a missing canopy hence the cheap price, but thats something that can be replaced with a squadron item.
this is a kit that i'm sure will sneak into this campaign.
with a rare bout of good weather enabling me to do some garden and house maintenance, family visits, and discovering world of tanks, i haven't been near anything plastic for a good while!
however i'm back modelling, but not the 188, i have another campaign build that has to be finished for the 15th of June, soon as that's done i can swing back to the 188.
also, today this arrived-
via eBay for the princely sum of £4 inc postage, just has a missing canopy hence the cheap price, but thats something that can be replaced with a squadron item.
this is a kit that i'm sure will sneak into this campaign.
SGTJKJ
#041
Joined: July 20, 2006
KitMaker: 10,069 posts
AeroScale: 3,788 posts
Posted: Monday, June 11, 2012 - 07:04 AM UTC
Nice catch on Ebay, Phil!
Instead of a Squadron cockpit glazing you can build it with a plastic cockpit shape and then cover it with a tarp made from tissue. Glazing was often protected with tarps to avoid reflexion of sunlight and to protect against the weather.
Looking forward to see more on your Ju 188 and Brewster
Instead of a Squadron cockpit glazing you can build it with a plastic cockpit shape and then cover it with a tarp made from tissue. Glazing was often protected with tarps to avoid reflexion of sunlight and to protect against the weather.
Looking forward to see more on your Ju 188 and Brewster
 |

WEB HOSTING BY


Copyright ©2021 AeroScale and Kitmaker Network, a subsidiary of Silver Star Enterprises
All Rights Reserved. Please read our Conditions of Use and Privacy Policy.
All Rights Reserved. Please read our Conditions of Use and Privacy Policy.